Door Hyundai Sonata 2014 Owner's Manual
[x] Cancel search | Manufacturer: HYUNDAI, Model Year: 2014, Model line: Sonata, Model: Hyundai Sonata 2014Pages: 665, PDF Size: 17.43 MB
Page 13 of 665
F13F13
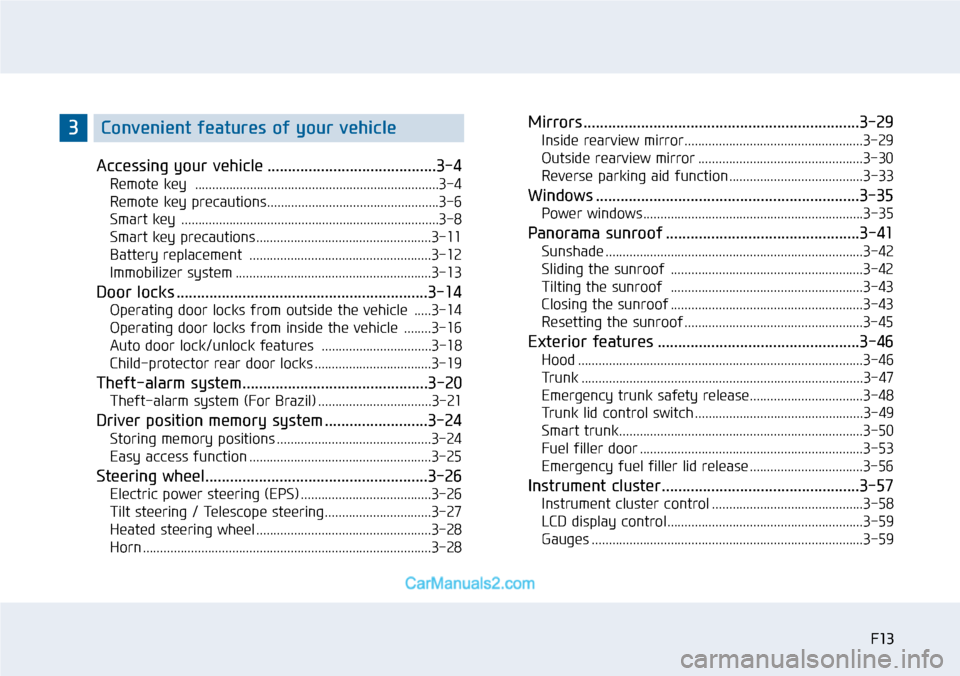
Accessing your vehicle .........................................3-4
Remote key .......................................................................3-4
Remote key precautions..................................................3-6
Smart key ...........................................................................3-8
Smart key precautions...................................................3-11
Battery replacement .....................................................3-12
Immobilizer system .........................................................3-13
Door locks .............................................................3-14
Operating door locks from outside the vehicle .....3-14
Operating door locks from inside the vehicle ........3-16
Auto door lock/unlock features ................................3-18
Child-protector rear door locks ..................................3-19
Theft-alarm system .............................................3-20
Theft-alarm system (For Brazil) .................................3-21
Driver position memory system .........................3-24
Storing memory positions .............................................3-24
Easy access function .....................................................3-25
Steering wheel......................................................3-26
Electric power steering (EPS) ......................................3-26
Tilt steering / Telescope steering...............................3-27
Heated steering wheel ...................................................3-28
Horn ....................................................................................3-28
Mirrors ...................................................................3-29
Inside rearview mirror....................................................3-29
Outside rearview mirror ................................................3-30
Reverse parking aid function.......................................3-33
Windows ................................................................3-35
Power windows................................................................3-35
Panorama sunroof ...............................................3-41
Sunshade ...........................................................................3-42
Sliding the sunroof ........................................................3-42
Tilting the sunroof ........................................................3-43
Closing the sunroof ........................................................3-43
Resetting the sunroof ....................................................3-45
Exterior features .................................................3-46
Hood ...................................................................................3-46
Tr u n k . . . . . . . . . . . . . . . . . . . . . . . . . . . . . . . . . . . . . . . . . . . . . . . . . . . . . . . . . . . . . . . . . . . . . . . . . . . . . . . . . . 3 - 4 7
Emergency trunk safety release.................................3-48
Tr u n k l i d c o n t r o l s w i t c h . . . . . . . . . . . . . . . . . . . . . . . . . . . . . . . . . . . . . . . . . . . . . . . . . 3 - 4 9
Smart trunk.......................................................................3-50
Fuel filler door .................................................................3-53
Emergency fuel filler lid release .................................3-56
Instrument cluster................................................3-57
Instrument cluster control ............................................3-58
LCD display control.........................................................3-59
Gauges ...............................................................................3-59
3Convenient features of your vehicle
Page 24 of 665
1-3
Yo u r v e h i c l e a t a g l a n c e
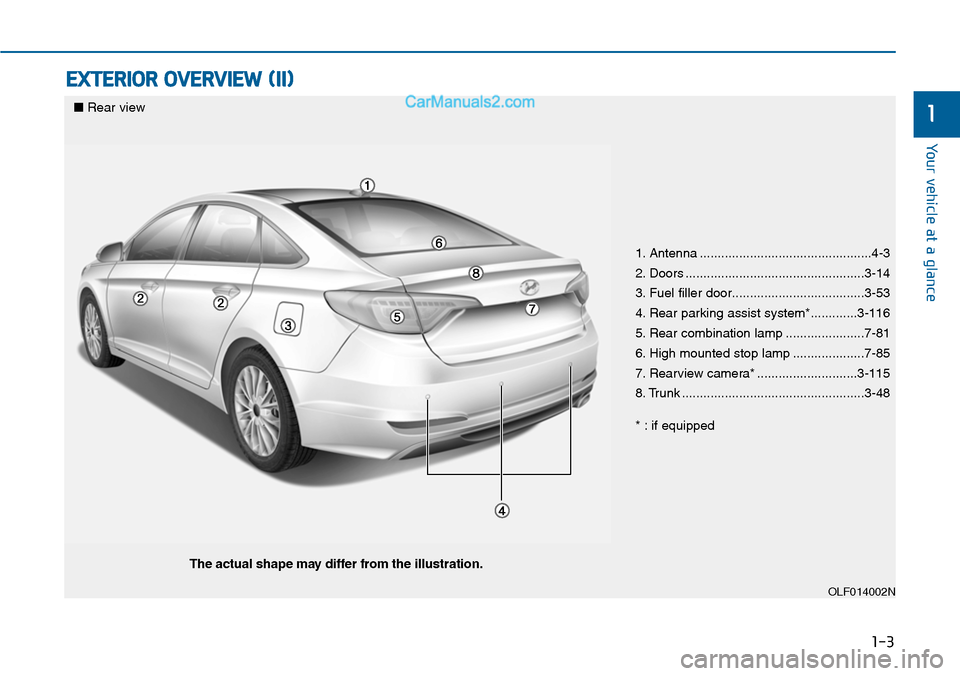
EXTERIOR OVERVIEW (II)
1
1. Antenna ................................................4-3
2. Doors ..................................................3-14
3. Fuel filler door.....................................3-53
4. Rear parking assist system*.............3-116
5. Rear combination lamp ......................7-81
6. High mounted stop lamp ....................7-85
7. Rearview camera* ............................3-115
8. Trunk ...................................................3-48
* : if equipped
OLF014002N
■Rear view
The actual shape may differ from the illustration.
Page 25 of 665
1-4
Yo u r v e h i c l e a t a g l a n c e
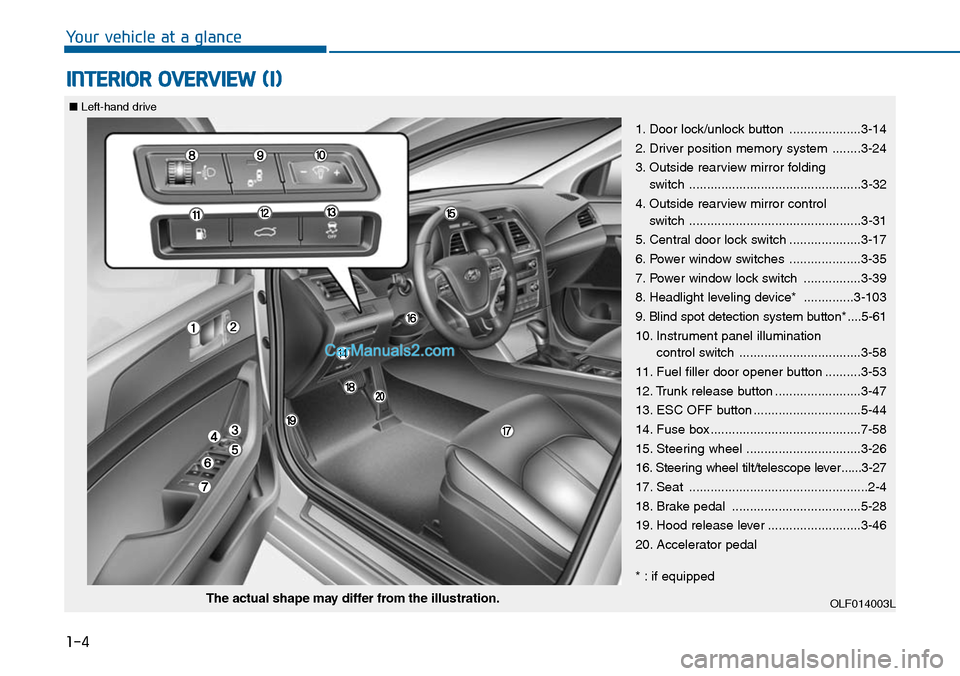
INTERIOR OVERVIEW (I)
1. Door lock/unlock button ....................3-14
2. Driver position memory system ........3-24
3. Outside rearview mirror folding
switch ................................................3-32
4. Outside rearview mirror control
switch ................................................3-31
5. Central door lock switch ....................3-17
6. Power window switches ....................3-35
7. Power window lock switch ................3-39
8. Headlight leveling device* ..............3-103
9. Blind spot detection system button* ....5-61
10. Instrument panel illumination
control switch ..................................3-58
11. Fuel filler door opener button ..........3-53
12. Trunk release button ........................3-47
13. ESC OFF button ..............................5-44
14. Fuse box ..........................................7-58
15. Steering wheel ................................3-26
16. Steering wheel tilt/telescope lever ......3-27
17. Seat ..................................................2-4
18. Brake pedal ....................................5-28
19. Hood release lever ..........................3-46
20. Accelerator pedal
* : if equipped
OLF014003LThe actual shape may differ from the illustration.
■Left-hand drive
Page 26 of 665
1-5
Yo u r v e h i c l e a t a g l a n c e
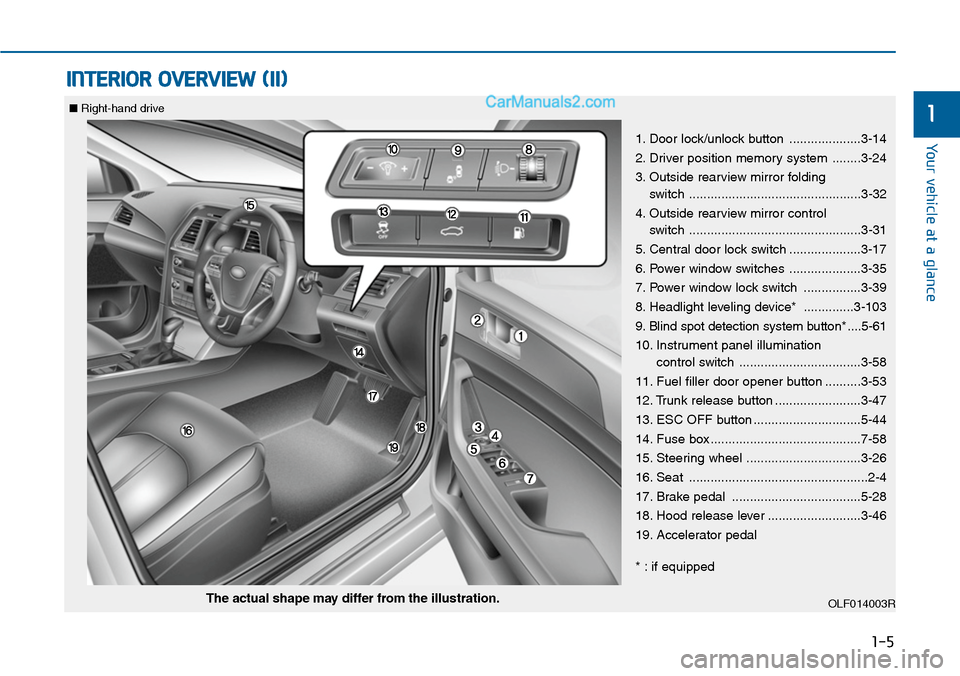
INTERIOR OVERVIEW (II)
1
1. Door lock/unlock button ....................3-14
2. Driver position memory system ........3-24
3. Outside rearview mirror folding
switch ................................................3-32
4. Outside rearview mirror control
switch ................................................3-31
5. Central door lock switch ....................3-17
6. Power window switches ....................3-35
7. Power window lock switch ................3-39
8. Headlight leveling device* ..............3-103
9. Blind spot detection system button* ....5-61
10. Instrument panel illumination
control switch ..................................3-58
11. Fuel filler door opener button ..........3-53
12. Trunk release button ........................3-47
13. ESC OFF button ..............................5-44
14. Fuse box ..........................................7-58
15. Steering wheel ................................3-26
16. Seat ..................................................2-4
17. Brake pedal ....................................5-28
18. Hood release lever ..........................3-46
19. Accelerator pedal
* : if equipped
OLF014003RThe actual shape may differ from the illustration.
■Right-hand drive
Page 56 of 665
2-27
Safety system of your vehicle
2
Seat belt restraint system
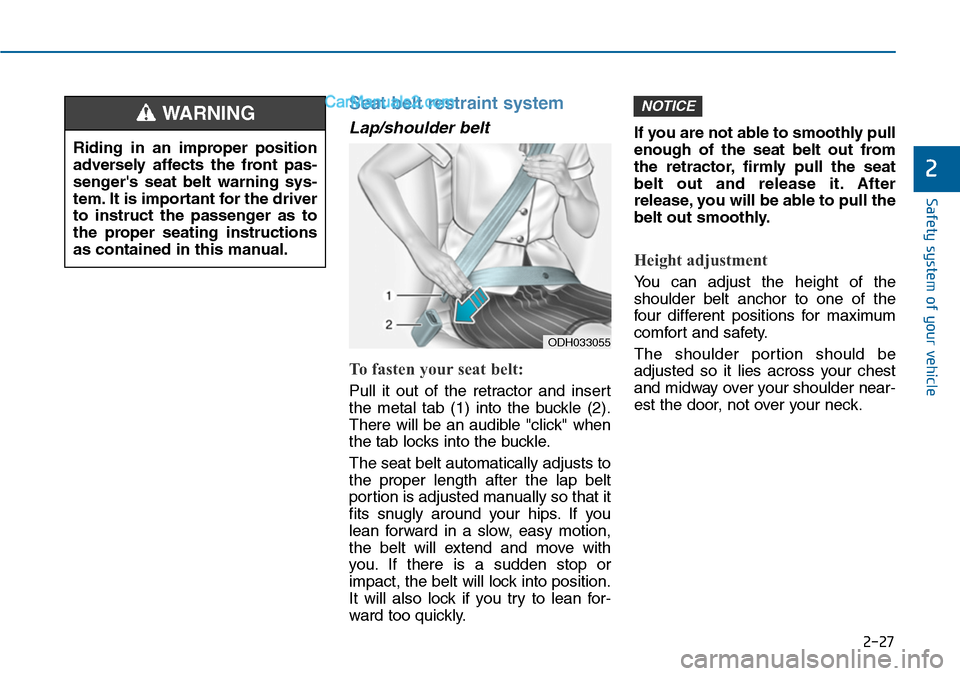
Lap/shoulder belt
To fasten your seat belt:
Pull it out of the retractor and insert
the metal tab (1) into the buckle (2).
There will be an audible "click" when
the tab locks into the buckle.
The seat belt automatically adjusts to
the proper length after the lap belt
portion is adjusted manually so that it
fits snugly around your hips. If you
lean forward in a slow, easy motion,
the belt will extend and move with
you. If there is a sudden stop or
impact, the belt will lock into position.
It will also lock if you try to lean for-
ward too quickly.
If you are not able to smoothly pull
enough of the seat belt out from
the retractor, firmly pull the seat
belt out and release it. After
release, you will be able to pull the
belt out smoothly.
Height adjustment
Yo u c a n a d j u s t t h e h e i g h t o f t h e
shoulder belt anchor to one of the
four different positions for maximum
comfort and safety.
The shoulder portion should be
adjusted so it lies across your chest
and midway over your shoulder near-
est the door, not over your neck.
NOTICE
Riding in an improper position
adversely affects the front pas-
senger's seat belt warning sys-
tem. It is important for the driver
to instruct the passenger as to
the proper seating instructions
as contained in this manual.
WARNING
ODH033055
Page 64 of 665
2-35
Safety system of your vehicle
2
Care of seat belts
Seat belt systems should never be
disassembled or modified. In addi-
tion, care should be taken to assure
that seat belts and belt hardware are
not damaged by seat hinges, doors
or other abuse.
Periodic inspection
All seat belts should be inspected
periodically for wear or damage of
any kind. Any damaged parts should
be replaced as soon as possible.
Keep belts clean and dry
Seat belts should be kept clean and
dry. If belts become dirty, they can be
cleaned by using a mild soap solu-
tion and warm water. Bleach, dye,
strong detergents or abrasives
should not be used because they
may damage and weaken the fabric.
When to replace seat belts
The entire seat belt assembly or
assemblies should be replaced if the
vehicle has been involved in an acci-
dent. This should be done even if no
damage is visible. We recommend
that you consult an authorized
HYUNDAI dealer.
Page 79 of 665
2-50
Safety system of your vehicle
Ve h i c l e s a r e e q u i p p e d w i t h a
Supplemental Air Bag System for the
driver’s seat and front passenger’s
seats.
The front air bags are designed to
supplement the three-point seat
belts. For these air bags to provide
protection, the seat belts must be
worn at all times when driving.
Yo u c a n b e s e v e r e l y i n j u r e d o r k i l l e d
in an accident if you are not wearing
a seat belt. Air bags are designed to
supplement seat belts, but do not
replace them. Also, air bags are not
designed to deploy in every collision.
In some accidents, the seat belts are
the only restraint protecting you.
AIR BAG SAFETY PRECAUTIONS
ALWAYS use seat belts and child restraints - every trip, every time,
everyone! Even with air bags, you can be seriously injured or killed in
a collision if you are improperly belted or not wearing your seat belt
when the air bag inflates.
NEVER place a child in any child restraint or booster seat in the front
passenger seat. An inflating air bag could forcefully strike the infant
or child causing serious or fatal injuries.
ABC - Always Buckle Children under age 13 in the back seat. It is the
safest place for children of any age to ride. If a child age 13 or older
must be seated in the front seat, he or she must be properly belted
and the seat should be moved as far back as possible.
All occupants should sit upright with the seatback in an upright posi-
tion, centered on the seat cushion with their seat belt on, legs com-
fortably extended and their feet on the floor until the vehicle is parked
and the engine is turned off. If an occupant is out of position during
an accident, the rapidly deploying air bag may forcefully contact the
occupant causing serious or fatal injuries.
Yo u a n d y o u r p a s s e n g e r s s h o u l d n e v e r s i t o r l e a n u n n e c e s s a r i l y
close to the air bags or lean against the door or center console.
Move your seat as far back as possible from front air bags, while still
maintaining control of the vehicle.
WARNING
Page 80 of 665
2-51
Safety system of your vehicle
2
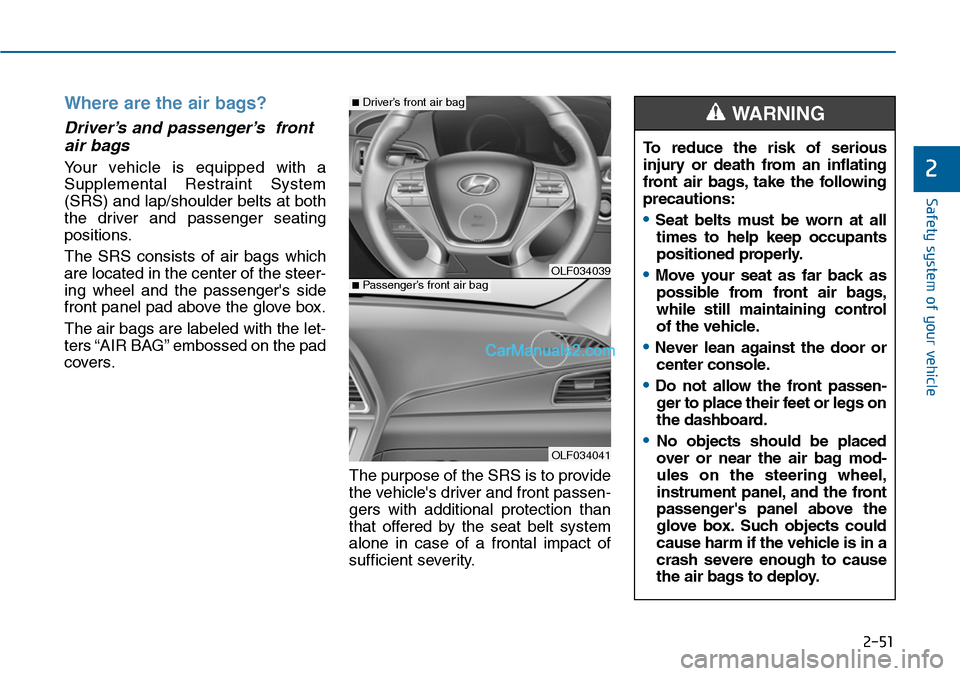
Where are the air bags?
Driver’s and passenger’s front
air bags
Yo u r v e h i c l e i s e q u i p p e d w i t h a
Supplemental Restraint System
(SRS) and lap/shoulder belts at both
the driver and passenger seating
positions.
The SRS consists of air bags which
are located in the center of the steer-
ing wheel and the passenger's side
front panel pad above the glove box.
The air bags are labeled with the let-
ters “AIR BAG” embossed on the pad
covers.
The purpose of the SRS is to provide
the vehicle's driver and front passen-
gers with additional protection than
that offered by the seat belt system
alone in case of a frontal impact of
sufficient severity.
To r e d u c e t h e r i s k o f s e r i o u s
injury or death from an inflating
front air bags, take the following
precautions:
•Seat belts must be worn at all
times to help keep occupants
positioned properly.
•Move your seat as far back as
possible from front air bags,
while still maintaining control
of the vehicle.
•Never lean against the door or
center console.
•Do not allow the front passen-
ger to place their feet or legs on
the dashboard.
•No objects should be placed
over or near the air bag mod-
ules on the steering wheel,
instrument panel, and the front
passenger's panel above the
glove box. Such objects could
cause harm if the vehicle is in a
crash severe enough to cause
the air bags to deploy.
WARNING
OLF034039
OLF034041
■Passenger’s front air bag
■Driver’s front air bag
Page 81 of 665
2-52
Safety system of your vehicle
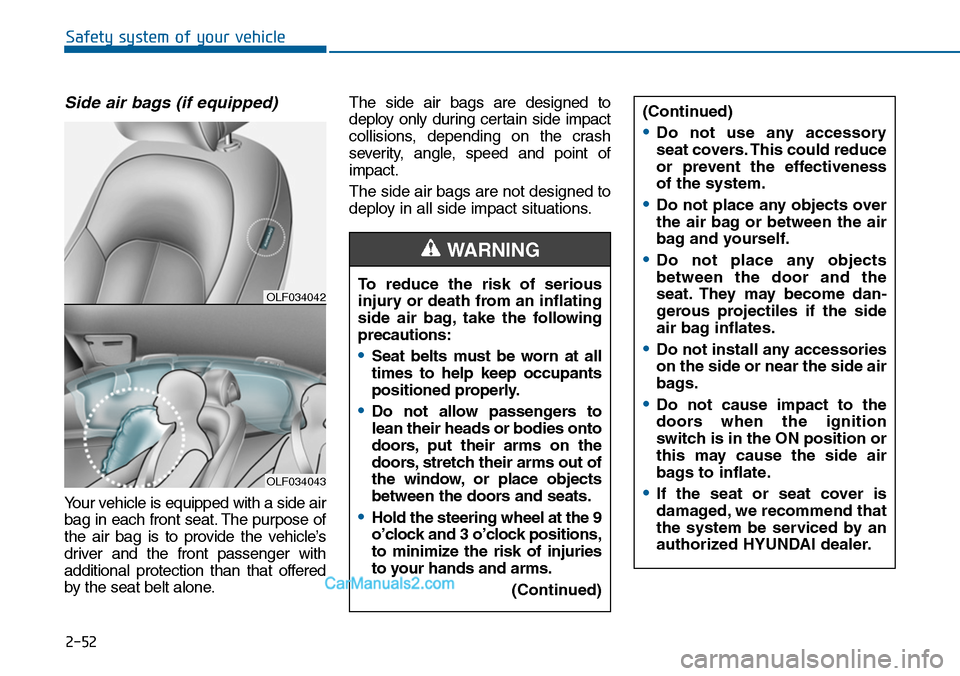
Side air bags (if equipped)
Yo u r v e h i c l e i s e q u i p p e d w i t h a s i d e a i r
bag in each front seat. The purpose of
the air bag is to provide the vehicle’s
driver and the front passenger with
additional protection than that offered
by the seat belt alone.
The side air bags are designed to
deploy only during certain side impact
collisions, depending on the crash
severity, angle, speed and point of
impact.
The side air bags are not designed to
deploy in all side impact situations.
OLF034042
OLF034043
(Continued)
•Do not use any accessory
seat covers. This could reduce
or prevent the effectiveness
of the system.
•Do not place any objects over
the air bag or between the air
bag and yourself.
•Do not place any objects
between the door and the
seat. They may become dan-
gerous projectiles if the side
air bag inflates.
•Do not install any accessories
on the side or near the side air
bags.
•Do not cause impact to the
doors when the ignition
switch is in the ON position or
this may cause the side air
bags to inflate.
•If the seat or seat cover is
damaged, we recommend that
the system be serviced by an
authorized HYUNDAI dealer.
To reduce the risk of serious
injury or death from an inflating
side air bag, take the following
precautions:
•Seat belts must be worn at all
times to help keep occupants
positioned properly.
•Do not allow passengers to
lean their heads or bodies onto
doors, put their arms on the
doors, stretch their arms out of
the window, or place objects
between the doors and seats.
•Hold the steering wheel at the 9
o’clock and 3 o’clock positions,
to minimize the risk of injuries
to your hands and arms.
(Continued)
WARNING
Page 82 of 665
2-53
Safety system of your vehicle
2
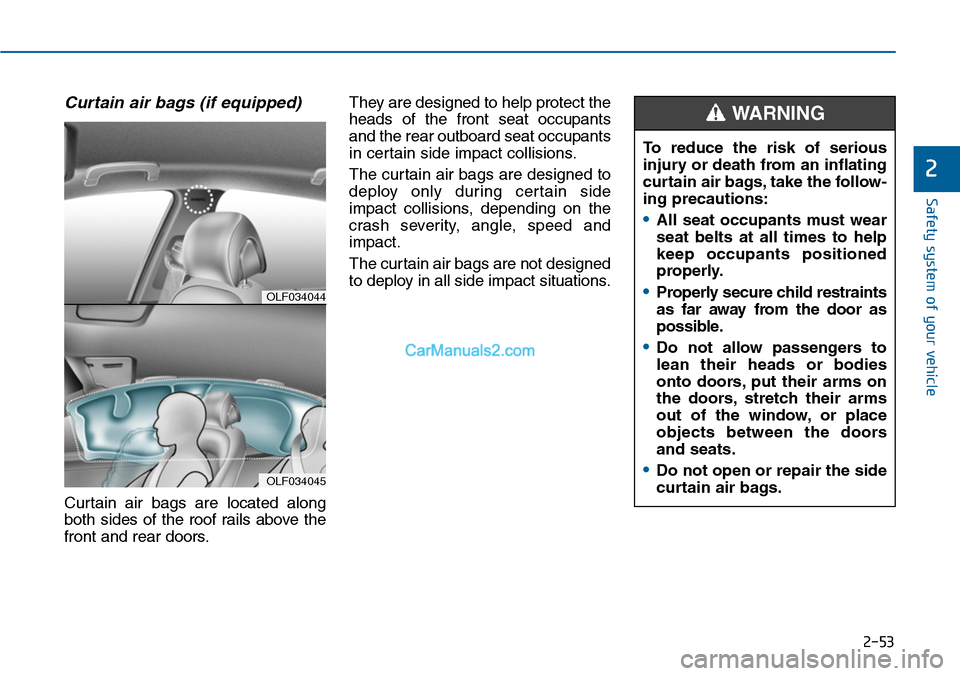
Curtain air bags (if equipped)
Curtain air bags are located along
both sides of the roof rails above the
front and rear doors.
They are designed to help protect the
heads of the front seat occupants
and the rear outboard seat occupants
in certain side impact collisions.
The curtain air bags are designed to
deploy only during certain side
impact collisions, depending on the
crash severity, angle, speed and
impact.
The curtain air bags are not designed
to deploy in all side impact situations.OLF034044
OLF034045
To reduce the risk of serious
injury or death from an inflating
curtain air bags, take the follow-
ing precautions:
•All seat occupants must wear
seat belts at all times to help
keep occupants positioned
properly.
•Properly secure child restraints
as far away from the door as
possible.
•Do not allow passengers to
lean their heads or bodies
onto doors, put their arms on
the doors, stretch their arms
out of the window, or place
objects between the doors
and seats.
•Do not open or repair the side
curtain air bags.
WARNING