Led Hyundai Sonata 2015 Owner's Guide
[x] Cancel search | Manufacturer: HYUNDAI, Model Year: 2015, Model line: Sonata, Model: Hyundai Sonata 2015Pages: 603, PDF Size: 14.7 MB
Page 116 of 603
3-21
Convenient features of your vehicle
3
Recalling positions from memory
1. Check that the shift lever is in P(Park) while the ignition switch is
in the ON position.
2. Press the desired memory button (1 or 2). The system will beep once,
and then the driver's seat position,
outside rearview mirror position
and instrument panel illumination
intensity will automatically adjust to
the stored positions.
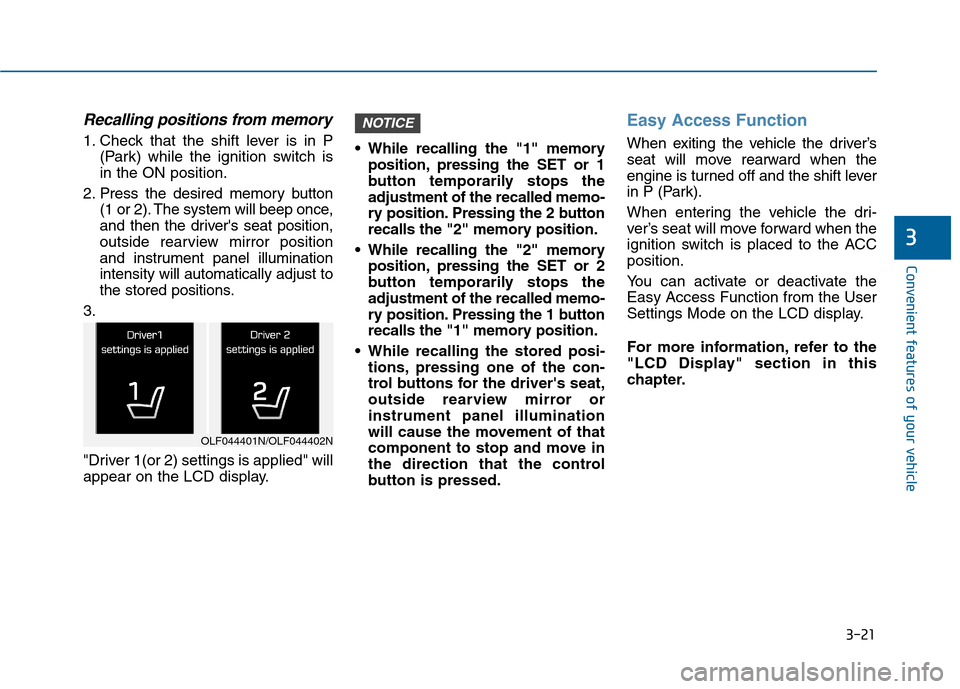
3.
"Driver 1(or 2) settings is applied" will
appear on the LCD display. While recalling the "1" memory
position, pressing the SET or 1
button temporarily stops the
adjustment of the recalled memo-
ry position. Pressing the 2 button
recalls the "2" memory position.
While recalling the "2" memory position, pressing the SET or 2
button temporarily stops the
adjustment of the recalled memo-
ry position. Pressing the 1 button
recalls the "1" memory position.
While recalling the stored posi- tions, pressing one of the con-
trol buttons for the driver's seat,
outside rearview mirror or
instrument panel illumination
will cause the movement of that
component to stop and move in
the direction that the control
button is pressed.
Easy Access Function
When exiting the vehicle the driver’s
seat will move rearward when the
engine is turned off and the shift lever
in P (Park).
When entering the vehicle the dri-
ver’s seat will move forward when the
ignition switch is placed to the ACC
position.
You can activate or deactivate the
Easy Access Function from the User
Settings Mode on the LCD display.
For more information, refer to the
"LCD Display" section in this
chapter.
NOTICE
OLF044401N/OLF044402N
Page 122 of 603
3-27
Convenient features of your vehicle
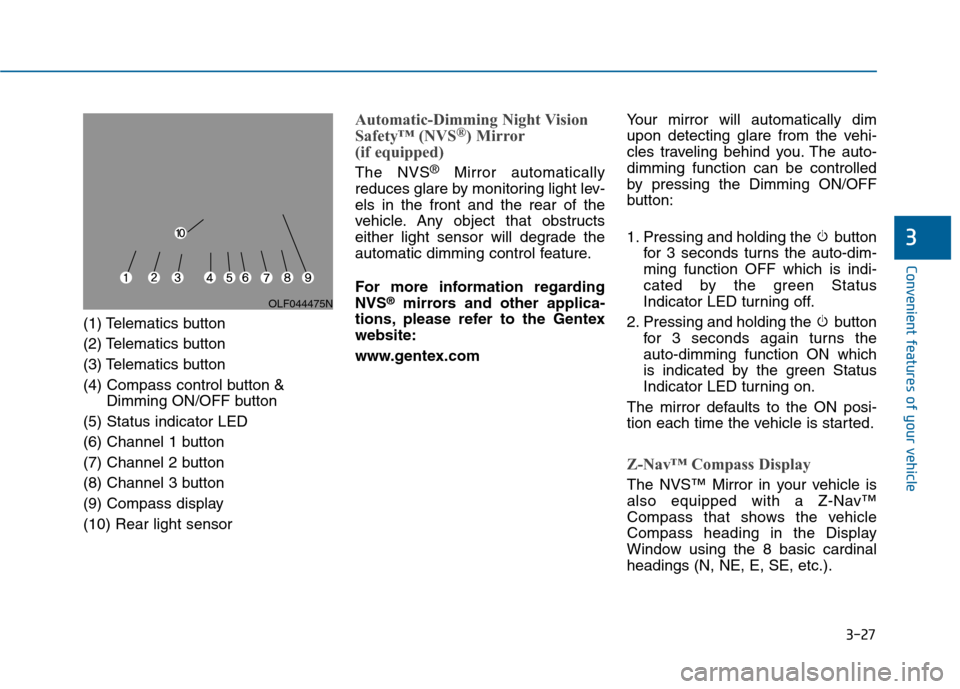
(1) Telematics button
(2) Telematics button
(3) Telematics button
(4) Compass control button &Dimming ON/OFF button
(5) Status indicator LED
(6) Channel 1 button
(7) Channel 2 button
(8) Channel 3 button
(9) Compass display
(10) Rear light sensor
Automatic-Dimming Night Vision
Safety™ (NVS®) Mirror
(if equipped)
The NVS®Mirror automatically
reduces glare by monitoring light lev-
els in the front and the rear of the
vehicle. Any object that obstructs
either light sensor will degrade the
automatic dimming control feature.
For more information regarding
NVS
®mirrors and other applica-
tions, please refer to the Gentex
website:
www.gentex.com Your mirror will automatically dim
upon detecting glare from the vehi-
cles traveling behind you. The auto-
dimming function can be controlled
by pressing the Dimming ON/OFF
button:
1. Pressing and holding the button
for 3 seconds turns the auto-dim-
ming function OFF which is indi-
cated by the green Status
Indicator LED turning off.
2. Pressing and holding the button for 3 seconds again turns the
auto-dimming function ON which
is indicated by the green Status
Indicator LED turning on.
The mirror defaults to the ON posi-
tion each time the vehicle is started.
Z-Nav™ Compass Display
The NVS™ Mirror in your vehicle is
also equipped with a Z-Nav™
Compass that shows the vehicle
Compass heading in the Display
Window using the 8 basic cardinal
headings (N, NE, E, SE, etc.).
3
OLF044475N
Page 123 of 603
3-28
Convenient features of your vehicle
Compass function
The Compass can be turned ON and
OFF and will remember the last state
when the ignition is cycled. To turn
the display feature ON/OFF:
1. Press and release the buttonwithin 1 second to turn the display
feature OFF.
2. Press and release the button again within 1 second to turn the
display back ON.
Additional options can be set with
press and hold sequences of the
button and are detailed below.
There is a difference between mag-
netic north and true north. To com-
pensate for this difference you will
need to adjust the Zone setting based
on where you live.
B520C05NF
Page 129 of 603
3-34
Convenient features of your vehicle
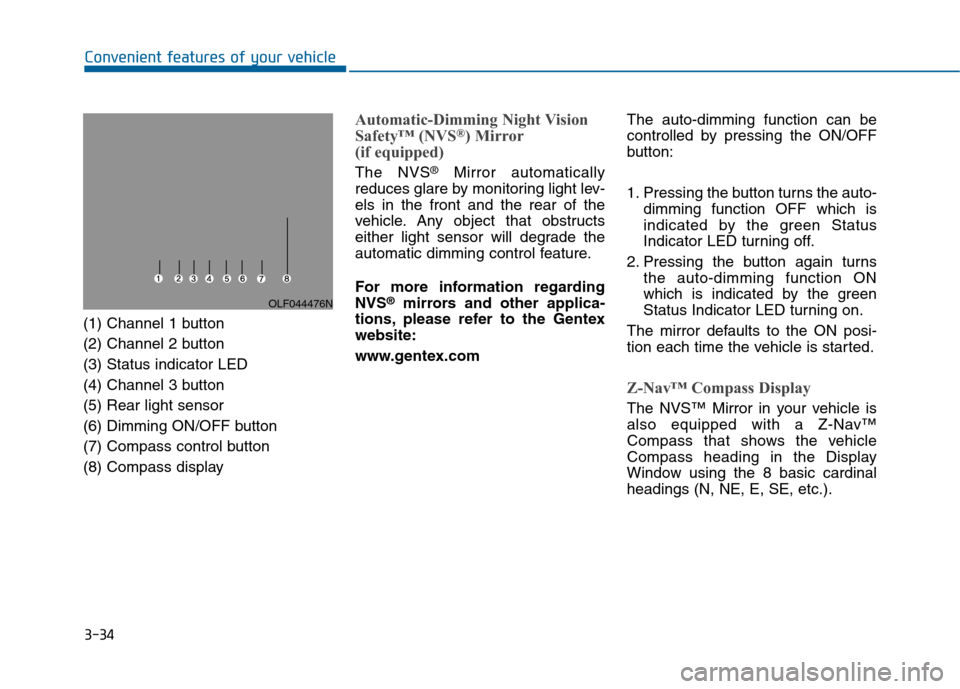
(1) Channel 1 button
(2) Channel 2 button
(3) Status indicator LED
(4) Channel 3 button
(5) Rear light sensor
(6) Dimming ON/OFF button
(7) Compass control button
(8) Compass display
Automatic-Dimming Night Vision
Safety™ (NVS®) Mirror
(if equipped)
The NVS®Mirror automatically
reduces glare by monitoring light lev-
els in the front and the rear of the
vehicle. Any object that obstructs
either light sensor will degrade the
automatic dimming control feature.
For more information regarding
NVS
®mirrors and other applica-
tions, please refer to the Gentex
website:
www.gentex.com The auto-dimming function can be
controlled by pressing the ON/OFF
button:
1. Pressing the button turns the auto-
dimming function OFF which is
indicated by the green Status
Indicator LED turning off.
2. Pressing the button again turns the auto-dimming function ON
which is indicated by the green
Status Indicator LED turning on.
The mirror defaults to the ON posi-
tion each time the vehicle is started.
Z-Nav™ Compass Display
The NVS™ Mirror in your vehicle is
also equipped with a Z-Nav™
Compass that shows the vehicle
Compass heading in the Display
Window using the 8 basic cardinal
headings (N, NE, E, SE, etc.).
OLF044476N
Page 130 of 603
3-35
Convenient features of your vehicle
3
Compass function
The Compass can be turned ON and
OFF and will remember the last state
when the ignition is cycled. To turn
the display feature ON/OFF:
1. Press and release the button toturn the display feature OFF.
2. Press and release the button again to turn the display back ON.
Additional options can be set with
press and hold sequences of the but-
ton and are detailed below.
There is a difference between mag-
netic north and true north. To com-
pensate for this difference you will
need to adjust the Zone setting
based on where you live.
B520C05NF
Page 133 of 603
3-38
Convenient features of your vehicle
To train rolling code devices, follow
these instructions:
1. At the garage door opener receiv- er (motor-head unit) in the garage,
locate the "learn" or "smart" but-
ton. This can usually be found
where the hanging antenna wire is
attached to the motor-head unit.
Exact location and color of the but-
ton may vary by garage door
opener brand. If there is difficulty
locating the training button, refer-
ence the device owner's manual or
please visit our Web site at
www.homelink.com.
2. Firmly press and release the "learn" or "smart" button (which
activates the "training light"). You
will have 30 seconds to initiate
step 3. 3. Return to the vehicle and firmly
press, hold for two seconds and
then release the desired
HomeLink
®button. Repeat the
"press/hold/release" sequence a
second time to complete the pro-
gramming. (Some devices may
require you to repeat this
sequence a third time to complete
the programming.)
4. Press and hold the just-trained HomeLink
®button and observe
the red Status Indicator LED. If the
indicator light stays on constantly,
programming is complete and
your device should activate.
5. To program the remaining two HomeLink
®buttons, follow either
steps 1 through 4 above for other
Rolling Code devices or steps 2
through 5 in Standard Programming
for standard devices.
Standard programming
To train most devices, follow these
instructions:
1. For first-time programming, press and hold the two outside buttons,
HomeLink
®Channel 1 and
Channel 3 Buttons, until the indi-
cator light begins to flash (after 20
seconds). Release both buttons.
Do not hold the buttons for longer
than 30 seconds.
2. Position the end of your hand-held transmitter 1-3 inches (2-8 cm)
away from the HomeLink
®buttons
while keeping the indicator light in
view.
3. Simultaneously press and hold both the HomeLink
®and hand-
held transmitter button. DO NOT
release the buttons until step 4
has been completed.
4. While continuing to hold the but- tons the red Indicator Status LED
will flash slowly and then rapidly
after HomeLink
®successfully
trains to the frequency signal from
the hand-held transmitter. Release
both buttons.
Page 134 of 603
3-39
Convenient features of your vehicle
3
5. Press and hold the just-trainedHomeLink®button and observe
the red Status Indicator LED. If the
indicator light stays on constantly,
programming is complete and
your device should activate when
the HomeLink
®button is pressed
and released.
6. To program the remaining two HomeLink
®buttons, follow steps 2
through 5.
Gate operator & Canadian program- ming
During programming, your handheld
transmitter may automatically stop
transmitting. Continue to press the
Integrated HomeLink
®Wireless
Control System button (note
steps 2 through 4 in the Standard
Programming portion of this docu-
ment) while you press and re-press
("cycle") your handheld transmitter
every two seconds until the frequen-
cy signal has been learned. The indi-
cator light will flash slowly and then
rapidly after several seconds upon
successful training.
Operating HomeLink®
To operate, simply press and release
the programmed HomeLink®button.
Activation will now occur for the
trained device (i.e. garage door
opener, gate operator, security sys-
tem, entry door lock, home/office
lighting, etc.). For convenience, the
hand-held transmitter of the device
may also be used at any time.
Reprogramming a single HomeLink®button
To program a new device to a previ-
ously trained HomeLink®button, fol-
low these steps:
1. Press and hold the desired HomeLink
®button. Do NOT
release until step 4 has been com-
pleted.
2. When the indicator light begins to flash slowly (after 20 seconds),
position the handheld transmitter 1
to 3 inches away from the
HomeLink
®surface.
3. Press and hold the handheld transmitter button. The HomeLink
®
indicator light will flash, first slowly
and then rapidly.
4. When the indicator light begins to flash rapidly, release both buttons.
5. Press and hold the just-trained HomeLink
®button and observe
the red Status Indicator LED. If the
indicator light stays on constantly,
programming is complete and
your new device should activate.
Page 141 of 603
3-46
Convenient features of your vehicle
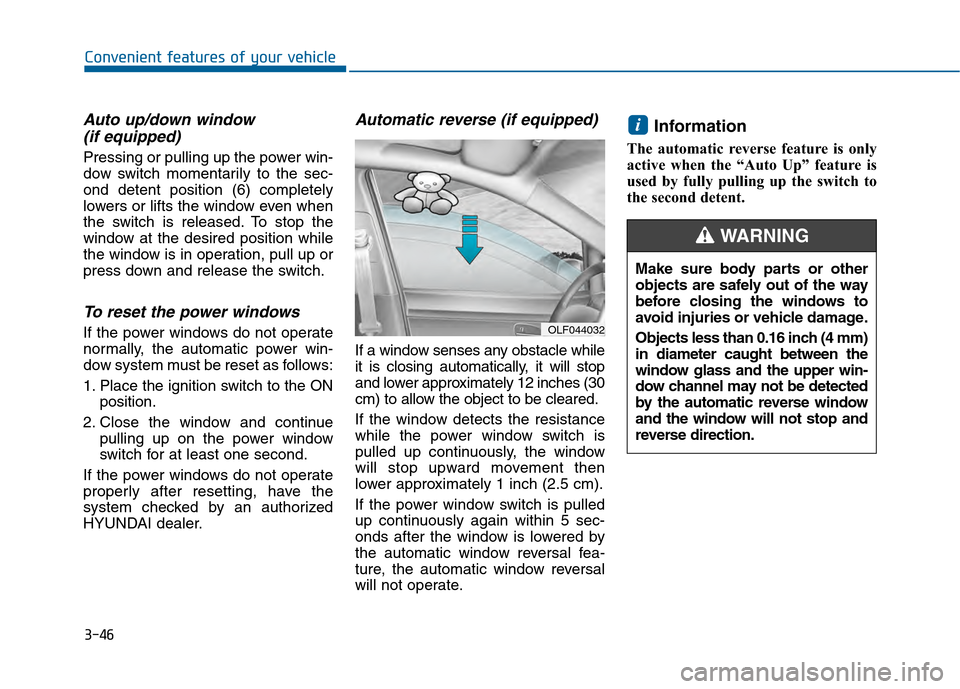
Auto up/down window (if equipped)
Pressing or pulling up the power win-
dow switch momentarily to the sec-
ond detent position (6) completely
lowers or lifts the window even when
the switch is released. To stop the
window at the desired position while
the window is in operation, pull up or
press down and release the switch.
To reset the power windows
If the power windows do not operate
normally, the automatic power win-
dow system must be reset as follows:
1. Place the ignition switch to the ON
position.
2. Close the window and continue pulling up on the power window
switch for at least one second.
If the power windows do not operate
properly after resetting, have the
system checked by an authorized
HYUNDAI dealer.
Automatic reverse (if equipped)
If a window senses any obstacle while
it is closing automatically, it will stop
and lower approximately 12 inches (30
cm) to allow the object to be cleared.
If the window detects the resistance
while the power window switch is
pulled up continuously, the window
will stop upward movement then
lower approximately 1 inch (2.5 cm).
If the power window switch is pulled
up continuously again within 5 sec-
onds after the window is lowered by
the automatic window reversal fea-
ture, the automatic window reversal
will not operate.
Information
The automatic reverse feature is only
active when the “Auto Up” feature is
used by fully pulling up the switch to
the second detent.
i
OLF044032
Make sure body parts or other
objects are safely out of the way
before closing the windows to
avoid injuries or vehicle damage.
Objects less than 0.16 inch (4 mm)
in diameter caught between the
window glass and the upper win-
dow channel may not be detected
by the automatic reverse window
and the window will not stop and
reverse direction.
WARNING
Page 145 of 603
3-50
Convenient features of your vehicle
Closing the Sunroof
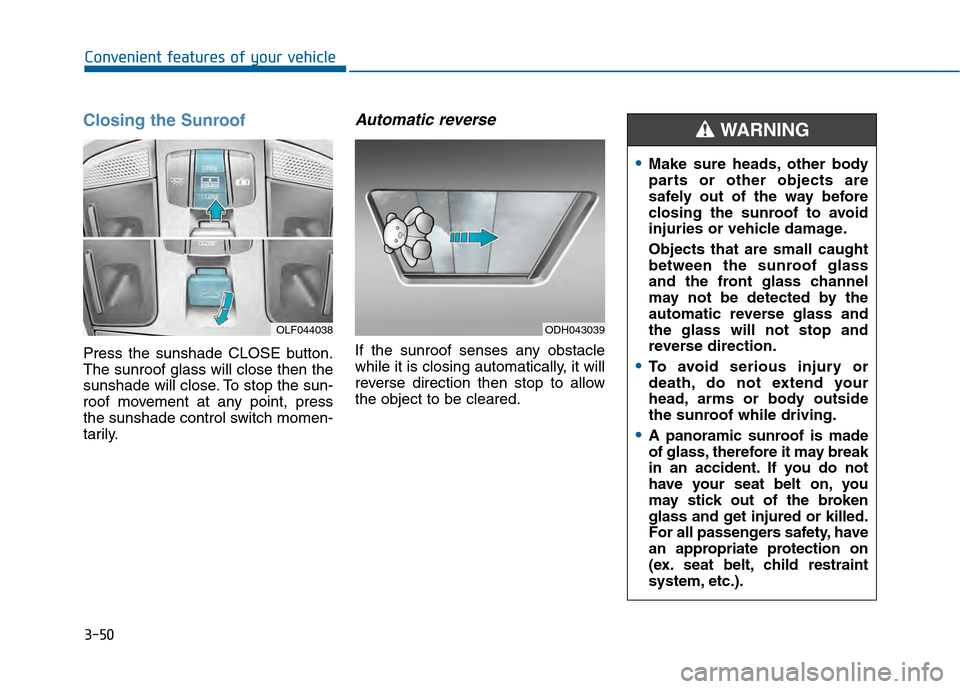
Press the sunshade CLOSE button.
The sunroof glass will close then the
sunshade will close. To stop the sun-
roof movement at any point, press
the sunshade control switch momen-
tarily.
Automatic reverse
If the sunroof senses any obstacle
while it is closing automatically, it will
reverse direction then stop to allow
the object to be cleared.
OLF044038ODH043039
Make sure heads, other body
parts or other objects are
safely out of the way before
closing the sunroof to avoid
injuries or vehicle damage.
Objects that are small caught
between the sunroof glass
and the front glass channel
may not be detected by the
automatic reverse glass and
the glass will not stop and
reverse direction.
To avoid serious injury or
death, do not extend your
head, arms or body outside
the sunroof while driving.
A panoramic sunroof is made
of glass, therefore it may break
in an accident. If you do not
have your seat belt on, you
may stick out of the broken
glass and get injured or killed.
For all passengers safety, have
an appropriate protection on
(ex. seat belt, child restraint
system, etc.).
WARNING
Page 147 of 603
3-52
Convenient features of your vehicle
Hood
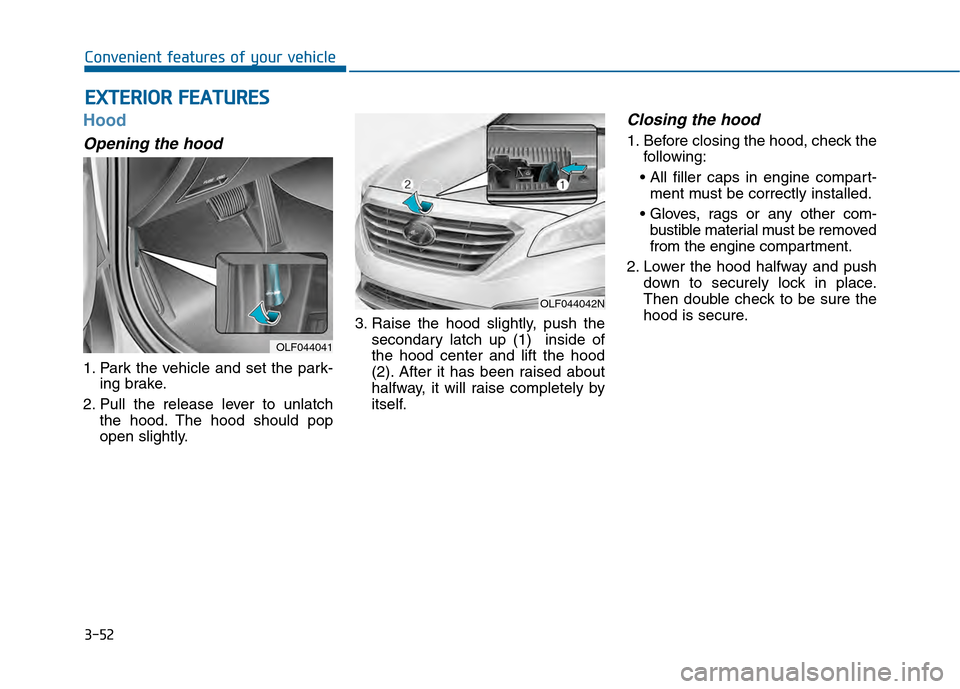
Opening the hood
1. Park the vehicle and set the park-ing brake.
2. Pull the release lever to unlatch the hood. The hood should pop
open slightly. 3. Raise the hood slightly, push the
secondary latch up (1) inside of
the hood center and lift the hood
(2). After it has been raised about
halfway, it will raise completely by
itself.
Closing the hood
1. Before closing the hood, check thefollowing:
ment must be correctly installed.
bustible material must be removed
from the engine compartment.
2. Lower the hood halfway and push down to securely lock in place.
Then double check to be sure the
hood is secure.
E EX
X T
TE
ER
R I
IO
O R
R
F
F E
E A
A T
TU
U R
RE
ES
S
OLF044041
OLF044042N