low Hyundai Sonata
[x] Cancel search | Manufacturer: HYUNDAI, Model Year: , Model line: , Model:Pages: 208, PDF Size: 16.93 MB
Page 149 of 208
CORROSION PREVENTION AND APPEARANCE CARE 4- 5
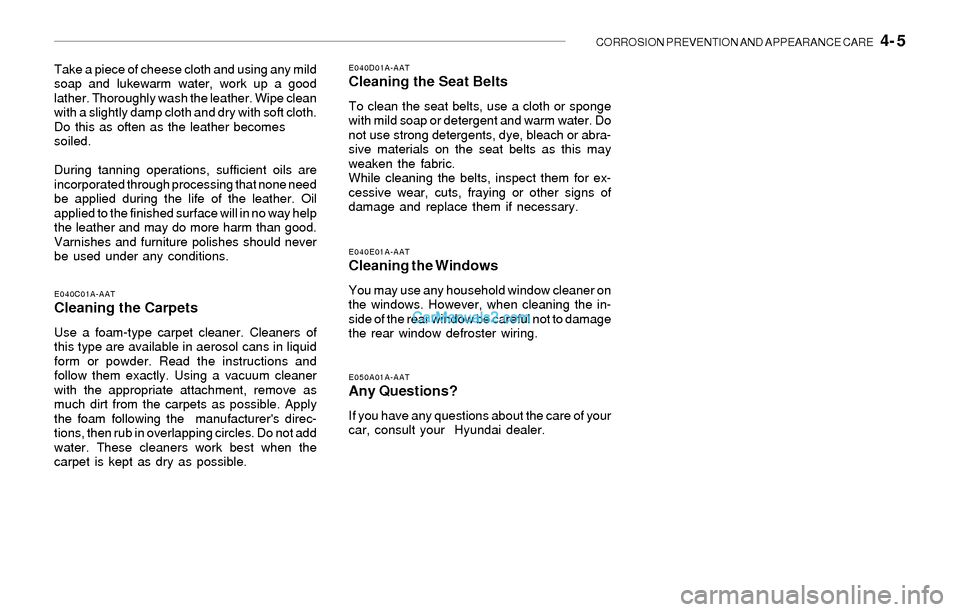
Take a piece of cheese cloth and using any mild
soap and lukewarm water, work up a good
lather. Thoroughly wash the leather. Wipe clean
with a slightly damp cloth and dry with soft cloth.
Do this as often as the leather becomes
soiled.
During tanning operations, sufficient oils are
incorporated through processing that none need
be applied during the life of the leather. Oil
applied to the finished surface will in no way help
the leather and may do more harm than good.
Varnishes and furniture polishes should never
be used under any conditions.E040D01A-AATCleaning the Seat Belts
To clean the seat belts, use a cloth or sponge
with mild soap or detergent and warm water. Do
not use strong detergents, dye, bleach or abra-
sive materials on the seat belts as this may
weaken the fabric.
While cleaning the belts, inspect them for ex-
cessive wear, cuts, fraying or other signs of
damage and replace them if necessary.
E040C01A-AATCleaning the Carpets
Use a foam-type carpet cleaner. Cleaners of
this type are available in aerosol cans in liquid
form or powder. Read the instructions and
follow them exactly. Using a vacuum cleaner
with the appropriate attachment, remove as
much dirt from the carpets as possible. Apply
the foam following the manufacturer's direc-
tions, then rub in overlapping circles. Do not add
water. These cleaners work best when the
carpet is kept as dry as possible.
E050A01A-AATAny Questions?
If you have any questions about the care of your
car, consult your Hyundai dealer.
E040E01A-AATCleaning the Windows
You may use any household window cleaner on
the windows. However, when cleaning the in-
side of the rear window be careful not to damage
the rear window defroster wiring.
Page 152 of 208

VEHICLE MAINTENANCE REQUIREMENTS 5- 3
F020A02Y-AATSCHEDULED MAINTENANCE
REQUIREMENTS
o Inspection should be performed any time a
malfunction is experienced or suspected.
o Receipts for all emission control system
services should be retained to demonstrate
compliance with conditions of the emissions
system warranty.
o After 120 months or 150,000 miles (240,000
km), continue to follow the prescribed main-
tenance intervals.
o For severe usage maintenance require-
ments, see page 5-6 of this section.
Page 153 of 208
5- 4 VEHICLE MAINTENANCE REQUIREMENTS
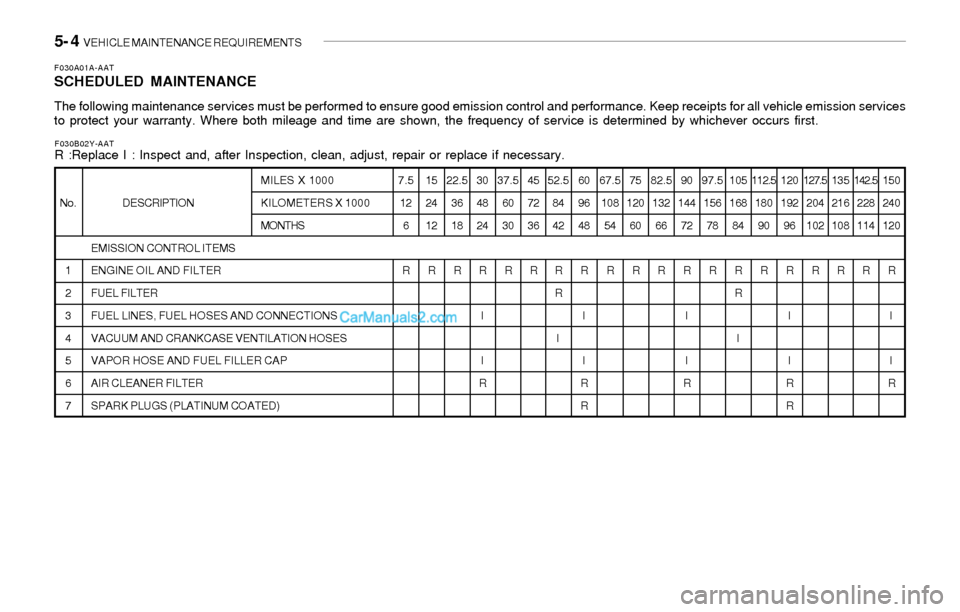
F030A01A-AATSCHEDULED MAINTENANCE
The following maintenance services must be performed to ensure good emission control and performance. Keep receipts for all vehicle emission services
to protect your warranty. Where both mileage and time are shown, the frequency of service is determined by whichever occurs first.
DESCRIPTION
EMISSION CONTROL ITEMS
ENGINE OIL AND FILTER
FUEL FILTER
FUEL LINES, FUEL HOSES AND CONNECTIONS
VACUUM AND CRANKCASE VENTILATION HOSES
VAPOR HOSE AND FUEL FILLER CAP
AIR CLEANER FILTER
SPARK PLUGS (PLATINUM COATED) No.
1
2
3
4
5
6
7MILES X 1000
KILOMETERS X 1000
MONTHS7.5
12
6
R15
24
12
R22.5
36
18
R30
48
24
R
I
I
R37.5
60
30
R45
72
36
R52.5
84
42
R
R
I60
96
48
R
I
I
R
R67.5
108
54
R75
120
60
R82.5
132
66
R90
144
72
R
I
I
R97.5
156
78
R105
168
84
R
R
I112.5
180
90
R120
192
96
R
I
I
R
R127.5
204
102
R135
216
108
R142.5
228
114
R150
240
120
R
I
I
R
F030B02Y-AATR :Replace I : Inspect and, after Inspection, clean, adjust, repair or replace if necessary.
Page 154 of 208
VEHICLE MAINTENANCE REQUIREMENTS 5- 5
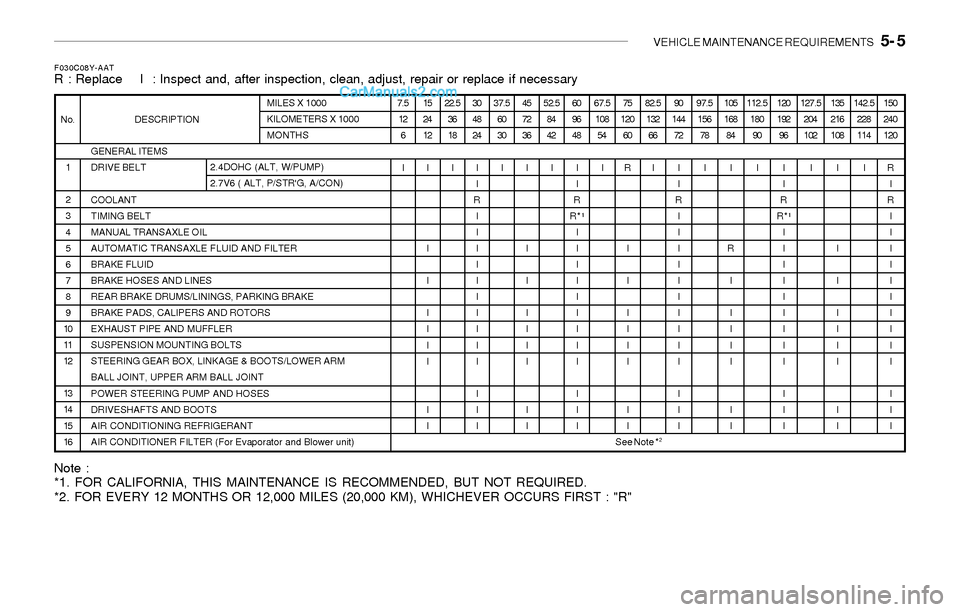
Note :
*1. FOR CALIFORNIA, THIS MAINTENANCE IS RECOMMENDED, BUT NOT REQUIRED.
*2. FOR EVERY 12 MONTHS OR 12,000 MILES (20,000 KM), WHICHEVER OCCURS FIRST : "R"
F030C08Y-AATR : Replace I : Inspect and, after inspection, clean, adjust, repair or replace if necessary
GENERAL ITEMS
DRIVE BELT
COOLANT
TIMING BELT
MANUAL TRANSAXLE OIL
AUTOMATIC TRANSAXLE FLUID AND FILTER
BRAKE FLUID
BRAKE HOSES AND LINES
REAR BRAKE DRUMS/LININGS, PARKING BRAKE
BRAKE PADS, CALIPERS AND ROTORS
EXHAUST PIPE AND MUFFLER
SUSPENSION MOUNTING BOLTS
STEERING GEAR BOX, LINKAGE & BOOTS/LOWER ARM
BALL JOINT, UPPER ARM BALL JOINT
POWER STEERING PUMP AND HOSES
DRIVESHAFTS AND BOOTS
AIR CONDITIONING REFRIGERANT
AIR CONDITIONER FILTER (For Evaporator and Blower unit) 1
2
3
4
5
6
7
8
9
10
11
12
13
14
15
16 No. DESCRIPTIONMILES X 1000
KILOMETERS X 1000
MONTHS
2.4DOHC (ALT, W/PUMP)
2.7V6 ( ALT, P/STR'G, A/CON)7.5
12
6
I15
24
12
I
I
I
I
I
I
I
I
I22.5
36
18
I30
48
24
I
I
R
I
I
I
I
I
I
I
I
I
I
I
I
I37.5
60
30
I45
72
36
I
I
I
I
I
I
I
I
I52.5
84
42
I60
96
48
I
I
R
R*¹
I
I
I
I
I
I
I
I
I
I
I
I67.5
108
54
I75
120
60
R
I
I
I
I
I
I
I
I82.5
132
66
I90
144
72
I
I
R
I
I
I
I
I
I
I
I
I
I
I
I
I97.5
156
78
I105
168
84
I
R
I
I
I
I
I
I
I112.5
180
90
I120
192
96
I
I
R
R*¹
I
I
I
I
I
I
I
I
I
I
I
I127.5
204
102
I135
216
108
I
I
I
I
I
I
I
I
I142.5
228
114
I150
240
120
R
I
R
I
I
I
I
I
I
I
I
I
I
I
I
I
See Note *
2
Page 155 of 208
5- 6 VEHICLE MAINTENANCE REQUIREMENTS
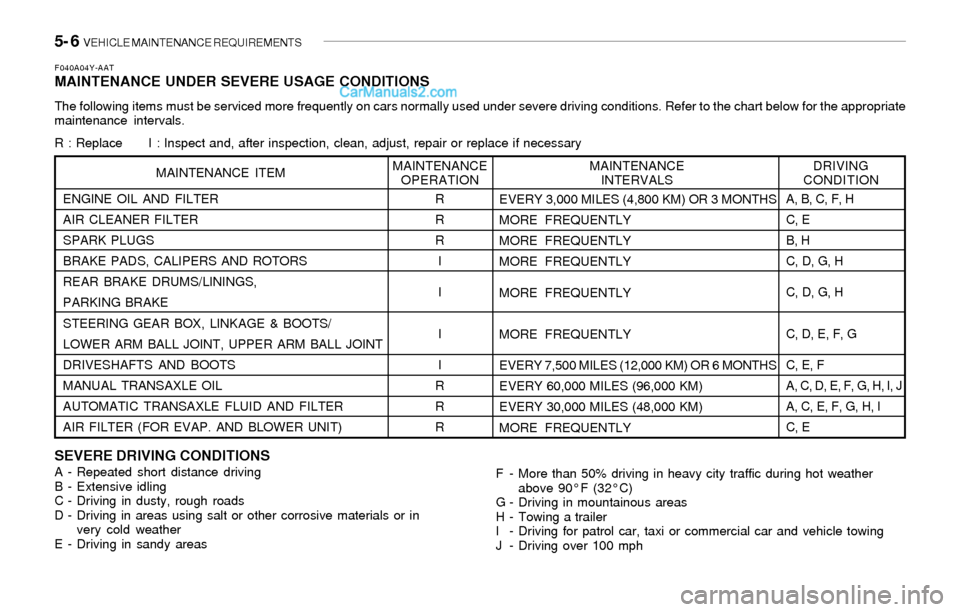
SEVERE DRIVING CONDITIONSA - Repeated short distance driving
B - Extensive idling
C - Driving in dusty, rough roads
D - Driving in areas using salt or other corrosive materials or in
very cold weather
E - Driving in sandy areas
F040A04Y-AATMAINTENANCE UNDER SEVERE USAGE CONDITIONS
The following items must be serviced more frequently on cars normally used under severe driving conditions. Refer to the chart below for the appropriate
maintenance intervals.
R : Replace I : Inspect and, after inspection, clean, adjust, repair or replace if necessary
F - More than 50% driving in heavy city traffic during hot weather
above 90°F (32°C)
G - Driving in mountainous areas
H - Towing a trailer
I - Driving for patrol car, taxi or commercial car and vehicle towing
J - Driving over 100 mph ENGINE OIL AND FILTER
AIR CLEANER FILTER
SPARK PLUGS
BRAKE PADS, CALIPERS AND ROTORS
REAR BRAKE DRUMS/LININGS,
PARKING BRAKE
STEERING GEAR BOX, LINKAGE & BOOTS/
LOWER ARM BALL JOINT, UPPER ARM BALL JOINT
DRIVESHAFTS AND BOOTS
MANUAL TRANSAXLE OIL
AUTOMATIC TRANSAXLE FLUID AND FILTER
AIR FILTER (FOR EVAP. AND BLOWER UNIT)
MAINTENANCE ITEM
R
R
R
I
I
I
I
R
R
REVERY 3,000 MILES (4,800 KM) OR 3 MONTHS
MORE FREQUENTLY
MORE FREQUENTLY
MORE FREQUENTLY
MORE FREQUENTLY
MORE FREQUENTLY
EVERY 7,500 MILES (12,000 KM) OR 6 MONTHS
EVERY 60,000 MILES (96,000 KM)
EVERY 30,000 MILES (48,000 KM)
MORE FREQUENTLY
DRIVING
CONDITION MAINTENANCE
INTERVALS MAINTENANCE
OPERATION
A, B, C, F, H
C, E
B, H
C, D, G, H
C, D, G, H
C, D, E, F, G
C, E, F
A, C, D, E, F, G, H, I, J
A, C, E, F, G, H, I
C, E
Page 157 of 208
5- 8 VEHICLE MAINTENANCE REQUIREMENTS
F070M01Y-AATo Steering Gear Box, Linkage & Boots/
Lower Arm Ball Joint, Upper Arm Ball
Joint
With the vehicle stopped and engine off, check
for excessive free-play in the steering wheel.
Check the linkage for bends or damage. Check
the dust boots and ball joints for deterioration,
cracks, or damage. Replace any damaged
parts.
F070G02A-AATo Brake Fluid
Check brake fluid level in the brake fluid reser-
voir. The level should be between "MIN" and
"MAX" marks on the side of the reservoir. Use
only hydraulic brake fluid conforming to DOT 3
or DOT 4.
F070D01A-AATo Manual transaxle oil
Inspect the manual transaxle oil according to
the maintenance schedule.
NOTE:If the oil level is low, check for possible leaks
before adding oil. Do not overfill.
F070F01A-AATo Brake Hoses and Lines
Visually check for proper installation, chafing,
cracks, deterioration and any leakage. Replace
any deteriorated or damaged parts immedi-
ately.
F070E04A-AATo Automatic Transaxle Fluid and Filter
The fluid level should be in the "HOT" range of
the dipstick, after the engine and transaxle are
at normal operating temperature. Check the
automatic transaxle fluid level with the engine
running and the transaxle in neutral, with the
parking brake properly applied. Use Genuine
Hyundai ATF or DIAMOND ATF SP-III or SK
ATF SP-III when adding or changing fluid.
F070K01A-AATo Exhaust Pipe and Muffler
Visually inspect the exhaust pipes, muffler and
hangers for cracks, deterioration, or damage.
Start the engine and listen carefully for any
exhaust gas leakage. Tighten connections or
replace parts as necessary.
F070J01A-AAT
o Brake Pads, Calipers and Rotors
Check the pads for excessive wear, discs for
run out and wear, and calipers for fluid leakage.
F070H01A-AAT
o Rear Brake Drums and Linings/
Parking Brake
Check the rear brake drums and linings for
scoring, burning, leaking fluid, broken parts,
and excessive wear. Inspect the parking brake
system including the parking brake lever and
cables. For detailed service procedures, refer
to the Shop Manual.
F070L01A-AAT
o Suspension Mounting Bolts
Check the suspension connections for loose-
ness or damage. Retighten to the specified
torque.
Page 162 of 208
6- 4 DO-IT-YOURSELF MAINTENANCE
G020C01A-AATVehicle Interior
The following should be checked each time
when the vehicle is driven:
o Lights operation
o Windshield wiper operation
o Horn operation
o Defroster, heating system operation (and air
conditioning, if installed)
o Steering operation and condition
o Mirror condition and operation
o Turn signal operation
o Accelerator pedal operation
o Brake operation, including parking brake
o Manual transaxle operation, including clutch
operation
o Automatic transaxle operation, including
"Park" mechanism operation
o Seat control condition and operation
o Seat belt condition and operation
o Sunvisor operation
If you notice anything that does not operate
correctly or appears to be functioning incor-
rectly, inspect it carefully and seek assistance
from your Hyundai dealer if service is needed.
G020B01A-AATVehicle Exterior
The following should be checked monthly:
o Overall appearance and condition
o Air filter condition
o Wheel condition and wheel nut torque
o Exhaust system condition
o Light condition and operation
o Windshield glass condition
o Wiper blade condition
o Paint condition and body corrosion
o Fluid leaks
o Door and hood lock condition
o Tire pressure and condition (including spare
tire)
G020A01A-AATGENERAL CHECKS
Engine Compartment
The following should be checked regularly:
o Engine oil level and condition
o Transaxle fluid level and condition
o Brake fluid level
o Clutch fluid level
o Engine coolant level
o Windshield washer fluid level
o Accessory drive belt condition
o Engine Coolant hose condition
o Fluid leaks (on or below components)
o Power steering fluid level
o Battery condition
Page 163 of 208

DO-IT-YOURSELF MAINTENANCE 6- 5
G030A01A-AATCHECKING THE ENGINE OIL
Engine oil is essential to the performance and
service of the engine. It is suggested that you
check the oil level at least once a week in normal
use and more often if you are on a trip or driving
in severe conditions.
G030C02A-AATTo Check the Oil LevelG030B01A-AATRecommended Oil
SH, SG or SG/CD (API) multi-grade and fuel
efficient oil is recommended.Before checking the oil, warm up the engine to
the normal operating temperature and be sure
your car is parked on level ground. Turn the
engine off.
Wait five minutes, then remove the dipstick,
wipe it off, fully reinsert the dipstick and withdraw
it again. Then note the highest level the oil has
reached on the dipstick. It should be between
the upper ("F") and lower ("L") range.
G030A02A
G030C01Y
Page 164 of 208
6- 6 DO-IT-YOURSELF MAINTENANCE
!
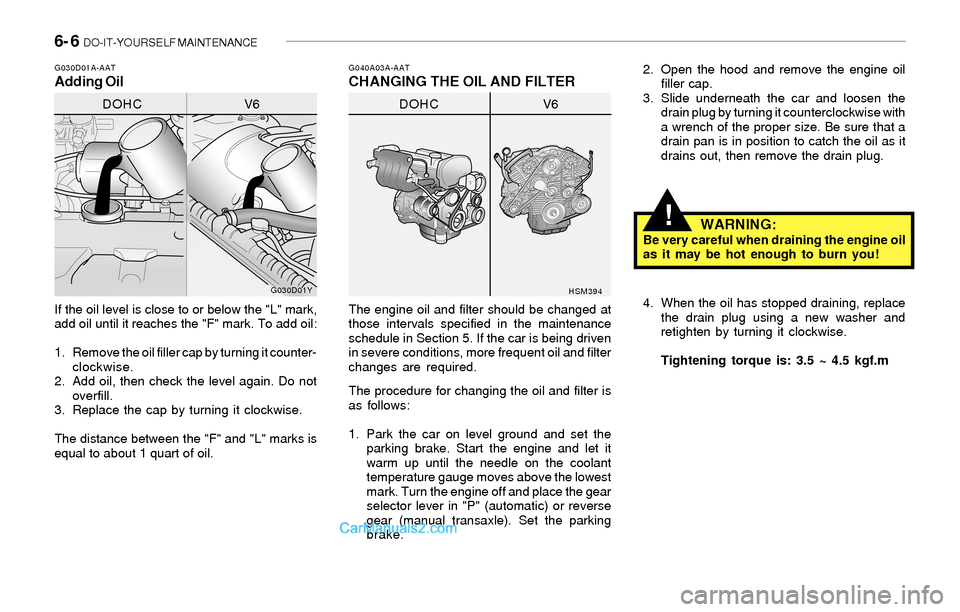
G040A03A-AATCHANGING THE OIL AND FILTERG030D01A-AATAdding Oil
If the oil level is close to or below the "L" mark,
add oil until it reaches the "F" mark. To add oil:
1. Remove the oil filler cap by turning it counter-
clockwise.
2. Add oil, then check the level again. Do not
overfill.
3. Replace the cap by turning it clockwise.
The distance between the "F" and "L" marks is
equal to about 1 quart of oil.The engine oil and filter should be changed at
those intervals specified in the maintenance
schedule in Section 5. If the car is being driven
in severe conditions, more frequent oil and filter
changes are required.
The procedure for changing the oil and filter is
as follows:
1. Park the car on level ground and set the
parking brake. Start the engine and let it
warm up until the needle on the coolant
temperature gauge moves above the lowest
mark. Turn the engine off and place the gear
selector lever in "P" (automatic) or reverse
gear (manual transaxle). Set the parking
brake.
G030D01Y
HSM394
DOHC V6DOHC V62. Open the hood and remove the engine oil
filler cap.
3. Slide underneath the car and loosen the
drain plug by turning it counterclockwise with
a wrench of the proper size. Be sure that a
drain pan is in position to catch the oil as it
drains out, then remove the drain plug.
WARNING:Be very careful when draining the engine oil
as it may be hot enough to burn you!
4. When the oil has stopped draining, replace
the drain plug using a new washer and
retighten by turning it clockwise.
Tightening torque is: 3.5 ~ 4.5 kgf.m
Page 166 of 208
6- 8 DO-IT-YOURSELF MAINTENANCE
G050D02A-AATTo Change the Engine CoolantThe engine coolant should be changed at those
intervals specified in the vehicle maintenance
schedule in Section 5.
G050C01A-AAT
To Check the Coolant LevelThe coolant level can be seen on the side of the
plastic coolant reservoir. The level of the cool-
ant should be between the "L" and "F" lines on
the reservoir when the engine is cool. If the level
is below the "L" mark, add engine coolant to
bring it up between "L" and "F". If the level is low,
inspect for coolant leaks and recheck the fluid
level frequently. If the level drops again, visit
your Hyundai dealer for an inspection and
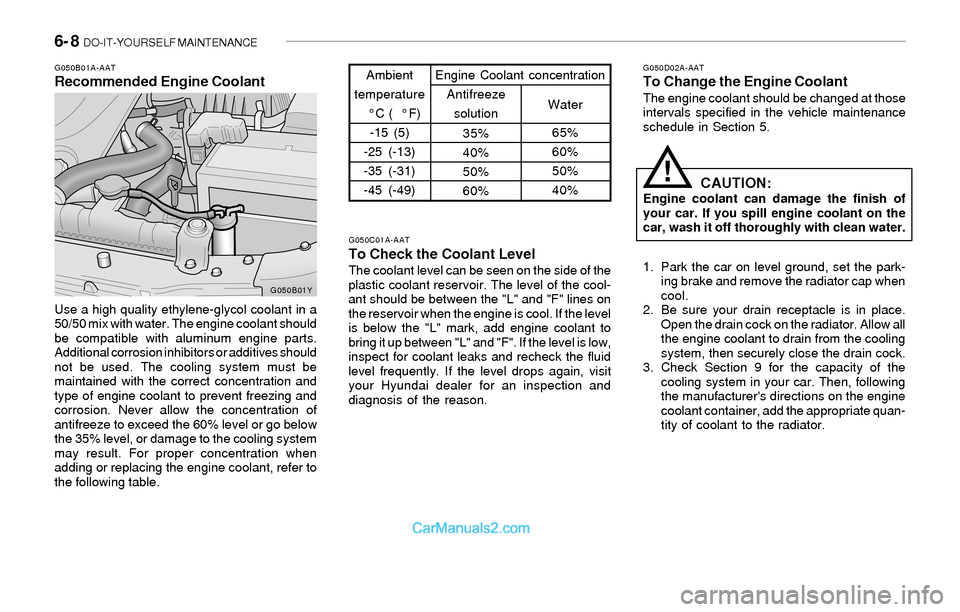
diagnosis of the reason.Ambient
temperature
°C ( °F)
-15 (5)
-25 (-13)
-35 (-31)
-45 (-49)
65%
60%
50%
40% 35%
40%
50%
60%Water Antifreeze
solution Engine Coolant concentration
G050B01A-AATRecommended Engine Coolant
Use a high quality ethylene-glycol coolant in a
50/50 mix with water. The engine coolant should
be compatible with aluminum engine parts.
Additional corrosion inhibitors or additives should
not be used. The cooling system must be
maintained with the correct concentration and
type of engine coolant to prevent freezing and
corrosion. Never allow the concentration of
antifreeze to exceed the 60% level or go below
the 35% level, or damage to the cooling system
may result. For proper concentration when
adding or replacing the engine coolant, refer to
the following table.
G050B01Y
CAUTION:Engine coolant can damage the finish of
your car. If you spill engine coolant on the
car, wash it off thoroughly with clean water.
1. Park the car on level ground, set the park-
ing brake and remove the radiator cap when
cool.
2. Be sure your drain receptacle is in place.
Open the drain cock on the radiator. Allow all
the engine coolant to drain from the cooling
system, then securely close the drain cock.
3. Check Section 9 for the capacity of the
cooling system in your car. Then, following
the manufacturer's directions on the engine
coolant container, add the appropriate quan-
tity of coolant to the radiator.
!