battery Hyundai Terracan 2003 User Guide
[x] Cancel search | Manufacturer: HYUNDAI, Model Year: 2003, Model line: Terracan, Model: Hyundai Terracan 2003Pages: 349, PDF Size: 4.56 MB
Page 126 of 349
WHAT TO DO IN AN EMERGENCY
3-2 tinue to apply water to the affected area with a sponge or cloth.
o The gas produced by the battery during the
jump-start operation is highly explosive. Do not smoke or allow a spark or an open flame in the vicinity.
o The battery being used to provide the jump
start must be 12-volt. If you cannot determine that it is a 12-volt battery, do not attempt to use it for the jump start.
o To jump start a car with a discharged battery,
follow this procedure exactly:
1. If the booster battery is installed in another vehicle, be sure the two vehicles are nottouching.
2. Turn off all unnecessary lights and acces-
sories in both vehicles.
3. Attach the clamps of the jumper cable in the
exact location shown in the illustration. First, attach one clamp of the jumper cable to the positive (+) post or cable of the discharged battery. Then attach the other end of the same cable to the positive (+) post or cable of the booster battery. Next, using the other cable, attach one clamp to the negative (-) post or cable of the booster battery. Then attach the other end of that cable to a solid metal part of the engine away from the battery. Do not connect the cable to any moving part.
4. Start the engine in the car with the booster battery and let it run for a few minutes. This will help to assure that the booster battery is fully charged. During the jumping operation,run the engine in this vehicle at about 2000 rpm.
5. Start the engine in the car with the discharged battery using the normal starting procedure. After the engine starts, leave the jumper cables connected and let the engine run at fast idle or about 2000 rpm for several min- utes.
6. Carefully remove the jumper cables in the reverse order of attachment.
If you do not know why your battery became discharged (because the lights were left on, etc.), have the charging system checked by your Hyundai dealer. visible loss of coolant and no steam, leave theengine running and check to be sure the engine cooling fan is operating. If the fan is not running, turn the engine off.
4. Check to see if the water pump drive belt is
missing. If it is not missing, check to see that it is tight. If the drive belt seems to be satis- factory, check for engine coolant leaking from the radiator, hoses or under the car. (If the air conditioning had been in use, it is normal for cold water to be draining from it when you stop).
WARNING: While the engine is running, keep hands and clothing away from moving parts such as the fan and drive belts to prevent injury.
5. If the water pump drive belt is broken or coolant is leaking out, stop the engine im- mediately and call the nearest Hyundai deal- er for assistance.
WARNING: Do not remove the radiator cap when the engine is hot. This can allow coolant to be blown out of the opening and cause serious burns.
6. If you cannot find the cause of the overheat- ing, wait until the engine temperature has returned to normal. Then, if coolant has been lost, carefully add coolant to the reservoir (Page 6-8) to bring the fluid level in the reser- voir up to the halfway mark.
D030A01HP-AAT IF THE ENGINE OVERHEATS If your temperature gauge indicates overheating, you experience a loss of power, or hear loud pinging or knocking, the engine is probably too hot. If this happens to you, you should:
1. Pull off the road and stop as soon as it is safe
to do so.
2. Place the gear selector lever in "P" (auto- matic), or neutral (manual transmission) and set the parking brake. If the air conditioning is on, turn it off.
3. If engine coolant is running out under the car or steam is coming out from under the hood, stop the engine. Do not open the hood until the engine coolant has stopped running or the steaming has stopped. If there is no
Page 137 of 349
CORROSION PREVENTION AND APPEARANCE CARE 4-3
tion, tree resin, insects and bird droppings, when not removed immediately. If water alone is not strong enough to remove the accumulated dirt, use a mild car washing solution. Be sure to rinse the surface after washing to remove the solution. Never allow the solution to dry on the painted surfaces.
E030D01A-AAT When to Wax Again You should polish and wax the car again when water no longer beads on a clean surface but spreads out over a larger area. E030E01A-AAT Maintaining Bumpers Special precautions must be observed to pre- serve the appearance of the bumpers on your Hyundai. They are:
o Be careful not to spill battery electrolyte or
hydraulic brake fluid on the bumpers. If you do, wash it off immediately with clean water.
o Be gentle when cleaning the bumper sur- faces. They are made of soft plastic and the surface can be damaged if mistreated. Do not use abrasive cleaners. Use warm water and mild soap or car-washing solution.
o Do not expose the bumpers to high tem-
peratures. For example, if you have your car repainted, do not leave the bumpers on the car if the car is going to be placed in a high- temperature paint booth.
E040A01A-AAT CLEANING THE INTERIOR To Clean the Vinyl Upholstery To clean the vinyl upholstery, first remove loose dirt and dust with a vacuum cleaner. Then apply a solution of mild soap or detergent and water using a clean sponge or soft cloth. Allow this to stay on the surface to loosen the dirt, then wipe with a clean damp sponge or cloth. If all the dirt stains are not removed, repeat this procedure until the upholstery is clean. Do not use gasoline, solvent, paint thinner or other strong cleaners.
E030B01A-AAT Spot CleaningDon’t use gasoline, strong solvents or corrosive cleaning agents. These can damage the finish of the car. To remove road tar, use turpentine on a clean, soft cloth or commercially available bug and tar remover. Be gentle. To remove dead insects or tree sap, use warm water and mild soap or car-washing solution. Soak the spot and rub gently. If the paint has lost its luster, use a commercial car-cleaning polish. E030C01A-AAT Polishing and Waxing Always wash and dry the car before polishing or waxing or using a combination cleaner and wax. Use a good quality commercial product and follow the manufacturer’s directions on the con- tainer. Polish and wax the bright trim pieces as well as the paint. E040B01A-AAT To Clean the Leather Upholstery (If installed) In the normal course of use, leather upholsteredsurfaces will, like any material, pick-up dust and dirt. This dust and dirt must be cleaned off or it may work into the surface of the leather, causing damage. Fine leather needs care, and should be cleaned when necessary. Washing leather thoroughly with soap and water will keep your leather lus- trous, beautiful and ensure you have many years of wear. Take a piece of cheese cloth and using any mild soap and lukewarm water, work up a good lather. Thoroughly wash the leather. Wipe clean with a slightly damp cloth and dry with soft cloth. Do this as often as the leather becomes soiled. During tanning operations, sufficient oils are in- corporated through processing that none need be applied during the life of the leather. Oil applied to the finished surface will in no way help the leather and may do more harm than good. Varnishes and furniture polishes should never be used under any conditions.
Page 147 of 349
DO-IT-YOURSELF MAINTENANCE 6-1
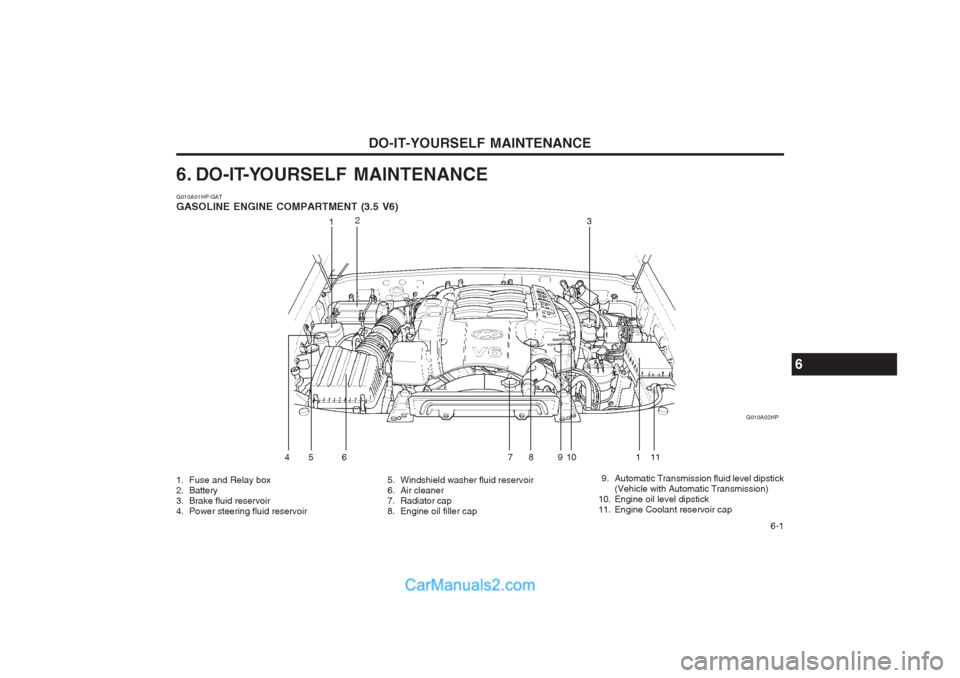
6. DO-IT-YOURSELF MAINTENANCE G010A01HP-GAT GASOLINE ENGINE COMPARTMENT (3.5 V6)
1. Fuse and Relay box
2. Battery
3. Brake fluid reservoir
4. Power steering fluid reservoir5. Windshield washer fluid reservoir
6. Air cleaner
7. Radiator cap
8. Engine oil filler cap 9. Automatic Transmission fluid level dipstick
(Vehicle with Automatic Transmission)
10. Engine oil level dipstick
11. Engine Coolant reservoir cap G010A02HP
1
2
3
4 5 6 7 8 9 10 11
6
1
Page 148 of 349
DO-IT-YOURSELF MAINTENANCE
6-2
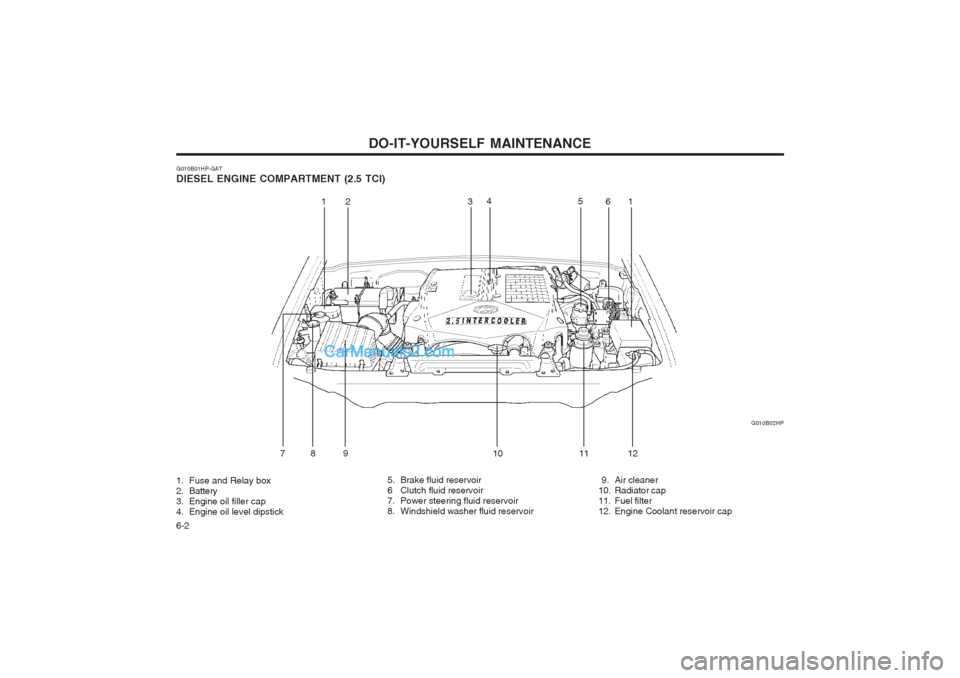
G010B01HP-GAT DIESEL ENGINE COMPARTMENT (2.5 TCI) G010B02HP
1. Fuse and Relay box
2. Battery
3. Engine oil filler cap
4. Engine oil level dipstick 5. Brake fluid reservoir
6 Clutch fluid reservoir
7. Power steering fluid reservoir
8. Windshield washer fluid reservoir
9. Air cleaner
10. Radiator cap
11. Fuel filter
12. Engine Coolant reservoir cap
12 3
4
56
78 9 1 0 11 121
Page 149 of 349
DO-IT-YOURSELF MAINTENANCE 6-3
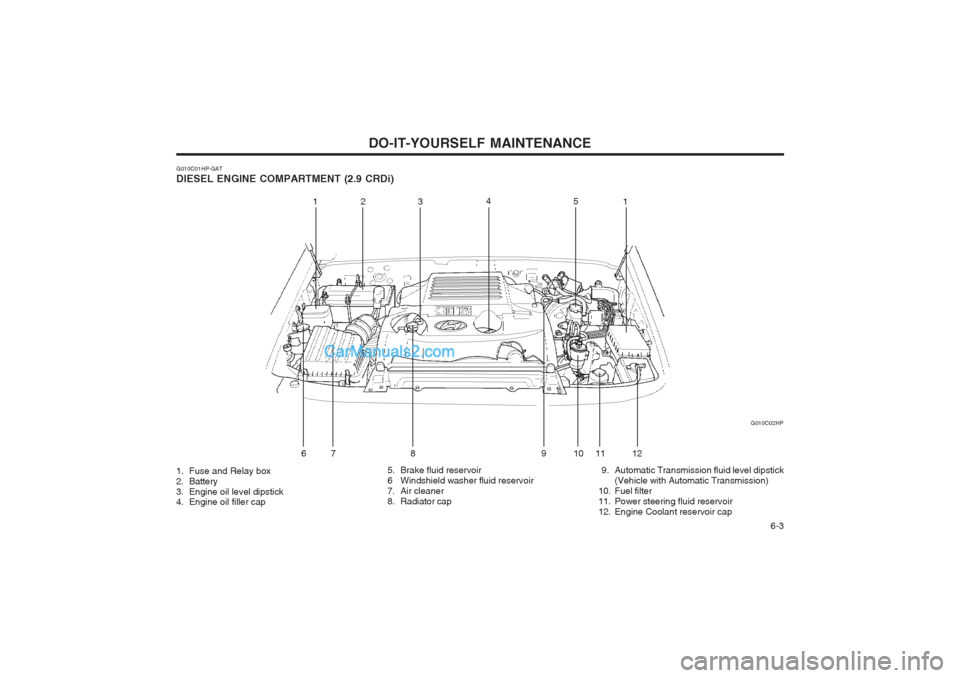
G010C01HP-GAT DIESEL ENGINE COMPARTMENT (2.9 CRDi) G010C02HP
1. Fuse and Relay box
2. Battery
3. Engine oil level dipstick
4. Engine oil filler cap 5. Brake fluid reservoir
6 Windshield washer fluid reservoir
7. Air cleaner
8. Radiator cap
9. Automatic Transmission fluid level dipstick
(Vehicle with Automatic Transmission)
10. Fuel filter
11. Power steering fluid reservoir
12. Engine Coolant reservoir cap
12 3 4
5
6 7 8 9 11 121
10
Page 150 of 349
DO-IT-YOURSELF MAINTENANCE
6-4
G020A01A-AAT GENERAL CHECKS Engine Compartment The following should be checked regularly:
o Engine oil level and condition
o Transmission fluid level and condition
o Brake fluid level
o Clutch fluid level
o Engine coolant level
o Windshield washer fluid level
o Accessory drive belt condition
o Engine coolant hose condition
o Fluid leaks (on or below components)
o Power steering fluid level
o Battery condition
o Air filter condition G020B01A-AAT Vehicle Exterior The following should be checked monthly:
o Overall appearance and condition
o Wheel condition and wheel nut torque
o Exhaust system condition
o Light condition and operation
o Windshield glass condition
o Wiper blade condition
o Paint condition and body corrosion
o Fluid leaks
o Door and hood lock condition
o Tire pressure and condition (including
spare tire) G020C01A-AAT Vehicle InteriorThe following should be checked each time when the vehicle is driven:
o Lights operation
o Windshield wiper operation
o Horn operation
o Defroster, heating system operation (and air
conditioning, if installed)
o Steering operation and condition
o Mirror condition and operation
o Turn signal operation
o Accelerator pedal operation
o Brake operation, including parking brake
o Manual transmission operation, including clutch operation
o Automatic transmission operation, including "Park" mechanism operation
o Seat control condition and operation
o Seat belt condition and operation
o Sunvisor operation If you notice anything that does not operate correctly or appears to be functioning incorrect- ly, inspect it carefully and seek assistance from your Hyundai dealer if service is needed. G030A01A-AAT CHECKING THE ENGINE OILEngine oil is essential to the performance and service of the engine. It is suggested that you check the oil level at least once a week in normal use and more often if you are on a trip or driving in severe conditions. G030B03HP-GAT Recommended Oil 1. Gasoline Engine
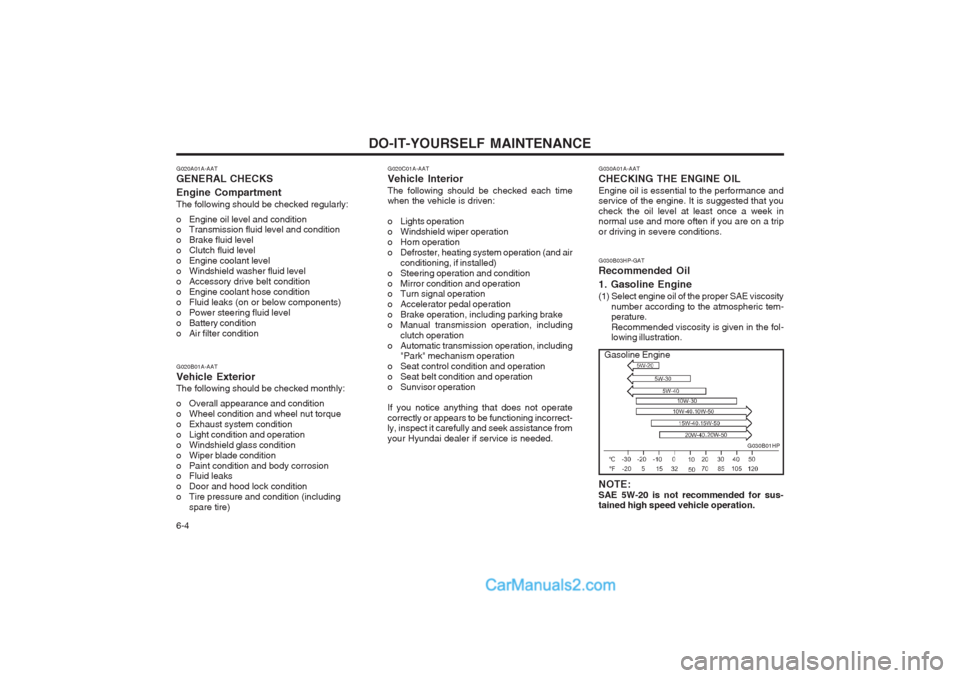
(1) Select engine oil of the proper SAE viscosity
number according to the atmospheric tem- perature. Recommended viscosity is given in the fol- lowing illustration.
G030B01HP
NOTE: SAE 5W-20 is not recommended for sus- tained high speed vehicle operation.
Gasoline Engine
Page 164 of 349
DO-IT-YOURSELF MAINTENANCE
6-18
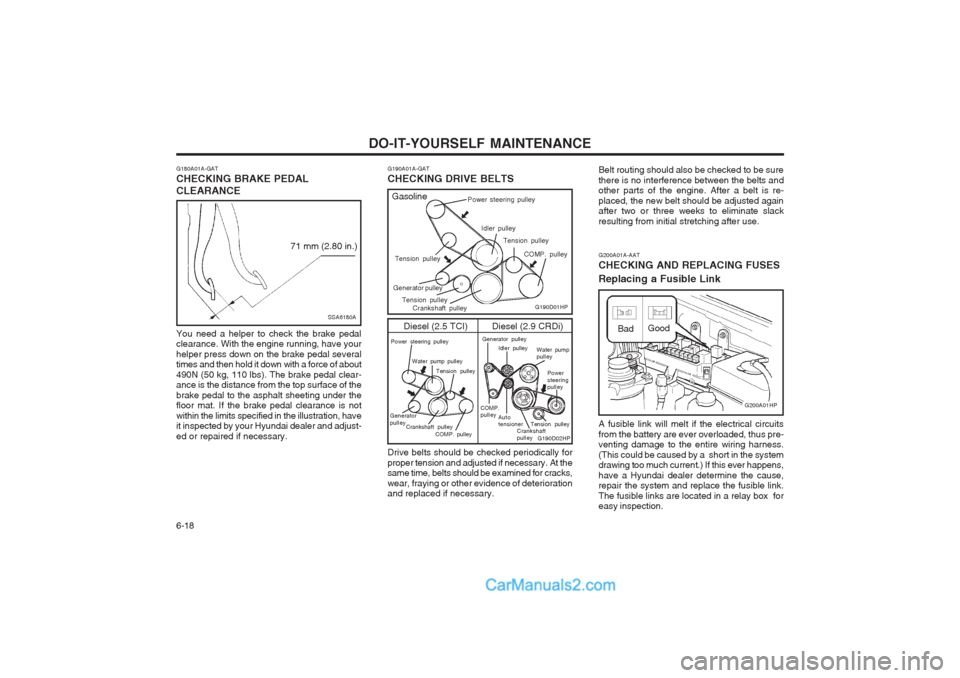
G200A01A-AAT CHECKING AND REPLACING FUSES Replacing a Fusible Link A fusible link will melt if the electrical circuits from the battery are ever overloaded, thus pre- venting damage to the entire wiring harness. (This could be caused by a short in the system drawing too much current.) If this ever happens, have a Hyundai dealer determine the cause, repair the system and replace the fusible link. The fusible links are located in a relay box for easy inspection.
G200A01HP
Bad
Good
Belt routing should also be checked to be sure there is no interference between the belts and other parts of the engine. After a belt is re- placed, the new belt should be adjusted again after two or three weeks to eliminate slack resulting from initial stretching after use.
G190A01A-GAT CHECKING DRIVE BELTS Drive belts should be checked periodically for proper tension and adjusted if necessary. At the same time, belts should be examined for cracks, wear, fraying or other evidence of deterioration and replaced if necessary. Diesel (2.5 TCI)
G190D01HP
G190D02HP
Gasoline
Generator pulley
Idler pulley Water pump pulley
COMP.pulley Autotensioner
Crankshaft pulley
Diesel (2.9 CRDi)
Crankshaft pulleyCOMP. pulley
Generator pulley Power steering pulley
Idler pulley Tension pulley
COMP. pulley
Power steering pulley
Water pump pulley Tension pulley Power steering pulley
Crankshaft pulleyTension pulleyGenerator pulley
Tension pulley
Tension pulley
G180A01A-GAT CHECKING BRAKE PEDAL CLEARANCE You need a helper to check the brake pedal clearance. With the engine running, have your helper press down on the brake pedal several times and then hold it down with a force of about 490N (50 kg, 110 lbs). The brake pedal clear- ance is the distance from the top surface of the brake pedal to the asphalt sheeting under the floor mat. If the brake pedal clearance is not within the limits specified in the illustration, have it inspected by your Hyundai dealer and adjust- ed or repaired if necessary.
SSA6180A
71 mm (2.80 in.)
Page 166 of 349
DO-IT-YOURSELF MAINTENANCE
6-20
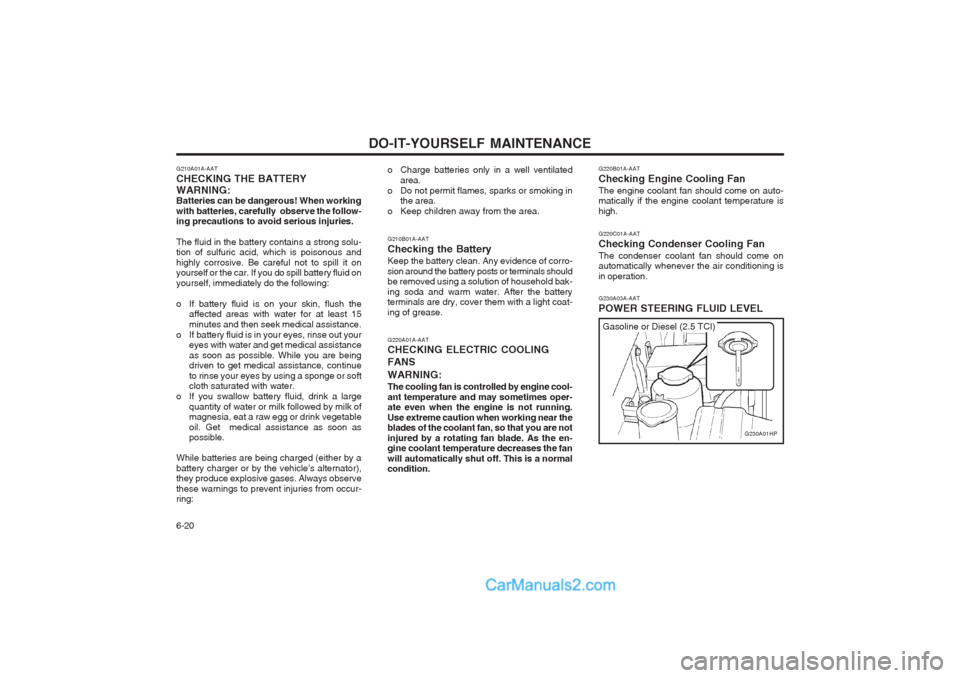
G220B01A-AAT Checking Engine Cooling FanThe engine coolant fan should come on auto- matically if the engine coolant temperature is high. G220C01A-AAT Checking Condenser Cooling FanThe condenser coolant fan should come on automatically whenever the air conditioning is in operation. G230A03A-AAT POWER STEERING FLUID LEVEL
G230A01HP
Gasoline or Diesel (2.5 TCI)
o Charge batteries only in a well ventilated
area.
o Do not permit flames, sparks or smoking in the area.
o Keep children away from the area. G210B01A-AAT Checking the BatteryKeep the battery clean. Any evidence of corro- sion around the battery posts or terminals should be removed using a solution of household bak- ing soda and warm water. After the battery terminals are dry, cover them with a light coat- ing of grease. G220A01A-AAT CHECKING ELECTRIC COOLING FANS WARNING: The cooling fan is controlled by engine cool- ant temperature and may sometimes oper- ate even when the engine is not running. Use extreme caution when working near the blades of the coolant fan, so that you are not injured by a rotating fan blade. As the en- gine coolant temperature decreases the fan will automatically shut off. This is a normal condition.
G210A01A-AAT CHECKING THE BATTERYWARNING: Batteries can be dangerous! When working with batteries, carefully observe the follow- ing precautions to avoid serious injuries. The fluid in the battery contains a strong solu- tion of sulfuric acid, which is poisonous and highly corrosive. Be careful not to spill it on yourself or the car. If you do spill battery fluid on yourself, immediately do the following:
o If battery fluid is on your skin, flush the
affected areas with water for at least 15 minutes and then seek medical assistance.
o If battery fluid is in your eyes, rinse out your eyes with water and get medical assistanceas soon as possible. While you are being driven to get medical assistance, continue to rinse your eyes by using a sponge or soft cloth saturated with water.
o If you swallow battery fluid, drink a large quantity of water or milk followed by milk ofmagnesia, eat a raw egg or drink vegetable oil. Get medical assistance as soon as possible.
While batteries are being charged (either by a battery charger or by the vehicle’s alternator), they produce explosive gases. Always observe these warnings to prevent injuries from occur- ring:
Page 178 of 349
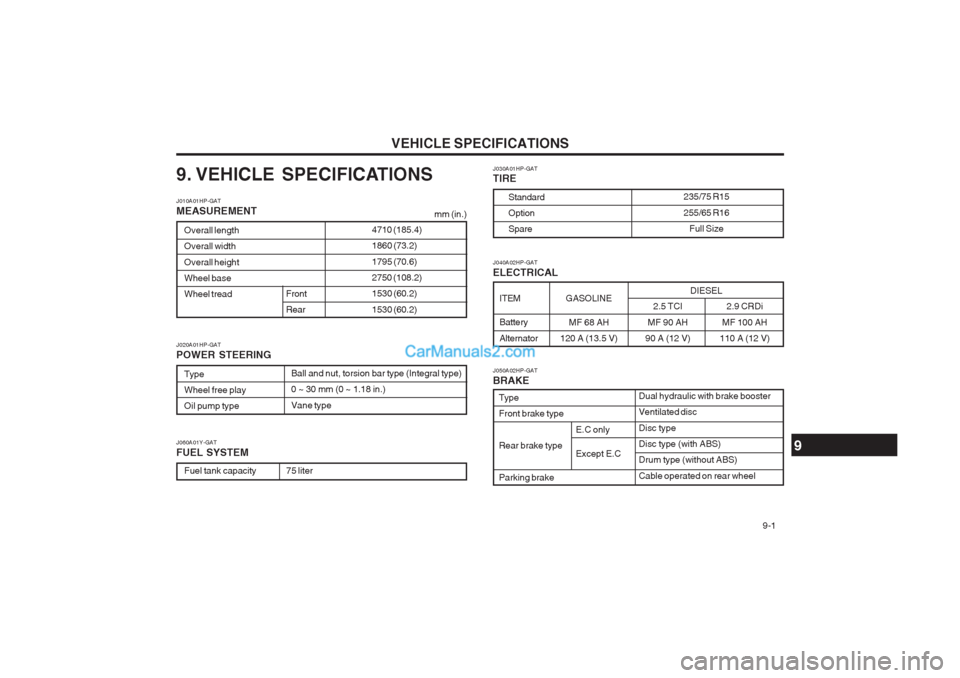
VEHICLE SPECIFICATIONS 9-1
GASOLINE
MF 68 AH
120 A (13.5 V)
9. VEHICLE SPECIFICATIONS J010A01HP-GAT MEASUREMENT
Overall length Overall width Overall height Wheel baseWheel tread
Front Rear
Type Wheel free playOil pump type
Ball and nut, torsion bar type (Integral type)0 ~ 30 mm (0 ~ 1.18 in.) Vane type
J020A01HP-GAT POWER STEERING J030A01HP-GAT TIRE
Standard OptionSpare235/75 R15 255/65 R16
Full Size
J050A02HP-GAT BRAKE Dual hydraulic with brake booster Ventilated disc Disc type Disc type (with ABS)Drum type (without ABS) Cable operated on rear wheel
Type Front brake type Rear brake typeParking brake
J060A01Y-GAT FUEL SYSTEM
Fuel tank capacity75 liter mm (in.)
4710 (185.4) 1860 (73.2) 1795 (70.6) 2750 (108.2)1530 (60.2) 1530 (60.2)
ITEM Battery Alternator
J040A02HP-GAT ELECTRICAL
2.5 TCI
MF 90 AH
90 A (12 V)
9
2.9 CRDi
MF 100 AH
110 A (12 V)
DIESEL
E.C only Except E.C
Page 182 of 349
INDEX 10-1
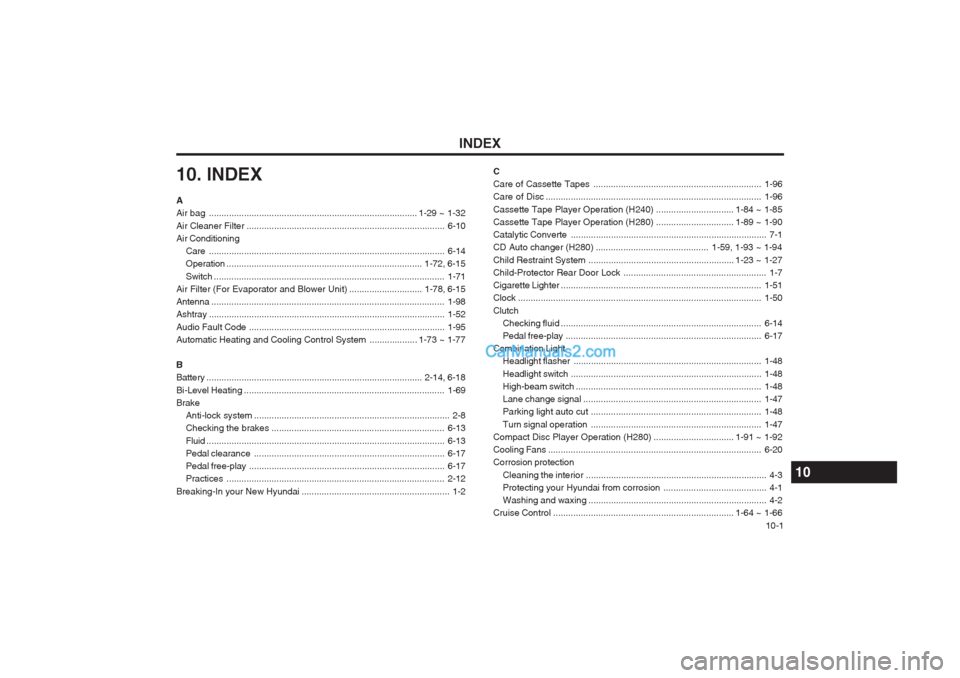
A Air bag
................................................................................... 1-29 ~ 1-32
Air Cleaner Filter ............................................................................... 6-10
Air Conditioning Care .............................................................................................. 6-14
Operation .............................................................................. 1-72, 6-15
Switch ............................................................................................ 1-71
Air Filter (For Evaporator and Blower Uni t) ............................. 1-78, 6-15
Antenna ............................................................................................. 1-98
Ashtray .............................................................................................. 1-52
Audio Fault Code .............................................................................. 1-95
Automatic Heating and Cooling Control System ................... 1-73 ~ 1-77
BBattery ...................................................................................... 2-14, 6-18
Bi-Level Heating ................................................................................ 1-69
Brake
Anti-lock system .............................................................................. 2-8
Checking the brakes ..................................................................... 6-13
Fluid ............................................................................................... 6-13
Pedal clearance ............................................................................ 6-17
Pedal free-play .............................................................................. 6-17
Practices ....................................................................................... 2-12
Breaking-In your New Hyundai ........................................................... 1-2 CCare of Cass
ette Tapes ................................................................... 1-96
Care of Disc ...................................................................................... 1-96
Cassette Tape Player Operation (H240) ............................... 1-84 ~ 1-85
Cassette Tape Player Operation (H280) ............................... 1-89 ~ 1-90
Catalytic Con verte .............................................................................. 7-1
CD Auto changer (H280) ............................................. 1-59, 1-93 ~ 1-94
Child Restraint System .......................................................... 1-23 ~ 1-27
Child-Protector Rear Door Lock ......................................................... 1-7
Cigarette Lighter ................................................................................ 1-51
Clock ................................................................................................. 1-50
Clutch Checking fluid ................................................................................ 6-14
Pedal free-play .............................................................................. 6-17
Combination Light Headlight flasher ........................................................................... 1-48
Headlight switch ............................................................................ 1-48
High-beam switch .......................................................................... 1-48
Lane change signal ....................................................................... 1-47
Parking light auto cut .................................................................... 1-48
Turn signal operation .................................................................... 1-47
Compact Disc Player Operation (H280) ................................ 1-91 ~ 1-92
Cooling Fans ..................................................................................... 6-20
Corrosion protection
Cleaning the interior ........................................................................ 4-3
Protecting your Hyundai from corrosion ......................................... 4-1Washing and waxing ....................................................................... 4-2
Cruise Control ........................................................................ 1-64 ~ 1-66
10. INDEX
10