adding oil Hyundai Terracan 2003 Owner's Manual
[x] Cancel search | Manufacturer: HYUNDAI, Model Year: 2003, Model line: Terracan, Model: Hyundai Terracan 2003Pages: 349, PDF Size: 4.56 MB
Page 145 of 349
VEHICLE MAINTENANCE REQUIREMENTS 5-7
F060A01A-AAT EXPLANATION OF SCHEDULED MAIN- TENANCE ITEMS F060M01A-AAT o Engine Oil and FilterThe engine oil and filter should be changed at
the intervals specified in the maintenance sched- ule. If the car is being driven in severe condi- tions, more frequent oil and filter changes are required. F060B01A-AAT
o Drive BeltsInspect all drive belts for evidence of cuts, cracks, excessive wear or oil saturation and replace if necessary. Drive belts should be checked periodically for proper tension and adjusted as necessary. F060C01A-AAT
o Fuel Filter A clogged filter can limit the speed at which the vehicle may be driven, damage the emission system and cause hard starting. If an exces- sive amount of foreign matter accumulates in the fuel tank, the filter may require replacement more frequently.After installing a new filter, run the engine for several minutes, and check for leaks at the connections. Fuel filters should be installed by trained technicians.
F060D01A-AAT
o Fuel Lines, Fuel Hoses and Connec-
tions
Check the fuel lines, fuel hoses and connec- tions for leakage and damage. Have a trained technician replace any damaged or leaking parts immediately. F060E01A-AAT
o Timing BeltInspect all parts related to the timing belt for damage and deformation. Replace any dam- aged parts immediately. F060G01A-AAT
o Vapor Hose and Fuel Filler CapThe vapor hose and fuel filler cap should be inspected at those intervals specified in the maintenance schedule. Make sure that a new vapor hose or fuel filler cap is correctly re- placed. F060F01A-AAT
o Vacuum, Crankcase
Ventilation Hoses
Inspect the surface of hoses for evidence ofheat and/or mechanical damage. Hard and brit- tle rubber, cracking, tears, cuts, abrasions, and excessive swelling indicate deterioration. Par- ticular attention should be paid to examine those hose surfaces nearest to high heat sourc- es, such as the exhaust manifold. Inspect the hose routing to assure that thehoses do not come in contact with any heat source, sharp edges or moving component which might cause heat damage or mechanical wear. Inspect all hose connections, such as clamps and couplings, to make sure they are secure, and that no leaks are present. Hoses should be replaced immediately if there is any evidence of deterioration or damage. F060H01A-AAT o Air Cleaner FilterA Genuine Hyundai air cleaner filter is recom- mended when the filter is replaced. F060J01A-AAT o Spark PlugsMake sure to install new spark plugs of the correct heat range. F070C01A-AAT o Engine CoolantThe coolant should be changed at the intervals specified in the maintenance sched- ule. F070D01A-AAT o Manual Transmission OilInspect the manual transmission oil according to the maintenance schedule. NOTE: If the oil level is low, check for possible leaks before adding oil. Do not overfill.
Page 146 of 349
VEHICLE MAINTENANCE REQUIREMENTS
5- 8
F070E01HP-GAT
o Automatic Transmission Fluid and
Filter
The fluid level should be in the "HOT" range of the dipstick, after the engine and transmission are at normal operating temperature. Check the automatic transmission fluid level with the en- gine running and the transmission in neutral, with the parking brake properly applied. Use DEXRON- II or III when adding or changing
fluid. F070F01A-AAT
o Brake Hoses and LinesVisually check for proper installation, chafing, cracks, deterioration and any leakage. Replace any deteriorated or damaged parts immediate- ly. F070G02A-AAT o Brake FluidCheck brake fluid level in the brake fluid reser- voir. The level should be between "MIN" and "MAX" marks on the side of the reservoir. Use only hydraulic brake fluid conforming to DOT 3 or DOT 4. F070H01A-AAT
o Rear Brake Drums/ Linings,
Parking Brake
Check the rear brake drums and linings for scoring, burning, leaking fluid, broken parts, and excessive wear. Inspect the parking brake system including the parking brake lever and cables. For detailed service procedures, refer to the Shop Manual. F070J01A-AAT o Brake Pads, Calipers and RotorsCheck the pads for excessive wear, discs for run out and wear, and calipers for fluid leakage. F070K01A-AAT o Exhaust Pipe and Muffler Visually inspect the exhaust pipes, muffler and hangers for cracks, deterioration, or damage. Start the engine and listen carefully for any exhaust gas leakage. Tighten connections or replace parts as necessary. F070L01A-AAT o Suspension Mounting BoltsCheck the suspension connections for loose- ness or damage. Retighten to the specified torque. F070N01A-AAT
o Power Steering Pump, Belt and
Hoses
Check the power steering pump and hoses for leakage and damage. Replace any damaged or leaking parts immediately. Inspect the power steering belt for evidence of cuts, cracks, ex- cessive wear, oiliness and proper tension. Re- place or adjust it if necessary. F070P01A-AAT o Driveshafts and Boots Check the drive shafts, boots and clamps for cracks, deterioration, or damage. Replace any damaged parts and, if necessary, repack the grease. F070Q01A-AAT
o Air Conditioning RefrigerantCheck the air conditioning lines and connec- tions for leakage and damage. Check air condi- tioning performance according to the relevant shop manual if necessary.
F070M01B-AAT
o Steering Gear Box, Linkage & Boots/
Lower Arm Ball Joint, Upper Arm Ball Joint
With the vehicle stopped and engine off, check for excessive free-play in the steering wheel. Check the linkage for bends or damage. Check the dust boots and ball joints for deterioration, cracks, or damage. Replace any damaged parts.
Page 151 of 349
DO-IT-YOURSELF MAINTENANCE 6-5
G030B02HP
(2) The engine oil quality should meet the fol-
lowing API classification. Europe : SG, SG/CD, SH OR SH/CD Except Europe : SE or ABOVE
2. Diesel Engine
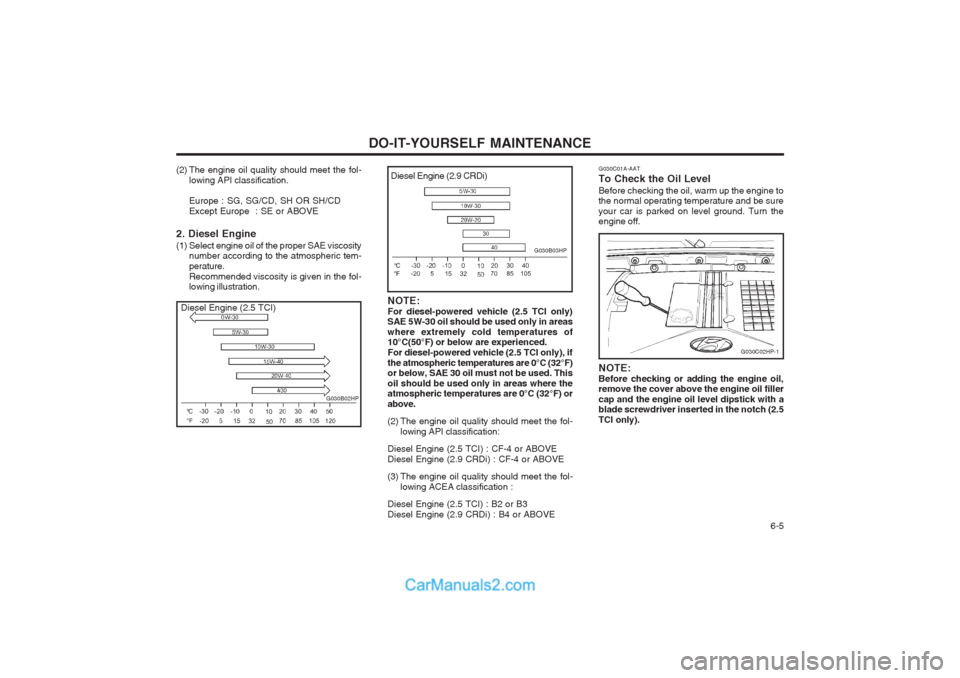
(1) Select engine oil of the proper SAE viscosity number according to the atmospheric tem- perature.Recommended viscosity is given in the fol- lowing illustration.
NOTE: For diesel-powered vehicle (2.5 TCI only) SAE 5W-30 oil should be used only in areas where extremely cold temperatures of 10°C(50°F) or below are experienced. For diesel-powered vehicle (2.5 TCI only), ifthe atmospheric temperatures are 0°C (32°F) or below, SAE 30 oil must not be used. This oil should be used only in areas where the atmospheric temperatures are 0°C (32°F) or above.
(2) The engine oil quality should meet the fol-lowing API classification:
Diesel Engine (2.5 TCI) : CF-4 or ABOVE Diesel Engine (2.9 CRDi) : CF-4 or ABOVE
(3) The engine oil quality should meet the fol- lowing ACEA classification :
Diesel Engine (2.5 TCI) : B2 or B3 Diesel Engine (2.9 CRDi) : B4 or ABOVE
G030B03HP
Diesel Engine (2.5 TCI) Diesel Engine (2.9 CRDi)
G030C01A-AAT To Check the Oil LevelBefore checking the oil, warm up the engine to the normal operating temperature and be sure your car is parked on level ground. Turn the engine off.
G030C02HP-1
NOTE: Before checking or adding the engine oil, remove the cover above the engine oil filler cap and the engine oil level dipstick with a blade screwdriver inserted in the notch (2.5 TCI only).
Page 152 of 349
DO-IT-YOURSELF MAINTENANCE
6-6
G350A01A-GAT ENGINE OIL CONSUMPTION Function of Engine Oil Engine oil has the primary function of lubricat- ing and cooling the inside of the engine. Engine oil consumption It is normal that an engine should consume
some engine oil while normal driving. The cause of oil consumption in a normal engine are as follows;
o Engine oil is used to lubricate pistons, piston rings and cylinders. A thin film of oil is left on the cylinder wall
when a piston moves downwards in the cylinder. High negative pressure generated during engine operation sucks some of the oil into the combustion chamber. This oil with some oil of the cylinder wall is
burned by the high temperature combustion gases during the combustion process.
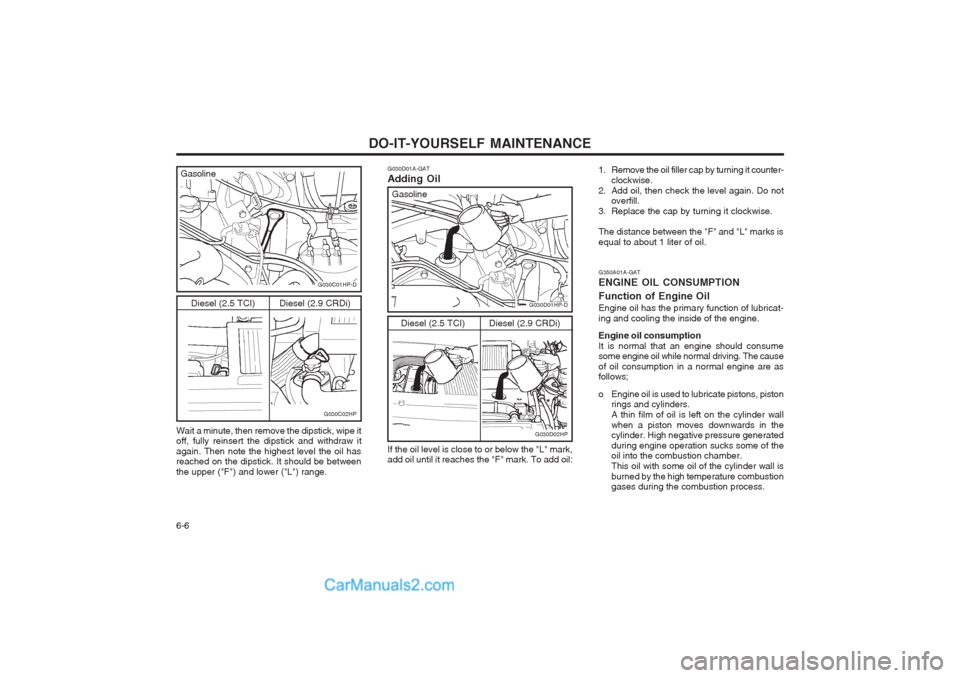
1. Remove the oil filler cap by turning it counter-
clockwise.
2. Add oil, then check the level again. Do not overfill.
3. Replace the cap by turning it clockwise. The distance between the "F" and "L" marks is equal to about 1 liter of oil.
G030D01A-GAT Adding Oil
G030D01HP-D
Gasoline
G030D02HP
Diesel (2.9 CRDi)
Diesel (2.5 TCI)
G030C01HP-D
G030C02HP
Diesel (2.9 CRDi)
Diesel (2.5 TCI)
Gasoline
Wait a minute, then remove the dipstick, wipe it off, fully reinsert the dipstick and withdraw it again. Then note the highest level the oil has reached on the dipstick. It should be between the upper ("F") and lower ("L") range. If the oil level is close to or below the "L" mark, add oil until it reaches the "F" mark. To add oil:
Page 154 of 349
DO-IT-YOURSELF MAINTENANCE
6-8
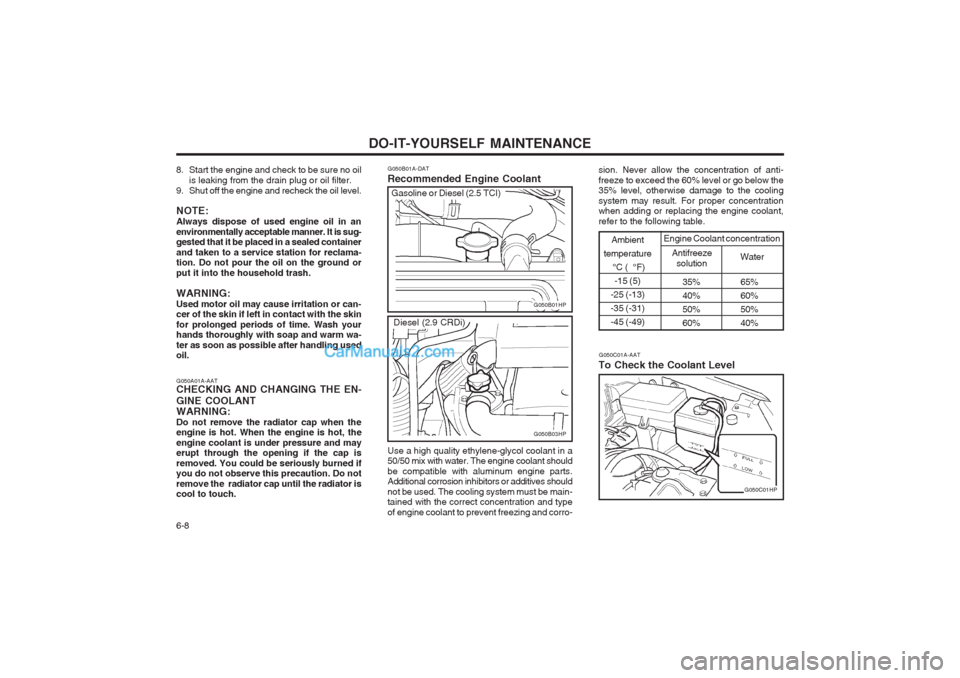
G050B01A-DAT Recommended Engine Coolant
35% 65%
40% 60%
50% 50%
60% 40%
Ambient
temperature °C ( °F)-15 (5)
-25 (-13) -35 (-31)-45 (-49)
Antifreeze solution Water
Engine Coolant concentration
G050B01HP
G050C01A-AAT
To Check the Coolant Level
G050C01HP
Use a high quality ethylene-glycol coolant in a 50/50 mix with water. The engine coolant should be compatible with aluminum engine parts. Additional corrosion inhibitors or additives should not be used. The cooling system must be main- tained with the correct concentration and type of engine coolant to prevent freezing and corro-
Gasoline or Diesel (2.5 TCI)
G050B03HP
Diesel (2.9 CRDi) sion. Never allow the concentration of anti- freeze to exceed the 60% level or go below the 35% level, otherwise damage to the cooling system may result. For proper concentration when adding or replacing the engine coolant, refer to the following table.
8. Start the engine and check to be sure no oil
is leaking from the drain plug or oil filter.
9. Shut off the engine and recheck the oil level. NOTE: Always dispose of used engine oil in anenvironmentally acceptable manner. It is sug- gested that it be placed in a sealed container and taken to a service station for reclama- tion. Do not pour the oil on the ground or put it into the household trash. WARNING: Used motor oil may cause irritation or can- cer of the skin if left in contact with the skin for prolonged periods of time. Wash your hands thoroughly with soap and warm wa- ter as soon as possible after handling used oil. G050A01A-AAT CHECKING AND CHANGING THE EN- GINE COOLANT WARNING: Do not remove the radiator cap when the engine is hot. When the engine is hot, the engine coolant is under pressure and may erupt through the opening if the cap is removed. You could be seriously burned if you do not observe this precaution. Do not remove the radiator cap until the radiator is cool to touch.
Page 158 of 349
DO-IT-YOURSELF MAINTENANCE
6-12
G110D02HP-GAT
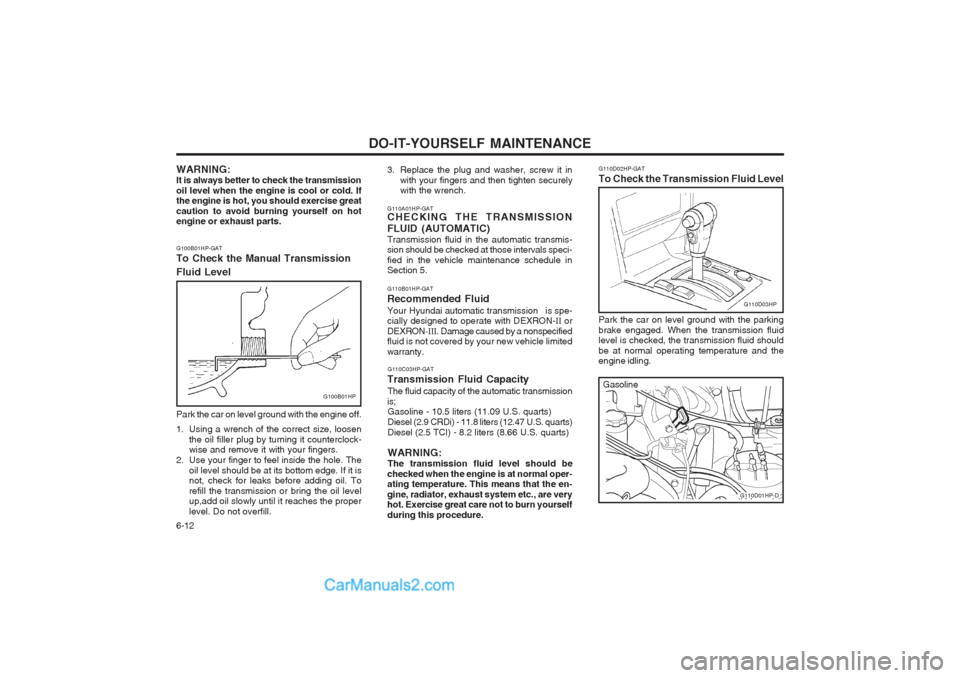
To Check the Transmission Fluid Level
G110D03HP
Park the car on level ground with the parking brake engaged. When the transmission fluid level is checked, the transmission fluid should be at normal operating temperature and the engine idling.
G110C03HP-GAT
Transmission Fluid Capacity The fluid capacity of the automatic transmission
is; Gasoline - 10.5 liters (11.09 U.S. quarts) Diesel (2.9 CRDi) - 11.8 liters (12.47 U.S. quarts)
Diesel (2.5 TCI) - 8.2 liters (8.66 U.S. quarts)
WARNING:The transmission fluid level should be
checked when the engine is at normal oper- ating temperature. This means that the en- gine, radiator, exhaust system etc., are very hot. Exercise great care not to burn yourself during this procedure.
G110A01HP-GAT
CHECKING THE TRANSMISSION FLUID (AUTOMATIC) Transmission fluid in the automatic transmis- sion should be checked at those intervals speci- fied in the vehicle maintenance schedule in Section 5. G110B01HP-GAT Recommended FluidYour Hyundai automatic transmission is spe- cially designed to operate with DEXRON- II or
DEXRON -III. Damage caused by a nonspecified
fluid is not covered by your new vehicle limited warranty.
3. Replace the plug and washer, screw it in
with your fingers and then tighten securely with the wrench.
G110D01HP-D
Gasoline
G100B01HP-GAT To Check the Manual Transmission Fluid LevelG100B01HP
WARNING: It is always better to check the transmissionoil level when the engine is cool or cold. If the engine is hot, you should exercise great caution to avoid burning yourself on hot engine or exhaust parts. Park the car on level ground with the engine off.
1. Using a wrench of the correct size, loosen
the oil filler plug by turning it counterclock- wise and remove it with your fingers.
2. Use your finger to feel inside the hole. The oil level should be at its bottom edge. If it isnot, check for leaks before adding oil. To refill the transmission or bring the oil level up,add oil slowly until it reaches the proper level. Do not overfill.
Page 311 of 349
VEHICLE MAINTENANCE REQUIREMENTS 5-7
F070E02HP-GAT
o Automatic transmission fluid and
filter
The fluid level should be in the "HOT" range of the dipstick, after engine and transmissionand filter are at normal operating temperature.Check the Automatic and filter Transmissionand filter Fluid level with the engine runningand the transmission and filter in neutral, withthe parking brake properly applied. Use MOBILDEXRON- �� when adding or changing fluid.
F070F01A-AAT
o Brake hoses and lines Visually check for proper installation, chafing, cracks, deterioration and any leakage. Re-place any deteriorated or damaged parts im-mediately. F070G02A-AAT o Brake fluidCheck brake fluid level in the brake fluid reservoir. The level should be between "MIN"and "MAX" marks on the side of the reservoir.Use only hydraulic brake fluid conforming toDOT 3 or DOT 4. F070H01HP-AAT
o Rear brake drums, linings and pads
parking brake
Check the rear brake drums, linings and pads
for scoring, burning, leaking fluid, brokenparts, and excessive wear. Inspect the park-ing brake system including the parking brakelever and cables. For detailed service proce-dures, refer to the Shop Manual.
F070J01A-AAT
o Brake pads, calipers and rotors
Check the pads for excessive wear, discs for
run out and wear, and calipers for fluid leak-age. F070K01A-AAT
o Exhaust pipe and muffler Visually inspect the exhaust pipes, muffler and hangers for cracks, deterioration, or dam-age. Start the engine and listen carefully forany exhaust gas leakage. Tighten connec-tions or replace parts as necessary. F070L01A-AAT
o Suspension mounting bolts Check the suspension connections for loose- ness or damage. Retighten to the specifiedtorque.
F060H01A-AAT
o Air cleaner filter
A Genuine Hyundai air cleaner filter is recom-mended when filter is replaced. F060J01A-AAT
o Spark plugs (For Petrol Engine) Make sure to install new spark plugs of the
correct heat range.
F070C01A-AAT
o Coolant The coolant should be changed at the intervals specified in the maintenance sched-ule. F070D01HP-AAT
o Manual transmission oil Inspect the manual transmission oil according to the maintenance schedule.
NOTE: If the oil level is low, check for possibleleaks before adding oil. Do not overfill.
Page 322 of 349
OWNER MAINTENANCE
6-10 1. To check the transmission lubricant level,
the vehicle should be placed on level ground and the level plug removed with a suitablespanner.
2. If the level is correct, lubricant should begin to drip from the plug orifice. In this case theplug should be replaced. If the level is incorrect, lubricant should be added until it begins to drip from the plugorifice at which time the plug should bereplaced.
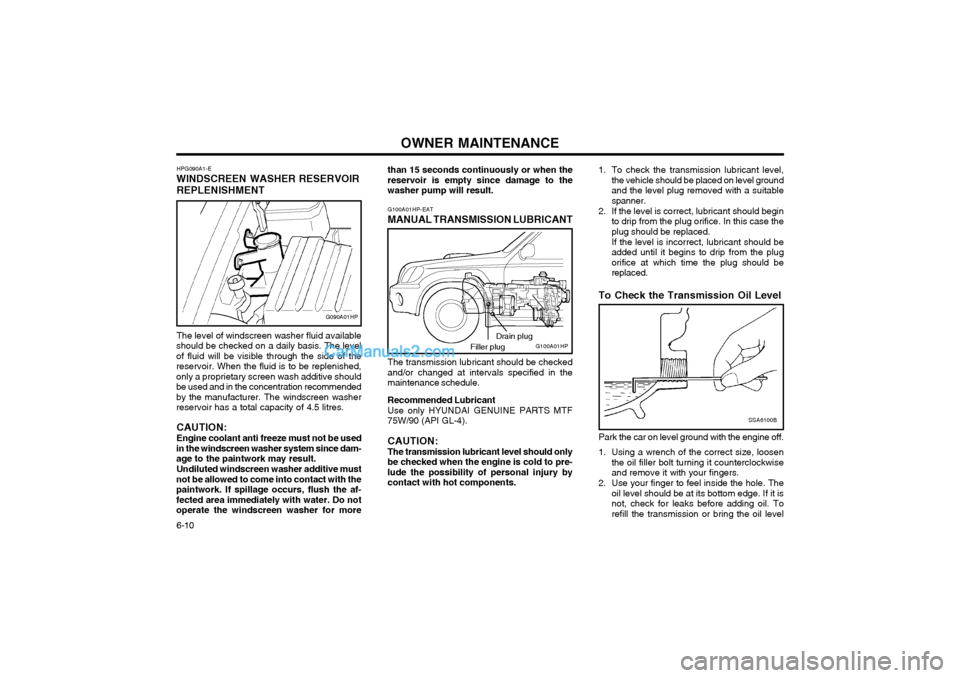
To Check the Transmission Oil Level
SSA6100B
Park the car on level ground with the engine off.
1. Using a wrench of the correct size, loosen the oil filler bolt turning it counterclockwise and remove it with your fingers.
2. Use your finger to feel inside the hole. The oil level should be at its bottom edge. If it isnot, check for leaks before adding oil. Torefill the transmission or bring the oil level
G100A01HP-EAT
MANUAL TRANSMISSION LUBRICANT
The transmission lubricant should be checkedand/or changed at intervals specified in themaintenance schedule. Recommended Lubricant Use only HYUNDAI GENUINE PARTS MTF 75W/90 (API GL-4). CAUTION: The transmission lubricant level should onlybe checked when the engine is cold to pre-lude the possibility of personal injury bycontact with hot components.
G090A01HP
HPG090A1-E
WINDSCREEN WASHER RESERVOIR
REPLENISHMENT The level of windscreen washer fluid available
should be checked on a daily basis. The level of fluid will be visible through the side of thereservoir. When the fluid is to be replenished,only a proprietary screen wash additive shouldbe used and in the concentration recommendedby the manufacturer. The windscreen washerreservoir has a total capacity of 4.5 litres.
CAUTION: Engine coolant anti freeze must not be used
in the windscreen washer system since dam- age to the paintwork may result.
Undiluted windscreen washer additive must
not be allowed to come into contact with thepaintwork. If spillage occurs, flush the af-fected area immediately with water. Do notoperate the windscreen washer for more than 15 seconds continuously or when thereservoir is empty since damage to thewasher pump will result.
G100A01HP
Drain plug
Filler plug