belt Hyundai Terracan 2003 Owner's Manual
[x] Cancel search | Manufacturer: HYUNDAI, Model Year: 2003, Model line: Terracan, Model: Hyundai Terracan 2003Pages: 349, PDF Size: 4.56 MB
Page 14 of 349
FEATURES OF YOUR HYUNDAI
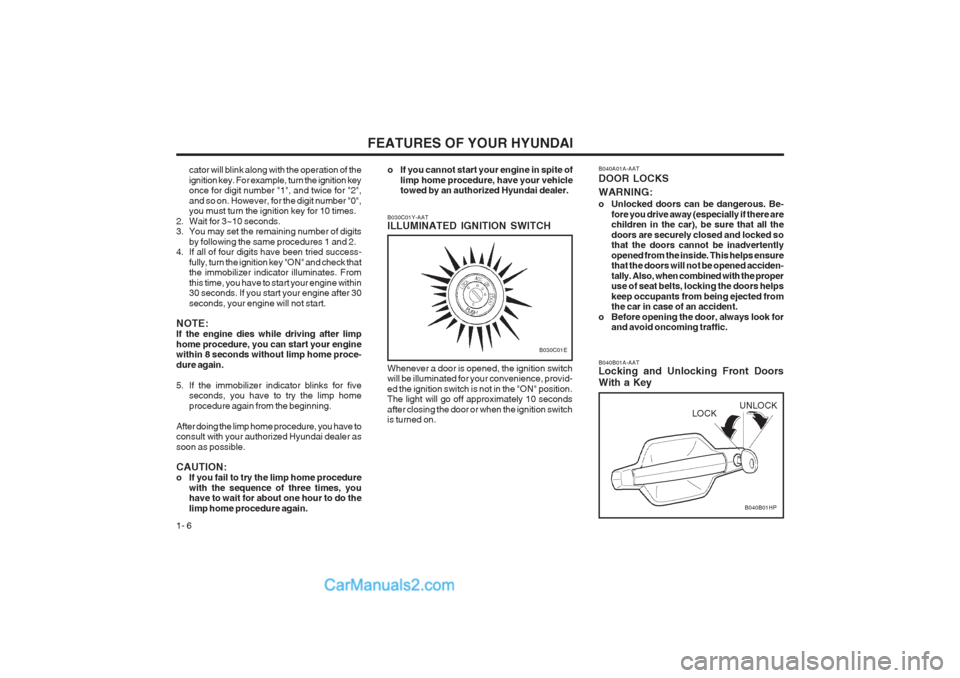
1- 6 B040B01A-AAT Locking and Unlocking Front Doors With a Key
B040B01HP
LOCK
UNLOCK
B040A01A-AAT DOOR LOCKS WARNING:
o Unlocked doors can be dangerous. Be-
fore you drive away (especially if there are children in the car), be sure that all the doors are securely closed and locked so that the doors cannot be inadvertently opened from the inside. This helps ensure that the doors will not be opened acciden- tally. Also, when combined with the proper use of seat belts, locking the doors helps keep occupants from being ejected from the car in case of an accident.
o Before opening the door, always look for and avoid oncoming traffic.
B030C01Y-AAT ILLUMINATED IGNITION SWITCH Whenever a door is opened, the ignition switch will be illuminated for your convenience, provid- ed the ignition switch is not in the "ON" position. The light will go off approximately 10 seconds after closing the door or when the ignition switch is turned on.
B030C01E
cator will blink along with the operation of the ignition key. For example, turn the ignition key once for digit number "1", and twice for "2", and so on. However, for the digit number "0", you must turn the ignition key for 10 times.
2. Wait for 3~10 seconds.
3. You may set the remaining number of digits by following the same procedures 1 and 2.
4. If all of four digits have been tried success-
fully, turn the ignition key "ON" and check thatthe immobilizer indicator illuminates. From this time, you have to start your engine within 30 seconds. If you start your engine after 30 seconds, your engine will not start.
NOTE: If the engine dies while driving after limp home procedure, you can start your engine within 8 seconds without limp home proce- dure again.
5. If the immobilizer indicator blinks for five seconds, you have to try the limp home procedure again from the beginning.
After doing the limp home procedure, you have to consult with your authorized Hyundai dealer as soon as possible. CAUTION:
o If you fail to try the limp home procedure with the sequence of three times, youhave to wait for about one hour to do the limp home procedure again. o If you cannot start your engine in spite of
limp home procedure, have your vehicle towed by an authorized Hyundai dealer.
Page 20 of 349
FEATURES OF YOUR HYUNDAI
1- 12
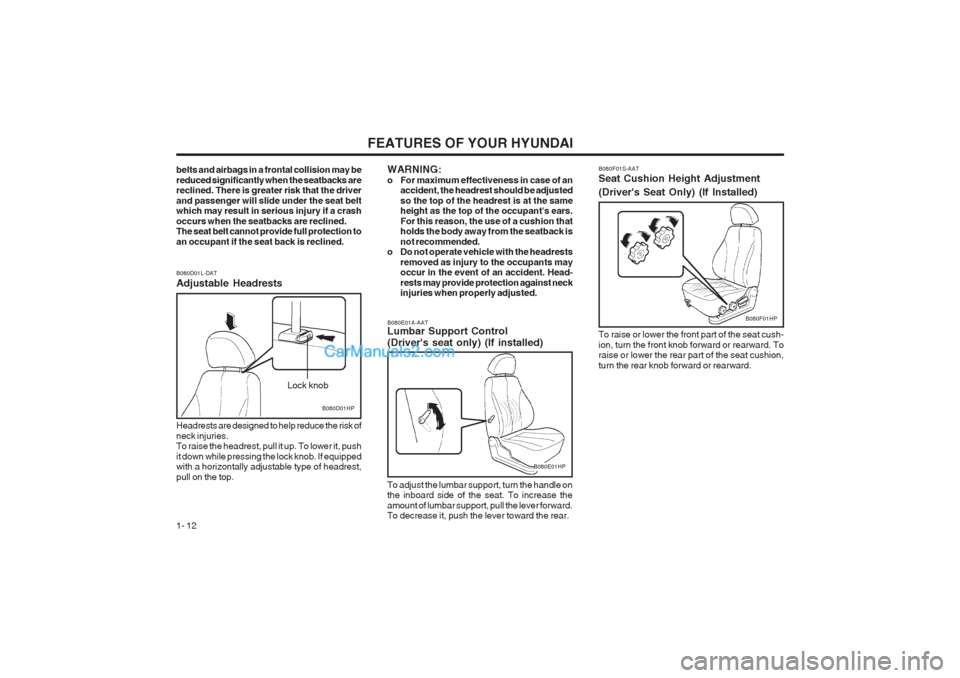
B080F01S-AAT Seat Cushion Height Adjustment (Driver's Seat Only) (If Installed) To raise or lower the front part of the seat cush- ion, turn the front knob forward or rearward. To raise or lower the rear part of the seat cushion, turn the rear knob forward or rearward.
B080F01HP
B080E01A-AAT Lumbar Support Control (Driver's seat only) (If installed)
B080E01HP
To adjust the lumbar support, turn the handle on the inboard side of the seat. To increase the amount of lumbar support, pull the lever forward. To decrease it, push the lever toward the rear.
B080D01L-DAT Adjustable Headrests
B080D01HP
Lock knob
Headrests are designed to help reduce the risk of neck injuries. To raise the headrest, pull it up. To lower it, push it down while pressing the lock knob. If equipped with a horizontally adjustable type of headrest, pull on the top.
belts and airbags in a frontal collision may bereduced significantly when the seatbacks are reclined. There is greater risk that the driver and passenger will slide under the seat belt which may result in serious injury if a crash occurs when the seatbacks are reclined. The seat belt cannot provide full protection to an occupant if the seat back is reclined.
WARNING:
o For maximum effectiveness in case of an
accident, the headrest should be adjustedso the top of the headrest is at the same height as the top of the occupant's ears. For this reason, the use of a cushion that holds the body away from the seatback is not recommended.
o Do not operate vehicle with the headrests
removed as injury to the occupants may occur in the event of an accident. Head- rests may provide protection against neck injuries when properly adjusted.
Page 22 of 349
FEATURES OF YOUR HYUNDAI
1- 14
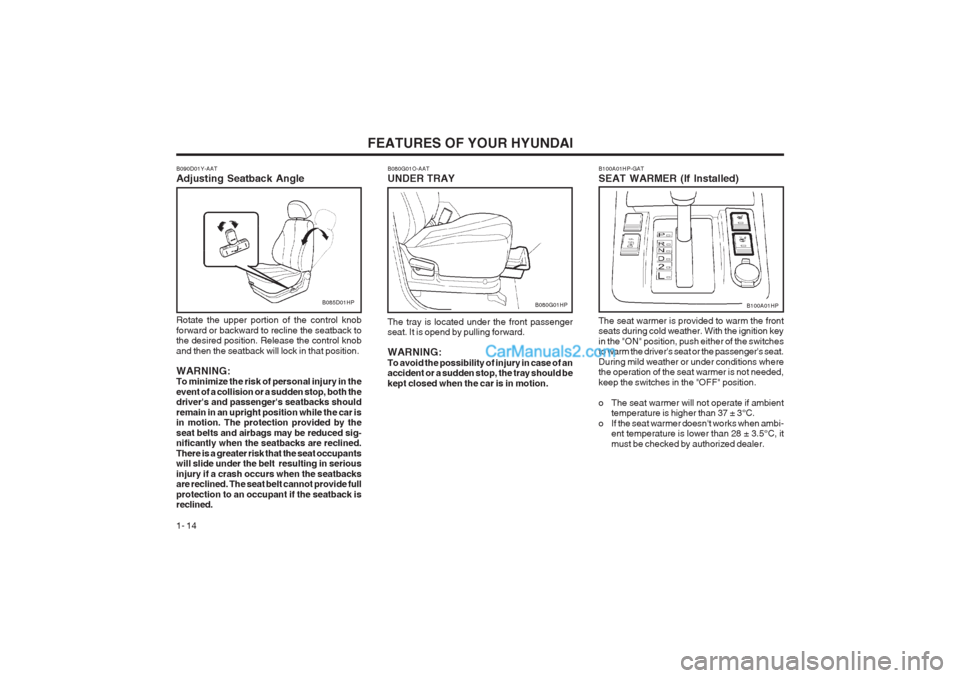
B100A01HP-GAT SEAT WARMER (If Installed) The seat warmer is provided to warm the front seats during cold weather. With the ignition key in the "ON" position, push either of the switches to warm the driver's seat or the passenger's seat. During mild weather or under conditions where the operation of the seat warmer is not needed, keep the switches in the "OFF" position.
o The seat warmer will not operate if ambient temperature is higher than 37 ± 3°C.
o If the seat warmer doesn't works when ambi- ent temperature is lower than 28 ± 3.5°C, it must be checked by authorized dealer.
B100A01HP
B080G01O-AAT UNDER TRAY
B080G01HP
The tray is located under the front passenger seat. It is opend by pulling forward. WARNING: To avoid the possibility of injury in case of an accident or a sudden stop, the tray should be kept closed when the car is in motion.B085D01HP
B090D01Y-AAT Adjusting Seatback Angle Rotate the upper portion of the control knob forward or backward to recline the seatback to the desired position. Release the control knob and then the seatback will lock in that position. WARNING: To minimize the risk of personal injury in the event of a collision or a sudden stop, both the driver's and passenger's seatbacks should remain in an upright position while the car is in motion. The protection provided by the seat belts and airbags may be reduced sig- nificantly when the seatbacks are reclined. There is a greater risk that the seat occupants will slide under the belt resulting in serious injury if a crash occurs when the seatbacks are reclined. The seat belt cannot provide full protection to an occupant if the seatback is reclined.
Page 24 of 349
FEATURES OF YOUR HYUNDAI
1- 16 o When you return the seatback to its upright
position, always be sure it is locked into position by pulling and pushing on the top of seatback.
WARNING: o The purpose of the fold-down rear seat back and the fold-up rear seat cushion isto allow you to carry more objects than could be accommodated. Never allow pas- sengers to sit on the cargo area while the car is moving. This is not a proper seating position and no seat belts are available for use when the seat back is folded down. This could result in serious injury or death in case of an accident or a sudden stop. Objects should not extend higher than the top of the front seatbacks. This could allow cargo to slide forward and cause injury or damage during sud- den stops.
o When you return the rear seatback to its upright position after being folded down, be careful not to damage the seatbelt web- bing or buckle. In addition, do not allow the seatbelt webbing or buckle to get caught or pinched in the rear seat.
o Do not allow passengers to fold down and up the seatback and seat cushion while the car is moving.
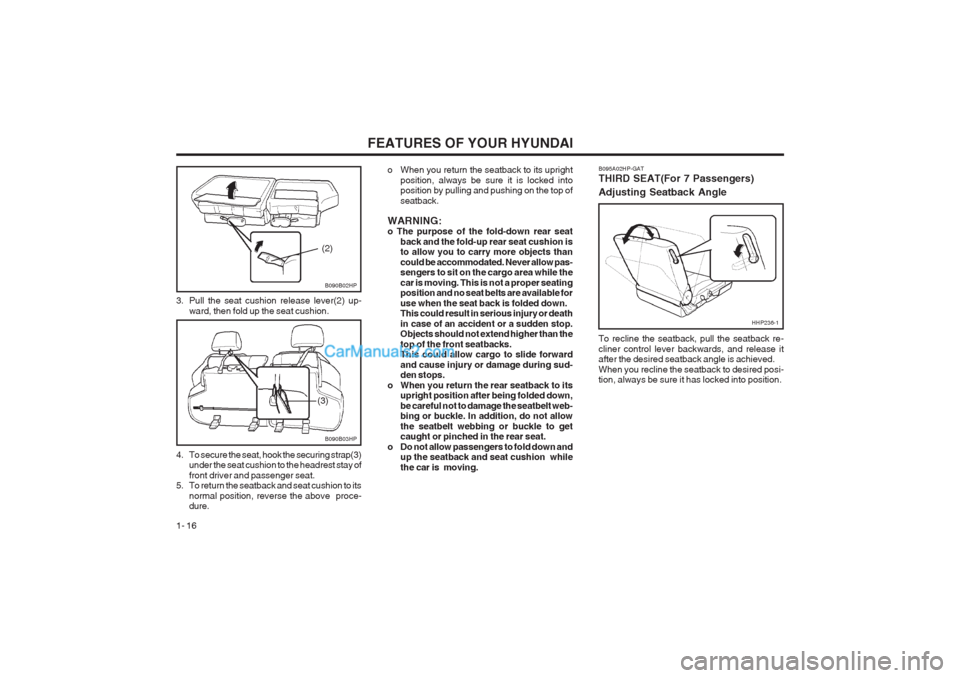
3. Pull the seat cushion release lever(2) up-
ward, then fold up the seat cushion.
B090B02HP
(2)
B090B03HP
(3)
4. To secure the seat, hook the securing strap(3) under the seat cushion to the headrest stay of front driver and passenger seat.
5. To return the seatback and seat cushion to its
normal position, reverse the above proce- dure. B095A02HP-GAT THIRD SEAT(For 7 Passengers) Adjusting Seatback Angle To recline the seatback, pull the seatback re- cliner control lever backwards, and release it after the desired seatback angle is achieved. When you recline the seatback to desired posi- tion, always be sure it has locked into position.
HHP236-1
Page 25 of 349
FEATURES OF YOUR HYUNDAI 1- 17
B095B02HP-1
(2)
B095B01HP-1
(1)
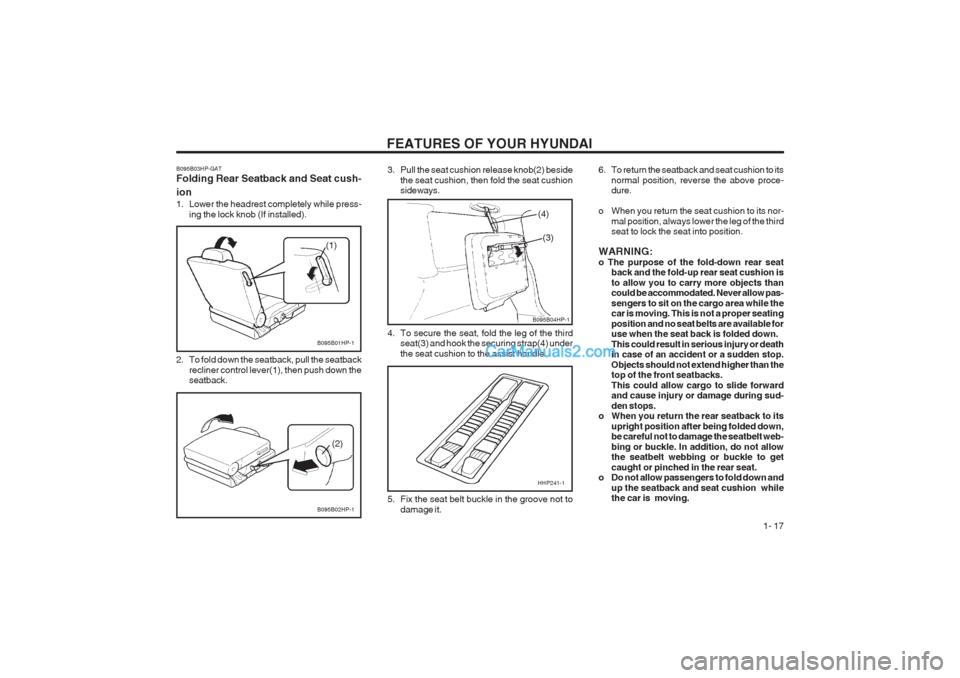
2. To fold down the seatback, pull the seatback recliner control lever(1), then push down the seatback.
B095B03HP-GAT Folding Rear Seatback and Seat cush- ion
1. Lower the headrest completely while press-
ing the lock knob (If installed). 3. Pull the seat cushion release knob(2) beside
the seat cushion, then fold the seat cushion sideways.
4. To secure the seat, fold the leg of the third seat(3) and hook the securing strap(4) under the seat cushion to the assist handle.
(4)
(3)
HHP241-1
B095B04HP-1
5. Fix the seat belt buckle in the groove not to damage it. 6. To return the seatback and seat cushion to its
normal position, reverse the above proce- dure.
o When you return the seat cushion to its nor- mal position, always lower the leg of the thirdseat to lock the seat into position.
WARNING: o The purpose of the fold-down rear seat back and the fold-up rear seat cushion isto allow you to carry more objects than could be accommodated. Never allow pas- sengers to sit on the cargo area while the car is moving. This is not a proper seating position and no seat belts are available for use when the seat back is folded down. This could result in serious injury or death in case of an accident or a sudden stop. Objects should not extend higher than the top of the front seatbacks. This could allow cargo to slide forward and cause injury or damage during sud- den stops.
o When you return the rear seatback to its
upright position after being folded down, be careful not to damage the seatbelt web- bing or buckle. In addition, do not allow the seatbelt webbing or buckle to get caught or pinched in the rear seat.
o Do not allow passengers to fold down and
up the seatback and seat cushion while the car is moving.
Page 26 of 349
FEATURES OF YOUR HYUNDAI
1- 18
B150A02A-GAT SEAT BELT PRECAUTIONSAll occupants of the vehicle should wear their seat belts at all times. Indeed, your province's laws may require that some or all occupants of the vehicle use seat belts. The possibility of injury or the severity of injury in
an accident will be decreased if this elementary safety precaution is observed. In addition, the following recommendations are made:
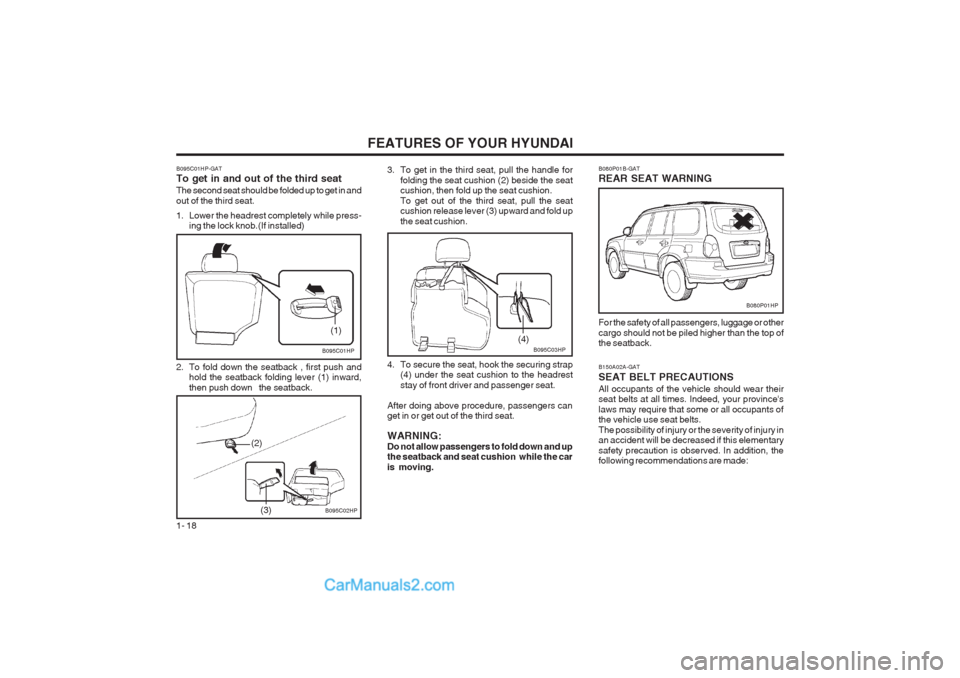
3. To get in the third seat, pull the handle for
folding the seat cushion (2) beside the seatcushion, then fold up the seat cushion. To get out of the third seat, pull the seat cushion release lever (3) upward and fold up the seat cushion.
4. To secure the seat, hook the securing strap (4) under the seat cushion to the headreststay of front driver and passenger seat.
After doing above procedure, passengers can get in or get out of the third seat. WARNING: Do not allow passengers to fold down and up the seatback and seat cushion while the car is moving.
B095C03HP
(4)
B080P01B-GAT REAR SEAT WARNING
B080P01HP
For the safety of all passengers, luggage or other cargo should not be piled higher than the top of the seatback.
B095C01HP-GAT To get in and out of the third seat The second seat should be folded up to get in and out of the third seat.
1. Lower the headrest completely while press- ing the lock knob.(If installed)
2. To fold down the seatback , first push and hold the seatback folding lever (1) inward, then push down the seatback.
B095C01HP
B095C02HP
(1)
(3)
(2)
Page 27 of 349
FEATURES OF YOUR HYUNDAI 1- 19
B150B01Y-GAT Infant or Small Child Some countries require the use of child restraint systems for infants and small children. Whether this is required by law or not, it is strongly recommended that a child restraint seat or infant
restraint system be used for infants or small children weighing less than 18 kilograms (40 pounds). NOTE: Small children are best protected in an acci- dent when properly restrained by a child restraint system. B150C02A-AAT Larger ChildrenChildren who are too large for child restraint systems should always occupy the rear seat and use the available lap/shoulder belts. The lap portion should be fastened snug on the hips and as low as possible. Check belt fit periodically. A child's squirming could put the belt out of posi- tion. Children are afforded the most safety in the event of an accident when they are restrained by a proper restraint system in the rear seat. If a larger child (over age 13) must be seated in the front seat, the child should be securely restrained by the available lap/shoulder belt and the seat should be placed in the rearmost position. Chil- dren under the age of 13 should be restrained securely in the rear seat. NEVER place a child under the age of 13 in the front seat. NEVER place a rear facing child seat in the front seat of a vehicle.
B150E01A-AAT Injured Person A seat belt should be used when an injured person is being transported. When this is neces- sary, you should consult a physician for recom- mendations. B150F01A-AAT One Person Per BeltTwo people (including children) should never attempt to use a single seat belt. This could increase the severity of injuries in case of an accident. B150G01A-AAT Do Not Lie Down To reduce the chance of injuries in the event of an accident and to achieve maximum effectiveness of the restraint system, all passengers should be sitting up and the front seats should be in an upright position when the car is moving. A seat belt cannot operate properly if the person is lying down in the rear seat or if the front seat is in a reclined position.
B150D01A-AAT Pregnant Women The use of a seat belt is recommended for pregnant women to lessen the chance of injury in an accident. When a seat belt is used, the lap belt portion should be placed as low and snugly as possible on the hips, not across the abdomen. For specific recommendations, consult a physi- cian.
WARNING: Sitting in a reclined position or lying down when your vehicle is in motion can be dan- gerous. Even if you buckle up, your seat belts can't do their job when you're reclined. The shoulder belt can't do its job because it won't be against your body. Instead, it will be in front of you. In a crash you could go into it with great force, receiving serious neck or other injuries. The lap belt can't do its job either. In a crash the belt could go up over your abdomen. The belt forces would be applied there, not at your strong pelvic bones. This could cause serious internal injuries. For proper protection when the vehicle is in motion, have the seatback upright. Then sit well back in the seat and wear your seat belt properly. See page 1-21. B160A01A-AAT CARE OF SEAT BELTS Seat belt systems should never be disassem- bled or modified. In addition, care should be taken to assure that seat belts and belt hardware are not damaged by seat hinges, doors or other abuse. WARNING: When you return the rear seatback to its upright position after the rear seatback was folded down, be careful not to damage the seat belt webbing or buckle. Be sure that the webbing or buckle does not get caught or pinched in the rear seat.
Page 28 of 349
FEATURES OF YOUR HYUNDAI
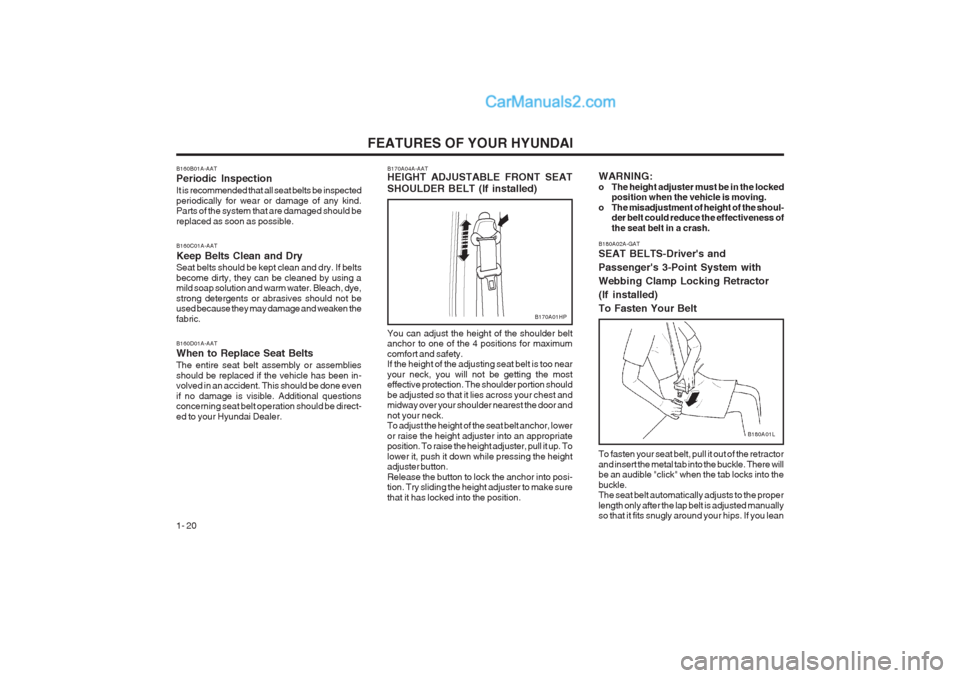
1- 20 To fasten your seat belt, pull it out of the retractor and insert the metal tab into the buckle. There will be an audible "click" when the tab locks into the buckle. The seat belt automatically adjusts to the proper length only after the lap belt is adjusted manually so that it fits snugly around your hips. If you lean
B180A02A-GAT SEAT BELTS-Driver's and Passenger's 3-Point System withWebbing Clamp Locking Retractor(If installed)To Fasten Your Belt
B180A01L
B170A04A-AAT HEIGHT ADJUSTABLE FRONT SEAT SHOULDER BELT (If installed)
B170A01HP
You can adjust the height of the shoulder belt anchor to one of the 4 positions for maximum comfort and safety. If the height of the adjusting seat belt is too near your neck, you will not be getting the most effective protection. The shoulder portion should be adjusted so that it lies across your chest and midway over your shoulder nearest the door and not your neck. To adjust the height of the seat belt anchor, lower or raise the height adjuster into an appropriate position. To raise the height adjuster, pull it up. To lower it, push it down while pressing the height adjuster button. Release the button to lock the anchor into posi- tion. Try sliding the height adjuster to make sure that it has locked into the position. WARNING:
o The height adjuster must be in the locked
position when the vehicle is moving.
o The misadjustment of height of the shoul- der belt could reduce the effectiveness ofthe seat belt in a crash.
B160B01A-AAT Periodic Inspection It is recommended that all seat belts be inspected periodically for wear or damage of any kind. Parts of the system that are damaged should be replaced as soon as possible. B160C01A-AAT Keep Belts Clean and Dry Seat belts should be kept clean and dry. If belts become dirty, they can be cleaned by using a mild soap solution and warm water. Bleach, dye, strong detergents or abrasives should not be used because they may damage and weaken the fabric. B160D01A-AAT When to Replace Seat Belts The entire seat belt assembly or assemblies should be replaced if the vehicle has been in- volved in an accident. This should be done even if no damage is visible. Additional questions concerning seat belt operation should be direct- ed to your Hyundai Dealer.
Page 29 of 349
FEATURES OF YOUR HYUNDAI 1- 21
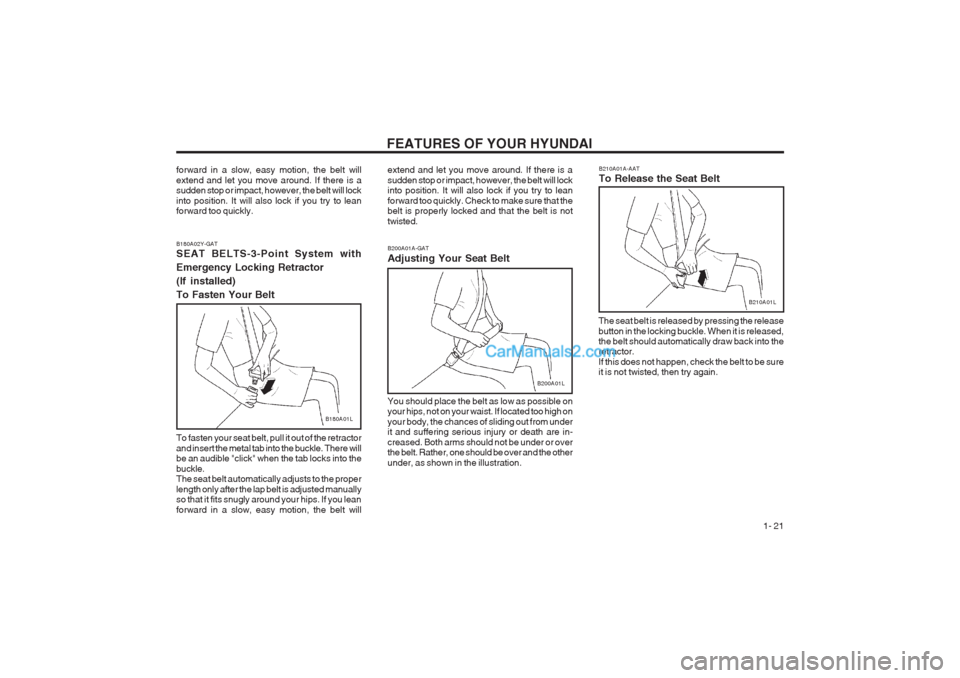
To fasten your seat belt, pull it out of the retractor
and insert the metal tab into the buckle. There will be an audible "click" when the tab locks into the buckle. The seat belt automatically adjusts to the proper length only after the lap belt is adjusted manually
so that it fits snugly around your hips. If you lean forward in a slow, easy motion, the belt will
B180A01L
B180A02Y-GAT SEAT BELTS-3-Point System with
Emergency Locking Retractor(If installed)To Fasten Your Belt
forward in a slow, easy motion, the belt will extend and let you move around. If there is a sudden stop or impact, however, the belt will lock into position. It will also lock if you try to lean forward too quickly.
B200A01A-GAT Adjusting Your Seat Belt
B200A01L
You should place the belt as low as possible on your hips, not on your waist. If located too high on your body, the chances of sliding out from under it and suffering serious injury or death are in- creased. Both arms should not be under or over the belt. Rather, one should be over and the other under, as shown in the illustration.
extend and let you move around. If there is asudden stop or impact, however, the belt will lock into position. It will also lock if you try to lean forward too quickly. Check to make sure that the belt is properly locked and that the belt is not twisted.
B210A01A-AAT To Release the Seat Belt
B210A01L
The seat belt is released by pressing the release button in the locking buckle. When it is released, the belt should automatically draw back into theretractor. If this does not happen, check the belt to be sure it is not twisted, then try again.
Page 30 of 349
FEATURES OF YOUR HYUNDAI
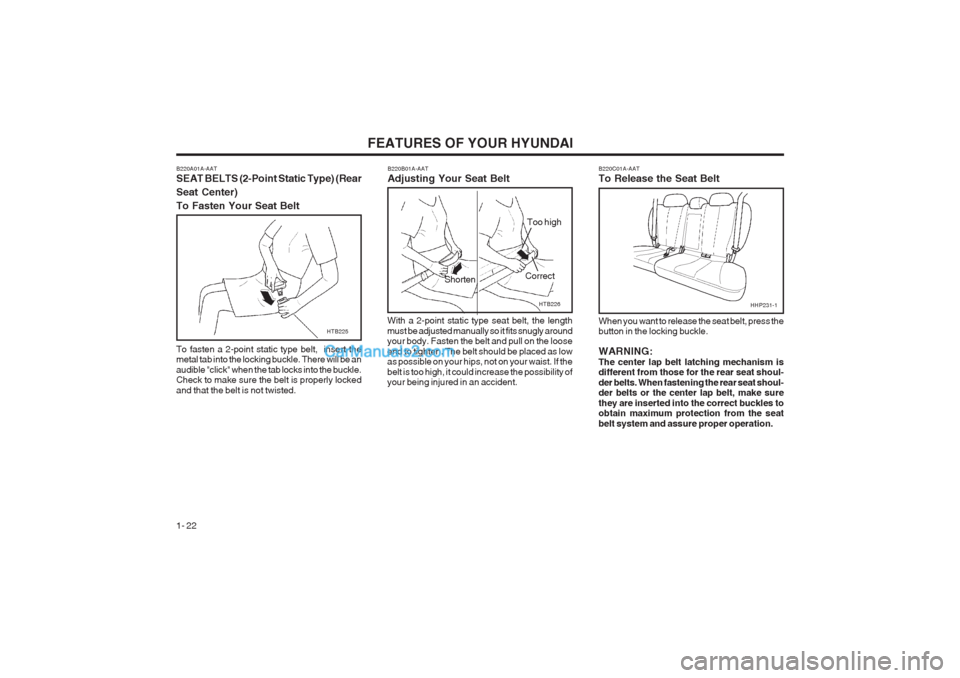
1- 22 B220C01A-AAT To Release the Seat Belt When you want to release the seat belt, press the button in the locking buckle. WARNING: The center lap belt latching mechanism is different from those for the rear seat shoul- der belts. When fastening the rear seat shoul- der belts or the center lap belt, make sure they are inserted into the correct buckles to obtain maximum protection from the seat belt system and assure proper operation.
B220B01A-AAT Adjusting Your Seat Belt
HTB226
With a 2-point static type seat belt, the length must be adjusted manually so it fits snugly around your body. Fasten the belt and pull on the loose end to tighten. The belt should be placed as low as possible on your hips, not on your waist. If the belt is too high, it could increase the possibility of your being injured in an accident. Correct
Shorten Too high
HTB225
B220A01A-AAT SEAT BELTS (2-Point Static Type) (Rear Seat Center)To Fasten Your Seat Belt To fasten a 2-point static type belt, insert the metal tab into the locking buckle. There will be an audible "click" when the tab locks into the buckle. Check to make sure the belt is properly locked and that the belt is not twisted.
HHP231-1