display Hyundai Terracan 2003 Owner's Manual
[x] Cancel search | Manufacturer: HYUNDAI, Model Year: 2003, Model line: Terracan, Model: Hyundai Terracan 2003Pages: 349, PDF Size: 4.56 MB
Page 52 of 349
FEATURES OF YOUR HYUNDAI
1- 44
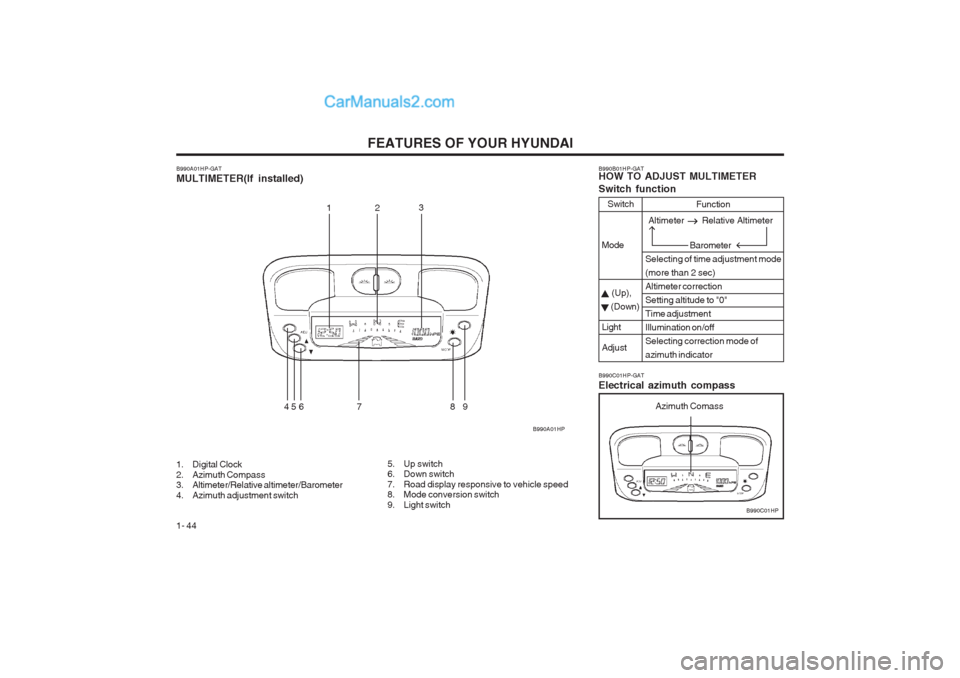
B990A01HP-GAT MULTIMETER(If installed)
1. Digital Clock
2. Azimuth Compass
3. Altimeter/Relative altimeter/Barometer
4. Azimuth adjustment switch 5. Up switch
6. Down switch
7. Road display responsive to vehicle speed
8. Mode conversion switch
9. Light switch
12
3
45 6 7 8 9 B990B01HP-GAT HOW TO ADJUST MULTIMETER Switch function
Switch
Mode
(Up),
(Down) LightAdjust Function
Selecting of time adjustment mode (more than 2 sec)Altimeter correctionSetting altitude to "0"Time adjustmentIllumination on/offSelecting correction mode ofazimuth indicator
B990C01HP-GAT Electrical azimuth compass
B990C01HP
B990A01HP
Azimuth Comass
Altimeter Relative Altimeter
Barometer
Page 53 of 349
FEATURES OF YOUR HYUNDAI 1- 45
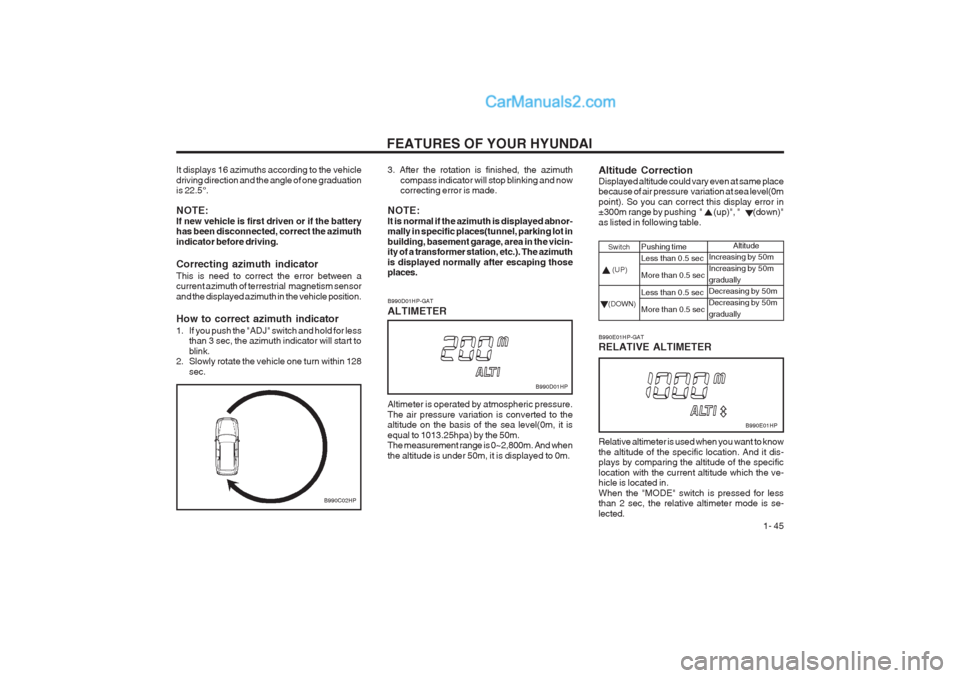
It displays 16 azimuths according to the vehicle driving direction and the angle of one graduation is 22.5°.
NOTE: If new vehicle is first driven or if the battery has been disconnected, correct the azimuth indicator before driving. Correcting azimuth indicator This is need to correct the error between a current azimuth of terrestrial magnetism sensor and the displayed azimuth in the vehicle position. How to correct azimuth indicator
1. If you push the "ADJ" switch and hold for less
than 3 sec, the azimuth indicator will start to blink.
2. Slowly rotate the vehicle one turn within 128
sec. B990D01HP-GAT ALTIMETER
B990C02HP 3. After the rotation is finished, the azimuth
compass indicator will stop blinking and now correcting error is made.
NOTE: It is normal if the azimuth is displayed abnor- mally in specific places(tunnel, parking lot in building, basement garage, area in the vicin- ity of a transformer station, etc.). The azimuth is displayed normally after escaping those places. Altimeter is operated by atmospheric pressure. The air pressure variation is converted to the altitude on the basis of the sea level(0m, it is equal to 1013.25hpa) by the 50m. The measurement range is 0~2,800m. And when the altitude is under 50m, it is displayed to 0m. B990D01HP
Altitude Correction Displayed altitude could vary even at same place because of air pressure variation at sea level(0m point). So you can correct this display error in ±300m range by pushing " (up)", " (down)" as listed in following table.
Switch (UP) (DOWN)
Pushing time Less than 0.5 sec More than 0.5 sec Less than 0.5 sec More than 0.5 sec Altitude
Increasing by 50m Increasing by 50mgradually Decreasing by 50m Decreasing by 50mgradually
B990E01HP-GAT RELATIVE ALTIMETER Relative altimeter is used when you want to know the altitude of the specific location. And it dis- plays by comparing the altitude of the specific location with the current altitude which the ve- hicle is located in. When the "MODE" switch is pressed for less than 2 sec, the relative altimeter mode is se- lected. B990E01HP
Page 54 of 349
FEATURES OF YOUR HYUNDAI
1- 46
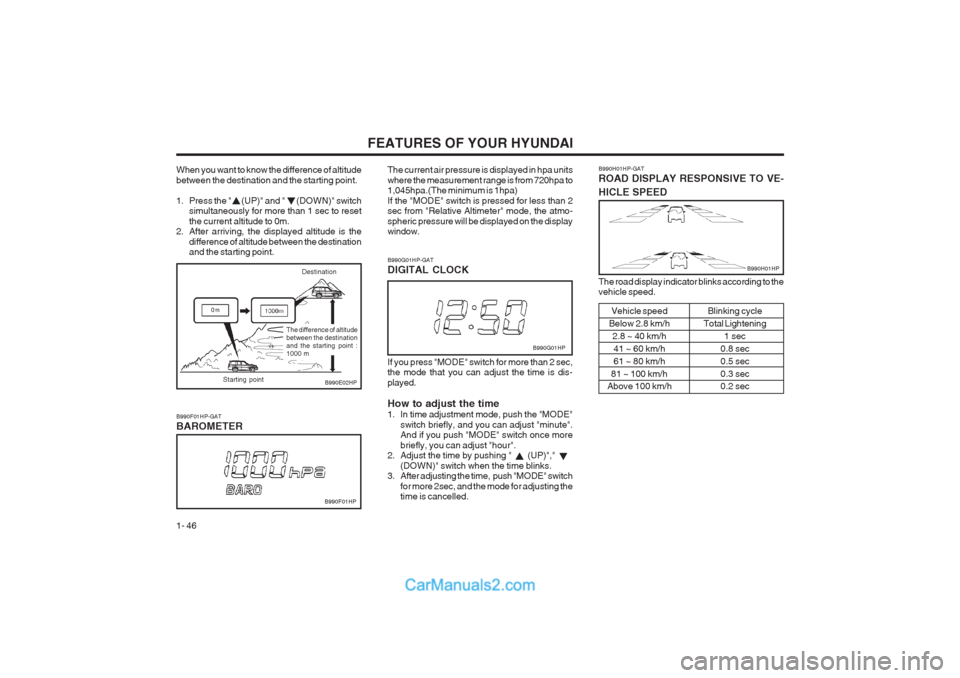
When you want to know the difference of altitude between the destination and the starting point.
1. Press the " (UP)" and " (DOWN)" switch simultaneously for more than 1 sec to reset the current altitude to 0m.
2. After arriving, the displayed altitude is the
difference of altitude between the destination and the starting point.
Destination
B990E02HP
B990F01HP-GAT BAROMETER The current air pressure is displayed in hpa units
where the measurement range is from 720hpa to 1,045hpa.(The minimum is 1hpa) If the "MODE" switch is pressed for less than 2 sec from "Relative Altimeter" mode, the atmo- spheric pressure will be displayed on the display window.
B990F01HP
B990G01HP-GAT DIGITAL CLOCK If you press "MODE" switch for more than 2 sec,
the mode that you can adjust the time is dis- played. How to adjust the time
1. In time adjustment mode, push the "MODE" switch briefly, and you can adjust "minute". And if you push "MODE" switch once more briefly, you can adjust "hour".
2. Adjust the time by pushing " (UP)","
(DOWN)" switch when the time blinks.
3. After adjusting the time, push "MODE" switch
for more 2sec, and the mode for adjusting the time is cancelled. B990G01HP
B990H01HP-GAT ROAD DISPLAY RESPONSIVE TO VE- HICLE SPEED
B990H01HP
The road display indicator blinks according to the vehicle speed.Vehicle speed
Below 2.8 km/h 2.8 ~ 40 km/h
41 ~ 60 km/h 61 ~ 80 km/h
81 ~ 100 km/h
Above 100 km/h Blinking cycle
Total Lightening 1 sec
0.8 sec0.5 sec0.3 sec 0.2 sec
The difference of altitude between the destinationand the starting point :1000 m
Starting point
Page 59 of 349
FEATURES OF YOUR HYUNDAI 1- 51
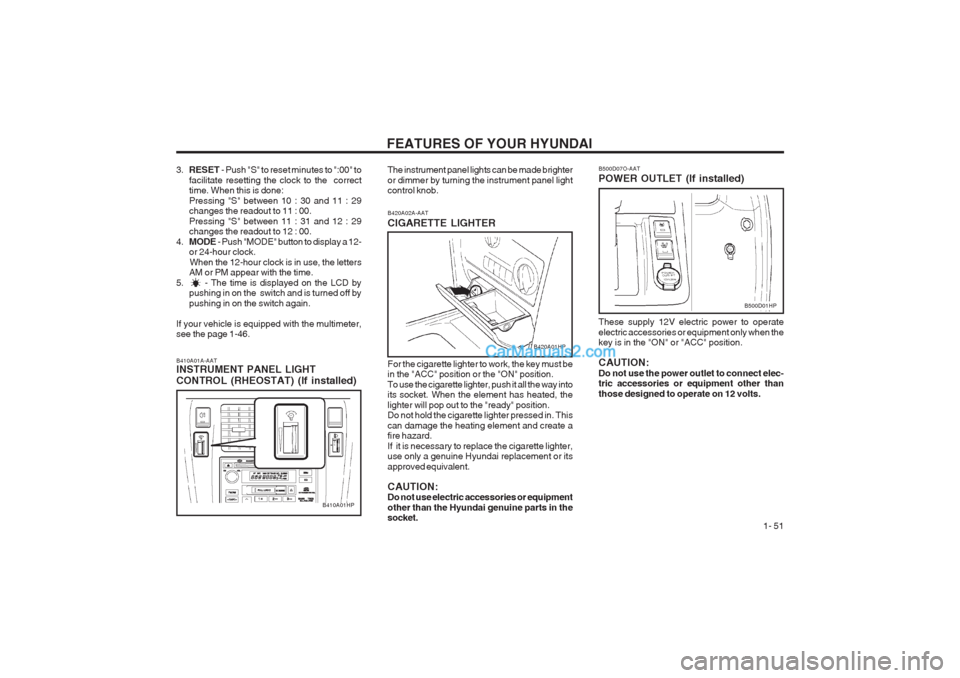
B420A02A-AAT CIGARETTE LIGHTER For the cigarette lighter to work, the key must be in the "ACC" position or the "ON" position. To use the cigarette lighter, push it all the way into its socket. When the element has heated, the lighter will pop out to the "ready" position. Do not hold the cigarette lighter pressed in. This can damage the heating element and create a fire hazard. If it is necessary to replace the cigarette lighter, use only a genuine Hyundai replacement or its approved equivalent. CAUTION: Do not use electric accessories or equipment other than the Hyundai genuine parts in the socket.
B410A01A-AATINSTRUMENT PANEL LIGHT CONTROL (RHEOSTAT) (If installed)
B410A01HP The instrument panel lights can be made brighter or dimmer by turning the instrument panel light control knob.
B420A01HP
B500D01HP
3.
RESET - Push "S" to reset minutes to ":00" to
facilitate resetting the clock to the correct time. When this is done: Pressing "S" between 10 : 30 and 11 : 29 changes the readout to 11 : 00. Pressing "S" between 11 : 31 and 12 : 29 changes the readout to 12 : 00.
4. MODE - Push "MODE" button to display a 12-
or 24-hour clock.
When the 12-hour clock is in use, the letters AM or PM appear with the time.
5. - The time is displayed on the LCD by pushing in on the switch and is turned off by pushing in on the switch again.
If your vehicle is equipped with the multimeter, see the page 1-46. B500D07O-AAT POWER OUTLET (If installed) These supply 12V electric power to operate electric accessories or equipment only when the key is in the "ON" or "ACC" position. CAUTION: Do not use the power outlet to connect elec- tric accessories or equipment other than those designed to operate on 12 volts.
Page 81 of 349
FEATURES OF YOUR HYUNDAI 1- 73
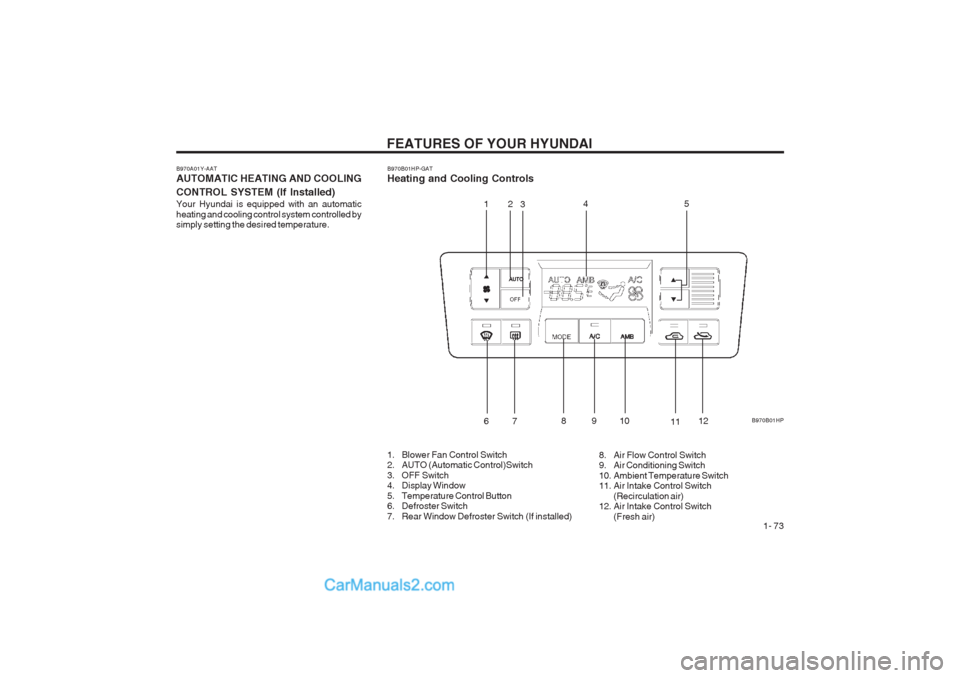
B970A01Y-AAT AUTOMATIC HEATING AND COOLING CONTROL SYSTEM (If lnstalled) Your Hyundai is equipped with an automatic heating and cooling control system controlled by simply setting the desired temperature.B970B01HP-GAT Heating and Cooling Controls
1. Blower Fan Control Switch
2. AUTO (Automatic Control)Switch
3. OFF Switch
4. Display Window
5. Temperature Control Button
6. Defroster Switch
7. Rear Window Defroster Switch (If installed) 8. Air Flow Control Switch
9. Air Conditioning Switch
10. Ambient Temperature Switch
11. Air Intake Control Switch
(Recirculation air)
12. Air Intake Control Switch
(Fresh air) B970B01HP
12
3 45
67 891
0
1112
Page 82 of 349
FEATURES OF YOUR HYUNDAI
1- 74
B970C02L-AAT Automatic Operation
B970C01HP
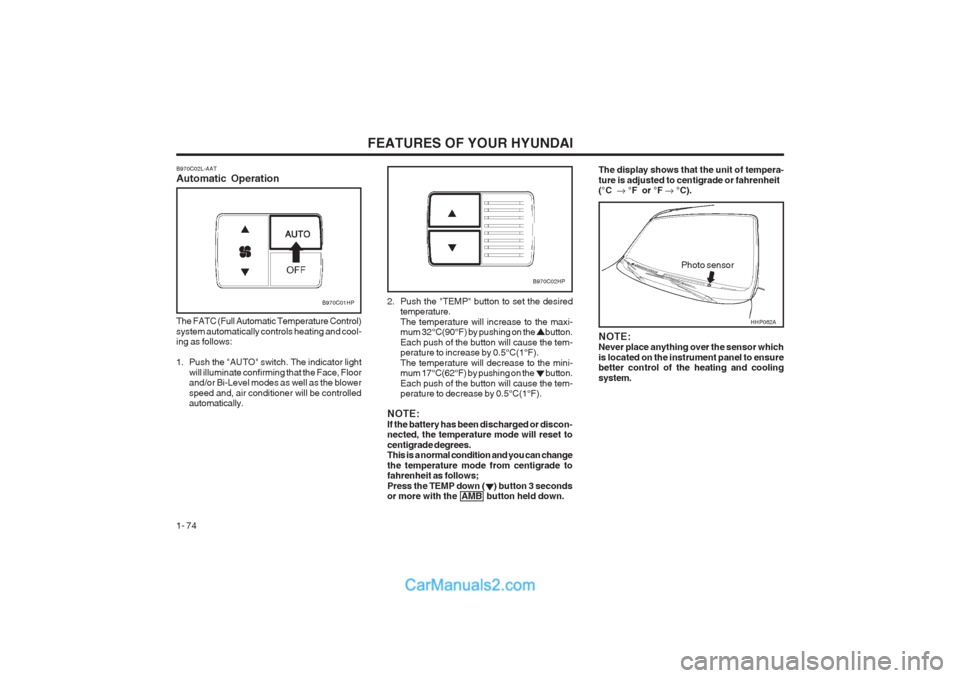
The FATC (Full Automatic Temperature Control) system automatically controls heating and cool- ing as follows:
1. Push the "AUTO" switch. The indicator light will illuminate confirming that the Face, Floor and/or Bi-Level modes as well as the blower speed and, air conditioner will be controlled automatically. 2. Push the "TEMP" button to set the desired
temperature. The temperature will increase to the maxi- mum 32°C(90°F) by pushing on the button. Each push of the button will cause the tem- perature to increase by 0.5°C(1°F). The temperature will decrease to the mini- mum 17°C(62°F) by pushing on the button. Each push of the button will cause the tem- perature to decrease by 0.5°C(1°F).
NOTE: If the battery has been discharged or discon- nected, the temperature mode will reset to centigrade degrees. This is a normal condition and you can change the temperature mode from centigrade to fahrenheit as follows; Press the TEMP down ( ) button 3 seconds or more with the AMB button held down.
Photo sensor
B970C02HP
NOTE: Never place anything over the sensor which is located on the instrument panel to ensure better control of the heating and cooling system.
The display shows that the unit of tempera- ture is adjusted to centigrade or fahrenheit (°C � °F or °F � °C).
HHP062A
Page 83 of 349
FEATURES OF YOUR HYUNDAI 1- 75
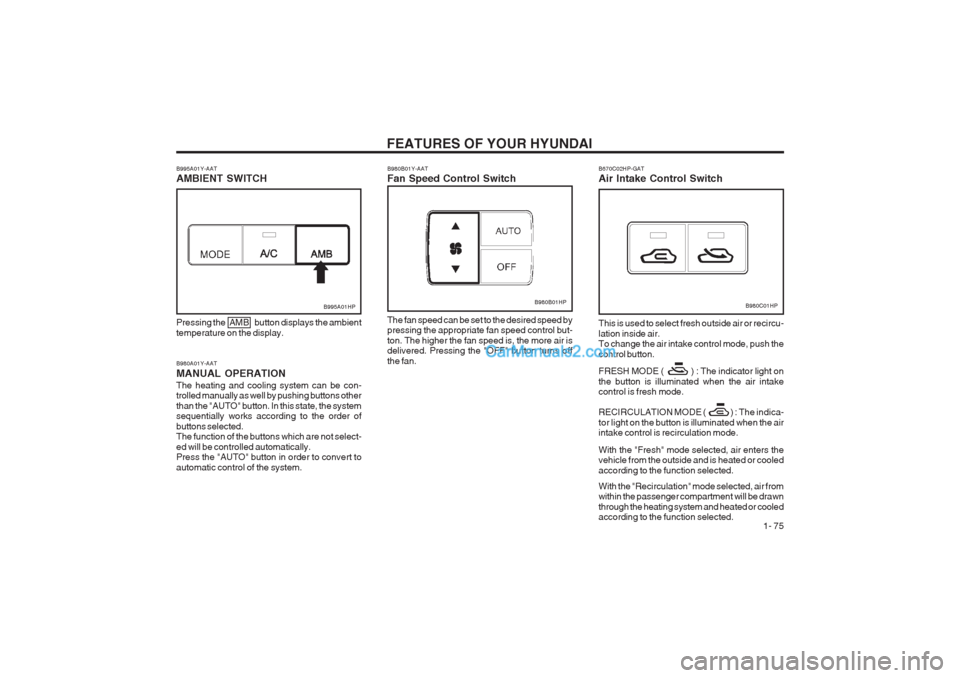
B980A01Y-AAT MANUAL OPERATIONThe heating and cooling system can be con- trolled manually as well by pushing buttons other than the "AUTO" button. In this state, the system sequentially works according to the order of buttons selected. The function of the buttons which are not select- ed will be controlled automatically. Press the "AUTO" button in order to convert to automatic control of the system.
B995A01HP
Pressing the AMB button displays the ambient temperature on the display.
B980B01Y-AAT Fan Speed Control Switch
B980B01HP
The fan speed can be set to the desired speed by pressing the appropriate fan speed control but- ton. The higher the fan speed is, the more air is delivered. Pressing the "OFF" button turns off the fan.
B995A01Y-AAT AMBIENT SWITCHB980C01HP
B670C02HP-GAT Air Intake Control Switch This is used to select fresh outside air or recircu- lation inside air. To change the air intake control mode, push the control button. FRESH MODE ( ) : The indicator light on the button is illuminated when the air intake control is fresh mode.
RECIRCULATION MODE ( ) :
The indica-
tor light on the button is illuminated when the air
intake control is recirculation mode. With the "Fresh" mode selected, air enters the vehicle from the outside and is heated or cooled according to the function selected. With the "Recirculation" mode selected, air from within the passenger compartment will be drawn through the heating system and heated or cooled according to the function selected.
Page 90 of 349
FEATURES OF YOUR HYUNDAI
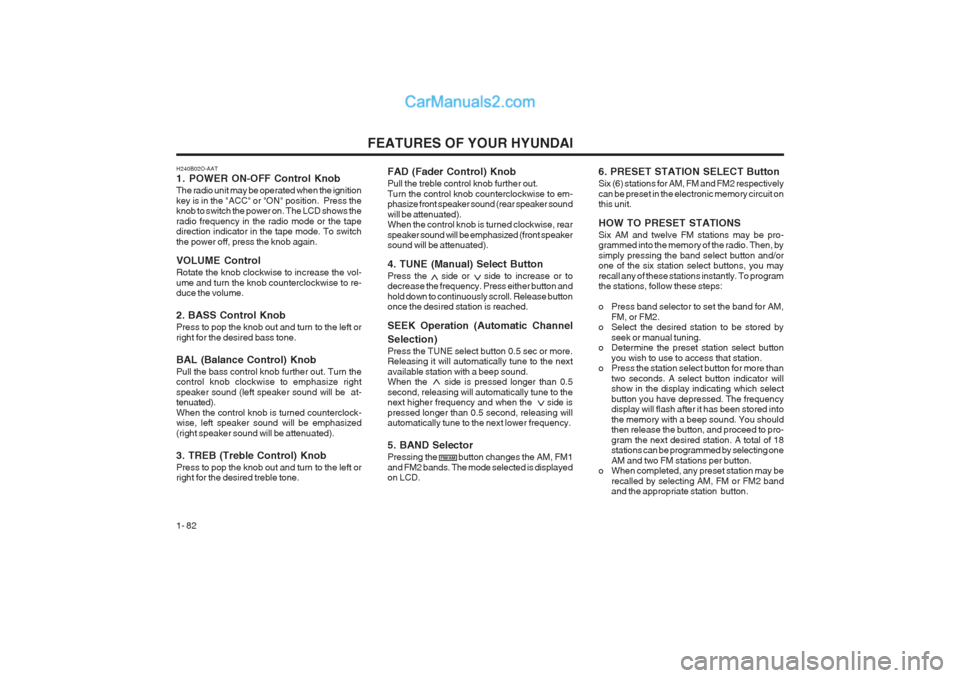
1- 82 FAD (Fader Control) Knob Pull the treble control knob further out. Turn the control knob counterclockwise to em- phasize front speaker sound (rear speaker sound will be attenuated). When the control knob is turned clockwise, rear speaker sound will be emphasized (front speaker sound will be attenuated). 4. TUNE (Manual) Select Button Press the side or side to increase or to decrease the frequency. Press either button and hold down to continuously scroll. Release button once the desired station is reached. SEEK Operation (Automatic Channel Selection) Press the TUNE select button 0.5 sec or more. Releasing it will automatically tune to the next available station with a beep sound. When the side is pressed longer than 0.5 second, releasing will automatically tune to the next higher frequency and when the side is pressed longer than 0.5 second, releasing will automatically tune to the next lower frequency. 5. BAND Selector Pressing the button changes the AM, FM1 and FM2 bands. The mode selected is displayed on LCD.
6. PRESET STATION SELECT Button Six (6) stations for AM, FM and FM2 respectively can be preset in the electronic memory circuit on this unit. HOW TO PRESET STATIONS Six AM and twelve FM stations may be pro- grammed into the memory of the radio. Then, by simply pressing the band select button and/or one of the six station select buttons, you may recall any of these stations instantly. To program the stations, follow these steps:
o Press band selector to set the band for AM,
FM, or FM2.
o Select the desired station to be stored by
seek or manual tuning.
o Determine the preset station select button
you wish to use to access that station.
o Press the station select button for more than
two seconds. A select button indicator will show in the display indicating which select button you have depressed. The frequency display will flash after it has been stored into the memory with a beep sound. You should then release the button, and proceed to pro- gram the next desired station. A total of 18 stations can be programmed by selecting one AM and two FM stations per button.
o When completed, any preset station may be
recalled by selecting AM, FM or FM2 band and the appropriate station button.
H240B02O-AAT
1. POWER ON-OFF Control Knob The radio unit may be operated when the ignition key is in the "ACC" or "ON" position. Press the knob to switch the power on. The LCD shows the radio frequency in the radio mode or the tape direction indicator in the tape mode. To switch the power off, press the knob again. VOLUME Control Rotate the knob clockwise to increase the vol- ume and turn the knob counterclockwise to re- duce the volume. 2. BASS Control Knob Press to pop the knob out and turn to the left or right for the desired bass tone. BAL (Balance Control) Knob Pull the bass control knob further out. Turn the control knob clockwise to emphasize right speaker sound (left speaker sound will be at- tenuated). When the control knob is turned counterclock- wise, left speaker sound will be emphasized (right speaker sound will be attenuated). 3. TREB (Treble Control) Knob Press to pop the knob out and turn to the left or right for the desired treble tone.
FM/AM
Page 93 of 349
FEATURES OF YOUR HYUNDAI 1- 85
H240A02O-AAT 1. FF/REW Button
o The FF (fast forward tape winding) starts whenthe button is pressed during PLAY or REW.
o PLAY starts when the button is pressed
again during the FF.
o REW (rewinding) starts when the button
is pressed during PLAY or FF.
o PLAY starts when the button is pressed
again during REW.
2. AUTO MUSIC SELECT ButtonPress the button to find the starting point of each song in a prerecorded music tape. The quiet space between songs (must have at least a 4 sec. gap) can be identified by the AUTO MUSIC SELECT button.
o Pressing the button will play the beginning of the next music segment.
o Pressing the button will start replay at the beginning of the music just listened to.
3. TAPE PROGRAM Button This allows you to play the reverse side of the tape by merely pressing the program button. An arrow will appear in the display to show tape direction. NOTE:When tape operation is abnormal or ER8 fault code is displayed, Press eject button more than 5 seconds to initialize the deck. 4. EJECT Button
o When the EJECT button is pressed with a
cassette loaded, the cassette will eject.
o When the EJECT button is pressed during FF/REW, the cassette will eject.
5. DOLBY SELECT ButtonIf you get background noise during PLAY, you can reduce this considerably by merely pressing DOLBY SELECT button. If you want to release, press the button again.
Page 95 of 349
FEATURES OF YOUR HYUNDAI 1- 87
H290B02E-AAT
1. POWER ON-OFF Control Knob The radio unit may be operated when the ignition key is in the "ACC" or "ON" position. Press the button to switch the power on. The display shows the radio frequency in the radio mode or the tape direction indicator in the tape mode, or CD track either the CD mode or CD AUTO CHANGER mode. To switch the power off, press the button again. VOLUME Control Rotate the knob clockwise to increase the vol- ume and turn the knob counterclockwise to re- duce the volume.
2. BASS/BALANCE Control Knob BASS Control Knob Press to pop the knob out. To increase the bass, rotate the knob clockwise, while to decrease the bass, rotate the knob counterclockwise. BALANCE Control knob Pull the Bass control knob out further. Rotate the knob clockwise to emphasize right speaker sound (left speaker sound will be attenuated). When the control knob is turned counterc- lockwise, left speaker sound will be emphasized (right speaker sound will be attenuated).
3. TREBLE/FAD Knob TREBLE Control Knob Press to pop the knob out and turn to the left or right for the desired treble tone. FAD (Fader Control) Knob Further pull the popped-up knob. Turn the control knob counterclockwise to emphasize front speaker sound (rear speaker sound will be at- tenuated). When the control knob is turned clock- wise, rear speaker sound will be emphasized (front speaker sound will be attenuated).
4. TUNE (Manual) Select Button Press the ( ) side or ( ) side to increase or to decrease the frequency. With the button held down for 0.5 sec. or more, the stop signal (broad- casting radio wave) is ignored and channel se- lection continues. SEEK Operation (Automatic Channel Selection) Press the TUNE select button for 0.5 sec or more. Releasing it will automatically tune to the next available station with a beep sound. When the ( ) side is pressed longer than 0.5 second, releasing will automatically tune to the next higher frequency and when the ( ) side is pressed longer than 0.5 second, releasing will automatically tune to the next lower frequency.5. PRESET STATION Select Buttons Six (6) stations for AM, FM and FM2 respectively can be preset in the electronic memory circuit. HOW TO PRESET STATIONS Six AM and twelve FM stations may be pro- grammed into the memory of the radio. Then, by simply pressing the band select button and/or one of the six station select buttons, you may recall any of these stations instantly. To program the stations, follow these steps:
o Press band selector to set the band for AM,
FM and FM2.
o Select the desired station to be stored by
seek or manual tuning.
o Determine the preset station select button
you wish to use to access that station.
o Press the station select button for more than
two seconds. A select button indicator will show in the display indicating which select button you have depressed. The frequency display will flash after it has been stored into the memory with a beep sound. You should then release the button, and proceed to pro- gram the next desired station. A total of 18 stations can be programmed by selecting one AM and two FM station per button.
o When completed, any preset station may be
recalled by selecting AM, FM or FM2 band and the appropriate station button.