display Hyundai Terracan 2003 User Guide
[x] Cancel search | Manufacturer: HYUNDAI, Model Year: 2003, Model line: Terracan, Model: Hyundai Terracan 2003Pages: 349, PDF Size: 4.56 MB
Page 96 of 349
FEATURES OF YOUR HYUNDAI
1- 88
6. BAND Selector Pressing the button changes the AM, FM1 and FM2 bands. The mode selected is shown on the display.
7. EQUALIZER Button Press the EQ button to select the CLASSIC, JAZZ, ROCK and DEFEAT MODE for the de- sired tone quality. Each press of the button changes the display as follows;
8. Best Station Memory Button (BSM)
(If installed)
When the BSM button is pressed for two sec- onds or longer, the six channels from the highest field intensity are selected next and stored in memory. The stations selected are stored in the sequence frequency from the first preset key. SCAN Button (If installed) When the scan button is pressed, the frequency will increase and the receivable stations will be tuned in one after another, receiving each station for 5 seconds. To stop scanning, press the scan button again. CLASSIC
� JAZZ � ROCK � DEFEAT
�
FM/AM
Page 98 of 349
FEATURES OF YOUR HYUNDAI
1- 90
H290D01O-AAT
1. FF/REW Button
o Fast forward tape winding starts when the FF
( ) button is pressed during the PLAY or REW mode.
o Tape play starts when the FF ( ) button is pressed again during the FF mode.
o Tape rewinding starts when the REW ( ) button is pressed during the PLAY or FF mode.
o Tape play starts when the REW ( ) button
pressed again during the REW mode.
2. AUTO MUSIC Select Button Press the button to find the starting point of each song in a prerecorded music tape. The quiet space between songs (must have at least a 4 sec. gap) can be identified by the AUTO MUSIC Select button.
o Pressing the button will play the beginn- ing of the next music segment.
o Pressing the button will start replay at the beginning of the music just listened to.
3. TAPE PROGRAM Button This allows you to play the reverse side of the tape by merely depressing the program button. An arrow will appear in the display to show tape direction. 4. TAPE EJECT button
o When the button is pressed with the
cassette loaded, the cassette is ejected.
o When the button is pressed during the FF/
REW mode, the cassette is ejected.
5. EQ ButtonPress the EQ button to select the CLASSIC, JAZZ, ROCK and DEFEAT MODE for the de- sired tone quality. Each press of the button changes the display as follows;
6. DOLBY Button If you get background noise during tape PLAY, you can reduce this considerably by merely pressing the DOLBY button. If you want to cancel the DOLBY feature, press the button again. CLASSIC
� JAZZ � ROCK � DEFEAT
�
Page 100 of 349
FEATURES OF YOUR HYUNDAI
1- 92
H290F02O-GAT
1. CD Select Button
o Insert the CD with the label facing upward.
o Insert the CD to start CD playback, during
radio operation or cassette tape playing.
o When a disc is in the CD deck, if you press the
CD/CDC button the CD player will beginplaying even if the radio or cassette player is being used.
o The CD player can be used when the ignition
switch is in either the "ON" or "ACC" position.
2. FF/REW ( / ) If you want to fast forward or reverse through the compact disc track, push and hold the FF ( ) or REW ( ) button. When you release the button, the compact disc player will resume playing.
3. TRACK UP/DOWN
o The desired track on the disc currently being played can be selected using the track num- ber.
o Press button once to skip forward to the
beginning of the next track. Press button once to skip back to the beginning of the track.
4. REPEAT
o To repeat the track you are currently listening to, press the RPT button. To cancel, press again. o If you do not release RPT operation when the
track ends, it will automatically be replayed. This process will be continued until you push the button again.
5. EQUALIZER Button Press the EQ button to select the CLASSIC, JAZZ, ROCK and DEFEAT MODE for the de- sired tone quality. Each press of the button changes the display as follows; NOTE:
o To assure proper operation of the unit,
keep the vehicle interior temperaturewithin a normal range by using the vehicle's air conditioning or heating sys- tem.
o When replacing the fuse, replace it with a
fuse having the correct capacity.
o The preset station frequencies are all
erased when the car battery is discon- nected. Therefore, all data will have to be set again if this should occur.
o Do not add any oil to the rotating parts.
Keep magnets, screwdrivers and other metallic objects away from the tape mecha- nism and head.
o This equipment is designed to be used
only in a 12 volt DC battery system with negative ground.
o This unit is made of precision parts. Do not attempt to disassemble or adjust any parts.
o When driving your vehicle, be sure to keep
the volume of the unit set low enough to allow you to hear sounds coming from the outside.
o Do not expose this equipment (including
the speakers and tape) to water or exces- sive moisture.
CAUTION: Do not insert warped or poor quality discs into the CD player as damage to the unit may occur.
CLASSIC � JAZZ � ROCK � DEFEAT
�
6. CD EJECT Button When the button is pressed with a CD loaded, the CD will eject.
7. SCAN Button (If installed)
o Press the SCAN button to playback the first 10 seconds of each track.
o Press the SCAN button again within 10 sec. when you have reached the desired track.
Page 102 of 349
FEATURES OF YOUR HYUNDAI
1- 94
3. TRACK UP/DOWN
o The desired track on the disc currently being played can be selected using the track num- ber.
o Press once to skip forward to the begin- ning of the next track. Press once to skip back to the beginning of the track.
4. FF/REW ( / ) If you want to fast forward or reverse through the compact disc track, push and hold in the FF ( ) or REW ( ) button. When you release the button, the compact disc player will resume playing. 5. REPEAT
o To repeat the track you are listening to, press the RPT button. To cancel, press again.
o If you do not release RPT operation when the track ends, it will automatically be replayed. This process will be continued until you push the button again.B290H02HP-GAT The CD auto changer is located in the right side of the luggage compartment.
o To use the CD auto changer.
1. Open the sliding lid of the CD auto chang- er.
2. To eject the compact disc magazine, press
the EJECT button located inside the CD auto changer.
3. Insert the discs into the magazine.
4. Push the magazine into the CD auto chang- er and close the sliding lid.
o The CD auto changer can be used when the ignition switch is in either "ON" or "ACC"position.
1. CD CHANGER Select Button When the CD changer magazine contains discs, press the "CD/CDC" button and the CD changer can be used even if the radio or cassette player is being used. The Hyundai CD changer can hold up to eight discs. The disc number will be lit, and the track number, and elapsed time will be dis- played. 2. DISC Select Button To select the CD you want, push " " to change the disc number. 6. SCAN Button (If installed)
o Press the SCAN button to playback the first
10 seconds of each track.
o Press the SCAN button again within 10 sec.
for the desired track.
7. EQ ButtonPress the EQ button to select the CLASSIC, JAZZ, ROCK and DEFEAT MODE for the de- sired tone quality. Each press of the button changes the display as follows;
CLASSIC � JAZZ � ROCK � DEFEAT
�
NOTE:
o When replacing the fuse, replace it with a fuse having the correct capacity.
o This equipment is designed to be used
only in a 12 volt DC battery system withnegative ground.
o This unit is made of precision parts. Do not attempt to disassemble or adjust any parts.
o When driving your vehicle, be sure to keep
the volume of the unit set low enough to allow you to hear sounds coming from the outside.
CAUTION: Do not insert warped or poor quality discs into the CD changer as damage to the unit may occur.
TUNE DISC
Page 103 of 349
FEATURES OF YOUR HYUNDAI 1- 95
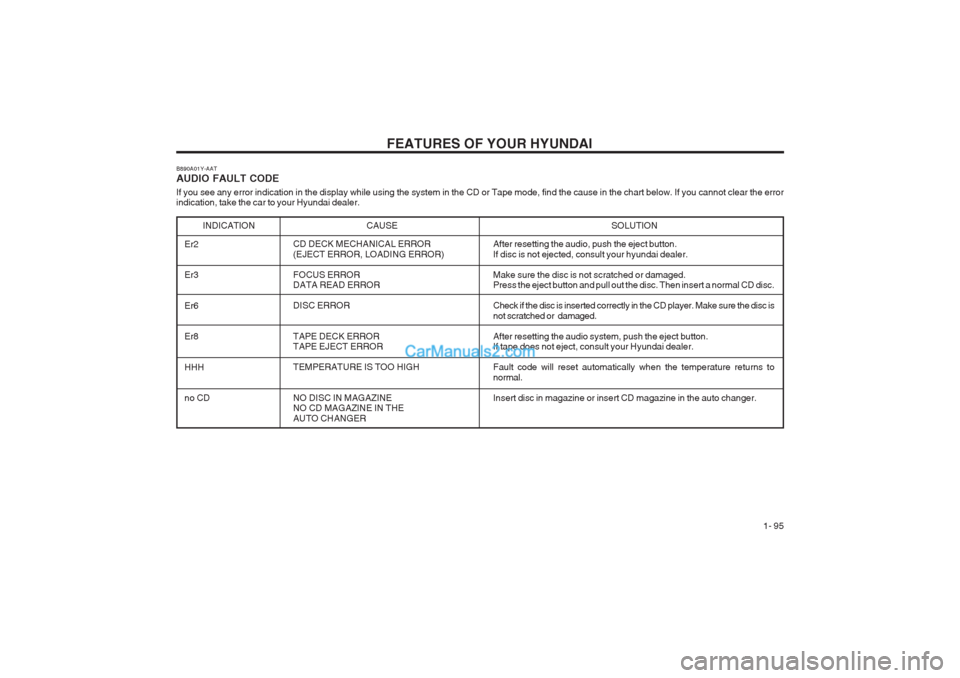
B890A01Y-AAT AUDIO FAULT CODE
If you see any error indication in the display while using the system in the CD or Tape mode, find the cause in the chart below. If you cannot clear the error indication, take the car to your Hyundai dealer.
INDICATION CAUSE
SOLUTION
Er2 Er3 Er6 Er8 HHH no CD CD DECK MECHANICAL ERROR (EJECT ERROR, LOADING ERROR) FOCUS ERROR DATA READ ERROR DISC ERROR TAPE DECK ERROR TAPE EJECT ERROR TEMPERATURE IS TOO HIGH NO DISC IN MAGAZINE NO CD MAGAZINE IN THE AUTO CHANGER After resetting the audio, push the eject button.If disc is not ejected, consult your hyundai dealer. Make sure the disc is not scratched or damaged.
Press the eject button and pull out the disc. Then insert a normal CD disc.
Check if the disc is inserted correctly in the CD player. Make sure the disc is not scratched or damaged. After resetting the audio system, push the eject button.
If tape does not eject, consult your Hyundai dealer. Fault code will reset automatically when the temperature returns to normal.
Insert disc in magazine or insert CD magazine in the auto changer.
Page 239 of 349
CONTROLS AND EQUIPMENT1- 45
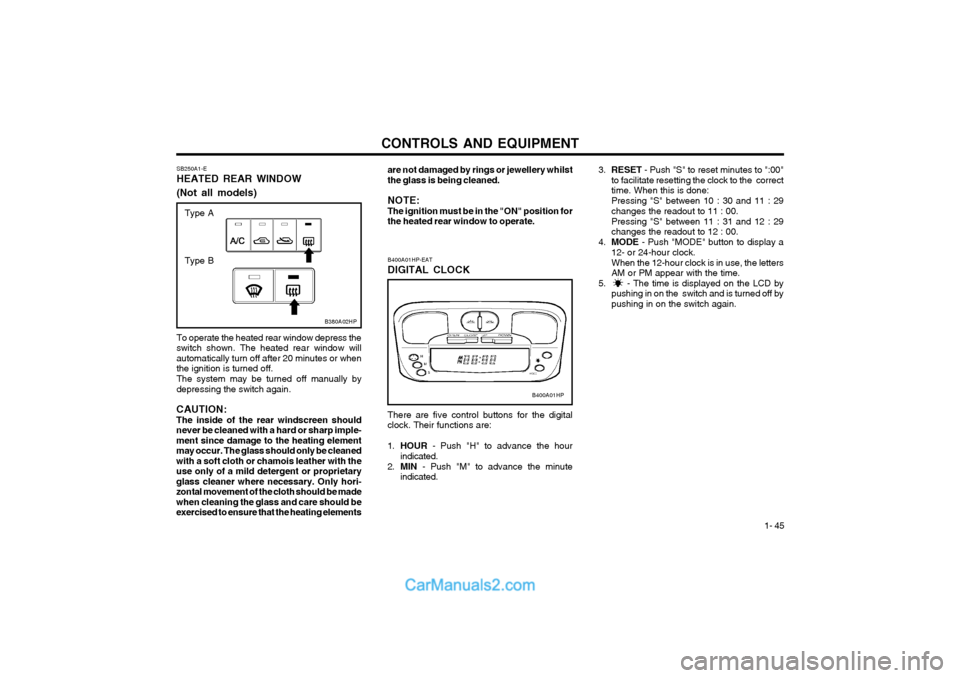
SB250A1-E HEATED REAR WINDOW (Not all models)
B380A02HP
To operate the heated rear window depress the switch shown. The heated rear window willautomatically turn off after 20 minutes or whenthe ignition is turned off. The system may be turned off manually by depressing the switch again.
CAUTION:The inside of the rear windscreen shouldnever be cleaned with a hard or sharp imple-ment since damage to the heating elementmay occur. The glass should only be cleanedwith a soft cloth or chamois leather with theuse only of a mild detergent or proprietaryglass cleaner where necessary. Only hori-zontal movement of the cloth should be madewhen cleaning the glass and care should beexercised to ensure that the heating elements are not damaged by rings or jewellery whilstthe glass is being cleaned. NOTE: The ignition must be in the "ON" position forthe heated rear window to operate.
B400A01HP
B400A01HP-EAT DIGITAL CLOCK There are five control buttons for the digital
clock. Their functions are: 1. HOUR - Push "H" to advance the hour
indicated.
2. MIN - Push "M" to advance the minute
indicated.
3. RESET - Push "S" to reset minutes to ":00"
to facilitate resetting the clock to the correct time. When this is done: Pressing "S" between 10 : 30 and 11 : 29 changes the readout to 11 : 00. Pressing "S" between 11 : 31 and 12 : 29 changes the readout to 12 : 00.
4. MODE - Push "MODE" button to display a
12- or 24-hour clock. When the 12-hour clock is in use, the letters AM or PM appear with the time.
5. - The time is displayed on the LCD by pushing in on the switch and is turned off bypushing in on the switch again.
Type A
Type B
Page 263 of 349
CONTROLS AND EQUIPMENT1- 69
B970A01Y-EAT AUTOMATIC HEATING AND COOL-
ING CONTROL SYSTEM
(Not aII models) Your Hyundai is equipped with an automatic
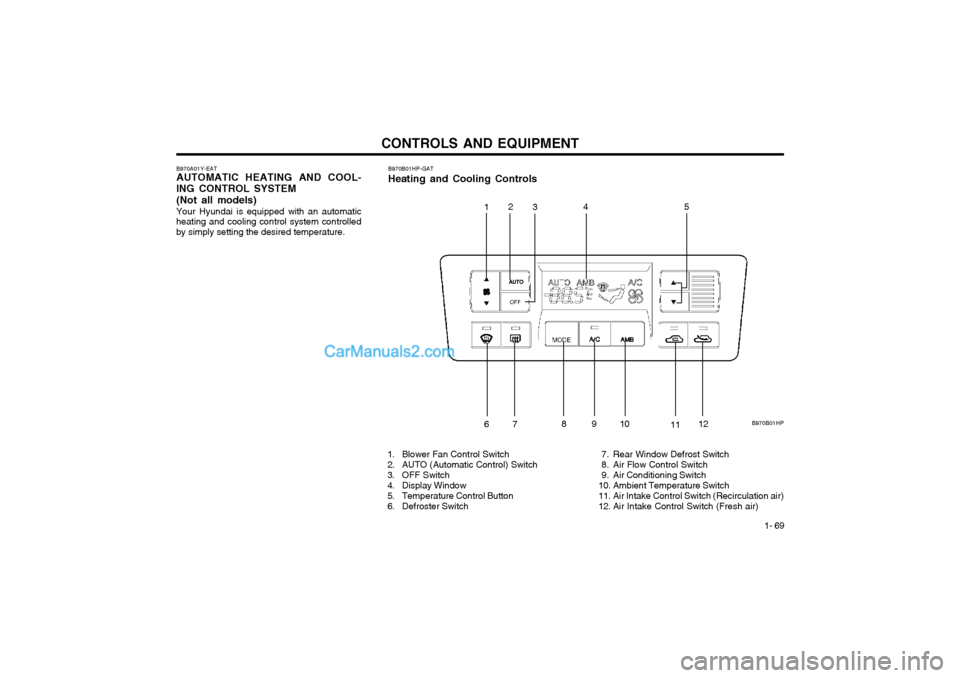
heating and cooling control system controlled by simply setting the desired temperature. B970B01HP-GAT Heating and Cooling Controls
1. Blower Fan Control Switch
2. AUTO (Automatic Control) Switch
3. OFF Switch
4. Display Window
5. Temperature Control Button
6. Defroster Switch 7. Rear Window Defrost Switch
8. Air Flow Control Switch
9. Air Conditioning Switch
10. Ambient Temperature Switch
11. Air Intake Control Switch (Recirculation air)
12. Air Intake Control Switch (Fresh air)
B970B01HP
1
2
3 45
67 891
0
1112
Page 264 of 349
CONTROLS AND EQUIPMENT
1- 70
B970C02L-EAT Automatic Operation
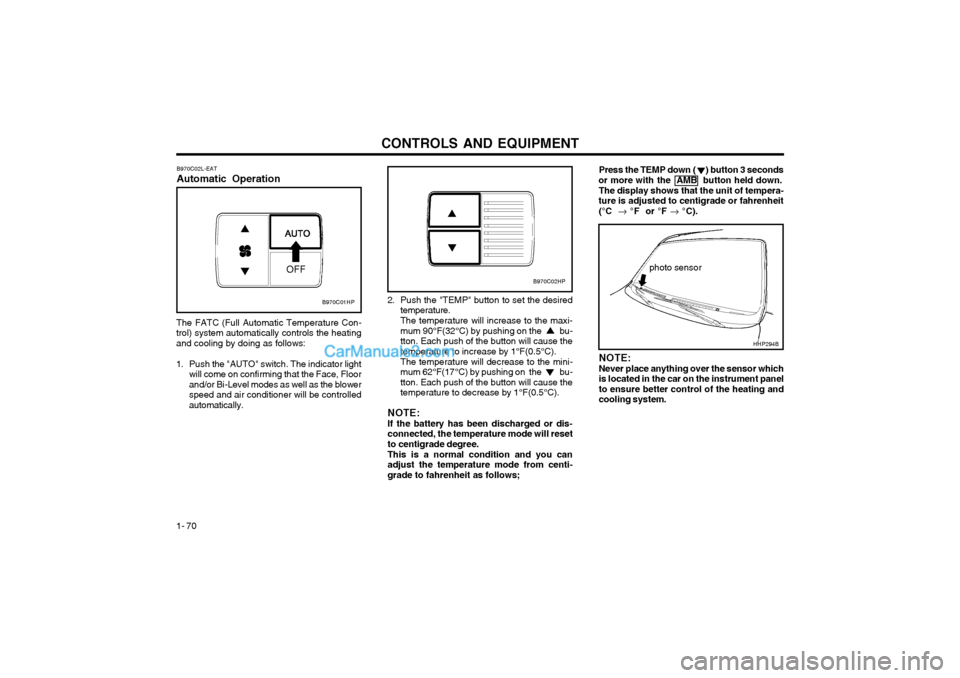
The FATC (Full Automatic Temperature Con- trol) system automatically controls the heatingand cooling by doing as follows:
1. Push the "AUTO" switch. The indicator light will come on confirming that the Face, Floorand/or Bi-Level modes as well as the blowerspeed and air conditioner will be controlledautomatically. Press the TEMP down ( ) button 3 seconds
or more with the AMB button held down.
The display shows that the unit of tempera-
ture is adjusted to centigrade or fahrenheit
(°C � °F or °F � °C).
photo sensor
HHP294B
2. Push the "TEMP" button to set the desired
temperature. The temperature will increase to the maxi- mum 90°F(32°C) by pushing on the bu-tton. Each push of the button will cause thetemperature to increase by 1°F(0.5°C). The temperature will decrease to the mini- mum 62°F(17°C) by pushing on the bu-tton. Each push of the button will cause thetemperature to decrease by 1°F(0.5°C).
NOTE: If the battery has been discharged or dis- connected, the temperature mode will resetto centigrade degree. This is a normal condition and you can adjust the temperature mode from centi-grade to fahrenheit as follows; NOTE: Never place anything over the sensor which is located in the car on the instrument panelto ensure better control of the heating andcooling system.
B970C01HP
B970C02HP
Page 265 of 349
CONTROLS AND EQUIPMENT1- 71
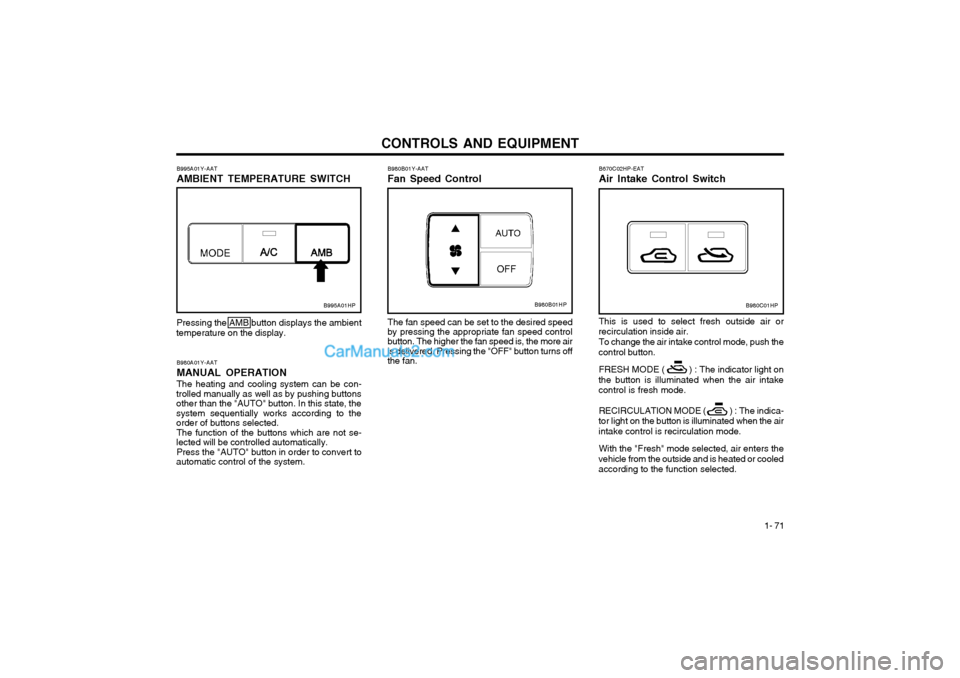
B670C02HP-EAT Air Intake Control Switch This is used to select fresh outside air or
recirculation inside air.
To change the air intake control mode, push the
control button.
FRESH MODE ( ) : The indicator light on
the button is illuminated when the air intake control is fresh mode.
RECIRCULATION MODE ( ) : The indica-
tor light on the button is illuminated when the air
intake control is recirculation mode.
With the "Fresh" mode selected, air enters the
vehicle from the outside and is heated or cooledaccording to the function selected.
B980A01Y-AAT MANUAL OPERATION The heating and cooling system can be con-
trolled manually as well as by pushing buttons other than the "AUTO" button. In this state, thesystem sequentially works according to the order of buttons selected.
The function of the buttons which are not se-
lected will be controlled automatically.
Press the "AUTO" button in order to convert to
automatic control of the system. B980B01Y-AAT Fan Speed Control
Pressing the AMB button displays the ambient
temperature on the display. The fan speed can be set to the desired speed
by pressing the appropriate fan speed control button. The higher the fan speed is, the more air is delivered. Pressing the "OFF" button turns offthe fan.
B995A01Y-AAT AMBIENT TEMPERATURE SWITCH
B995A01HPB980B01HPB980C01HP
Page 303 of 349
APPEARANCE CARE
4-2 JE070A1-E
POLISHING
The exterior paint work should be polished with
a proprietary wax polish when water no longer collects in bead form on the paint work. Theinstructions of the product manufacturer shouldbe adhered to. JE120A1-E
WINDOWS A proprietary glass cleaner should be used toclean the inside of the windows. However, therear heated windscreen must only be cleanedusing a light horizontal cleaning action. Careshould be exercised to avoid the use of abra-sive cleaners or contact with items of jewellerywhich may damage the heating elements.
Plastic wheel covers should be cleaned using a
sponge and water. Cast alloy wheels should becleaned using a mild soap or neutral detergent.Abrasive compounds must not be used since inthe event of these damaging the lacquer coat-ing, oxidisation of the aluminium wheel willoccur, spoiling the appearance.
The use of a toothbrush will facilitate cleaning
between the wheel "spokes". and ensure that accidental spillages are imme-diately flushed with water.
Do not use abrasive cleaning materials whichmay damage the bumpers.Avoid subjecting the bumpers to high tempera-tures such as may be encountered in high bakepaint ovens. JE110A1-E
INTERIOR VALETING
The soft trim and carpets should be maintainedwith the regular use of a vacuum cleaner. Heavysoiling should be removed with a dry cleaningagent recommended for this purpose followingthe instructions of the product manufacturer.Paint thinner, solvents or other such cleaningmaterials should not be used since damage tothe upholstery may result.
JE060A1-E
STAIN/SPOT REMOVAL Should tree sap, dead insects or tar prove to be
difficult to remove from the paint film, turpentineor a proprietary paint cutting compound may beused. Ensure that the area to be cleaned is notrubbed intensively to prevent breaking throughthe colour coat and exposing the under coat.
JE080A1-E
BUMPER MAINTENANCE The special material from which the bumpers
are manufactured warrants special attention topreserve the appearance of the bumpers. Avoidcontact with battery electrolyte or brake fluid JE090A1-E
ACCIDENT REPAIRS
In the event of the body work sustaining dam-age, the following points should be noted priorto repairs being undertaken. If body panels are replaced or repaired, anti corrosion treatment must be applied to therepair area. The product used must be compat-ible with those used in manufacture. It is recom-mended that repairs are entrusted to a Hyundaidealer to ensure that replacement parts usedare of the same high quality as those used inmanufacture of the vehicle and that the correctrepair methods and materials will ensure ade-quate levels of corrosion protection and thecontinued validity of the Anti Perforation War-ranty. JE100A1-E
SEAT BELTS
Seat belts should be cleaned only with a mild soap solution. Strong detergents, solvens orbleaches may damage the belt webbing andtherefore reduce the effectiveness of the belt.Belts which display signs of fraying, wear or cutshould be replaced.