turn signal Hyundai Terracan 2005 Owner's Manual
[x] Cancel search | Manufacturer: HYUNDAI, Model Year: 2005, Model line: Terracan, Model: Hyundai Terracan 2005Pages: 539, PDF Size: 18.03 MB
Page 14 of 539
YOUR VEHICLE AT A GLANCE
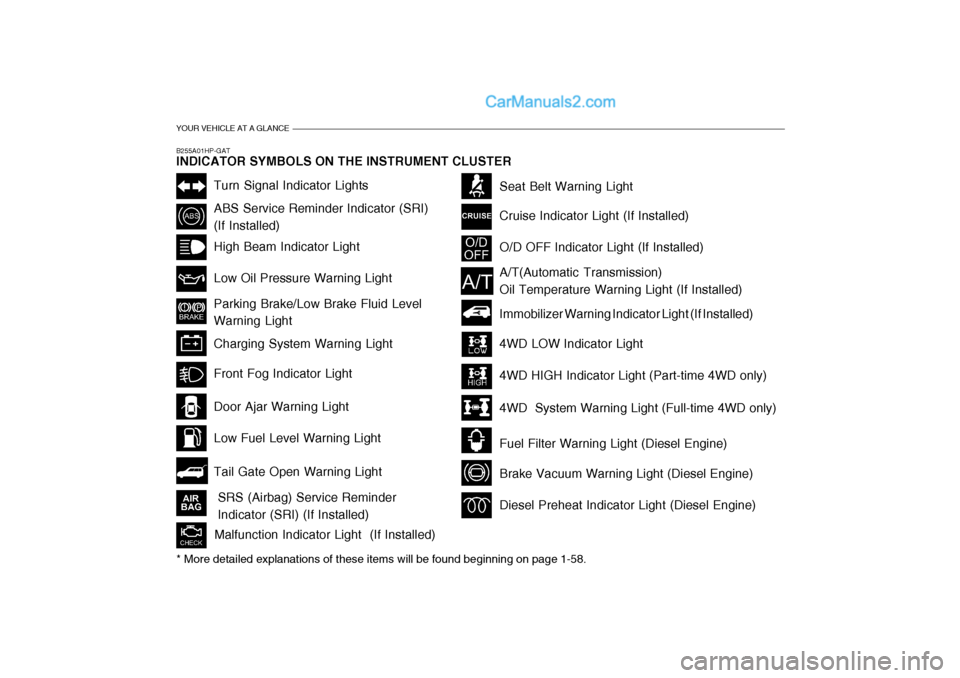
B255A01HP-GAT INDICATOR SYMBOLS ON THE INSTRUMENT CLUSTER
Turn Signal Indicator Lights
ABS Service Reminder Indicator (SRI) (If Installed) High Beam Indicator Light Low Oil Pressure Warning Light Parking Brake/Low Brake Fluid Level Warning Light Charging System Warning Light
Tail Gate Open Warning Light
Door Ajar Warning Light Low Fuel Level Warning Light
Front Fog Indicator Light
O/D OFF Indicator Light (If Installed)
Immobilizer Warning Indicator Light (If Installed)
SRS (Airbag) Service Reminder Indicator (SRI) (If Installed) Seat Belt Warning Light Cruise Indicator Light (If Installed)
Malfunction Indicator Light (If Installed)
A/T(Automatic Transmission) Oil Temperature Warning Light (If Installed)
4WD LOW Indicator Light 4WD HIGH Indicator Light (Part-time 4WD only)
4WD System Warning Light (Full-time 4WD only)
Fuel Filter Warning Light (Diesel Engine)
Brake Vacuum Warning Light (Diesel Engine)
* More detailed explanations of these items will be found beginning on page 1-58.
Diesel Preheat Indicator Light (Diesel Engine)
Page 27 of 539
1
FEATURES OF YOUR HYUNDAI
13THEFT-ALARM SYSTEM
NOTE:
o When pushing the front portion of the driver's door lock switch, all vehicle doors will lock. If anydoor is open when the switch is depressed, the door will remain locked when closed.
o When pushing the rear portion of the switch, all vehicle doors willunlock.
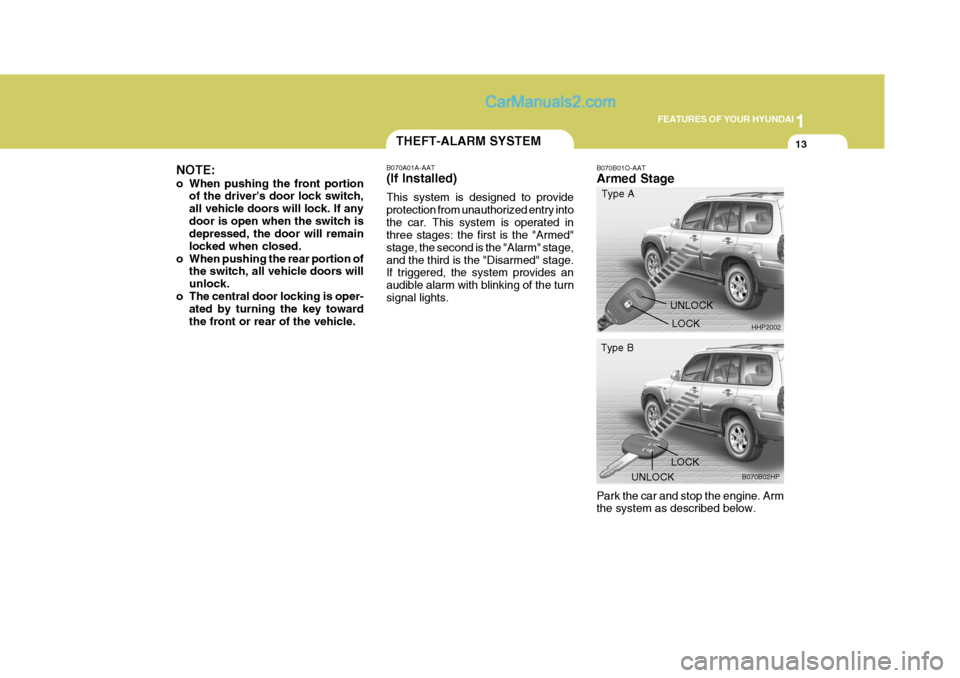
o The central door locking is oper- ated by turning the key towardthe front or rear of the vehicle. B070A01A-AAT (If Installed) This system is designed to provide protection from unauthorized entry intothe car. This system is operated in three stages: the first is the "Armed" stage, the second is the "Alarm" stage,and the third is the "Disarmed" stage. If triggered, the system provides an audible alarm with blinking of the turnsignal lights.
B070B01O-AAT Armed Stage Park the car and stop the engine. Arm the system as described below.
LOCK HHP2002
B070B02HP
Type A
Type B
UNLOCK LOCK
UNLOCK
Page 28 of 539
1FEATURES OF YOUR HYUNDAI
14
!
!
1) Remove the ignition key from the
ignition switch.
2) Make sure that the engine hood and tail gate are closed and latched.
3) Lock the doors using the transmitter
of the keyless entry system.
After completion of the steps above, the turn signal lights will blink once to indicate that the system is armed. NOTE:
1) If any door, tail gate or engine hood remains open, the system will not be armed.
2) If this happens, rearm the system as previously described.
CAUTION:
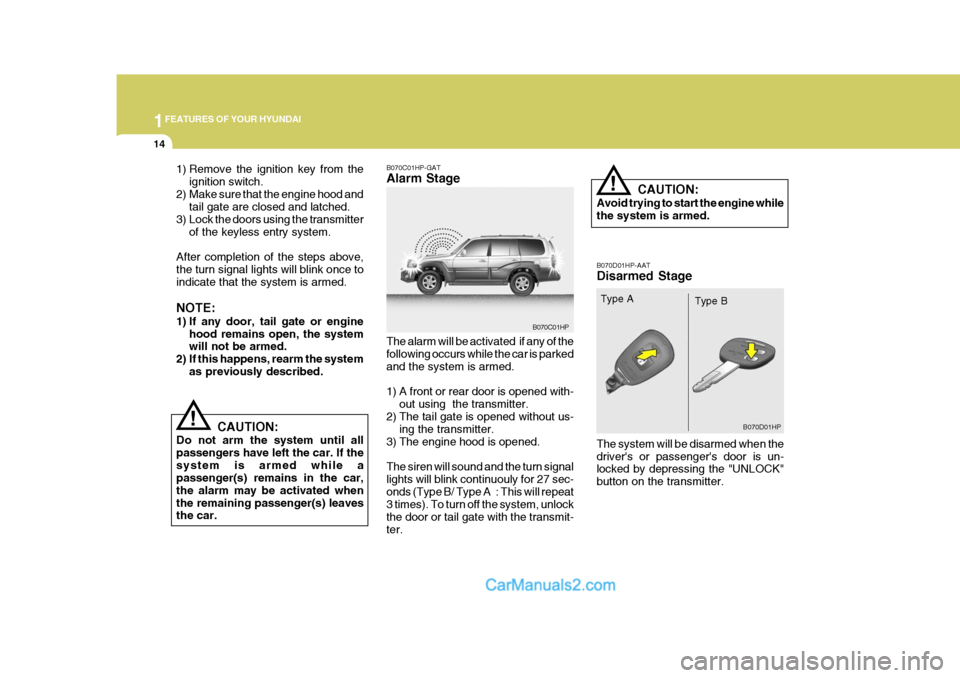
Do not arm the system until all passengers have left the car. If thesystem is armed while a passenger(s) remains in the car, the alarm may be activated whenthe remaining passenger(s) leaves the car. B070C01HP-GAT Alarm Stage The alarm will be activated if any of the following occurs while the car is parked and the system is armed.
1) A front or rear door is opened with-
out using the transmitter.
2) The tail gate is opened without us- ing the transmitter.
3) The engine hood is opened.The siren will sound and the turn signal lights will blink continuouly for 27 sec-
onds (Type B/ Type A : This will repeat 3 times). To turn off the system, unlock the door or tail gate with the transmit-ter. CAUTION: Avoid trying to start the engine while the system is armed. B070D01HP-AAT Disarmed Stage The system will be disarmed when the driver's or passenger's door is un- locked by depressing the "UNLOCK" button on the transmitter.
B070C01HP
B070D01HP
Type A
Type B
Page 29 of 539
1
FEATURES OF YOUR HYUNDAI
15
!
After completion of the step above, the turn signal lights will blink twice toindicate that the system is disarmed. NOTE: If any door, tail gate or engine hood is not opened within 30 seconds,the system will be rearmed.
CAUTION:
Only the transmitter can disarm thearmed stage. If the transmitter does not disarm the system, it is neces- sary to take the following steps;
1. Unlock the door with the key, which will cause the alarm to be activated.
2. Insert the key in the ignition key
cylinder and turn the ignition keyto "ON" position.
3. Wait for 30 seconds. After completing the steps above, the system will be disarmed. B070F01A-GAT Keyless Entry System (If Installed) Locking doors
1. Close all doors.
2. Push the "LOCK" button on the trans-
mitter.
3. At the same time all doors lock, the
turn signal lights will blink once toindicate that the system is armed.
Unlocking doors
1. Push the "UNLOCK" button on the transmitter.
2. At the same time all doors unlock,
the turn signal lights will blink twice to indicate that the system is dis- armed. B070E02HP-GAT Replacing the battery When the transmitter's battery begins to get weak, it may take several pushes on the button to lock or unlock thedoors, and the LED will not light. Re- place the battery as soon as possible.
Battery type : CR2032(Type A)
or CR1616 (Type B)
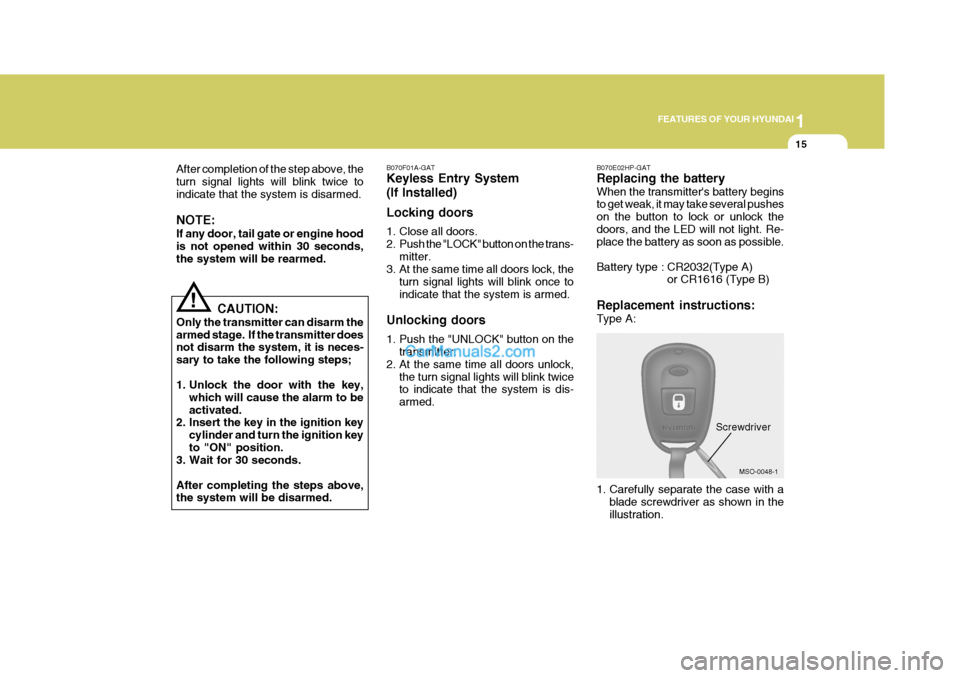
Replacement instructions: Type A:
MSO-0048-1
1. Carefully separate the case with a blade screwdriver as shown in the illustration.
Screwdriver
Page 69 of 539
1
FEATURES OF YOUR HYUNDAI
55
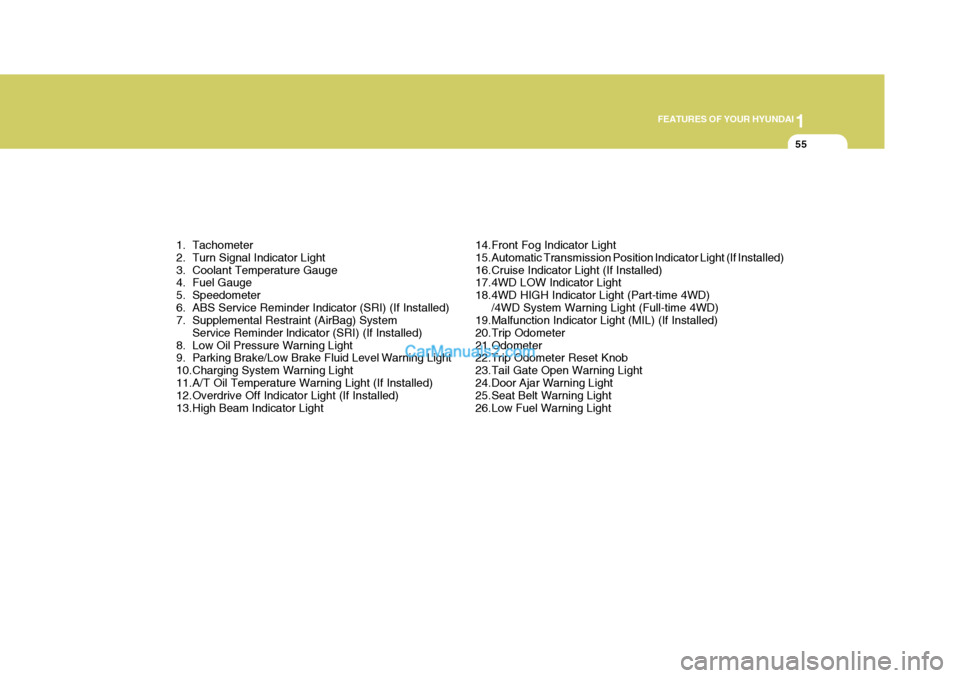
1. Tachometer
2. Turn Signal Indicator Light
3. Coolant Temperature Gauge
4. Fuel Gauge
5. Speedometer
6. ABS Service Reminder Indicator (SRI) (If Installed)
7. Supplemental Restraint (AirBag) System Service Reminder lndicator (SRI) (If Installed)
8. Low Oil Pressure Warning Light
9. Parking Brake/Low Brake Fluid Level Warning Light
10.Charging System Warning Light
11.A/T Oil Temperature Warning Light (If Installed)
12.Overdrive Off Indicator Light (If Installed)
13.High Beam Indicator Light 14.Front Fog Indicator Light
15.Automatic Transmission Position Indicator Light (If Installed)
16.Cruise Indicator Light (If Installed)
17.4WD LOW Indicator Light
18.4WD HIGH Indicator Light (Part-time 4WD)
/4WD System Warning Light (Full-time 4WD)
19.Malfunction Indicator Light (MIL) (If Installed)
20.Trip Odometer
21.Odometer 22.Trip Odometer Reset Knob
23.Tail Gate Open Warning Light
24.Door Ajar Warning Light
25.Seat Belt Warning Light
26.Low Fuel Warning Light
Page 71 of 539
1
FEATURES OF YOUR HYUNDAI
57
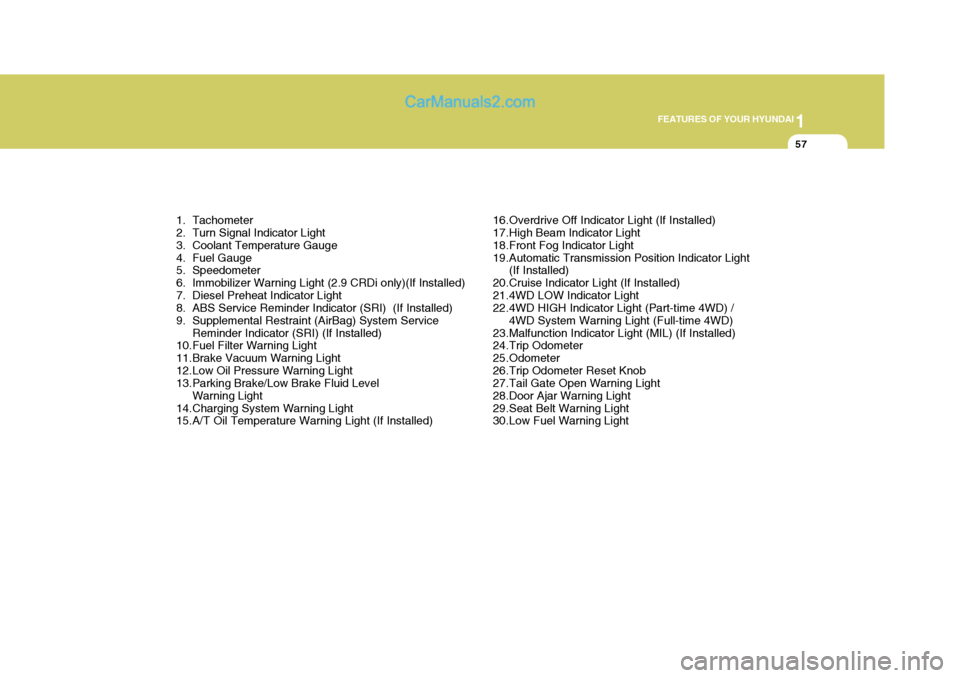
1. Tachometer
2. Turn Signal Indicator Light
3. Coolant Temperature Gauge
4. Fuel Gauge
5. Speedometer
6. Immobilizer Warning Light (2.9 CRDi only)(If Installed)
7. Diesel Preheat Indicator Light
8. ABS Service Reminder Indicator (SRI) (If Installed)
9. Supplemental Restraint (AirBag) System Service Reminder Indicator (SRI) (If Installed)
10.Fuel Filter Warning Light
11.Brake Vacuum Warning Light
12.Low Oil Pressure Warning Light
13.Parking Brake/Low Brake Fluid Level
Warning Light
14.Charging System Warning Light
15.A/T Oil Temperature Warning Light (If Installed) 16.Overdrive Off Indicator Light (If Installed)
17.High Beam Indicator Light
18.Front Fog Indicator Light
19.Automatic Transmission Position Indicator Light
(If Installed)
20.Cruise Indicator Light (If Installed)
21.4WD LOW Indicator Light
22.4WD HIGH Indicator Light (Part-time 4WD) / 4WD System Warning Light (Full-time 4WD)
23.Malfunction Indicator Light (MIL) (If Installed)
24.Trip Odometer
25.Odometer
26.Trip Odometer Reset Knob
27.Tail Gate Open Warning Light
28.Door Ajar Warning Light
29.Seat Belt Warning Light
30.Low Fuel Warning Light
Page 72 of 539
1FEATURES OF YOUR HYUNDAI
58WARNING AND INDICATOR LIGHTS
!
B260D01A-AAT
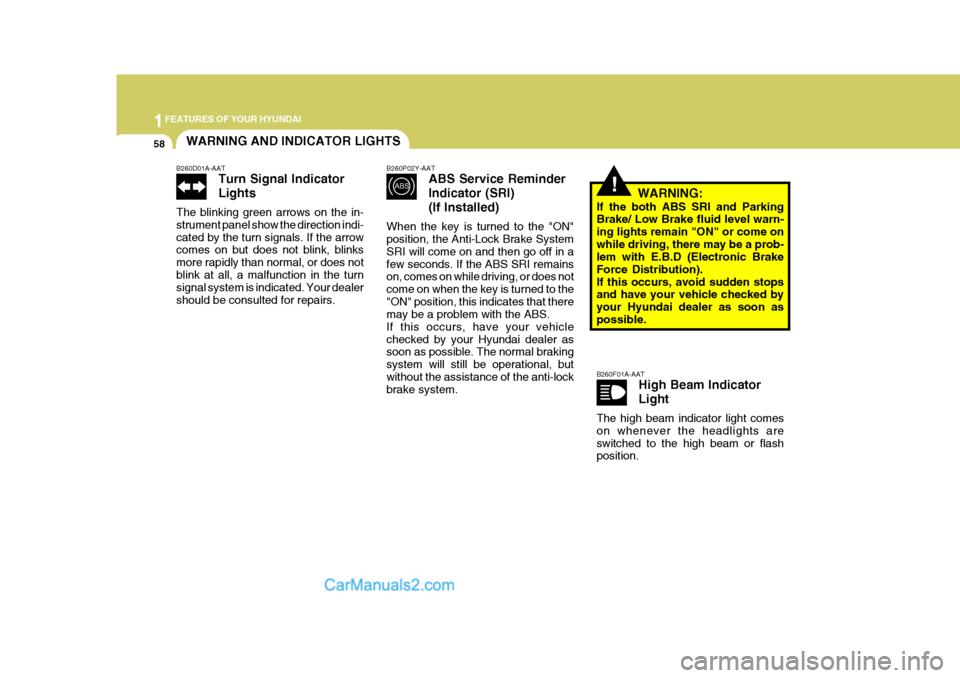
Turn Signal Indicator Lights
The blinking green arrows on the in- strument panel show the direction indi-cated by the turn signals. If the arrow comes on but does not blink, blinks more rapidly than normal, or does notblink at all, a malfunction in the turn signal system is indicated. Your dealer should be consulted for repairs. B260P02Y-AAT
ABS Service Reminder Indicator (SRI)(If Installed)
When the key is turned to the "ON" position, the Anti-Lock Brake System SRI will come on and then go off in afew seconds. If the ABS SRI remains on, comes on while driving, or does not come on when the key is turned to the"ON" position, this indicates that there may be a problem with the ABS. If this occurs, have your vehiclechecked by your Hyundai dealer as soon as possible. The normal braking system will still be operational, butwithout the assistance of the anti-lock brake system. WARNING:
If the both ABS SRI and ParkingBrake/ Low Brake fluid level warn- ing lights remain "ON" or come onwhile driving, there may be a prob- lem with E.B.D (Electronic Brake Force Distribution).If this occurs, avoid sudden stops and have your vehicle checked by your Hyundai dealer as soon aspossible. B260F01A-AAT High Beam Indicator Light
The high beam indicator light comes on whenever the headlights areswitched to the high beam or flash position.
Page 87 of 539
1
FEATURES OF YOUR HYUNDAI
73MULTI-FUNCTION LIGHT SWITCH
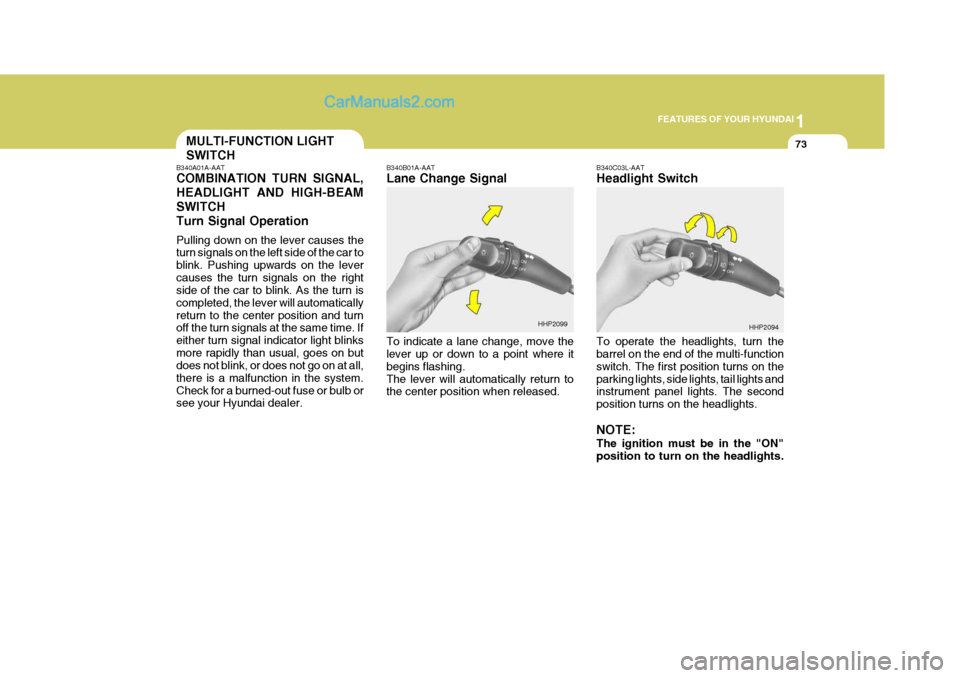
B340A01A-AAT COMBINATION TURN SIGNAL, HEADLIGHT AND HIGH-BEAMSWITCHTurn Signal Operation Pulling down on the lever causes the turn signals on the left side of the car to blink. Pushing upwards on the levercauses the turn signals on the right side of the car to blink. As the turn is completed, the lever will automaticallyreturn to the center position and turn off the turn signals at the same time. If either turn signal indicator light blinksmore rapidly than usual, goes on but does not blink, or does not go on at all, there is a malfunction in the system.Check for a burned-out fuse or bulb or see your Hyundai dealer. B340B01A-AAT Lane Change Signal To indicate a lane change, move the lever up or down to a point where it begins flashing.The lever will automatically return to the center position when released.
B340C03L-AAT Headlight Switch To operate the headlights, turn the barrel on the end of the multi-function switch. The first position turns on theparking lights, side lights, tail lights and instrument panel lights. The second position turns on the headlights. NOTE: The ignition must be in the "ON" position to turn on the headlights.
HHP2099
HHP2094
Page 92 of 539
1FEATURES OF YOUR HYUNDAI
78FRONT/REAR WINDOW DE- FROSTER SWITCHHAZARD WARNING SYSTEM
!
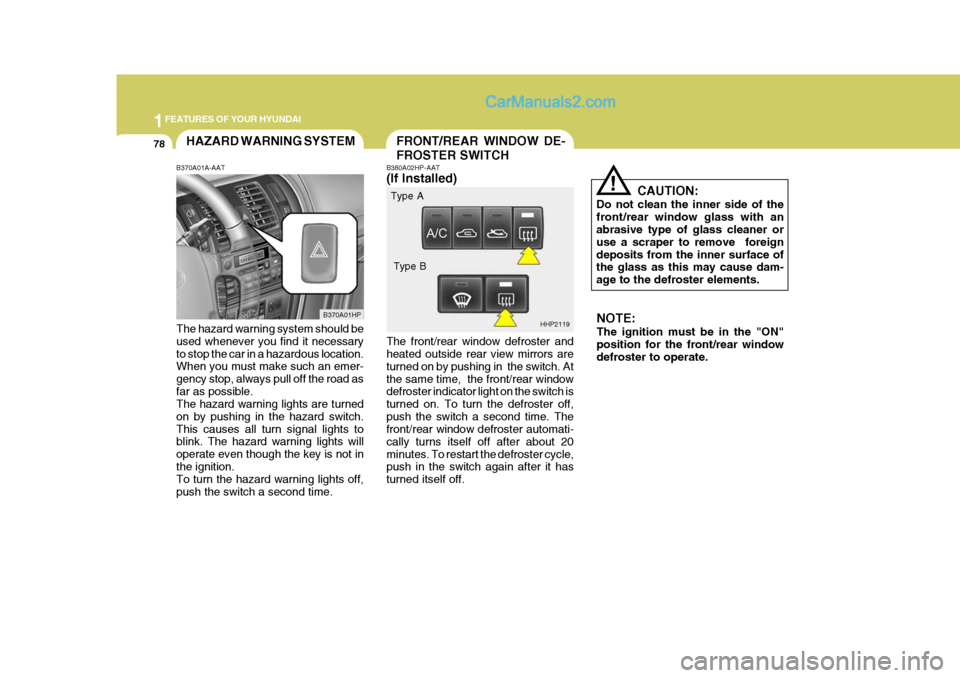
B380A02HP-AAT (If Installed) The front/rear window defroster and heated outside rear view mirrors are turned on by pushing in the switch. Atthe same time, the front/rear window defroster indicator light on the switch is turned on. To turn the defroster off,push the switch a second time. The front/rear window defroster automati- cally turns itself off after about 20minutes. To restart the defroster cycle, push in the switch again after it has turned itself off. CAUTION:
Do not clean the inner side of thefront/rear window glass with an abrasive type of glass cleaner or use a scraper to remove foreigndeposits from the inner surface of the glass as this may cause dam- age to the defroster elements.
B370A01A-AAT The hazard warning system should be used whenever you find it necessary to stop the car in a hazardous location. When you must make such an emer- gency stop, always pull off the road asfar as possible. The hazard warning lights are turned on by pushing in the hazard switch.This causes all turn signal lights to blink. The hazard warning lights will operate even though the key is not inthe ignition. To turn the hazard warning lights off, push the switch a second time. B370A01HP
HHP2119NOTE: The ignition must be in the "ON" position for the front/rear window defroster to operate.
Type A
Type B
Page 141 of 539
1
FEATURES OF YOUR HYUNDAI
127
H290B03E-AAT
1. POWER ON-OFF Control Knob The radio unit may be operated when the ignition key is in the "ACC" or "ON"position. Press the button to switch the power on. The display shows the radio frequency in the radio mode or thetape direction indicator in the tape mode, or CD track either the CD mode or CD AUTO CHANGER mode. Toswitch the power off, press the button again. VOLUME Control Rotate the knob clockwise to increase the volume and turn the knob counter-clockwise to reduce the volume.
2. BASS/BALANCE Control Knob
BASS Control Knob Press to pop the knob out. To increase the bass, rotate the knob clockwise, while to decrease the bass, rotate the knob counterclockwise. BALANCE Control knob Pull the Bass control knob out further. Rotate the knob clockwise to empha-size right speaker sound (left speaker sound will be attenuated). When the control knob is turned coun-terclockwise, left speaker sound will be emphasized (right speaker sound will be attenuated).
3. TREBLE/FAD Knob TREBLE Control Knob Press to pop the knob out and turn to the left or right for the desired treble tone. FAD (Fader) Control Knob Further pull the popped-up knob. Turn the control knob counterclockwise to emphasize front speaker sound (rearspeaker sound will be attenuated). When the control knob is turned clock- wise, rear speaker sound will be em-phasized (front speaker sound will be attenuated).
4. TUNE (Manual) Select Button Press the ( ) side or ( ) side to increase or to decrease the frequency.With the button held down for 0.5 sec. or more, the stop signal (broadcasting radio wave) is ignored and channelselection continues. SEEK Operation (Automatic Channel Selection) Press the TUNE select button for 0.5 sec or more. Releasing it will automati- cally tune to the next available station with a beep sound.When the ( ) side is pressed longer than 0.5 second, releasing it will auto- matically tune to the next higher fre-quency and when the ( ) side is pressed longer than 0.5 second, re- leasing it will automatically tune to thenext lower frequency.
5. PRESET STATION Select
Buttons
Six (6) stations for AM, FM1 and FM2 respectively can be preset in the elec- tronic memory circuit.