Hyundai Tiburon 2005 Owner's Manual
Tiburon 2005
Hyundai
Hyundai
https://www.carmanualsonline.info/img/35/19690/w960_19690-0.png
Hyundai Tiburon 2005 Owner's Manual
Trending: reset, child restraint, coolant temperature, spark plugs replace, oil filter, mileage, rear view mirror
Page 221 of 262
6
DO-IT-YOURSELF MAINTENANCE
32
!
WARNING:
This halogen bulb contains gas under pres-
sure and if impacted could shatter, result-
ing in flying fragments. Always wear eye
protection when servicing the bulb. Protect
the bulb against abrasions or scratches
and against liquids when lighted. Turn the
bulb on only when installing in a headlight.
Replace the headlight if damaged or cracked.
Keep the bulb out of the reach of children
and dispose of the used bulb with care.
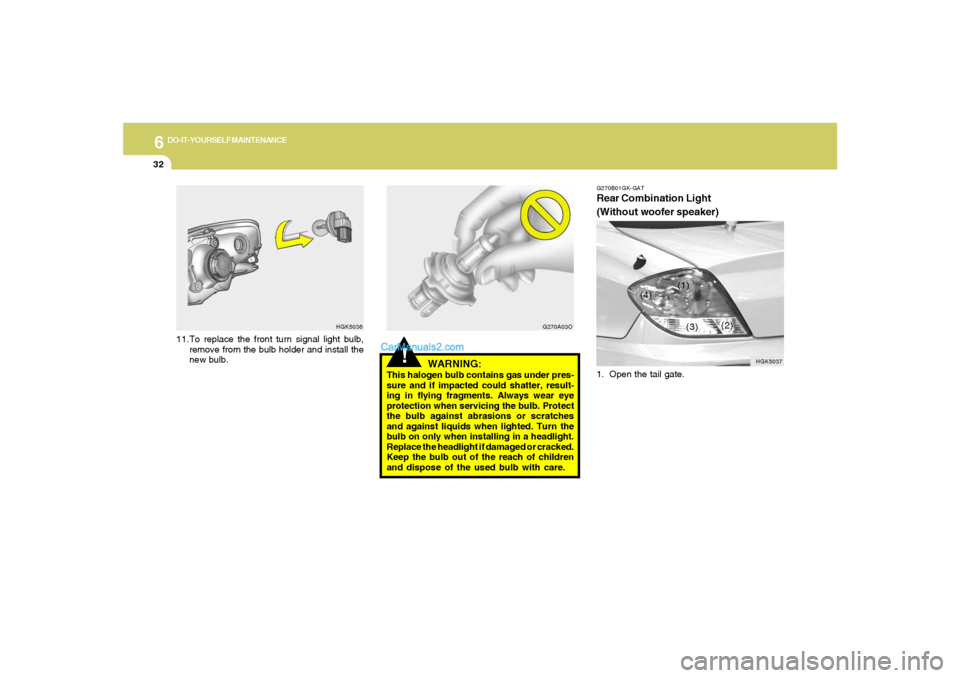
HGK5036G270A03O
11.To replace the front turn signal light bulb,
remove from the bulb holder and install the
new bulb.
G270B01GK-GATRear Combination Light
(Without woofer speaker)1. Open the tail gate.
HGK5037
(1)
(2)
(3) (4)
Page 222 of 262
6
DO-IT-YOURSELF MAINTENANCE
33
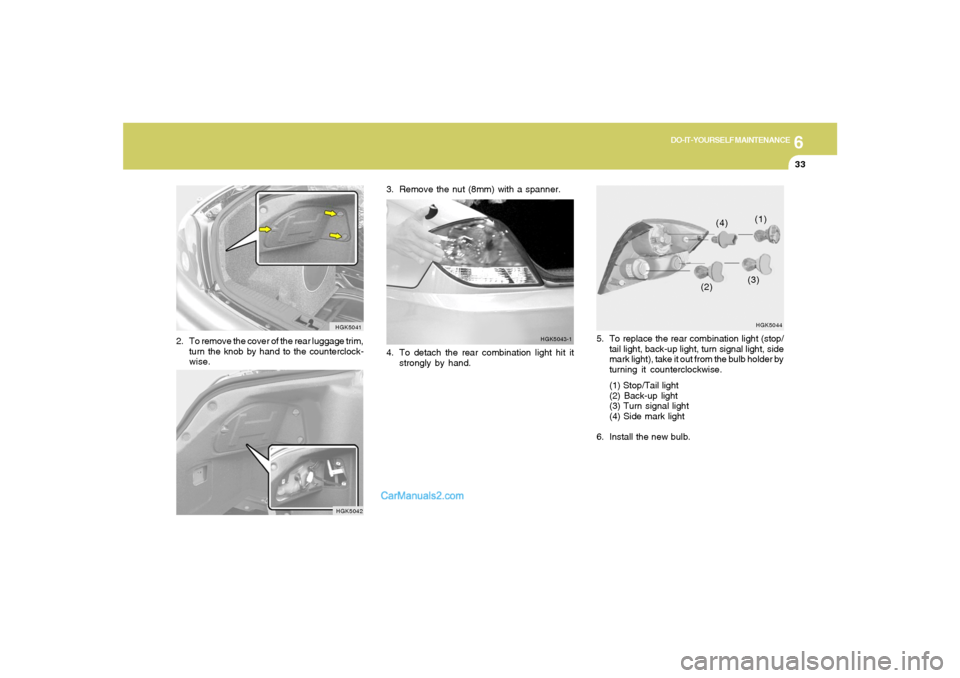
5. To replace the rear combination light (stop/
tail light, back-up light, turn signal light, side
mark light), take it out from the bulb holder by
turning it counterclockwise.
(1) Stop/Tail light
(2) Back-up light
(3) Turn signal light
(4) Side mark light
6. Install the new bulb.
HGK5044(1)
(2)(3) (4)
HGK5041
2. To remove the cover of the rear luggage trim,
turn the knob by hand to the counterclock-
wise.
HGK5042
3. Remove the nut (8mm) with a spanner.
4. To detach the rear combination light hit it
strongly by hand.
HGK5043-1
Page 223 of 262
6
DO-IT-YOURSELF MAINTENANCE
34
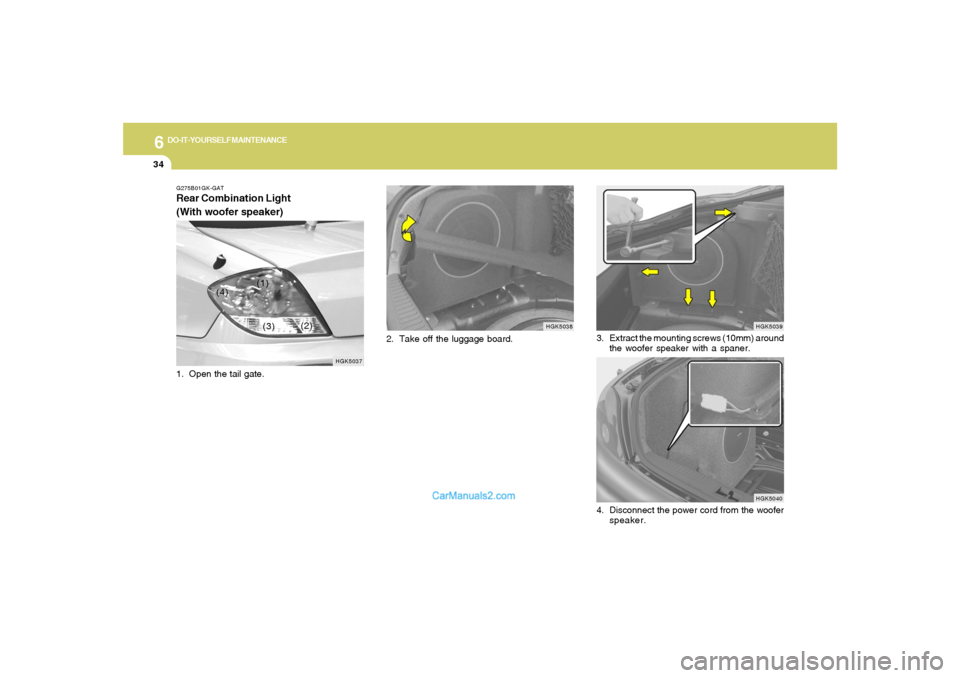
2. Take off the luggage board.
HGK5038 G275B01GK-GAT
Rear Combination Light
(With woofer speaker)
HGK5037
(1)
(2)
(3) (4)
1. Open the tail gate.
HGK5039
HGK5040
3. Extract the mounting screws (10mm) around
the woofer speaker with a spaner.
4. Disconnect the power cord from the woofer
speaker.
Page 224 of 262
6
DO-IT-YOURSELF MAINTENANCE
35
HGK5044(1)
(2)(3) (4)
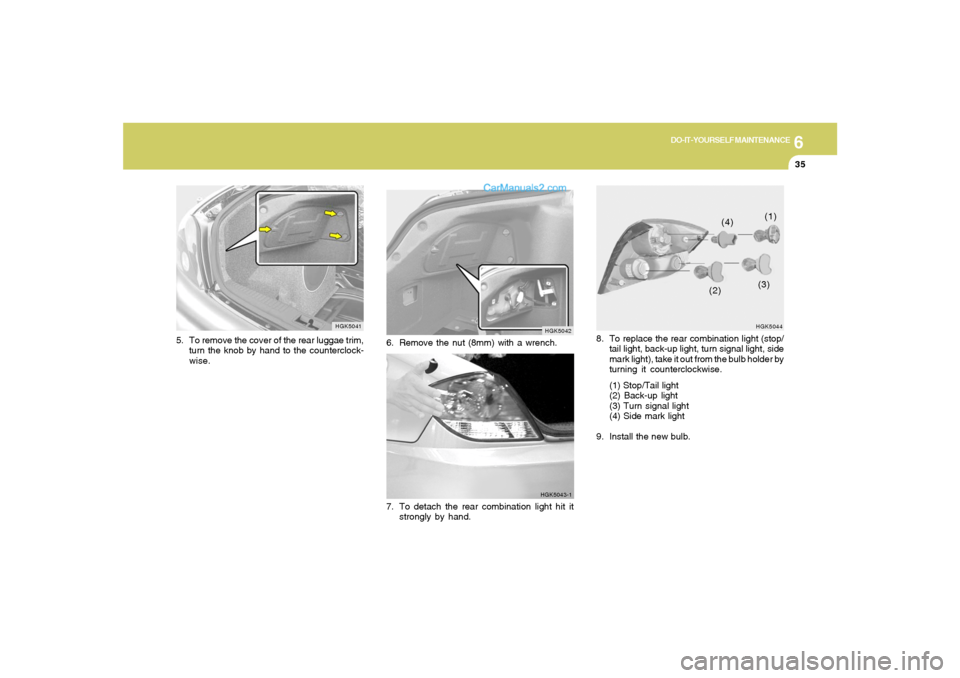
8. To replace the rear combination light (stop/
tail light, back-up light, turn signal light, side
mark light), take it out from the bulb holder by
turning it counterclockwise.
(1) Stop/Tail light
(2) Back-up light
(3) Turn signal light
(4) Side mark light
9. Install the new bulb.
HGK5041
5. To remove the cover of the rear luggae trim,
turn the knob by hand to the counterclock-
wise.
HGK5042
6. Remove the nut (8mm) with a wrench.
HGK5043-1
7. To detach the rear combination light hit it
strongly by hand.
Page 225 of 262
6
DO-IT-YOURSELF MAINTENANCE
36
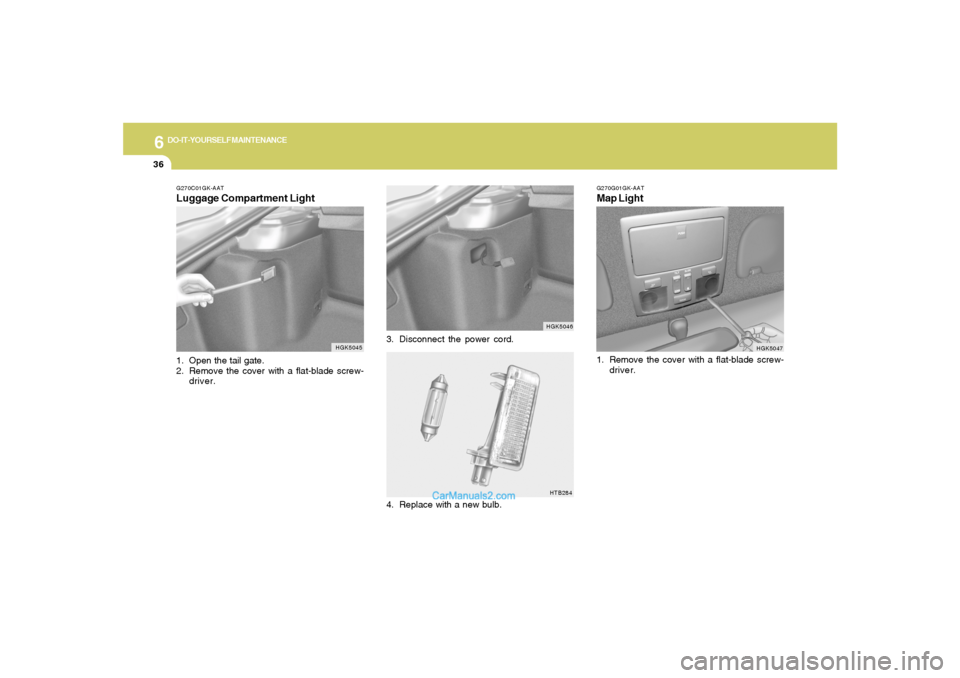
3. Disconnect the power cord.
HGK5046HTB284
G270C01GK-AATLuggage Compartment Light1. Open the tail gate.
2. Remove the cover with a flat-blade screw-
driver.
HGK5045
4. Replace with a new bulb.
G270G01GK-AATMap Light
HGK5047
1. Remove the cover with a flat-blade screw-
driver.
Page 226 of 262
6
DO-IT-YOURSELF MAINTENANCE
37
HGK2112
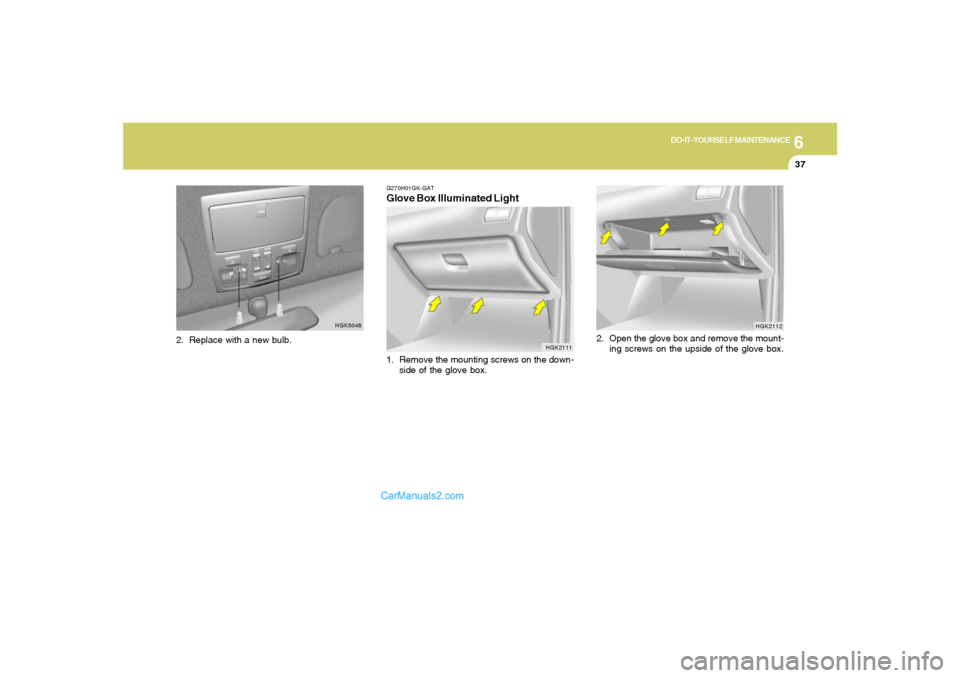
2. Open the glove box and remove the mount-
ing screws on the upside of the glove box.
HGK5048
G270H01GK-GATGlove Box Illuminated Light1. Remove the mounting screws on the down-
side of the glove box.
HGK2111
2. Replace with a new bulb.
Page 227 of 262
6
DO-IT-YOURSELF MAINTENANCE
38
HGK5053
ClipPower Cord
4. Disconnect the power cord.
5. Remove the glove box illuminated light by
pushing the clip. 3. Remove the glove box by pulling strongly.
CAUTION:
Be careful not to damage the glove box
when pulling the glove box.
!
HGK5052
HTB284
6. Replace with a new bulb.
Page 228 of 262
6
DO-IT-YOURSELF MAINTENANCE
39
Part Name
High Mounted Rear
Stop Light
Rear
Combination
Light
License Plate Light
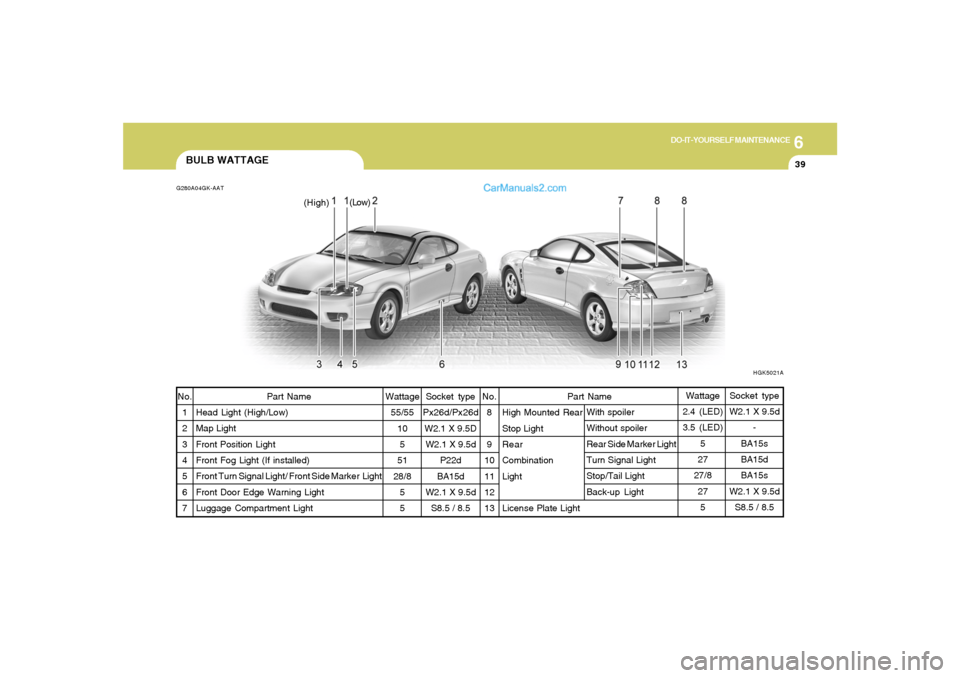
BULB WATTAGEG280A04GK-AATNo.
1
2
3
4
5
6
7Part Name
Head Light (High/Low)
Map Light
Front Position Light
Front Fog Light (If installed)
Front Turn Signal Light/ Front Side Marker Light
Front Door Edge Warning Light
Luggage Compartment LightWattage
55/55
10
5
51
28/8
5
5No.
8
9
10
11
12
13Wattage
2.4 (LED)
3.5 (LED)
5
27
27/8
27
5
HGK5021A
(High)(Low)
Socket type
Px26d/Px26d
W2.1 X 9.5D
W2.1 X 9.5d
P22d
BA15d
W2.1 X 9.5d
S8.5 / 8.5
With spoiler
Without spoiler
Rear Side Marker Light
Turn Signal Light
Stop/Tail Light
Back-up LightSocket type
W2.1 X 9.5d
-
BA15s
BA15d
BA15s
W2.1 X 9.5d
S8.5 / 8.5
Page 229 of 262
6
DO-IT-YOURSELF MAINTENANCE
40
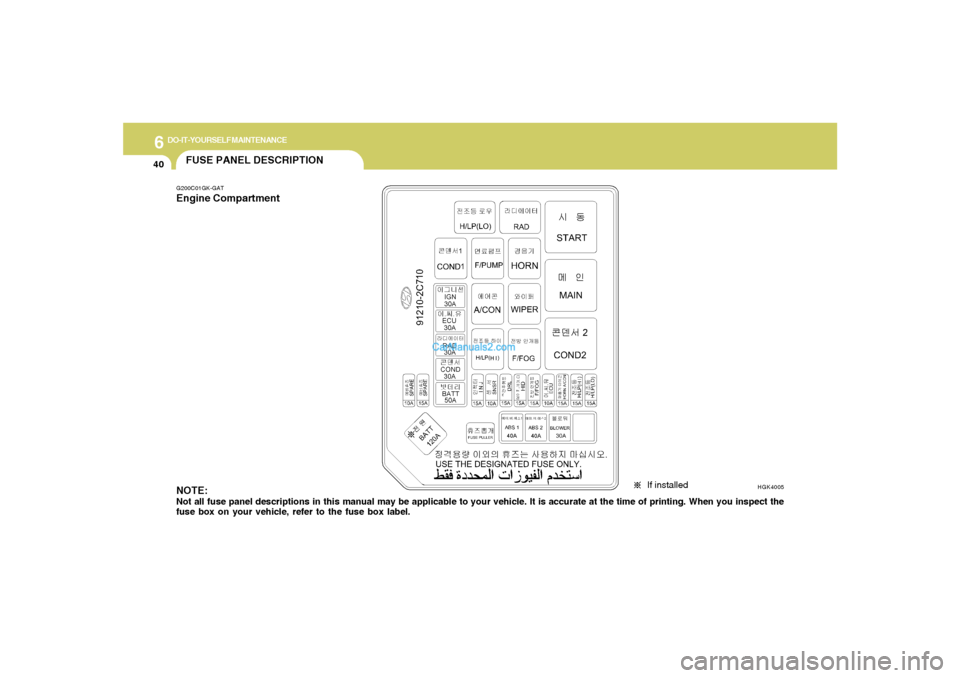
FUSE PANEL DESCRIPTIONG200C01GK-GATEngine Compartment
If installed
NOTE:Not all fuse panel descriptions in this manual may be applicable to your vehicle. It is accurate at the time of printing. When you inspect the
fuse box on your vehicle, refer to the fuse box label.
HGK4005
Page 230 of 262
6
DO-IT-YOURSELF MAINTENANCE
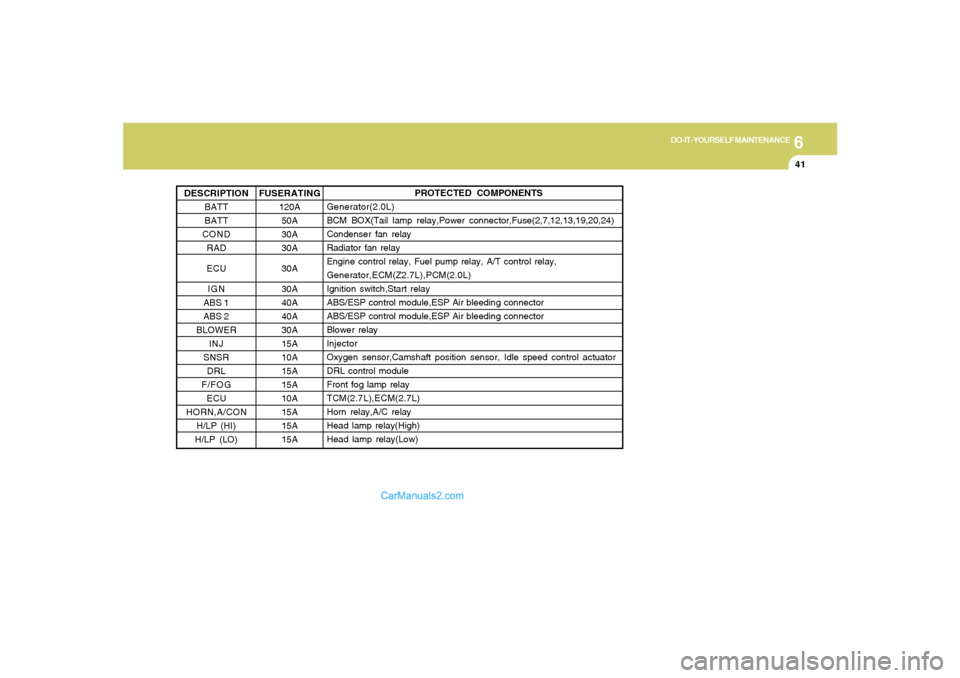
41
PROTECTED COMPONENTS
Generator(2.0L)
BCM BOX(Tail lamp relay,Power connector,Fuse(2,7,12,13,19,20,24)
Condenser fan relay
Radiator fan relay
Engine control relay, Fuel pump relay, A/T control relay,
Generator,ECM(Z2.7L),PCM(2.0L)
Ignition switch,Start relay
ABS/ESP control module,ESP Air bleeding connector
ABS/ESP control module,ESP Air bleeding connector
Blower relay
Injector
Oxygen sensor,Camshaft position sensor, Idle speed control actuator
DRL control module
Front fog lamp relay
TCM(2.7L),ECM(2.7L)
Horn relay,A/C relay
Head lamp relay(High)
Head lamp relay(Low)
FUSERATING
120A
50A
30A
30A
30A
30A
40A
40A
30A
15A
10A
15A
15A
10A
15A
15A
15A DESCRIPTION
BATT
BATT
COND
RAD
ECU
IGN
ABS 1
ABS 2
BLOWER
INJ
SNSR
DRL
F/FOG
ECU
HORN,A/CON
H/LP (HI)
H/LP (LO)
Trending: four wheel drive, towing capacity, park assist, traction control, battery replacement, engine overheat, airbag
