steering Hyundai Tiburon 2006 Owner's Guide
[x] Cancel search | Manufacturer: HYUNDAI, Model Year: 2006, Model line: Tiburon, Model: Hyundai Tiburon 2006Pages: 266, PDF Size: 10.94 MB
Page 179 of 266
314
WHAT TO DO IN AN EMERGENCY
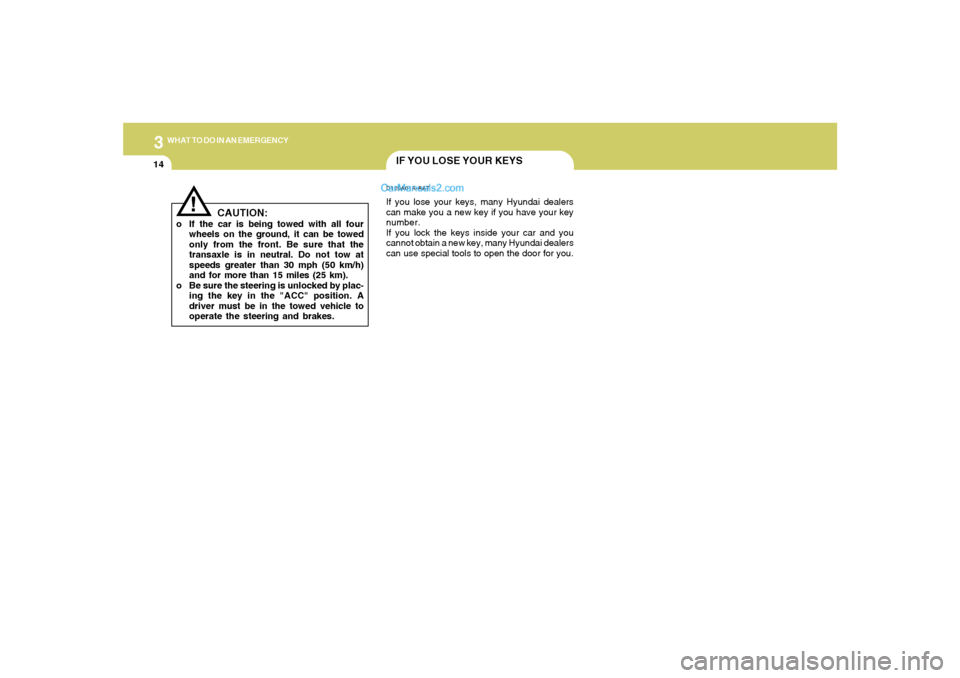
IF YOU LOSE YOUR KEYSD120A01A-AATIf you lose your keys, many Hyundai dealers
can make you a new key if you have your key
number.
If you lock the keys inside your car and you
cannot obtain a new key, many Hyundai dealers
can use special tools to open the door for you.
!
CAUTION:
o If the car is being towed with all four
wheels on the ground, it can be towed
only from the front. Be sure that the
transaxle is in neutral. Do not tow at
speeds greater than 30 mph (50 km/h)
and for more than 15 miles (25 km).
o Be sure the steering is unlocked by plac-
ing the key in the "ACC" position. A
driver must be in the towed vehicle to
operate the steering and brakes.
Page 190 of 266
5
VEHICLE MAINTENANCE REQUIREMENTS
5
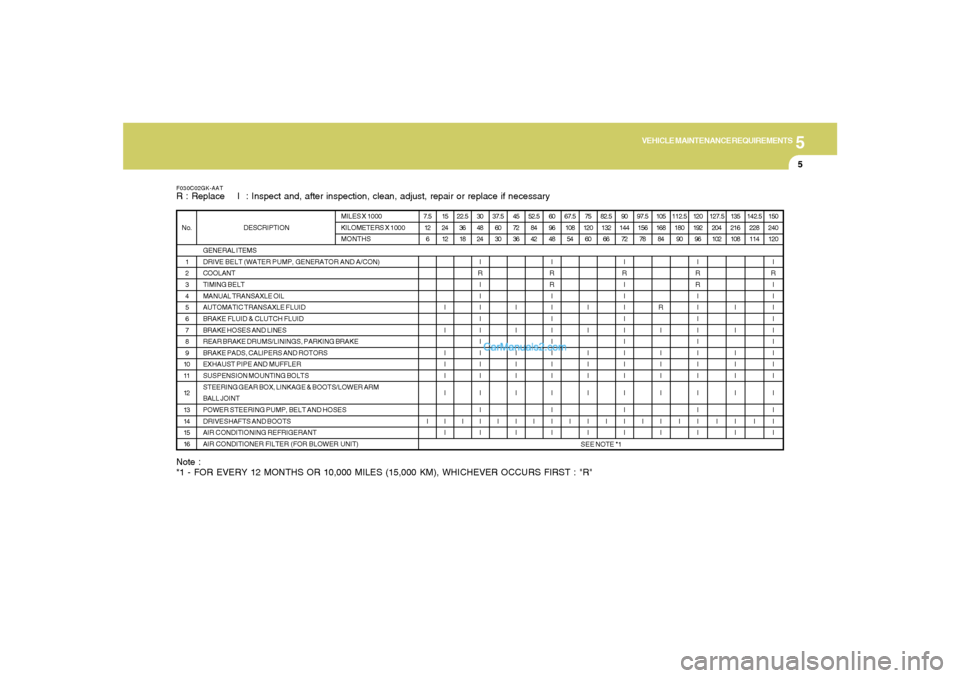
Note :
*1 - FOR EVERY 12 MONTHS OR 10,000 MILES (15,000 KM), WHICHEVER OCCURS FIRST : "R"
F030C02GK-AATR : Replace I : Inspect and, after inspection, clean, adjust, repair or replace if necessaryNo.
1
2
3
4
5
6
7
8
9
10
11
12
13
14
15
16DESCRIPTION
GENERAL ITEMS
DRIVE BELT (WATER PUMP, GENERATOR AND A/CON)
COOLANT
TIMING BELT
MANUAL TRANSAXLE OIL
AUTOMATIC TRANSAXLE FLUID
BRAKE FLUID & CLUTCH FLUID
BRAKE HOSES AND LINES
REAR BRAKE DRUMS/LININGS, PARKING BRAKE
BRAKE PADS, CALIPERS AND ROTORS
EXHAUST PIPE AND MUFFLER
SUSPENSION MOUNTING BOLTS
STEERING GEAR BOX, LINKAGE & BOOTS/LOWER ARM
BALL JOINT
POWER STEERING PUMP, BELT AND HOSES
DRIVESHAFTS AND BOOTS
AIR CONDITIONING REFRIGERANT
AIR CONDITIONER FILTER (FOR BLOWER UNIT)MILES X 1000
KILOMETERS X 1000
MONTHS7.5
12
6
I15
24
12
I
I
I
I
I
I
I
I22.5
36
18
I30
48
24
I
R
I
I
I
I
I
I
I
I
I
I
I
I
I37.5
60
30
I45
72
36
I
I
I
I
I
I
I
I52.5
84
42
I60
96
48
I
R
R
I
I
I
I
I
I
I
I
I
I
I
I67.5
108
54
I75
120
60
I
I
I
I
I
I
I
I82.5
132
66
I90
144
72
I
R
I
I
I
I
I
I
I
I
I
I
I
I
I97.5
156
78
I105
168
84
R
I
I
I
I
I
I
I112.5
180
90
I120
192
96
I
R
R
I
I
I
I
I
I
I
I
I
I
I
I127.5
204
102
I135
216
108
I
I
I
I
I
I
I
I142.5
228
114
I150
240
120
I
R
I
I
I
I
I
I
I
I
I
I
I
I
ISEE NOTE *1
Page 191 of 266
5
VEHICLE MAINTENANCE REQUIREMENTS6
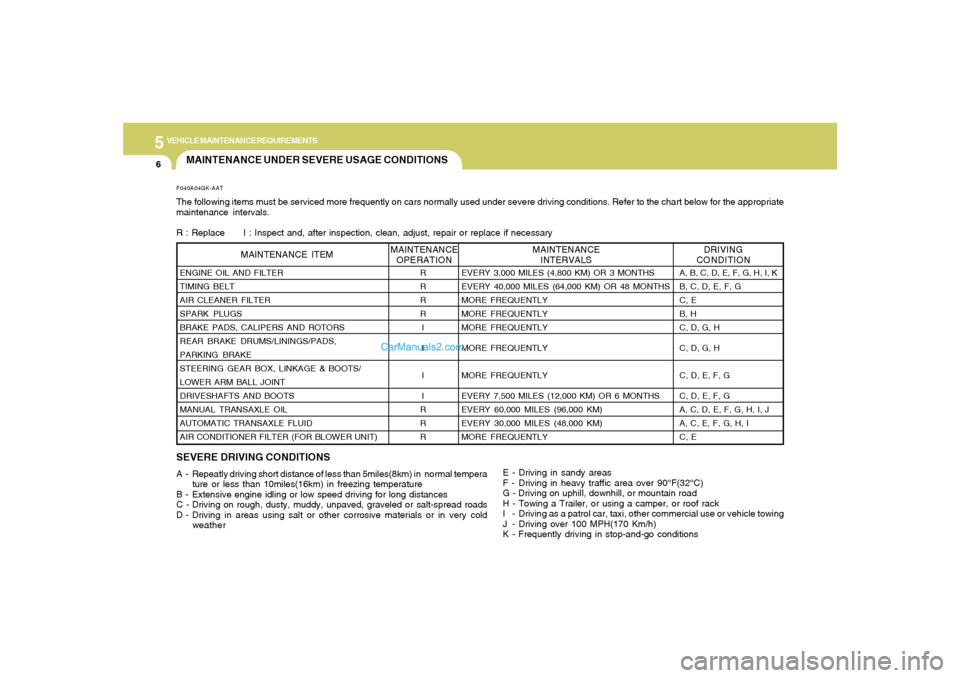
MAINTENANCE UNDER SEVERE USAGE CONDITIONSF040A04GK-AATThe following items must be serviced more frequently on cars normally used under severe driving conditions. Refer to the chart below for the appropriate
maintenance intervals.
R : Replace I : Inspect and, after inspection, clean, adjust, repair or replace if necessaryENGINE OIL AND FILTER
TIMING BELT
AIR CLEANER FILTER
SPARK PLUGS
BRAKE PADS, CALIPERS AND ROTORS
REAR BRAKE DRUMS/LININGS/PADS,
PARKING BRAKE
STEERING GEAR BOX, LINKAGE & BOOTS/
LOWER ARM BALL JOINT
DRIVESHAFTS AND BOOTS
MANUAL TRANSAXLE OIL
AUTOMATIC TRANSAXLE FLUID
AIR CONDITIONER FILTER (FOR BLOWER UNIT)
MAINTENANCE ITEM
R
R
R
R
I
I
I
I
R
R
R
EVERY 3,000 MILES (4,800 KM) OR 3 MONTHS
EVERY 40,000 MILES (64,000 KM) OR 48 MONTHS
MORE FREQUENTLY
MORE FREQUENTLY
MORE FREQUENTLY
MORE FREQUENTLY
MORE FREQUENTLY
EVERY 7,500 MILES (12,000 KM) OR 6 MONTHS
EVERY 60,000 MILES (96,000 KM)
EVERY 30,000 MILES (48,000 KM)
MORE FREQUENTLY
DRIVING
CONDITION MAINTENANCE
INTERVALS MAINTENANCE
OPERATION
A, B, C, D, E, F, G, H, I, K
B, C, D, E, F, G
C, E
B, H
C, D, G, H
C, D, G, H
C, D, E, F, G
C, D, E, F, G
A, C, D, E, F, G, H, I, J
A, C, E, F, G, H, I
C, E
SEVERE DRIVING CONDITIONSA - Repeatly driving short distance of less than 5miles(8km) in normal tempera
ture or less than 10miles(16km) in freezing temperature
B - Extensive engine idling or low speed driving for long distances
C - Driving on rough, dusty, muddy, unpaved, graveled or salt-spread roads
D - Driving in areas using salt or other corrosive materials or in very cold
weatherE - Driving in sandy areas
F - Driving in heavy traffic area over 90°F(32°C)
G - Driving on uphill, downhill, or mountain road
H - Towing a Trailer, or using a camper, or roof rack
I - Driving as a patrol car, taxi, other commercial use or vehicle towing
J - Driving over 100 MPH(170 Km/h)
K - Frequently driving in stop-and-go conditions
Page 194 of 266
5
VEHICLE MAINTENANCE REQUIREMENTS
9
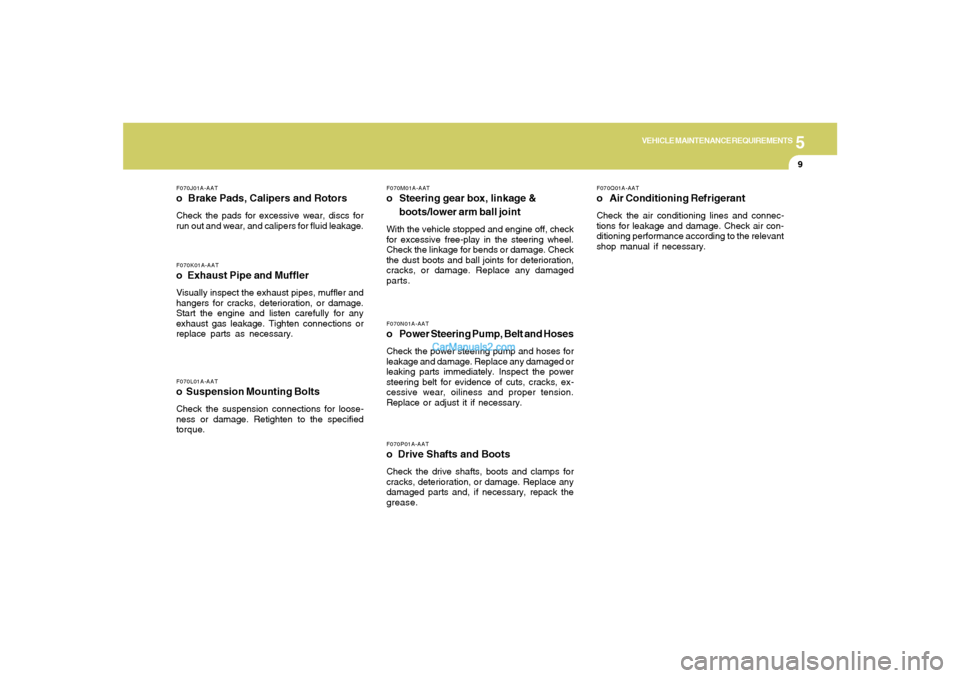
F070J01A-AATo Brake Pads, Calipers and RotorsCheck the pads for excessive wear, discs for
run out and wear, and calipers for fluid leakage.F070K01A-AATo Exhaust Pipe and MufflerVisually inspect the exhaust pipes, muffler and
hangers for cracks, deterioration, or damage.
Start the engine and listen carefully for any
exhaust gas leakage. Tighten connections or
replace parts as necessary.F070L01A-AATo Suspension Mounting BoltsCheck the suspension connections for loose-
ness or damage. Retighten to the specified
torque.
F070M01A-AATo Steering gear box, linkage &
boots/lower arm ball jointWith the vehicle stopped and engine off, check
for excessive free-play in the steering wheel.
Check the linkage for bends or damage. Check
the dust boots and ball joints for deterioration,
cracks, or damage. Replace any damaged
parts.F070N01A-AATo Power Steering Pump, Belt and HosesCheck the power steering pump and hoses for
leakage and damage. Replace any damaged or
leaking parts immediately. Inspect the power
steering belt for evidence of cuts, cracks, ex-
cessive wear, oiliness and proper tension.
Replace or adjust it if necessary.F070P01A-AATo Drive Shafts and BootsCheck the drive shafts, boots and clamps for
cracks, deterioration, or damage. Replace any
damaged parts and, if necessary, repack the
grease.
F070Q01A-AATo Air Conditioning RefrigerantCheck the air conditioning lines and connec-
tions for leakage and damage. Check air con-
ditioning performance according to the relevant
shop manual if necessary.
Page 195 of 266
Do-It-Yourself Maintenance
6
Engine Compartment .................................................... 6-2
General Checks ............................................................ 6-4
Checking the Engine Oil ............................................... 6-5
Changing the Oil and Filter ............................................ 6-6
Checking and Changing the Engine Coolant ................ 6-7
Changing the Air Cleaner Filter ...................................6-10
Checking the Transaxle Oil (manual) .........................6-12
Checking the Transaxle Fluid (Automatic)..................6-13
Checking the Brakes ..................................................6-15
Checking the Clutch Fluid...........................................6-16
Air Conditioning Care..................................................6-17
Checking Drive Belts ..................................................6-21
Checking and Replacing Fuses..................................6-22
Checking the Battery..................................................6-23
Power Steering Fluid Level .........................................6-26
Headlight Aiming Adjustment......................................6-26
Replacement of Light Bulbs ........................................6-28
Bulb Wattage ...............................................................6-37
Fuse Panel Description...............................................6-38
6
Page 196 of 266

6
DO-IT-YOURSELF MAINTENANCE
2
ENGINE COMPARTMENTG010B01GK-GAT(2.0 DOHC CVVT)
HGK5002
1. Engine oil filler cap
2. Brake booster
3. Brake fluid reservoir
4. Clutch fluid reservoir (If installed)5. Relay box
6. Windshield washer fluid reservoir cap
7. Power steering fluid reservoir
8. Engine coolant reservoir
9. Engine oil level dipstick10.Radiator cap
11.Automatic transaxle fluid level dipstick
(If installed)
12.Air cleaner
13.Battery
CAUTION:
When inspecting or servicing the engine,
you should handle tools and other heavy
objects carefully so that the plastic rocker
cover of the engine is not damaged.
!
Page 197 of 266

6
DO-IT-YOURSELF MAINTENANCE
3
G010C01GK-GAT(2.7 V6)
HGK5001
1. Power steering fluid reservoir
2. Brake booster
3. Brake fluid reservoir
4. Air Cleaner5. Relay box
6. Windshield washer fluid reservoir cap
7. Engine coolant reservoir
8. Engine oil level dipstick
9. Radiator cap10.Engine oil filler cap
11.Automatic transaxle fluid level dipstick
(If installed)
12.Battery
CAUTION:
When inspecting or servicing the engine,
you should handle tools and other heavy
objects carefully so that the plastic rocker
cover of the engine is not damaged.
!
Page 198 of 266
6
DO-IT-YOURSELF MAINTENANCE
4
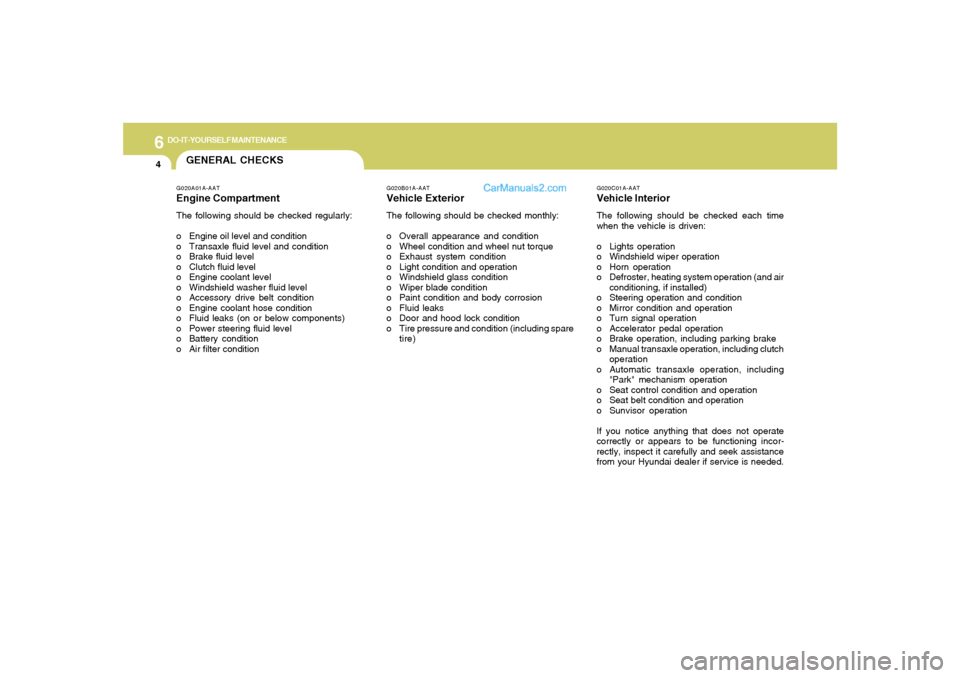
GENERAL CHECKS
G020C01A-AATVehicle InteriorThe following should be checked each time
when the vehicle is driven:
o Lights operation
o Windshield wiper operation
o Horn operation
o Defroster, heating system operation (and air
conditioning, if installed)
o Steering operation and condition
o Mirror condition and operation
o Turn signal operation
o Accelerator pedal operation
o Brake operation, including parking brake
o Manual transaxle operation, including clutch
operation
o Automatic transaxle operation, including
"Park" mechanism operation
o Seat control condition and operation
o Seat belt condition and operation
o Sunvisor operation
If you notice anything that does not operate
correctly or appears to be functioning incor-
rectly, inspect it carefully and seek assistance
from your Hyundai dealer if service is needed.
G020B01A-AATVehicle ExteriorThe following should be checked monthly:
o Overall appearance and condition
o Wheel condition and wheel nut torque
o Exhaust system condition
o Light condition and operation
o Windshield glass condition
o Wiper blade condition
o Paint condition and body corrosion
o Fluid leaks
o Door and hood lock condition
o Tire pressure and condition (including spare
tire)
G020A01A-AATEngine CompartmentThe following should be checked regularly:
o Engine oil level and condition
o Transaxle fluid level and condition
o Brake fluid level
o Clutch fluid level
o Engine coolant level
o Windshield washer fluid level
o Accessory drive belt condition
o Engine coolant hose condition
o Fluid leaks (on or below components)
o Power steering fluid level
o Battery condition
o Air filter condition
Page 212 of 266
6
DO-IT-YOURSELF MAINTENANCE
18
CHANGING THE CLIMATE CON-
TROL AIR FILTERG145A03GK-GAT(In front of blower unit) (If installed)The climate control air filter is located in front of
the evaporator unit behind the glove box.
It helps to decrease the amount of pollutants
entering the car.
1. Remove the mounting screws on the down-
side of the glove box.
HGK2111 G140D01A-AAT
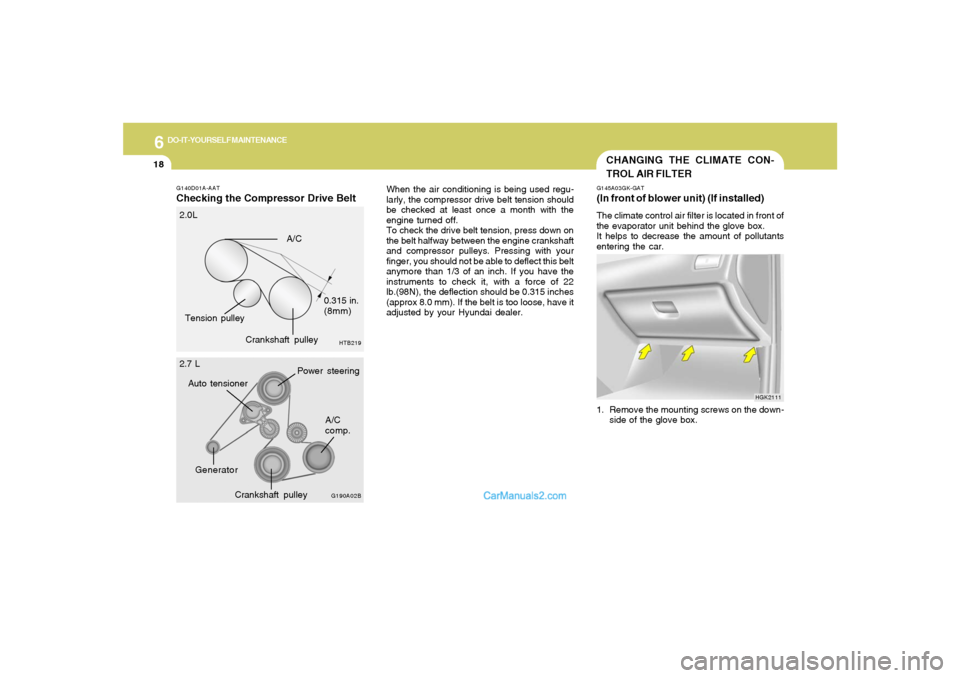
Checking the Compressor Drive Belt
When the air conditioning is being used regu-
larly, the compressor drive belt tension should
be checked at least once a month with the
engine turned off.
To check the drive belt tension, press down on
the belt halfway between the engine crankshaft
and compressor pulleys. Pressing with your
finger, you should not be able to deflect this belt
anymore than 1/3 of an inch. If you have the
instruments to check it, with a force of 22
lb.(98N), the deflection should be 0.315 inches
(approx 8.0 mm). If the belt is too loose, have it
adjusted by your Hyundai dealer.
Crankshaft pulley
HTB219
A/C
Tension pulley0.315 in.
(8mm)
2.0L
G190A02BA/C
comp.
Crankshaft pulley
Power steering
Auto tensioner
Generator 2.7 L
Page 214 of 266
6
DO-IT-YOURSELF MAINTENANCE
20
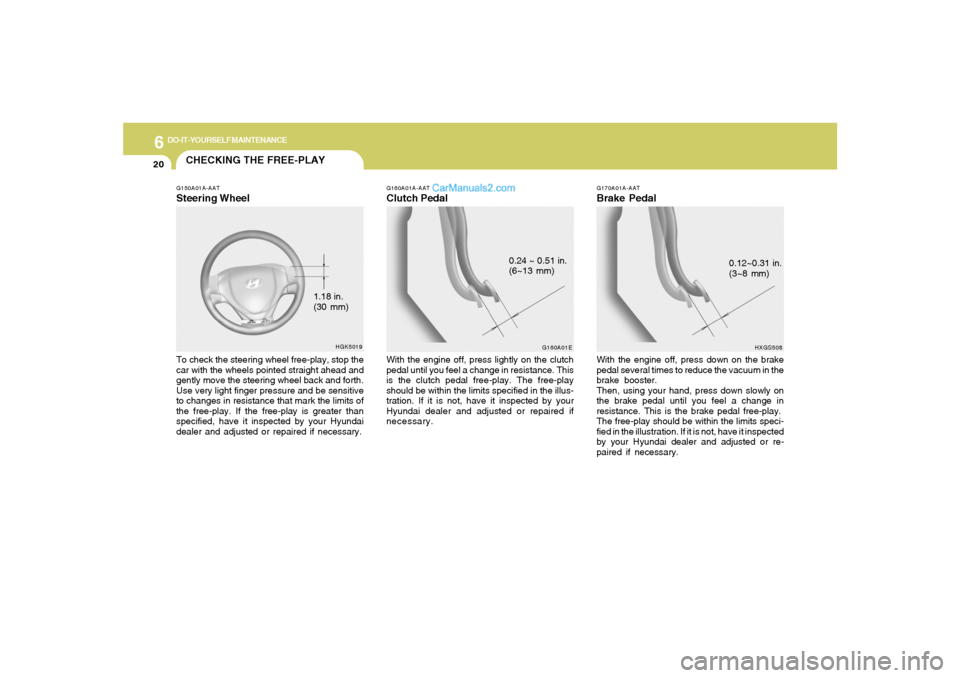
G170A01A-AATBrake PedalWith the engine off, press down on the brake
pedal several times to reduce the vacuum in the
brake booster.
Then, using your hand, press down slowly on
the brake pedal until you feel a change in
resistance. This is the brake pedal free-play.
The free-play should be within the limits speci-
fied in the illustration. If it is not, have it inspected
by your Hyundai dealer and adjusted or re-
paired if necessary.
HXGS508
0.12~0.31 in.
(3~8 mm)
CHECKING THE FREE-PLAYG150A01A-AATSteering WheelTo check the steering wheel free-play, stop the
car with the wheels pointed straight ahead and
gently move the steering wheel back and forth.
Use very light finger pressure and be sensitive
to changes in resistance that mark the limits of
the free-play. If the free-play is greater than
specified, have it inspected by your Hyundai
dealer and adjusted or repaired if necessary.
HGK5019
1.18 in.
(30 mm)
G160A01A-AATClutch PedalWith the engine off, press lightly on the clutch
pedal until you feel a change in resistance. This
is the clutch pedal free-play. The free-play
should be within the limits specified in the illus-
tration. If it is not, have it inspected by your
Hyundai dealer and adjusted or repaired if
necessary.
G160A01E
0.24 ~ 0.51 in.
(6~13 mm)