radio HYUNDAI TUCSON 2016 Owners Manual
[x] Cancel search | Manufacturer: HYUNDAI, Model Year: 2016, Model line: TUCSON, Model: HYUNDAI TUCSON 2016Pages: 642, PDF Size: 9.78 MB
Page 2 of 642
F2
Your HYUNDAI should not be modified in any way. Such modifications may adversely affect
the performance, safety or durability of your HYUNDAI and may, in addition, violate condi-
tions of the limited warranties covering the vehicle. Certain modifications may also be in vio-
lation of regulations established by the U.S. Department of Transportation and other federal
or state agencies.
Your vehicle is equipped with electronic fuel injection and other electronic components. It is
possible for an improperly installed/adjusted two-way radio or cellular telephone to adversely
affect electronic systems. For this reason, we recommend that you carefully follow the radio
manufacturer’s instructions or consult your HYUNDAI dealer for precautionary measures or
special instructions if you choose to install one of these devices.
CAUTION: MODIFICATIONS TO YOUR HYUNDAI
TWO-WAY RADIO OR CELLULAR TELEPHONE INSTALLATION
Page 16 of 642
F16F16
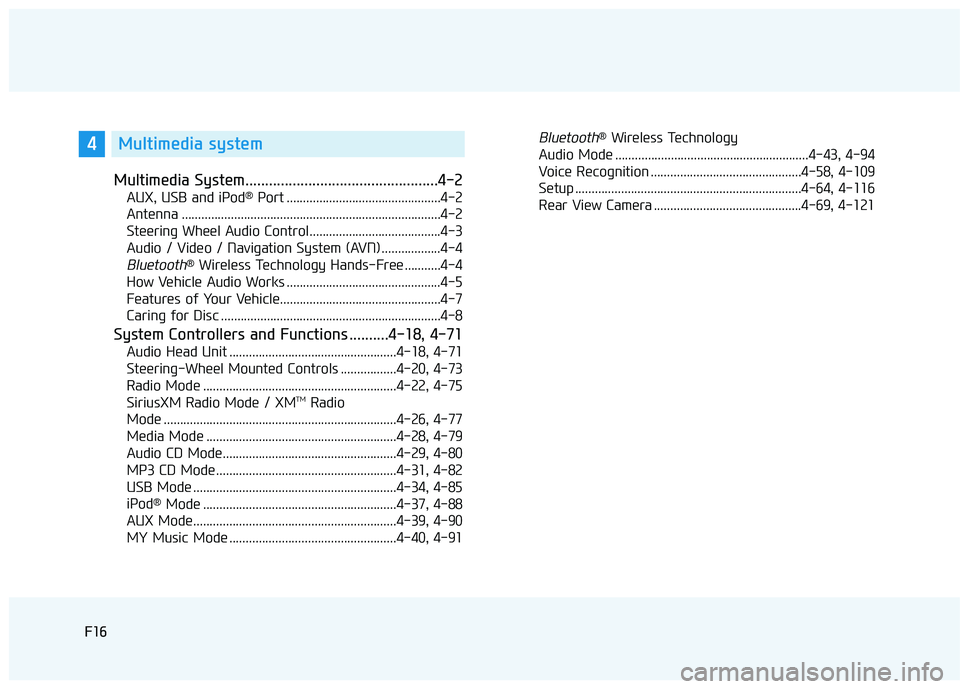
Multimedia System.................................................4-2
AUX, USB and iPod®
Port ...............................................4-2
Antenna ...............................................................................4-2
Steering Wheel Audio Control........................................4-3
Audio / Video / Navigation System (AVN) ..................4-4
Bluetooth® Wireless Technology Hands-Free ...........4-4
How Vehicle Audio Works ...............................................4-5
Features of Your Vehicle.................................................4-7
Caring for Disc ...................................................................4-8
System Controllers and Functions ..........4-18, 4-71
Audio Head Unit ...................................................4-18, 4-71
Steering-Wheel Mounted Controls .................4-20, 4-73
Radio Mode ...........................................................4-22, 4-75 SiriusXM Radio Mode / XM TM
Radio
Mode .......................................................................4-26, 4-77
Media Mode ..........................................................4-28, 4-79
Audio CD Mode.....................................................4-29, 4-80
MP3 CD Mode .......................................................4-31, 4-82
USB Mode ..............................................................4-34, 4-85
iPod ®
Mode ...........................................................4-37, 4-88
AUX Mode..............................................................4-39, 4-90
MY Music Mode ...................................................4-40, 4-91
Bluetooth® Wireless Technology
Audio Mode ...........................................................4-43, 4-94
Voice Recognition ..............................................4-58, 4-109
Setup .....................................................................4-64, 4-116
Rear View Camera .............................................4-69, 4-1214Multimedia system
Page 87 of 642
2-60
Safety system of your vehicle
Always be sure that you and all vehi-
cle occupants are seated properly
and wearing the seat belt properly for
the most effective protection by theair bag and the seat belt.
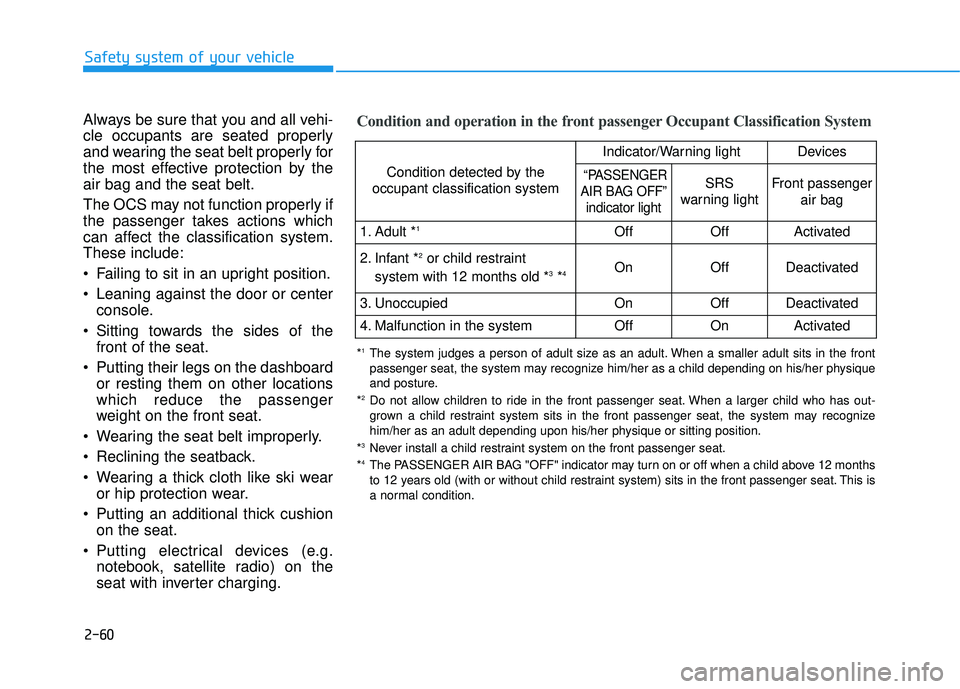
The OCS may not function properly if
the passenger takes actions which
can affect the classification system.These include:
Failing to sit in an upright position.
Leaning against the door or centerconsole.
Sitting towards the sides of the front of the seat.
Putting their legs on the dashboard or resting them on other locations which reduce the passenger
weight on the front seat.
Wearing the seat belt improperly.
Reclining the seatback.
Wearing a thick cloth like ski wear or hip protection wear.
Putting an additional thick cushion on the seat.
Putting electrical devices (e.g. notebook, satellite radio) on the
seat with inverter charging.Condition and operation in the front passenger Occupant Classification System
Condition detected by the
occupant classification system
Indicator/Warning lightDevices
“PASSENGER
AIR BAG OFF”
indicator lightSRS
warning lightFront passenger
air bag
1. Adult * 1OffOffActivated
2. Infant * 2
or child restraint
system with 12 months old * 3
*4 OnOffDeactivated
3. Unoccupied OnOffDeactivated
4. Malfunction in the systemOffOnActivated
*
1
The system judges a person of adult size as an adult. When a smaller adult sits in the front
passenger seat, the system may recognize him/her as a child depending on his/her physique
and posture.
* 2
Do not allow children to ride in the front passenger seat. When a larger child who has out-
grown a child restraint system sits in the front passenger seat, the system may recognize
him/her as an adult depending upon his/her physique or sitting position.
* 3
Never install a child restraint system on the front passenger seat.
* 4
The PASSENGER AIR BAG "OFF" indicator may turn on or off when a child above 12 months
to 12 years old (with or without child restraint system) sits in the front passenger seat. This is
a normal condition.
Page 104 of 642
3-6
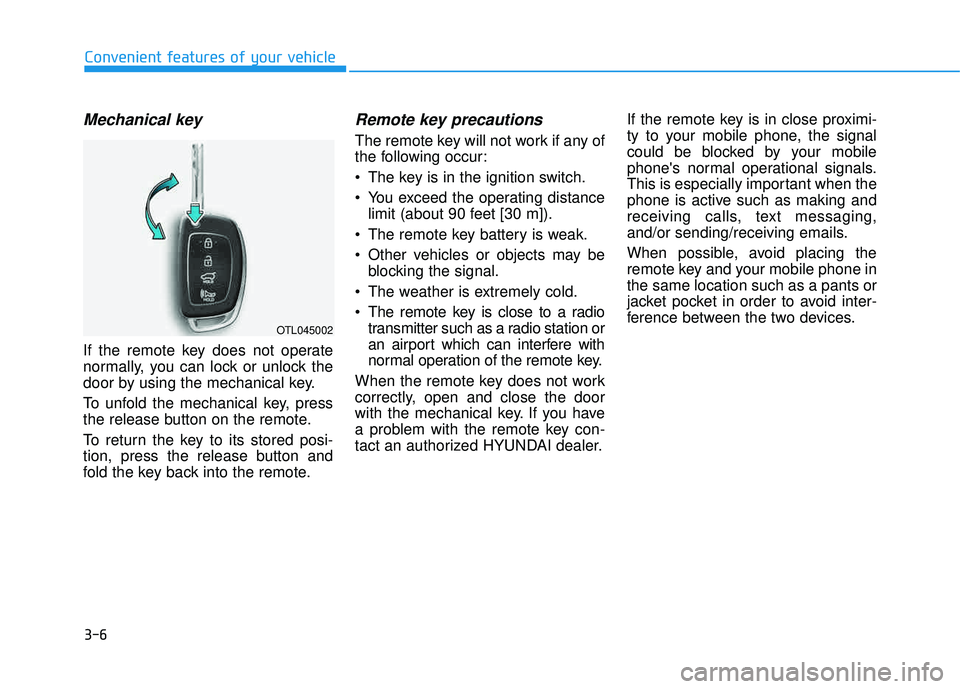
Mechanical key
If the remote key does not operate
normally, you can lock or unlock the
door by using the mechanical key.
To unfold the mechanical key, press
the release button on the remote.
To return the key to its stored posi-
tion, press the release button and
fold the key back into the remote.
Remote key precautions
The remote key will not work if any of
the following occur:
The key is in the ignition switch.
You exceed the operating distancelimit (about 90 feet [30 m]).
The remote key battery is weak.
Other vehicles or objects may be blocking the signal.
The weather is extremely cold.
The remote key is close to a radio transmitter such as a radio station or
an airport which can interfere with
normal operation of the remote key.
When the remote key does not work
correctly, open and close the door
with the mechanical key. If you have
a problem with the remote key con-
tact an authorized HYUNDAI dealer. If the remote key is in close proximi-
ty to your mobile phone, the signal
could be blocked by your mobile
phone's normal operational signals.
This is especially important when the
phone is active such as making and
receiving calls, text messaging,
and/or sending/receiving emails.
When possible, avoid placing the
remote key and your mobile phone inthe same location such as a pants or
jacket pocket in order to avoid inter-
ference between the two devices.
Convenient features of your vehicle
OTL045002
Page 109 of 642
3-11
Convenient features of your vehicle
3
Loss of a smart key
A maximum of two Smart Keys can
be registered to a single vehicle. If
you happen to lose your smart key,
you should immediately take the
vehicle and remaining keys to your
authorized HYUNDAI dealer or tow
the vehicle, if necessary.
Smart key precautions
The smart key will not work if any of
the following occur:
The smart key is close to a radiotransmitter such as a radio station
or an airport which can interfere
with normal operation of the trans-
mitter.
The smart key is near a mobile two way radio system or a cellular
phone.
Another vehicle’s smart key is being operated close to your vehicle.
When the smart key does not work
correctly, open and close the door
with the mechanical key. If you have
a problem with the smart key, contact
an authorized HYUNDAI dealer. If the smart key is in close proximity
to your mobile phone, the signal
could be blocked by your mobile
phone's normal operational signals.
This is especially important when the
phone is active such as making and
receiving calls, text messaging,
and/or sending/receiving emails.
When possible, avoid placing the
remote key and your mobile phone inthe same location such as a pants or
jacket pocket in order to avoid inter-
ference between the two devices.
Keep the smart key away from
electromagnetic materials that
blocks electromagnetic waves
to the key surface.
CAUTION
Page 123 of 642
3-25
Convenient features of your vehicle
Retain the original transmitter for
future programming procedures (i.e.,
new vehicle purchase). It is also sug-
gested that upon the sale of the vehi-
cle, the programmed HomeLink but-
tons be erased for security purposes
(follow step 1 in the “Programming”
portion of this text).Programming
Your vehicle may require the ignition
switch to be turned to the ACC posi-
tion for programming and/or operation
of HomeLink. It is also recommended
that a new battery be replaced in the
hand-held transmitter of the device
being programmed to HomeLink for
quicker training and accurate trans-
mission of the radio-frequency.
Follow these steps to train your
HomeLink mirror:
3
When programming the HomeLink
®
Wireless Control
System, you may be operating
a garage door or gate operator.Make sure that people and
objects are out of the way of
the moving door or gate to pre-
vent potential harm or damage.
Do not use HomeLink with
any garage door opener that
lacks the safety stop and
reverse feature as required by
federal safety standards. (This
includes any garage door
opener model manufactured
before April 1, 1982.) A garage
door opener which cannot
detect an object, signaling the
door to stop and reverse,
does not meet current federal
safety standards. Using a
garage door opener without
these features increases risk
of serious injury or death. For
more information, call 1-800-355-3515 or on the internet at
www.homelink.com.
WARNING
Page 129 of 642
3-31
Convenient features of your vehicle
3
To adjust the Zone setting:
1. Determine the desired ZoneNumber based upon your current
location on the Zone Map.
2. Press and hold the button for 6 seconds, the current Zone
Number will appear on the display.
3. Pressing and holding the button again will cause the numbers to
increment (Note: they will repeat
…13, 14, 15, 1, 2, …). Releasing
the button when the desired Zone
Number appears on the display
will set the new Zone.
4. Within about 5 seconds the com- pass will start displaying a com-pass heading again.
There are some conditions that can
cause changes to the vehicle mag-
nets, such as installing a ski rack or
a CB antenna. Body repair work on
the vehicle can also cause changes
to the vehicle’s magnetic field. In
these situations, the compass will
need to be re-calibrated to quickly
correct these changes. If you need to recalibrate the com-pass:
1. Press and hold the button for
more than 9 seconds. When the
compass memory is cleared a "C"
will appear in the display.
2. Drive the vehicle in 2 complete cir- cles at less than 5 mph (8 km/h).Integrated HomeLink ®
Wireless
Control System
The HomeLink®Wireless Control
System can replace up to three hand-
held radio-frequency (RF) transmit-
ters with a single built-in device. This
innovative feature will learn the radiofrequency codes of most current
transmitters to operate devices such
as gate operators, garage door open-
ers, entry door locks, security sys-
tems, even home lighting. Both stan-
dard and rolling code-equipped trans-
mitters can be programmed by fol-
lowing the outlined procedures. Additional HomeLink
®information
can be found at: www.homelink.com
or by calling 1-800-355-3515.
Retain the original transmitter of the
RF device you are programming for
use in other vehicles as well as forfuture HomeLink
®programming. It is
also suggested that upon the sale of
the vehicle, the programmedHomeLink
®buttons be erased for
security purposes.
Page 130 of 642

3-32
Convenient features of your vehicle
Programming HomeLink®
Please note the following:
When programming a garage door
opener, it is advised to park the
vehicle outside of the garage.
It is recommended that a new bat- tery be placed in the hand-held
transmitter of the device being pro-
grammed to HomeLink
®for quicker
training and accurate transmission
of the radio-frequency signal.
Some vehicles may require the ignition switch to be placed in the
ACC (or "Accessories") position for
programming and/or operation ofHomeLink
®.
In the event that there are still pro- gramming difficulties or questions
after following the programming
steps listed below, contactHomeLink
®at: www.homelink.com
or by calling 1-800-355-3515.
Programming
To train most devices, follow these
instructions:
1. For first-time programming, press and hold the two outside buttons ( ,), HomeLink
®Channel 1
and Channel 3, until the indicatorlight begins to flash (after 10 sec-
onds). Release both buttons. Do
not hold the buttons for longer
than 20 seconds.
ODH044413N
Flashing
Before programming HomeLink®
to a garage door opener or gate
operator, make sure people and
objects are out of the way of the
device to prevent potential harm
or damage. Do not use theHomeLink
®with any garage door
opener that lacks the safety stop
and reverse features required by
U.S. federal safety standards (this
includes any garage door opener
model manufactured before April
1, 1982). A garage door that can-not detect an object - signaling
the door to stop and reverse -
does not meet current U.S. feder-
al safety standards. Using a
garage door opener without
these features increases the risk
of serious injury or death.
WARNING
Page 160 of 642
3-62
If you press the door unlock but-ton (2), the Smart Liftgate func-
tion will be deactivated tem-
porarily. But, if you do not open
any door for 30 seconds, the
Smart Liftgate function will be
activated again.
If you press the liftgate open button (3) for more than 1 sec-
ond, the liftgate opens.
The Smart Liftgate function will still be activated if you press the
door lock button (1) or liftgate
open button (3) on the smart key
as long as the Smart Liftgate is
not already in the Detect and
Alert stage.
In case you have deactivated the Smart Liftgate function by
pressing the smart key button
and opened a door, the Smart
Liftgate function can be activat-
ed again by closing and locking
all doors.
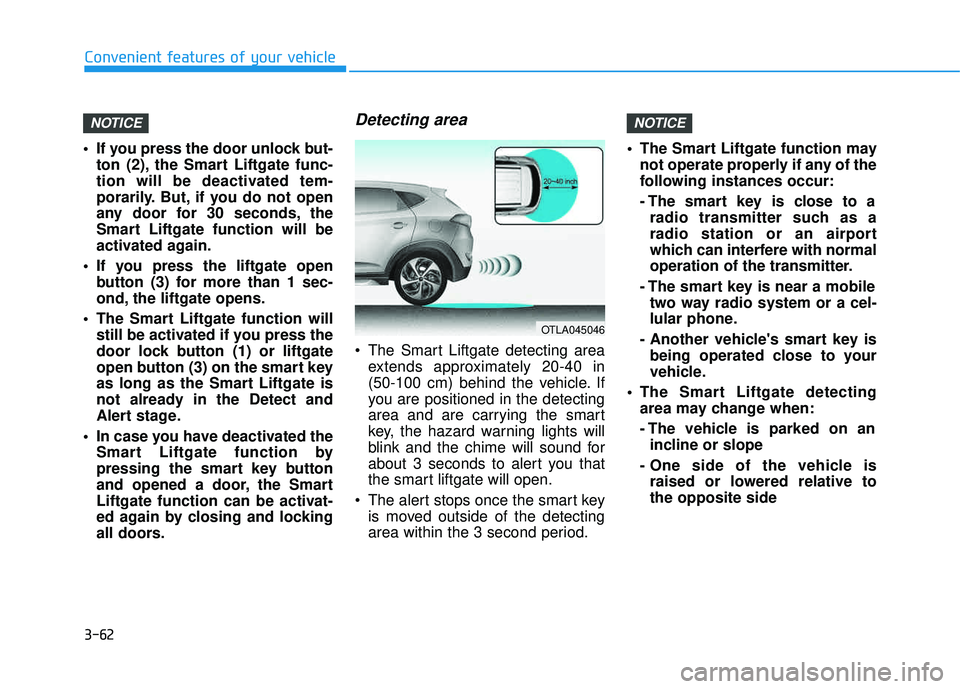
Detecting area
The Smart Liftgate detecting areaextends approximately 20-40 in
(50-100 cm) behind the vehicle. If
you are positioned in the detecting
area and are carrying the smart
key, the hazard warning lights will
blink and the chime will sound for
about 3 seconds to alert you that
the smart liftgate will open.
The alert stops once the smart key is moved outside of the detecting
area within the 3 second period. The Smart Liftgate function may
not operate properly if any of the
following instances occur:
- The smart key is close to aradio transmitter such as a
radio station or an airport
which can interfere with normal
operation of the transmitter.
- The smart key is near a mobile two way radio system or a cel-
lular phone.
- Another vehicle's smart key is being operated close to your
vehicle.
The Smart Liftgate detecting area may change when:
- The vehicle is parked on anincline or slope
- One side of the vehicle is raised or lowered relative to the opposite side
NOTICENOTICE
Convenient features of your vehicle
OTLA045046
Page 264 of 642
Multimedia System
Multimedia System.................................................4-2
AUX, USB and iPod®
Port ...............................................4-2
Antenna ...............................................................................4-2
Steering Wheel Audio Control........................................4-3
Audio / Video / Navigation System (AVN) ..................4-4
Bluetooth® Wireless Technology Hands-Free ...........4-4
How Vehicle Audio Works ...............................................4-5
Features of Your Vehicle.................................................4-7
Caring for Disc ...................................................................4-8
System Controllers and Functions ..........4-18, 4-71
Audio Head Unit ...................................................4-18, 4-71
Steering-Wheel Mounted Controls .................4-20, 4-73
Radio Mode ...........................................................4-22, 4-75 SiriusXM Radio Mode / XM TM
Radio
Mode .......................................................................4-26, 4-77
Media Mode ..........................................................4-28, 4-79
Audio CD Mode.....................................................4-29, 4-80
MP3 CD Mode .......................................................4-31, 4-82
USB Mode ..............................................................4-34, 4-85
iPod ®
Mode ...........................................................4-37, 4-88
AUX Mode..............................................................4-39, 4-90
MY Music Mode ...................................................4-40, 4-91
Bluetooth® Wireless Technology
Audio Mode ...........................................................4-43, 4-94 Voice Recognition ..............................................4-58, 4-109
Setup .....................................................................4-64, 4-116
Rear View Camera .............................................4-69, 4-121
4