Tyre change Hyundai Tucson 2019 - RHD (UK, Australia) User Guide
[x] Cancel search | Manufacturer: HYUNDAI, Model Year: 2019, Model line: Tucson, Model: Hyundai Tucson 2019Pages: 685, PDF Size: 17.76 MB
Page 521 of 685
6-18
What to do in an emergency
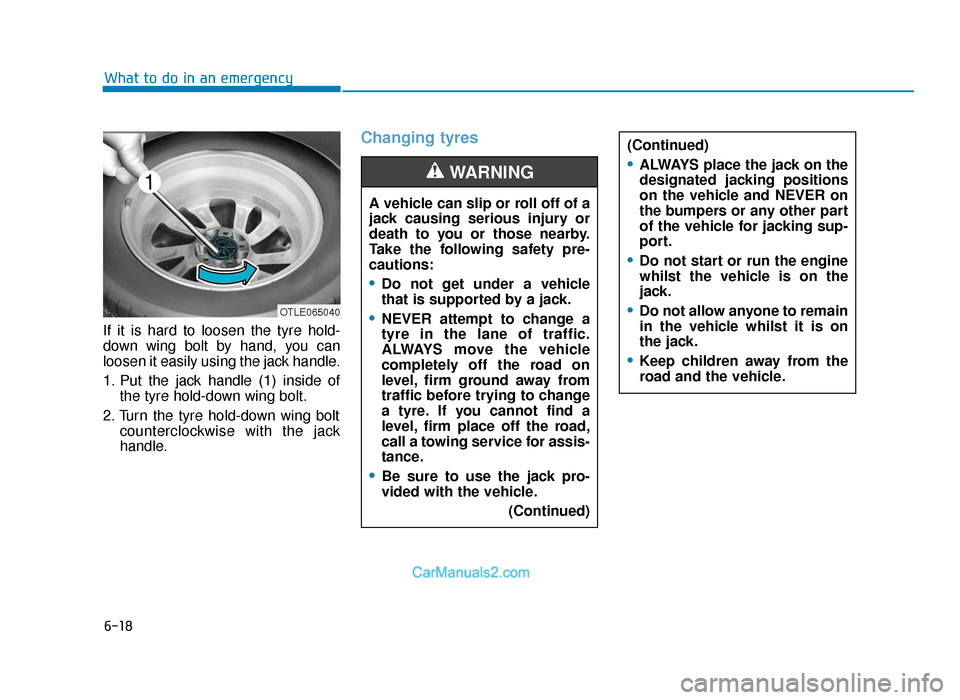
If it is hard to loosen the tyre hold-
down wing bolt by hand, you can
loosen it easily using the jack handle.
1. Put the jack handle (1) inside of the tyre hold-down wing bolt.
2. Turn the tyre hold-down wing bolt counterclockwise with the jack
handle.
Changing tyres
A vehicle can slip or roll off of a
jack causing serious injury or
death to you or those nearby.
Take the following safety pre-
cautions:
•Do not get under a vehicle
that is supported by a jack.
•NEVER attempt to change a
tyre in the lane of traffic.
ALWAYS move the vehicle
completely off the road on
level, firm ground away from
traffic before trying to change
a tyre. If you cannot find a
level, firm place off the road,
call a towing service for assis-
tance.
•Be sure to use the jack pro-
vided with the vehicle.
(Continued)
WARNING
(Continued)
•ALWAYS place the jack on the
designated jacking positions
on the vehicle and NEVER on
the bumpers or any other part
of the vehicle for jacking sup-
port.
•Do not start or run the engine
whilst the vehicle is on the
jack.
•Do not allow anyone to remain
in the vehicle whilst it is on
the jack.
•Keep children away from the
road and the vehicle.
OTLE065040
TLe UK 6.qxp 5/10/2018 1:20 PM Page 18
Page 522 of 685
6-19
What to do in an emergency
6
Follow these steps to change your
vehicle’s tyre:
1. Park on a level, firm surface.
2. Move the shift lever into P (Park,for automatic transaxle/dual clutch
transmission vehicle) or neutral
(for manual transaxle vehicle),
apply the parking brake, and place
the ignition switch in the
LOCK/OFF position.
3. Press the hazard warning flasher button.
4. Remove the wheel lug nut wrench, jack, jack handle, and spare tyre
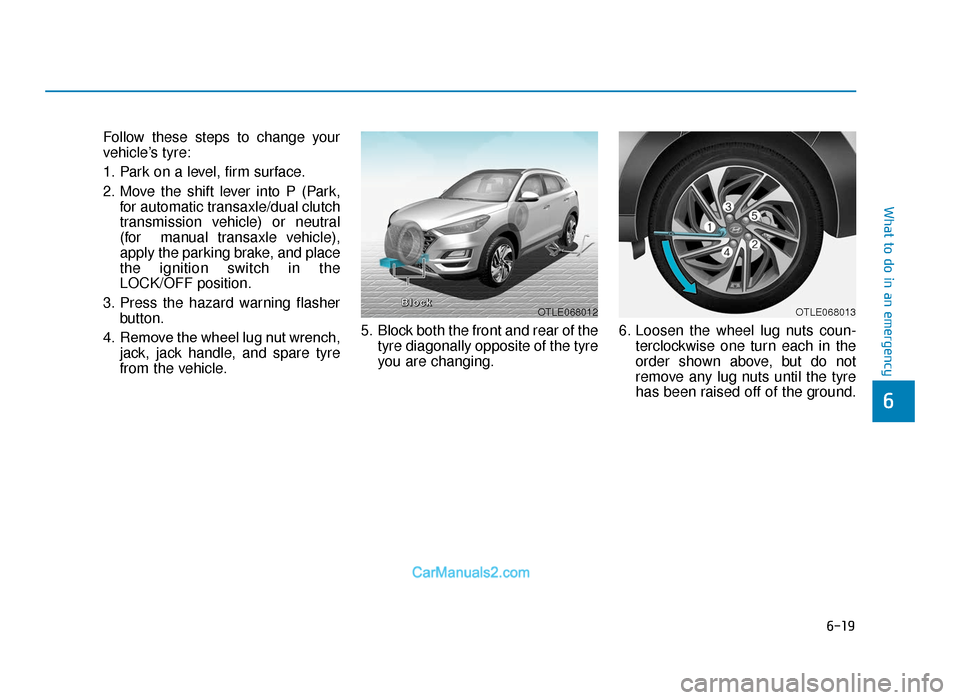
from the vehicle. 5. Block both the front and rear of the
tyre diagonally opposite of the tyre
you are changing. 6. Loosen the wheel lug nuts coun-
terclockwise one turn each in the
order shown above, but do not
remove any lug nuts until the tyre
has been raised off of the ground.
OTLE068012
BBlloocckkOTLE068013
TLe UK 6.qxp 5/10/2018 1:20 PM Page 19
Page 524 of 685
6-21
What to do in an emergency
6
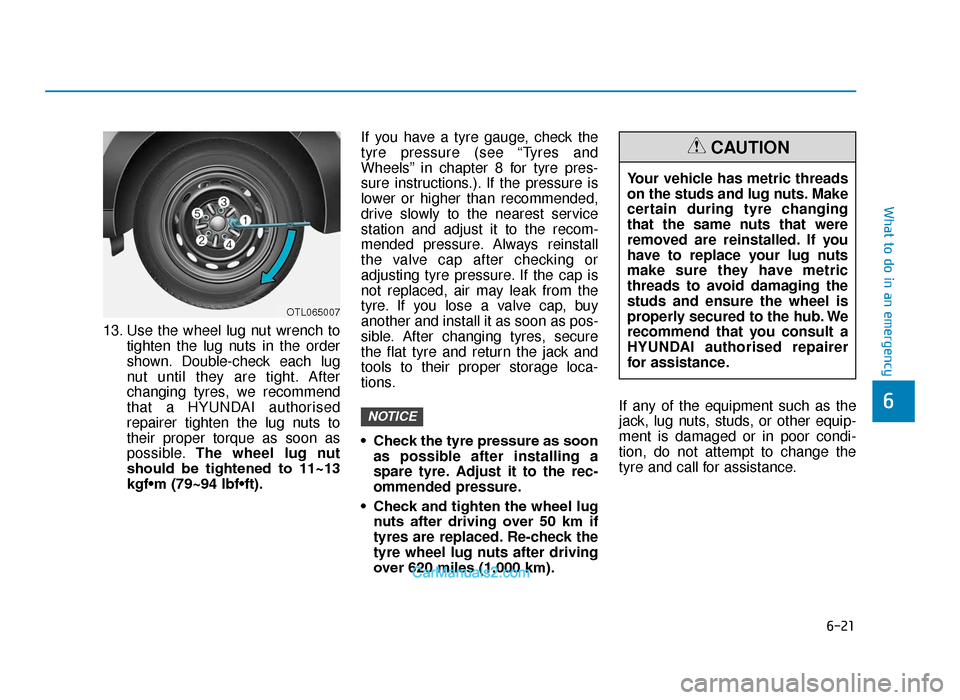
13. Use the wheel lug nut wrench totighten the lug nuts in the order
shown. Double-check each lug
nut until they are tight. After
changing tyres, we recommend
that a HYUNDAI authorised
repairer tighten the lug nuts to
their proper torque as soon as
possible. The wheel lug nut
should be tightened to 11~13
kgf•m (79~94 lbf•ft). If you have a tyre gauge, check the
tyre pressure (see “Tyres and
Wheels” in chapter 8 for tyre pres-
sure instructions.). If the pressure is
lower or higher than recommended,
drive slowly to the nearest service
station and adjust it to the recom-
mended pressure. Always reinstall
the valve cap after checking or
adjusting tyre pressure. If the cap is
not replaced, air may leak from the
tyre. If you lose a valve cap, buy
another and install it as soon as pos-
sible. After changing tyres, secure
the flat tyre and return the jack and
tools to their proper storage loca-
tions.
• Check the tyre pressure as soon
as possible after installing a
spare tyre. Adjust it to the rec-
ommended pressure.
• Check and tighten the wheel lug nuts after driving over 50 km if
tyres are replaced. Re-check the
tyre wheel lug nuts after driving
over 620 miles (1,000 km). If any of the equipment such as the
jack, lug nuts, studs, or other equip-
ment is damaged or in poor condi-
tion, do not attempt to change the
tyre and call for assistance.
NOTICE
OTL065007
Your vehicle has metric threads
on the studs and lug nuts. Make
certain during tyre changing
that the same nuts that were
removed are reinstalled. If you
have to replace your lug nuts
make sure they have metric
threads to avoid damaging the
studs and ensure the wheel is
properly secured to the hub. We
recommend that you consult a
HYUNDAI authorised repairer
for assistance.
CAUTION
TLe UK 6.qxp 5/10/2018 1:21 PM Page 21
Page 558 of 685
7-9
7
Maintenance
Owner maintenance schedule
When you stop for fuel:
• Check the engine oil level.
• Check coolant level in the enginecoolant reservoir.
• Check the windscreen washer fluid level.
• Check for low or under-inflated tyres.
Whilst operating your vehicle:
• Note any changes in the sound of the exhaust or any smell of exhaust
fumes in the vehicle.
• Check for vibrations in the steering wheel. Notice if there is any
increased steering effort or loose-
ness in the steering wheel, or
change in its straight-ahead position.
• Notice if your vehicle constantly turns slightly or “pulls” to one side when
travelling on smooth, level road.
• When stopping, listen and check for unusual sounds, pulling to one side,
increased brake pedal travel or
“hard-to-push” brake pedal.
• If any slipping or changes in the operation of your transaxle occurs,
check the transaxle fluid level.
• Check the automatic transaxle/ dual clutch transmission P (Park)
function.
• Check the parking brake.
• Check for fluid leaks under your vehicle (water dripping from the air
conditioning system during or after
use is normal).
Be careful when checking your
engine coolant level when the
engine is hot. This may result in
coolant being blown out of the
opening and cause serious
burns and other injuries.
WARNING
Diesel Engine
Never manipulate or modify the
injection system whilst running
the diesel engine or within 30
seconds after turning OFF the
diesel engine. The high-pres-
sure pump, high-pressure
pipes, rail, and injectors are still
subject to the high pressure
right after stopping the diesel
engine.
When the fuel leakage vents
out, it may cause serious body
injury. Any people, who are
implemented with the artificial
cardiac pacemaker, should
remain away from the ECU or
the wiring harness by at least 30
cm, whilst running the diesel
engine. The high currents of the
electric engine control system
produce a considerable amount
of magnetic fields.
WARNING
TLe UK 7.qxp 5/10/2018 1:32 PM Page 9