lock HYUNDAI TUCSON HYBRID 2021 User Guide
[x] Cancel search | Manufacturer: HYUNDAI, Model Year: 2021, Model line: TUCSON HYBRID, Model: HYUNDAI TUCSON HYBRID 2021Pages: 630, PDF Size: 77.98 MB
Page 59 of 630
03
3-13
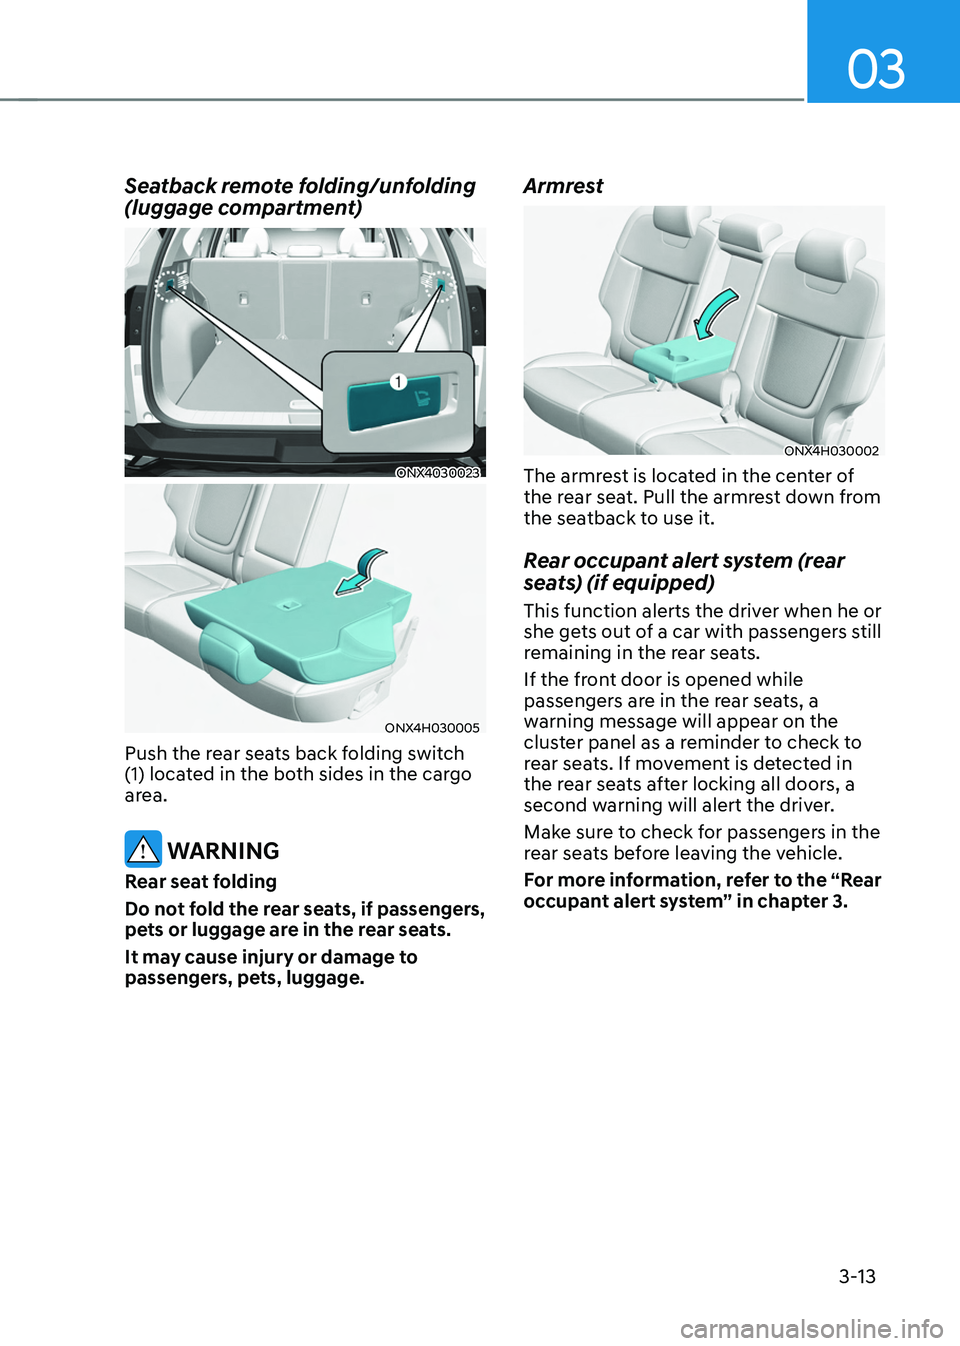
Seatback remote folding/unfolding
(luggage compartment)
ONX4030023
ONX4H030005
Push the rear seats back folding switch
(1) located in the both sides in the cargo
area.
WARNING
Rear seat folding
Do not fold the rear seats, if passengers,
pets or luggage are in the rear seats.
It may cause injury or damage to
passengers, pets, luggage.
Armrest
ONX4H030002
The armrest is located in the center of
the rear seat. Pull the armrest down from
the seatback to use it.
Rear occupant alert system (rear
seats) (if equipped)
This function alerts the driver when he or
she gets out of a car with passengers still
remaining in the rear seats.
If the front door is opened while
passengers are in the rear seats, a
warning message will appear on the
cluster panel as a reminder to check to
rear seats. If movement is detected in
the rear seats after locking all doors, a
second warning will alert the driver.
Make sure to check for passengers in the
rear seats before leaving the vehicle.
For more information, refer to the “Rear
occupant alert system” in chapter 3.
Page 60 of 630
Seats & Safety System
3-14
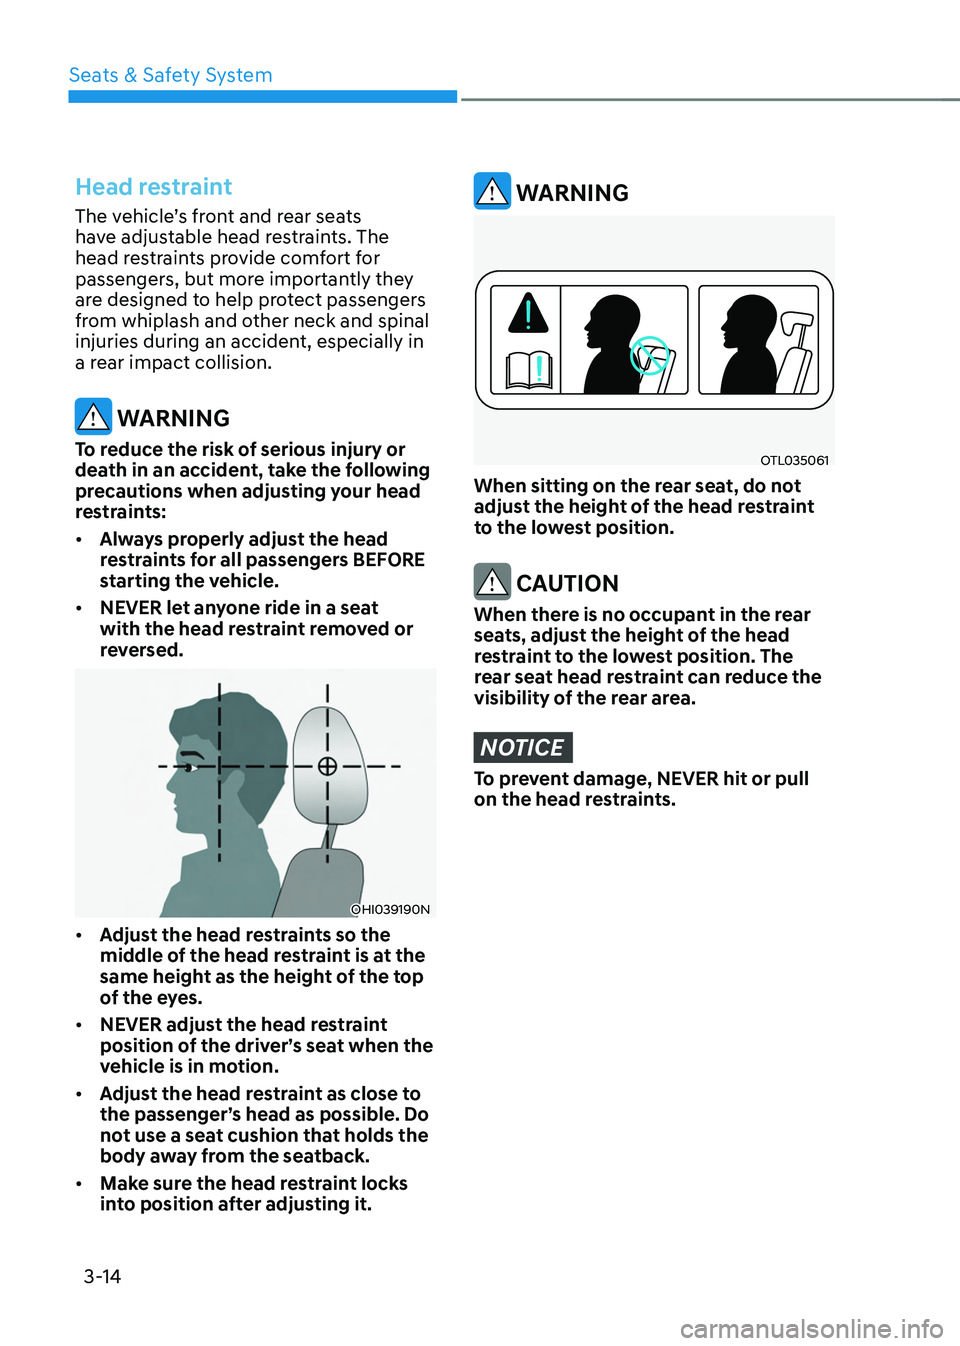
Head restraint
The vehicle’s front and rear seats
have adjustable head restraints. The
head restraints provide comfort for
passengers, but more importantly they
are designed to help protect passengers
from whiplash and other neck and spinal
injuries during an accident, especially in
a rear impact collision.
WARNING
To reduce the risk of serious injury or
death in an accident, take the following
precautions when adjusting your head
restraints:
• Always properly adjust the head
restraints for all passengers BEFORE
starting the vehicle.
• NEVER let anyone ride in a seat
with the head restraint removed or
reversed.
OHI039190N
• Adjust the head restraints so the
middle of the head restraint is at the
same height as the height of the top
of the eyes.
• NEVER adjust the head restraint
position of the driver’s seat when the
vehicle is in motion.
• Adjust the head restraint as close to
the passenger’s head as possible. Do
not use a seat cushion that holds the
body away from the seatback.
• Make sure the head restraint locks
into position after adjusting it.
WARNING
OTL035061
When sitting on the rear seat, do not
adjust the height of the head restraint
to the lowest position.
CAUTION
When there is no occupant in the rear
seats, adjust the height of the head
restraint to the lowest position. The
rear seat head restraint can reduce the
visibility of the rear area.
NOTICE
To prevent damage, NEVER hit or pull
on the head restraints.
Page 62 of 630
Seats & Safety System
3-16
„„Type A
ONX4030012
„„Type B
ONX4030013
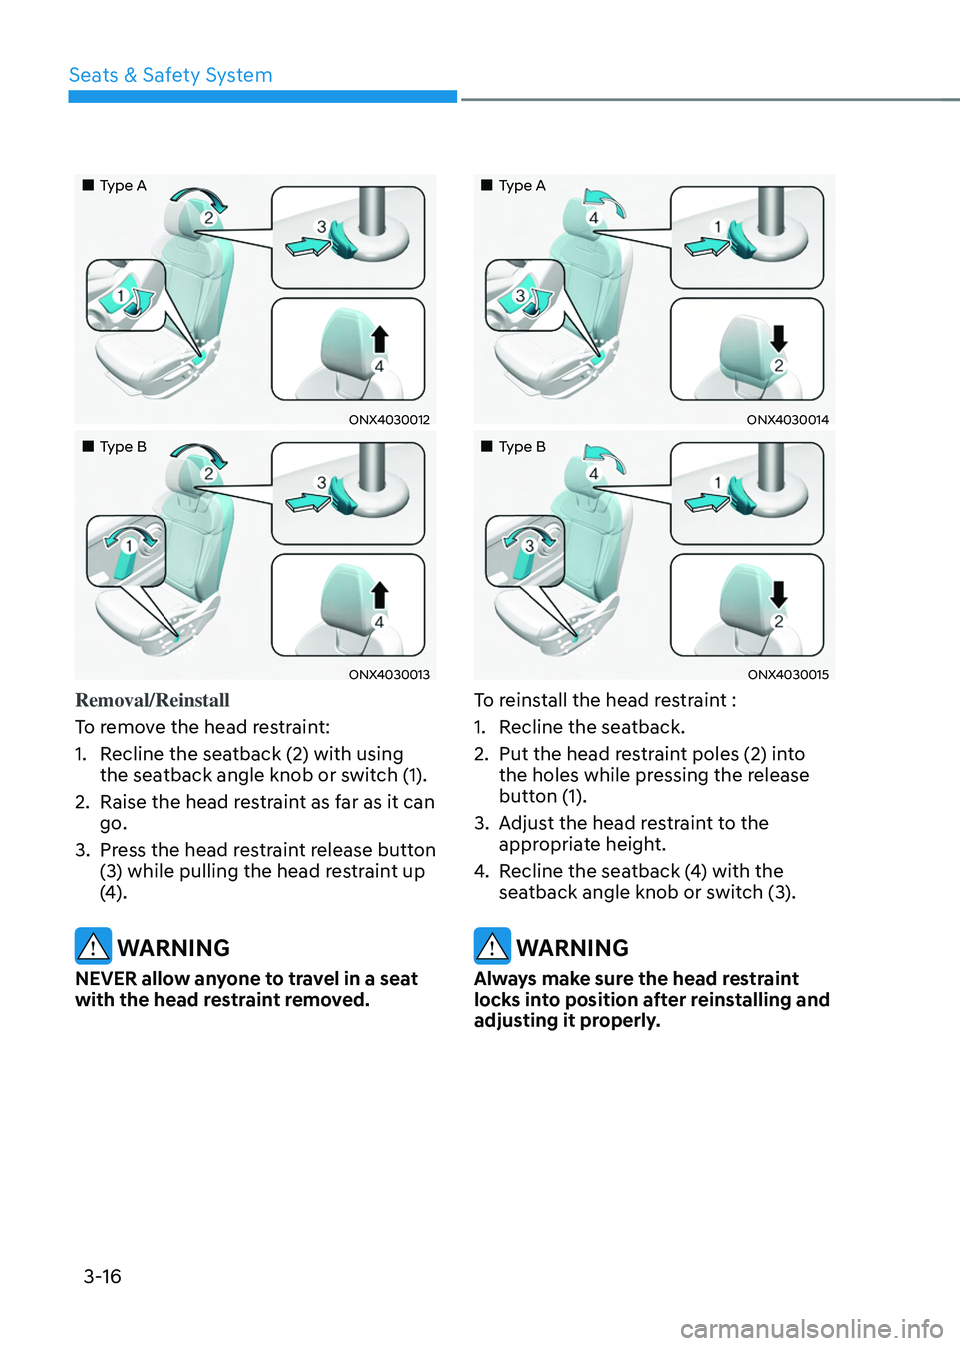
Removal/Reinstall
To remove the head restraint:
1.
Recline the sea
tback (2) with using
the seatback angle knob or switch (1).
2.
Raise the head res
traint as far as it can
go.
3.
Press the head r
estraint release button
(3) while pulling the head restraint up
(4).
WARNING
NEVER allow anyone to travel in a seat
with the head restraint removed.
„„Type A
ONX4030014
„„Type B
ONX4030015
To reinstall the head restraint :
1.
Recline the sea
tback.
2.
Put the head res
traint poles (2) into
the holes while pressing the release
button (1).
3.
Adjus
t the head restraint to the
appropriate height.
4.
Recline the sea
tback (4) with the
seatback angle knob or switch (3).
WARNING
Always make sure the head restraint
locks into position after reinstalling and
adjusting it properly.
Page 66 of 630
Seats & Safety System
3-20
• Auto Comfort Control (for driver’s
seat) (if equipped)
- The seat w
armer automatically
controls the seat temperature
depending on the ambient
temperature and the set climate
control temperature when the
engine is running. If the seat
warmer switch is pushed, the seat
warmer will have to be controlled
manually.
To use this function, it must be
activated from the Settings menu in
the AV/AVN system screen.
- The seat w
armer defaults to the
OFF position whenever the ignition
switch is ON. However, if the Auto
Comfort Control function is ON, the
driver’s seat warmer will turn on
and off depending on the ambient
temperature and the set climate
control temperature.
For more details, refer to the separately
supplied Infotainment manual with
your vehicle.
Information
With the seat warmer switch in the ON
position, the heating system in the seat
turns off or on automatically depending on
the seat temperature.
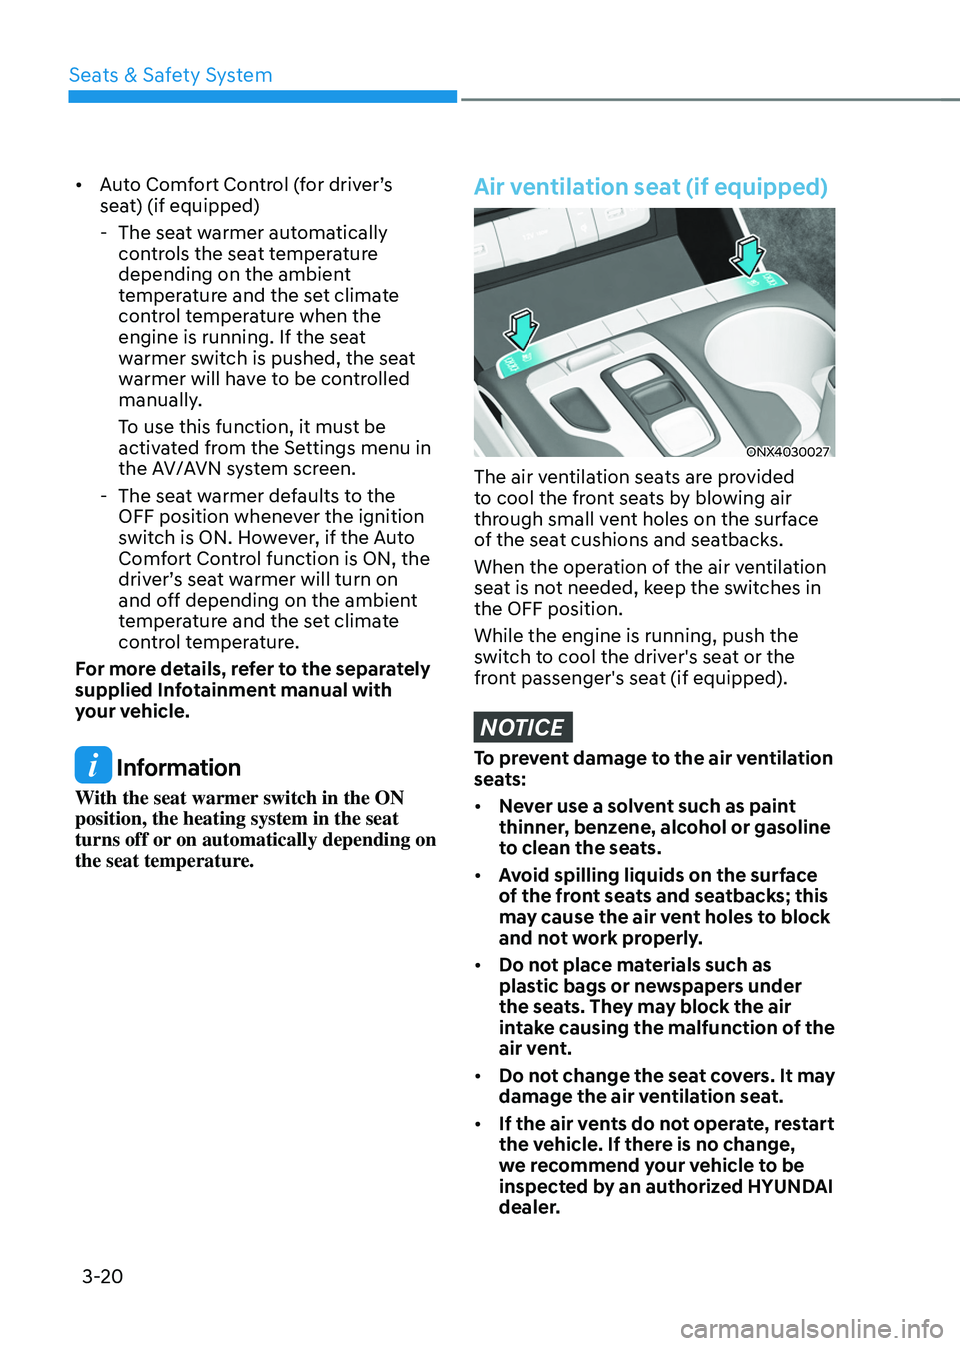
Air ventilation seat (if equipped)
ONX4030027
The air ventilation seats are provided
to cool the front seats by blowing air
through small vent holes on the surface
of the seat cushions and seatbacks.
When the operation of the air ventilation
seat is not needed, keep the switches in
the OFF position.
While the engine is running, push the
switch to cool the driver's seat or the
front passenger's seat (if equipped).
NOTICE
To prevent damage to the air ventilation
seats:
• Never use a solvent such as paint
thinner, benzene, alcohol or gasoline
to clean the seats.
• Avoid spilling liquids on the surface
of the front seats and seatbacks; this
may cause the air vent holes to block
and not work properly.
• Do not place materials such as
plastic bags or newspapers under
the seats. They may block the air
intake causing the malfunction of the
air vent.
• Do not change the seat covers. It may
damage the air ventilation seat.
• If the air vents do not operate, restart
the vehicle. If there is no change,
we recommend your vehicle to be
inspected by an authorized HYUNDAI
dealer.
Page 67 of 630
03
3-21
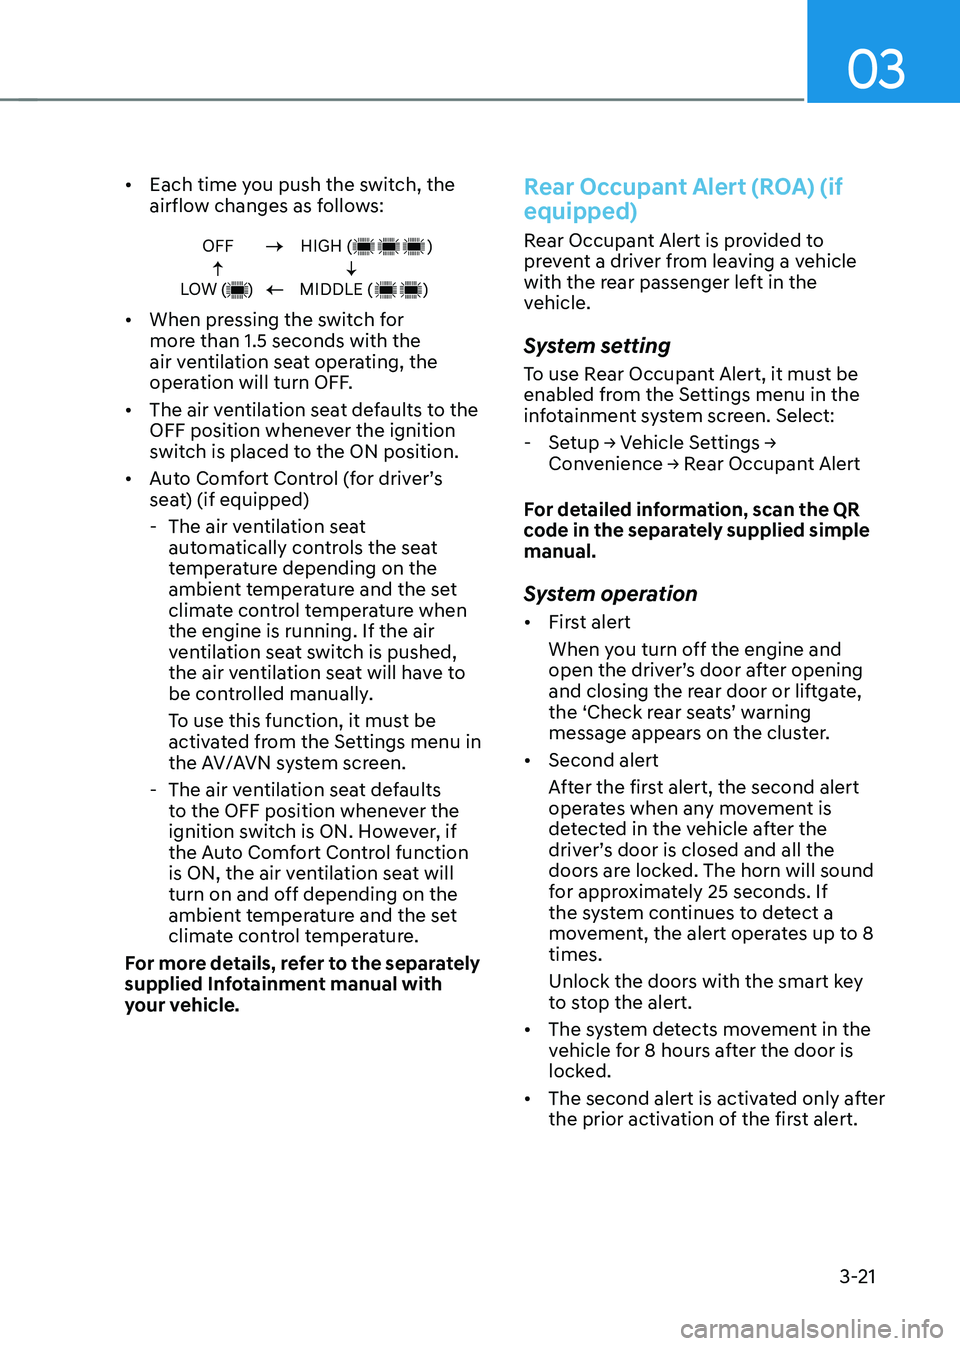
• Each time you push the switch, the
airflow changes as follows:
OFF
LOW ( )HIGH ( )
MIDDLE ( )
• When pressing the switch for
more than 1.5 seconds with the
air ventilation seat operating, the
operation will turn OFF.
• The air ventilation seat defaults to the
OFF position whenever the ignition
switch is placed to the ON position.
• Auto Comfort Control (for driver’s
seat) (if equipped)
- The air ven
tilation seat
automatically controls the seat
temperature depending on the
ambient temperature and the set
climate control temperature when
the engine is running. If the air
ventilation seat switch is pushed,
the air ventilation seat will have to
be controlled manually.
To use this function, it must be
activated from the Settings menu in
the AV/AVN system screen.
- The air ven
tilation seat defaults
to the OFF position whenever the
ignition switch is ON. However, if
the Auto Comfort Control function
is ON, the air ventilation seat will
turn on and off depending on the
ambient temperature and the set
climate control temperature.
For more details, refer to the separately
supplied Infotainment manual with
your vehicle.
Rear Occupant Alert (ROA) (if
equipped)
Rear Occupant Alert is provided to
prevent a driver from leaving a vehicle
with the rear passenger left in the
vehicle.
System setting
To use Rear Occupant Alert, it must be
enabled from the Settings menu in the
infotainment system screen. Select:
- Setup → V
ehicle
Se
ttings
→ Conv
enience
→ R
ear
Occupan
t
Alert
F
or detailed information, scan the QR
code in the separately supplied simple
manual.
System operation
• First alert
When you turn off the engine and
open the driver’s door after opening
and closing the rear door or liftgate,
the ‘Check rear seats’ warning
message appears on the cluster.
• Second alert
After the first alert, the second alert
operates when any movement is
detected in the vehicle after the
driver’s door is closed and all the
doors are locked. The horn will sound
for approximately 25 seconds. If
the system continues to detect a
movement, the alert operates up to 8
times.
Unlock the doors with the smart key
to stop the alert.
• The system detects movement in the
vehicle for 8 hours after the door is
locked.
• The second alert is activated only after
the prior activation of the first alert.
Page 68 of 630
Seats & Safety System
3-22
System precautions
• Make sure that all the windows are
closed. If the window is open, the
alert may operate by the sensor
detecting an unintended movement
(e.g. wind or bugs).
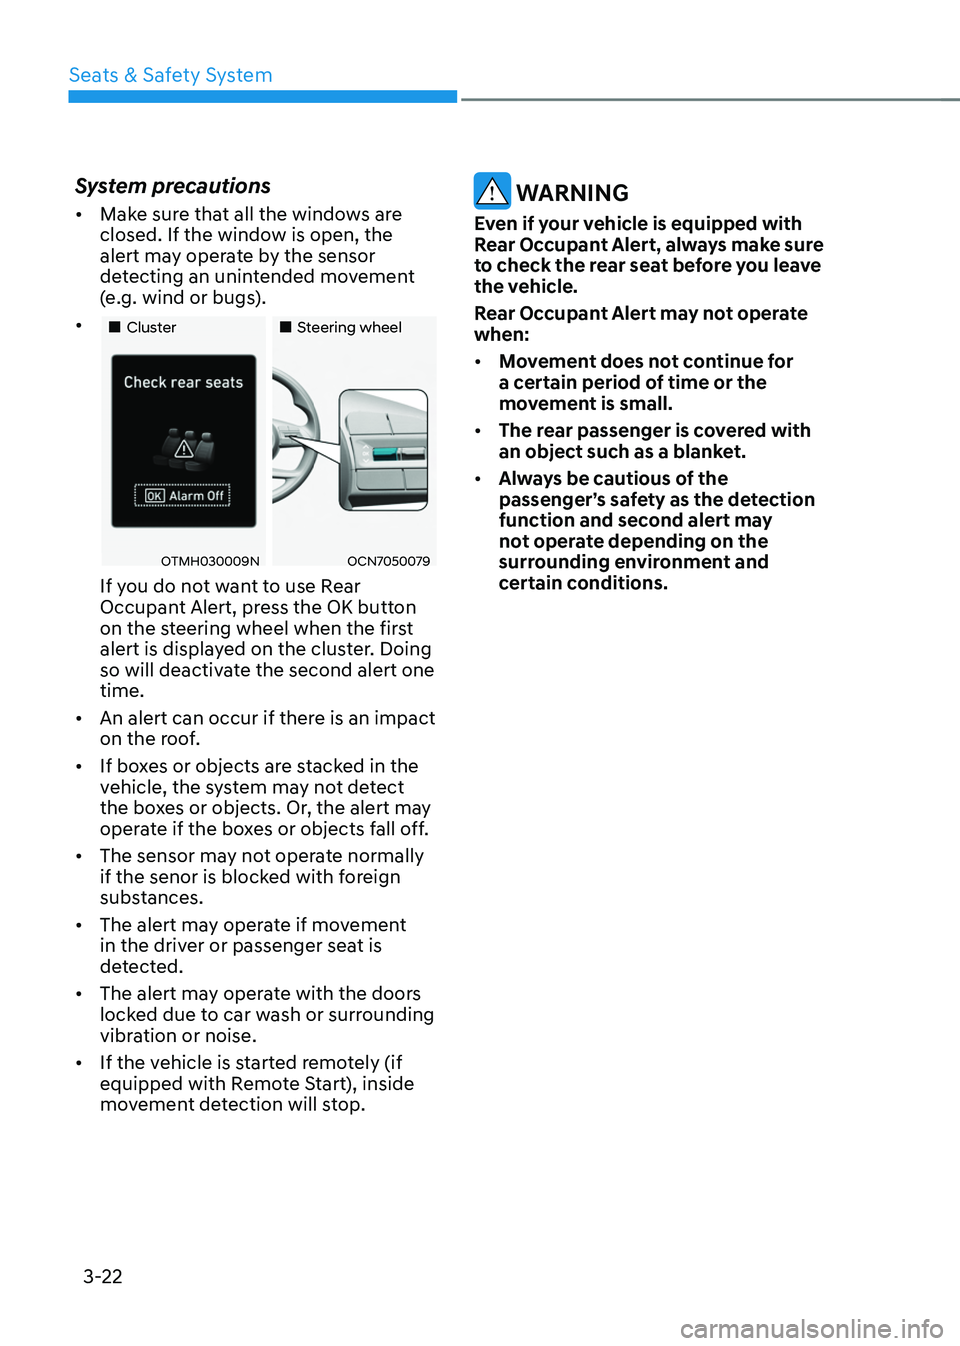
• „„Cluster „„Steering wheel
OTMH030009NOCN7050079
If you do not want to use Rear
Occupant Alert, press the OK button
on the steering wheel when the first
alert is displayed on the cluster. Doing
so will deactivate the second alert one
time.
• An alert can occur if there is an impact
on the roof.
• If boxes or objects are stacked in the
vehicle, the system may not detect
the boxes or objects. Or, the alert may
operate if the boxes or objects fall off.
• The sensor may not operate normally
if the senor is blocked with foreign
substances.
• The alert may operate if movement
in the driver or passenger seat is
detected.
• The alert may operate with the doors
locked due to car wash or surrounding
vibration or noise.
• If the vehicle is started remotely (if
equipped with Remote Start), inside
movement detection will stop.
WARNING
Even if your vehicle is equipped with
Rear Occupant Alert, always make sure
to check the rear seat before you leave
the vehicle.
Rear Occupant Alert may not operate
when:
• Movement does not continue for
a certain period of time or the
movement is small.
• The rear passenger is covered with
an object such as a blanket.
• Always be cautious of the
passenger’s safety as the detection
function and second alert may
not operate depending on the
surrounding environment and
certain conditions.
Page 71 of 630
03
3-25
Seat belt restraint system
Lap/shoulder belt
OHI038140
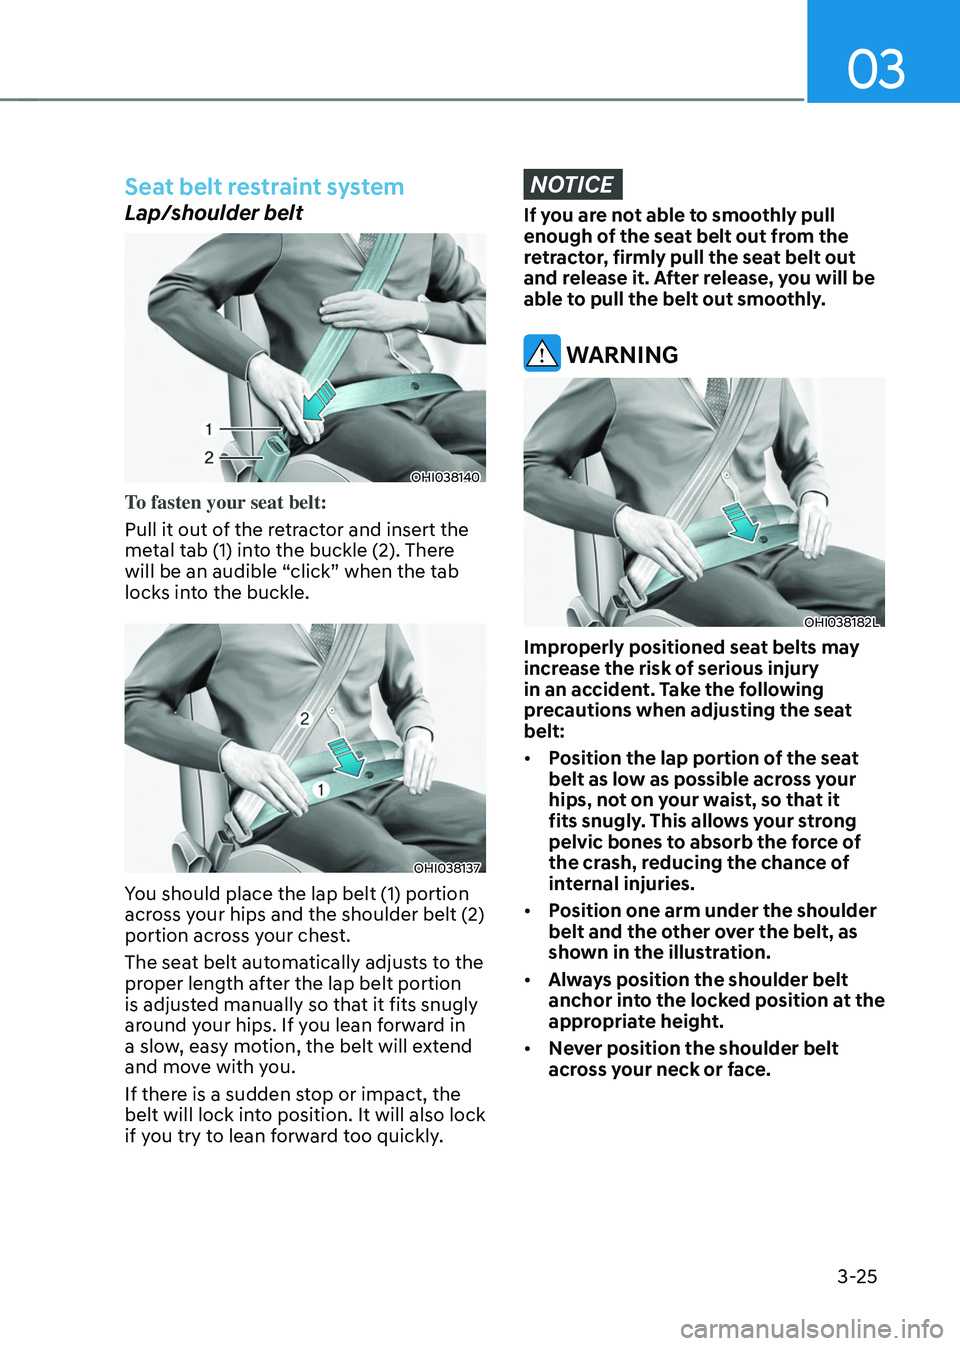
To fasten your seat belt:
Pull it out of the retractor and insert the
metal tab (1) into the buckle (2). There
will be an audible “click” when the tab
locks into the buckle.
OHI038137
You should place the lap belt (1) portion
across your hips and the shoulder belt (2)
portion across your chest.
The seat belt automatically adjusts to the
proper length after the lap belt portion
is adjusted manually so that it fits snugly
around your hips. If you lean forward in
a slow, easy motion, the belt will extend
and move with you.
If there is a sudden stop or impact, the
belt will lock into position. It will also lock
if you try to lean forward too quickly.
NOTICE
If you are not able to smoothly pull
enough of the seat belt out from the
retractor, firmly pull the seat belt out
and release it. After release, you will be
able to pull the belt out smoothly.
WARNING
OHI038182L
Improperly positioned seat belts may
increase the risk of serious injury
in an accident. Take the following
precautions when adjusting the seat
belt:
• Position the lap portion of the seat
belt as low as possible across your
hips, not on your waist, so that it
fits snugly. This allows your strong
pelvic bones to absorb the force of
the crash, reducing the chance of
internal injuries.
• Position one arm under the shoulder
belt and the other over the belt, as
shown in the illustration.
• Always position the shoulder belt
anchor into the locked position at the
appropriate height.
• Never position the shoulder belt
across your neck or face.
Page 72 of 630
Seats & Safety System
3-26
Height adjustment
You can adjust the height of the shoulder
belt anchor to one of the four different
positions for maximum comfort and
safety.
The shoulder portion should be adjusted
so it lies across your chest and midway
over your shoulder nearest the door, not
over your neck.
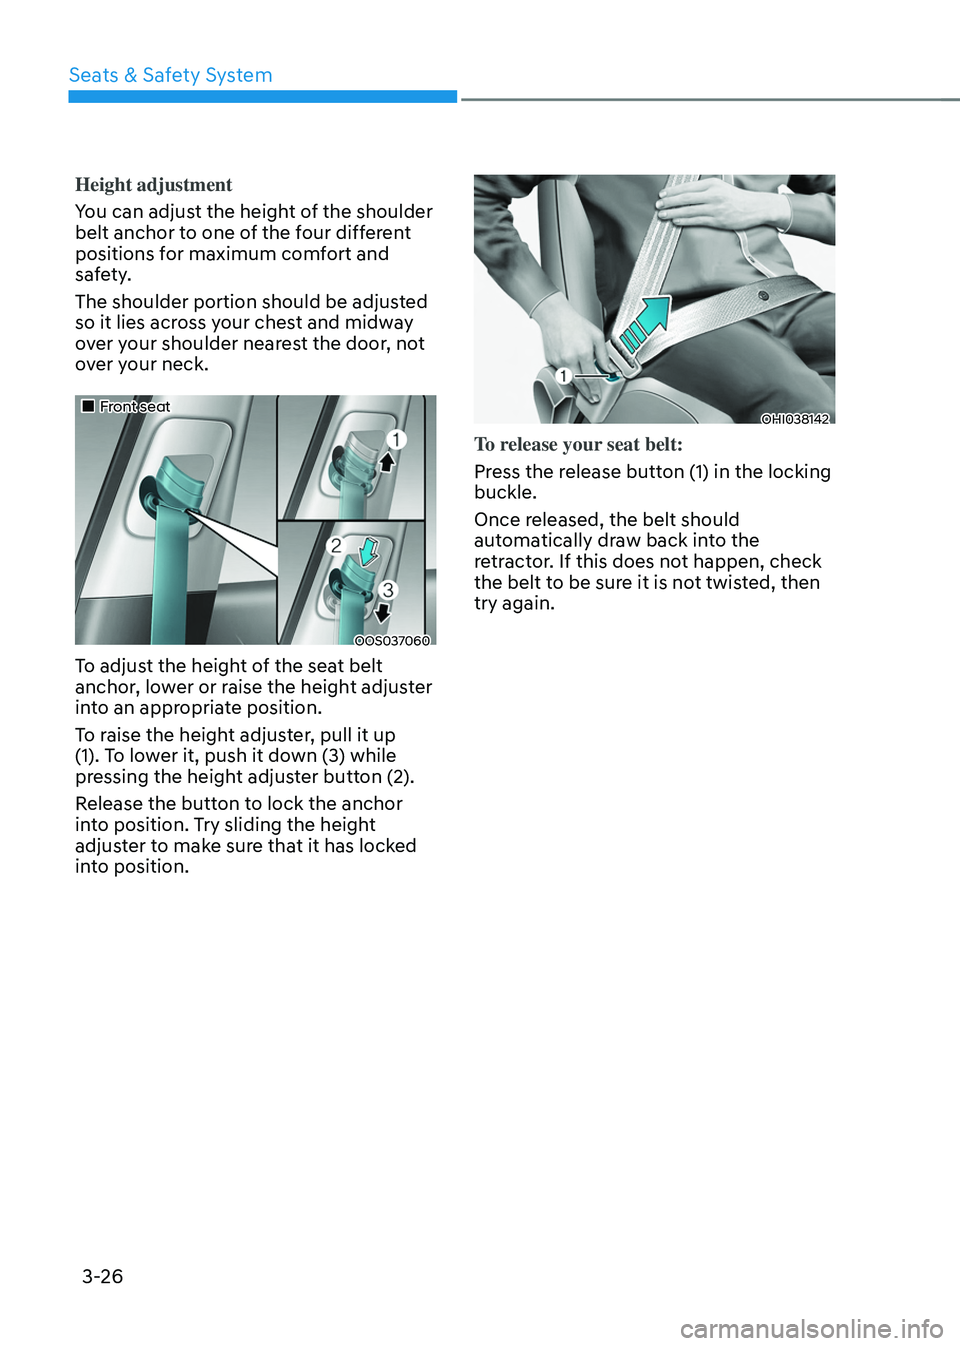
„„Front seat
OOS037060
To adjust the height of the seat belt
anchor, lower or raise the height adjuster
into an appropriate position.
To raise the height adjuster, pull it up
(1). To lower it, push it down (3) while
pressing the height adjuster button (2).
Release the button to lock the anchor
into position. Try sliding the height
adjuster to make sure that it has locked
into position.
OHI038142
To release your seat belt:
Press the release button (1) in the locking
buckle.
Once released, the belt should
automatically draw back into the
retractor. If this does not happen, check
the belt to be sure it is not twisted, then
try again.
Page 73 of 630
03
3-27
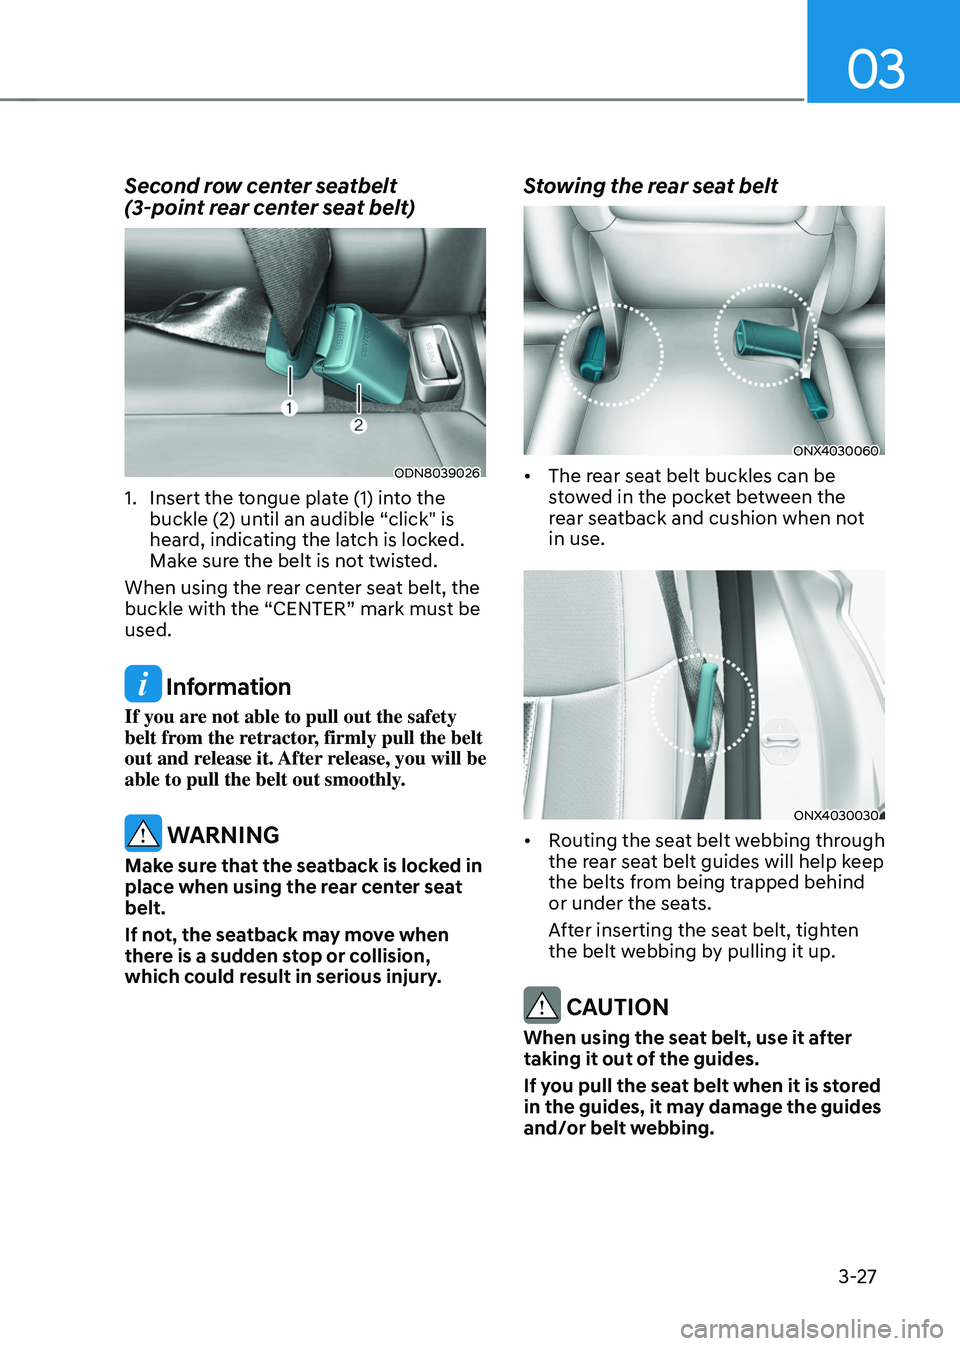
Second row center seatbelt
(3-point rear center seat belt)
ODN8039026
1. Insert the tongue plate (1) into the
buckle (2) until an audible “click" is
heard, indicating the latch is locked.
Make sure the belt is not twisted.
When using the rear center seat belt, the
buckle with the “CENTER” mark must be
used.
Information
If you are not able to pull out the safety
belt from the retractor, firmly pull the belt
out and release it. After release, you will be
able to pull the belt out smoothly.
WARNING
Make sure that the seatback is locked in
place when using the rear center seat
belt.
If not, the seatback may move when
there is a sudden stop or collision,
which could result in serious injury.
Stowing the rear seat belt
ONX4030060
• The rear seat belt buckles can be
stowed in the pocket between the
rear seatback and cushion when not
in use.
ONX4030030
• Routing the seat belt webbing through
the rear seat belt guides will help keep
the belts from being trapped behind
or under the seats.
After inserting the seat belt, tighten
the belt webbing by pulling it up.
CAUTION
When using the seat belt, use it after
taking it out of the guides.
If you pull the seat belt when it is stored
in the guides, it may damage the guides
and/or belt webbing.
Page 74 of 630
Seats & Safety System
3-28
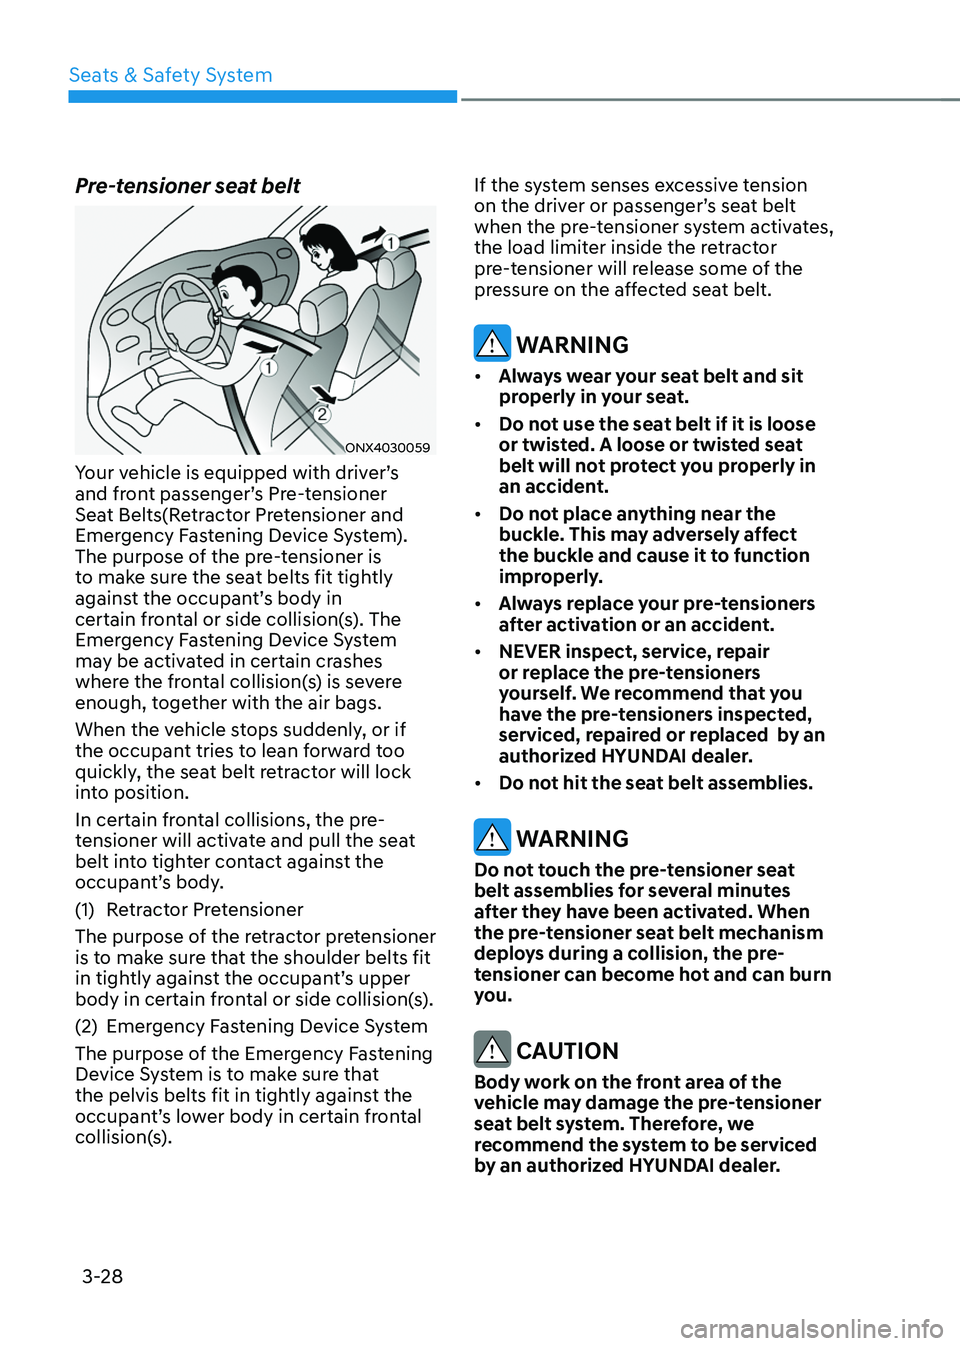
Pre-tensioner seat belt
ONX4030059
Your vehicle is equipped with driver’s
and front passenger’s Pre-tensioner
Seat Belts(Retractor Pretensioner and
Emergency Fastening Device System).
The purpose of the pre-tensioner is
to make sure the seat belts fit tightly
against the occupant’s body in
certain frontal or side collision(s). The
Emergency Fastening Device System
may be activated in certain crashes
where the frontal collision(s) is severe
enough, together with the air bags.
When the vehicle stops suddenly, or if
the occupant tries to lean forward too
quickly, the seat belt retractor will lock
into position.
In certain frontal collisions, the pre-
tensioner will activate and pull the seat
belt into tighter contact against the
occupant’s body.
(1)
Re
tractor Pretensioner
The purpose of the retractor pretensioner
is to make sure that the shoulder belts fit
in tightly against the occupant’s upper
body in certain frontal or side collision(s).
(2)
Emer
gency Fastening Device System
The purpose of the Emergency Fastening
Device System is to make sure that
the pelvis belts fit in tightly against the
occupant’s lower body in certain frontal
collision(s). If the system senses excessive tension
on the driver or passenger’s seat belt
when the pre-tensioner system activates,
the load limiter inside the retractor
pre-tensioner will release some of the
pressure on the affected seat belt.
WARNING
•
Always wear your seat belt and sit
properly in your seat.
• Do not use the seat belt if it is loose
or twisted. A loose or twisted seat
belt will not protect you properly in
an accident.
• Do not place anything near the
buckle. This may adversely affect
the buckle and cause it to function
improperly.
• Always replace your pre-tensioners
after activation or an accident.
• NEVER inspect, service, repair
or replace the pre-tensioners
yourself. We recommend that you
have the pre-tensioners inspected,
serviced, repaired or replaced by an
authorized HYUNDAI dealer.
• Do not hit the seat belt assemblies.
WARNING
Do not touch the pre-tensioner seat
belt assemblies for several minutes
after they have been activated. When
the pre-tensioner seat belt mechanism
deploys during a collision, the pre-
tensioner can become hot and can burn
you.
CAUTION
Body work on the front area of the
vehicle may damage the pre-tensioner
seat belt system. Therefore, we
recommend the system to be serviced
by an authorized HYUNDAI dealer.