HYUNDAI VELOSTER N 2022 Owners Manual
Manufacturer: HYUNDAI, Model Year: 2022, Model line: VELOSTER N, Model: HYUNDAI VELOSTER N 2022Pages: 446, PDF Size: 9.71 MB
Page 251 of 446
5-57
Driving your vehicle
5
• Warm up the tires before using
launch control for the best
result.
• Launch Control is intended for
use at a closed race track with
dry road surface and not intend-
ed for use on public roads. It will
not compensate for driver's who
are inexperienced or lack famil-
iarity with the race track.
• Do not use Launch Control in
poor road condition (ex. wet,
sand, snow). Control over vehi-
cle may be lost with poor road
condition and driver inatten-
tions. Do not endanger other
road users by using Launch
Control.
• Do not use Launch Control dur-
ing break-in period of the vehi-
cle.
• Constant use of Launch Control
can put enormous stress on the
vehicle resulting in premature
wear of related components.
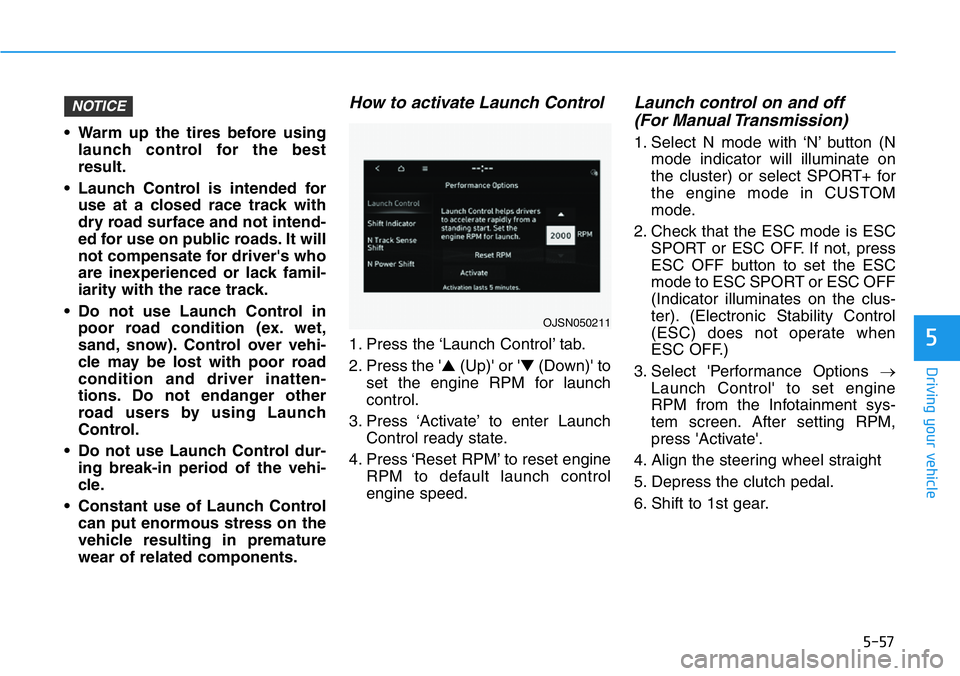
How to activate Launch Control
1. Press the ‘Launch Control’ tab.
2. Press the '▲(Up)' or '▼(Down)' to
set the engine RPM for launch
control.
3. Press ‘Activate’ to enter Launch
Control ready state.
4. Press ‘Reset RPM’ to reset engine
RPM to default launch control
engine speed.
Launch control on and off
(For Manual Transmission)
1. Select N mode with ‘N’ button (N
mode indicator will illuminate on
the cluster) or select SPORT+ for
the engine mode in CUSTOM
mode.
2. Check that the ESC mode is ESC
SPORT or ESC OFF. If not, press
ESC OFF button to set the ESC
mode to ESC SPORT or ESC OFF
(Indicator illuminates on the clus-
ter). (Electronic Stability Control
(ESC) does not operate when
ESC OFF.)
3. Select 'Performance Options →
Launch Control' to set engine
RPM from the Infotainment sys-
tem screen. After setting RPM,
press 'Activate'.
4. Align the steering wheel straight
5. Depress the clutch pedal.
6. Shift to 1st gear.
NOTICE
OJSN050211
Page 252 of 446
5-58
Driving your vehicle
7. While depressing the clutch pedal
with your left foot, quickly and fully
depress the accelerator pedal with
your right foot. Launch control will
be in the ready state. The mes-
sage 'Launch Control Ready' will
appear on the cluster. If neces-
sary, adjust engine rpm with the
cruise control switch (+/-).
8. A smooth, quick release of the
clutch pedal within 8 seconds,
while maintaining full depression
of the accelerator pedal will initiate
launching of the vehicle. The mes-
sage 'Launch Control Active' will
appear on the cluster.
9. Control will deactivate when the
accelerator pedal is released.
Launch control on and off
(For Dual Clutch Transmission)
1. Select N mode with 'N' button (N
mode indicator will illuminate on
the cluster) or select SPORT+ for
the engine mode in CUSTOM
mode.
2. Check that the ESC mode is ESC
SPORT or ESC OFF. If not, press
ESC OFF button to set the ESC
mode to ESC SPORT or ESC OFF
(Indicator illuminates on the clus-
ter). (Electronic Stability Control
(ESC) does not operate when
ESC OFF.)
3. Shift the gear to D (Drive) or M
(Manual shift mode). (When
Manual shift mode is selected,
driver must shift manually.)
4. Select 'Performance Options →
Launch Control' to set engine
RPM from the Infotainment sys-
tem screen. After setting RPM,
press 'Activate’.
5. Align the steering wheel straight
6. Depress the brake pedal to the
maximum with your left foot.7. While depressing the brake pedal
with your left foot, quickly and fully
depress the accelerator pedal with
your right foot. Launch control will
be in the ready state. The mes-
sage 'Launch Control Ready' will
appear on the cluster. If neces-
sary, adjust engine rpm with the
cruise control switch (+/-).
8. A smooth, quick release of the
brake pedal within 8 seconds,
while maintaining full depression
of the accelerator pedal will initiate
launching of the vehicle. The mes-
sage 'Launch Control Active' will
appear on the cluster.
9. Launch Control will deactivate
when the accelerator pedal is
released.
Page 253 of 446
5-59
Driving your vehicle
5
(For Dual Clutch Transmission)
•If you depress the brake pedal
and the accelerator pedal at
the same time and then
release the accelerator pedal,
Launch Control is released.
•Launch Control is available
again after it is cooled down
for at least 2 minutes.
•If you do not launch the vehi-
cle within 8 seconds in launch
control “READY” state, launch
control will be automatically
aborted.
CAUTION
Performance of Launch Control
is highly dependent on clutch
release technique, tire friction
and road conditions. In other
words, the use of Launch
Control does not always guar-
antee the maximum launch per-
formance.
CAUTION
(For Manual Transmission)
•If you depress the clutch
pedal and the accelerator
pedal at the same time and
then release the accelerator
pedal, Launch Control is
released.
•Launch Control is available
again after it is cooled down
for at least 2 minutes.
•If you do not launch the vehi-
cle within 8 seconds in launch
control “READY” state, launch
control will be automatically
aborted.
CAUTION
Page 254 of 446
5-60
Driving your vehicle
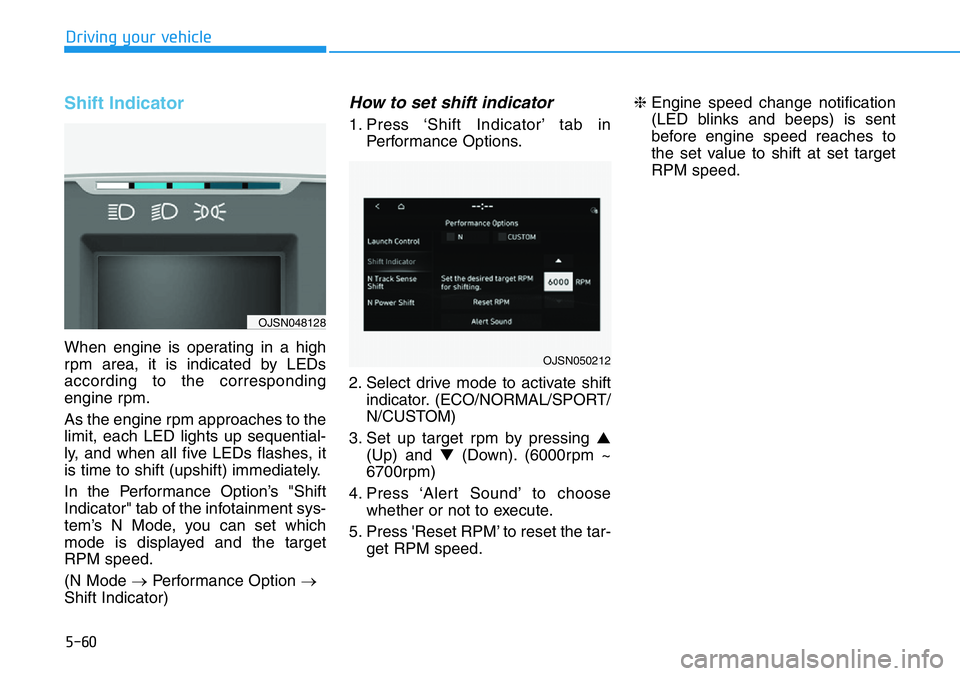
Shift Indicator
When engine is operating in a high
rpm area, it is indicated by LEDs
according to the corresponding
engine rpm.
As the engine rpm approaches to the
limit, each LED lights up sequential-
ly, and when all five LEDs flashes, it
is time to shift (upshift) immediately.
In the Performance Option’s "Shift
Indicator" tab of the infotainment sys-
tem’s N Mode, you can set which
mode is displayed and the target
RPM speed.
(N Mode →Performance Option →
Shift Indicator)
How to set shift indicator
1. Press ‘Shift Indicator’ tab in
Performance Options.
2. Select drive mode to activate shift
indicator. (ECO/NORMAL/SPORT/
N/CUSTOM)
3. Set up target rpm by pressing ▲
(Up) and ▼(Down). (6000rpm ~
6700rpm)
4. Press ‘Alert Sound’ to choose
whether or not to execute.
5. Press 'Reset RPM’ to reset the tar-
get RPM speed.❈Engine speed change notification
(LED blinks and beeps) is sent
before engine speed reaches to
the set value to shift at set target
RPM speed.
OJSN050212
OJSN048128
Page 255 of 446
5-61
Driving your vehicle
5
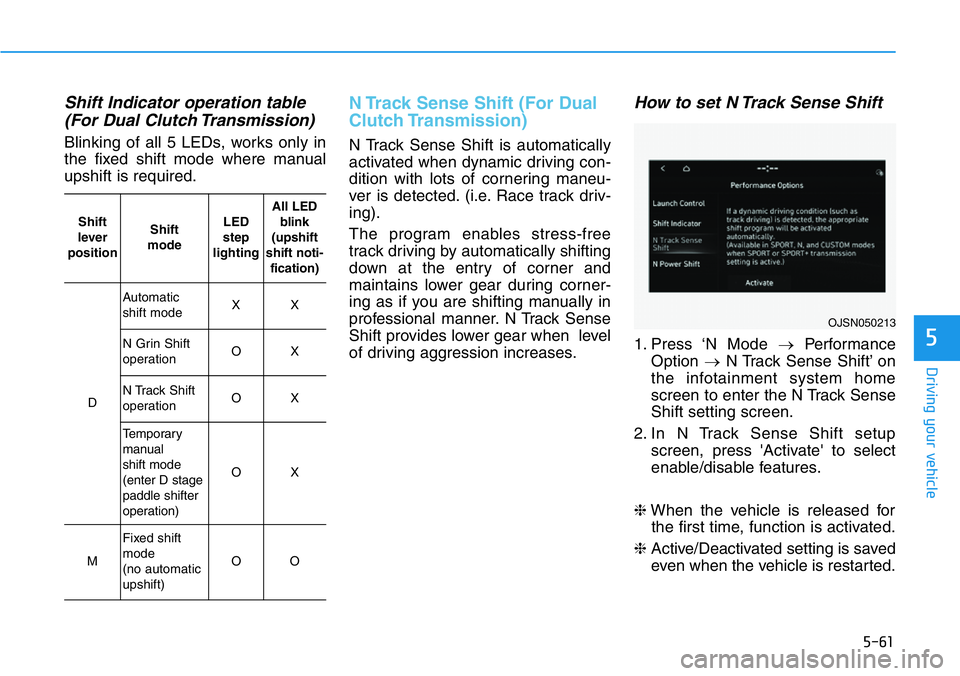
Shift Indicator operation table
(For Dual Clutch Transmission)
Blinking of all 5 LEDs, works only in
the fixed shift mode where manual
upshift is required.
N Track Sense Shift (For Dual
Clutch Transmission)
N Track Sense Shift is automatically
activated when dynamic driving con-
dition with lots of cornering maneu-
ver is detected. (i.e. Race track driv-
ing).
The program enables stress-free
track driving by automatically shifting
down at the entry of corner and
maintains lower gear during corner-
ing as if you are shifting manually in
professional manner. N Track Sense
Shift provides lower gear when level
of driving aggression increases.
How to set N Track Sense Shift
1. Press ‘N Mode →Performance
Option →N Track Sense Shift’ on
the infotainment system home
screen to enter the N Track Sense
Shift setting screen.
2. In N Track Sense Shift setup
screen, press 'Activate' to select
enable/disable features.
❈When the vehicle is released for
the first time, function is activated.
❈Active/Deactivated setting is saved
even when the vehicle is restarted.
OJSN050213
Shift
lever
positionShift
modeLED
step
lightingAll LED
blink
(upshift
shift noti-
fication)
D
Automatic
shift modeXX
N Grin Shift
operationOX
N Track Shift
operationOX
Temporary
manual
shift mode
(enter D stage
paddle shifter
operation)
OX
M
Fixed shift
mode
(no automatic
upshift)
OO
Page 256 of 446
5-62
Driving your vehicle
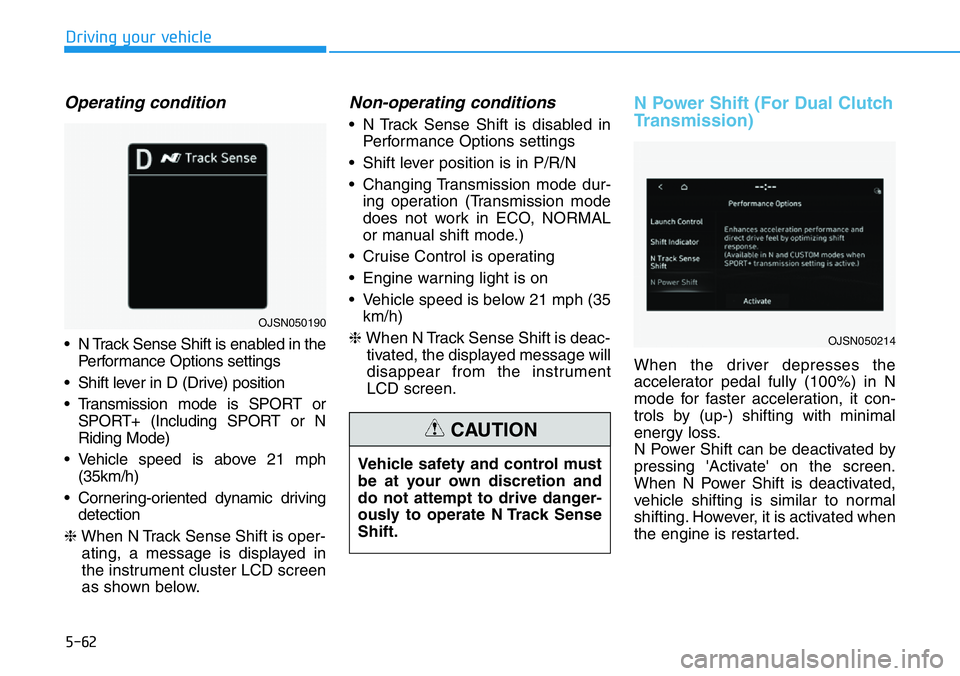
Operating condition
• N Track Sense Shift is enabled in the
Performance Options settings
• Shift lever in D (Drive) position
• Transmission mode is SPORT or
SPORT+ (Including SPORT or N
Riding Mode)
• Vehicle speed is above 21 mph
(35km/h)
• Cornering-oriented dynamic driving
detection
❈When N Track Sense Shift is oper-
ating, a message is displayed in
the instrument cluster LCD screen
as shown below.
Non-operating conditions
• N Track Sense Shift is disabled in
Performance Options settings
• Shift lever position is in P/R/N
• Changing Transmission mode dur-
ing operation (Transmission mode
does not work in ECO, NORMAL
or manual shift mode.)
• Cruise Control is operating
• Engine warning light is on
• Vehicle speed is below 21 mph (35
km/h)
❈When N Track Sense Shift is deac-
tivated, the displayed message will
disappear from the instrument
LCD screen.
N Power Shift (For Dual Clutch
Transmission)
When the driver depresses the
accelerator pedal fully (100%) in N
mode for faster acceleration, it con-
trols by (up-) shifting with minimal
energy loss.
N Power Shift can be deactivated by
pressing 'Activate' on the screen.
When N Power Shift is deactivated,
vehicle shifting is similar to normal
shifting. However, it is activated when
the engine is restarted. Vehicle safety and control must
be at your own discretion and
do not attempt to drive danger-
ously to operate N Track Sense
Shift.
CAUTION
OJSN050214
OJSN050190
Page 257 of 446
5-63
Driving your vehicle
5
DECLARATION OF CONFORMITY (IF EQUIPPED)
OANATEL002
OANATEL003
The radio frequency components (Rear Corner Radar) complies:
- FOR USA
Page 258 of 446
5-64
Driving your vehicle
Basic function
Forward Collision-Avoidance Assist
is designed to help detect and moni-
tor the vehicle ahead or help detect a
pedestrian in the roadway and warn
the driver that a collision is imminent
with a warning message and an
audible warning, and if necessary,
apply emergency braking.
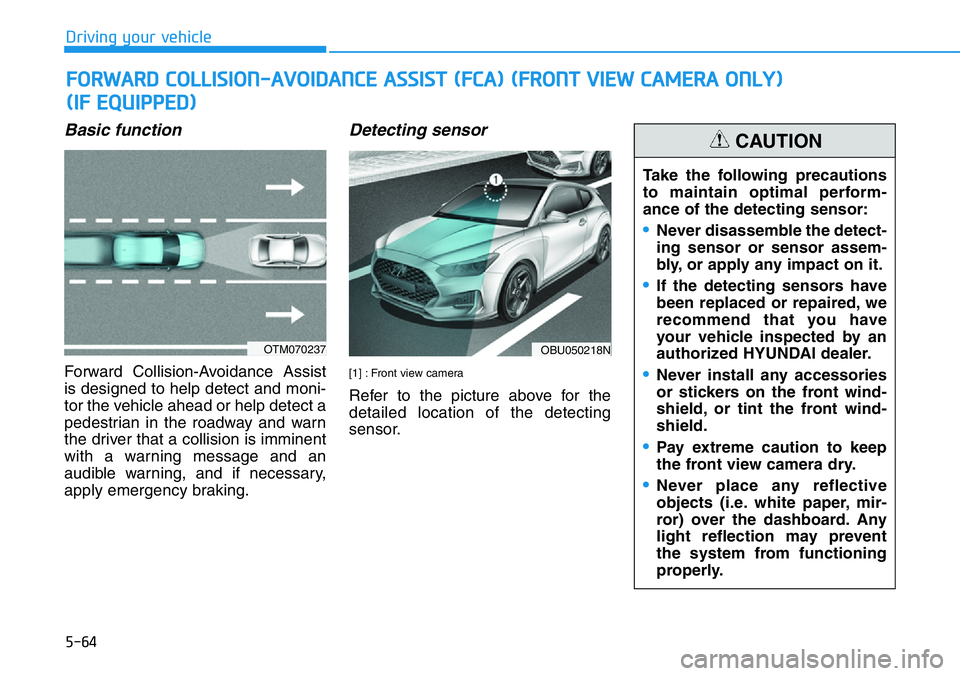
Detecting sensor
[1] : Front view camera
Refer to the picture above for the
detailed location of the detecting
sensor.
FORWARD COLLISION-AVOIDANCE ASSIST (FCA) (FRONT VIEW CAMERA ONLY)
(IF EQUIPPED)
OTM070237OBU050218N
Take the following precautions
to maintain optimal perform-
ance of the detecting sensor:
•Never disassemble the detect-
ing sensor or sensor assem-
bly, or apply any impact on it.
•If the detecting sensors have
been replaced or repaired, we
recommend that you have
your vehicle inspected by an
authorized HYUNDAI dealer.
•Never install any accessories
or stickers on the front wind-
shield, or tint the front wind-
shield.
•Pay extreme caution to keep
the front view camera dry.
•Never place any reflective
objects (i.e. white paper, mir-
ror) over the dashboard. Any
light reflection may prevent
the system from functioning
properly.
CAUTION
Page 259 of 446
5-65
Driving your vehicle
5
System settings
functions for the system
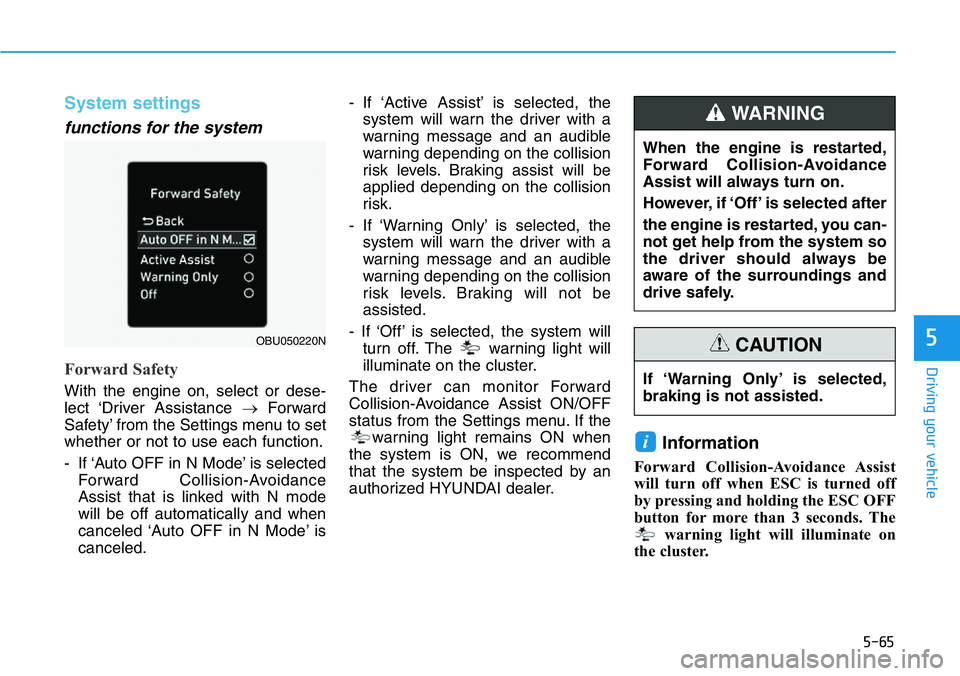
Forward Safety
With the engine on, select or dese-
lect ‘Driver Assistance →Forward
Safety’ from the Settings menu to set
whether or not to use each function.
- If ‘Auto OFF in N Mode’ is selected
Forward Collision-Avoidance
Assist that is linked with N mode
will be off automatically and when
canceled ‘Auto OFF in N Mode’ is
canceled.- If ‘Active Assist’ is selected, the
system will warn the driver with a
warning message and an audible
warning depending on the collision
risk levels. Braking assist will be
applied depending on the collision
risk.
- If ‘Warning Only’ is selected, the
system will warn the driver with a
warning message and an audible
warning depending on the collision
risk levels. Braking will not be
assisted.
- If ‘Off’ is selected, the system will
turn off. The warning light will
illuminate on the cluster.
The driver can monitor Forward
Collision-Avoidance Assist ON/OFF
status from the Settings menu. If the
warning light remains ON when
the system is ON, we recommend
that the system be inspected by an
authorized HYUNDAI dealer.
Information
Forward Collision-Avoidance Assist
will turn off when ESC is turned off
by pressing and holding the ESC OFF
button for more than 3 seconds. The
warning light will illuminate on
the cluster.
i
OBU050220N
If ‘Warning Only’ is selected,
braking is not assisted.
CAUTION
When the engine is restarted,
Forward Collision-Avoidance
Assist will always turn on.
However, if ‘Off’ is selected after
the engine is restarted, you can-
not get help from the system so
the driver should always be
aware of the surroundings and
drive safely.
WARNING
Page 260 of 446
5-66
Driving your vehicle
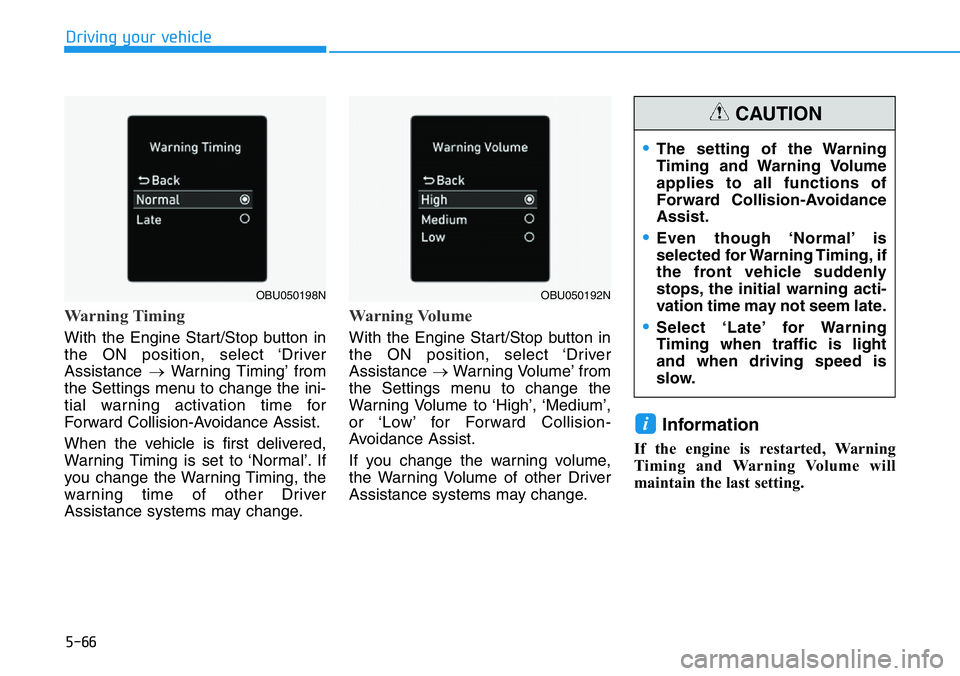
Warning Timing
With the Engine Start/Stop button in
the ON position, select ‘Driver
Assistance →Warning Timing’ from
the Settings menu to change the ini-
tial warning activation time for
Forward Collision-Avoidance Assist.
When the vehicle is first delivered,
Warning Timing is set to ‘Normal’. If
you change the Warning Timing, the
warning time of other Driver
Assistance systems may change.
Warning Volume
With the Engine Start/Stop button in
the ON position, select ‘Driver
Assistance →Warning Volume’ from
the Settings menu to change the
Warning Volume to ‘High’, ‘Medium’,
or ‘Low’ for Forward Collision-
Avoidance Assist.
If you change the warning volume,
the Warning Volume of other Driver
Assistance systems may change.
Information
If the engine is restarted, Warning
Timing and Warning Volume will
maintain the last setting.
i
OBU050198NOBU050192N
•The setting of the Warning
Timing and Warning Volume
applies to all functions of
Forward Collision-Avoidance
Assist.
•Even though ‘Normal’ is
selected for Warning Timing, if
the front vehicle suddenly
stops, the initial warning acti-
vation time may not seem late.
•Select ‘Late’ for Warning
Timing when traffic is light
and when driving speed is
slow.
CAUTION