tension HYUNDAI VELOSTER TURBO 2016 Owners Manual
[x] Cancel search | Manufacturer: HYUNDAI, Model Year: 2016, Model line: VELOSTER TURBO, Model: HYUNDAI VELOSTER TURBO 2016Pages: 406, PDF Size: 7.83 MB
Page 33 of 406
317
Safety features of your vehicle
Seat belt - Driver's 3-point system
with emergency locking retractor
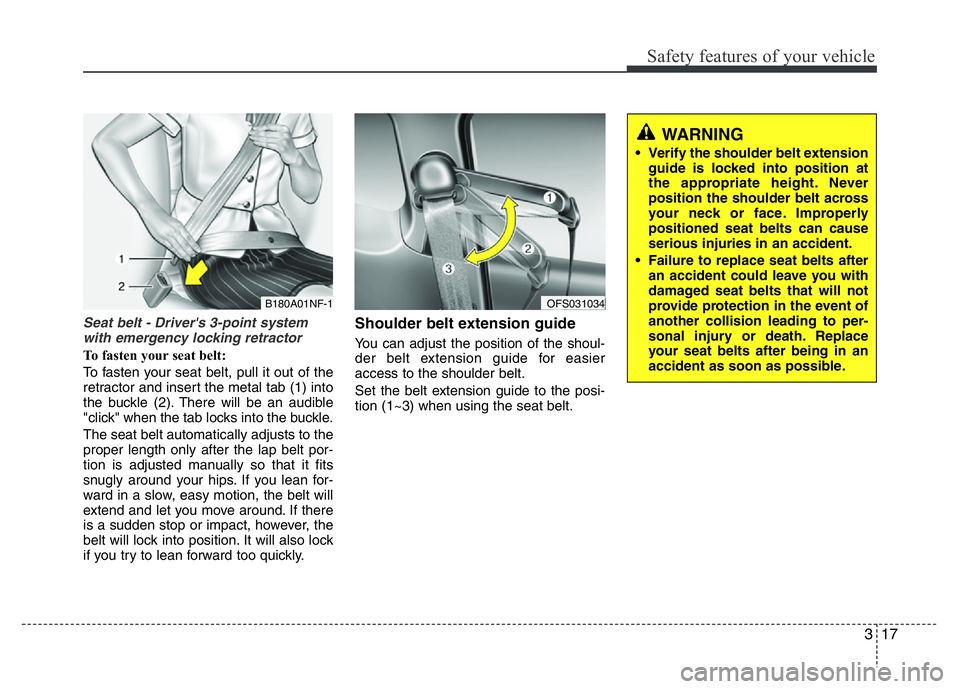
To fasten your seat belt:
To fasten your seat belt, pull it out of the
retractor and insert the metal tab (1) into
the buckle (2). There will be an audible
"click" when the tab locks into the buckle.
The seat belt automatically adjusts to the
proper length only after the lap belt por-
tion is adjusted manually so that it fits
snugly around your hips. If you lean for-
ward in a slow, easy motion, the belt will
extend and let you move around. If there
is a sudden stop or impact, however, the
belt will lock into position. It will also lock
if you try to lean forward too quickly.
Shoulder belt extension guide
You can adjust the position of the shoul-
der belt extension guide for easier
access to the shoulder belt.
Set the belt extension guide to the posi-
tion (1~3) when using the seat belt.
B180A01NF-1OFS031034
WARNING
• Verify the shoulder belt extension
guide is locked into position at
the appropriate height. Never
position the shoulder belt across
your neck or face. Improperly
positioned seat belts can cause
serious injuries in an accident.
• Failure to replace seat belts after
an accident could leave you with
damaged seat belts that will not
provide protection in the event of
another collision leading to per-
sonal injury or death. Replace
your seat belts after being in an
accident as soon as possible.
Page 35 of 406
319
Safety features of your vehicle
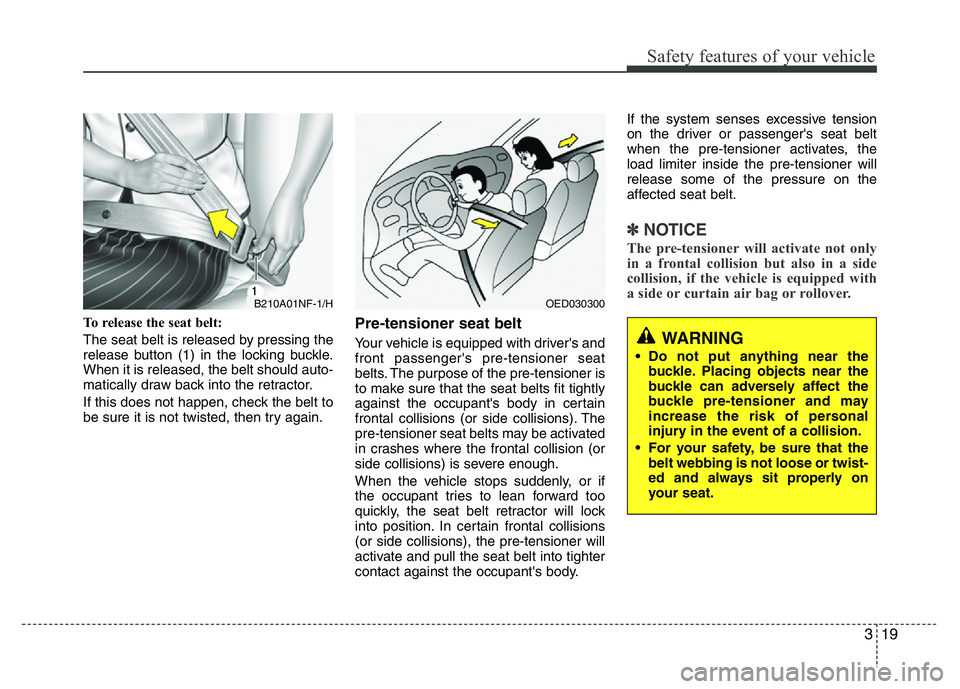
To release the seat belt:
The seat belt is released by pressing the
release button (1) in the locking buckle.
When it is released, the belt should auto-
matically draw back into the retractor.
If this does not happen, check the belt to
be sure it is not twisted, then try again.Pre-tensioner seat belt
Your vehicle is equipped with driver's and
front passenger's pre-tensioner seat
belts. The purpose of the pre-tensioner is
to make sure that the seat belts fit tightly
against the occupant's body in certain
frontal collisions (or side collisions). The
pre-tensioner seat belts may be activated
in crashes where the frontal collision (or
side collisions) is severe enough.
When the vehicle stops suddenly, or if
the occupant tries to lean forward too
quickly, the seat belt retractor will lock
into position. In certain frontal collisions
(or side collisions), the pre-tensioner will
activate and pull the seat belt into tighter
contact against the occupant's body.If the system senses excessive tension
on the driver or passenger's seat belt
when the pre-tensioner activates, the
load limiter inside the pre-tensioner will
release some of the pressure on the
affected seat belt.
✽NOTICE
The pre-tensioner will activate not only
in a frontal collision but also in a side
collision, if the vehicle is equipped with
a side or curtain air bag or rollover.
B210A01NF-1/HOED030300
WARNING
• Do not put anything near the
buckle. Placing objects near the
buckle can adversely affect the
buckle pre-tensioner and may
increase the risk of personal
injury in the event of a collision.
• For your safety, be sure that the
belt webbing is not loose or twist-
ed and always sit properly on
your seat.
Page 36 of 406
Safety features of your vehicle
20 3
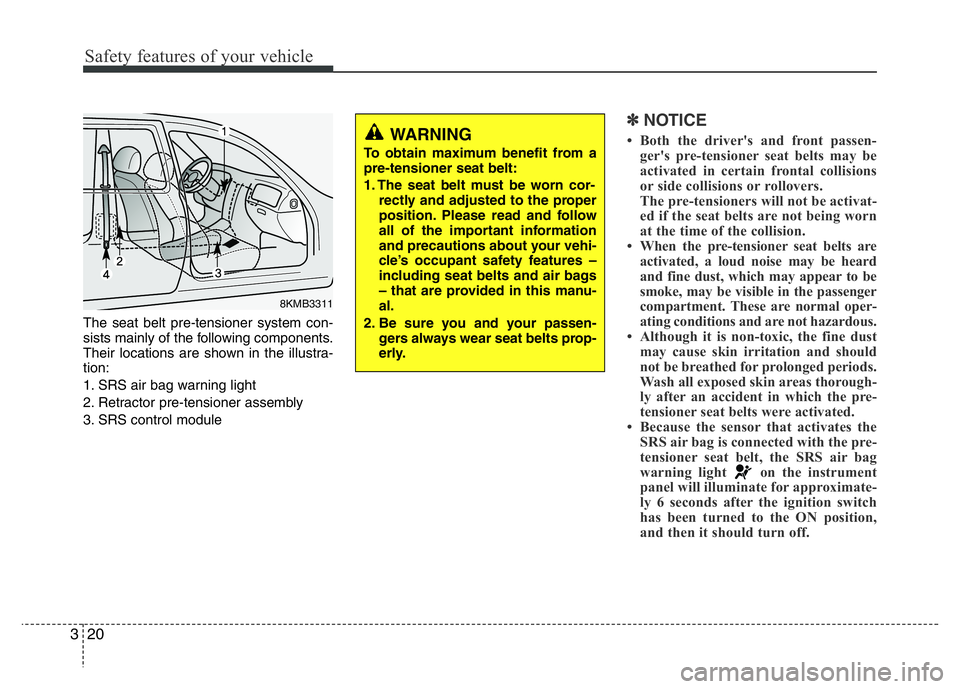
The seat belt pre-tensioner system con-
sists mainly of the following components.
Their locations are shown in the illustra-
tion:
1. SRS air bag warning light
2. Retractor pre-tensioner assembly
3. SRS control module
✽NOTICE
• Both the driver's and front passen-
ger's pre-tensioner seat belts may be
activated in certain frontal collisions
or side collisions or rollovers.
The pre-tensioners will not be activat-
ed if the seat belts are not being worn
at the time of the collision.
• When the pre-tensioner seat belts are
activated, a loud noise may be heard
and fine dust, which may appear to be
smoke, may be visible in the passenger
compartment. These are normal oper-
ating conditions and are not hazardous.
• Although it is non-toxic, the fine dust
may cause skin irritation and should
not be breathed for prolonged periods.
Wash all exposed skin areas thorough-
ly after an accident in which the pre-
tensioner seat belts were activated.
• Because the sensor that activates the
SRS air bag is connected with the pre-
tensioner seat belt, the SRS air bag
warning light on the instrument
panel will illuminate for approximate-
ly 6 seconds after the ignition switch
has been turned to the ON position,
and then it should turn off.
8KMB3311
WARNING
To obtain maximum benefit from a
pre-tensioner seat belt:
1. The seat belt must be worn cor-
rectly and adjusted to the proper
position. Please read and follow
all of the important information
and precautions about your vehi-
cle’s occupant safety features –
including seat belts and air bags
– that are provided in this manu-
al.
2. Be sure you and your passen-
gers always wear seat belts prop-
erly.
Page 37 of 406
321
Safety features of your vehicle
CAUTION
If the pre-tensioner seat belt is not
working properly, this warning light
will illuminate even if there is no
malfunction of the SRS air bag. If
the SRS air bag warning light does
not illuminate when the ignition
switch is turned ON, or if it remains
illuminated after illuminating for
approximately 6 seconds, or if it
illuminates while the vehicle is
being driven, have an authorized
HYUNDAI dealer inspect the pre-
tensioner seat belt and SRS air bag
system as soon as possible.WARNING
• Pre-tensioners are designed to
operate only one time. After acti-
vation, pre-tensioner seat belts
must be replaced. All seat belts,
of any type, should always be
replaced after they have been
worn during a collision.
• The pre-tensioner seat belt
assembly mechanisms become
hot during activation. Do not
touch the pre-tensioner seat belt
assemblies for several minutes
after they have been activated.
• Do not attempt to inspect or
replace the pre-tensioner seat
belts yourself. This must be done
by an authorized HYUNDAI deal-
er.
• Do not strike the pre-tensioner
seat belt assemblies.
• Do not attempt to service or
repair the pre-tensioner seat belt
system in any manner.
(Continued)
(Continued)
• Improper handling of the pre-ten-
sioner seat belt assemblies, and
failure to heed the warnings not
to strike, modify, inspect, replace,
service or repair the pre-tension-
er seat belt assemblies may lead
to improper operation or inadver-
tent activation and serious injury.
• Always wear the seat belts when
driving or riding in a motor vehi-
cle.
• If the vehicle or pre-tensioner
seat belt must be discarded, con-
tact an authorized HYUNDAI deal-
er.
Page 54 of 406
Safety features of your vehicle
38 3
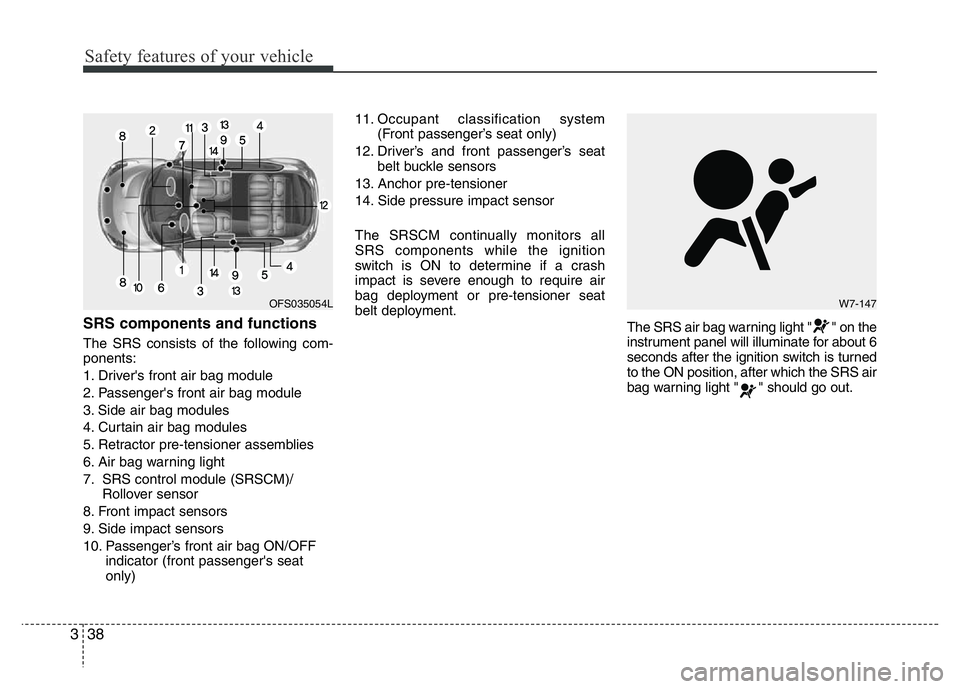
SRS components and functions
The SRS consists of the following com-
ponents:
1. Driver's front air bag module
2. Passenger's front air bag module
3. Side air bag modules
4. Curtain air bag modules
5. Retractor pre-tensioner assemblies
6. Air bag warning light
7. SRS control module (SRSCM)/
Rollover sensor
8. Front impact sensors
9. Side impact sensors
10. Passenger’s front air bag ON/OFF
indicator (front passenger's seat
only)11. Occupant classification system
(Front passenger’s seat only)
12. Driver’s and front passenger’s seat
belt buckle sensors
13. Anchor pre-tensioner
14. Side pressure impact sensor
The SRSCM continually monitors all
SRS components while the ignition
switch is ON to determine if a crash
impact is severe enough to require air
bag deployment or pre-tensioner seat
belt deployment.
The SRS air bag warning light " " on the
instrument panel will illuminate for about 6
seconds after the ignition switch is turned
to the ON position, after which the SRS air
bag warning light " " should go out.
OFS035054L
●●●
●
●
W7-147
Page 65 of 406
349
Safety features of your vehicle
Additionally, your vehicle is equipped
with an occupant classification system in
the front passenger's seat. The occupant
classification system detects the pres-
ence of a passenger in the front passen-
ger's seat and will turn off the front pas-
senger's air bag under certain condi-
tions. For more detail, see "Occupant
classification system" in this section.
✽NOTICE
• Be sure to read information about the
SRS on the labels provided on the sun
visor.
• Advanced air bags are combined with
pre-tensioner seat belts to help pro-
vide enhanced occupant protection in
frontal crashes. Front air bags are not
intended to deploy in collisions in
which protection can be provided by
the pre-tensioner seat belt.
WARNING
Always use seat belts and child
restraints – every trip, every time,
everyone! Air bags inflate with con-
siderable force and in the blink of
an eye. Seat belts help keep occu-
pants in proper position to obtain
maximum benefit from the air bag.
Even with air bags, improperly and
unbelted occupants can be severe-
ly injured when the air bag inflates.
Always follow the precautions
about seat belts, air bags and occu-
pant safety contained in this manu-
al.
To reduce the chance of serious or
fatal injuries and receive the maxi-
mum safety benefit from your
restraint system:
• Never place a child in any child or
booster seat in the front seat.
• ABC – Always Buckle Children in
the back seat. It is the safest
place for children of any age to
ride.
• Front and side impact air bags
can injure occupants improperly
positioned in the front seats.
(Continued)
WARNING
Do not place any objects under-
neath the front seats as they could
interfere with the occupant classifi-
cation system.
WARNING
If you are considering modification
of your vehicle due to a disability,
please contact the HYUNDAI dealer.
Page 213 of 406
55
Driving your vehicle
Illuminated ignition switch
(if equipped)
Whenever a front door is opened, the
ignition switch will be illuminated for your
convenience, provided the ignition switch
is not in the ON position. The light will go
off immediately when the ignition switch
is turned on or go off after about 30 sec-
onds when the door is closed.
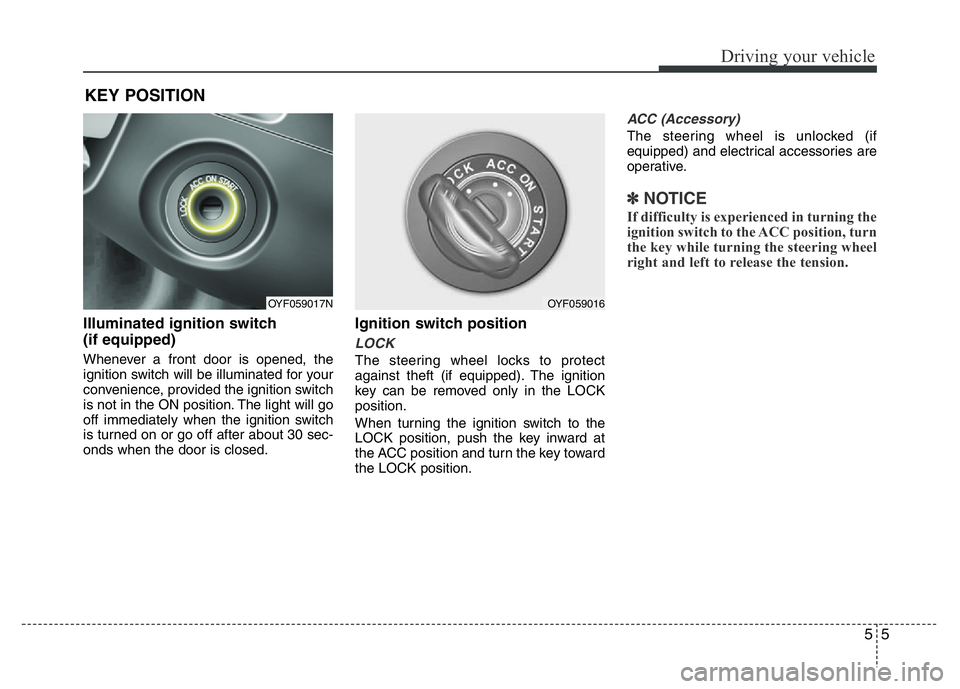
Ignition switch position
LOCK
The steering wheel locks to protect
against theft (if equipped). The ignition
key can be removed only in the LOCK
position.
When turning the ignition switch to the
LOCK position, push the key inward at
the ACC position and turn the key toward
the LOCK position.
ACC (Accessory)
The steering wheel is unlocked (if
equipped) and electrical accessories are
operative.
✽NOTICE
If difficulty is experienced in turning the
ignition switch to the ACC position, turn
the key while turning the steering wheel
right and left to release the tension.
KEY POSITION
OYF059017NOYF059016
Page 269 of 406
561
Driving your vehicle
Highway driving
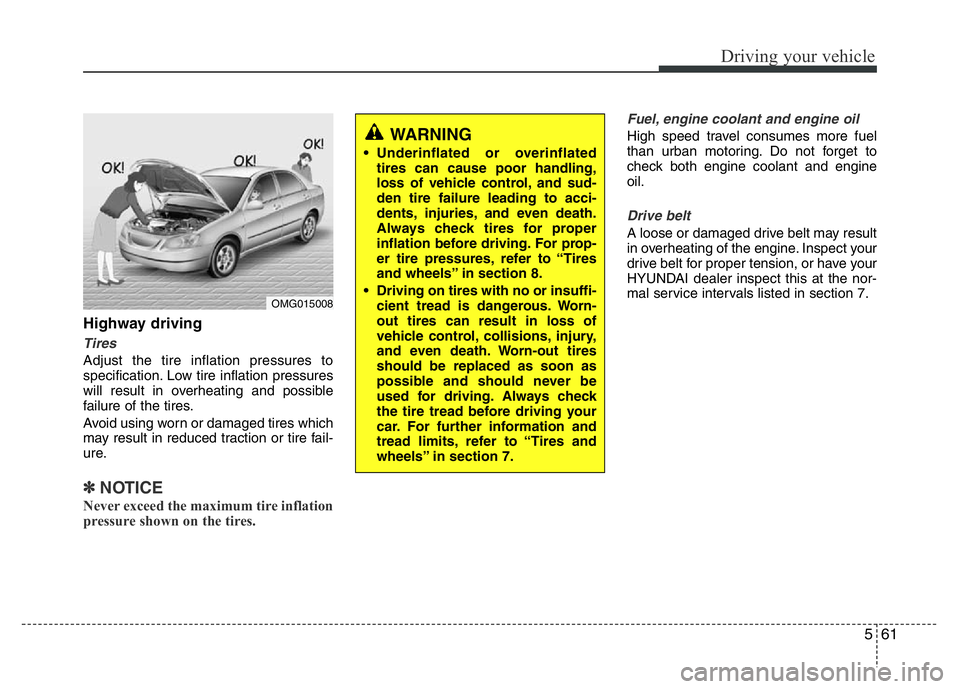
Tires
Adjust the tire inflation pressures to
specification. Low tire inflation pressures
will result in overheating and possible
failure of the tires.
Avoid using worn or damaged tires which
may result in reduced traction or tire fail-
ure.
✽NOTICE
Never exceed the maximum tire inflation
pressure shown on the tires.
Fuel, engine coolant and engine oil
High speed travel consumes more fuel
than urban motoring. Do not forget to
check both engine coolant and engine
oil.
Drive belt
A loose or damaged drive belt may result
in overheating of the engine. Inspect your
drive belt for proper tension, or have your
HYUNDAI dealer inspect this at the nor-
mal service intervals listed in section 7.
WARNING
• Underinflated or overinflated
tires can cause poor handling,
loss of vehicle control, and sud-
den tire failure leading to acci-
dents, injuries, and even death.
Always check tires for proper
inflation before driving. For prop-
er tire pressures, refer to “Tires
and wheels” in section 8.
• Driving on tires with no or insuffi-
cient tread is dangerous. Worn-
out tires can result in loss of
vehicle control, collisions, injury,
and even death. Worn-out tires
should be replaced as soon as
possible and should never be
used for driving. Always check
the tire tread before driving your
car. For further information and
tread limits, refer to “Tires and
wheels” in section 7.
OMG015008
Page 295 of 406
617
What to do in an emergency
11. To reinstall the wheel, hold it on
the studs, put the wheel nuts on
the studs and tighten them finger
tight. The nuts should be installed
with their tapered small diameter
ends directed inward. Jiggle the
tire to be sure it is completely
seated, then tighten the nuts as
much as possible with your fin-
gers again.
12. Lower the car to the ground by
turning the wheel nut wrench
counterclockwise.
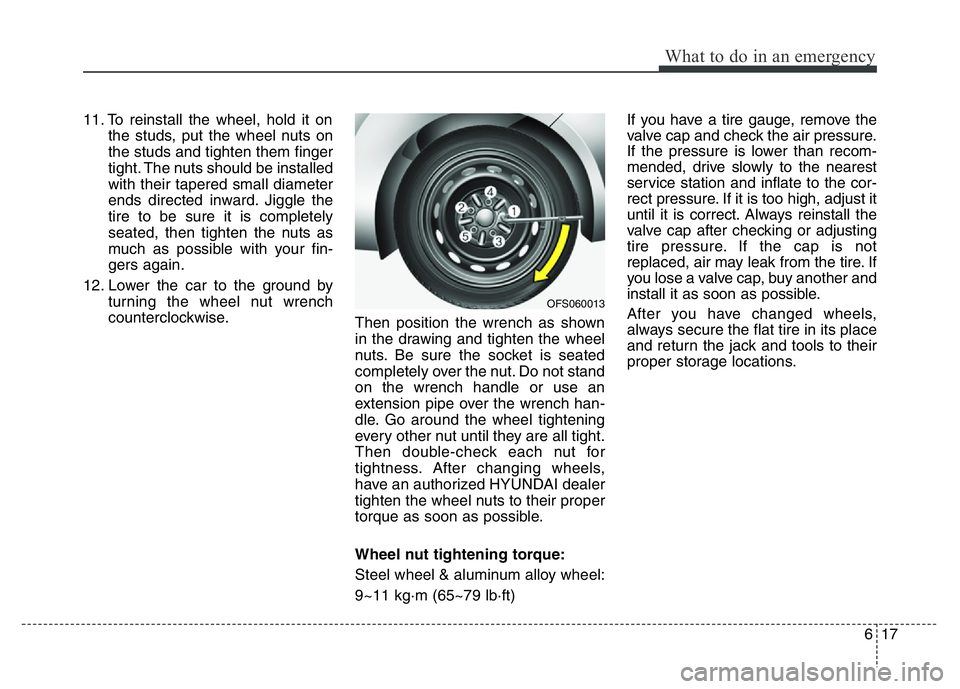
Then position the wrench as shown
in the drawing and tighten the wheel
nuts. Be sure the socket is seated
completely over the nut. Do not stand
on the wrench handle or use an
extension pipe over the wrench han-
dle. Go around the wheel tightening
every other nut until they are all tight.
Then double-check each nut for
tightness. After changing wheels,
have an authorized HYUNDAI dealer
tighten the wheel nuts to their proper
torque as soon as possible.
Wheel nut tightening torque:
Steel wheel & aluminum alloy wheel:
9~11 kg·m (65~79 lb·ft)If you have a tire gauge, remove the
valve cap and check the air pressure.
If the pressure is lower than recom-
mended, drive slowly to the nearest
service station and inflate to the cor-
rect pressure. If it is too high, adjust it
until it is correct. Always reinstall the
valve cap after checking or adjusting
tire pressure. If the cap is not
replaced, air may leak from the tire. If
you lose a valve cap, buy another and
install it as soon as possible.
After you have changed wheels,
always secure the flat tire in its place
and return the jack and tools to their
proper storage locations.
OFS060013
Page 324 of 406
Maintenance
14 7
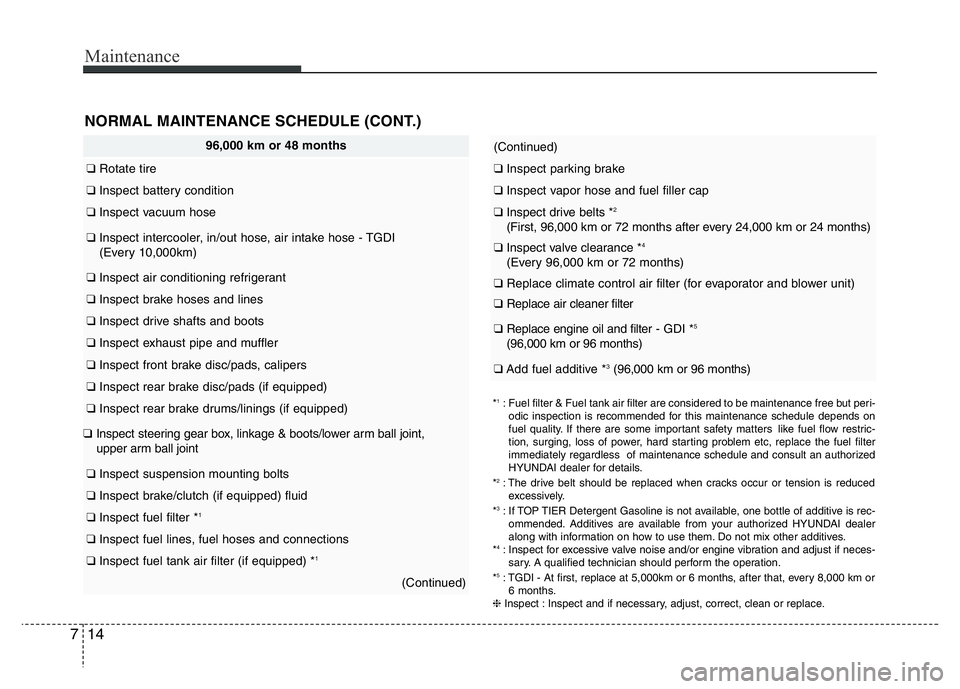
(Continued)
❑Inspect parking brake
❑Inspect vapor hose and fuel filler cap
❑Inspect drive belts *2
(First, 96,000 km or 72 months after every 24,000 km or 24 months)
❑Inspect valve clearance *4
(Every 96,000 km or 72 months)
❑Replace climate control air filter (for evaporator and blower unit)
❑Replace air cleaner filter
❑Replace engine oil and filter - GDI *5
(96,000 km or 96 months)
❑Add fuel additive *3(96,000 km or 96 months)
*1: Fuel filter & Fuel tank air filter are considered to be maintenance free but peri-
odic inspection is recommended for this maintenance schedule depends on
fuel quality. If there are some important safety matters like fuel flow restric-
tion, surging, loss of power, hard starting problem etc, replace the fuel filter
immediately regardless of maintenance schedule and consult an authorized
HYUNDAI dealer for details.
*
2: The drive belt should be replaced when cracks occur or tension is reduced
excessively.
*
3: If TOP TIER Detergent Gasoline is not available, one bottle of additive is rec-
ommended. Additives are available from your authorized HYUNDAI dealer
along with information on how to use them. Do not mix other additives.
*
4: Inspect for excessive valve noise and/or engine vibration and adjust if neces-
sary. A qualified technician should perform the operation.
*
5: TGDI - At first, replace at 5,000km or 6 months, after that, every 8,000 km or
6 months.
❈Inspect : Inspect and if necessary, adjust, correct, clean or replace.
96,000 km or 48 months
❑Rotate tire
❑Inspect battery condition
❑Inspect vacuum hose
❑Inspect intercooler, in/out hose, air intake hose - TGDI
(Every 10,000km)
❑Inspect air conditioning refrigerant
❑Inspect brake hoses and lines
❑Inspect drive shafts and boots
❑Inspect exhaust pipe and muffler
❑Inspect front brake disc/pads, calipers
❑Inspect rear brake disc/pads (if equipped)
❑Inspect rear brake drums/linings (if equipped)
❑Inspect steering gear box, linkage & boots/lower arm ball joint,
upper arm ball joint
❑Inspect suspension mounting bolts
❑Inspect brake/clutch (if equipped) fluid
❑Inspect fuel filter *1
❑Inspect fuel lines, fuel hoses and connections
❑Inspect fuel tank air filter (if equipped) *1
(Continued)
NORMAL MAINTENANCE SCHEDULE (CONT.)