mirror controls INFINITI EX 2013 Owner's Manual
[x] Cancel search | Manufacturer: INFINITI, Model Year: 2013, Model line: EX, Model: INFINITI EX 2013Pages: 498, PDF Size: 2.5 MB
Page 12 of 498

SSI0401
1. Coat hooks (P.2-49)
2. Seat-mounted jacket hanger (if soequipped) (P.2-48)
3. Rear personal light (P.2-57)
4. Power window controls (P.2-52) —
Outside mirror remote control
switch (P.3-24)
5. Automatic drive positioner switch (if so equipped) (P.3-26)
6. Sun visors (P.3-22) 7. Moonroof switch (if so equipped)
(P.2-54)
8. Map light (P.2-57)
9. Sunglasses holder (P.2-46)
10. Inside rearview mirror (P.3-23) —HomeLink
®(if so equipped)
(P.2-59)
11. Cargo cover (if so equipped) (P.2-50)
12. Rear cup holders (P.2-45)
13. Console box —Power outlet (P.2-44)
— USB memory operation (P.4-77)
— iPod
®player operation (P.4-87)
14. Front cup holders (P.2-45)
Illustrated table of contents0-5
PASSENGER COMPARTMENT
Page 72 of 498

2 Instruments and controls
Cockpit ................................................................ 2-3
Instrument panel ................................................. 2-5
Meters and gauges .............................................. 2-6
Speedometer and odometer ............................ 2-7
Tachometer...................................................... 2-8
Engine coolant temperature gauge .................. 2-8
Fuel gauge ...................................................... 2-9
Warning/indicator lights and
audible reminders ............................................. 2-10 Checking bulbs.............................................. 2-10
Warning lights ............................................... 2-11
Indicator lights .............................................. 2-16
Audible reminders ......................................... 2-19
Dot matrix liquid crystal display ........................ 2-20 Indicators for operation ................................. 2-22
Indicators for maintenance ............................ 2-25
Trip computer ................................................ 2-26
Security systems ............................................... 2-29 Vehicle Security System ................................ 2-29
INFINITI Vehicle Immobilizer System .............. 2-30
Windshield wiper and washer switch ................. 2-32 Windshield wiper and washer operation ........ 2-32
Rear window wiper and washer operation ..... 2-33
Rear window and outside mirror
defroster switch ................................................. 2-34 Headlight and turn signal switch ....................... 2-34
Xenon headlights (if so equipped) ............... 2-34
Headlight switch .......................................... 2-35
Turn signal switch........................................ 2-39
Fog light switch ........................................... 2-39
Horn ................................................................. 2-40
Heated seats (if so equipped) ........................... 2-40
Warning systems switch (if so equipped) .......... 2-41
SNOW mode switch........................................... 2-42
Intelligent Brake Assist (IBA) OFF switch (if
so equipped)..................................................... 2-43
Vehicle Dynamic Control (VDC) OFF switch ......... 2-43
Clock................................................................. 2-44
Adjusting the time ....................................... 2-44
Power outlet ..................................................... 2-44
Storage ............................................................. 2-45
Cup holders ................................................. 2-45
Sunglasses holder ...................................... 2-46
Glove box .................................................... 2-47
Console box................................................. 2-48
Card holder.................................................. 2-48
Seat-mounted jacket hanger (if
so equipped) ............................................... 2-48
Coat hooks .................................................. 2-49>
Page 105 of 498

2-34Instruments and controls
SIC3239
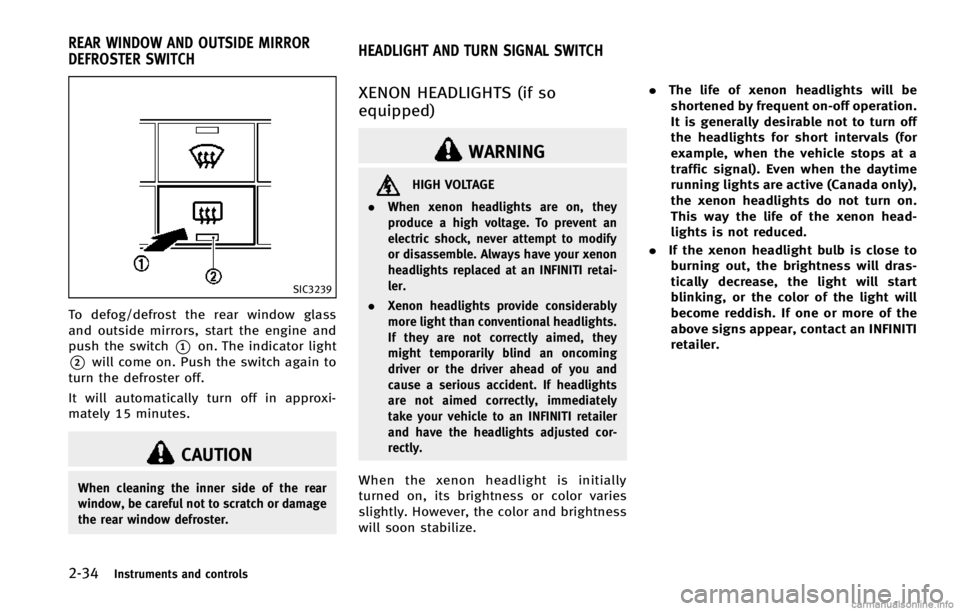
To defog/defrost the rear window glass
and outside mirrors, start the engine and
push the switch
*1on. The indicator light
*2will come on. Push the switch again to
turn the defroster off.
It will automatically turn off in approxi-
mately 15 minutes.
CAUTION
When cleaning the inner side of the rear
window, be careful not to scratch or damage
the rear window defroster.
XENON HEADLIGHTS (if so
equipped)
WARNING
HIGH VOLTAGE
. When xenon headlights are on, they
produce a high voltage. To prevent an
electric shock, never attempt to modify
or disassemble. Always have your xenon
headlights replaced at an INFINITI retai-
ler.
. Xenon headlights provide considerably
more light than conventional headlights.
If they are not correctly aimed, they
might temporarily blind an oncoming
driver or the driver ahead of you and
cause a serious accident. If headlights
are not aimed correctly, immediately
take your vehicle to an INFINITI retailer
and have the headlights adjusted cor-
rectly.
When the xenon headlight is initially
turned on, its brightness or color varies
slightly. However, the color and brightness
will soon stabilize. .
The life of xenon headlights will be
shortened by frequent on-off operation.
It is generally desirable not to turn off
the headlights for short intervals (for
example, when the vehicle stops at a
traffic signal). Even when the daytime
running lights are active (Canada only),
the xenon headlights do not turn on.
This way the life of the xenon head-
lights is not reduced.
. If the xenon headlight bulb is close to
burning out, the brightness will dras-
tically decrease, the light will start
blinking, or the color of the light will
become reddish. If one or more of the
above signs appear, contact an INFINITI
retailer.
REAR WINDOW AND OUTSIDE MIRROR
DEFROSTER SWITCH HEADLIGHT AND TURN SIGNAL SWITCH
Page 113 of 498

2-42Instruments and controls
Spot Warning (BSW) indicator lights, lo-
cated next to the outside mirrors, when the
radar sensors detect a vehicle in the
detection zone. If the turn signal is
activated in the direction of the detected
vehicle, a chime sounds twice and the BSW
indicator light will flash. (See“Blind Spot
Warning (BSW) system” in the“5. Starting
and driving” section.)
The FCW system will sound a warning
chime and the vehicle ahead detection
indicator light blinks to alert the driver if
the vehicle is traveling close to the vehicle
ahead. (See “Forward Collision Warning
(FCW) system” in the“5. Starting and
driving” section.)
The warning systems switch is automati-
cally turned on when the engine is started,
and the warning systems ON indicator
*1
on the switch illuminates.
To cancel the warning systems, push the
warning systems switch to turn off the
system. The warning systems ON indicator
will turn off.
NOTE:
If you continue to push the warning
systems switch from off to on for over 4
seconds, a chime will sound. This will change the default status of the LDW, BSW
and FCW systems to OFF so that these
systems will not automatically turn on
when the engine is started. If this proce-
dure is repeated, the default status will
return to ON.
SIC3602
For driving or starting the vehicle on snowy
roads or slippery areas, turn on the SNOW
mode switch. The indicator light
*1on the
switch will illuminate. When the SNOW
mode is activated, engine output is con-
trolled to avoid wheel spin.
Turn off the SNOW mode for normal
driving.
SNOW MODE SWITCH
Page 129 of 498

2-58Instruments and controls
.ignition switch is switched to the LOCK
position
— remain on for about 15 seconds.
. doors are unlocked by pushing the
UNLOCK button on the Intelligent Key
or door handle request switch with the
ignition switch in the LOCK position
— remain on for about 15 seconds.
. any door is opened and then closed
with the ignition switch in the LOCK
position
— remain on for about 15 seconds.
. any door is opened with the ignition
switch in the ACC or ON position
— remain on while the door is opened.
When the door is closed, the lights
go off.
The lights will also turn off after a period
of time when the lights remain illuminated
after the ignition switch has been pushed
to the OFF or LOCK position to prevent the
battery from becoming discharged.
When the auto interior illumination is set
to the OFF position (see “Vehicle informa-
tion and settings” in the“4. Monitor,
climate, audio, phone and voice recogni-
tion systems” section), the lights will
illuminate under the following condition: .
any door is opened with the ignition
switch in any position
— remain on while the door is opened.
When the door is closed, the lights
go off.
OFF position
When the switch is in the OFF position*3,
the lights will not illuminate, regardless of
the condition.
CAUTION
Do not use for extended periods of time with
the engine stopped. This could result in a
discharged battery.
SIC3869
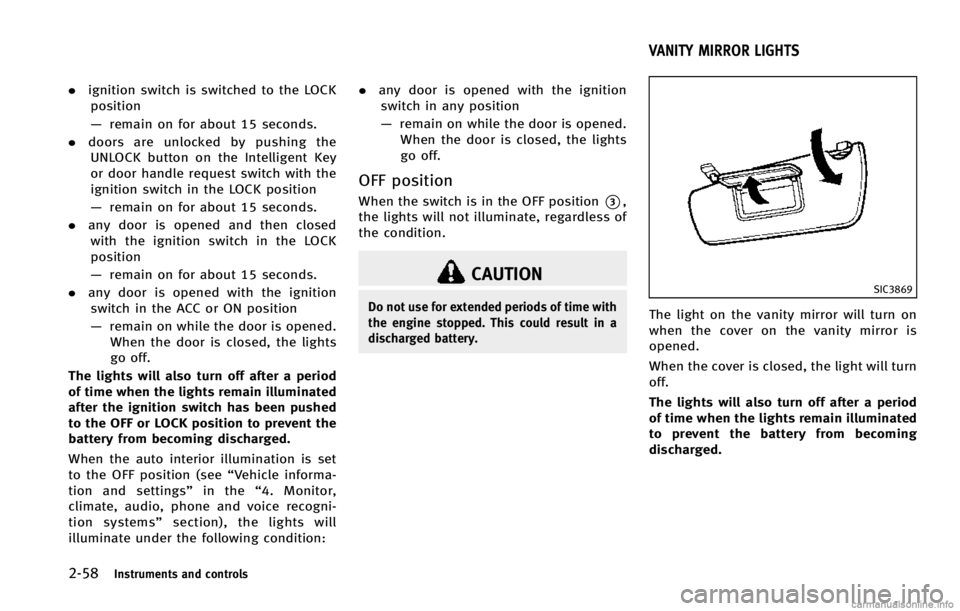
The light on the vanity mirror will turn on
when the cover on the vanity mirror is
opened.
When the cover is closed, the light will turn
off.
The lights will also turn off after a period
of time when the lights remain illuminated
to prevent the battery from becoming
discharged.
VANITY MIRROR LIGHTS
Page 159 of 498

3-24Pre-driving checks and adjustments
SPA2450
Automatic anti-glare type
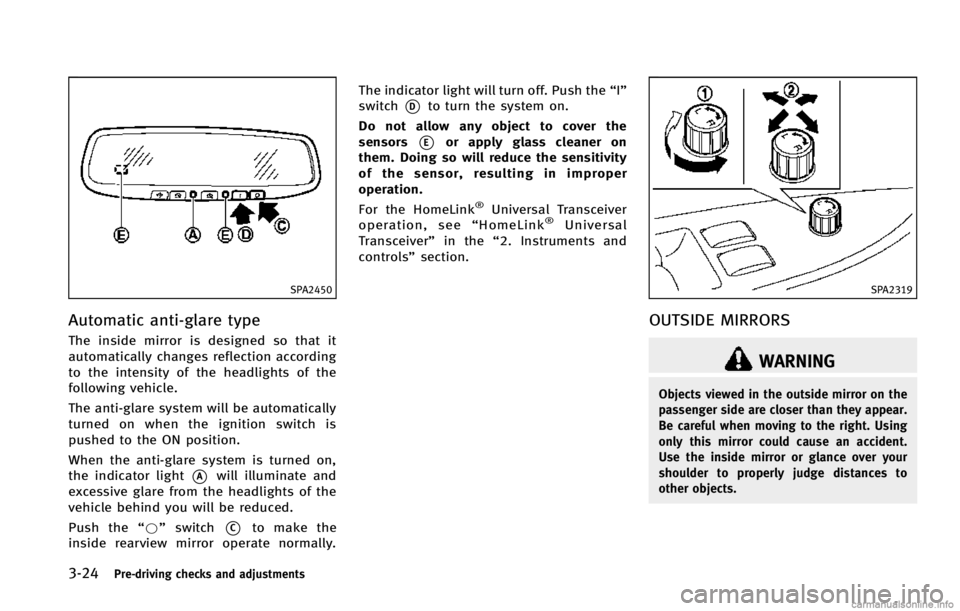
The inside mirror is designed so that it
automatically changes reflection according
to the intensity of the headlights of the
following vehicle.
The anti-glare system will be automatically
turned on when the ignition switch is
pushed to the ON position.
When the anti-glare system is turned on,
the indicator light
*Awill illuminate and
excessive glare from the headlights of the
vehicle behind you will be reduced.
Push the “*”switch
*Cto make the
inside rearview mirror operate normally. The indicator light will turn off. Push the
“I”
switch
*Dto turn the system on.
Do not allow any object to cover the
sensors
*Eor apply glass cleaner on
them. Doing so will reduce the sensitivity
of the sensor, resulting in improper
operation.
For the HomeLink
®Universal Transceiver
operation, see “HomeLink®Universal
Transceiver” in the“2. Instruments and
controls” section.
SPA2319
OUTSIDE MIRRORS
WARNING
Objects viewed in the outside mirror on the
passenger side are closer than they appear.
Be careful when moving to the right. Using
only this mirror could cause an accident.
Use the inside mirror or glance over your
shoulder to properly judge distances to
other objects.
Page 210 of 498

You can individually set the driver and front
passenger side temperature using each
temperature control button.
SAA1527
Type A
AUTOMATIC CLIMATE CONTROL
(Type A)
Automatic operation
1.“AUTO” automatic climate control ON
button/Temperature control dial (dri-
ver side)
2. “A/C” air conditioner ON/OFF button
3. “
”fan speed increase button
4. “
”front defroster button
5. “MODE” manual air flow control but-
ton
6. “DUAL” zone control ON/OFF button/
Temperature control dial (passenger side)
7. “OFF” button for climate control sys-
tem
8. “
”fan speed decrease button
9. “
”rear window defroster button
(See “Rear window and outside mirror
defroster switch” in the“2. Instru-
ments and controls” section.)
10. “
”intake air control button
Cooling and/or dehumidified heating
(AUTO):
This mode may be used all year round. The
system works automatically to control the
Monitor, climate, audio, phone and voice recognition systems4-45
Page 213 of 498

4-48Monitor, climate, audio, phone and voice recognition systems
SAA3568
Type B
AUTOMATIC CLIMATE CONTROL (Type B)
Automatic operation (AUTO)
1.“AUTO” automatic climate control ON
button/Temperature control dial (dri-
ver side)
2. “A/C” air conditioner ON/OFF button
3. “
”fan speed increase button
4. “
”front defroster button
5. “MODE” manual air flow control but-
ton
6. “DUAL” zone control ON/OFF button/
Temperature control dial (passenger
side) 7.
“OFF” button for climate control sys-
tem*
8. “
”fan speed decrease button
9. “
”rear window defroster button
(See “Rear window and outside mirror
defroster switch” in the“2. Instru-
ments and controls” section.)
10. “
”auto-recirculation button/
intake air control button
The AUTO mode may be used year-round
as the system automatically controls con-
stant temperature, air flow distribution and
fan speed after the desired temperature is set manually.
To turn off the heater and air conditioner,
push the
“OFF”button.
Cooling and dehumidified heating:
1. Push the “AUTO”button.
(The AUTO indicator light will illuminate
and “AUTO” will appear on the display.)
2. If the A/C indicator light does not illuminate, push the “A/C”button.
(The A/C indicator light will illuminate.)
3. Turn the temperature control dial (dri- ver’s side) to set the desired tempera-
ture.
.The temperature can be set withinthe following range.
— For U.S.: 60 to 908F
— For Canada: 18 to 328C
.When the DUAL indicator light is
turned off:
— Pushing the driver’s side “AUTO”
button changes both the driver’s
and front passenger’s side tem-
perature.
— Pushing the passenger’ s side
“DUAL” button changes only the
front passenger’s side tempera-
Page 323 of 498

5-12Starting and driving
SSD0785
INTELLIGENT KEY BATTERY DIS-
CHARGE
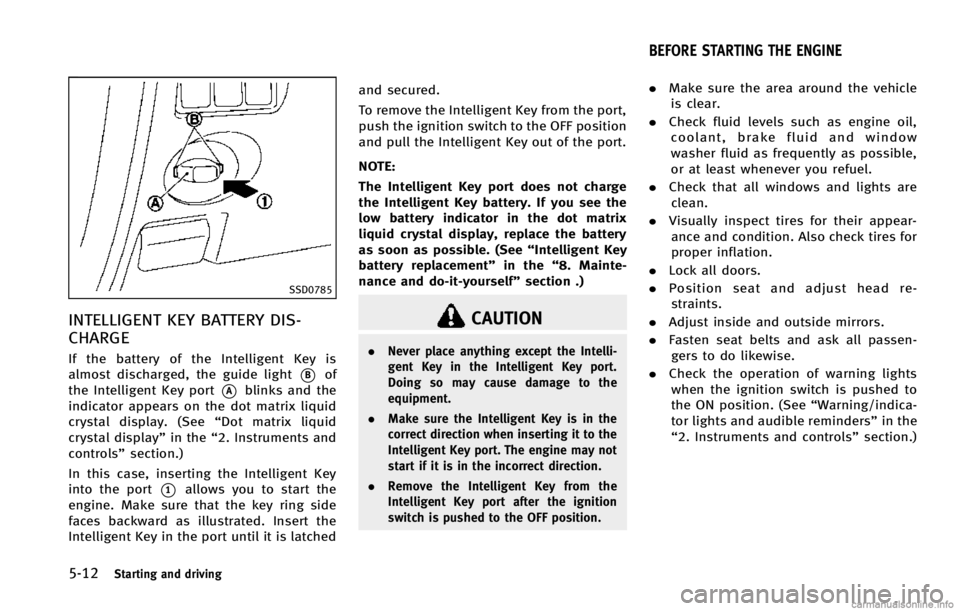
If the battery of the Intelligent Key is
almost discharged, the guide light
*Bof
the Intelligent Key port
*Ablinks and the
indicator appears on the dot matrix liquid
crystal display. (See “Dot matrix liquid
crystal display” in the“2. Instruments and
controls” section.)
In this case, inserting the Intelligent Key
into the port
*1allows you to start the
engine. Make sure that the key ring side
faces backward as illustrated. Insert the
Intelligent Key in the port until it is latched and secured.
To remove the Intelligent Key from the port,
push the ignition switch to the OFF position
and pull the Intelligent Key out of the port.
NOTE:
The Intelligent Key port does not charge
the Intelligent Key battery. If you see the
low battery indicator in the dot matrix
liquid crystal display, replace the battery
as soon as possible. (See
“Intelligent Key
battery replacement” in the“8. Mainte-
nance and do-it-yourself” section .)
CAUTION
.Never place anything except the Intelli-
gent Key in the Intelligent Key port.
Doing so may cause damage to the
equipment.
. Make sure the Intelligent Key is in the
correct direction when inserting it to the
Intelligent Key port. The engine may not
start if it is in the incorrect direction.
. Remove the Intelligent Key from the
Intelligent Key port after the ignition
switch is pushed to the OFF position.
.Make sure the area around the vehicle
is clear.
. Check fluid levels such as engine oil,
coolant, brake fluid and window
washer fluid as frequently as possible,
or at least whenever you refuel.
. Check that all windows and lights are
clean.
. Visually inspect tires for their appear-
ance and condition. Also check tires for
proper inflation.
. Lock all doors.
. Position seat and adjust head re-
straints.
. Adjust inside and outside mirrors.
. Fasten seat belts and ask all passen-
gers to do likewise.
. Check the operation of warning lights
when the ignition switch is pushed to
the ON position. (See “Warning/indica-
tor lights and audible reminders” in the
“2. Instruments and controls” section.)
BEFORE STARTING THE ENGINE
Page 453 of 498

8-30Maintenance and do-it-yourself
SDI1500B
Cargo light
SDI1839
Vanity mirror lightIf you have a flat tire, see
“Flat tire”in the
“6. In case of emergency” section.
TIRE PRESSURE
Tire Pressure Monitoring System
(TPMS)
This vehicle is equipped with the Tire
Pressure Monitoring System (TPMS). It
monitors tire pressure of all tires except
the spare. When the low tire pressure
warning light is lit and the CHECK TIRE
PRESSURE warning appears on the dot
matrix liquid crystal display, one or more
of your tires is significantly under-inflated.
The TPMS will activate only when the
vehicle is driven at speeds above 16 MPH
(25 km/h). Also, this system may not
detect a sudden drop in tire pressure (for
example a flat tire while driving).
For more details, see“Low tire pressure
warning light” in the“2. Instruments and
controls” section,“Tire Pressure Monitor-
ing System (TPMS)” in the“5. Starting and
driving” section and “Tire Pressure Mon-
itoring System (TPMS) ”in the “6. In case
of emergency” section.
Tire inflation pressure
Check the pressure of the tires
(including the spare) often and al-
ways prior to long distance trips. The
recommended tire pressure specifi-
cations are shown on the Tire and
Loading Information label under the
“Cold Tire Pressure” heading. The
Tire and Loading Information label is
affixed to the driver side center pillar.
Tire pressures should be checked
regularly because:
.Most tires naturally lose air over time.
.Tires can lose air suddenly whendriven over potholes or other
objects or if the vehicle strikes a
curb while parking.
The tire pressures should be checked
when the tires are cold. The tires are
considered COLD after the vehicle
has been parked for 3 or more hours,
or driven less than 1 mile (1.6 km) at
moderate speeds.
WHEELS AND TIRES