jacking INFINITI FX 2012 Owners Manual
[x] Cancel search | Manufacturer: INFINITI, Model Year: 2012, Model line: FX, Model: INFINITI FX 2012Pages: 522, PDF Size: 3.51 MB
Page 417 of 522

6-4In case of emergency
MCE0001A
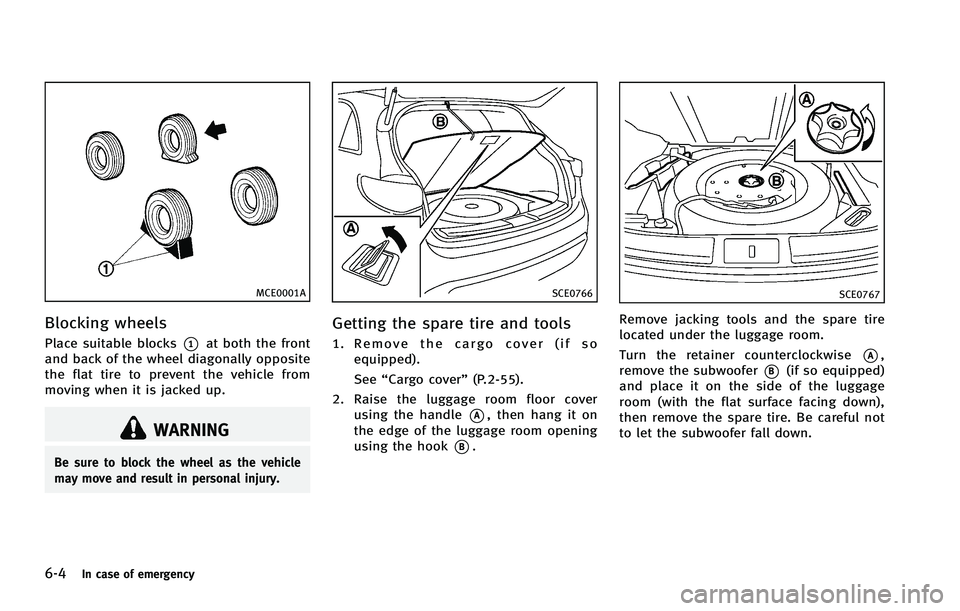
Blocking wheels
Place suitable blocks*1at both the front
and back of the wheel diagonally opposite
the flat tire to prevent the vehicle from
moving when it is jacked up.
WARNING
Be sure to block the wheel as the vehicle
may move and result in personal injury.
SCE0766
Getting the spare tire and tools
1. Remove the cargo cover (if so
equipped).
See “Cargo cover” (P.2-55).
2. Raise the luggage room floor cover using the handle
*A, then hang it on
the edge of the luggage room opening
using the hook
*B.
SCE0767
Remove jacking tools and the spare tire
located under the luggage room.
Turn the retainer counterclockwise
*A,
remove the subwoofer
*B(if so equipped)
and place it on the side of the luggage
room (with the flat surface facing down),
then remove the spare tire. Be careful not
to let the subwoofer fall down.
Page 418 of 522

Jacking up the vehicle and remov-
ing the damaged tire
WARNING
.Never get under the vehicle while it is
supported only by the jack. If it is
necessary to work under the vehicle,
support it with safety stands.
. Use only the jack provided with your
vehicle to lift the vehicle. Do not use the
jack provided with your vehicle on other
vehicles. The jack is designed for lifting
only your vehicle during a tire change.
. Use the correct jack-up points. Never use
any other part of the vehicle for jack
support.
. Never jack up the vehicle more than
necessary.
. Never use blocks on or under the jack.
. Do not start or run the engine while
vehicle is on the jack, as it may cause
the vehicle to move. This is especially
true for vehicles with limited slip differ-
entials.
. Do not allow passengers to stay in the
vehicle while it is on the jack.
Carefully read the caution label attached to
the jack body and the following instruc-
tions.
SCE0771
Jack-up point
1. Place the jack directly under the jack-up
point as illustrated so the top of the
jack contacts the vehicle at the jack-up
point. Align the jack head between the
two notches in the front or the rear as
shown. Also fit the groove of the jack
head between the notches as shown.
The jack should be used on level firm
ground.
In case of emergency6-5
Page 420 of 522

4. Lower the vehicle slowly until the tiretouches the ground. Then, with the
wheel nut wrench, tighten the wheel
nuts securely in the sequence as
illustrated. Lower the vehicle comple-
tely.
WARNING
. Incorrect wheel nuts or improperly tigh-
tened wheel nuts can cause the wheel to
become loose or come off. This could
cause an accident.
. Do not use oil or grease on the wheel
studs or nuts. This could cause the nuts
to become loose.
. Retighten the wheel nuts when the
vehicle has been driven for 600 miles
(1,000 km) (also in cases of a flat tire,
etc.).
.As soon as possible, tighten the
wheel nuts to the specified torque
with a torque wrench.
Wheel nut tightening torque: 80 ft-lb (108 N·m)
The wheel nuts must be kept tigh-
tened to specification at all times. It is recommended that wheel nuts be
tightened to specifications at each
lubrication interval.
.Adjust tire pressure to the COLD
pressure.
COLD pressure:
After the vehicle has been parked
for three hours or more or driven
less than 1 mile (1.6 km).
COLD tire pressures are shown on
the Tire and Loading Information
label affixed to the driver side center
pillar.
After adjusting tire pressure to the COLD
tire pressure, the display of the tire
pressure information may show higher
pressure than the COLD tire pressure after
the vehicle has been driven more than 1
mile (1.6 km). This is because the tire
pressurizes as the tire temperature rises.
This does not indicate a system malfunc-
tion.
Stowing the damaged tire and tools
1. Securely store the damaged tire, jack and tools in the storage area.
2. Close the luggage floor cover.
3. Close the lift gate.
WARNING
. Always make sure that the spare tire and
jacking equipment are properly secured
after use. Such items can become
dangerous projectiles in an accident or
sudden stop.
. The T-type spare tire and small size
spare tire are designed for emergency
use. See specific instructions under the
heading “Wheels and tires” (P.8-32).
If needed Roadside Assistance is available.
Please see your Warranty Information
Booklet or Roadside Assistance I.D. Card
for the toll-free number to call (U.S.) or
Warranty Information Booklet (Canada).
In case of emergency6-7
Page 428 of 522

VEHICLE RECOVERY (freeing a stuck
vehicle)
WARNING
.Stand clear of a stuck vehicle.
. Do not spin your tires at high speed. This
could cause them to explode and result
in serious injury. Parts of your vehicle
could also overheat and be damaged.
Pulling a stuck vehicle
If your vehicle is stuck in sand, snow, mud,
etc., use a tow strap or other device
designed specifically for vehicle recovery.
Always follow the manufacturer’s instruc-
tions for the recovery device.
Securely install the vehicle recovery hook
*1stored with jacking tools as illustrated.
Attach the tow strap to the recovery hook.
Make sure that the hook is properly
secured in the original place after use.
Do not use the tie down hooks
*2for
towing or vehicle recovery.
CAUTION
. Tow chains or cables must be attached
only to the vehicle recovery hooks or
main structural members of the vehicle.
Otherwise, the vehicle body will be
damaged.
. Do not use the vehicle tie downs to free
a vehicle stuck in sand, snow, mud, etc.
. Never tow a vehicle using the vehicle tie
downs or recovery hooks.
. Always pull the cable straight out from
the front of the vehicle. Never pull on the
vehicle at an angle.
. Pulling devices should be routed so they
do not touch any part of the suspension,
steering, brake or cooling systems.
. Pulling devices such as ropes or canvas
straps are not recommended for use in
vehicle towing or recovery.
Rocking a stuck vehicle
If your vehicle is stuck in sand, snow, mud,
etc., use the following procedure:
1. Turn off the Vehicle Dynamic Control
(VDC) system. 2. Make sure the area in front and behind
the vehicle is clear of obstructions.
3. Turn the steering wheel right and left to clear an area around the front tires.
4. Slowly rock the vehicle forward and backward.
.Shift back and forth between R
(reverse) and D (drive).
.Apply the accelerator as little aspossible to maintain the rocking
motion.
.Release the accelerator pedal beforeshifting between R and D.
.Do not spin the tires above 35 MPH(55 km/h).
5. If the vehicle cannot be freed after a few tries, contact a professional towing
service to remove the vehicle.
In case of emergency6-15