sport mode INFINITI FX 2012 Owners Manual
[x] Cancel search | Manufacturer: INFINITI, Model Year: 2012, Model line: FX, Model: INFINITI FX 2012Pages: 522, PDF Size: 3.51 MB
Page 19 of 522
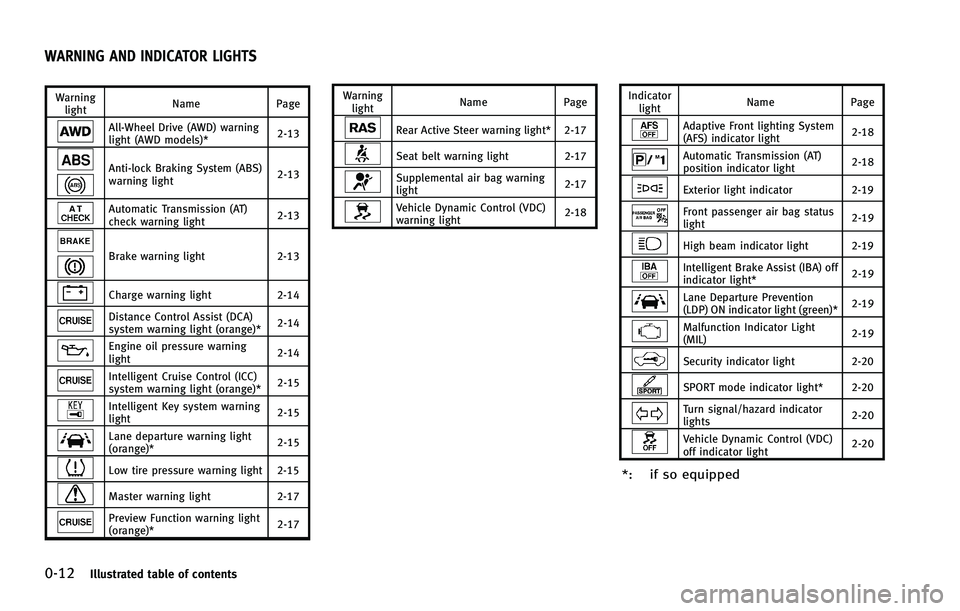
0-12Illustrated table of contents
Warninglight Name Page
All-Wheel Drive (AWD) warning
light (AWD models)*
2-13
Anti-lock Braking System (ABS)
warning light2-13
Automatic Transmission (AT)
check warning light
2-13
Brake warning light
2-13
Charge warning light2-14
Distance Control Assist (DCA)
system warning light (orange)* 2-14
Engine oil pressure warning
light
2-14
Intelligent Cruise Control (ICC)
system warning light (orange)*2-15
Intelligent Key system warning
light2-15
Lane departure warning light
(orange)*
2-15
Low tire pressure warning light 2-15
Master warning light
2-17
Preview Function warning light
(orange)* 2-17Warning
light Name
Page
Rear Active Steer warning light* 2-17
Seat belt warning light 2-17
Supplemental air bag warning
light 2-17
Vehicle Dynamic Control (VDC)
warning light2-18Indicator
light Name Page
Adaptive Front lighting System
(AFS) indicator light 2-18
Automatic Transmission (AT)
position indicator light
2-18
Exterior light indicator
2-19
Front passenger air bag status
light 2-19
High beam indicator light 2-19
Intelligent Brake Assist (IBA) off
indicator light*2-19
Lane Departure Prevention
(LDP) ON indicator light (green)*2-19
Malfunction Indicator Light
(MIL)2-19
Security indicator light 2-20
SPORT mode indicator light* 2-20
Turn signal/hazard indicator
lights
2-20
Vehicle Dynamic Control (VDC)
off indicator light2-20
*: if so equipped
WARNING AND INDICATOR LIGHTS
Page 37 of 522
1-18Safety—Seats, seat belts and supplemental restraint system
until they are completely dry.
. If dirt builds up in the shoulder belt
guide of the seat belt anchors, the seat
belts may retract slowly. Wipe the
shoulder belt guide with a clean, dry
cloth.
. Periodically check to see that the seat
belt and the metal components such as
buckles, tongues, retractors, flexible
wires and anchors work properly. If
loose parts, deterioration, cuts or other
damage on the webbing is found, the
entire seat belt assembly should be
replaced.WARNING
Do not allow children to play with the seat
belts. Most seating positions are equipped
with Automatic Locking Retractor (ALR)
mode seat belts. If the seat belt becomes
wrapped around a child’s neck with the ALR
mode activated, the child can be seriously
injured or killed if the seat belt retracts and
becomes tight. This can occur even if the
vehicle is parked. Unbuckle the seat belt to
release the child. If the seat belt can not be
unbuckled or is already unbuckled, release
the child by cutting the seat belt with a
suitable tool (such as a knife or scissors) to
release the seat belt.
Children need adults to help protect them.
They need to be properly restrained.
In addition to the general information in
this manual, child safety information is
available from many other sources, includ-
ing doctors, teachers, government traffic
safety offices, and community organiza-
tions. Every child is different, so be sure to
learn the best way to transport your child.
There are three basic types of child
restraint systems: .
Rear-facing child restraint
. Forward-facing child restraint
. Booster seat
The proper restraint depends on the child’s
size. Generally, infants up to about 1 year
and less than 20 lbs (9 kg) should be
placed in rear-facing child restraints. For-
ward-facing child restraints are available
for children who outgrow rear-facing child
restraints and are at least 1 year old.
Booster seats are used to help position a
vehicle lap/shoulder belt on a child who
can no longer use a forward-facing child
restraint.
WARNING
Infants and children need special protection.
The vehicle’s seat belts may not fit them
properly. The shoulder belt may come too
close to the face or neck. The lap belt may
not fit over their small hip bones. In an
accident, an improperly fitting seat belt
could cause serious or fatal injury. Always
use appropriate child restraints.
All U.S. states and Canadian provinces or
territories require the use of approved
child restraints for infants and small
CHILD SAFETY
Page 72 of 522
2 Instruments and controls
Cockpit ................................................................ 2-3
Instrument panel ................................................. 2-5
Meters and gauges .............................................. 2-6
Speedometer and odometer ............................ 2-6
Tachometer...................................................... 2-7
Engine coolant temperature gauge .................. 2-8
Fuel gauge ...................................................... 2-8
Meter/ring illumination and needle sweep ...... 2-9
Compass (if so equipped) .................................... 2-9 Zone variation change procedure ................... 2-11
Warning/indicator lights and
audible reminders ............................................. 2-12 Checking bulbs.............................................. 2-12
Warning lights ............................................... 2-13
Indicator lights .............................................. 2-18
Audible reminders ......................................... 2-21
Dot matrix liquid crystal display ........................ 2-21 Indicators for operation ................................. 2-24
Indicators for maintenance ............................ 2-26
Trip computer ................................................ 2-28
Security systems ............................................... 2-30 Vehicle security system ................................. 2-30
INFINITI vehicle immobilizer system ............... 2-32
Windshield wiper and washer switch ................. 2-33 Windshield wiper and washer operation ........ 2-34 Rain-sensing auto wiper system (if
so equipped) ............................................... 2-34
Rear window wiper and washer operation.... 2-36
Rear window and outside mirror
defroster switch ................................................ 2-36
Headlight and turn signal switch ....................... 2-36 Xenon headlights......................................... 2-36Headlight switch .......................................... 2-37
Turn signal switch........................................ 2-42
Fog light switch ........................................... 2-42
Hazard warning flasher switch .......................... 2-42
Horn ................................................................. 2-43
Heated Seats (if so equipped) ........................... 2-43
Climate controlled seats (if so equipped) .......... 2-45
Warning systems switch (if so equipped) .......... 2-46
Snow mode switch ............................................ 2-46 Continuous damping control mode select switch
(if so equipped) ................................................ 2-47 Auto mode................................................... 2-47Sport mode ................................................. 2-47
Intelligent Brake Assist (IBA) off switch (if
so equipped)..................................................... 2-47 Vehicle Dynamic Control (VDC) off switch .......... 2-48
Clock................................................................. 2-48 Adjusting the time ....................................... 2-48>
Page 83 of 522
2-12Instruments and controls
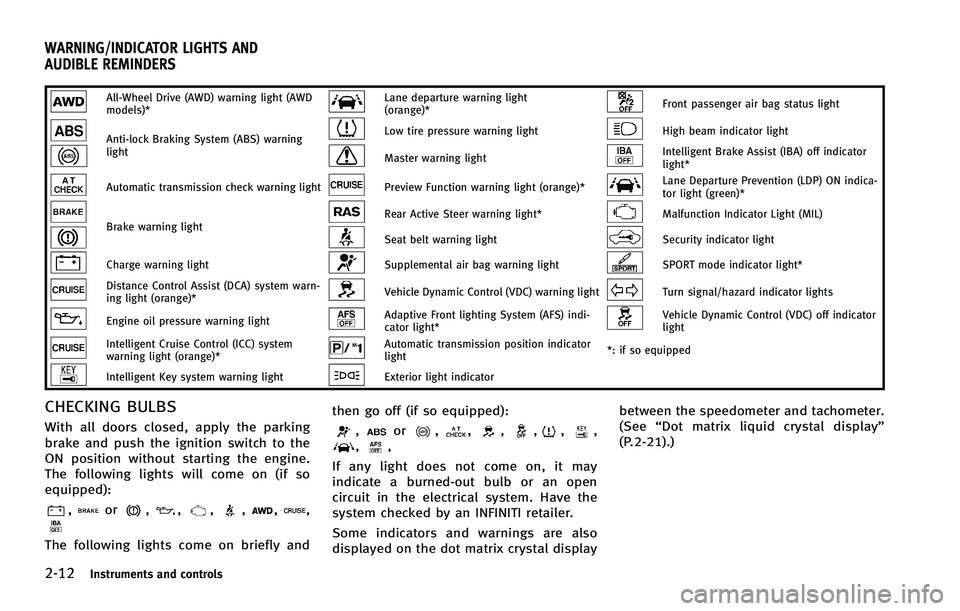
All-Wheel Drive (AWD) warning light (AWD
models)*Lane departure warning light
(orange)*Front passenger air bag status light
Anti-lock Braking System (ABS) warning
lightLow tire pressure warning lightHigh beam indicator light
Master warning lightIntelligent Brake Assist (IBA) off indicator
light*
Automatic transmission check warning lightPreview Function warning light (orange)*Lane Departure Prevention (LDP) ON indica-
tor light (green)*
Brake warning lightRear Active Steer warning light*Malfunction Indicator Light (MIL)
Seat belt warning lightSecurity indicator light
Charge warning lightSupplemental air bag warning lightSPORT mode indicator light*
Distance Control Assist (DCA) system warn-
ing light (orange)*Vehicle Dynamic Control (VDC) warning lightTurn signal/hazard indicator lights
Engine oil pressure warning lightAdaptive Front lighting System (AFS) indi-
cator light*Vehicle Dynamic Control (VDC) off indicator
light
Intelligent Cruise Control (ICC) system
warning light (orange)*Automatic transmission position indicator
light*: if so equipped
Intelligent Key system warning lightExterior light indicator
CHECKING BULBS
With all doors closed, apply the parking
brake and push the ignition switch to the
ON position without starting the engine.
The following lights will come on (if so
equipped):
,or,,,,,,
The following lights come on briefly and then go off (if so equipped):
,or,,,,,,,,
If any light does not come on, it may
indicate a burned-out bulb or an open
circuit in the electrical system. Have the
system checked by an INFINITI retailer.
Some indicators and warnings are also
displayed on the dot matrix crystal display between the speedometer and tachometer.
(See
“Dot matrix liquid crystal display”
(P.2-21).)
WARNING/INDICATOR LIGHTS AND
AUDIBLE REMINDERS
Page 91 of 522
2-20Instruments and controls
After a few driving trips, thelight
should turn off if no other potential
emission control system malfunction ex-
ists.
If this indicator light remains on for 20
seconds and then blinks for 10 seconds
when the engine is not running, it indicates
that the vehicle is not ready for an
emission control system inspection/main-
tenance test. (See “Readiness for Inspec-
tion/Maintenance (I/M) test” (P.9-31).)
Operation:
The malfunction indicator light will come
on in one of two ways:
. Malfunction indicator light on steady —
An emission control system malfunc-
tion has been detected. Check the fuel-
filler cap. (The LOOSE FUEL CAP warning
appears on the dot matrix liquid crystal
display.) If the fuel-filler cap is loose or
missing, tighten or install the cap and
continue to drive the vehicle. The
light should turn off after a few driving
trips. If thelight does not turn off
after a few driving trips, have the
vehicle inspected by an INFINITI retai-
ler. You do not need to have your
vehicle towed to the retailer. .
Malfunction indicator light blinking —
An engine misfire has been detected
which may damage the emission con-
trol system.
To reduce or avoid emission control
system damage:
1) Do not drive at speeds above 45 MPH (72 km/h).
2) Avoid hard acceleration or decelera- tion.
3) Avoid steep uphill grades.
4) If possible, reduce the amount of cargo being hauled or towed.
The malfunction indicator light may
stop blinking and remain on.
Have the vehicle inspected by an
INFINITI retailer. You do not need to
have your vehicle towed to the retailer.
CAUTION
Continued vehicle operation without having
the emission control system checked and
repaired as necessary could lead to poor
driveability, reduced fuel economy, and
possible damage to the emission control
system.
Security indicator light
The light blinks when the ignition switch is
in the ACC, OFF and LOCK position. This
function indicates the security system
equipped on the vehicle is operational.
If the security system is malfunctioning,
this light will remain on while the ignition
switch is in the ON position. For additional
information, see “Security systems” (P.2-
30).
SPORT mode indicator light (if
so equipped)
The SPORT mode indicator light illuminates
when the SPORT mode is turned “ON”.
(See “Continuous damping control” (P.5-
77).)
Turn signal/hazard indicator
lights
The light flashes when the turn signal
switch lever or hazard switch is turned on.
Vehicle Dynamic Control (VDC)
off indicator light
The light comes on when the vehicle
dynamic control off switch is pushed to
OFF. This indicates that the vehicle dynamic
control system and traction control system
Page 118 of 522

SIC3848
The Continuous Damping Control optimizes
the damping force and helps minimize the
movement of the vehicle body. It helps
stable driving when the vehicle moves up
and down on large rolling roads or when
the vehicle body leans during cornering
with a high centrifugal force.
The damping force will automatically ad-
just according to the road surface and
driving conditions.
The damping force of the shock absorbers
can be adjusted to the level you desire. Set
the switch to the position you desire while
the ignition switch is ON.
AUTO MODE
Push the switch to the AUTO position*Afor a smooth ride.
SPORT MODE
Push the switch to the SPORT position*Bwhen you desire a quick response all the
time.
The SPORT mode indicator light will illumi-
nate.
SIC3844
The vehicle should be driven with the
Intelligent Brake Assist (IBA) system on
for most driving conditions.
The Intelligent Brake Assist (IBA) system
will sound a warning chime to alert the
driver when the vehicle is traveling too
close to the vehicle ahead and will apply
the brake control if necessary.
To turn off the system, push the IBA OFF
switch. The
indicator will illuminate.
The IBA system will remain in the last ON
or OFF state it was left in until it is
manually changed by pushing the IBA OFF
switch.
Instruments and controls2-47
CONTINUOUS DAMPING CONTROL MODE
SELECT SWITCH (if so equipped) INTELLIGENT BRAKE ASSIST (IBA) OFF
SWITCH (if so equipped)
Page 340 of 522
AUTOMATIC TRANSMISSION
7 speed automatic transmission
The automatic transmission in your vehicle
is electronically controlled by a transmis-
sion control module to produce maximum
efficiency and smooth operation.
Shown on the following pages are the
recommended operating procedures for
this transmission. Follow these procedures
for maximum vehicle performance and
driving enjoyment.
Starting the vehicle
After starting the engine, fully depress the
foot brake pedal and push the selector
lever button before shifting the selector
lever to the R (Reverse), N (Neutral), D
(Drive), DS (Drive Sport) or Manual shift
mode position. Be sure the vehicle is fully
stopped before attempting to shift the
selector lever.
This automatic transmission model is
designed so that the foot brake pedal
must be depressed before shifting from P
(Park) to any drive position while the
ignition switch position is ON.The selector lever cannot be moved out of
the P (Park) position and into any of the
other gear positions if the ignition switch
is pushed to the LOCK, OFF or ACC
position.
1. Keep the foot brake pedal depressed
and push the selector lever button to
shift into a driving gear.
2. Release the parking brake and foot brake, then gradually start the vehicle
in motion.WARNING
. Do not depress the accelerator pedal
while shifting from P (Park) or N
(Neutral) to R (Reverse), D (Drive), DS
(Drive Sport) or manual shift mode.
Always depress the brake pedal until
shifting is completed. Failure to do so
could cause you to lose control and have
an accident.
. Cold engine idle speed is high, so use
caution when shifting into a forward or
reverse gear before the engine has
warmed up.
. Never shift to P (Park) or R (Reverse)
while vehicle is moving forward. Never shift to P (Park), D (Drive) or DS (Drive
Sport) while vehicle is moving rearward.
Failure to do so could cause you to lose
control and have an accident.
CAUTION
.
When stopping the vehicle on an uphill
grade, do not hold the vehicle by
depressing the accelerator pedal. The
foot brake should be used for this
purpose.
. Do not downshift abruptly on slippery
roads. This may cause a loss of control.
Starting and driving5-15
DRIVING THE VEHICLE
Page 341 of 522

5-16Starting and driving
SSD0774
Selector lever
To move the selector lever,
: Push the button while depressing the brake pedal,
: Push the button,
: Just move the selector lever.
Shifting
After starting the engine, fully depress the
brake pedal and shift the selector lever
from P (Park) to R (Reverse), N (Neutral), D
(Drive), DS (Drive Sport) or Manual shift
mode position.
Push the button to shift into P (Park) or R
(Reverse). All other positions can be
selected without pushing the button.
WARNING
Apply the parking brake if the selector lever
is in any position while the engine is not
running. Failure to do so could cause the
vehicle to move unexpectedly or roll away
and result in serious personal injury or
property damage.
CAUTION
Make sure the vehicle is completely stopped
and the transmission is in the P (Park)
position.
P (Park) position:
Use this selector position when the vehicle
is parked or when starting the engine.
Make sure the vehicle is completely
stopped. The brake pedal must be de-
pressed and the selector lever button
pushed in to move the selector lever from
the N (Neutral) position or any drive
position to the P (Park) position. Apply
the parking brake. When parking on a hill,
apply the parking brake first, then move the selector lever to the P (Park) position.
CAUTION
Use this position only when the vehicle is
completely stopped.
R (Reverse):
Use this position to back up. Always be
sure the vehicle is completely stopped
before selecting the R (Reverse) position.
The brake pedal must be depressed and
the selector lever button pushed in to
move the selector lever from the P (Park)
position, the N (Neutral) position or any
drive position to the R (Reverse) position.
N (Neutral):
Neither forward nor reverse gear is en-
gaged. The engine can be started in this
position. You may shift to the N (Neutral)
position and restart a stalled engine while
the vehicle is moving.
D (Drive):
Use this position for all normal forward
driving.
Page 342 of 522
DS (Drive Sport) mode
When the selector lever is shifted from the
D (Drive) position to the manual shift gate,
the transmission enters the DS (Drive
Sport) mode.
Moving the selector lever to the DS (Drive
Sport) position allows you to enjoy com-
fortable driving on a winding road and feel
smooth acceleration or deceleration on a
hilly road by moving in a lower gear
automatically.
When canceling the DS mode, return the
selector lever to the D (Drive) position. The
transmission returns to the normal driving
mode.
SSD0732
Paddle shifters (If so equipped)
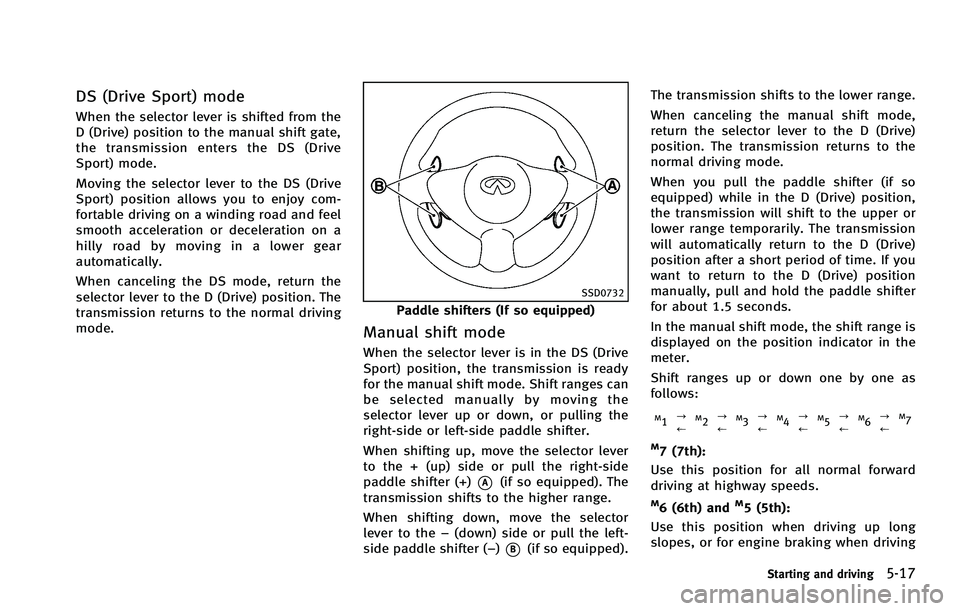
Manual shift mode
When the selector lever is in the DS (Drive
Sport) position, the transmission is ready
for the manual shift mode. Shift ranges can
be selected manually by moving the
selector lever up or down, or pulling the
right-side or left-side paddle shifter.
When shifting up, move the selector lever
to the + (up) side or pull the right-side
paddle shifter (+)
*A(if so equipped). The
transmission shifts to the higher range.
When shifting down, move the selector
lever to the −(down) side or pull the left-
side paddle shifter (−)
*B(if so equipped). The transmission shifts to the lower range.
When canceling the manual shift mode,
return the selector lever to the D (Drive)
position. The transmission returns to the
normal driving mode.
When you pull the paddle shifter (if so
equipped) while in the D (Drive) position,
the transmission will shift to the upper or
lower range temporarily. The transmission
will automatically return to the D (Drive)
position after a short period of time. If you
want to return to the D (Drive) position
manually, pull and hold the paddle shifter
for about 1.5 seconds.
In the manual shift mode, the shift range is
displayed on the position indicator in the
meter.
Shift ranges up or down one by one as
follows:
M1
?
/M2?
/M3?
/M4?
/M5?
/M6?
/M7
M7 (7th):
Use this position for all normal forward
driving at highway speeds.
M6 (6th) andM5 (5th):
Use this position when driving up long
slopes, or for engine braking when driving
Starting and driving5-17
Page 344 of 522
SSD0775
Shift lock release
If the battery charge is low or discharged,
the selector lever may not be moved from
the P (Park) position even with the brake
pedal depressed and the selector lever
button pushed.
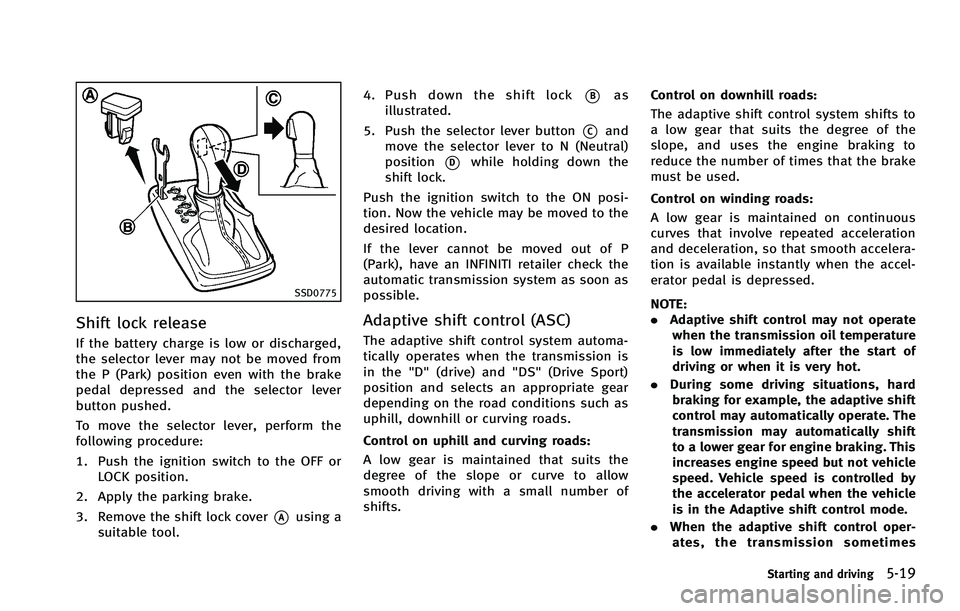
To move the selector lever, perform the
following procedure:
1. Push the ignition switch to the OFF orLOCK position.
2. Apply the parking brake.
3. Remove the shift lock cover
*Ausing a
suitable tool. 4. Push down the shift lock
*Bas
illustrated.
5. Push the selector lever button
*Cand
move the selector lever to N (Neutral)
position
*Dwhile holding down the
shift lock.
Push the ignition switch to the ON posi-
tion. Now the vehicle may be moved to the
desired location.
If the lever cannot be moved out of P
(Park), have an INFINITI retailer check the
automatic transmission system as soon as
possible.
Adaptive shift control (ASC)
The adaptive shift control system automa-
tically operates when the transmission is
in the "D" (drive) and "DS" (Drive Sport)
position and selects an appropriate gear
depending on the road conditions such as
uphill, downhill or curving roads.
Control on uphill and curving roads:
A low gear is maintained that suits the
degree of the slope or curve to allow
smooth driving with a small number of
shifts. Control on downhill roads:
The adaptive shift control system shifts to
a low gear that suits the degree of the
slope, and uses the engine braking to
reduce the number of times that the brake
must be used.
Control on winding roads:
A low gear is maintained on continuous
curves that involve repeated acceleration
and deceleration, so that smooth accelera-
tion is available instantly when the accel-
erator pedal is depressed.
NOTE:
. Adaptive shift control may not operate
when the transmission oil temperature
is low immediately after the start of
driving or when it is very hot.
. During some driving situations, hard
braking for example, the adaptive shift
control may automatically operate. The
transmission may automatically shift
to a lower gear for engine braking. This
increases engine speed but not vehicle
speed. Vehicle speed is controlled by
the accelerator pedal when the vehicle
is in the Adaptive shift control mode.
. When the adaptive shift control oper-
ates, the transmission sometimes
Starting and driving5-19