steering INFINITI FX35 2008 Service Manual
[x] Cancel search | Manufacturer: INFINITI, Model Year: 2008, Model line: FX35, Model: INFINITI FX35 2008Pages: 3924, PDF Size: 81.37 MB
Page 3654 of 3924
AUTOMATIC DRIVE POSITIONERSE-15
< SERVICE INFORMATION >
C
DE
F
G H
J
K L
M A
B
SE
N
O P
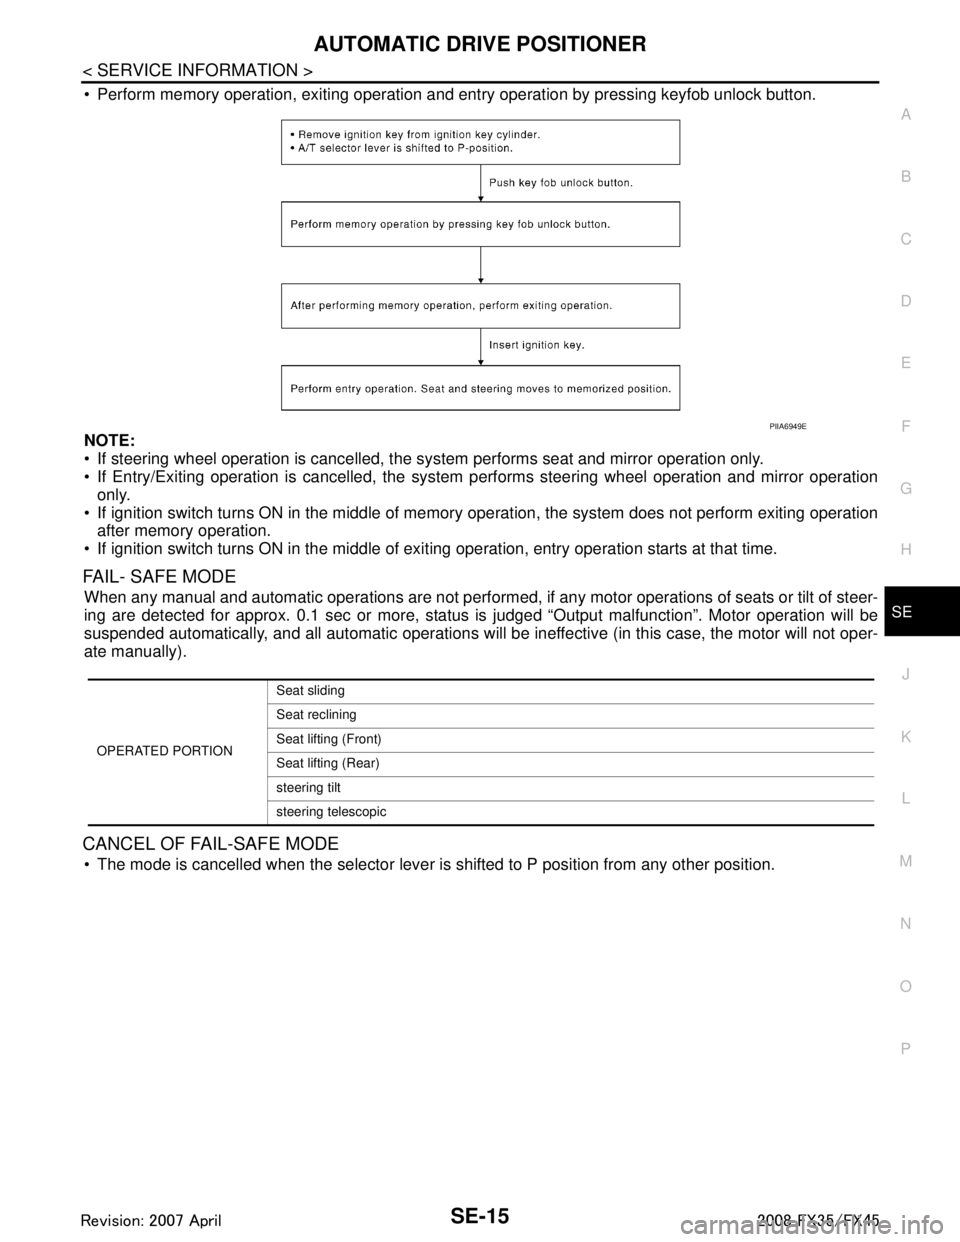
Perform memory operation, exiting operation and entry operation by pressing keyfob unlock button.
NOTE:
If steering wheel operation is cancelled, t he system performs seat and mirror operation only.
If Entry/Exiting operation is canc elled, the system performs steering wheel operation and mirror operation
only.
If ignition switch turns ON in the middle of memory operation, the system does not perform exiting operation
after memory operation.
If ignition switch turns ON in the middle of exit ing operation, entry operation starts at that time.
FAIL- SAFE MODE
When any manual and automatic operations are not performed, if any motor operations of seats or tilt of steer-
ing are detected for approx. 0.1 sec or more, status is judged “Output malfunction”. Motor operation will be
suspended automatically, and all automatic operations will be ineffective (in this case, the motor will not oper-
ate manually).
CANCEL OF FAIL-SAFE MODE
The mode is cancelled when the selector lever is shifted to P position from any other position.
PIIA6949E
OPERATED PORTIONSeat sliding
Seat reclining
Seat lifting (Front)
Seat lifting (Rear)
steering tilt
steering telescopic
3AA93ABC3ACD3AC03ACA3AC03AC63AC53A913A773A893A873A873A8E3A773A983AC73AC93AC03AC3
3A893A873A873A8F3A773A9D3AAF3A8A3A8C3A863A9D3AAF3A8B3A8C
Page 3656 of 3924

AUTOMATIC DRIVE POSITIONERSE-17
< SERVICE INFORMATION >
C
DE
F
G H
J
K L
M A
B
SE
N
O P
CAN Communication System DescriptionINFOID:0000000001328099
CAN (Controller Area Network) is a serial communication li ne for real time application. It is an on-vehicle mul-
tiplex communication line with high data communication speed and excellent error detection ability. Many elec-
tronic control units are equipped onto a vehicle, and each control unit shares information and links with other
control units during operation (not independent). In CAN communication, control units are connected with 2
communication lines (CAN H line, CAN L line) allowing a high rate of information transmission with less wiring.
Each control unit transmits/receives data but selectively reads required data only.
CAN Communication UnitINFOID:0000000001328100
Refer to LAN-43, "CAN System Specification Chart".
1. a: 10A 38 fuse (With Intelligent Key)
b: 50A M fusible link 2. a: Fuse block (J/B) M1, M2
b: BCM M3, M4, B14
(View with the dash side LH removed) 3. Fuse block (J/B) fuse layout
4. a: Automatic drive positioner control unit M49, M50
b: A/T device (park position switch)
M67
(View with the center console re-
moved) 5. Tilt motor and telescopic motor M27
Tilt sensor and telescopic sensor M28
(View with the instrument driver lower
panel removed) 6. Seat memory switch D22
7. a: Power seat switch B175 b: Sliding switch & Lifting switch
(front & rear)
c: Reclining switch
d: Lumbar support switch B158 8. a: Lumbar support motor B172
b: Reclining motor B166 9. a: Sliding motor B161
b: Lifting motor (front) B164
c: Lifting motor (rear) B162
d: Driver seat control unit B152,
B153
10. ADP steering switch M13 11. Key switch connector M23 (Without Intelligent Key)12. Key switch and ignition knob switch
connector M22
(With Intelligent Key)
13. Front door switch (Driver side) B26 14. Door mirro r (Driver side) D2 15. Door mirror (Passenger side) D32
16. Door mirror remote control switch M18 17. Unified meter and A/C amp. M55
(View with the clus ter lid C removed)
PIIB8566E
3AA93ABC3ACD3AC03ACA3AC03AC63AC53A913A773A893A873A873A8E3A773A983AC73AC93AC03AC3
3A893A873A873A8F3A773A9D3AAF3A8A3A8C3A863A9D3AAF3A8B3A8C
Page 3676 of 3924

AUTOMATIC DRIVE POSITIONERSE-37
< SERVICE INFORMATION >
C
DE
F
G H
J
K L
M A
B
SE
N
O P
Work FlowINFOID:0000000001328106
1. Check the symptom and customer's requests.
2. Understand the system description. Refer to SE-12, "
System Description".
3. Perform the preliminary check, refer to SE-37, "
Preliminary Check".
4. Perform the CAN communication inspec tion using CONSULT-III, refer to SE-40, "
CONSULT-III Function
(AUTO DRIVE POS.)".
5. Perform the self-diagnosis. Refer to SE-42, "
Check CAN Communication System".
6. Repair or replace depending on the self-diagnostic results.
7. Based on the trouble diagnosis chart, repair or replace the cause of the malfunction. Refer to SE-43,
"Symptom Chart".
8. Does the automatic drive pos itioner system operate normally?
If it is normal, GO TO 8.
If it is not normal, GO TO 3.
9. INSPECTION END
Preliminary CheckINFOID:0000000001328107
SETTING CHANGE FUNCTION
The settings of the automatic driving positioner system can be changed, using CONSULT-III and the display
unit in the center of the instrument panel.
× : Applicable –: Not applicable
It is possible to set sliding driver seat fo r entry/exit of vehicle by pressing set switch.
37 WSeat sliding switch
BACKWARD signal
InputWhen seat sliding switch
BACKWARD operation
0
Other than above Battery voltage
38 LG/B Seat reclining switch
BACKWARD signal InputWhen seat reclining switch
BACKWARD operation
0
Other than above Battery voltage
39 L/G Front lifting switch
DOWN signal InputWhen front lifting switch
DOWN operation
0
Other than above Battery voltage
40 L/Y Rear lifting switch
DOWN signal
InputWhen rear lifting switch
DOWN operation
0
Other than above Battery voltage
61E B/Y Ground (signal) — — 0 Te r -
minal Wire
Color ItemSignal Input/
Output Condition Voltage (V)
(Approx.)
Setting item Content CONSULT-III
(WORK SUPPORT) Display unitFactory
setting
Change seat sliding volume
setting The distance at retain operation can
be selected from the following 3
modes. 40 mm
—×
80 mm —
150 mm —
Change the Entry/Exit seat
slide function setting The seat sliding turnout and return
at entry/exit can be selected: ON
(operated) – OFF (not operated) ON ON: Indicator lamp ON
×
OFF OFF: Indicator lamp OFF —
Change the Entry/Exit tilt steer-
ing wheel function setting Tilt up and backward steering wheel
at entry and exit can be selected:
ON (operated) - OFF (not operated) ON ON: Indicator lamp ON
×
OFF OFF: Indicator lamp OFF —
Reset custom settings All settings to default. — Default: Setting button
OFF
—
3AA93ABC3ACD3AC03ACA3AC03AC63AC53A913A773A893A873A873A8E3A773A983AC73AC93AC03AC3
3A893A873A873A8F3A773A9D3AAF3A8A3A8C3A863A9D3AAF3A8B3A8C
Page 3677 of 3924

SE-38
< SERVICE INFORMATION >
AUTOMATIC DRIVE POSITIONER
NOTE:
After the setting is registered, the new setting is effective, even if the battery is disconnected.
CHECK POWER SUPPLY AND GROUND
1.CHECK FUSE
Check if any of the following fuses in the BCM are blown.
Check 50A fusible link (letter M, located in the fuse and fusible link box.)
Check 15A fuse [No.22, located in the fuse block (J/B)]
Check 10A fuse [No.1, located in the fuse block (J/B)]
Check 10A fuse [No.6, located in the fuse block (J/B)]
NOTE:
Refer to SE-16, "
Component Parts and Harness Connector Location".
OK or NG
OK >> GO TO 2.
NG >> If fuse is blown out, be sure to eliminate cause of malfunction before installing new fuse. Refer to SE-16, "
Component Parts and Harness Connector Location".
2.CHECK POWER SUPPLY CIRCUIT (BCM)
1. Turn ignition switch OFF.
2. Disconnect BCM connector.
3. Check voltage between BCM connector and ground.
OK or NG
OK >> GO TO 3.
NG >> Check harness for open and short between BCM and fuse or fusible link.
3.CHECK GROUND CIRCUIT (BCM)
1. Turn ignition switch OFF.
2. Check continuity between BCM connector M4 terminal 49, 52 and ground.
OK or NG
OK >> BCM circuit is OK. Check the driver seat control unit. GO TO 4.
NG >> Repair or replace the harness between BCM and ground.
4.CHECK FUSE
Content Setting change operation Indicator LED
The seat sliding turnout and
steering wheel up/backward at
entry/exit can be operated. Press the set switch for more than 10 seconds Blinking twice
The seat sliding turnout and
steering wheel up/backward at
entry/exit can be not operated. Blinking ones
Connector
Terminals (Wire color)
Ignition
switch Voltage (V) (Ap-
prox.)
(+) (–)
M3 11 ( L G )
Ground ACC
Battery voltage
38 (W/L) ON
M4 42 (L/R)
OFF
55 (G)
PIIA5083E
49 (B) – Ground : Continuity should exist.
52 (B) – Ground : Continuity should exist.
PIIA5084E
3AA93ABC3ACD3AC03ACA3AC03AC63AC53A913A773A893A873A873A8E3A773A983AC73AC93AC03AC3
3A893A873A873A8F3A773A9D3AAF3A8A3A8C3A863A9D3AAF3A8B3A8C
Page 3680 of 3924

AUTOMATIC DRIVE POSITIONERSE-41
< SERVICE INFORMATION >
C
DE
F
G H
J
K L
M A
B
SE
N
O P
NOTE:
The displays of CAN communication and P range switch display error detecting condition from memory erase to the present on “TIME”.
- If error is detected in the past and present error is detected, “CRNT” is displayed.
- If error is detected in the past and present error is not detected, “PAST” is displayed.
- If error has never been detected, nothing is displayed on “TIME”.
Any items other than CAN communication and P range s witch count error detection frequency occurred after
erase history to “1-127”.
- If error was detected in the past, error detection frequen cy from memory erase to the present is displayed on
“TIME”.
- If error has never been detected, nothing is displayed on “TIME”.
- Can clear the detected memory. Normal: Clear memory in normal condition, hist ory is erased and nothing is displayed on “TIME”.
Error: Clear memory in error condition, error is detected again and “1” is displayed on “TIME”.
DATA MONITOR
Selection from Menu
B2116 TILT OUTPUT When any manual and automatic operations are not performed, if any motor
operations of steering tilt is detected for 0.1 second or more, status is judged “Out-
put error”. SE-49SE-58
B2118 TILT SENSOR When tilt sensor detects 0.1V or lo
wer, or 4.9V or higher, for 0.5 seconds or more.SE-58
B2119 TELESCO SENSORWhen telescopic sensor detects 0.1V or lower, or 4.9V or higher, for 0.5 seconds
or more.
SE-57
B2125 P RANGE SWWith the A/T selector lever in P position, if the vehicle speed of 7 km/h (4 MPH) or
higher was input the park position switch input system is judged malfunctioning. SE-74
B2128 UART COMM Malfunction is detected in UART communication.
SE-80
DTCSelf-diagnosis item
(CONSULT-III indica-
tion) DTC detection condition
Reference
page
Monitor item [OPERATION or UNIT] Contents
SLIDE SW–FR “ON/OFF” ON/OFF status judged from the sliding switch (FR) signal is displayed.
SLIDE SW–RR “ON/OFF” ON/OFF status judged from th e sliding switch (RR) signal is displayed.
RECLN SW–FR “ON/OFF” ON/OFF status judged from the reclining switch (FR) signal is displayed.
RECLN SW–RR “ON/OFF” ON/OFF status judged from the reclining switch (RR) signal is displayed.
LIFT FR SW–UP “ON/OFF” ON/OFF status judged from the FR lifter switch (UP) signal is displayed.
LIFT FR SW–DN “ON/OFF” ON/OFF status judged from the FR lifter switch (DOWN) signal is displayed.
LIFT RR SW–UP “ON/OFF” ON/OFF status judged from the RR lifter switch (UP) signal is displayed.
LIFT RR SW–DN “ON/OFF” ON/OFF status judged from the RR lifter switch (DOWN) signal is displayed.
MIR CON SW–UP “ON/OFF” ON/OFF status judged from the door mirror remote control switch (UP) signal is dis-
played.
MIR CON SW–DN “ON/OFF” ON/OFF status judged from the door mirror remote control switch (DOWN) signal
is displayed.
MIR CON SW–RH “ON/OFF” ON/OFF status judged from the door mirror remote control switch (RIGHT) signal
is displayed.
MIR CON SW–LH “ON/OFF” ON/OFF status judged from the door mirror remote control switch (LEFT) signal s
displayed.
MIR CHNG SW–R “ON/OFF” ON/OFF status judged from the door mirror remote control switch (switching to
RIGHT) signal is displayed.
MIR CHNG SW–L “ON/OFF” ON/OFF status judged from the door mirror remote control switch (switching to
LEFT) signal is displayed.
TELESCO SW-FR “ON/OFF” ON/OFF status judged from the telescoping switch (FR) signal is displayed.
TELESCO SW-RR “ON/OFF” ON/OFF status judged from the telescoping switch (RR) signal is displayed.
3AA93ABC3ACD3AC03ACA3AC03AC63AC53A913A773A893A873A873A8E3A773A983AC73AC93AC03AC3
3A893A873A873A8F3A773A9D3AAF3A8A3A8C3A863A9D3AAF3A8B3A8C
Page 3682 of 3924

AUTOMATIC DRIVE POSITIONERSE-43
< SERVICE INFORMATION >
C
DE
F
G H
J
K L
M A
B
SE
N
O P
Is “CAN COMM CIRCUIT” displayed?
YES >> Refer to LAN-14, "Trouble Diagnosis Flow Chart".
NO >> INSPECTION END.
Symptom ChartINFOID:0000000001328110
Symptom Diagnoses / service procedure Refer to
page
Only setting change function cannot be set with display. Interacted display system (without NAVI)
AV- 5 2
Navigation system (with NAVI)AV- 8 7
A part of seat system does not operate
(both automatically and manually).1. Check sliding motor circuit
SE-44
2. Check reclining motor circuit SE-45
3. Check front lifter motor circuitSE-46
4. Check rear lifter motor circuitSE-47
5. If the above systems are normal, replace the driver
seat control unit SE-16
A part of steering tilt, telescopic and door mirror does not
operate (both automatically and manually). 1. Check tilt motor circuit
SE-49
2. Check telescopic motor circuitSE-48
3. Check driver side mirror motor circuit SE-50
4. Check passenger side mirror motor circuit SE-52
5. If the above systems are normal, replace the
automatic drive positioner control unit SE-16
A part of seat system does not operate
(only automatic operation). 1. Check sliding sensor circuit
SE-53
2. Check reclining sensor circuitSE-54
3. Check front lifting sensor circuitSE-55
4. Check rear lifting sensor circuitSE-56
5. If the above systems are normal, replace the driver
seat control unit SE-16
A part of steering tilt, telescopic system and door mirror
system dose not operate (only automatic operation). 1. Check steering and door mirror sensor power supply
and ground circuit SE-61
2. Check driver side mirror sensor circuit
SE-59
3. Check passenger side mirror sensor circuitSE-60
4. Check tilt sensor circuitSE-58
5. Check telescopic sensor circuitSE-57
6. If all the above systems are normal, replace the
automatic drive positioner control unit SE-16
All the automatic operations do not operate. 1. Check A/T device (park position switch) circuit
SE-74
2. Check key switch circuit (with intelligent key)SE-76
3. Check key switch circuit (without intelligent key)SE-77
4. Check UART communication line circuitSE-80
5.If all the above systems are normal, replace the
automatic drive positioner control unit
SE-16
A part of seat system does not operate
(only manual operation). 1. Check sliding switch circuit
SE-63
2. Check reclining switch circuitSE-64
3. Check front lifting switch circuitSE-66
4. Check rear lifting switch circuitSE-67
5.If the above systems are normal, replace the driver
seat control unit SE-16
3AA93ABC3ACD3AC03ACA3AC03AC63AC53A913A773A893A873A873A8E3A773A983AC73AC93AC03AC3
3A893A873A873A8F3A773A9D3AAF3A8A3A8C3A863A9D3AAF3A8B3A8C
Page 3683 of 3924
SE-44
< SERVICE INFORMATION >
AUTOMATIC DRIVE POSITIONER
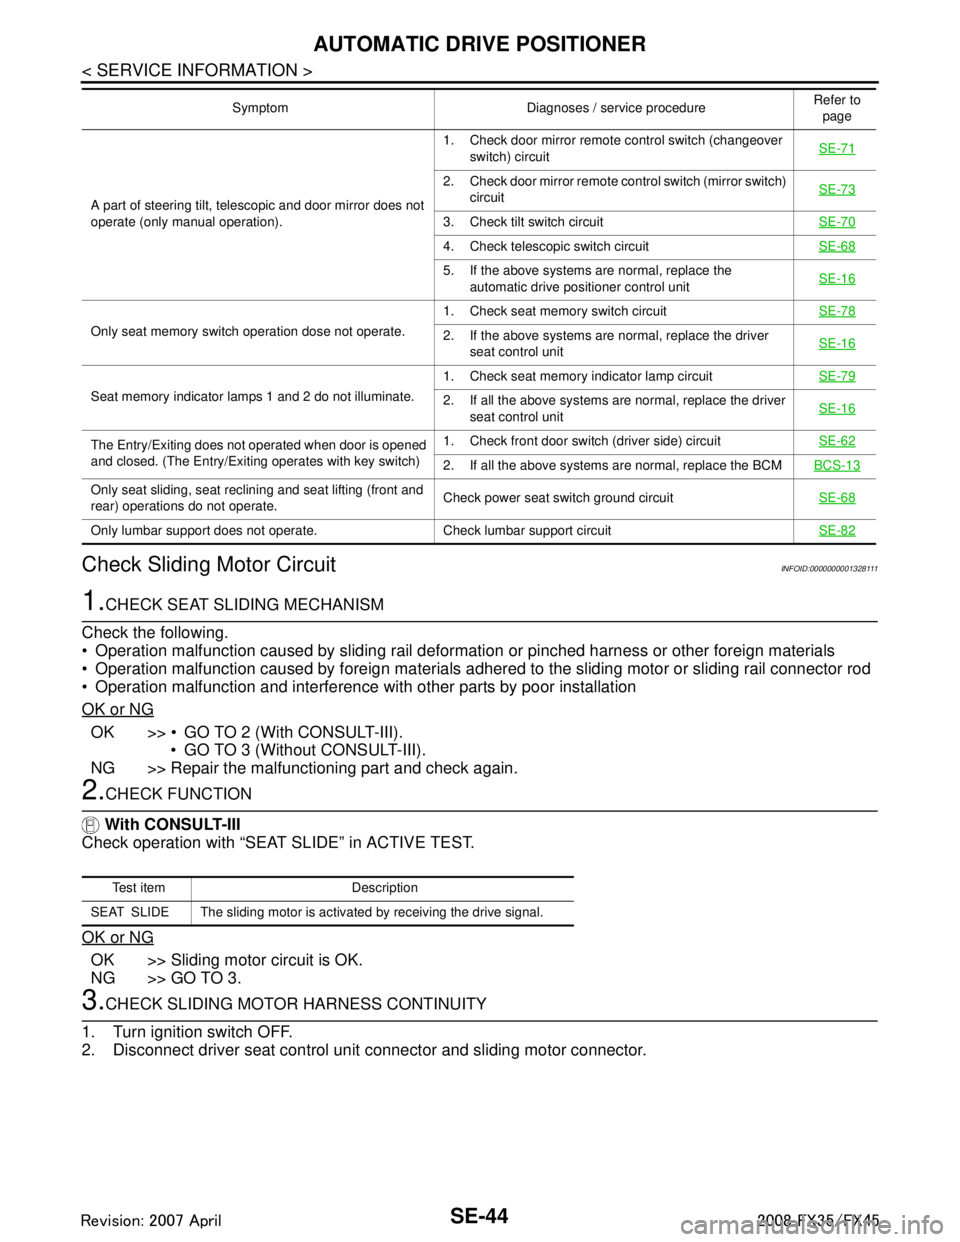
Check Sliding Motor Circuit
INFOID:0000000001328111
1.CHECK SEAT SLIDING MECHANISM
Check the following.
Operation malfunction caused by sliding rail deformation or pinched harness or other foreign materials
Operation malfunction caused by foreign materials adhered to the sliding motor or sliding rail connector rod
Operation malfunction and interference wit h other parts by poor installation
OK or NG
OK >> GO TO 2 (With CONSULT-III). GO TO 3 (Without CONSULT-III).
NG >> Repair the malfunctioning part and check again.
2.CHECK FUNCTION
With CONSULT-III
Check operation with “SEAT SLIDE” in ACTIVE TEST.
OK or NG
OK >> Sliding motor circuit is OK.
NG >> GO TO 3.
3.CHECK SLIDING MOTOR HARNESS CONTINUITY
1. Turn ignition switch OFF.
2. Disconnect driver seat control unit connector and sliding motor connector.
A part of steering tilt, telescopic and door mirror does not
operate (only manual operation). 1. Check door mirror remote
control switch (changeover
switch) circuit SE-71
2. Check door mirror remote co
ntrol switch (mirror switch)
circuit SE-73
3. Check tilt switch circuit
SE-70
4. Check telescopic switch circuitSE-68
5. If the above systems are normal, replace the
automatic drive positioner control unit SE-16
Only seat memory switch operation dose not operate. 1. Check seat memory switch circuit
SE-782. If the above systems are normal, replace the driver
seat control unit SE-16
Seat memory indicator lamps 1 and 2 do not illuminate. 1. Check seat memory indicator lamp circuit
SE-792. If all the above systems are normal, replace the driver
seat control unit SE-16
The Entry/Exiting does not operated when door is opened
and closed. (The Entry/Exiting operates with key switch) 1. Check front door switch
(driver side) circuit SE-62
2. If all the above systems are normal, replace the BCM BCS-13
Only seat sliding, seat reclining and seat lifting (front and
rear) operations do not operate.Check power seat switch ground circuit
SE-68
Only lumbar support does not operate. Check lumbar support circuit SE-82
Symptom Diagnoses / service procedureRefer to
page
Test item Description
SEAT SLIDE The sliding motor is activated by receiving the drive signal.
3AA93ABC3ACD3AC03ACA3AC03AC63AC53A913A773A893A873A873A8E3A773A983AC73AC93AC03AC3
3A893A873A873A8F3A773A9D3AAF3A8A3A8C3A863A9D3AAF3A8B3A8C
Page 3687 of 3924
SE-48
< SERVICE INFORMATION >
AUTOMATIC DRIVE POSITIONER
OK >> Rear lifting motor check is OK.
NG >> GO TO 3.
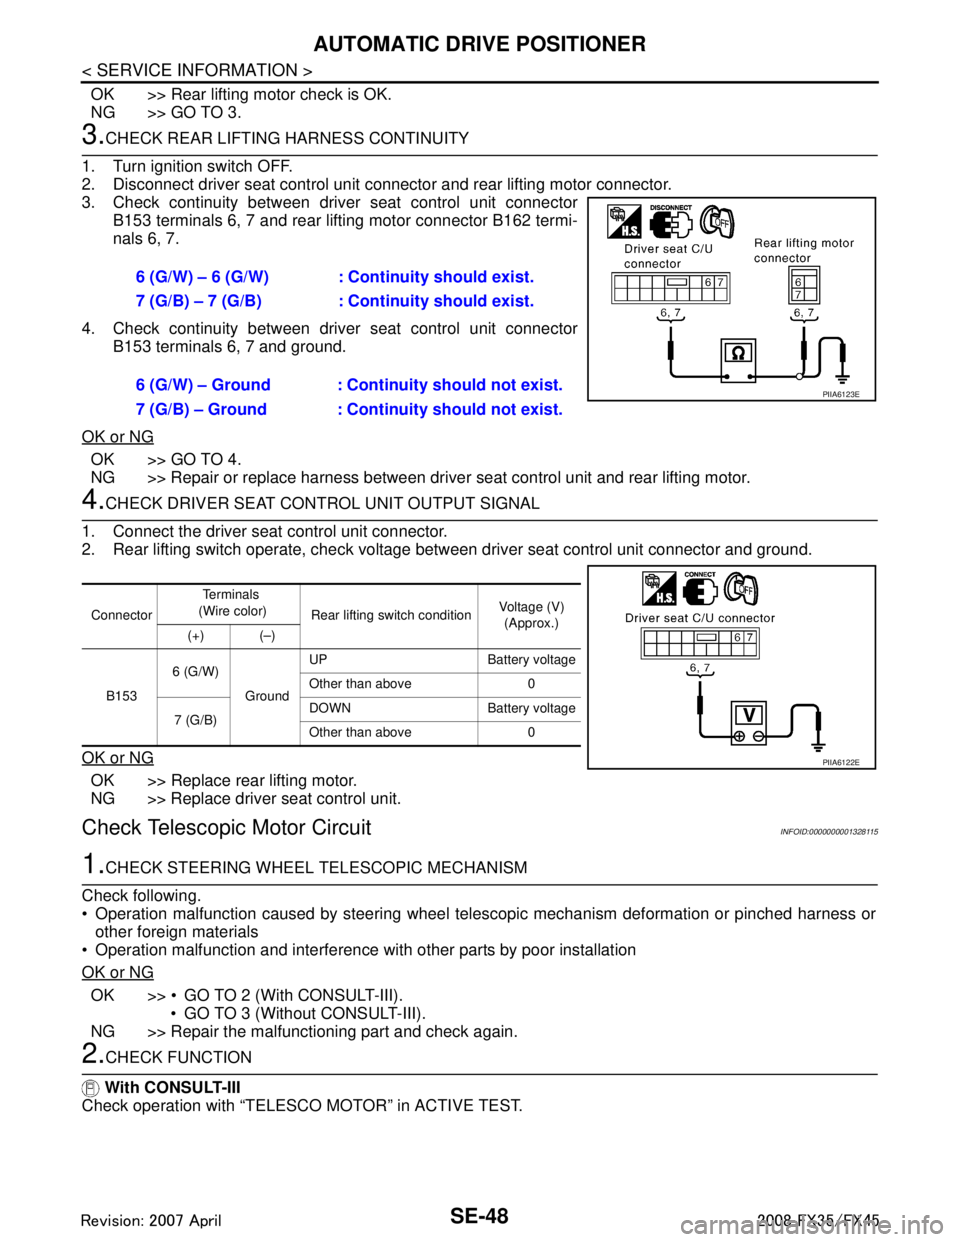
3.CHECK REAR LIFTING HARNESS CONTINUITY
1. Turn ignition switch OFF.
2. Disconnect driver seat control unit connector and rear lifting motor connector.
3. Check continuity between driv er seat control unit connector
B153 terminals 6, 7 and rear lifting motor connector B162 termi-
nals 6, 7.
4. Check continuity between driv er seat control unit connector
B153 terminals 6, 7 and ground.
OK or NG
OK >> GO TO 4.
NG >> Repair or replace harness between driver seat control unit and rear lifting motor.
4.CHECK DRIVER SEAT CONTROL UNIT OUTPUT SIGNAL
1. Connect the driver seat control unit connector.
2. Rear lifting switch operate, check voltage between driver seat control unit connector and ground.
OK or NG
OK >> Replace rear lifting motor.
NG >> Replace driver seat control unit.
Check Telescopic Motor CircuitINFOID:0000000001328115
1.CHECK STEERING WHEEL TELESCOPIC MECHANISM
Check following.
Operation malfunction caused by steering wheel telescopic mechanism deformation or pinched harness or other foreign materials
Operation malfunction and interference wit h other parts by poor installation
OK or NG
OK >> GO TO 2 (With CONSULT-III). GO TO 3 (Without CONSULT-III).
NG >> Repair the malfunctioning part and check again.
2.CHECK FUNCTION
With CONSULT-III
Check operation with “TELESCO MOTOR” in ACTIVE TEST. 6 (G/W) – 6 (G/W) : Co
ntinuity should exist.
7 (G/B) – 7 (G/B) : Co ntinuity should exist.
6 (G/W) – Ground : Continuity should not exist.
7 (G/B) – Ground : Continuity should not exist.
PIIA6123E
Connector Te r m i n a l s
(Wire color) Rear lifting switch condition Voltage (V)
(Approx.)
(+) (–)
B153 6 (G/W)
GroundUP Battery voltage
Other than above 0
7 (G/B) DOWN Battery voltage
Other than above 0
PIIA6122E
3AA93ABC3ACD3AC03ACA3AC03AC63AC53A913A773A893A873A873A8E3A773A983AC73AC93AC03AC3
3A893A873A873A8F3A773A9D3AAF3A8A3A8C3A863A9D3AAF3A8B3A8C
Page 3688 of 3924
AUTOMATIC DRIVE POSITIONERSE-49
< SERVICE INFORMATION >
C
DE
F
G H
J
K L
M A
B
SE
N
O P
OK or NG
OK >> Steering telescopic motor circuit is OK.
NG >> GO TO 3.
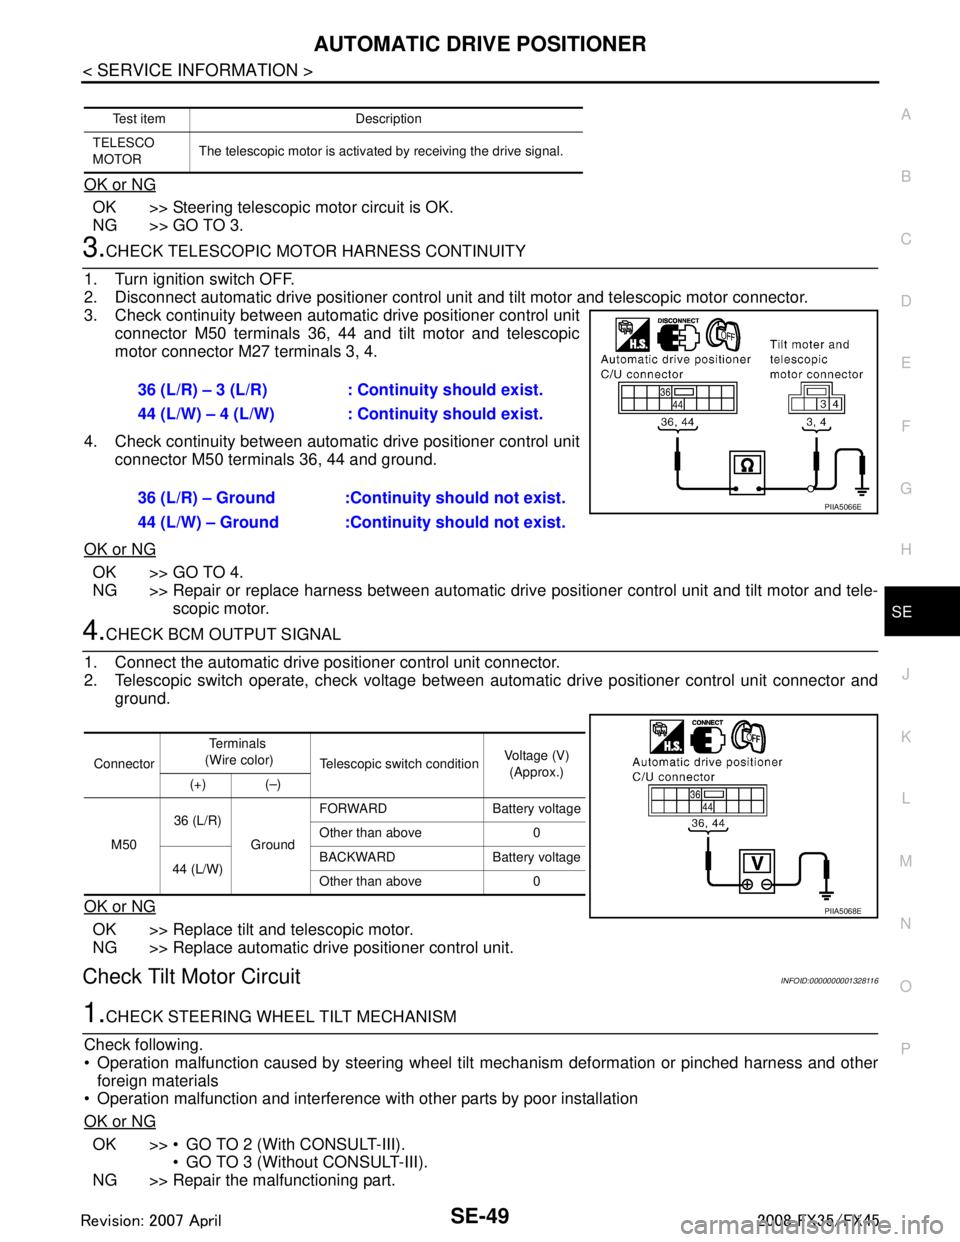
3.CHECK TELESCOPIC MOTO R HARNESS CONTINUITY
1. Turn ignition switch OFF.
2. Disconnect automatic drive positioner control unit and tilt motor and telescopic motor connector.
3. Check continuity between automat ic drive positioner control unit
connector M50 terminals 36, 44 and tilt motor and telescopic
motor connector M27 terminals 3, 4.
4. Check continuity between automat ic drive positioner control unit
connector M50 terminals 36, 44 and ground.
OK or NG
OK >> GO TO 4.
NG >> Repair or replace harness between automatic dr ive positioner control unit and tilt motor and tele-
scopic motor.
4.CHECK BCM OUTPUT SIGNAL
1. Connect the automatic drive positioner control unit connector.
2. Telescopic switch operate, check voltage between aut omatic drive positioner control unit connector and
ground.
OK or NG
OK >> Replace tilt and telescopic motor.
NG >> Replace automatic drive positioner control unit.
Check Tilt Motor CircuitINFOID:0000000001328116
1.CHECK STEERING WH EEL TILT MECHANISM
Check following.
Operation malfunction caused by steering wheel t ilt mechanism deformation or pinched harness and other
foreign materials
Operation malfunction and interference with other parts by poor installation
OK or NG
OK >> GO TO 2 (With CONSULT-III). GO TO 3 (Without CONSULT-III).
NG >> Repair the malfunctioning part.
Test item Description
TELESCO
MOTOR The telescopic motor is activated by receiving the drive signal.
36 (L/R) – 3 (L/R) : Co
ntinuity should exist.
44 (L/W) – 4 (L/W) : Co ntinuity should exist.
36 (L/R) – Ground :Continuity should not exist.
44 (L/W) – Ground :Continuity should not exist.
PIIA5066E
Connector Te r m i n a l s
(Wire color) Telescopic switch condition Voltage (V)
(Approx.)
(+) (–)
M50 36 (L/R)
GroundFORWARD Battery voltage
Other than above 0
44 (L/W) BACKWARD Battery voltage
Other than above 0
PIIA5068E
3AA93ABC3ACD3AC03ACA3AC03AC63AC53A913A773A893A873A873A8E3A773A983AC73AC93AC03AC3
3A893A873A873A8F3A773A9D3AAF3A8A3A8C3A863A9D3AAF3A8B3A8C
Page 3689 of 3924
SE-50
< SERVICE INFORMATION >
AUTOMATIC DRIVE POSITIONER
2.CHECK FUNCTION
With CONSULT-III
Check operation with “TILT MOTOR” in ACTIVE TEST.
OK or NG
OK >> Steering tilt motor circuit is OK.
NG >> GO TO 3.
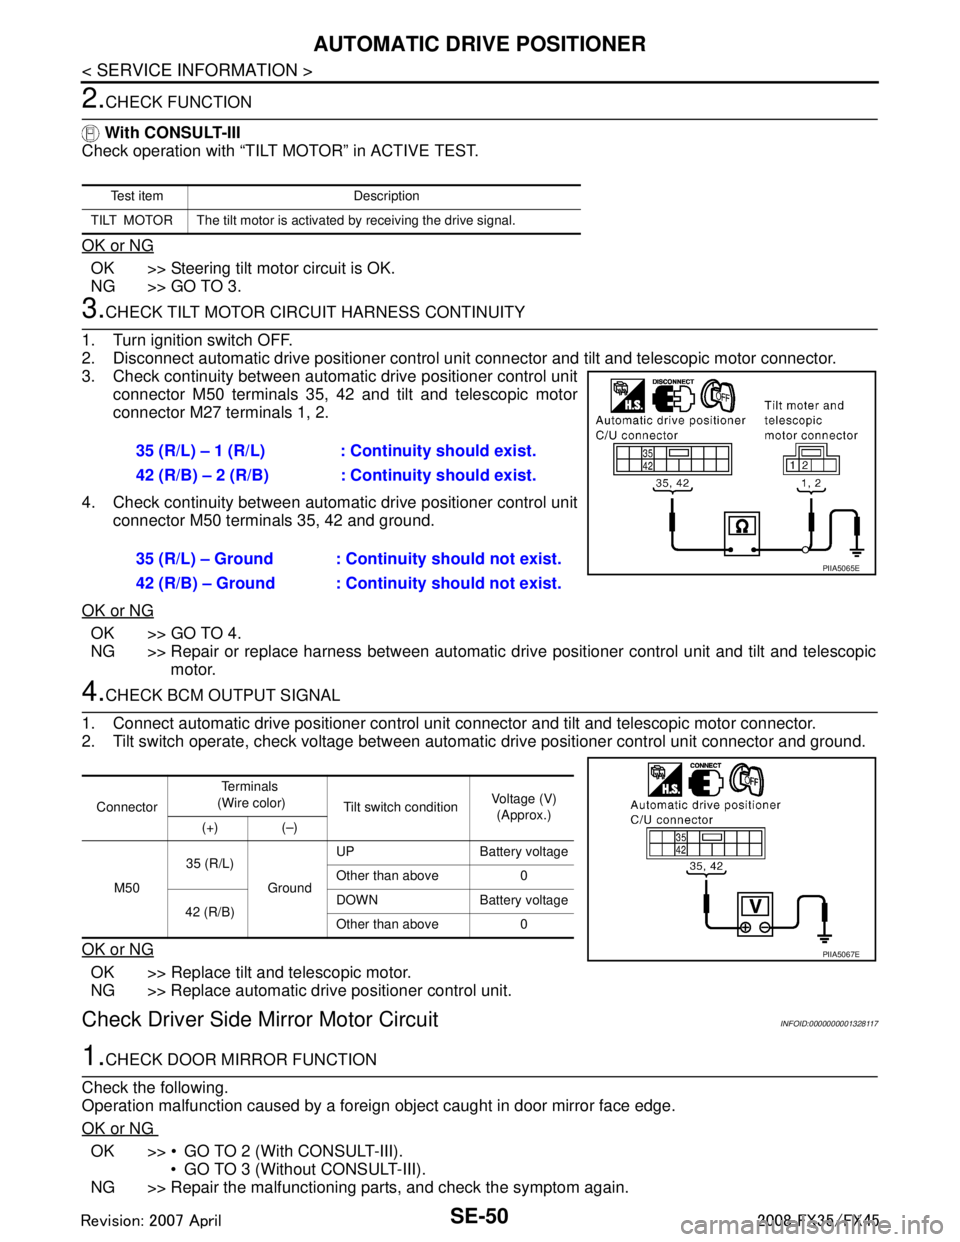
3.CHECK TILT MOTOR CIRCUIT HARNESS CONTINUITY
1. Turn ignition switch OFF.
2. Disconnect automatic drive positioner control uni t connector and tilt and telescopic motor connector.
3. Check continuity between automat ic drive positioner control unit
connector M50 terminals 35, 42 and tilt and telescopic motor
connector M27 terminals 1, 2.
4. Check continuity between automat ic drive positioner control unit
connector M50 terminals 35, 42 and ground.
OK or NG
OK >> GO TO 4.
NG >> Repair or replace harness between automatic dr ive positioner control unit and tilt and telescopic
motor.
4.CHECK BCM OUTPUT SIGNAL
1. Connect automatic drive positioner control unit connector and tilt and telescopic motor connector.
2. Tilt switch operate, check voltage between automat ic drive positioner control unit connector and ground.
OK or NG
OK >> Replace tilt and telescopic motor.
NG >> Replace automatic drive positioner control unit.
Check Driver Side Mirror Motor CircuitINFOID:0000000001328117
1.CHECK DOOR MIRROR FUNCTION
Check the following.
Operation malfunction caused by a foreign object caught in door mirror face edge.
OK or NG
OK >> GO TO 2 (With CONSULT-III). GO TO 3 (Without CONSULT-III).
NG >> Repair the malfunctioning parts, and check the symptom again.
Te s t i t e m D e s c r i p t i o n
TILT MOTOR The tilt motor is activated by receiving the drive signal.
35 (R/L) – 1 (R/L) : Co ntinuity should exist.
42 (R/B) – 2 (R/B) : Continuity should exist.
35 (R/L) – Ground : Continuity should not exist.
42 (R/B) – Ground : Continuity should not exist.
PIIA5065E
Connector Te r m i n a l s
(Wire color) Tilt switch condition Voltage (V)
(Approx.)
(+) (–)
M50 35 (R/L)
GroundUP Battery voltage
Other than above 0
42 (R/B) DOWN Battery voltage
Other than above 0
PIIA5067E
3AA93ABC3ACD3AC03ACA3AC03AC63AC53A913A773A893A873A873A8E3A773A983AC73AC93AC03AC3
3A893A873A873A8F3A773A9D3AAF3A8A3A8C3A863A9D3AAF3A8B3A8C