warning INFINITI FX35 2008 Service Manual
[x] Cancel search | Manufacturer: INFINITI, Model Year: 2008, Model line: FX35, Model: INFINITI FX35 2008Pages: 3924, PDF Size: 81.37 MB
Page 3862 of 3924

WT-22
< SERVICE INFORMATION >
TROUBLE DIAGNOSES
NOTE:
If more than one wheel transmitter is NOT activated, the warning lamp blinking patterns for those wheels will combine. (Example: one
blink/OFF/three blinks = Rear LH and Rear RH transmitters are not activated.)
RUN-FLAT TIRE WARNING LAMP DIAGNOSTIC CHART
CONSULT-III Function (BCM)INFOID:0000000001327585
FUNCTION
CONSULT-III can display each self-diagnostic item using the diagnostic test modes shown following.
Low tire pres-
sure warning
lampWarning lamp blinks
4 times
Rear LH wheel trans-
mitter is not activat-
ed.Activate rear LH wheel
transmitter. Refer to WT-20,
"Transmitter Wake Up Oper-
ation".
Warning lamp comes
on and does not turn
off The fuse for combi-
nation meter from
battery is pulled out.
Check the fuse for combina-
tion meter from battery. In-
stall or replace (if needed).
BCM connector
pulled out. Check BCM connector. Re-
connect if needed.
Low tire pressure or
tire pressure moni-
toring system mal-
function. Perform CONSULT-III Self
Diagnosis. Refer to "Self-
Diagnosis".
- Perform ID Registration if needed. Refer to WT-19,
"ID Registration Proce-
dure".
Turn signal
lamp Turn signal lamp
does not flash 2 times
or horn does not
sound after transmit-
ter activation. 1. Tool J-45295
(special ser-
vice tool) bat-
tery low.
2. Ignition OFF
during activa-
tion.
3. Tool J-45295
(special ser-
vice tool) not
positioned cor-
rectly.
4. Transmitters al- ready activated. 1. Install new battery.
2. Make sure ignition is
ON during activation.
3. Position tool correctly during activation.
4. None
Diagnosis
Item Symptom
(Ignition switch ON) Low tire pressure wa
rning lamp Cause Action
SEIA0597E
SEIA0598E
Diagnosis
Item Symptom
(Ignition Switch ON) Run-flat tire warning lamp Cause Action
Run-flat tire
warning lamp Warning lamp comes
on and does not turn
off Tire pressure drop to
86 kPa (0.88 kg/cm
2,
12.5 psi) or less. 1. Check air pressure of
tire.
2. Repair or change the
tire (if needed)
3. Perform CONSULT-III Self Diagnosis. Refer
to WT-22, "
CONSULT-
III Function (BCM)".SEIA0793E
3AA93ABC3ACD3AC03ACA3AC03AC63AC53A913A773A893A873A873A8E3A773A983AC73AC93AC03AC3
3A893A873A873A8F3A773A9D3AAF3A8A3A8C3A863A9D3AAF3A8B3A8C
Page 3864 of 3924

WT-24
< SERVICE INFORMATION >
TROUBLE DIAGNOSES
NOTE:
Before performing the self-diagnosis, be sure to register the ID, or else the actual malfunction location may be different from that dis-
played on CONSULT-III.
ACTIVE TEST MODE
Test Item
Flasher
Horn
Warning lamp
ID regist warning
Flat tire warning
How to Perform Trouble Diagnosis for Quick and Accurate RepairINFOID:0000000001327586
INTRODUCTION
Before troubleshooting, verify customer complaints.
If a vehicle malfunction is difficult to reproduce, harnesses, harness connectors or terminals may be mal-
functioning. Hold and shake these parts to make sure they are securely connected.
When using a circuit tester to measure voltage or re sistance of each circuit, be careful not to damage or
deform connector terminals.
WORK FLOW
MONITOR CONDITION SPECIFICATION
VEHICLE SPEED Drive vehicle. V ehicle speed (km/h or MPH)
AIR PRESS FL
AIR PRESS FR
AIR PRESS RR
AIR PRESS RL Drive vehicle for a few minutes.
Tire pressure (kPa or Psi)
or
Ignition switch ON and activation tool is transmitting activation signals.
ID REGST FL 1
ID REGST FR 1
ID REGST RR 1
ID REGST RL 1 Ignition switch ON Registration ID: DONE
No registration ID: YET
WARNING LAMP Low tire pressure
warning lamp on: ON
Low tire pressure wa rning lamp off: OFF
BUZZER Buzzer in combination meter on: ON
Buzzer in combination meter off: OFF
3AA93ABC3ACD3AC03ACA3AC03AC63AC53A913A773A893A873A873A8E3A773A983AC73AC93AC03AC3
3A893A873A873A8F3A773A9D3AAF3A8A3A8C3A863A9D3AAF3A8B3A8C
Page 3865 of 3924

TROUBLE DIAGNOSESWT-25
< SERVICE INFORMATION >
C
DF
G H
I
J
K L
M A
B
WT
N
O P
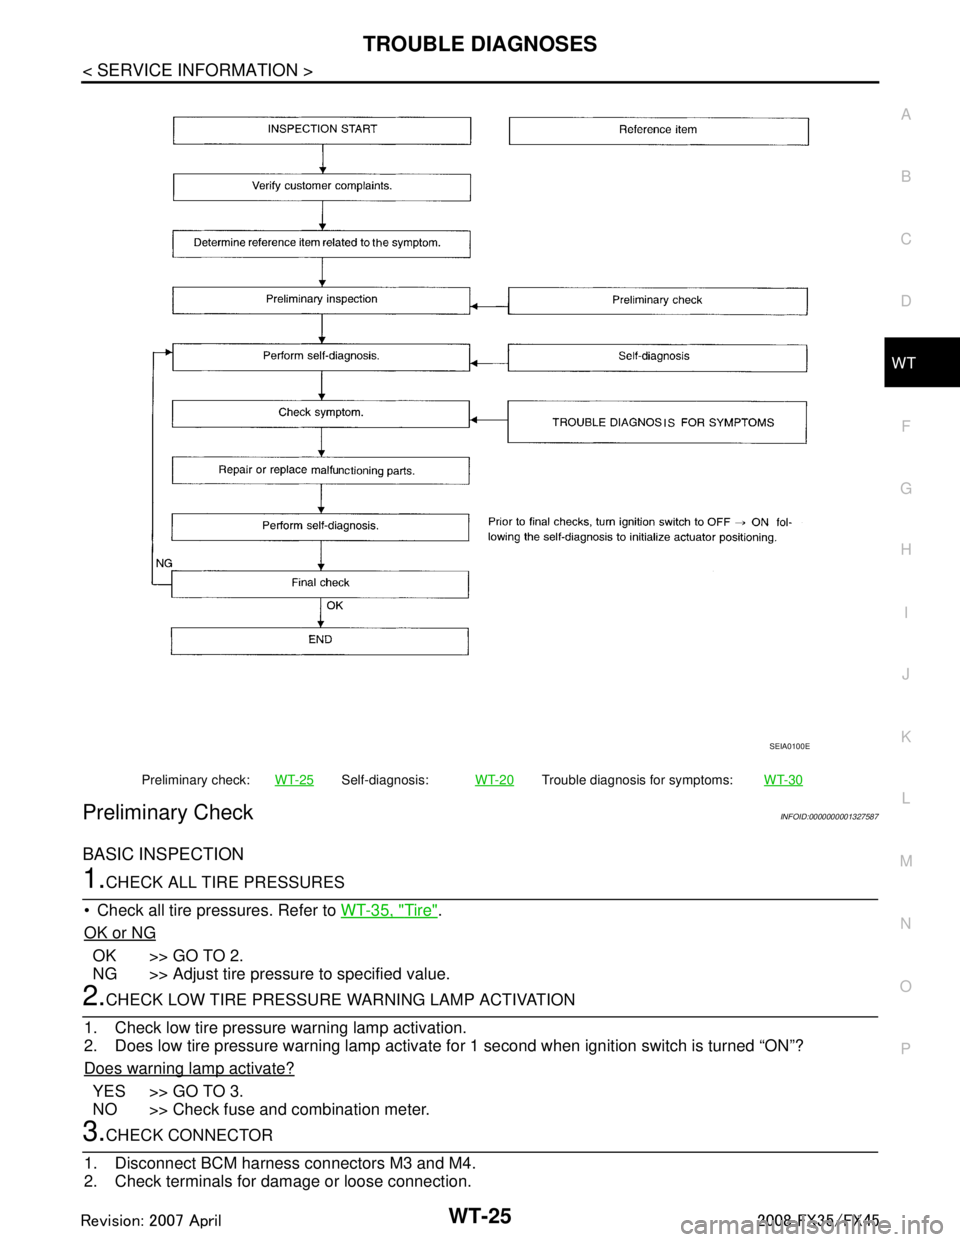
Preliminary CheckINFOID:0000000001327587
BASIC INSPECTION
1.CHECK ALL TIRE PRESSURES
Check all tire pressures. Refer to WT-35, "
Tire".
OK or NG
OK >> GO TO 2.
NG >> Adjust tire pressure to specified value.
2.CHECK LOW TIRE PRESSURE WARNING LAMP ACTIVATION
1. Check low tire pressure warning lamp activation.
2. Does low tire pressure warning lamp activate for 1 second when ignition switch is turned “ON”?
Does warning lamp activate?
YES >> GO TO 3.
NO >> Check fuse and combination meter.
3.CHECK CONNECTOR
1. Disconnect BCM harness connectors M3 and M4.
2. Check terminals for damage or loose connection.
Preliminary check: WT-25Self-diagnosis:WT-20Trouble diagnosis for symptoms: WT-30
SEIA0100E
3AA93ABC3ACD3AC03ACA3AC03AC63AC53A913A773A893A873A873A8E3A773A983AC73AC93AC03AC3
3A893A873A873A8F3A773A9D3AAF3A8A3A8C3A863A9D3AAF3A8B3A8C
Page 3866 of 3924

WT-26
< SERVICE INFORMATION >
TROUBLE DIAGNOSES
OK or NG
OK >> GO TO 4.
NG >> Repair or replace damaged parts.
4.CHECK TRANSMITTER TOOL
Check activation tool battery.
OK or NG
OK >> Perform self-diagnosis.
NG >> Replace activation tool battery.
Malfunction Code/Symptom ChartINFOID:0000000001327588
Code/Symptom Malfunction part Reference
06
07
08
09 Front-left tire pressure drops to 86 kPa (0.88 kg/cm
2, 12.5 psi) or less.
Front-right tire pressure drops to 86 kPa (0.88 kg/cm2, 12.5 psi) or less.
Rear-right tire pre ssure drops to 86 kPa (0.88 kg/cm2, 12.5 psi) or less.
Rear-left tire pressure drops to 86 kPa (0.88 kg/cm2, 12.5 psi) or less. —
15
16
17
18 Front-left tire pressure drops to 173 kPa (1.8 kg/cm
2, 25 psi) or less.
Front-right tire pressure drops to 173 kPa (1.8 kg/cm2, 25 psi) or less.
Rear-right tire pre ssure drops to 173 kPa (1.8 kg/cm2, 25 psi) or less.
Rear-left tire pressure drops to 173 kPa (1.8 kg/cm2, 25 psi) or less. —
21
22
23
24 Transmitter no data (front - left)
Transmitter no data (front - right)
Transmitter no data (rear - right)
Transmitter no data (rear - left)
WT-28
31
32
33
34Transmitter checksum e
rror (front - left)
Transmitter checksum e rror (front - right)
Transmitter checksum error (rear - right)
Transmitter checksum error (rear - left) WT-28
35
36
37
38Transmitter pressure data
error (front - left)
Transmitter pressure data error (front - right)
Transmitter pressure data error (rear - right)
Transmitter pressure data error (rear - left) WT-29
41
42
43
44Transmitter function code error (front - left)
Transmitter function code
error (front - right)
Transmitter function code error (rear - right)
Transmitter function code error (rear - left) WT-28
45
46
47
48Transmitter battery voltage low (front - left)
Transmitter battery voltage low (front - right)
Transmitter battery voltage low (rear - right)
Transmitter battery voltage low (rear - left)
WT-28
52 Vehicle speed signal
WT-29
Low tire pressure warning lamp does not
come on when ignition switch is turned on.Fuse or combination meter
BCM connector or circuit
BCM
WT-30
Low tire pressure warning lamp stays on
when ignition switch is turned on.Combination meter
BCM connector or circuit
BCM
WT-30
Low tire pressure wa
rning lamp blinks
when ignition switch is turned on. BCM connector or circuit
BCM
Transmitter's mode off
ID registration not yet
WT-31
Run-flat tire warning lamp stays on when
ignition switch is turned on.
Combination meter
Tire pressure
WT-32
3AA93ABC3ACD3AC03ACA3AC03AC63AC53A913A773A893A873A873A8E3A773A983AC73AC93AC03AC3
3A893A873A873A8F3A773A9D3AAF3A8A3A8C3A863A9D3AAF3A8B3A8C
Page 3868 of 3924

WT-28
< SERVICE INFORMATION >
TROUBLE DIAGNOSIS FOR SELF-DIAGNOSTIC ITEMS
TROUBLE DIAGNOSIS FOR SELF-DIAGNOSTIC ITEMS
Transmitter or Control Unit (BCM)INFOID:0000000001327589
MALFUNCTION CODE NO. 21, 22, 23 OR 24
1.CHECK CONTROL UNIT
Drive for several minutes. Check all tire pr essures with CONSULT-III “DATA MONITOR ITEM”.
Are all tire pressures displayed 0 kPa?
YES >> GO TO 2.
NO >> GO TO 3.
2.CHECK REMOTE KEYLESS EN TRY RECEIVER CONNECTOR
1. Disconnect remote keyless entry receiver harness connector M98.
2. Check terminals for damage or loose connection.
3. Reconnect harness connector.
OK or NG
OK >> Replace BCM refer to BCS-13, "Removal and Installation of BCM", then GO TO 3.
NG >> Repair or replace remote keyless entry receiver harness connector.
3.ID REGISTRATION
Perform ID registration of all transmitters.
Is there any tire that ID can not be registered to?
YES >> Replace transmitter of the tire, then GO TO 5.
NO >> GO TO 4.
4.VEHICLE DRIVING
Drive at a speed of 40 km/h (25 MPH) or more for several minutes without stopping. Check all tire pressures with CONSULT-III “DATA MONITOR ITEM” within 15 minutes after vehicle speed
becomes 17 km/h (11 MPH).
Does
“DATA MONITOR ITEM” display tire pressure as normal without any warning lamp?
YES >> INSPECTION END
NO >> GO TO 5.
5.ID REGISTRATION AND VEHICLE DRIVING
1. Perform ID registration of all transmitters.
2. Drive at a speed of 40 km/h (25 MPH) or more fo r 3 minutes, and then drive the vehicle at any speed for
10 minutes. Then check all tire pressures with CO NSULT-III “DATA MONITOR ITEM” within 5 minutes.
Does
“DATA MONITOR ITEM” display tire pressure as normal without any warning lamp?
YES >> INSPECTION END
NO >> Go to the inspection applicable to DTC.
Transmitter - 1INFOID:0000000001327590
MALFUNCTION CODE NO. 31, 32, 33, 34, 41, 42, 43, 44, 45, 46, 47 OR 48
1.ID REGISTRATION (CORRECTION OF TRANSMITTER LOCATION)
1. Perform ID registration of all transmitters.
2. Drive at a speed of 40 km/h (25 MPH) or more fo r 3 minutes, and then drive the vehicle at any speed for
10 minutes.
>> GO TO 2.
2.REPLACE TRANSMITTER
1. Check low tire pressure warning condition again, replace malfunctioning transmitter.
2. Perform ID registration of all transmitters.
Can ID registration of all transmitters be completed?
3AA93ABC3ACD3AC03ACA3AC03AC63AC53A913A773A893A873A873A8E3A773A983AC73AC93AC03AC3
3A893A873A873A8F3A773A9D3AAF3A8A3A8C3A863A9D3AAF3A8B3A8C
Page 3869 of 3924

TROUBLE DIAGNOSIS FOR SELF-DIAGNOSTIC ITEMS
WT-29
< SERVICE INFORMATION >
C
D F
G H
I
J
K L
M A
B
WT
N
O P
YES >> GO TO 3.
NO >> Go to the inspection 1. Refer to WT-28, "
Transmitter or Control Unit (BCM)".
3.VEHICLE DRIVING
Drive at a speed of 40 km/h (25 MPH) or more for 3 minutes, and then drive the vehicle at any speed for 10
minutes. Then check all tire pressures with CO NSULT-III “DATA MONITOR ITEM” within 5 minutes.
Does
“DATA MONITOR ITEM” displayed tire pressure as normal without any warning lamp?
YES >> INSPECTION END.
NO >> Replace malfunctioning transmitter, and perform “Step 3” again.
Transmitter - 2INFOID:0000000001327591
MALFUNCTION CODE NO. 35, 36, 37 OR 38
1.CHECK ALL TIRE PRESSURES
Check all tire pressures. Refer to WT-35, "
Tire".
Are there any tires whose pressure is
“64 psi” or more?
YES >> Adjust tire pressure to specified value.
NO >> GO TO 2.
2.VEHICLE DRIVING
1. Perform ID registration of all transmitters.
2. Drive at a speed of 40 km/h (25 MPH) or more for several minutes without stopping.
Check all tire pressures with CONSULT-III “DATA MO NITOR ITEM” within 15 minutes after vehicle speed
become 17 km/h (11 MPH).
>> Replace transmitter with new one if “DATA MO NITOR ITEM” displayed 64 psi or more. Then GO
TO 3.
3.ID REGISTRATION AND VEHICLE DRIVING
1. Perform ID registration of all transmitters.
2. Drive at a speed of 40 km/h (25 MPH) or more fo r 3 minutes, and then drive the vehicle at any speed for
10 minutes. Then check all tire pressures with CONS ULT-III “DATA MONITOR ITEM” within 5 minutes.
Does
“DATA MONITOR ITEM” display tire pressure as normal without any warning lamp?
YES >> INSPECTION END
NO >> Go to the inspection applicable to DTC.
Vehicle Speed SignalINFOID:0000000001327592
MALFUNCTION CODE NO. 52
1.CHECK SELF-DIAGNOSIS RESULTS
1. Select “SELF-DIAG RESULTS” on “SELECT DIAG MODE” screen.
2. Check display contents in self-diagnostic results.
Is
“CAN COMM CIRCUIT” displayed in the self-diagnosis display items?
YES >> Malfunction in CAN communication system. Go to LAN-43, "CAN System Specification Chart".
NO >> No malfunction. Check combination meter refer to DI-5, "
System Description".
3AA93ABC3ACD3AC03ACA3AC03AC63AC53A913A773A893A873A873A8E3A773A983AC73AC93AC03AC3
3A893A873A873A8F3A773A9D3AAF3A8A3A8C3A863A9D3AAF3A8B3A8C
Page 3870 of 3924

WT-30
< SERVICE INFORMATION >
TROUBLE DIAGNOSIS FOR SYMPTOMS
TROUBLE DIAGNOSIS FOR SYMPTOMS
Low Tire Pressure Warning Lamp Does Not Come On When Ignition Switch Is Turned
On
INFOID:0000000001327593
DIAGNOSTIC PROCEDURE
1.CHECK SELF-DIAGNOSIS RESULTS
1. Select “SELF-DIAG RESULTS” on “SELECT DIAG MODE” screen.
2. Check display contents in self-diagnostic results.
Is
“CAN COMM CIRCUIT” displayed in the self-diagnosis display items?
YES >> Malfunction in CAN communication system. Go to LAN-43, "CAN System Specification Chart".
NO >> No malfunction. GO TO 2.
2.CHECK COMBINATION METER
Check combination meter function.
OK or NG
OK >> GO TO 3.
NG >> Check combination meter. Refer to DI-5, "
System Description".
3.CHECK LOW TIRE PRESSURE WARNING LAMP
Disconnect BCM harness connectors M3 and M4.
Does the warning lamp activate?
YES >> Replace BCM. Refer to BCS-13, "Removal and Installation of BCM".
NO >> Check combination meter and repair or replace.
Low Tire Pressure Warning Lamp Stays On When Ignition Switch Is Turned On
INFOID:0000000001327594
DIAGNOSTIC PROCEDURE
1.CHECK CONNECTOR
1. Disconnect BCM harness connectors M3 and M4.
2. Check terminals for damage or loose connections.
OK or NG
OK >> GO TO 2.
NG >> Repair or replace damaged parts.
2.CHECK POWER SUPPLY CIRCUIT (BATTERY)
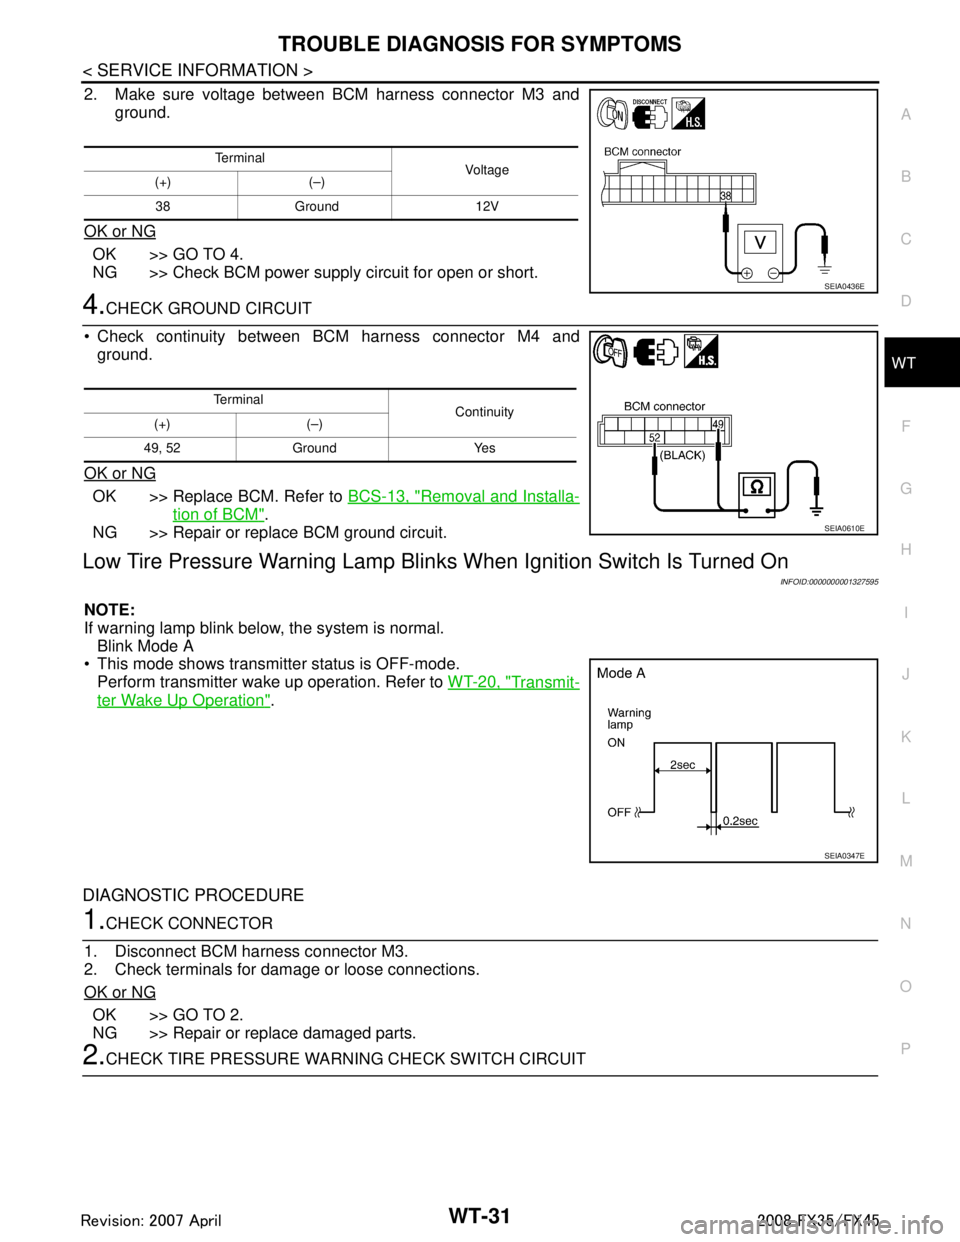
Make sure voltage between BCM harness connector M4 and
ground.
OK or NG
OK >> GO TO 3.
NG >> Check BCM power supply circuit for open or short.
3.CHECK POWER SUPPLY CIRCUIT (IGN)
1. Turn ignition switch ON.
Te r m i n a l Vol tag e
(+) (–)
42, 55 Ground 12V
SEIA0435E
3AA93ABC3ACD3AC03ACA3AC03AC63AC53A913A773A893A873A873A8E3A773A983AC73AC93AC03AC3
3A893A873A873A8F3A773A9D3AAF3A8A3A8C3A863A9D3AAF3A8B3A8C
Page 3871 of 3924

TROUBLE DIAGNOSIS FOR SYMPTOMSWT-31
< SERVICE INFORMATION >
C
DF
G H
I
J
K L
M A
B
WT
N
O P
2. Make sure voltage between BCM harness connector M3 and ground.
OK or NG
OK >> GO TO 4.
NG >> Check BCM power supply circuit for open or short.
4.CHECK GROUND CIRCUIT
Check continuity between BCM harness connector M4 and ground.
OK or NG
OK >> Replace BCM. Refer to BCS-13, "Removal and Installa-
tion of BCM".
NG >> Repair or replace BCM ground circuit.
Low Tire Pressure Warning Lamp Blin ks When Ignition Switch Is Turned On
INFOID:0000000001327595
NOTE:
If warning lamp blink below, the system is normal.
Blink Mode A
This mode shows transmitter status is OFF-mode.
Perform transmitter wake up operation. Refer to WT-20, "
Transmit-
ter Wake Up Operation".
DIAGNOSTIC PROCEDURE
1.CHECK CONNECTOR
1. Disconnect BCM harness connector M3.
2. Check terminals for damage or loose connections.
OK or NG
OK >> GO TO 2.
NG >> Repair or replace damaged parts.
2.CHECK TIRE PRESSURE WA RNING CHECK SWITCH CIRCUIT
Te r m i n a l
Voltag e
(+) (–)
38 Ground 12V
SEIA0436E
Te r m i n a l Continuity
(+) (–)
49, 52 Ground Yes
SEIA0610E
SEIA0347E
3AA93ABC3ACD3AC03ACA3AC03AC63AC53A913A773A893A873A873A8E3A773A983AC73AC93AC03AC3
3A893A873A873A8F3A773A9D3AAF3A8A3A8C3A863A9D3AAF3A8B3A8C
Page 3872 of 3924

WT-32
< SERVICE INFORMATION >
TROUBLE DIAGNOSIS FOR SYMPTOMS
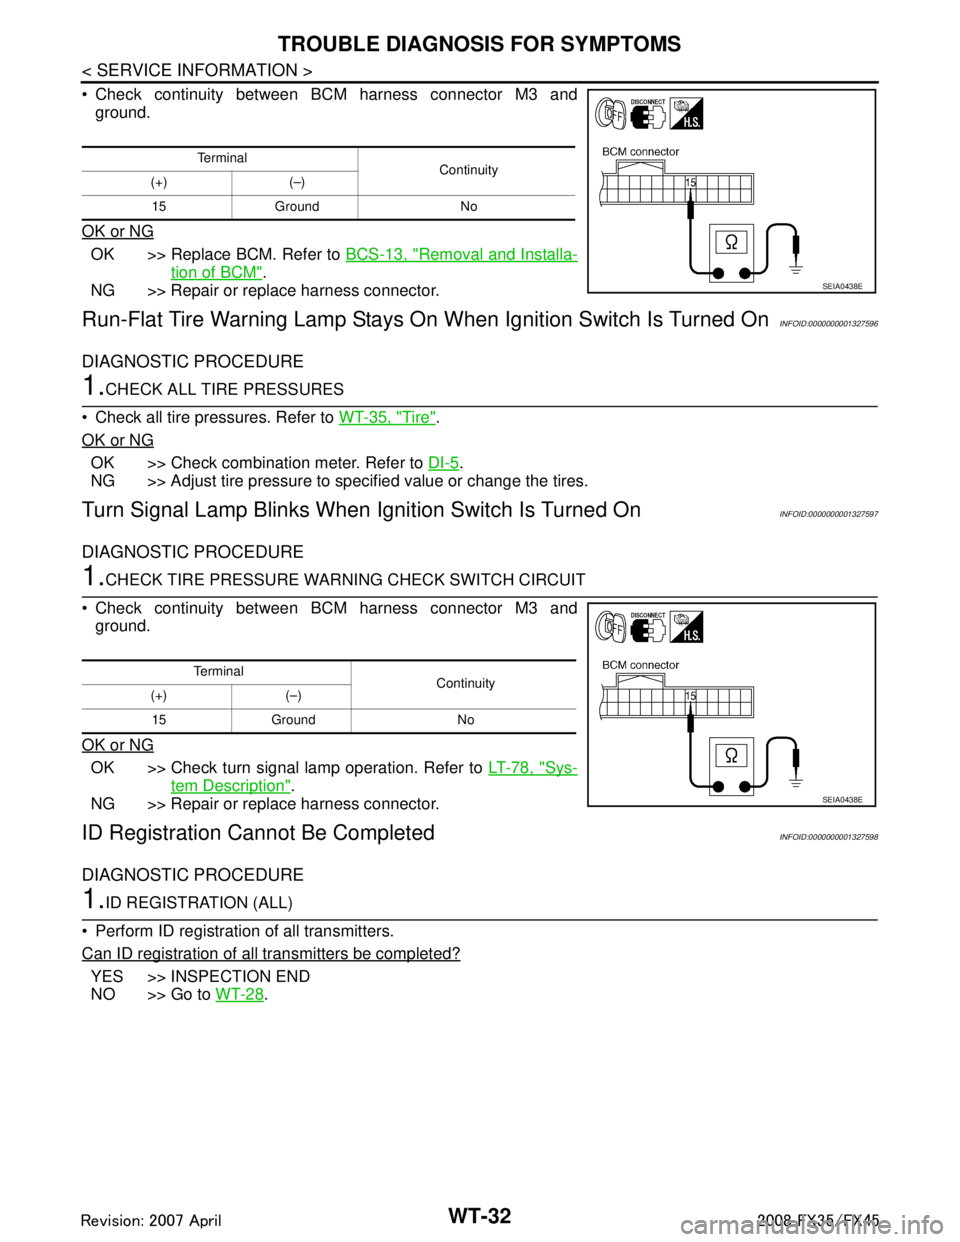
Check continuity between BCM harness connector M3 andground.
OK or NG
OK >> Replace BCM. Refer to BCS-13, "Removal and Installa-
tion of BCM".
NG >> Repair or replace harness connector.
Run-Flat Tire Warning Lamp Stays On When Ignition Switch Is Turned OnINFOID:0000000001327596
DIAGNOSTIC PROCEDURE
1.CHECK ALL TIRE PRESSURES
Check all tire pressures. Refer to WT-35, "
Tire".
OK or NG
OK >> Check combination meter. Refer to DI-5.
NG >> Adjust tire pressure to specified value or change the tires.
Turn Signal Lamp Blinks When Ignition Switch Is Turned OnINFOID:0000000001327597
DIAGNOSTIC PROCEDURE
1.CHECK TIRE PRESSURE WARNI NG CHECK SWITCH CIRCUIT
Check continuity between BCM harness connector M3 and ground.
OK or NG
OK >> Check turn signal lamp operation. Refer to LT-78, "Sys-
tem Description".
NG >> Repair or replace harness connector.
ID Registration Ca nnot Be CompletedINFOID:0000000001327598
DIAGNOSTIC PROCEDURE
1.ID REGISTRATION (ALL)
Perform ID registration of all transmitters.
Can ID registration of all transmitters be completed?
YES >> INSPECTION END
NO >> Go to WT-28
.
Te r m i n a l
Continuity
(+) (–)
15 Ground No
SEIA0438E
Te r m i n a l Continuity
(+) (–)
15 Ground No
SEIA0438E
3AA93ABC3ACD3AC03ACA3AC03AC63AC53A913A773A893A873A873A8E3A773A983AC73AC93AC03AC3
3A893A873A873A8F3A773A9D3AAF3A8A3A8C3A863A9D3AAF3A8B3A8C
Page 3878 of 3924

PRECAUTIONWW-3
< SERVICE INFORMATION >
C
DE
F
G H
I
J
L
M A
B
WW
N
O P
SERVICE INFORMATION
PRECAUTION
Precaution for Supplemental Restraint System (SRS) "AIR BAG" and "SEAT BELT
PRE-TENSIONER"
INFOID:0000000001612916
The Supplemental Restraint System such as “A IR BAG” and “SEAT BELT PRE-TENSIONER”, used along
with a front seat belt, helps to reduce the risk or severi ty of injury to the driver and front passenger for certain
types of collision. This system includes seat belt switch inputs and dual stage front air bag modules. The SRS
system uses the seat belt switches to determine the front air bag deployment, and may only deploy one front
air bag, depending on the severity of a collision and whether the front occupants are belted or unbelted.
Information necessary to service the system safely is included in the “SUPPLEMENTAL RESTRAINT SYS-
TEM” and “SEAT BELTS” of this Service Manual.
WARNING:
• To avoid rendering the SRS inoper ative, which could increase the risk of personal injury or death in
the event of a collision which would result in air bag inflation, all maintenance must be performed by
an authorized NISSAN/INFINITI dealer.
Improper maintenance, including in correct removal and installation of the SRS, can lead to personal
injury caused by unintentional act ivation of the system. For removal of Spiral Cable and Air Bag
Module, see the “SUPPLEMEN TAL RESTRAINT SYSTEM”.
Do not use electrical test equipm ent on any circuit related to the SRS unless instructed to in this
Service Manual. SRS wiring harnesses can be identi fied by yellow and/or orange harnesses or har-
ness connectors.
Precaution for Procedur e without Cowl Top CoverINFOID:0000000001612917
When performing the procedure after removing cowl top cover, cover
the lower end of windshield with urethane, etc.
PIIB3706J
3AA93ABC3ACD3AC03ACA3AC03AC63AC53A913A773A893A873A873A8E3A773A983AC73AC93AC03AC3
3A893A873A873A8F3A773A9D3AAF3A8A3A8C3A863A9D3AAF3A8B3A8C