window INFINITI FX35 2008 Manual PDF
[x] Cancel search | Manufacturer: INFINITI, Model Year: 2008, Model line: FX35, Model: INFINITI FX35 2008Pages: 3924, PDF Size: 81.37 MB
Page 2926 of 3924
BACK DOOR WINDOW GLASSGW-13
< SERVICE INFORMATION >
C
DE
F
G H
J
K L
M A
B
GW
N
O P
BACK DOOR WINDOW GLASS
Removal and InstallationINFOID:0000000001327961
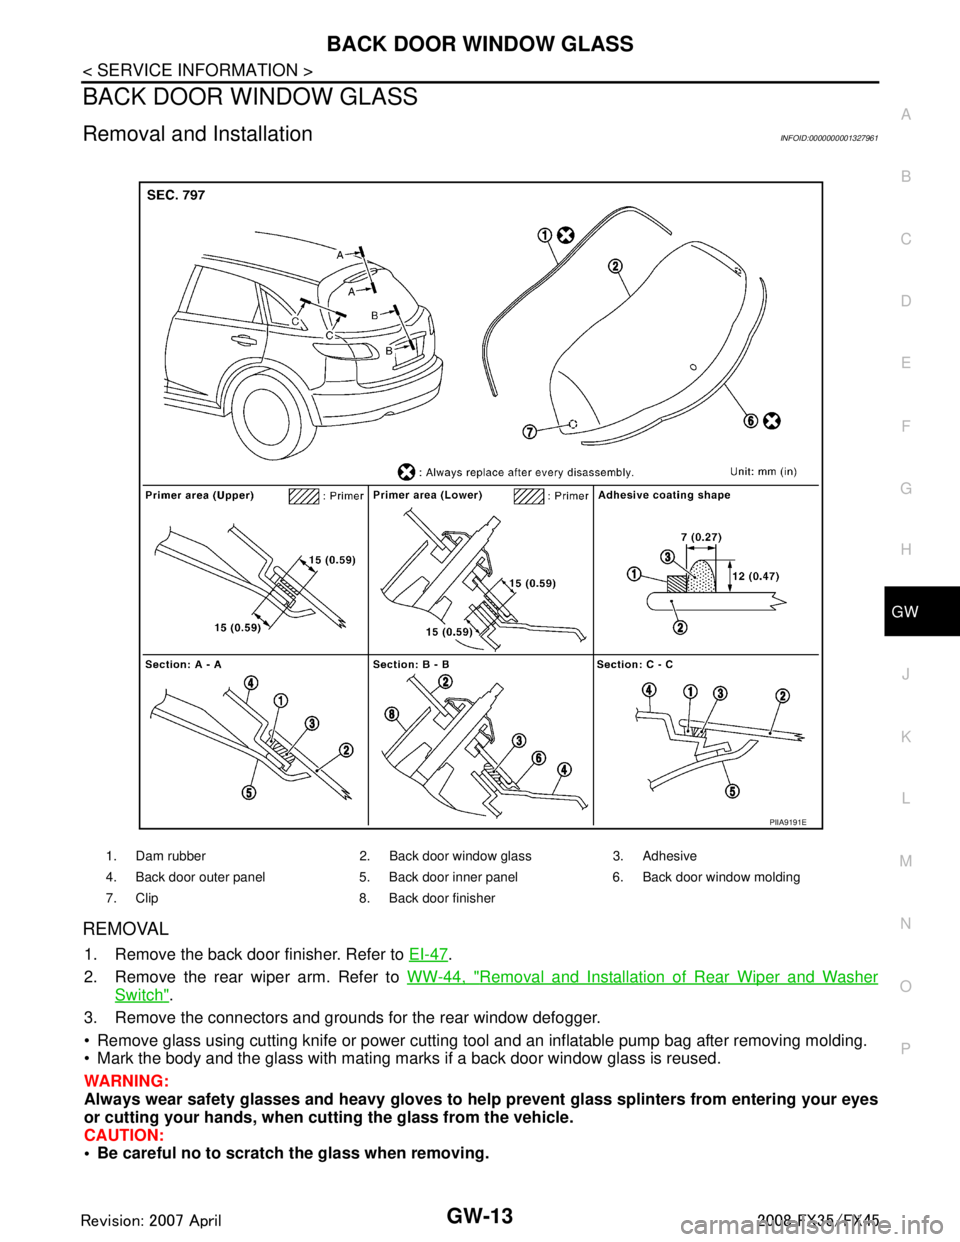
REMOVAL
1. Remove the back door finisher. Refer to EI-47.
2. Remove the rear wiper arm. Refer to WW-44, "
Removal and Installation of Rear Wiper and Washer
Switch".
3. Remove the connectors and grounds for the rear window defogger.
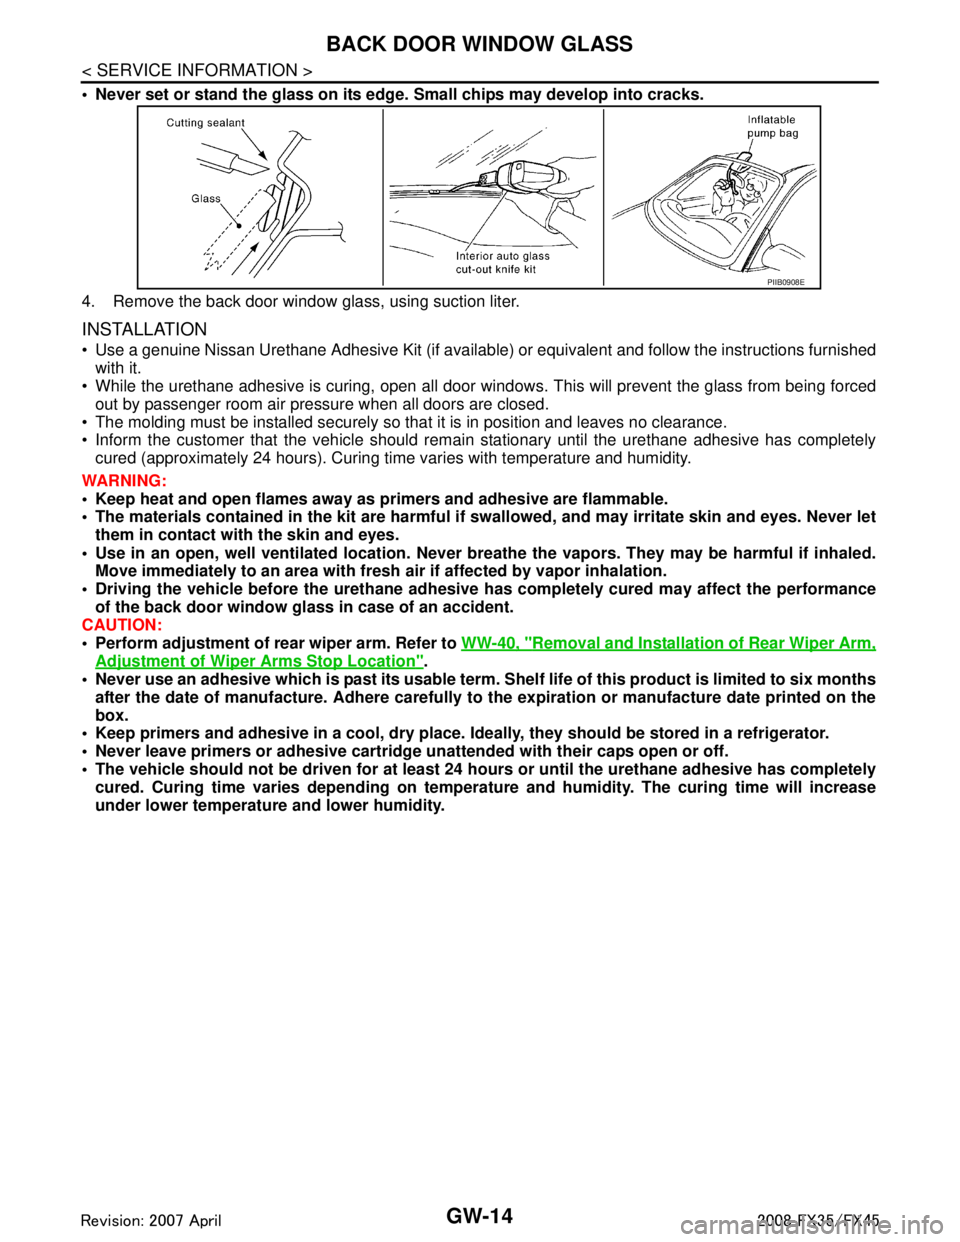
Remove glass using cutting knife or power cutting tool and an inflatable pump bag after removing molding.
Mark the body and the glass with mating marks if a back door window glass is reused.
WARNING:
Always wear safety glasses and heavy gloves to help prevent glass splinters from entering your eyes
or cutting your hands, when cu tting the glass from the vehicle.
CAUTION:
Be careful no to scratch the glass when removing.
1. Dam rubber 2. Back door window glass 3. Adhesive
4. Back door outer panel 5. Back door inner panel 6. Back door window molding
7. Clip 8. Back door finisher
PIIA9191E
3AA93ABC3ACD3AC03ACA3AC03AC63AC53A913A773A893A873A873A8E3A773A983AC73AC93AC03AC3
3A893A873A873A8F3A773A9D3AAF3A8A3A8C3A863A9D3AAF3A8B3A8C
Page 2927 of 3924
GW-14
< SERVICE INFORMATION >
BACK DOOR WINDOW GLASS
Never set or stand the glass on its edge. Small chips may develop into cracks.
4. Remove the back door window glass, using suction liter.
INSTALLATION
Use a genuine Nissan Urethane Adhesive Kit (if available) or equivalent and follow the instructions furnished
with it.
While the urethane adhesive is curing, open all door window s. This will prevent the glass from being forced
out by passenger room air pressure when all doors are closed.
The molding must be installed securely so that it is in position and leaves no clearance.
Inform the customer that the vehicle should rema in stationary until the urethane adhesive has completely
cured (approximately 24 hours). Curing time varies with temperature and humidity.
WARNING:
Keep heat and open flames away as primers and adhesive are flammable.
The materials contained in the ki t are harmful if swallowed, and may irritate skin and eyes. Never let
them in contact with the skin and eyes.
Use in an open, well ventilated location. Never br eathe the vapors. They may be harmful if inhaled.
Move immediately to an area with fresh air if affected by vapor inhalation.
Driving the vehicle before the urethane adhesive has completely cured may affect the performance
of the back door window gl ass in case of an accident.
CAUTION:
Perform adjustment of rear wiper arm. Refer to WW-40, "
Removal and Installation of Rear Wiper Arm,
Adjustment of Wiper Arms Stop Location".
Never use an adhesive which is past its usable term. Shelf life of this product is limited to six months
after the date of manufacture. Adhere carefully to the expiration or manufacture date printed on the
box.
Keep primers and adhesive in a c ool, dry place. Ideally, they should be stored in a refrigerator.
Never leave primers or adhesive cartridge un attended with their caps open or off.
The vehicle should not be driven for at least 24 hours or until the urethane adhesive has completely
cured. Curing time varies depe nding on temperature and humidity . The curing time will increase
under lower temperature and lower humidity.
PIIB0908E
3AA93ABC3ACD3AC03ACA3AC03AC63AC53A913A773A893A873A873A8E3A773A983AC73AC93AC03AC3
3A893A873A873A8F3A773A9D3AAF3A8A3A8C3A863A9D3AAF3A8B3A8C
Page 2928 of 3924
POWER WINDOW SYSTEMGW-15
< SERVICE INFORMATION >
C
DE
F
G H
J
K L
M A
B
GW
N
O P
POWER WINDOW SYSTEM
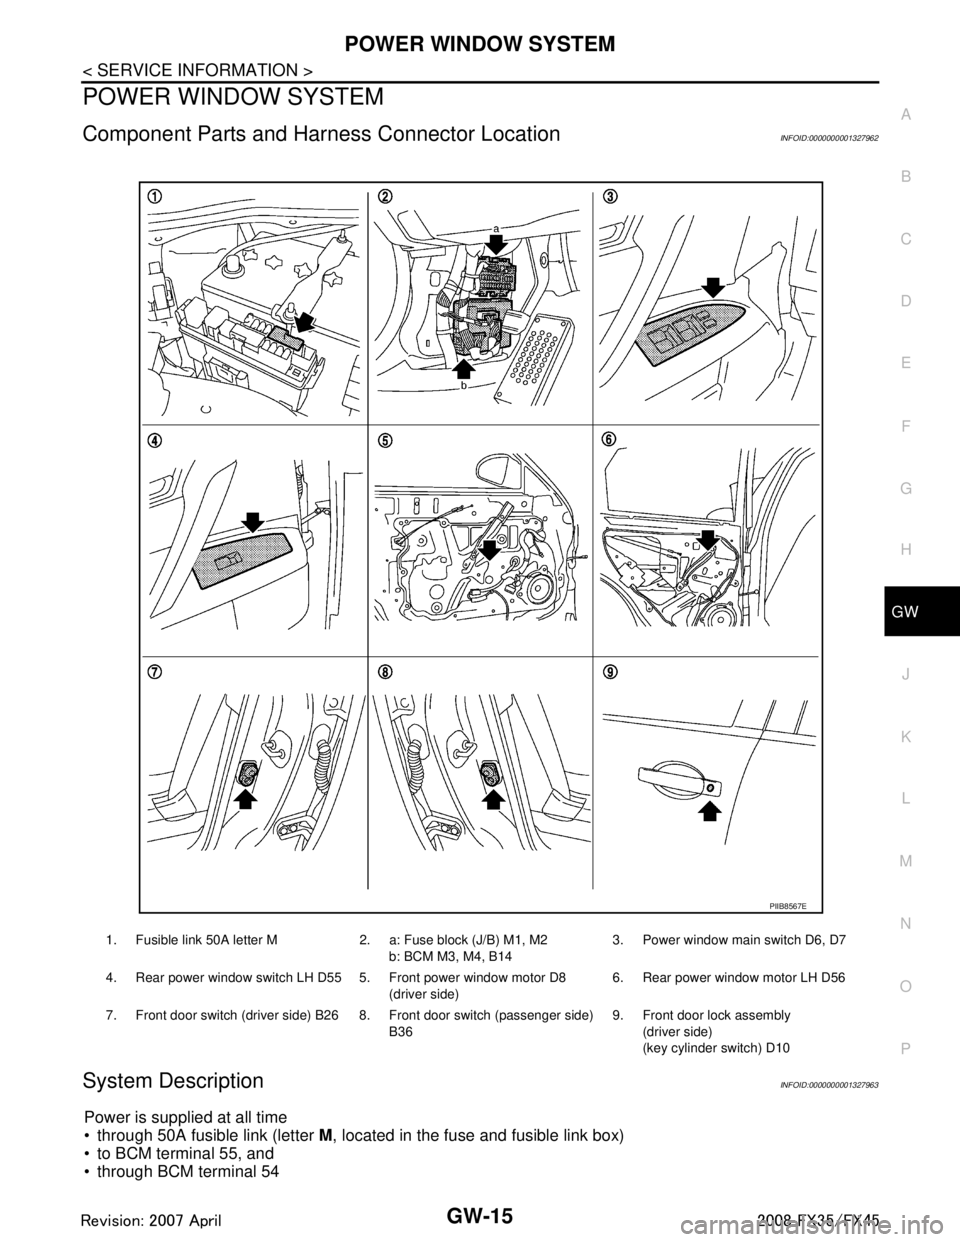
Component Parts and Har ness Connector LocationINFOID:0000000001327962
System DescriptionINFOID:0000000001327963
Power is supplied at all time
through 50A fusible link (letter M, located in the fuse and fusible link box)
to BCM terminal 55, and
through BCM terminal 54
1. Fusible link 50A letter M 2. a: Fuse block (J/B) M1, M2
b: BCM M3, M4, B143. Power window main switch D6, D7
4. Rear power window switch LH D55 5. Front power window motor D8 (driver side)6. Rear power window motor LH D56
7. Front door switch (driver side) B26 8. Front door switch (passenger side) B369. Front door lock assembly
(driver side)
(key cylinder switch) D10
PIIB8567E
3AA93ABC3ACD3AC03ACA3AC03AC63AC53A913A773A893A873A873A8E3A773A983AC73AC93AC03AC3
3A893A873A873A8F3A773A9D3AAF3A8A3A8C3A863A9D3AAF3A8B3A8C
Page 2929 of 3924

GW-16
< SERVICE INFORMATION >
POWER WINDOW SYSTEM
to power window main switch terminal 19
to front power window switch (passenger side) terminal 10.
through 15A fuse [No. 22, located in the fuse block (J/B)]
to BCM terminal 42.
With ignition switch in ON or START position,
Power is supplied
through 15A fuse [No. 1, located in the fuse block (J/B)]
to BCM terminal 38, and
trough BCM terminal 53
to power window main switch terminal 10
to rear power window switch (LH and RH) terminal 1.
Ground supplied
to BCM terminal 49 and 52
through body grounds M35, M45 and M85.
to power window main switch terminal 17
through body grounds M35, M45 and M85.
to front power window switch (passenger side) terminal 11
through body grounds M35, M45 and M85.
MANUAL OPERATION
Front Driver Side Door
WINDOW UP
When the front LH switch in the power window main switch is pressed in the up position,
Power is supplied
through power window main switch terminal 8
to front power window motor (driver side) terminal 2.
Ground is supplied
to front power window motor (driver side) terminal 1
through power window main switch terminal 11.
Then, the motor raises the window until the switch is released.
WINDOW DOWN
When the front LH switch in the power window main switch is pressed in the down position
Power is supplied
through power window main switch terminal 11
to front power window motor (driver side) terminal 1.
Ground is supplied
to front power window motor (driver side) terminal 2
through power window main switch terminal 8.
Then, the motor lowers the window until the switch is released.
Front Passenger Side Door
FRONT POWER WINDOW SWITCH (P ASSENGER SIDE) OPERATION
WINDOW UP
When the front power window switch (pass enger side) is pressed in the up position
Power is supplied
through front power window switch (passenger side) terminal 8
to front power window motor (passenger side) terminal 2.
Ground is supplied
to front power window motor (passenger side) terminal 1
through front power window switch (passenger side) terminal 9.
Then, the motor raises the window until the switch is released.
WINDOW DOWN
When the front power window switch (passenger side) is pressed in the down position
Power is supplied
through front power window switch (passenger side) terminal 9
to front power window motor (passenger side) terminal 1.
Ground is supplied
to front power window motor (passenger side) terminal 2
through front power window switch (passenger side) terminal 8.
Then, the motor lowers the window until the switch is released.
POWER WINDOW MAIN SWITCH OPERATION
3AA93ABC3ACD3AC03ACA3AC03AC63AC53A913A773A893A873A873A8E3A773A983AC73AC93AC03AC3
3A893A873A873A8F3A773A9D3AAF3A8A3A8C3A863A9D3AAF3A8B3A8C
Page 2930 of 3924

POWER WINDOW SYSTEMGW-17
< SERVICE INFORMATION >
C
DE
F
G H
J
K L
M A
B
GW
N
O P
Signal is sent
though power window main switch terminal 14.
to front power window switch (passenger side) terminal 16
The operation of power window after receive the signal is as same as operate the power window with front
power window switch (passenger side).
Rear Door (LH or RH)
REAR POWER WINDOW SWITCH (LH OR RH) OPERATION
WINDOW UP
When the rear power window switch (LH or RH) is pressed in the up position
Power is supplied
through rear power window switch (LH or RH) terminal 5
to rear power window motor (LH or RH) terminal 2.
Ground is supplied
to rear power window motor (LH or RH) terminal 1
through rear power window switch (LH or RH) terminal 4
through rear power window switch (LH or RH) terminal 3
through power window main switch terminal 3 (LH) or 5 (RH).
Then, the motor raises the window until the switch is released.
WINDOW DOWN
When the rear power window switch (LH or RH) is pressed in the down position
Power is supplied
through rear power window switch (LH or RH) terminal 4
to rear power window motor (LH or RH) terminal 1.
Ground is supplied
to rear power window motor (LH or RH) terminal 2
through rear power window switch (LH or RH) terminal 5
through rear power window switch (LH or RH) terminal 2
through power window main switch terminal 1 (LH) or 7 (RH).
Then, the motor lowers the window until the switch is released.
POWER WINDOW MAIN SWITCH OPERATION
WINDOW UP
When the rear LH or RH switch in the power wi ndow main switch is pressed in the up position
Power is supplied
through power window main switch terminal 1 (LH) or 7 (RH)
to rear power window switch (LH or RH) terminal 2
to rear power window switch (LH or RH) terminal 5
to rear power window motor (LH or RH) terminal 2.
Ground is supplied
to rear power window motor (LH or RH) terminal 1
through rear power window switch (LH or RH) terminal 4
through rear power window switch (LH or RH) terminal 3
through power window main switch terminal 3 (LH) or 5 (RH)
Then, the motor raises the window until the switch is released.
WINDOW DOWN
When the rear LH or RH switch in the power window main switch is pressed in the down position
Power is supplied
through power window main switch terminal 3 (LH) or 5 (RH)
through rear power window switch (LH or RH) terminal 3
through rear power window switch (LH or RH) terminal 4
to rear power window motor (LH or RH) terminal 1.
Ground is supplied
to rear power window motor (LH or RH) terminal 2
through rear power window switch (LH or RH) terminal 5
through rear power window switch (LH or RH) terminal 2
to power window main switch terminal 1 (LH) or 7 (RH)
Then, the motor raises the window until the switch is released.
AUTO OPERATION
The power window AUTO feature enables the driver to open or close the window without holding the window
switch in the down or up position.
Two types of auto operation syst em are applied to model S50.
3AA93ABC3ACD3AC03ACA3AC03AC63AC53A913A773A893A873A873A8E3A773A983AC73AC93AC03AC3
3A893A873A873A8F3A773A9D3AAF3A8A3A8C3A863A9D3AAF3A8B3A8C
Page 2931 of 3924
GW-18
< SERVICE INFORMATION >
POWER WINDOW SYSTEM
The one is applied only for front doors and the other is for all doors.
POWER WINDOW SERIAL LINK
Power window main switch, front power window switch (passenger side), and BCM transmit and receive the
signal by power window serial link.
The under mentioned signal is transmitted from BCM to power window main switch and front power window
switch (passenger side)
Keyless power window down signal.
The under mentioned signal is transmitted from power window main switch to front power window switch (pas-
senger side)
Front passenger side door window operation signal.
Power window control by key cylinder switch signal.
Power window lock signal.
Retained power operation signal.
POWER WINDOW LOCK
The power window lock is designed to lock operation of all windows except for driver side door window.
When the lock position, ground of the rear power window switches in the power window main switch is discon-
nected. The power window lock signal is transmitted to front power window switch (passenger side) by power
window serial link. This prevents t he power window motors from operating.
RETAINED POWER OPERATION
When the ignition switch is turned to the OFF position from ON or START position.
Power is supplied for 45 seconds
through BCM terminal 53
to power window main switch terminal 10
to rear power window switch (LH and RH) terminals 1.
When power and ground are supplied, the BCM conti nues to be energized, and the power window can be
operated.
The retained power operation is canceled when the driver or passenger side door is opened.
RAP signal period can be changed by CONSULT-III. Refer to GW-26, "
CONSULT-III Function".
ANTI-PINCH SYSTEM
Power window main switch and front power window switch (passenger side) monitors the power window motor
operation and the power window position (full closed or other) for driver side and passenger side power win-
dow by the signals from encoder and limit switch in front power window motor (driver side and passenger
side).
When power window main switch detects inte rruption during the following close operation,
automatic close operation when igniti on switch is in the “ON” position
automatic close operation during retained power operation
manual close operation during retained power operation
power window main switch or front power window swit ch (passenger side) controls each power window motor
for open and the power window will be lowered about 150 mm (5.91 in).
POWER WINDOW CONTROL BY THE KEY CYLINDER SWITCH
When ignition key switch is OFF, front power window can be opened or closed by turning the key cylinder
switch UNLOCK / LOCK position more than 1.5 second over condition.
Power window can be opened as the door key cylinder is kept fully turning to the UNLOCK position.
Power window can be closed as the door key cylinder is kept fully turning to the LOCK position.
The power window DOWN stops when the following operations are carried out.
While performing open / close the window, power window is stopped at the position as the door key cylinder is placed on NEUTRAL.
When the ignition switch is turned ON while the power window DOWN is operated.
CAN Communication System DescriptionINFOID:0000000001327964
CAN (Controller Area Network) is a serial communication line for real time application. It is an on-vehicle mul-
tiplex communication line with high data communication s peed and excellent error detection ability. Many elec-
tronic control units are equipped onto a vehicle, and each control unit shares information and links with other
control units during operation (not independent). In CA N communication, control units are connected with 2
communication lines (CAN H line, CAN L line) allowing a high rate of information transmission with less wiring.
Each control unit transmits/receives data but selectively reads required data only.
3AA93ABC3ACD3AC03ACA3AC03AC63AC53A913A773A893A873A873A8E3A773A983AC73AC93AC03AC3
3A893A873A873A8F3A773A9D3AAF3A8A3A8C3A863A9D3AAF3A8B3A8C
Page 2932 of 3924
POWER WINDOW SYSTEMGW-19
< SERVICE INFORMATION >
C
DE
F
G H
J
K L
M A
B
GW
N
O P
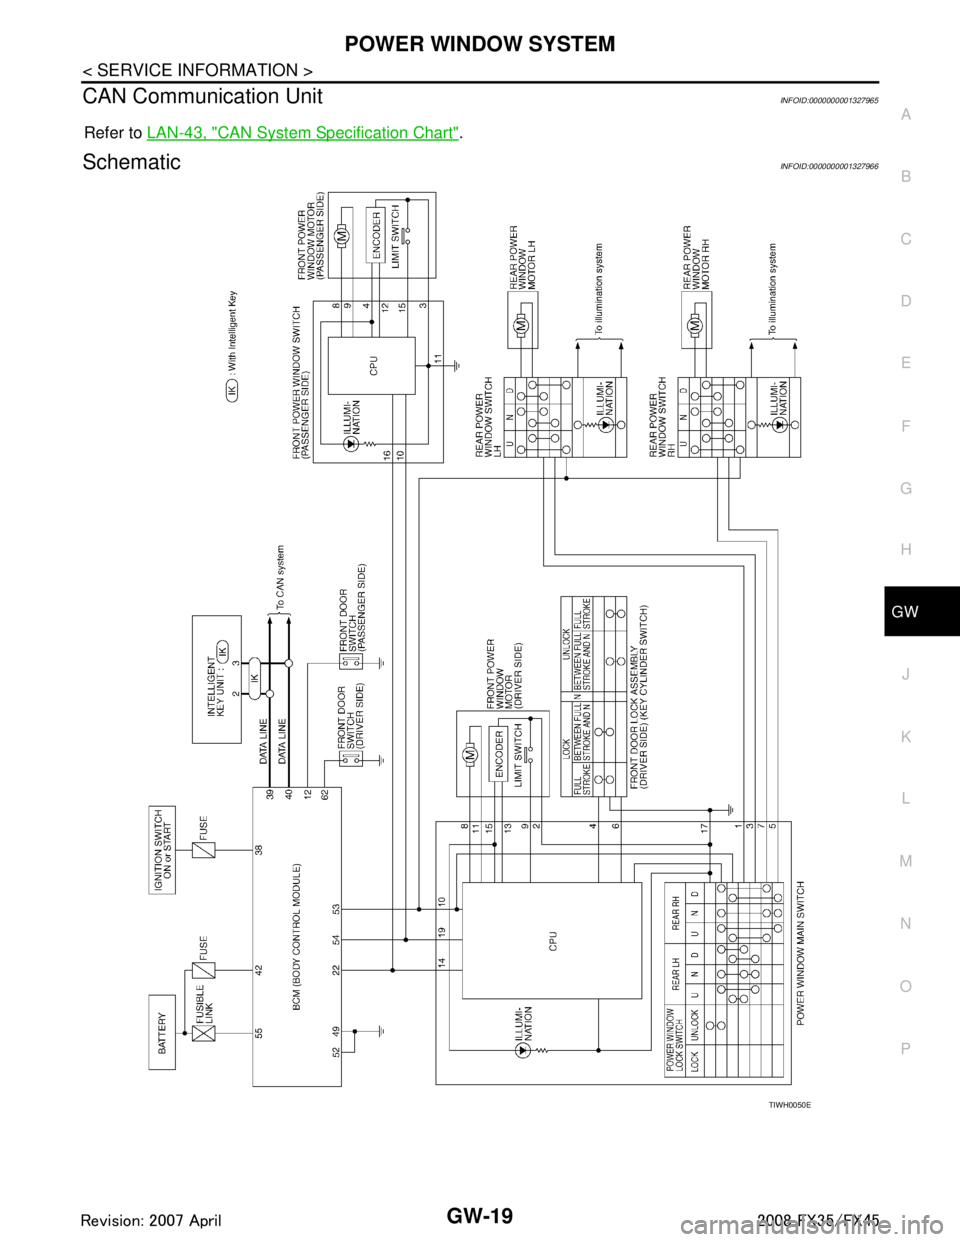
CAN Communication UnitINFOID:0000000001327965
Refer to LAN-43, "CAN System Specification Chart".
SchematicINFOID:0000000001327966
TIWH0050E
3AA93ABC3ACD3AC03ACA3AC03AC63AC53A913A773A893A873A873A8E3A773A983AC73AC93AC03AC3
3A893A873A873A8F3A773A9D3AAF3A8A3A8C3A863A9D3AAF3A8B3A8C
Page 2933 of 3924
GW-20
< SERVICE INFORMATION >
POWER WINDOW SYSTEM
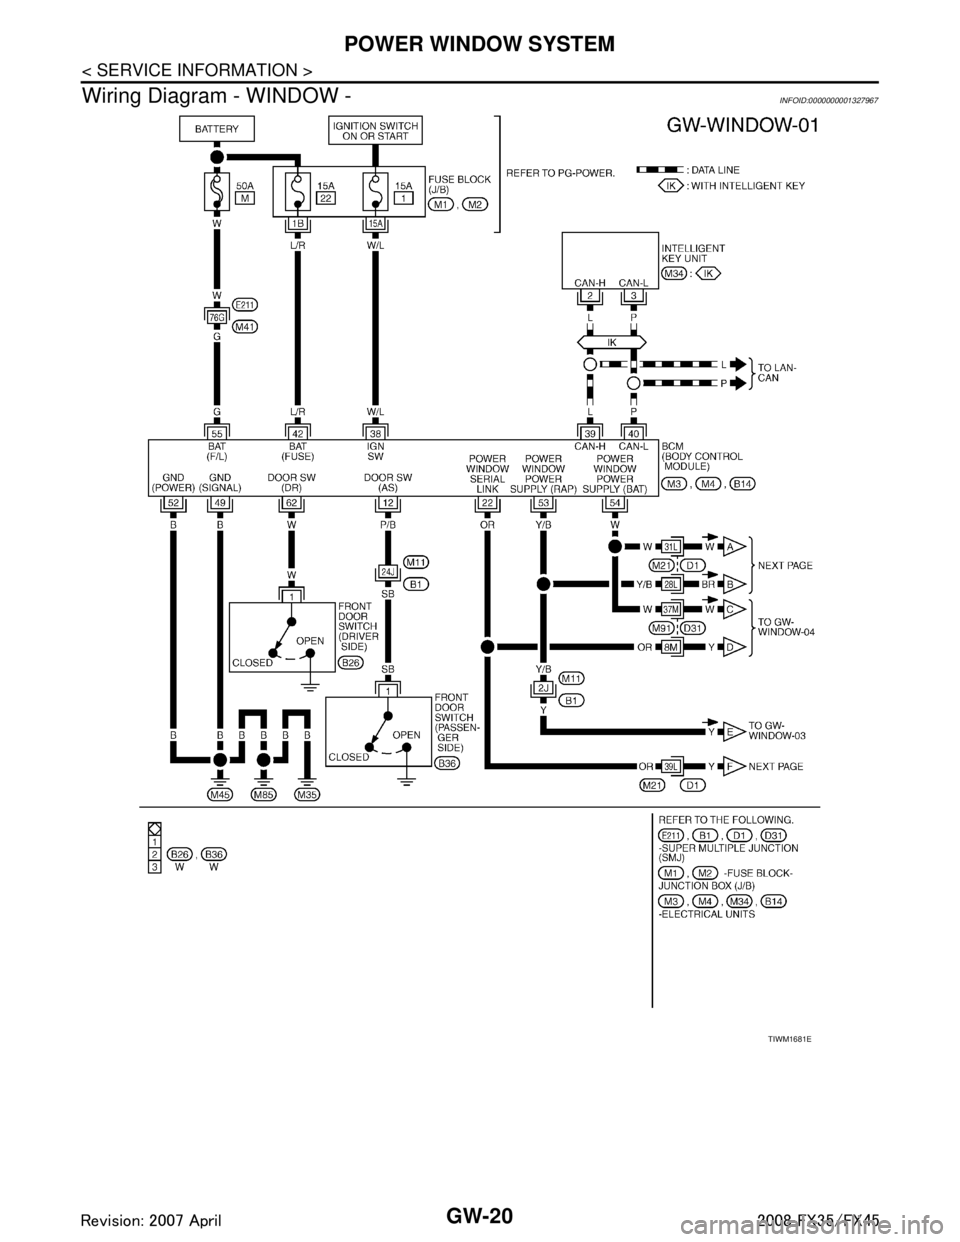
Wiring Diagram - WINDOW -
INFOID:0000000001327967
TIWM1681E
3AA93ABC3ACD3AC03ACA3AC03AC63AC53A913A773A893A873A873A8E3A773A983AC73AC93AC03AC3
3A893A873A873A8F3A773A9D3AAF3A8A3A8C3A863A9D3AAF3A8B3A8C
Page 2934 of 3924
POWER WINDOW SYSTEMGW-21
< SERVICE INFORMATION >
C
DE
F
G H
J
K L
M A
B
GW
N
O P
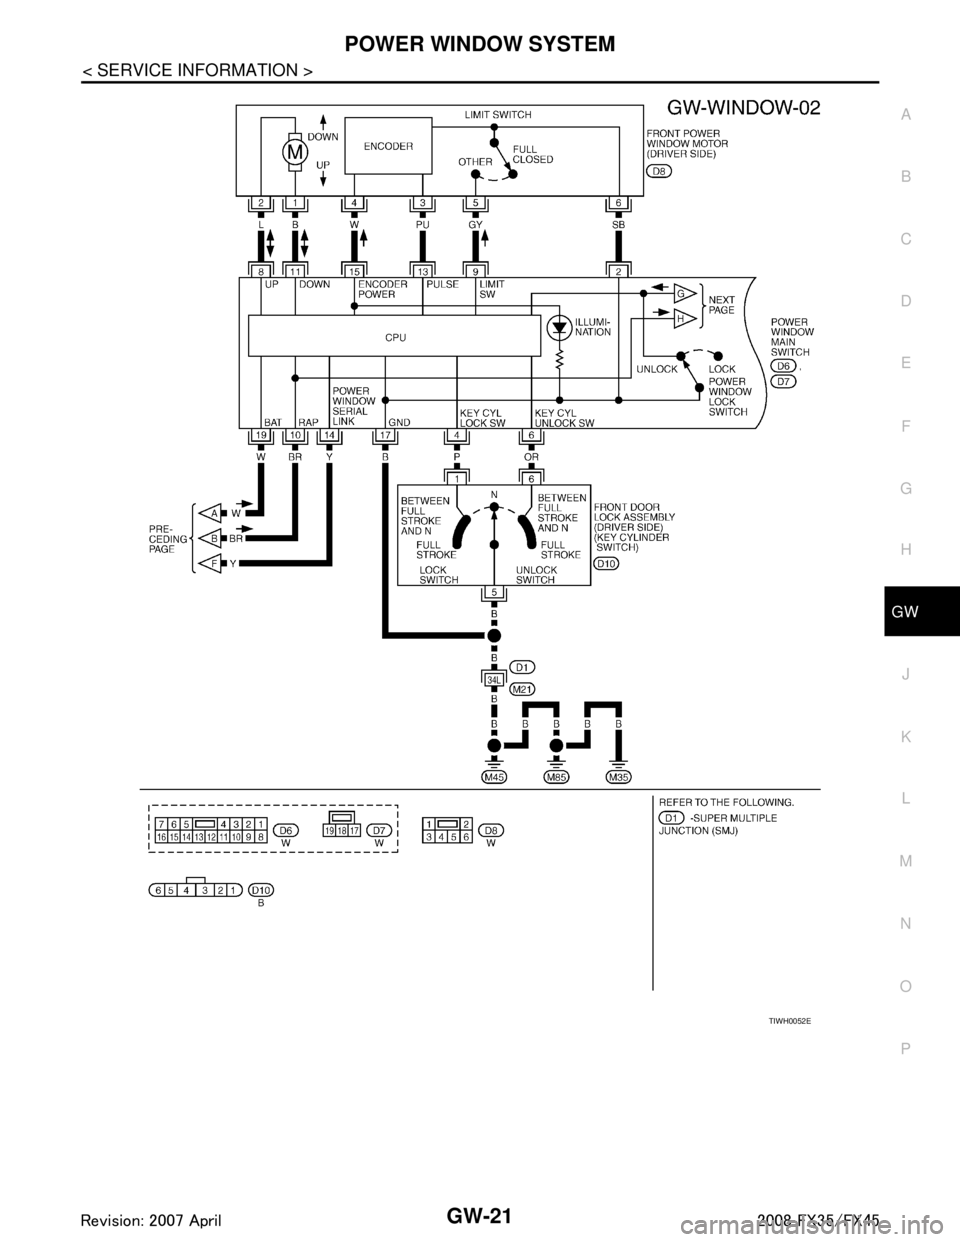
TIWH0052E
3AA93ABC3ACD3AC03ACA3AC03AC63AC53A913A773A893A873A873A8E3A773A983AC73AC93AC03AC3
3A893A873A873A8F3A773A9D3AAF3A8A3A8C3A863A9D3AAF3A8B3A8C
Page 2935 of 3924
GW-22
< SERVICE INFORMATION >
POWER WINDOW SYSTEM
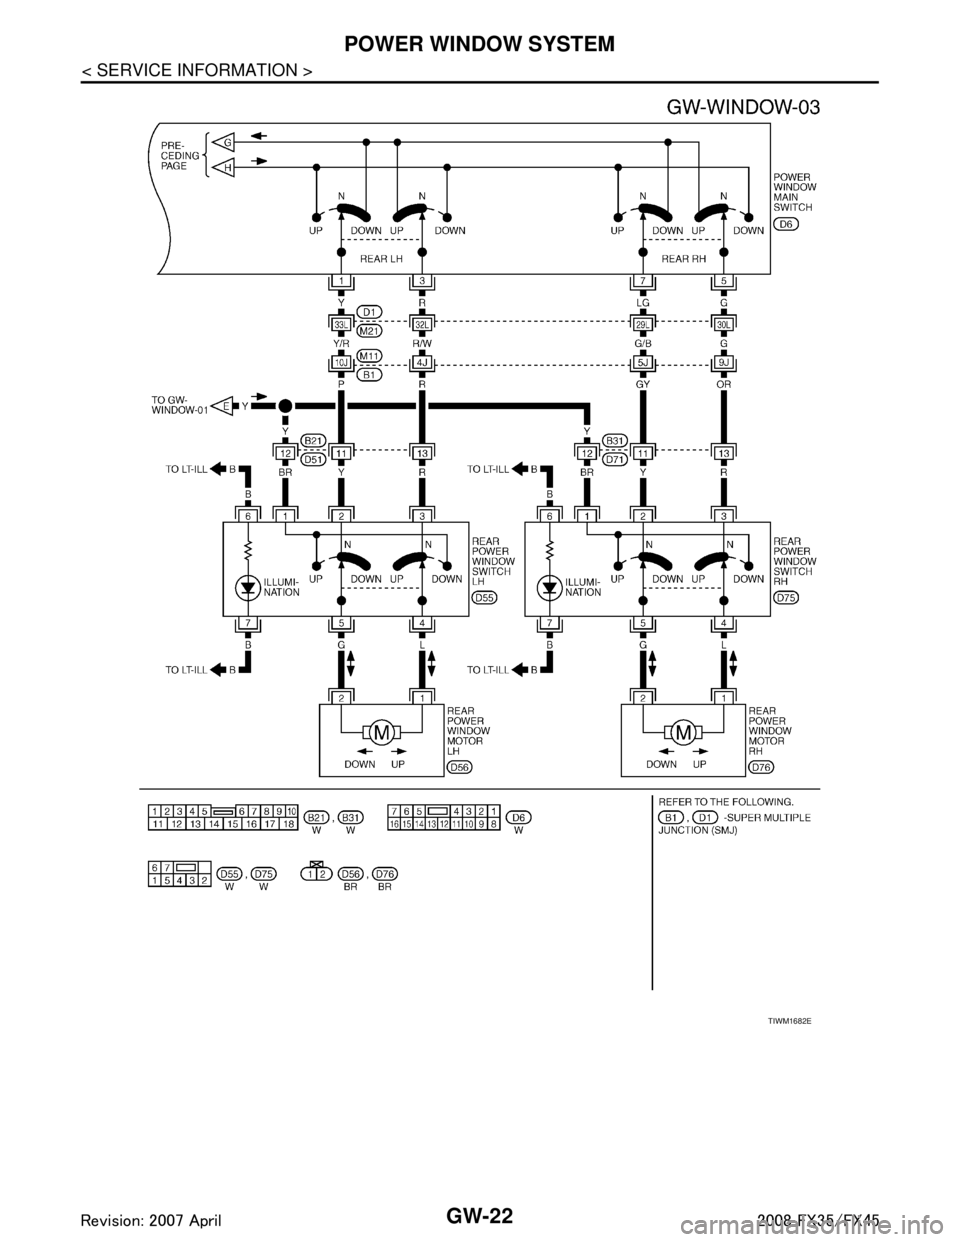
TIWM1682E
3AA93ABC3ACD3AC03ACA3AC03AC63AC53A913A773A893A873A873A8E3A773A983AC73AC93AC03AC3
3A893A873A873A8F3A773A9D3AAF3A8A3A8C3A863A9D3AAF3A8B3A8C