ECU INFINITI G-COUPE 2012 Service Manual
[x] Cancel search | Manufacturer: INFINITI, Model Year: 2012, Model line: G-COUPE, Model: INFINITI G-COUPE 2012Pages: 490, PDF Size: 3.73 MB
Page 169 of 490
3-26Pre-driving checks and adjustments
WARNING
.Do not adjust the steering wheel while
driving. You could lose control of your
vehicle and cause an accident.
. Do not adjust the steering wheel any
closer to you than is necessary for
proper steering operation and comfort.
The driver’s air bag inflates with great
force. If you are unrestrained, leaning
forward, sitting sideways or out of
position in any way, you are at greater
risk of injury or death in a crash. You
may also receive serious or fatal injuries
from the air bag if you are up against it
when it inflates. Always sit back against
the seatback and as far away as practical
from the steering wheel. Always use the
seat belts.
SPA2328
MANUAL OPERATION (if so
equipped)
Tilt or telescopic operation
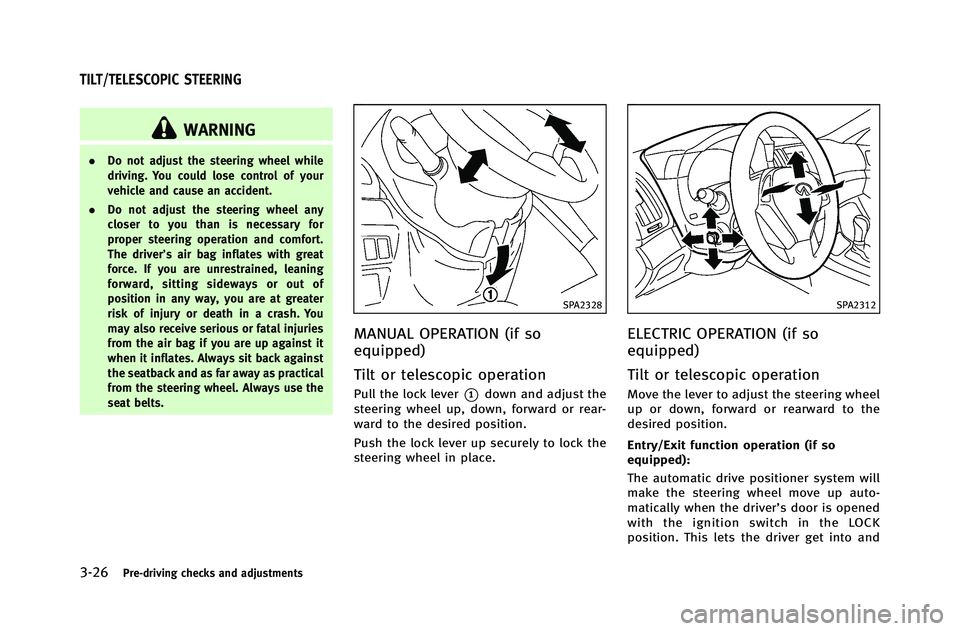
Pull the lock lever*1down and adjust the
steering wheel up, down, forward or rear-
ward to the desired position.
Push the lock lever up securely to lock the
steering wheel in place.
SPA2312
ELECTRIC OPERATION (if so
equipped)
Tilt or telescopic operation
Move the lever to adjust the steering wheel
up or down, forward or rearward to the
desired position.
Entry/Exit function operation (if so
equipped):
The automatic drive positioner system will
make the steering wheel move up auto-
matically when the driver’s door is opened
with the ignition switch in the LOCK
position. This lets the driver get into and
TILT/TELESCOPIC STEERING
Page 202 of 490
file.
.
(Previous)
Select the “
”key to display the
previous file.
Setting the Image Viewer:
The Image Viewer setting display will
appear when selecting the “Settings”key
on the full screen display. The following
settings are available for the full screen
display.
. Slideshow Speed
Select the “Slideshow Speed” key.
From the following display, select the
changing time from 5, 10, 30, 60
seconds or “No Auto Change”.
. Slideshow Order
Select the “Slideshow Order” key. From
the following display, select “Random”
or “Order List”. For “Order List”, the
image order is the order of the files as
stored on the USB memory.
Operating tips:
. Only files that meet the following
conditions will be displayed.
— Image type: JPEG
— File Extensions: *.jpg, *jpeg —
Maximum Resolution: 2048 61536
pixels
— Maximum Size: 2-MB
— Colors: 32768 (15-bit)
— Maximum File Name lengths: 253-
Bytes
— Maximum Folders: 500
— Maximum Images per Folder: 1024
. If an electronic device (such as a digital
camera) is directly connected to the
vehicle using a USB cable, no image
will be displayed on the screen.
. If the file name is too long, some file
names may not be entirely displayed.
. When the total number of characters in
the file name exceeds 100 or if 1 file
name in a directory exceeds 100
characters, all files will show a shor-
tened 8-character version. The image
will still be displayed when selected. When the selector/shift lever is shifted into
the
“R” (Reverse) position, the monitor
display shows view to the rear of the
vehicle.
The system is designed as an aid to the
driver in detecting large stationary objects
to help avoid damaging the vehicle. The
system will not detect small objects below
the bumper and may not detect objects
close to the bumper or on the ground.
WARNING
. The rearview monitor is a convenience
but it is not a substitute for proper
vehicle operation because it has areas
where objects cannot be viewed. Always
look out the windows and check mirrors
to be sure that it is safe to move before
operating the vehicle. Always operate
the vehicle slowly.
. Objects viewed in the RearView Monitor
differ from actual distance because a
wide-angle lens is used. Objects in the
RearView Monitor will appear visually
opposite like ones viewed in the inside
and outside mirrors.
. Make sure that the trunk is securely
closed when backing up.
Monitor, climate, audio, phone and voice recognition systems4-23
REARVIEW MONITOR (if so equipped)
Page 324 of 490
WARNING
.Do not leave children or adults who
would normally require the support of
others alone in your vehicle. Pets should
not be left alone either. They could
accidentally injure themselves or others
through inadvertent operation of the
vehicle. Also, on hot, sunny days,
temperatures in a closed vehicle could
quickly become high enough to cause
severe or possibly fatal injuries to
people or animals.
. Closely supervise children when they are
around cars to prevent them from play-
ing and becoming locked in the trunk
where they could be seriously injured.
Keep the car locked, with the rear
seatback and trunk lid securely latched
when not in use, and prevent children’s
access to car keys.
EXHAUST GAS (carbon monoxide)
WARNING
.Do not breathe exhaust gases; they
contain colorless and odorless carbon
monoxide. Carbon monoxide is danger-
ous. It can cause unconsciousness or
death.
. If you suspect that exhaust fumes are
entering the vehicle, drive with all
windows fully open, and have the
vehicle inspected immediately.
. Do not run the engine in closed spaces
such as a garage.
. Do not park the vehicle with the engine
running for any extended length of time.
. Keep the trunk lid closed while driving,
otherwise exhaust gases could be drawn
into the passenger compartment. If you
must drive with the trunk lid open,
follow these precautions:
1) Open all the windows.
2) Set the
air recirculation to off
and the fan control to high to
circulate the air. .
If electrical wiring or other cable con-
nections must pass to a trailer through
the seal on the trunk lid or the body,
follow the manufacturer’s recommenda-
tion to prevent carbon monoxide entry
into the vehicle.
. The exhaust system and body should be
inspected by a qualified mechanic when-
ever:
—The vehicle is raised for service.
—You suspect that exhaust fumes are
entering into the passenger compart-
ment.
—You notice a change in the sound of
the exhaust system.
—You have had an accident involvingdamage to the exhaust system,
underbody, or rear of the vehicle.
Starting and driving5-3
PRECAUTIONS WHEN STARTING AND
DRIVING
Page 330 of 490
in drivetrain damage or unexpected
vehicle movement which could result in
serious vehicle damage or personal
injury.
. Do not attempt to test an AWD equipped
vehicle on a 2-wheel dynamometer,
(such as the dynamometers used by
some states for emissions testing), or
similar equipment even if the other two
wheels are raised off the ground. Make
sure you inform test facility personnel
that your vehicle is equipped with AWD
before it is placed on a dynamometer.
Using the wrong test equipment may
result in drivetrain damage or unex-
pected vehicle movement which could
result in serious vehicle damage or
personal injury.
. When a wheel is off the ground due to an
unlevel surface, do not spin the wheel
excessively.WARNING
Do not operate the push-button ignition
switch while driving the vehicle except in an
emergency. (The engine will stop when the
ignition switch is pushed 3 consecutive
times or the ignition switch is pushed and
held for more than 2 seconds.) If the engine
stops while the vehicle is being driven, this
could lead to a crash and serious injury.
Before operating the push-button ignition
switch, be sure to move the selector lever
to the P (Park) position (for automatic
transmission model) or the shift lever to
the N (Neutral) position (for manual trans-
mission model).
INTELLIGENT KEY SYSTEM
The Intelligent Key system can operate the
ignition switch without it being taken out
from your pocket or purse. The operating
environment and/or conditions may affect
the Intelligent Key system operation.
Some indicators and warnings for opera-
tion are displayed on the dot matrix liquid
crystal display between the speedometer
and tachometer. (See “Dot matrix liquidcrystal display”
(P.2-20).)
CAUTION
.Be sure to carry the Intelligent Key with
you when operating the vehicle.
. Never leave the Intelligent Key inside the
vehicle when you leave the vehicle.
. If the vehicle battery is discharged, the
ignition switch cannot be switched from
the LOCK position. Charge the battery as
soon as possible. (See “Jump starting”
(P.6-8).)
Starting and driving5-9
PUSH-BUTTON IGNITION SWITCH
Page 332 of 490
The ignition lock is designed so that the
ignition switch position cannot be switched
to LOCK until the selector lever is moved to
the P (Park) position (Automatic Transmis-
sion models).
When the ignition switch cannot be
switched toward the LOCK position, pro-
ceed as follows:
Move the selector lever into the P (Park)
position (Automatic Transmission models).
1. Push the ignition switch to the OFFposition. The ignition switch position
indicator will not illuminate.
2. Open the door. The ignition switch will change to the LOCK position.
The selector lever can be moved from the P
(Park) position if the ignition switch is in
the ON position and the brake pedal is
depressed (Automatic Transmission mod-
els).PUSH-BUTTON IGNITION SWITCH
POSITIONS
LOCK (Normal parking position)
The ignition switch can only be locked in
this position.
The ignition switch will be unlocked when
it is pushed to the ACC position while
carrying the Intelligent Key or with the
Intelligent Key inserted in the port.
ACC (Accessories)
This position activates electrical acces-
sories such as the radio, when the engine
is not running.
ON (Normal operating position)
This position turns on the ignition system
and electrical accessories.
OFF
The engine can be turned off in this
position.
The ignition lock is designed so that the
ignition switch cannot be switched to the
LOCK position until the selector lever is
moved to the P (Park) position.
CAUTION
Do not leave the vehicle with the push-
button ignition switch in ACC or ON posi-
tions when the engine is not running for an
extended period. This can discharge the
battery.
EMERGENCY ENGINE SHUT OFF
To shut off the engine in an emergency
situation while driving, perform the follow-
ing procedure:
. Rapidly push the push-button ignition
switch 3 consecutive times in less than
1.5 seconds, or
. Push and hold the push-button ignition
switch for more than 2 seconds.
Starting and driving5-11
Page 333 of 490

5-12Starting and driving
SSD0768
INTELLIGENT KEY BATTERY DIS-
CHARGE
If the battery of the Intelligent Key is
almost discharged, the guide light
*Bof
the Intelligent Key port
*Ablinks and the
indicator appears on the dot matrix liquid
crystal display. (See “Dot matrix liquid
crystal display” (P.2-20).)
In this case, inserting the Intelligent Key
into the port
*1allows you to start the
engine. Make sure that the key ring side
faces backward as illustrated. Insert the
Intelligent Key in the port until it is latched
and secured. To remove the Intelligent Key from the port,
push the ignition switch to the OFF position
and pull the Intelligent Key out of the port.
NOTE:
The Intelligent Key port does not charge
the Intelligent Key battery. If you see the
low battery indicator in the dot matrix
liquid crystal display, replace the battery
as soon as possible. (See
“Intelligent Key
battery replacement” (P.8-26).)
CAUTION
.Never place anything except the Intelli-
gent Key in the Intelligent Key port.
Doing so may cause damage to the
equipment.
. Make sure the Intelligent Key is in the
correct direction when inserting it to the
Intelligent Key port. The engine may not
start if it is in the incorrect direction.
. Remove the Intelligent Key from the
Intelligent Key port after the ignition
switch is pushed to the OFF position.
.Make sure the area around the vehicle
is clear.
. Check fluid levels such as engine oil,
coolant, brake fluid and window
washer fluid as frequently as possible,
or at least whenever you refuel.
. Check that all windows and lights are
clean.
. Visually inspect tires for their appear-
ance and condition. Also check tires for
proper inflation.
. Lock all doors.
. Position seat and adjust head re-
straints.
. Adjust inside and outside mirrors.
. Fasten seat belts and ask all passen-
gers to do likewise.
. Check the operation of warning lights
when the ignition switch is pushed to
the ON position. (See “Warning/indica-
tor lights and audible reminders” (P.2-
12).)
BEFORE STARTING THE ENGINE
Page 383 of 490

6-2In case of emergency
In the event of a roadside emergency,
Roadside Assistance Service is available to
you. Please refer to your Warranty Informa-
tion Booklet (U.S.) or Warranty & Roadside
Assistance Information Booklet (Canada)
for details.To shut off the engine in an emergency
situation while driving, perform the follow-
ing procedure:
.
Rapidly push the push-button ignition
switch 3 consecutive times in less than
1.5 seconds, or
. Push and hold the push-button ignition
switch for more than 2 seconds.TIRE PRESSURE MONITORING SYS-
TEM (TPMS)
This vehicle is equipped with the Tire
Pressure Monitoring System (TPMS). It
monitors tire pressure of all tires except
the spare. When the low tire pressure
warning light is lit and the CHECK TIRE
PRESSURE warning appears on the dot
matrix liquid crystal display, one or more
of your tires is significantly under-inflated.
If the vehicle is being driven with low tire
pressure, the TPMS will activate and warn
you of it by the low tire pressure warning
light. This system will activate only when
the vehicle is driven at speeds above 16
MPH (25 km/h). For more details, see
“Warning/indicator lights and audible re-
minders” (P.2-12) and “Tire Pressure Mon-
itoring System (TPMS)” (P.5-4).
WARNING
.If the low tire pressure warning light
illuminates while driving, avoid sudden
steering maneuvers or abrupt braking,
reduce vehicle speed, pull off the road to
a safe location and stop the vehicle as
soon as possible. Driving with under-
inflated tires may permanently damage
ROADSIDE ASSISTANCE PROGRAM EMERGENCY ENGINE SHUT OFF FLAT TIRE
Page 384 of 490

the tires and increase the likelihood of
tire failure. Serious vehicle damage
could occur and may lead to an accident
and could result in serious personal
injury. Check the tire pressure for all
four tires. Adjust the tire pressure to the
recommended COLD tire pressure shown
on the Tire and Loading Information
label to turn the low tire pressure
warning light OFF. If the light still
illuminates while driving after adjusting
the tire pressure, a tire may be flat. If
you have a flat tire, replace it with a
spare tire as soon as possible.
. When a spare tire is mounted or a wheel
is replaced, the TPMS will not function
and the low tire pressure warning light
will flash for approximately 1 minute.
The light will remain on after 1 minute.
Contact your INFINITI retailer as soon as
possible for tire replacement and/or
system resetting.
. Replacing tires with those not originally
specified by INFINITI could affect the
proper operation of the TPMS.
. Do not inject any tire liquid or aerosol
tire sealant into the tires, as this may
cause a malfunction of the tire pressure sensors.
CHANGING A FLAT TIRE
If you have a flat tire, follow the instruc-
tions below.
Stopping the vehicle
1. Safely move the vehicle off the road
and away from traffic.
2. Turn on the hazard warning flashers.
3. Park on a level surface and apply the parking brake. Move the selector lever
to the P (Park) position (Automatic
transmission models). Move the shift
lever to the R (Reverse) gear (Manual
transmission models).
4. Turn off the engine.
5. Raise the hood to warn other traffic, and to signal professional road assis-
tance personnel that you need assis-
tance.
6. Have all passengers get out of the vehicle and stand in a safe place, away
from traffic and clear of the vehicle.
WARNING
. Make sure the parking brake is securely
applied and the manual transmission is
shifted into R (Reverse), or the automatic
transmission into P (Park).
. Never change tires when the vehicle is
on a slope, ice or slippery areas. This is
hazardous.
. Never change tires if oncoming traffic is
close to your vehicle. Wait for profes-
sional road assistance.
In case of emergency6-3
Page 387 of 490
6-6In case of emergency
SCE0504
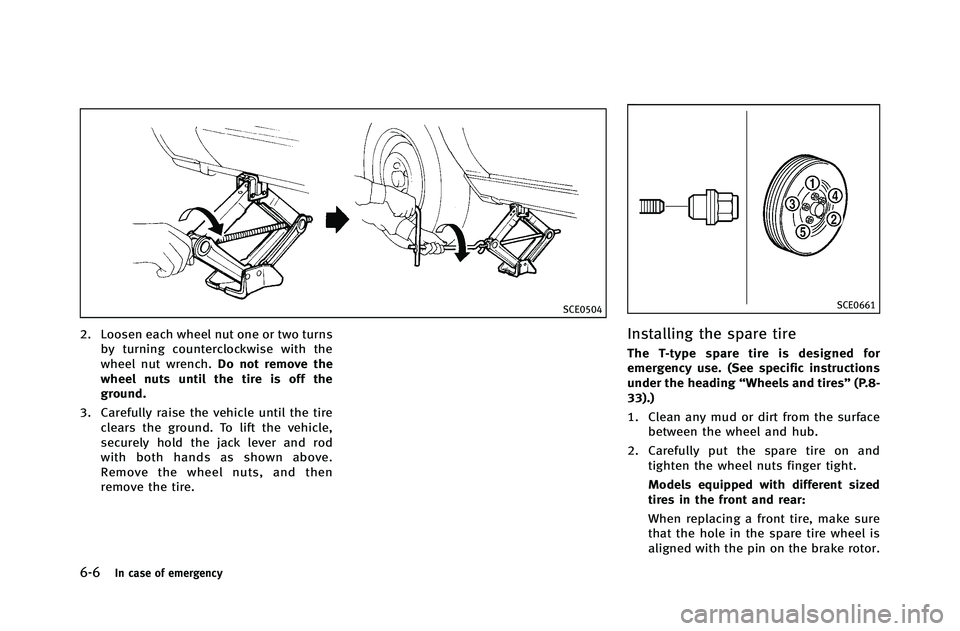
2. Loosen each wheel nut one or two turnsby turning counterclockwise with the
wheel nut wrench. Do not remove the
wheel nuts until the tire is off the
ground.
3. Carefully raise the vehicle until the tire clears the ground. To lift the vehicle,
securely hold the jack lever and rod
with both hands as shown above.
Remove the wheel nuts, and then
remove the tire.
SCE0661
Installing the spare tire
The T-type spare tire is designed for
emergency use. (See specific instructions
under the heading “Wheels and tires” (P.8-
33).)
1. Clean any mud or dirt from the surface between the wheel and hub.
2. Carefully put the spare tire on and tighten the wheel nuts finger tight.
Models equipped with different sized
tires in the front and rear:
When replacing a front tire, make sure
that the hole in the spare tire wheel is
aligned with the pin on the brake rotor.
Page 388 of 490
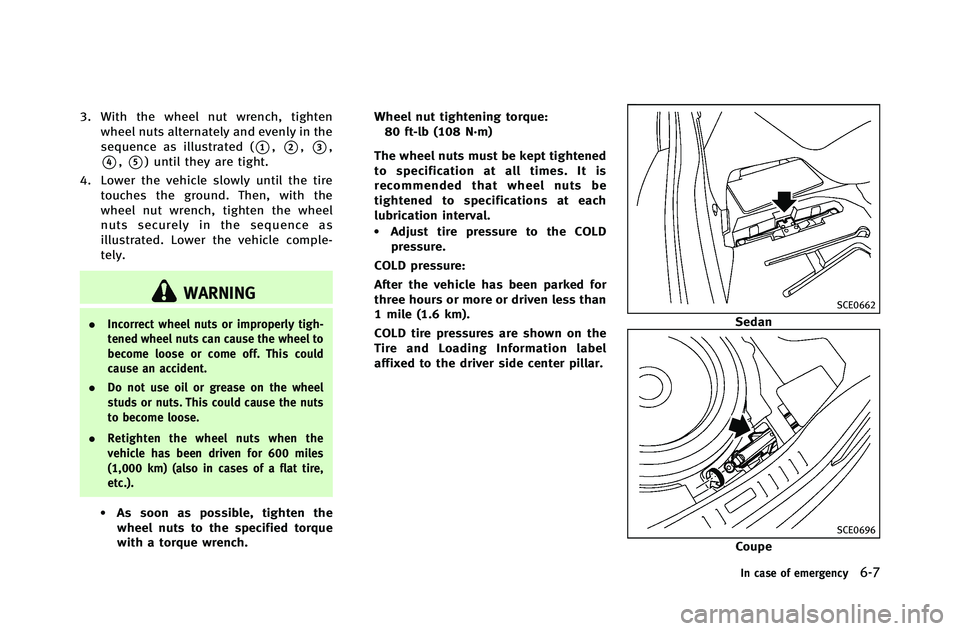
3. With the wheel nut wrench, tightenwheel nuts alternately and evenly in the
sequence as illustrated (
*1,*2,*3,
*4,*5) until they are tight.
4. Lower the vehicle slowly until the tire touches the ground. Then, with the
wheel nut wrench, tighten the wheel
nuts securely in the sequence as
illustrated. Lower the vehicle comple-
tely.
WARNING
. Incorrect wheel nuts or improperly tigh-
tened wheel nuts can cause the wheel to
become loose or come off. This could
cause an accident.
. Do not use oil or grease on the wheel
studs or nuts. This could cause the nuts
to become loose.
. Retighten the wheel nuts when the
vehicle has been driven for 600 miles
(1,000 km) (also in cases of a flat tire,
etc.).
.As soon as possible, tighten the
wheel nuts to the specified torque
with a torque wrench. Wheel nut tightening torque:
80 ft-lb (108 N·m)
The wheel nuts must be kept tightened
to specification at all times. It is
recommended that wheel nuts be
tightened to specifications at each
lubrication interval.
.Adjust tire pressure to the COLD pressure.
COLD pressure:
After the vehicle has been parked for
three hours or more or driven less than
1 mile (1.6 km).
COLD tire pressures are shown on the
Tire and Loading Information label
affixed to the driver side center pillar.
SCE0662
Sedan
SCE0696
Coupe
In case of emergency6-7