ESP INFINITI JX 2013 Quick Reference Guide
[x] Cancel search | Manufacturer: INFINITI, Model Year: 2013, Model line: JX, Model: INFINITI JX 2013Pages: 36, PDF Size: 2.53 MB
Page 5 of 36
3
Emergency Call (if so equipped) – This service provides emergency assistance by connecting
subscriber to an Infiniti Connection Specialist.
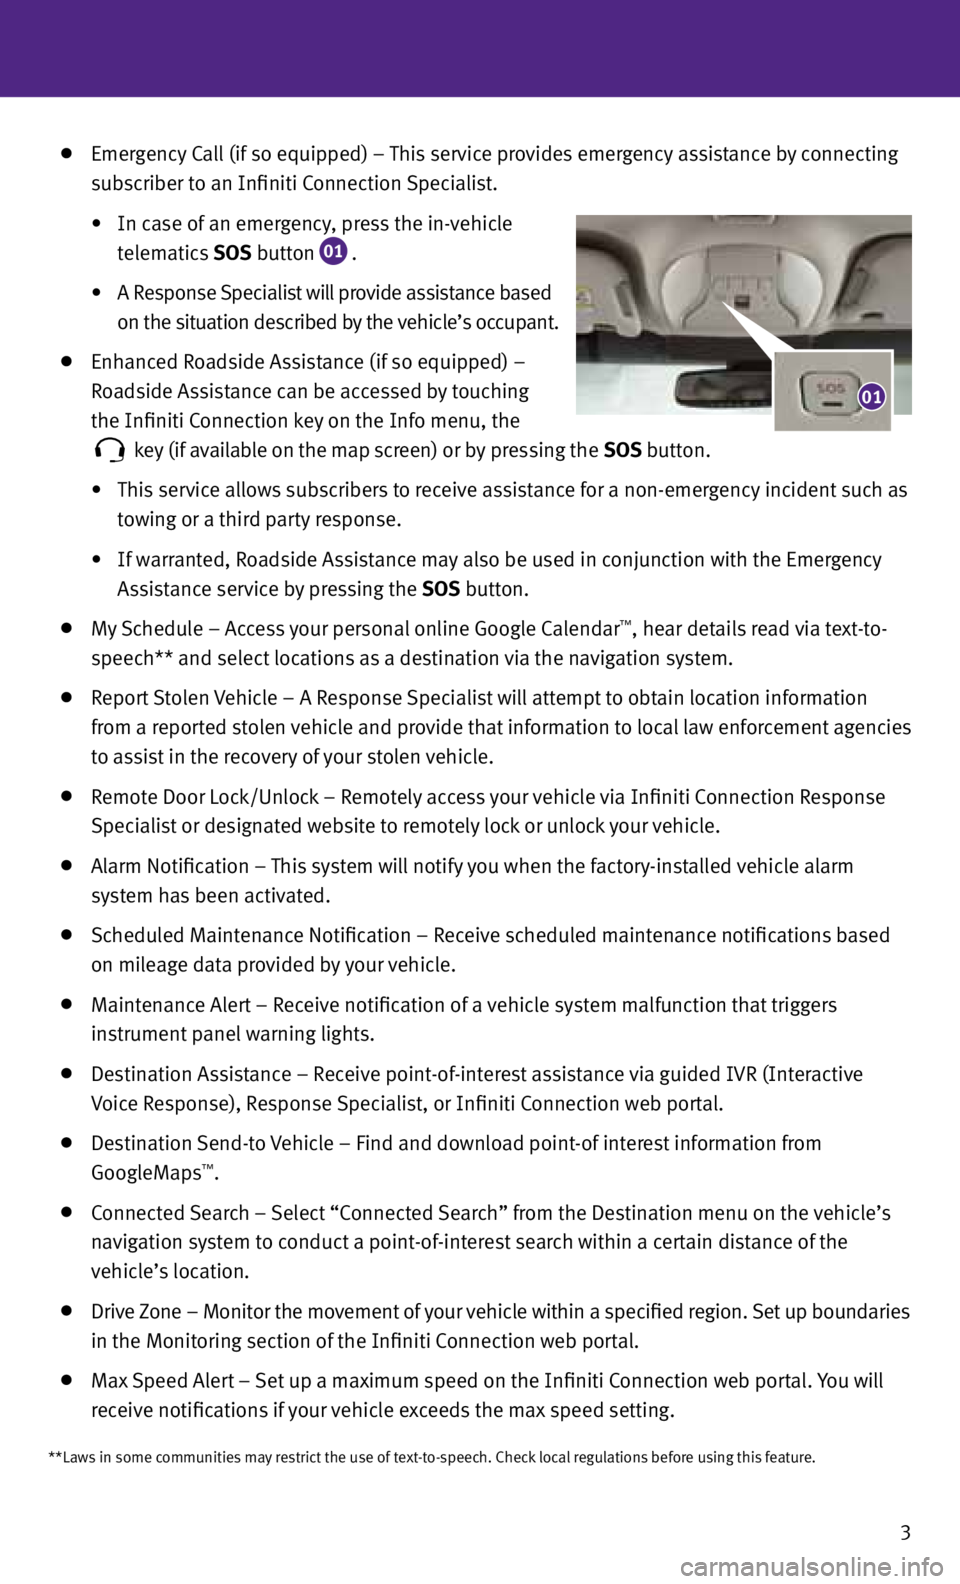
• In case of an emergency, press the in-vehicle
telematics SOS button
01 .
• A Response Specialist will provide assistance based
on the situation described by the vehicle’s occupant.
Enhanced Roadside Assistance (if so equipped) –
Roadside Assistance can be accessed by touching
the Infiniti Connection key on the Info menu, the
key (if available on the map screen) or by pressing the
SOS button.
• This service allows subscribers to receive assistance for a non-emergency incident such as
towing or a third party response.
• If warranted, Roadside Assistance may also be used in conjunction with the Emergency
Assistance service by pressing the SOS button.
My Schedule – Access your personal online Google Calendar™, hear details read via text-to-
speech** and select locations as a destination via the navigation system.
Report Stolen Vehicle – A Response Specialist will attempt to obtain location information
from a reported stolen vehicle and provide that information to local law enforcement agencies
to assist in the recovery of your stolen vehicle.
Remote Door Lock/Unlock – Remotely access your vehicle via Infiniti Connection Response
Specialist or designated website to remotely lock or unlock your vehicle.
Alarm Notification – This system will notify you when the factory-installed vehicle alarm
system has been activated.
Scheduled Maintenance Notification – Receive scheduled maintenance notifications based
on mileage data provided by your vehicle.
Maintenance Alert – Receive notification of a vehicle system malfunction that triggers
instrument panel warning lights.
Destination Assistance – Receive point-of-interest assistance via guided IVR (Interactive
Voice Response), Response Specialist, or Infiniti Connection web portal.
Destination Send-to Vehicle – find and download point-of interest information from
GoogleMaps™.
Connected Search – Select “Connected Search” from the Destination menu on the vehicle’s
navigation system to conduct a point-of-interest search within a certain distance of the
vehicle’s location.
Drive Zone – Monitor the movement of your vehicle within a specified region. Set up boundaries
in the Monitoring section of the Infiniti Connection web portal.
Max Speed Alert – Set up a maximum speed on the Infiniti Connection web portal. you will
receive notifications if your vehicle exceeds the max speed setting.
01
**Laws in some communities may restrict the use of text-to-speech. Check local regulations before using this feature.
Page 11 of 36
9
INFINITI Intelligent Key™ System
The INfINITI Intelligent Key™ system allows you to lock or unlock your
vehicle, open your liftgate and remotely start the engine.
NOTE: It is important to make sure the Intelligent Key is with you (that is,
in your pocket or purse).
REMOTE ENGINE START (if so equipped)
The remote engine start operating range is approximately 197 feet
(60 m) from the vehicle.
To use the remote start feature to start the engine:
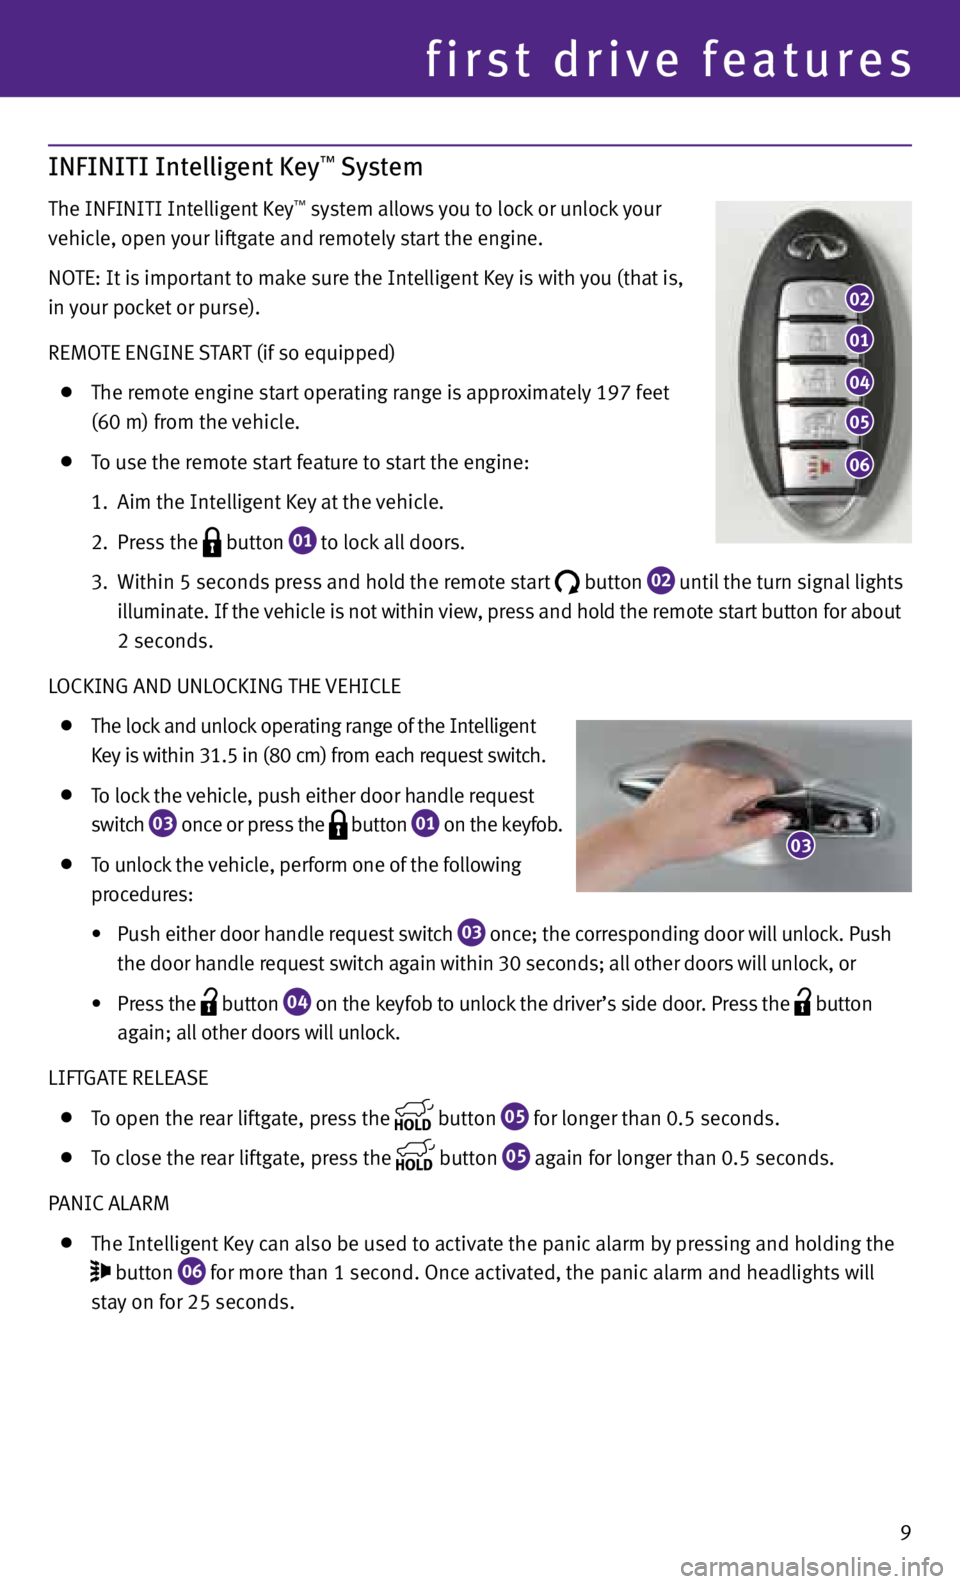
1. Aim the Intelligent Key at the vehicle.
2. Press the
button
01 to lock all doors.
3. Within 5 seconds press and hold the remote start
button
02 until the turn signal lights
illuminate. If the vehicle is not within view, press and hold the remote start button for about
2 seconds.
LOCKING AND UNLOCKING THE VEHICLE
The lock and unlock operating range of the Intelligent
Key is within 31.5 in (80 cm) from each request switch.
To lock the vehicle, push either door handle request
switch
03 once or press the
button
01 on the keyfob.
To unlock the vehicle, perform one of the following
procedures:
• Push either door handle request switch
03 once; the corresponding door will unlock. Push
the door handle request switch
again within 30 seconds; all
other doors will unlock, or
• Press the
button
04 on the keyfob to unlock the driver’s side door. Press the
button
again; all other doors will unlock.
LIf TGATE RELEASE
To open the rear liftgate, press the
button
05 for longer than 0.5 seconds.
To close the rear liftgate, press the
button
05 again for longer than 0.5 seconds.
PANIC ALARM
The Intelligent Key can also be used to activate the panic alarm by pressing and holding the
button
06 for more than 1 second. Once activated, the panic alarm and headlights will
stay on for 25 seconds.
first drive features
02
01
04
05
06
03
Page 21 of 36
19
USB/iPod® Interface
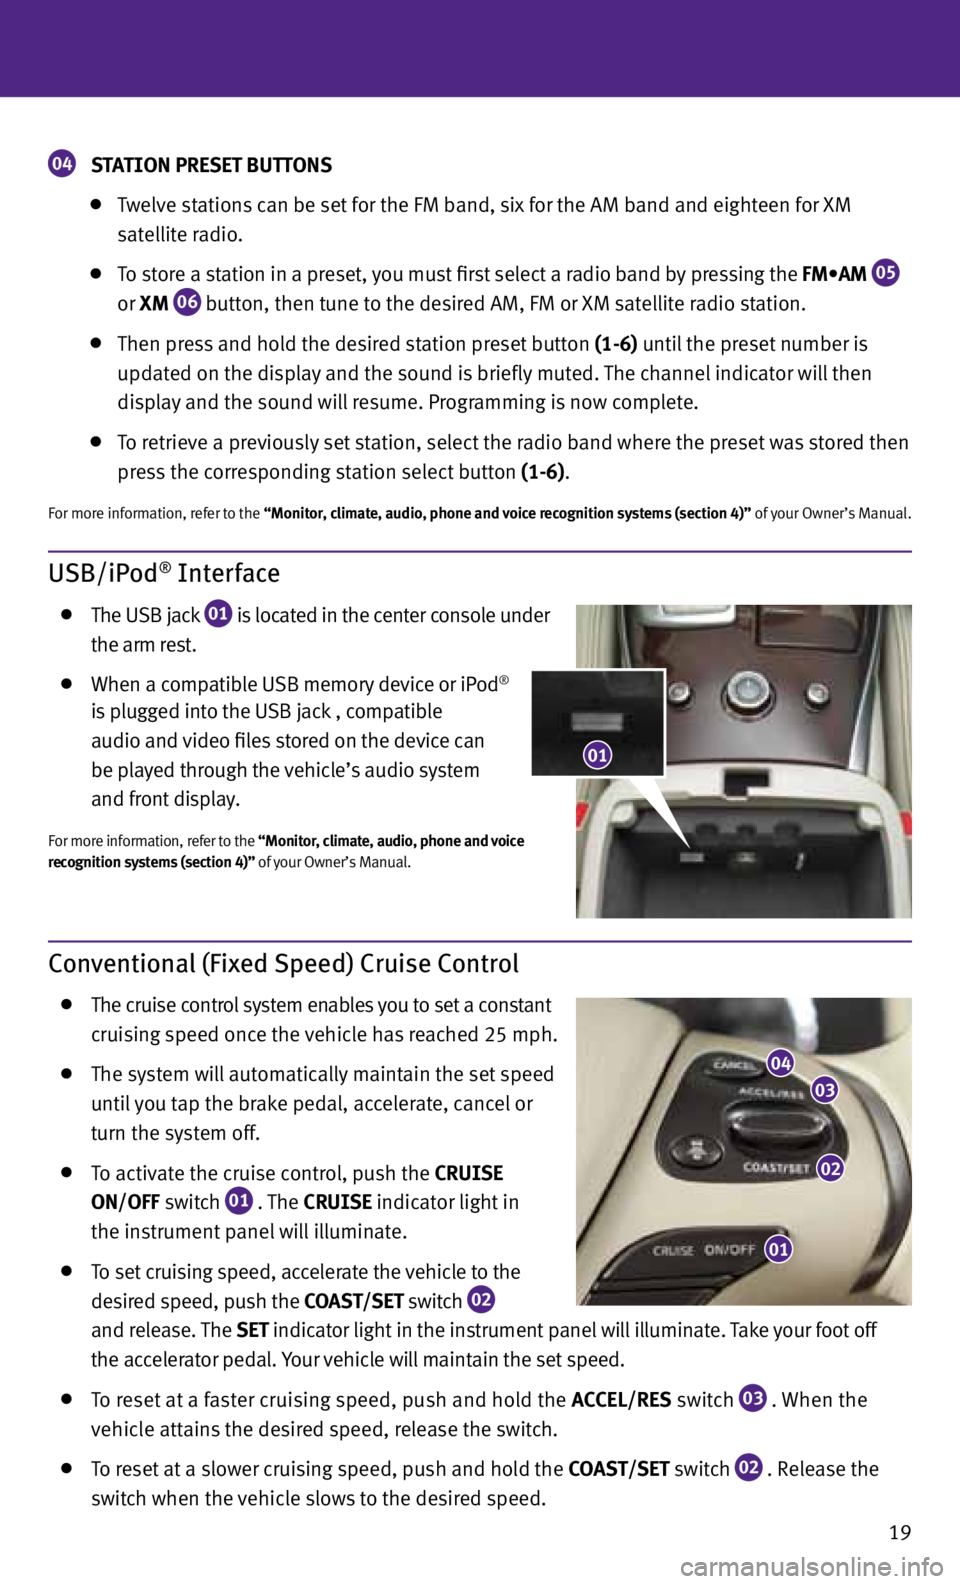
The USB jack
01 is located in the center console under
the arm rest.
When a compatible USB memory device or iPod®
is plugged into the USB jack
, compatible
audio and video files stored on the device can
be played through the vehicle’s audio system
and front display.
for more information, refer to the “Monitor, climate, audio, phone and voice
recognition systems (section 4)” of your Owner’s Manual.
Conventional (Fixed Speed) Cruise Control
The cruise control system enables you to set a constant
cruising speed once the vehicle has reached 25 mph.
The system will automatically maintain the set speed
until you tap the brake pedal, accelerate, cancel or
turn the system off.
To activate the cruise control, push the
CRUISE
ON/OFF switch
01 . The
CRUISE
indicator light in
the instrument panel will illuminate.
To set cruising speed, accelerate the vehicle to the
desired speed, push the COAST/SET switch
02
and release. The
SET
indicator light
in the instrument panel will illuminate. Take your foot off
the accelerator pedal. your vehicle will maintain the set speed.
To reset at a faster cruising speed, push and hold the ACCEL/RES switch
03 . When the
vehicle attains the desired speed, release the switch.
To reset at a slower cruising speed, push and hold the COAST/SET switch
02 . Release the
switch when the vehicle slows to the desired speed.
01
02
03
04
01
04 STATION PRESET BUTTONS
Twelve stations can be set for the fM band, six for the AM band and eighteen for XM
satellite radio.
To store a station in a preset, you must first select a radio band by pressing the FM•AM
05
or
XM
06 button, then tune to the desired AM, fM or XM satellite radio station.
Then press and hold the desired station preset button (1-6) until the preset number is
updated on the display and the sound is briefly muted. The channel indicator will then
display and the sound will resume. Programming is now complete.
To retrieve a previously set station, select the radio band where the preset was stored then
press the corresponding station select button (1-6).
for more information, refer to the “Monitor, climate, audio, phone and voice recognition systems (section 4)” of your Owner’s Manual.
Page 26 of 36
24
system guide
To increase or decrease the volume of the voice prompts, push the volume control switches up
or down
on the steering wheel or turn the VOL/ON•OFF control knob on the audio system
while the system is responding.
If the Voice Recognition system does not recognize your voice commands, train the system
using the Speaker Adaptation Mode. See your Owner’s Manual for detailed information.
Some commands are not available while the vehicle is in motion.
The “Help” command can be used to hear a list of available commands at any time.
Please refer to the cellular phone manufacturer’s Owner’s Manual for detailed information
regarding your Bluetooth phone.
Bluetooth® System without Navigation (if so equipped)
CONNECTING PROCEDURE
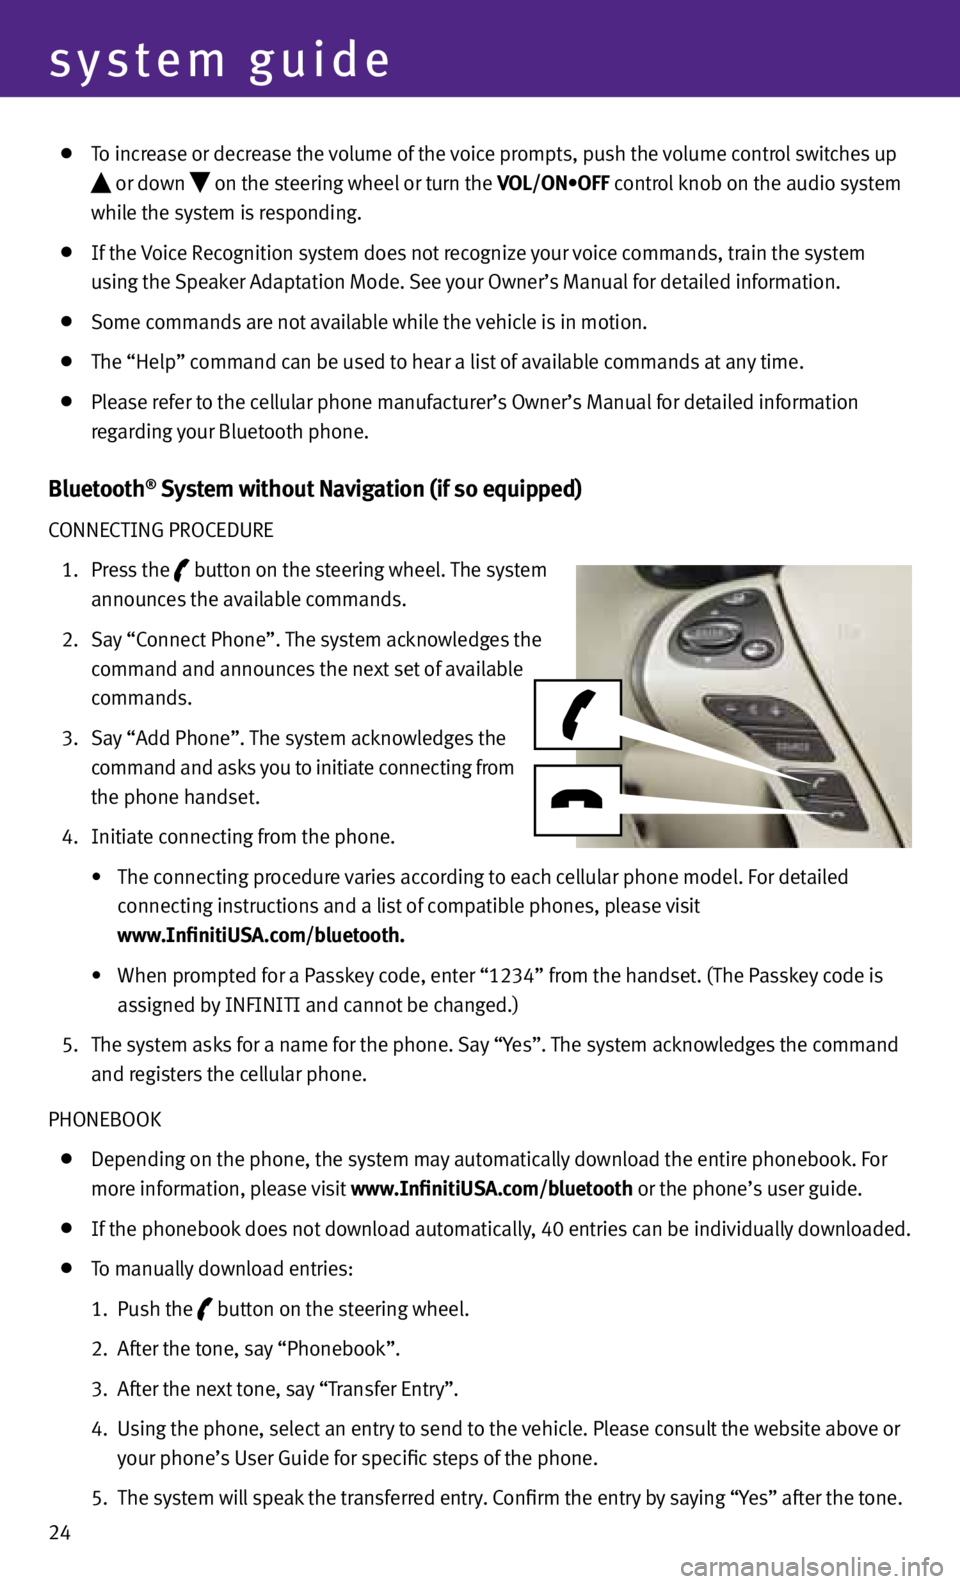
1. Press the
button on the steering wheel. The system
announces the available commands.
2. Say “Connect Phone”. The system acknowledges the
command and announces the next set of available
commands.
3. Say “Add Phone”. The system acknowledges the
command and asks you to initiate connecting from
the phone handset.
4. Initiate connecting from the phone.
• The connecting procedure varies according to each cellular phone model. For detailed
connecting instructions and a list of compatible phones, please visit
www.InfinitiUSA.com/bluetooth.
• When prompted for a Passkey code, enter “1234” from the handset. (The Passkey code is
assigned by INfINITI and cannot be changed.)
5. The system asks for a name for the phone. Say “y es”. The system acknowledges the command
and registers the cellular phone.
PHONEBOOK
Depending on the phone, the system may automatically download the entire phonebook. f or
more information, please visit www.InfinitiUSA.com/bluetooth or the phone’s user guide.
If the phonebook does not download automatically, 40 entries can be individually downloaded.
To manually download entries:
1. Push the
button on the steering wheel.
2. After the tone, say “Phonebook”.
3. After the next tone, say “Transfer Entry”.
4. Using the phone, select an entry to send to the vehicle. Please consult the website above or
your phone’s User Guide for specific steps of the phone.
5. The system will speak the transferred entry. Confirm the entry by saying “y es” after the tone.
Page 27 of 36
25
MAKING A CALL B
y PHONEBOOK ENTRy:
1. Press the
button.
2. After waiting for the tone, say “Call”.
3. After the next tone, speak a name of a phonebook entry. f or example “Michael Smith”.
4. Confirm the correct name is recognized by saying “Dial” after the tone.
NOTE: In some cases, names stored using all UPPERCASE letters may not be recognized by the voice
recognition system.
MAKING A CALL B y PHONE NUMBER
1. Press the
button.
2. After waiting for the tone, say “Call”.
3. After the next tone, say “Phone Number”.
4. After the next tone, say “123-456-7890”.
you may also say the digits in groups of 3, 3 and 4, respectively. To use this group dialing
method, say only the first 3 digits of the phone number instead of all 10 digits. After the system
recognizes the digits, it will request the next 3 digits and finally the last 4 digits.
5. After the system speaks the correct number and sounds the tone, say “Dial.”
RECEIVING/ENDING A CALL
To accept the call, press the
button on the steering wheel.
To reject the call, press the
button.
To hang-up, press the
button.
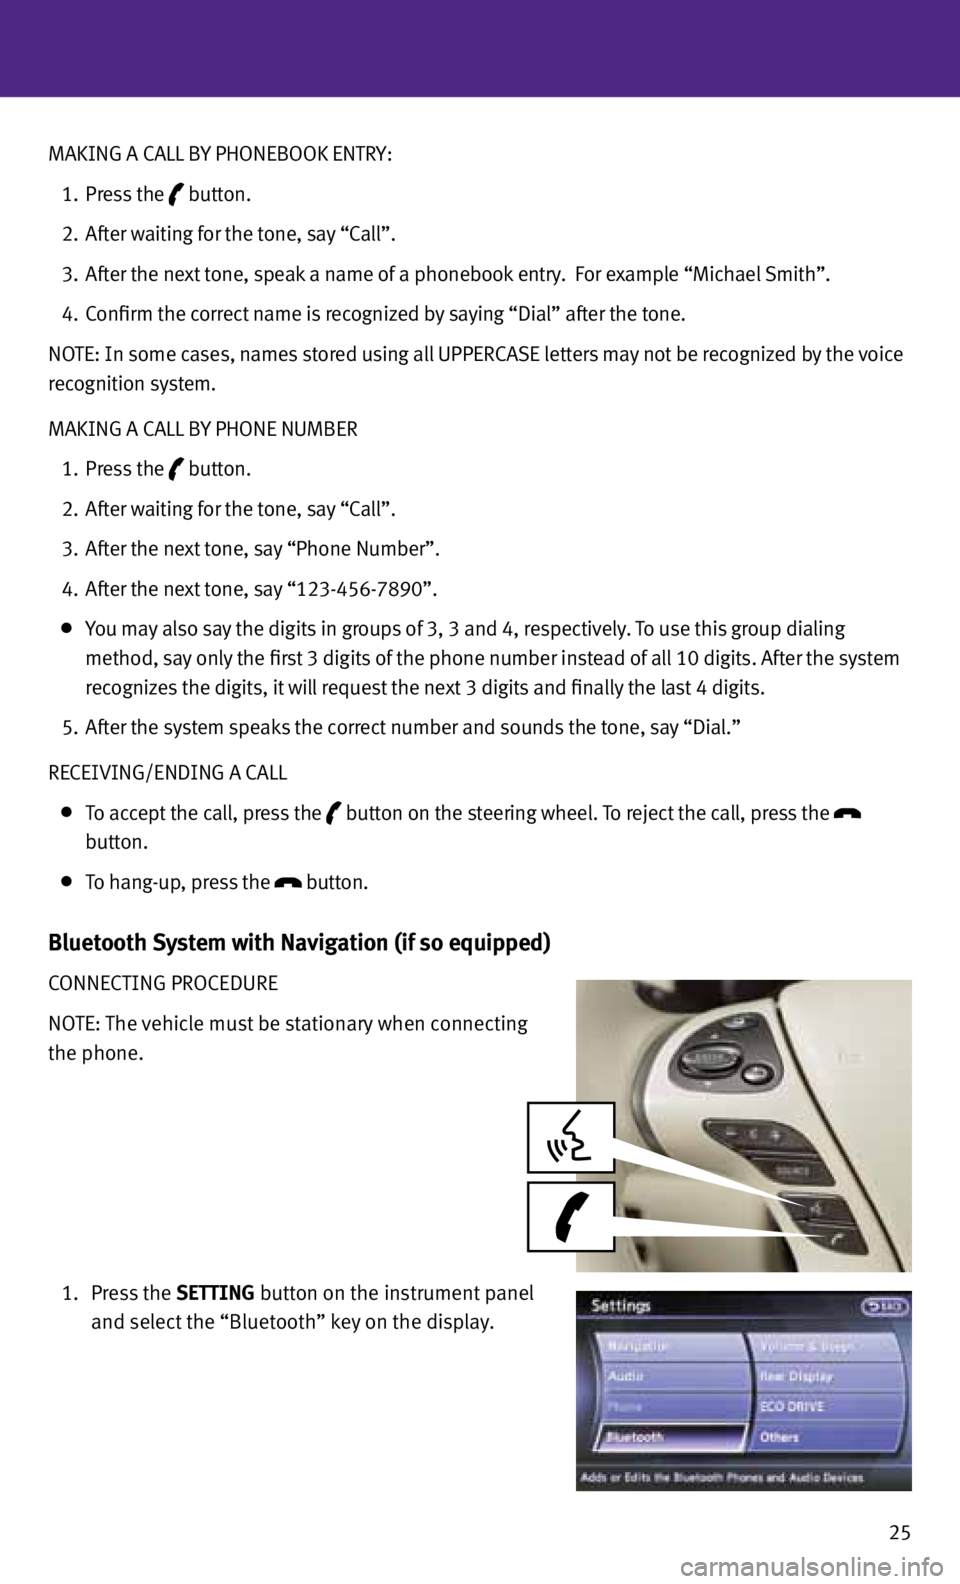
Bluetooth System with Navigation (if so equipped)
CONNECTING PROCEDURE
NOTE: The vehicle must be stationary when connecting
the phone.
1. Press the SETTING button on the instrument panel
and select the “Bluetooth” key on the display.
Page 31 of 36
29
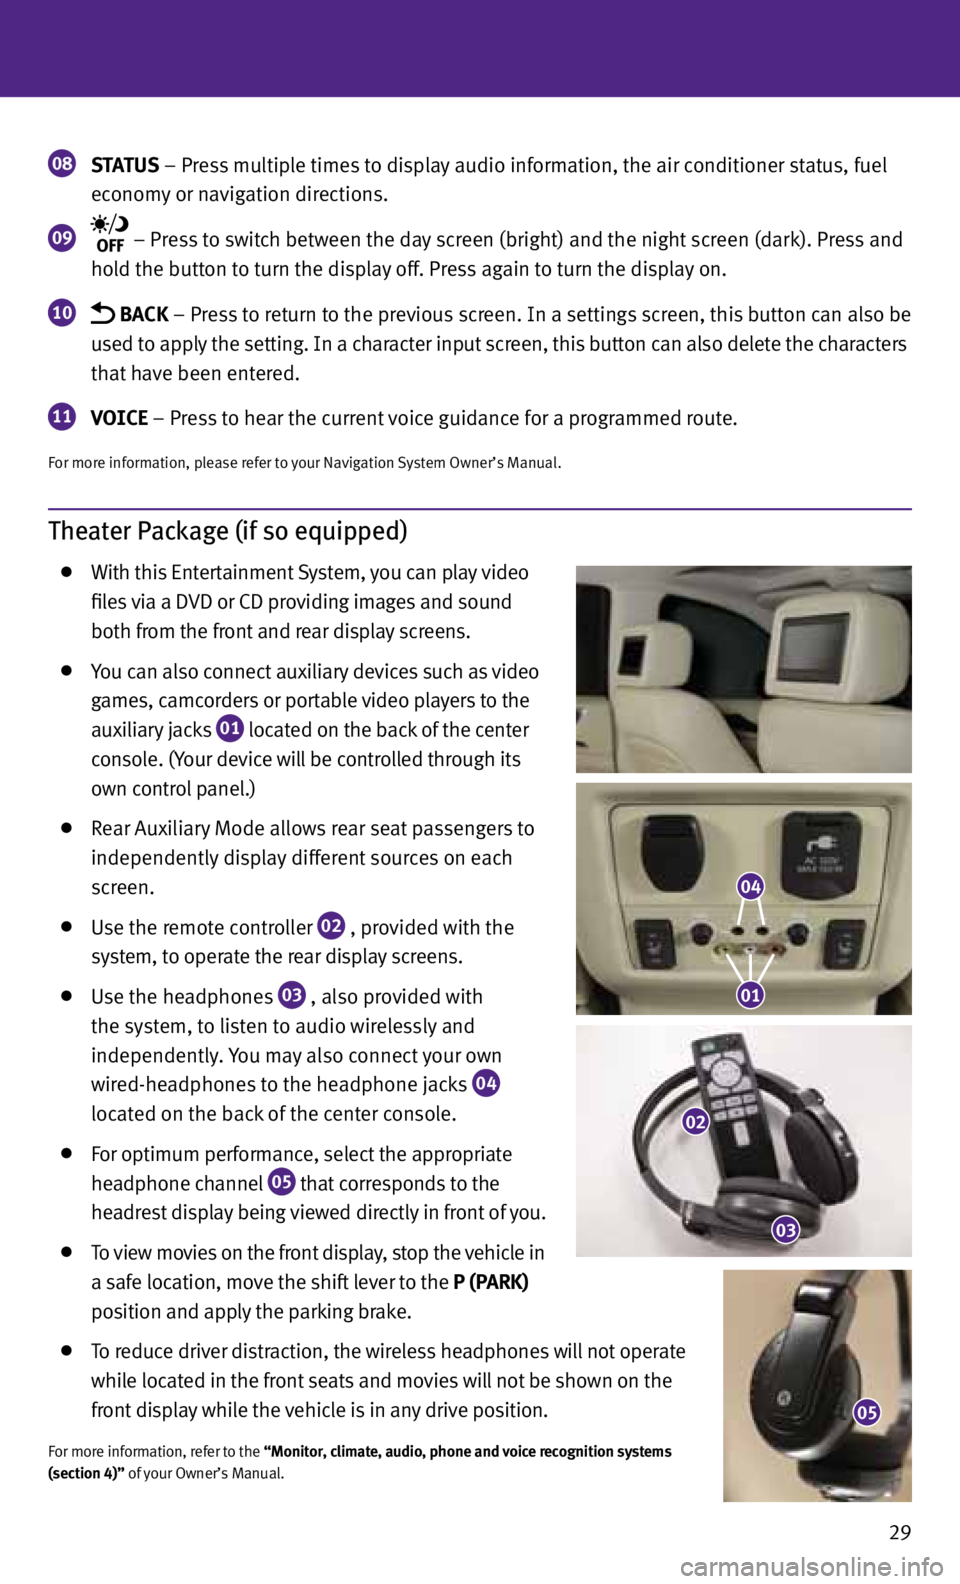
Theater Package (if so equipped)
With this Entertainment System, you can play video
files via a DVD or CD providing images and sound
both from the front and rear display screens.
you can also connect auxiliary devices such as video
games, camcorders or portable video players to the
auxiliary jacks
01 located on the back of the center
console. (y our device will be controlled through its
own control panel.)
Rear Auxiliary Mode allows rear seat passengers to
independently display different sources on each
screen.
Use the remote controller
02 , provided with the
system, to operate the rear display screens.
Use the headphones
03 , also provided with
the system, to listen to audio wirelessly and
independently. you may also connect your own
wired-headphones to the headphone jacks
04
located on the back of the center console.
for optimum performance, select the appropriate
headphone channel
05 that corresponds to the
headrest display being viewed directly in front of you.
To view movies on the front display, stop the vehicle in
a safe location, move the shift lever to the P (PARK)
position and apply the parking brake.
To reduce driver distraction, the wireless headphones will not operate
while located in the front seats and movies will not be shown on the
front display while the vehicle is in any drive position.
for more information, refer to the “Monitor, climate, audio, phone and voice recognition systems
(section 4)” of your Owner’s Manual.
08 STATUS
– Press multiple times to display audio information, the air conditioner status, fuel
economy or navigation directions.
09 – Press to switch between the day screen (bright) and the night screen (dark). Press and
hold the button to turn the display off. Press again to turn the display on.
10 BACK – Press to return to the previous screen. In a settings screen, this button can also be
used to apply the setting. In a character input screen, this button can also delete the characters
that have been entered.
11 VOICE – Press to hear the current voice guidance for a programmed route.
for more information, please refer to your Navigation System Owner’s Manual.
05
04
01
02
03