turn signal INFINITI M 2010 Owners Manual
[x] Cancel search | Manufacturer: INFINITI, Model Year: 2010, Model line: M, Model: INFINITI M 2010Pages: 445, PDF Size: 6.15 MB
Page 10 of 445

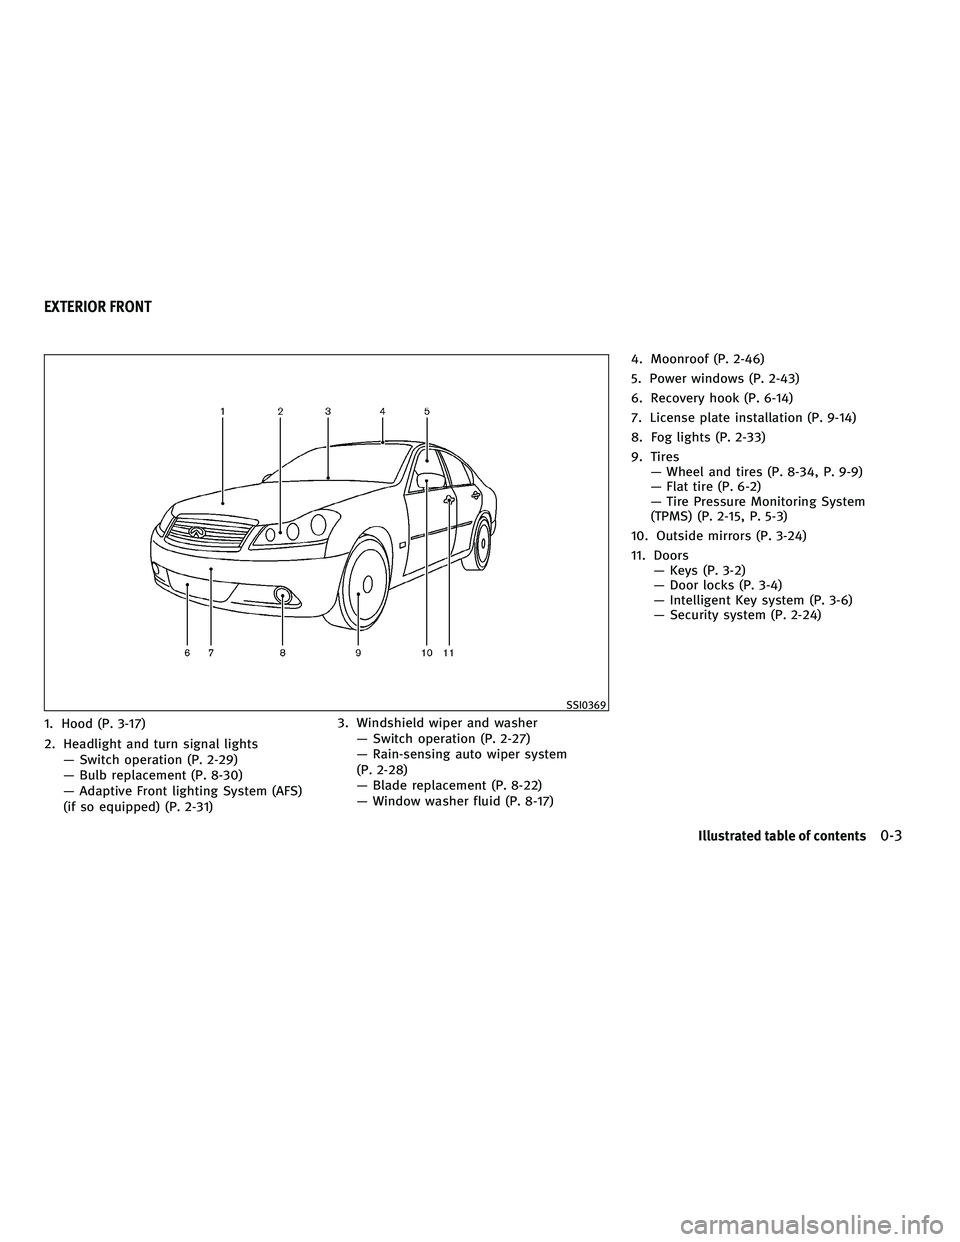
1. Hood (P. 3-17)
2. Headlight and turn signal lightsÐ Switch operation (P. 2-29)
Ð Bulb replacement (P. 8-30)
Ð Adaptive Front lighting System (AFS)
(if so equipped) (P. 2-31) 3. Windshield wiper and washer
Ð Switch operation (P. 2-27)
Ð Rain-sensing auto wiper system
(P. 2-28)
Ð Blade replacement (P. 8-22)
Ð Window washer fluid (P. 8-17) 4. Moonroof (P. 2-46)
5. Power windows (P. 2-43)
6. Recovery hook (P. 6-14)
7. License plate installation (P. 9-14)
8. Fog lights (P. 2-33)
9. Tires
Ð Wheel and tires (P. 8-34, P. 9-9)
Ð Flat tire (P. 6-2)
Ð Tire Pressure Monitoring System
(TPMS) (P. 2-15, P. 5-3)
10. Outside mirrors (P. 3-24)
11. Doors Ð Keys (P. 3-2)
Ð Door locks (P. 3-4)
Ð Intelligent Key system (P. 3-6)
Ð Security system (P. 2-24)
SSI0369
EXTERIOR FRONT
Illustrated table of contents0-3
wÐ
Ð
05/19/09Ðtbrooks
X
Page 14 of 445

1. Instrument brightness control switch(P. 2-32)
2. Outside mirror remote control switch (P. 3-24)
3. Adaptive Front lighting System (AFS) switch (P. 2-31) 4. Vehicle Dynamic Control (VDC) OFF switch
(P. 2-37)
5. Headlight, fog light and turn signal switch (P. 2-29)
6. Steering-wheel-mounted controls (left side) Ð ENTER switch (if so equipped)
(P. 4-6, P. 4-58)
Ð For audio system (P. 4-58)
Ð For phone system (P. 4-74, P. 4-84)
Ð For voice recognition system
(if so equipped) (P. 4-98)
7. Windshield wiper and washer switch (P. 2-27)
8. Steering-wheel-mounted controls (right side)
Ð Cruise control switches (P. 5-23)
Ð Intelligent Cruise Control (ICC) switches
(if so equipped) (P. 5-25)
Ð Lane Departure Prevention (LDP) switch
(if so equipped) (P. 5-16)
9. Hood release handle (P. 3-17)
10. Trunk lid release switch (P. 3-18)
11. Lane Departure Warning (LDW) switch (if so equipped) (P. 2-36, P. 5-16)
12. Intelligent Key port (P. 5-9)
13. Tilting/telescopic steering wheel switch (P. 3-22)
14. Steering wheel Ð Horn (P. 2-34)
Ð Driver supplemental air bag (P. 1-40)
15. Automatic Transmission (AT) selector lever (P. 5-11)
SIC3601
COCKPIT
Illustrated table of contents0-7
wÐ
Ð
05/19/09Ðtbrooks
X
Page 20 of 445

WarninglightName Page
All-Wheel Drive (AWD) warning
light (AWD models)* 2-13
Anti-lock Braking System (ABS)
warning light2-13
Automatic Transmission (AT)
check warning light2-13
Brake warning light
2-14
Charge warning light2-14
Door open warning light2-14
Engine oil pressure warning
light2-14
Intelligent Cruise Control (ICC)
system warning light (orange)*2-15
Intelligent Key system warning
light 2-15
Lane departure warning light
(orange)*2-15
Warning
lightName Page
Low fuel warning light 2-15
Low tire pressure warning light 2-15
Low washer fluid warning light 2-17
Preview Function warning light
(orange)*2-17
Rear Active Steer warning light* 2-17
Seat belt warning light
2-17
Supplemental air bag warning
light 2-17
IndicatorlightName Page
Adaptive Front lighting System
(AFS) indicator light 2-18
Automatic Transmission (AT)
position indicator light2-18
Cruise main switch indicator
light (green)2-18
IndicatorlightName Page
Cruise set switch indicator light 2-18
Front passenger air bag status
light 2-18
High beam indicator light
2-18
Intelligent Cruise Control (ICC)
system MAIN switch indicator
light (green)* 2-19
Lane Departure Prevention
(LDP) ON indicator light
(green)*2-19
Malfunction Indicator Light
(MIL)
2-19
Slip indicator light
2-20
Small light indicator lights 2-20
Turn signal/hazard indicator
lights2-20
Vehicle Dynamic Control (VDC)
off indicator light2-20
*: if so equipped
WARNING AND INDICATOR LIGHTS
Illustrated table of contents0-13
wÐ
Ð
05/14/09Ðpattie
X
Page 77 of 445

2 Instruments and controls
Cockpit........................................... 2-2
Instrument panel .................................. 2-3
Meters and gauges ................................ 2-5
Speedometer and odometer ..................... 2-6
Tachometer .................................... 2-6
Engine coolant temperature gauge ............... 2-7
Fuel gauge ..................................... 2-7
Meter/ring illumination and needle sweep ........ 2-8
Compass (if so equipped) .......................... 2-9
Zone variation change procedure ...............2-10
Warning/indicator lights and audible reminders .....2-12
Checking bulbs ............................... 2-13
Warning lights ................................ 2-13
Indicator lights ................................ 2-18
Audible reminders ............................. 2-20
Dot matrix liquid crystal display ...................2-21
Indicators for operation ........................ 2-22
Security systems ................................. 2-24
Vehicle security system ........................ 2-24
INFINITI Vehicle Immobilizer System ............2-25
Windshield wiper and washer switch ...............2-27
Rain-sensing auto wiper system ................2-28
Rear window and outside mirror defroster switch . . . 2-28 Headlight and turn signal switch
..................2-29
Xenon headlights ............................. 2-29
Headlight switch .............................. 2-29
Turn signal switch ............................. 2-33
Fog light switch ............................... 2-33
Hazard warning flasher switch .....................2-33
Horn ............................................ 2-34
Heated seats (rear seats) (if so equipped) ..........2-34
Climate controlled seats (front seats) ..............2-35
Lane Departure Warning (LDW) switch
(if so equipped) .................................. 2-36
SNOW mode switch (if so equipped) ...............2-37
Vehicle Dynamic Control (VDC) OFF switch ..........2-37
Clock ............................................ 2-38
Adjusting the time ............................. 2-38
Power outlets .................................... 2-38
Cigarette lighter and ashtrays .....................2-39
Front ......................................... 2-39
Rear ......................................... 2-39
Storage ......................................... 2-40
Cup holders .................................. 2-40
Sunglasses holder ............................. 2-41
Glove box .................................... 2-41
wÐ
Ð
05/19/09Ðtbrooks
X
Page 79 of 445

1. Instrument brightness control switch(P. 2-32)
2. Outside mirror remote control switch (P. 3-24)
3. Adaptive Front lighting System (AFS) switch (P. 2-31) 4. Vehicle Dynamic Control (VDC) OFF switch
(P. 2-37)
5. Headlight, fog light and turn signal switch (P. 2-29)
6. Steering-wheel-mounted controls (left side) Ð ENTER switch (if so equipped)
(P. 4-6, P. 4-58)
Ð For audio system (P. 4-58)
Ð For phone system (P. 4-74, P. 4-84)
Ð For voice recognition system
(if so equipped) (P. 4-98)
7. Windshield wiper and washer switch (P. 2-27)
8. Steering-wheel-mounted controls (right side)
Ð Cruise control switches (P. 5-23)
Ð Intelligent Cruise Control (ICC) switches
(if so equipped) (P. 5-25)
Ð Lane Departure Prevention (LDP) switch
(if so equipped) (P. 5-16)
9. Hood release handle (P. 3-17)
10. Trunk lid release switch (P. 3-18)
11. Lane Departure Warning (LDW) switch (if so equipped) (P. 2-36, P. 5-16)
12. Intelligent Key port (P. 5-9)
13. Tilting/telescopic steering wheel switch (P. 3-22)
14. Steering wheel Ð Horn (P. 2-34)
Ð Driver supplemental air bag (P. 1-40)
15. Automatic Transmission (AT) selector lever (P. 5-11)
SIC3601
COCKPIT
2-2Instruments and controls
wÐ
Ð
05/19/09Ðtbrooks
X
Page 89 of 445

All-Wheel Drive (AWD) warning light
(AWD models)*Lane departure warning light (or-
ange)*Cruise set switch indicator light
Anti-lock Braking System (ABS) warn-
ing lightLow fuel warning lightFront passenger air bag status light
Low tire pressure warning lightHigh beam indicator light
Automatic Transmission (AT) check
warning lightLow washer fluid warning lightIntelligent Cruise Control (ICC) system
MAIN switch indicator light (green)*
Brake warning light
Preview Function warning light
(orange)*Lane Departure Prevention (LDP) ON
indicator light (green)*
Rear Active Steer warning light*Malfunction Indicator Light (MIL)
Charge warning lightSeat belt warning lightSlip indicator light
Door open warning lightSupplemental air bag warning lightSmall light indicator lights
Engine oil pressure warning lightAdaptive Front lighting System (AFS)
indicator lightTurn signal/hazard indicator lights
Intelligent Cruise Control (ICC) sys-
tem warning light (orange)*Automatic Transmission (AT) position
indicator lightVehicle Dynamic Control (VDC) off
indicator light
Intelligent Key system warning lightCruise main switch indicator light
(green)*: if so equipped
WARNING/INDICATOR LIGHTS AND
AUDIBLE REMINDERS
2-12Instruments and controls
wÐ
Ð
05/14/09Ðpattie
X
Page 97 of 445

CAUTION
Continued vehicle operation without having
the emission control system checked and re-
paired as necessary could lead to poor drive-
ability, reduced fuel economy, and possible
damage to the emission control system.
Slip indicator light
This light will blink when the Vehicle Dynamic
Control (VDC) system is operating, thus alerting
the driver to the fact that the road surface is
slippery and the vehicle is nearing its traction
limits.
Small light indicator
light
The light comes on when the front park, side
marker, tail and license plate lights are on.
Turn signal/hazard indicator
lights
The light flashes when the turn signal switch
lever or hazard switch is turned on.
Vehicle Dynamic Control
(VDC) off indicator light
The light comes on when the Vehicle Dynamic
Control (VDC) off switch is pushed to OFF. This
indicates that the VDC system is not operating.
When the VDC off indicator light and slip indi-
cator light come on with the VDC system turned
on, this light alerts the driver to the fact that the
VDC system's fail-safe mode is operating, for
example the VDC system may not be function-
ing properly. Have the system checked by an
INFINITI retailer. If a malfunction occurs in the
system, the VDC system function will be can-
celed but the vehicle is still driveable. For
additional information, see ªVEHICLE DYNAMIC
CONTROL (VDC) SYSTEMº in the ª5. Starting and
drivingº section of this manual.
AUDIBLE REMINDERS
Key reminder chime
A chime will sound if the driver side door is
opened while the ignition switch is pushed to
the ACC or LOCK position with the Intelligent
Key left in the Intelligent Key port. Make sure
the ignition switch is pushed to the LOCK
position, and take the Intelligent Key with you
when leaving the vehicle.
Light reminder chime
A chime will sound when the driver side door is
opened with the light switch in the
or
position, and the ignition switch is
pushed to the ACC position.
Turn the light switch off when you leave the
vehicle.
Parking brake reminder chime
The chime will sound if the vehicle is driven at
more than 4 MPH (7 km/h) with the parking
brake applied. Stop the vehicle and release the
parking brake.
Seat belt warning chime
The chime will sound for about 6 seconds
unless the driver's seat belt is securely fas-
tened.
Brake pad wear warning
The disc brake pads have audible wear warn-
ings. When a brake pad requires replacement, it
will make a high pitched scraping sound when
the vehicle is in motion. This scraping sound
will first occur only when the brake pedal is
depressed. After more wear of the brake pad,
the sound will always be heard even if the brake
2-20Instruments and controls
wÐ
Ð
05/14/09Ðpattie
X
Page 106 of 445

XENON HEADLIGHTS
WARNING
HIGH VOLTAGE
cWhen xenon headlights are on, they produce
a high voltage. To prevent an electric shock,
never attempt to modify or disassemble. Al-
ways have your xenon headlights replaced
at an INFINITI retailer.
c Xenon headlights provide considerably
more light than conventional headlights. If
they are not correctly aimed, they might
temporarily blind an oncoming driver or the
driver ahead of you and cause a serious acci-
dent. If headlights are not aimed correctly,
immediately take your vehicle to an INFINITI
retailer and have the headlights adjusted
correctly.
When the xenon headlight is initially turned on,
its brightness or color varies slightly. However,
the color and brightness will soon stabilize.
c The life of xenon headlights will be shortened
by frequent on-off operation. It is generally
desirable not to turn off the headlights for
short intervals (for example, when the ve-
hicle stops at a traffic signal). Even when the daytime running lights are active (Canada
only), the xenon headlights do not turn on.
This way the life of the xenon headlights is
not reduced.
c If the xenon headlight bulb is close to burn-
ing out, the brightness will drastically de-
crease, the light will start blinking, or the
color of the light will become reddish. If one
or more of the above signs appear, contact an
INFINITI retailer.
HEADLIGHT SWITCH
Lighting
s1Turn the switch to theposition:
The front park, side marker, tail, license
plate and instrument lights will come on.
s2Turn the switch to theposition:
Headlights will come on and all the other
lights remain on.
SIC2411
HEADLIGHT AND TURN SIGNAL SWITCH
Instruments and controls2-29
wÐ
Ð
05/14/09Ðpattie
X
Page 110 of 445

TURN SIGNAL SWITCH
s1Turn signal
Move the lever up or down to signal the turning
direction. When the turn is completed, the turn
signals cancel automatically.
s2Lane change signal
To indicate a lane change, move the lever up or
down to the point where lights begin flashing.
FOG LIGHT SWITCH
To turn the fog lights on, turn the headlight
switch to the
position, then turn the
switch to the
position. To turn them off,
turn the switch to the OFF position.
The headlights must be on for the fog lights to
operate. Push the switch on to warn other drivers when
you must stop or park under emergency condi-
tions. All turn signal lights will flash.WARNING
c
If stopping for an emergency, be sure to
move the vehicle well off the road.
c Do not use the hazard warning flashers while
moving on the highway unless unusual cir-
cumstances force you to drive so slowly that
your vehicle might become a hazard to other
traffic.
c Turn signals do not work when the hazard
warning flasher lights are on.
SIC2231SIC2465SIC2574
HAZARD WARNING FLASHER SWITCH
Instruments and controls2-33
wÐ
Ð
05/14/09Ðpattie
X
Page 130 of 445

4. Hold down both buttons until the indica-tor light on HomeLinkT flashes, changing
from a ªslow blinkº to a ªrapid blinkº.
This could take up to 90 seconds. When
the indicator light blinks rapidly, both
buttons may be released. The rapidly
flashing light indicates successful pro-
gramming. To activate the garage door or
other programmed device, push and hold
the programmed HomeLink Tbutton - re-
leasing when the device begins to acti-
vate.
5. If the indicator light on HomeLinkT blinks
rapidly for two seconds and then turns
solid, HomeLink Thas picked up a ªrolling
codeº garage door opener signal. You will
need to proceed with the next steps to
train HomeLink T, completing the pro-
gramming may require a ladder and an-
other person for convenience.
6. Push and release the program button located on the garage door opener's mo-
tor to activate the ªtraining modeº. This
button is usually located near the an-
tenna wire that hangs down from the
motor. If the wire originates from under a
light lens, you will need to remove the
lens to access the program button.NOTE:
Once you have pushed and released the training
button on the garage door opener's motor and
the ªtraining lightº is lit, you have 30 seconds in
which to perform step 7. For convenience, use
the help of a second person to assist when per-
forming this step.
7. Quickly (within 30 seconds of pushingand releasing the garage door opener
program button) and firmly push and re-
lease the HomeLinkT button you've just
programmed. Push and release the
HomeLinkT button up to three times to
complete the training.
8. Your HomeLink Tbutton should now be
programmed.
To program the remaining HomeLink Tbuttons
for additional door or gate openers, follow
steps 2 through 8 only.
NOTE:
Do not repeat step 1 unless you want to ªclearº
all previously programmed HomeLinkT buttons.
If you have any questions or are having diffi-
culty programming your HomeLink Tbuttons,
please refer to the HomeLinkT web site at:
www.homelink.com or call 1-800-355-3515.
PROGRAMMING HOMELINKT FOR
CANADIAN CUSTOMERS
Prior to 1992, D.O.C. regulations required hand-
held transmitters to stop transmitting after 2
seconds. To program your hand-held transmit-
ter to HomeLinkT, continue to push and hold
the HomeLinkT button (note steps 2 through 4
under ªProgramming HomeLink Tº) while you
push and re-push (ªcycleº) your hand-held
transmitter every 2 seconds until the indicator
light flashes rapidly (indicating successful pro-
gramming).
NOTE:
If programming a garage door opener, etc., it is
advised to unplug the device during the ªcy-
clingº process to prevent possible damage to
the garage door opener components.
OPERATING THE HOMELINKT
UNIVERSAL TRANSCEIVER
HomeLinkT Universal Transceiver (once pro-
grammed) may now be used to activate the
garage door, etc. To operate, simply push the
appropriate programmed HomeLinkT Universal
Transceiver button. The red indicator light will
illuminate while the signal is being transmitted.
Instruments and controls2-53
wÐ
Ð
05/19/09Ðtbrooks
X