stall INFINITI M35 2006 Factory Owners Manual
[x] Cancel search | Manufacturer: INFINITI, Model Year: 2006, Model line: M35, Model: INFINITI M35 2006Pages: 5621, PDF Size: 65.56 MB
Page 406 of 5621
REPAIR FOR COMPONENT PARTS
AT-327
D
E
F
G
H
I
J
K
L
MA
B
AT
Revision: 2006 January2006 M35/M45
CAUTION:
If necessary, replace the input clutch assembly.
Front Carrier
Check for deformation, fatigue or damage.
CAUTION:
If necessary, replace the front carrier assembly.
Rear Internal Gear
Check for deformation, fatigue or damage.
CAUTION:
If necessary, replace the rear internal gear.
ASSEMBLY
1. Install input clutch.
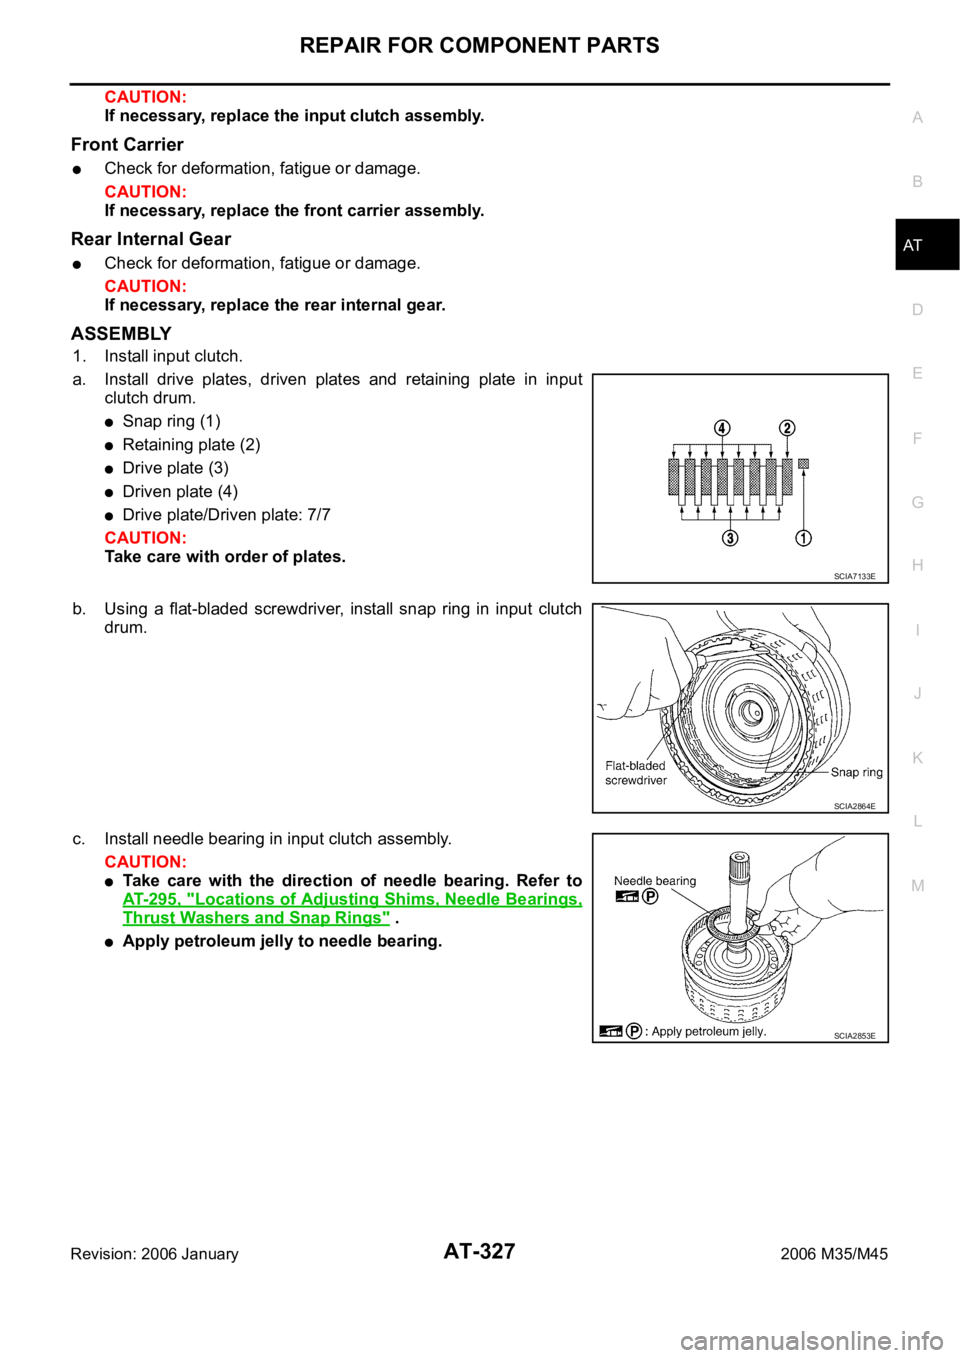
a. Install drive plates, driven plates and retaining plate in input
clutch drum.
Snap ring (1)
Retaining plate (2)
Drive plate (3)
Driven plate (4)
Drive plate/Driven plate: 7/7
CAUTION:
Take care with order of plates.
b. Using a flat-bladed screwdriver, install snap ring in input clutch
drum.
c. Install needle bearing in input clutch assembly.
CAUTION:
Take care with the direction of needle bearing. Refer to
AT- 2 9 5 , "
Locations of Adjusting Shims, Needle Bearings,
Thrust Washers and Snap Rings" .
Apply petroleum jelly to needle bearing.
SCIA7133E
SCIA2864E
SCIA2853E
Page 407 of 5621
AT-328
REPAIR FOR COMPONENT PARTS
Revision: 2006 January2006 M35/M45
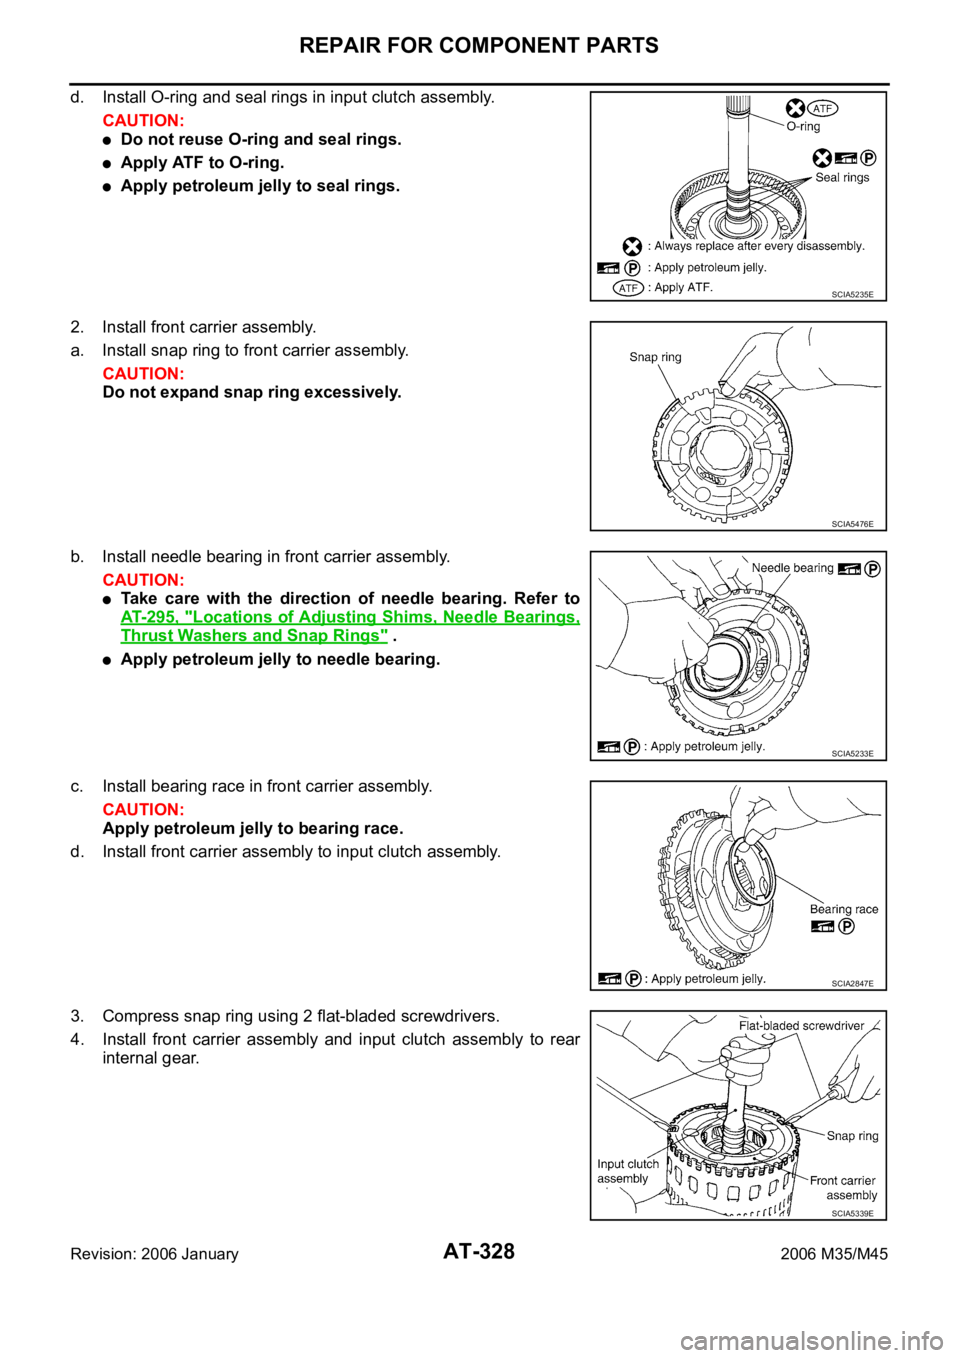
d. Install O-ring and seal rings in input clutch assembly.
CAUTION:
Do not reuse O-ring and seal rings.
Apply ATF to O-ring.
Apply petroleum jelly to seal rings.
2. Install front carrier assembly.
a. Install snap ring to front carrier assembly.
CAUTION:
Do not expand snap ring excessively.
b. Install needle bearing in front carrier assembly.
CAUTION:
Take care with the direction of needle bearing. Refer to
AT- 2 9 5 , "
Locations of Adjusting Shims, Needle Bearings,
Thrust Washers and Snap Rings" .
Apply petroleum jelly to needle bearing.
c. Install bearing race in front carrier assembly.
CAUTION:
Apply petroleum jelly to bearing race.
d. Install front carrier assembly to input clutch assembly.
3. Compress snap ring using 2 flat-bladed screwdrivers.
4. Install front carrier assembly and input clutch assembly to rear
internal gear.
SCIA5235E
SCIA5476E
SCIA5233E
SCIA2847E
SCIA5339E
Page 411 of 5621
AT-332
REPAIR FOR COMPONENT PARTS
Revision: 2006 January2006 M35/M45
INSPECTION
High and Low Reverse Clutch Hub Snap Ring, Rear Sun Gear Snap Ring
Check for deformation, fatigue or damage.
CAUTION:
If necessary, replace the snap ring.
1st One-way Clutch
Check frictional surface for wear or damage.
CAUTION:
If necessary, replace the 1st one-way clutch.
Mid Sun Gear
Check for deformation, fatigue or damage.
CAUTION:
If necessary, replace the mid sun gear.
Rear Sun Gear
Check for deformation, fatigue or damage.
CAUTION:
If necessary, replace the rear sun gear.
High and Low Reverse Clutch Hub
Check for deformation, fatigue or damage.
CAUTION:
If necessary, replace the high and low reverse clutch hub.
ASSEMBLY
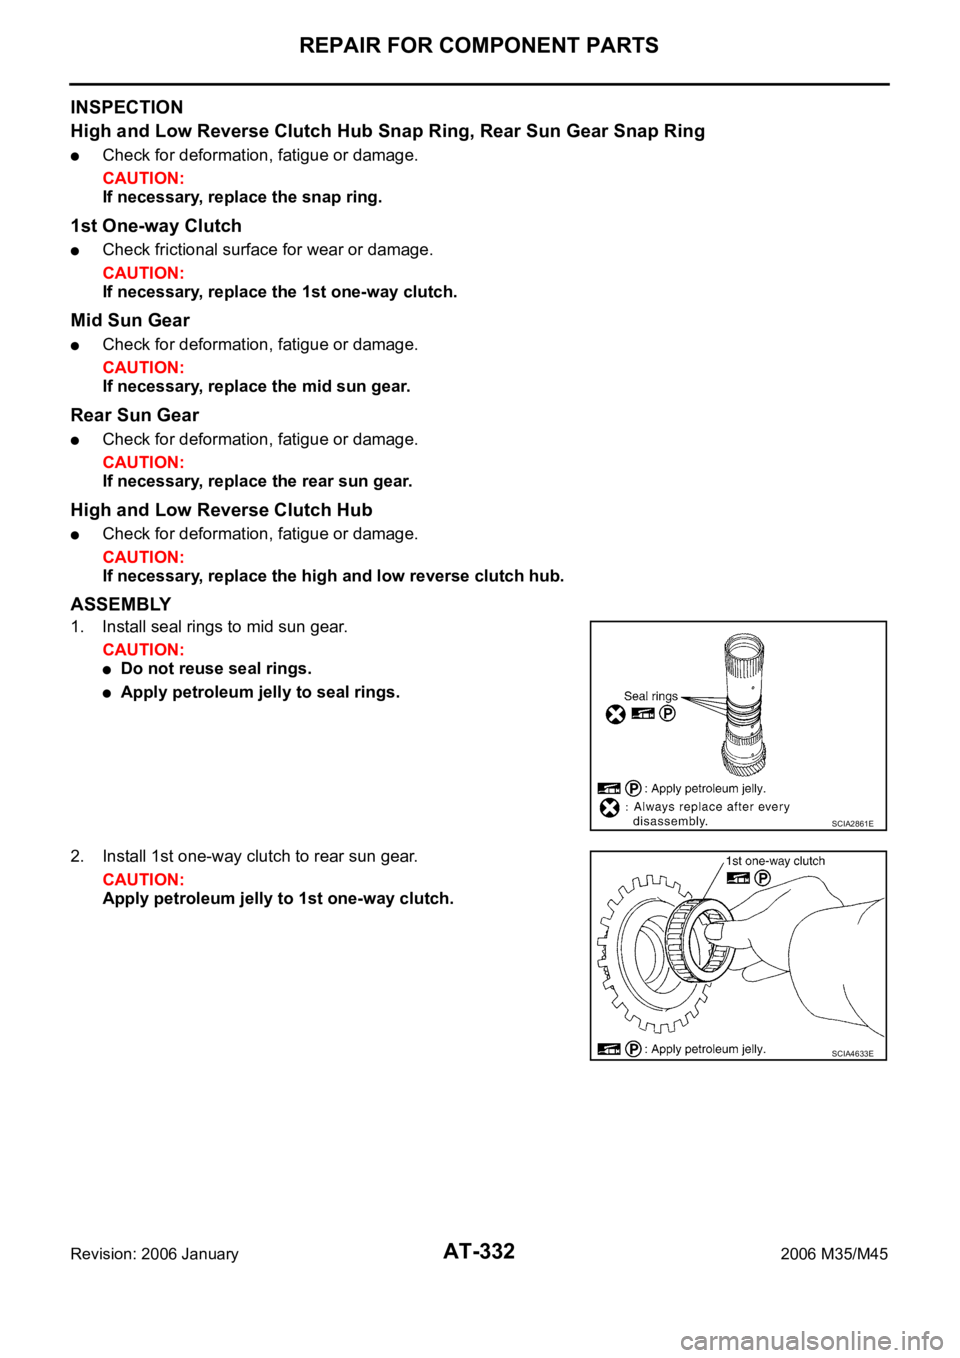
1. Install seal rings to mid sun gear.
CAUTION:
Do not reuse seal rings.
Apply petroleum jelly to seal rings.
2. Install 1st one-way clutch to rear sun gear.
CAUTION:
Apply petroleum jelly to 1st one-way clutch.
SCIA2861E
SCIA4633E
Page 412 of 5621
REPAIR FOR COMPONENT PARTS
AT-333
D
E
F
G
H
I
J
K
L
MA
B
AT
Revision: 2006 January2006 M35/M45
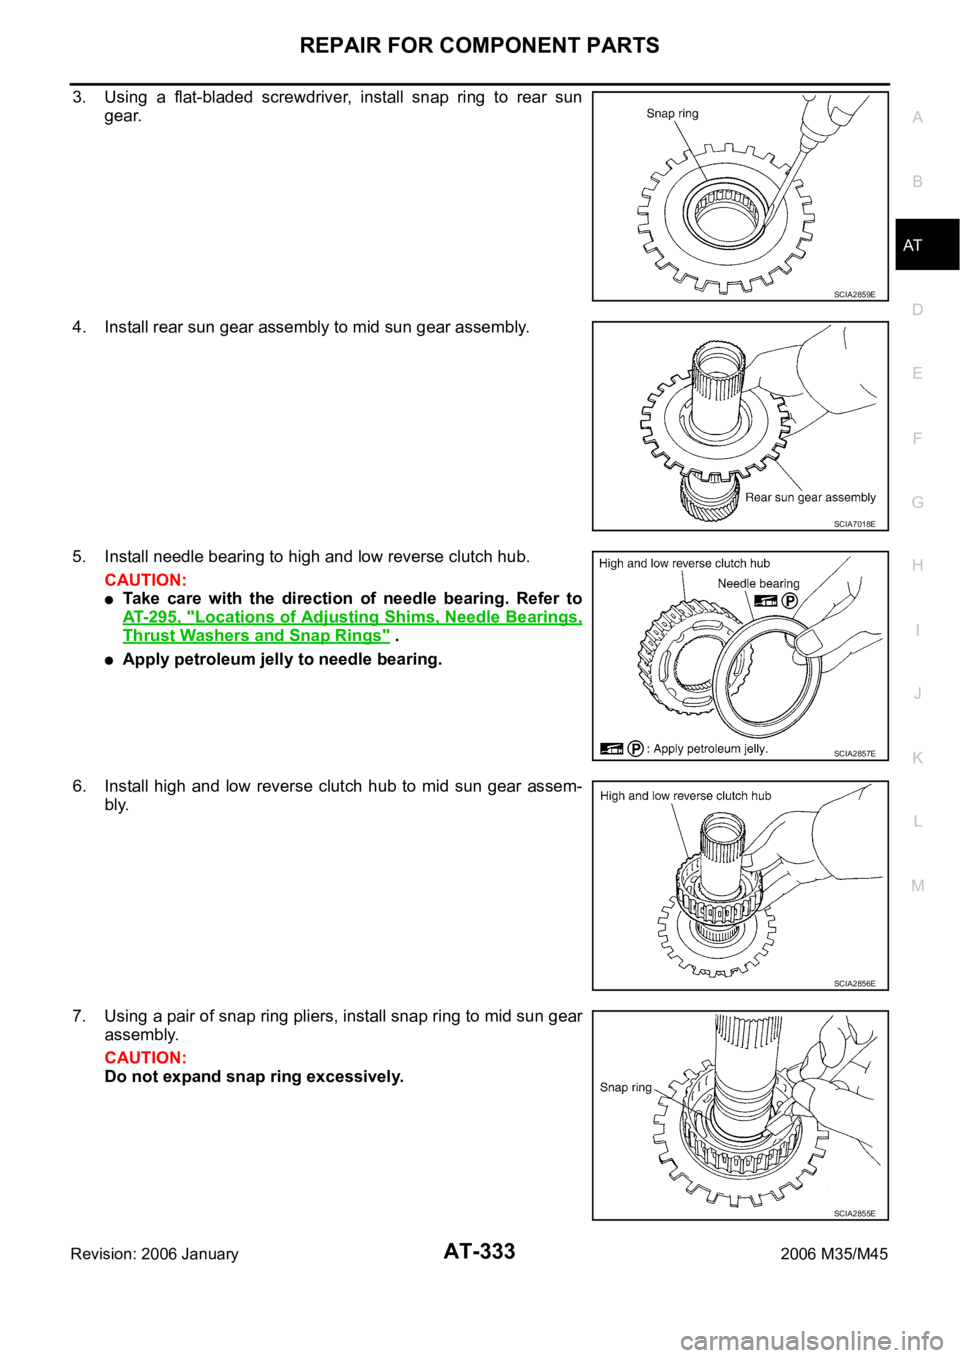
3. Using a flat-bladed screwdriver, install snap ring to rear sun
gear.
4. Install rear sun gear assembly to mid sun gear assembly.
5. Install needle bearing to high and low reverse clutch hub.
CAUTION:
Take care with the direction of needle bearing. Refer to
AT- 2 9 5 , "
Locations of Adjusting Shims, Needle Bearings,
Thrust Washers and Snap Rings" .
Apply petroleum jelly to needle bearing.
6. Install high and low reverse clutch hub to mid sun gear assem-
bly.
7. Using a pair of snap ring pliers, install snap ring to mid sun gear
assembly.
CAUTION:
Do not expand snap ring excessively.
SCIA2859E
SCIA7018E
SCIA2857E
SCIA2856E
SCIA2855E
Page 413 of 5621
AT-334
REPAIR FOR COMPONENT PARTS
Revision: 2006 January2006 M35/M45
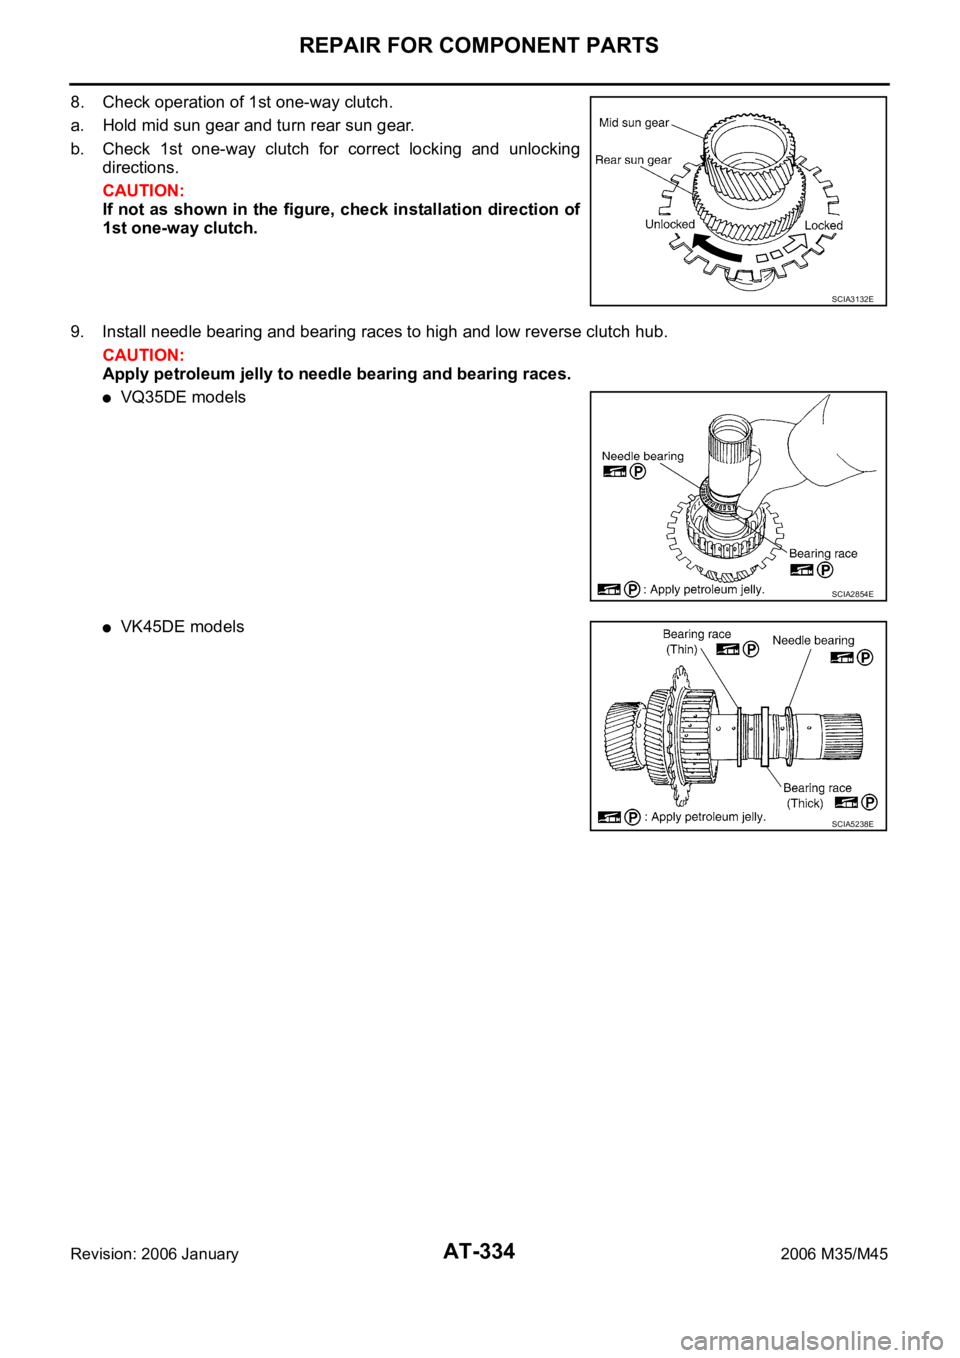
8. Check operation of 1st one-way clutch.
a. Hold mid sun gear and turn rear sun gear.
b. Check 1st one-way clutch for correct locking and unlocking
directions.
CAUTION:
If not as shown in the figure, check installation direction of
1st one-way clutch.
9. Install needle bearing and bearing races to high and low reverse clutch hub.
CAUTION:
Apply petroleum jelly to needle bearing and bearing races.
VQ35DE models
VK45DE models
SCIA3132E
SCIA2854E
SCIA5238E
Page 415 of 5621
AT-336
REPAIR FOR COMPONENT PARTS
Revision: 2006 January2006 M35/M45
High and Low Reverse Clutch Retaining Plate and Driven Plates
Check facing for burns, cracks or damage.
ASSEMBLY
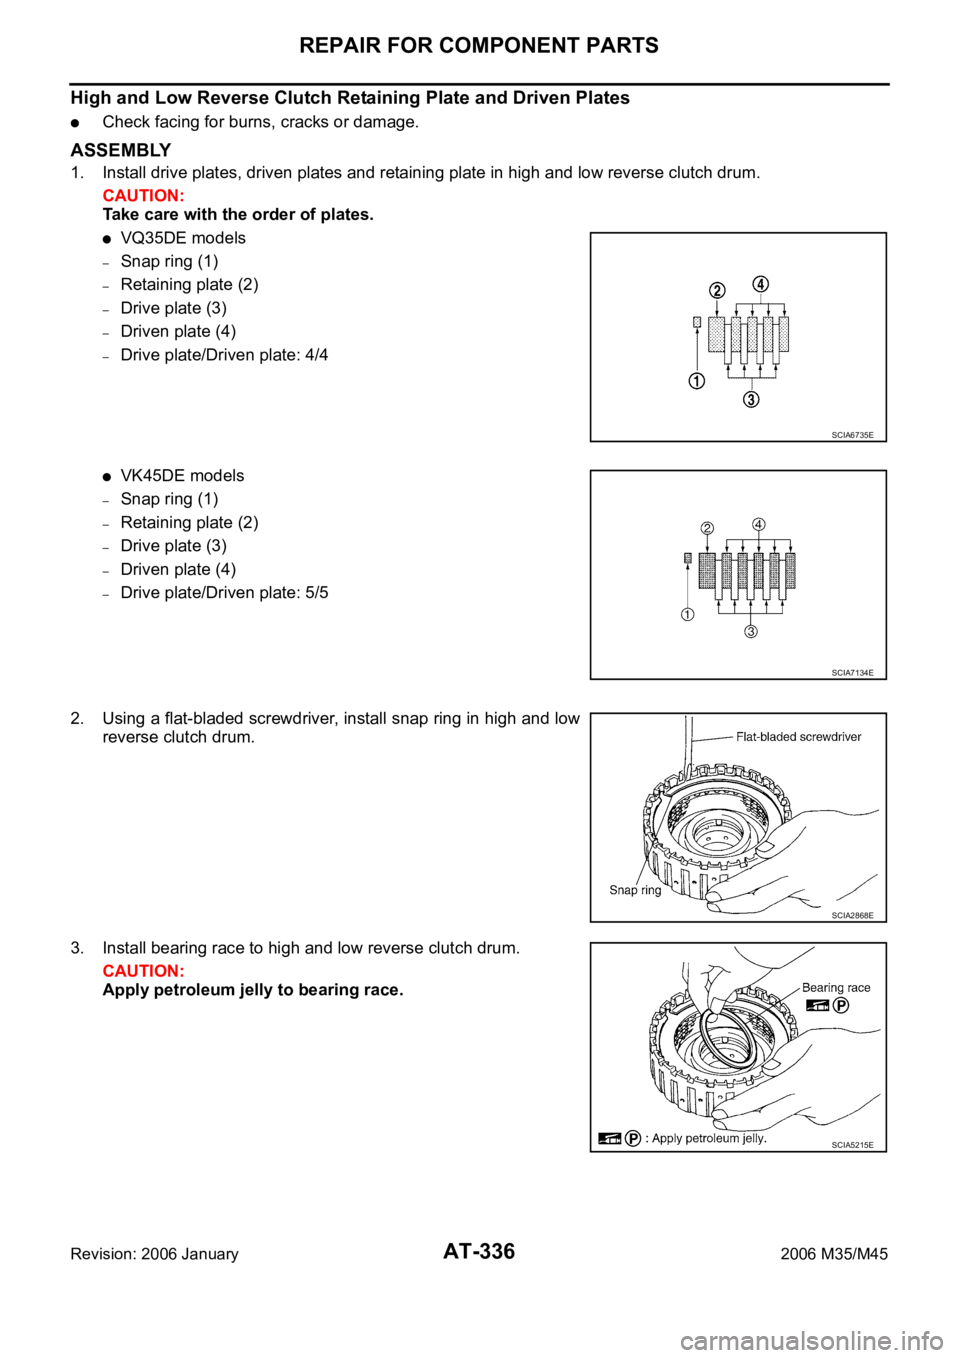
1. Install drive plates, driven plates and retaining plate in high and low reverse clutch drum.
CAUTION:
Take care with the order of plates.
VQ35DE models
–Snap ring (1)
–Retaining plate (2)
–Drive plate (3)
–Driven plate (4)
–Drive plate/Driven plate: 4/4
VK45DE models
–Snap ring (1)
–Retaining plate (2)
–Drive plate (3)
–Driven plate (4)
–Drive plate/Driven plate: 5/5
2. Using a flat-bladed screwdriver, install snap ring in high and low
reverse clutch drum.
3. Install bearing race to high and low reverse clutch drum.
CAUTION:
Apply petroleum jelly to bearing race.
SCIA6735E
SCIA7134E
SCIA2868E
SCIA5215E
Page 417 of 5621
AT-338
REPAIR FOR COMPONENT PARTS
Revision: 2006 January2006 M35/M45
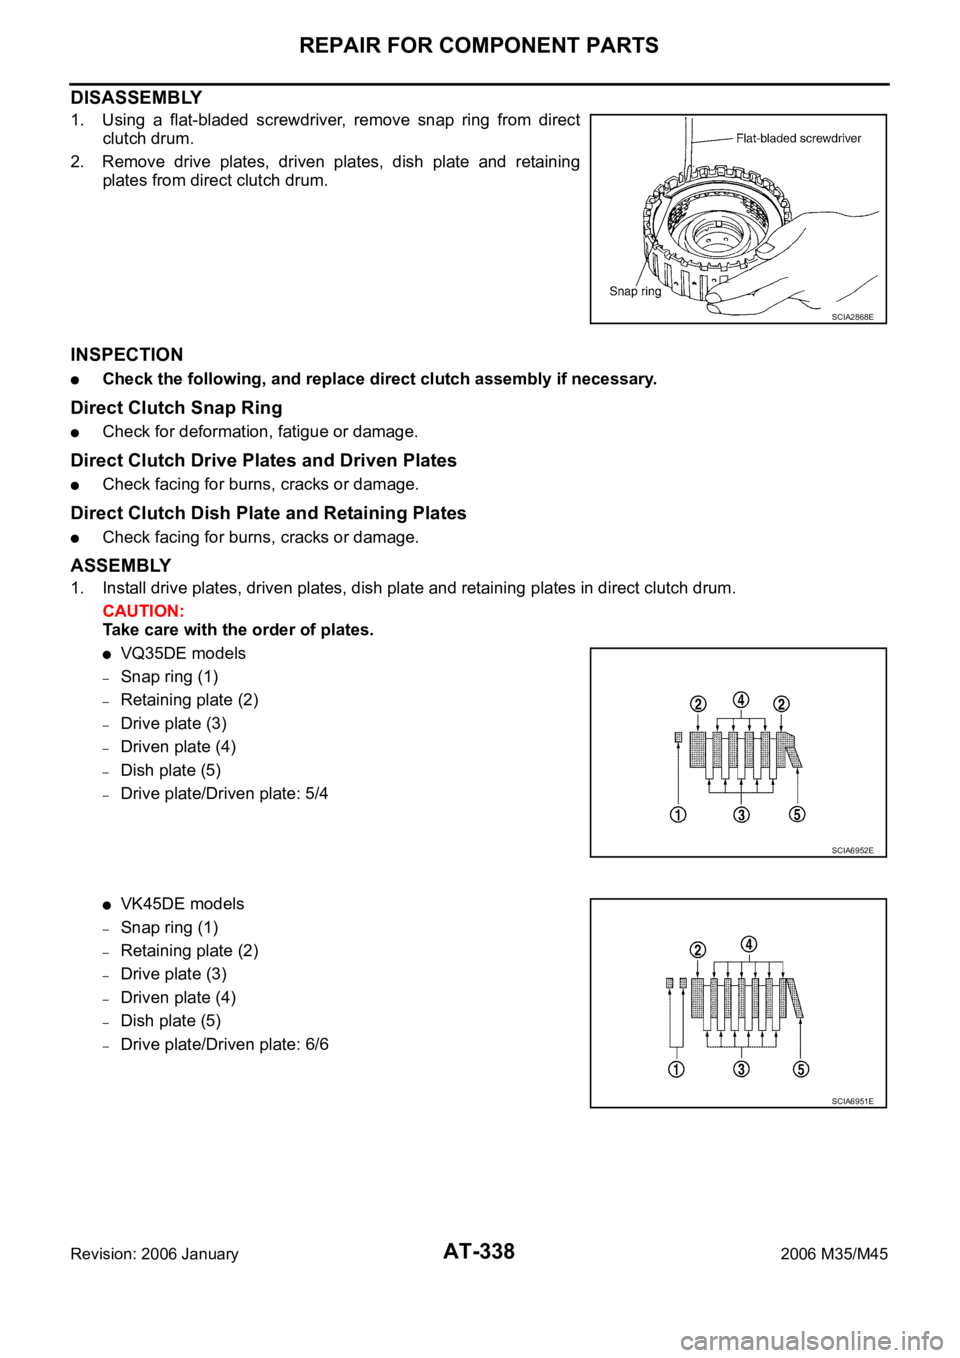
DISASSEMBLY
1. Using a flat-bladed screwdriver, remove snap ring from direct
clutch drum.
2. Remove drive plates, driven plates, dish plate and retaining
plates from direct clutch drum.
INSPECTION
Check the following, and replace direct clutch assembly if necessary.
Direct Clutch Snap Ring
Check for deformation, fatigue or damage.
Direct Clutch Drive Plates and Driven Plates
Check facing for burns, cracks or damage.
Direct Clutch Dish Plate and Retaining Plates
Check facing for burns, cracks or damage.
ASSEMBLY
1. Install drive plates, driven plates, dish plate and retaining plates in direct clutch drum.
CAUTION:
Take care with the order of plates.
VQ35DE models
–Snap ring (1)
–Retaining plate (2)
–Drive plate (3)
–Driven plate (4)
–Dish plate (5)
–Drive plate/Driven plate: 5/4
VK45DE models
–Snap ring (1)
–Retaining plate (2)
–Drive plate (3)
–Driven plate (4)
–Dish plate (5)
–Drive plate/Driven plate: 6/6
SCIA2868E
SCIA6952E
SCIA6951E
Page 418 of 5621
REPAIR FOR COMPONENT PARTS
AT-339
D
E
F
G
H
I
J
K
L
MA
B
AT
Revision: 2006 January2006 M35/M45
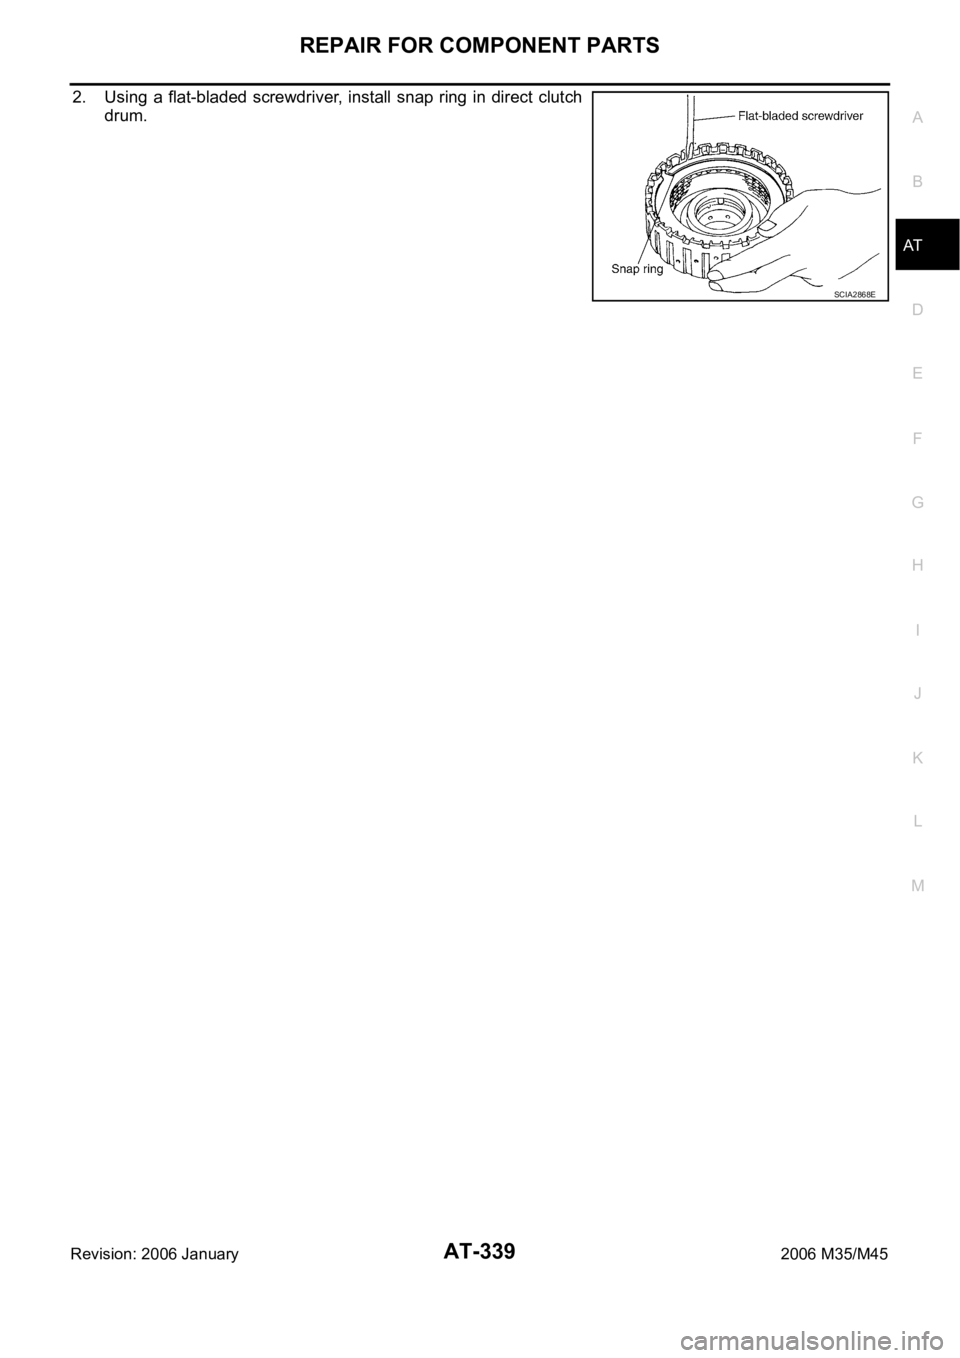
2. Using a flat-bladed screwdriver, install snap ring in direct clutch
drum.
SCIA2868E
Page 419 of 5621
![INFINITI M35 2006 Factory Owners Manual AT-340
ASSEMBLY
Revision: 2006 January2006 M35/M45
ASSEMBLYPFP:00000
Assembly (1)NCS001RA
1. As shown in the figure, use a drift [22 mm (0.87 in) dia. commer-
cial service tool] to drive manual shaft INFINITI M35 2006 Factory Owners Manual AT-340
ASSEMBLY
Revision: 2006 January2006 M35/M45
ASSEMBLYPFP:00000
Assembly (1)NCS001RA
1. As shown in the figure, use a drift [22 mm (0.87 in) dia. commer-
cial service tool] to drive manual shaft](/img/42/57023/w960_57023-418.png)
AT-340
ASSEMBLY
Revision: 2006 January2006 M35/M45
ASSEMBLYPFP:00000
Assembly (1)NCS001RA
1. As shown in the figure, use a drift [22 mm (0.87 in) dia. commer-
cial service tool] to drive manual shaft oil seals into the transmis-
sion case until it is flush.
CAUTION:
Apply ATF to manual shaft oil seals.
Do not reuse manual shaft oil seals.
2. Install detent spring and spacer in transmission case. Tighten
detent spring and spacer bolts to the specified torque. Refer to
AT-278, "
Components" .
3. Install manual shaft to transmission case.
4. Install parking rod to manual plate.
SCIA5259E
SCIA5248E
SCIA5716E
SCIA5220E
Page 420 of 5621
ASSEMBLY
AT-341
D
E
F
G
H
I
J
K
L
MA
B
AT
Revision: 2006 January2006 M35/M45
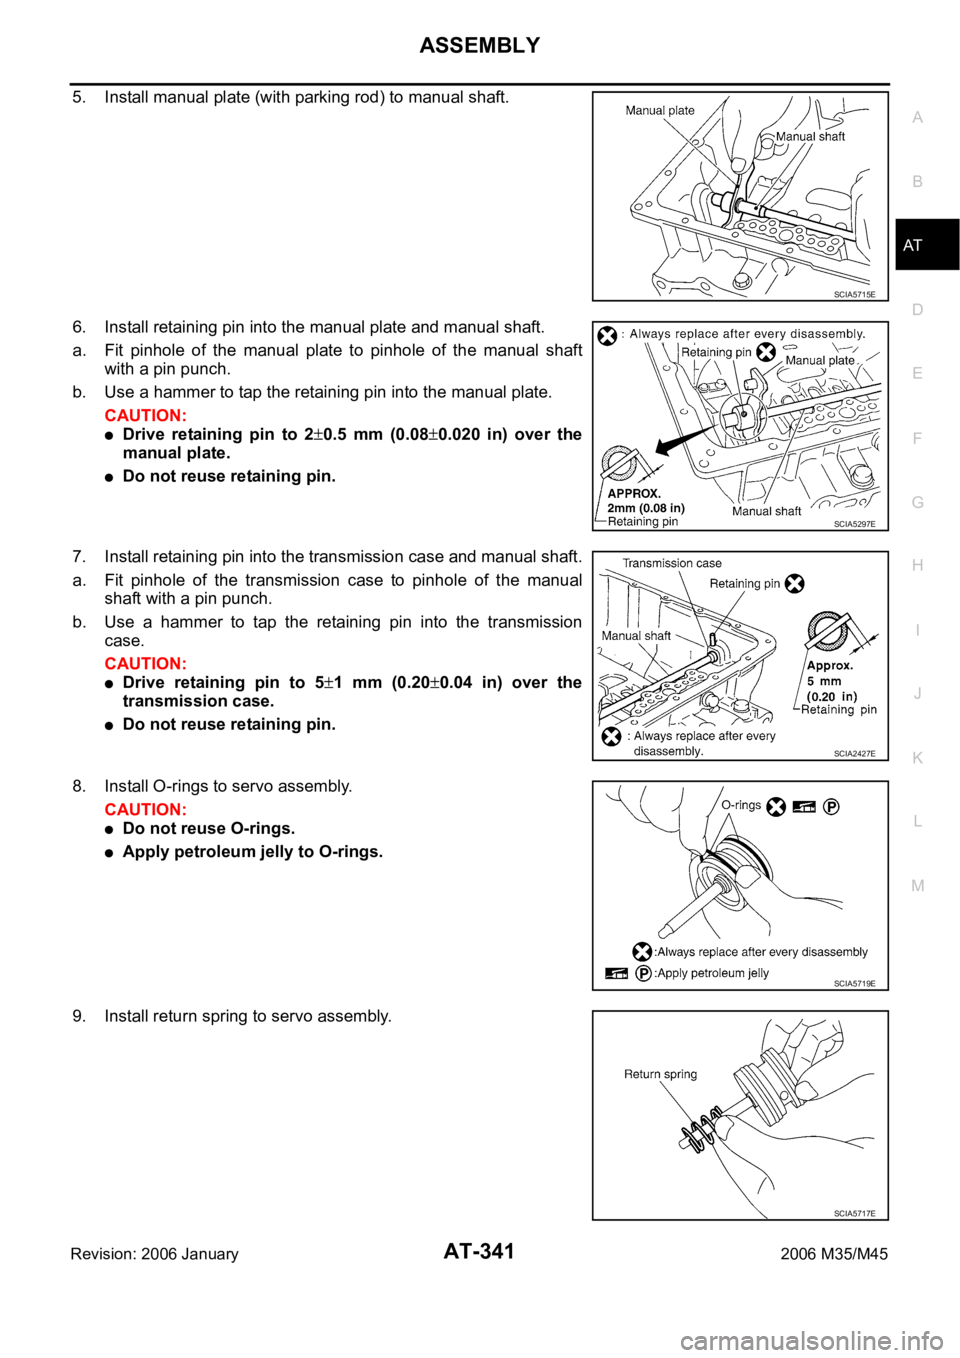
5. Install manual plate (with parking rod) to manual shaft.
6. Install retaining pin into the manual plate and manual shaft.
a. Fit pinhole of the manual plate to pinhole of the manual shaft
with a pin punch.
b. Use a hammer to tap the retaining pin into the manual plate.
CAUTION:
Drive retaining pin to 20.5 mm (0.080.020 in) over the
manual plate.
Do not reuse retaining pin.
7. Install retaining pin into the transmission case and manual shaft.
a. Fit pinhole of the transmission case to pinhole of the manual
shaft with a pin punch.
b. Use a hammer to tap the retaining pin into the transmission
case.
CAUTION:
Drive retaining pin to 51 mm (0.200.04 in) over the
transmission case.
Do not reuse retaining pin.
8. Install O-rings to servo assembly.
CAUTION:
Do not reuse O-rings.
Apply petroleum jelly to O-rings.
9. Install return spring to servo assembly.
SCIA5715E
SCIA5297E
SCIA2427E
SCIA5719E
SCIA5717E