ECU INFINITI Q50 2021 Service Manual
[x] Cancel search | Manufacturer: INFINITI, Model Year: 2021, Model line: Q50, Model: INFINITI Q50 2021Pages: 484, PDF Size: 1.86 MB
Page 167 of 484

CANCELING A REMOTE ENGINE
START
To cancel a remote engine start, perform one
of the following:
.Aim the Intelligent Key at the vehicle and
push and hold the remote engine start
button until the parking lights turn
off.
. Turn on the hazard warning flashers.
. Cycle the ignition switch ON and then
OFF.
. The extended engine run time has ex-
pired.
. The first 10 minute timer has expired.
. The engine hood has been opened.
. The shift lever is moved out of P (Park).
. The alarm sounds due to illegal entry into
the vehicle.
. The ignition switch is pushed without an
Intelligent Key in the vehicle.
. The ignition switch is pushed with an
Intelligent Key in the vehicle but the
brake pedal is not depressed.
CONDITIONS THE REMOTE EN-
GINE START WILL NOT WORK
The remote engine start will not operate if
any of the following conditions are present:
. The ignition switch is placed in the ON
position.
. The hood is not securely closed.
. The hazard warning lights are on.
. The engine is still running. The engine
must be completely stopped. Wait at
least 6 seconds if the engine goes from
running to off. This is not applicable
when extending engine run time.
. The remote engine start
button is
not pushed and held for at least 2
seconds.
. The remote engine start
button is
not pushed and held within 5 seconds of
pushing the LOCK button.
. The brake pedal is depressed.
. The doors are not closed and locked.
. The trunk is open.
. The Intelligent Key warning message is
displayed in the vehicle information dis-
play.
. The alarm sounds due to illegal entry into
the vehicle.
. Two remote engine starts, or a single
remote engine start with an extension,
have already been used. .
The vehicle is not in P (Park).
. The remote engine start function has
been switched to OFF in the settings
menu on the lower display. For additional
information, see the INFINITI InTouch
TM
Owner’s Manual.
The remote engine start may display a
warning or indicator in the vehicle informa-
tion display. For an explanation of the
warning or indicator, see “Indicators for
operation” (P.2-21).
Pre-driving checks and adjustments3-21
Page 168 of 484
3-22Pre-driving checks and adjustments
JVP0234X
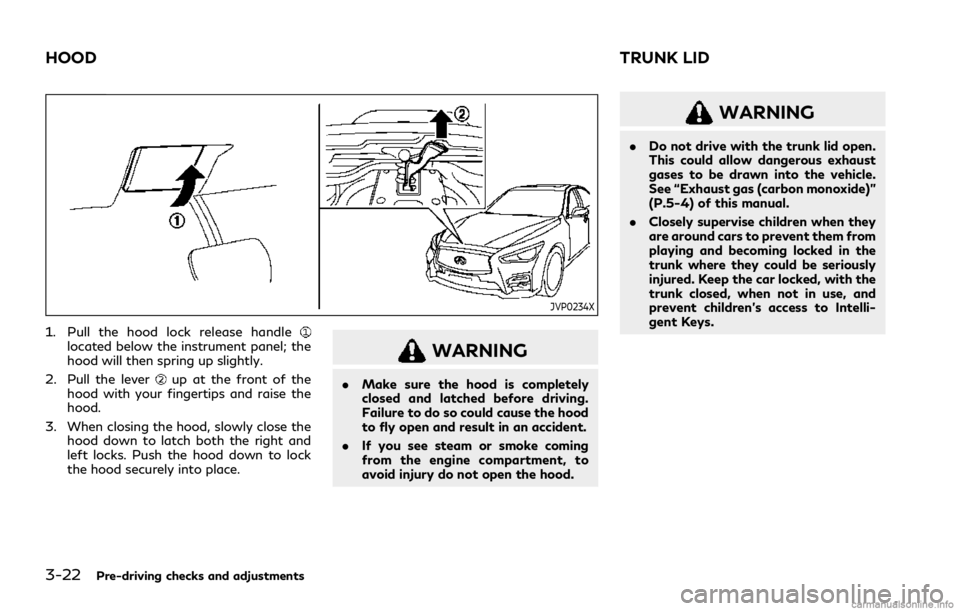
1. Pull the hood lock release handlelocated below the instrument panel; the
hood will then spring up slightly.
2. Pull the lever
up at the front of the
hood with your fingertips and raise the
hood.
3. When closing the hood, slowly close the hood down to latch both the right and
left locks. Push the hood down to lock
the hood securely into place.
WARNING
.Make sure the hood is completely
closed and latched before driving.
Failure to do so could cause the hood
to fly open and result in an accident.
. If you see steam or smoke coming
from the engine compartment, to
avoid injury do not open the hood.
WARNING
.Do not drive with the trunk lid open.
This could allow dangerous exhaust
gases to be drawn into the vehicle.
See “Exhaust gas (carbon monoxide)”
(P.5-4) of this manual.
. Closely supervise children when they
are around cars to prevent them from
playing and becoming locked in the
trunk where they could be seriously
injured. Keep the car locked, with the
trunk closed, when not in use, and
prevent children’s access to Intelli-
gent Keys.
HOOD TRUNK LID
Page 170 of 484

3-24Pre-driving checks and adjustments
JVP0203X
TRUNK RELEASE POWER CAN-
CEL SWITCH
When the switch located inside the glove
box is in the OFF position, the power to
the trunk lid will be canceled and the trunk lid
cannot be opened by the trunk lid release
switch, the trunk open request switch or the
TRUNK button on the Intelligent Key.
When you have to leave the vehicle with a
valet and want to keep your belongings safe
in the glove box and the trunk, push this
switch to OFF and lock the glove box with
the mechanical key. Then leave the vehicle
and the Intelligent Key with the valet and
keep the mechanical key with you. (See “Keys” (P.3-2).)
To connect the power to the trunk lid, push
the switch to the ON
position.
SPA2768
INTERIOR TRUNK LID RELEASE
WARNING
Closely supervise children when they are
around cars to prevent them from play-
ing and becoming locked in the trunk
where they could be seriously injured.
Keep the car locked, with the trunk lid
securely latched, when not in use, and
prevent children’s access to Intelligent
Keys.
The interior trunk lid release mechanism
allows opening of the trunk lid in the event
Page 171 of 484
that people become locked inside the trunk
or in the event of the loss of electrical power
such as a discharged battery.
Releasing inside the trunk
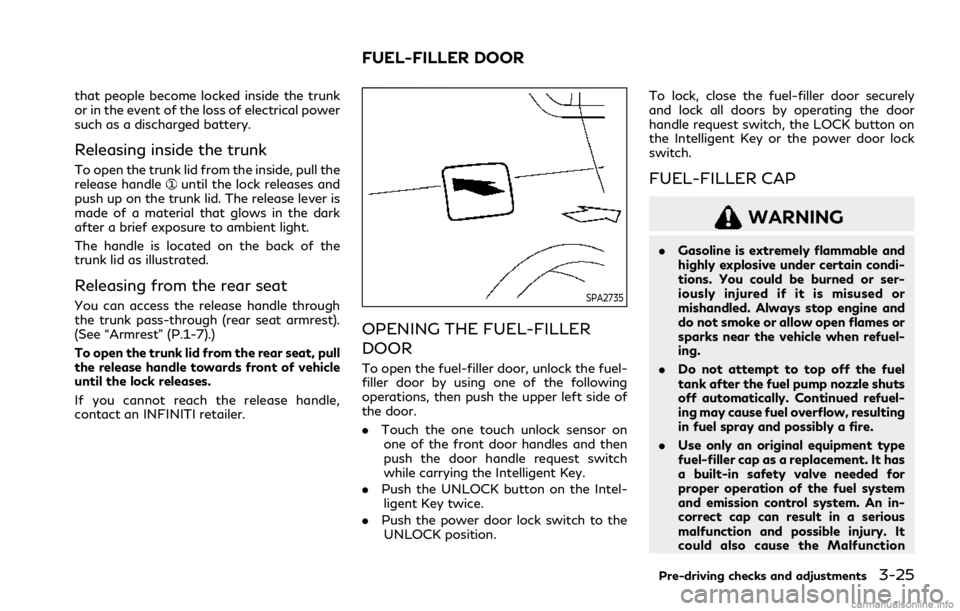
To open the trunk lid from the inside, pull the
release handleuntil the lock releases and
push up on the trunk lid. The release lever is
made of a material that glows in the dark
after a brief exposure to ambient light.
The handle is located on the back of the
trunk lid as illustrated.
Releasing from the rear seat
You can access the release handle through
the trunk pass-through (rear seat armrest).
(See “Armrest” (P.1-7).)
To open the trunk lid from the rear seat, pull
the release handle towards front of vehicle
until the lock releases.
If you cannot reach the release handle,
contact an INFINITI retailer.SPA2735
OPENING THE FUEL-FILLER
DOOR
To open the fuel-filler door, unlock the fuel-
filler door by using one of the following
operations, then push the upper left side of
the door.
. Touch the one touch unlock sensor on
one of the front door handles and then
push the door handle request switch
while carrying the Intelligent Key.
. Push the UNLOCK button on the Intel-
ligent Key twice.
. Push the power door lock switch to the
UNLOCK position. To lock, close the fuel-filler door securely
and lock all doors by operating the door
handle request switch, the LOCK button on
the Intelligent Key or the power door lock
switch.
FUEL-FILLER CAP
WARNING
.
Gasoline is extremely flammable and
highly explosive under certain condi-
tions. You could be burned or ser-
iously injured if it is misused or
mishandled. Always stop engine and
do not smoke or allow open flames or
sparks near the vehicle when refuel-
ing.
. Do not attempt to top off the fuel
tank after the fuel pump nozzle shuts
off automatically. Continued refuel-
ing may cause fuel overflow, resulting
in fuel spray and possibly a fire.
. Use only an original equipment type
fuel-filler cap as a replacement. It has
a built-in safety valve needed for
proper operation of the fuel system
and emission control system. An in-
correct cap can result in a serious
malfunction and possible injury. It
could also cause the Malfunction
Pre-driving checks and adjustments3-25
FUEL-FILLER DOOR
Page 174 of 484

3-28Pre-driving checks and adjustments
SPA2328
MANUAL OPERATION (if so
equipped)
Tilt or telescopic operation
Pull the lock leverdown and adjust the
steering wheel up, down, forward or rear-
ward to the desired position.
Push the lock lever up securely to lock the
steering wheel in place.
JVP0205X
ELECTRIC OPERATION (if so
equipped)
Tilt or telescopic operation
Move the switch to adjust the steering
wheel up or down, forward or rearward to
the desired position.
Entry/Exit function operation:
The memory seat system will make the
steering wheel move up automatically when
the driver’s door is opened with the ignition
switch in the LOCK position. This lets the
driver get into and out of the seat more
easily. For more information, see “Memory seat”
(P.3-33).
Page 189 of 484
REARVIEW MONITOR SYSTEM
LIMITATIONS
WARNING
Listed below are the system limitations
for RearView Monitor. Failure to oper-
ate the vehicle in accordance with these
system limitations could result in serious
injury or death.
.The system cannot completely elim-
inate blind spots and may not show
every object.
. Underneath the bumper and the
corner areas of the bumper cannot
be viewed on the RearView Monitor
because of its monitoring range lim-
itation. The system will not show
small objects below the bumper, and
may not show objects close to the
bumper or on the ground.
. Objects viewed in the RearView
Monitor differ from actual distance
because a wide-angle lens is used.
. Objects in the RearView Monitor will
appear visually opposite compared to
when viewed in the rearview and
outside mirrors. .
Use the displayed lines as a reference.
The lines are highly affected by the
number of occupants, fuel level, ve-
hicle position, road conditions and
road grade.
. Make sure that the trunk lid is
securely closed when backing up.
. Do not put anything on the rearview
camera. The rearview camera is in-
stalled above the license plate.
. When washing the vehicle with high-
pressure water, be sure not to spray
it around the camera. Otherwise,
water may enter the camera unit
causing water condensation on the
lens, a malfunction, fire or an electric
shock.
. Do not strike the camera. It is a
precision instrument. Otherwise, it
may malfunction or cause damage
resulting in a fire or an electric shock.
The following are operating limitations and
do not represent a system malfunction:
. When the temperature is extremely high
or low, the screen may not clearly display
objects.
. When strong light is directly coming on
the camera, objects may not be displayed
clearly. .
Vertical lines may be seen in objects on
the screen. This is due to strong reflected
light from the bumper.
. The screen may flicker under fluorescent
light.
. The colors of objects on the RearView
Monitor may differ somewhat from the
actual color of objects.
. Objects on the monitor may not be clear
in a dark environment.
. There may be a delay when switching to
the RearView Monitor.
. If dirt, rain or snow accumulates on the
camera, the RearView Monitor may not
display object clearly. Clean the camera.
. Do not use wax on the camera lens. Wipe
off any wax with a clean cloth dampened
with a diluted mild cleaning agent, then
wipe with a dry cloth.
Monitor, climate, audio, phone and voice recognition systems4-9
Page 202 of 484
4-22Monitor, climate, audio, phone and voice recognition systems
AROUND VIEW®MONITOR SYS-
TEM LIMITATIONS
WARNING
Listed below are the system limitations
for Around View®Monitor. Failure to
operate the vehicle in accordance with
these system limitations could result in
serious injury or death.
. Do not use the Around View
®Moni-
tor with the outside mirrors in the
stored position, and make sure that
the trunk lid is securely closed when
operating the vehicle using the
Around View
®Monitor.
. The apparent distance between ob-
jects viewed on the Around View
®
Monitor differs from the actual dis-
tance.
. The cameras are installed on the
front grille, the outside mirrors and
above the rear license plate. Do not
put anything on the vehicle that
covers the cameras.
. When washing the vehicle with high
pressure water, be sure not to spray
it around the cameras. Otherwise,
water may enter the camera unit causing water condensation on the
lens, a malfunction, fire or an electric
shock.
. Do not strike the cameras. They are
precision instruments. Doing so could
cause a malfunction or cause damage
resulting in a fire or an electric shock.
WAE0220X
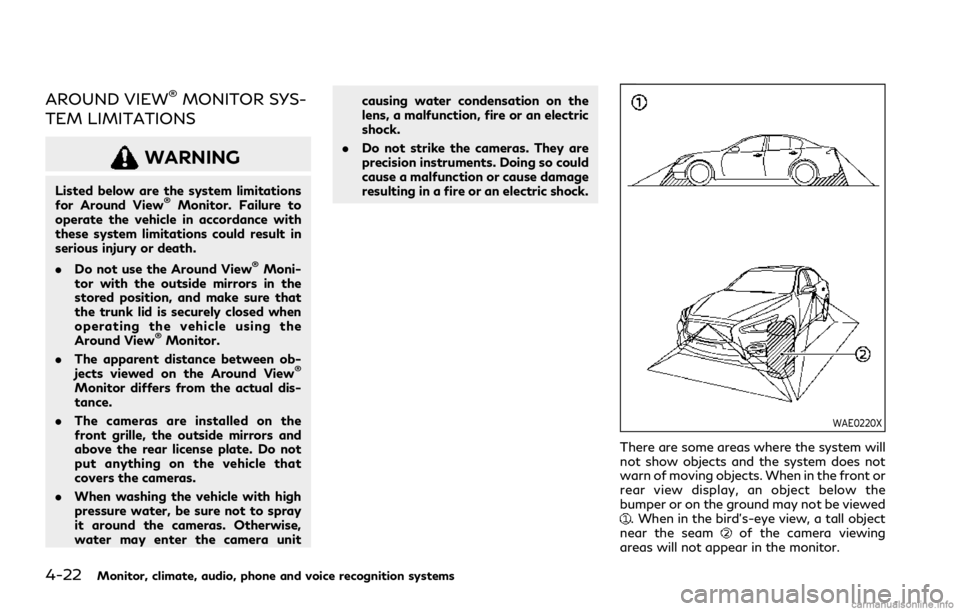
There are some areas where the system will
not show objects and the system does not
warn of moving objects. When in the front or
rear view display, an object below the
bumper or on the ground may not be viewed
. When in the bird’s-eye view, a tall object
near the seamof the camera viewing
areas will not appear in the monitor.
Page 228 of 484
5-4Starting and driving
WARNING
.Do not leave children or adults who
would normally require the support
of others alone in your vehicle. Pets
should not be left alone either. They
could accidentally injure themselves
or others through inadvertent opera-
tion of the vehicle. Also, on hot,
sunny days, temperatures in a closed
vehicle could quickly become high
enough to cause severe or possibly
fatal injuries to people or animals.
. Closely supervise children when they
are around cars to prevent them from
playing and becoming locked in the
trunk where they could be seriously
injured. Keep the car locked, with the
rear seatback and trunk lid securely
latched when not in use, and prevent
children’s access to car keys.
EXHAUST GAS (carbon monoxide)
WARNING
.Do not breathe exhaust gases; they
contain colorless and odorless carbon
monoxide. Carbon monoxide is dan-
gerous. It can cause unconsciousness
or death.
. If you suspect that exhaust fumes are
entering the vehicle, drive with all
windows fully open, and have the
vehicle inspected immediately.
. Do not run the engine in closed spaces
such as a garage.
. Do not park the vehicle with the
engine running for any extended
length of time.
. Keep the trunk lid closed while driv-
ing, otherwise exhaust gases could be
drawn into the passenger compart-
ment. If you must drive with the
trunk lid open, follow these precau-
tions:
1) Open all the windows.
2) Set the air recirculation to off and the fan control to high to circulate
the air. .
If electrical wiring or other cable
connections must pass to a trailer
through the seal on the trunk lid or
the body, follow the manufacturer’s
recommendation to prevent carbon
monoxide entry into the vehicle.
. The exhaust system and body should
be inspected by a qualified mechanic
whenever:
— The vehicle is raised for service.
— You suspect that exhaust fumes are entering into the passenger
compartment.
— You notice a change in the sound of the exhaust system.
— You have had an accident invol- ving damage to the exhaust sys-
tem, underbody, or rear of the
vehicle.
PRECAUTIONS WHEN STARTING
AND DRIVING
Page 235 of 484
belted or radial), and tread pattern
on all four wheels. Install tire chains
on the rear wheels when driving on
slippery roads and drive carefully.
. This vehicle is not designed for off-
road (rough road) use. Do not drive
on sandy or muddy roads that tires
may get stuck in.
. For AWD equipped vehicles, do not
attempt to raise two wheels off the
ground and shift the transmission to
any D (Drive) or R (Reverse) position
with the engine running. Doing so
may result in drivetrain damage or
unexpected vehicle movement which
could result in serious vehicle damage
or personal injury.
. Do not attempt to test an AWD
equipped vehicle on a 2-wheel dy-
namometer (such as the dynam-
ometers used by some states for
emissions testing), or similar equip-
ment even if the other two wheels are
raised off the ground. Make sure you
inform test facility personnel that
your vehicle is equipped with AWD
before it is placed on a dynamometer.
Using the wrong test equipment may
result in drivetrain damage or unex-
pected vehicle movement which could
result in serious vehicle damage or personal injury.
. When a wheel is off the ground due
to an unlevel surface, do not spin the
wheel excessively.WARNING
Do not operate the push-button ignition
switch while driving the vehicle except in
an emergency. (The engine will stop
when the ignition switch is pushed 3
consecutive times or the ignition switch
is pushed and held for more than 2
seconds.) If the engine stops while the
vehicle is being driven, this could lead to
a crash and serious injury.
Before operating the push-button ignition
switch, be sure to move the shift lever to the
P (Park) position.
Starting and driving5-11
PUSH-BUTTON IGNITION SWITCH
Page 237 of 484
Some indicators and warnings for operation
are displayed in the vehicle information
display between the speedometer and tach-
ometer. (See “Vehicle information display”
(P.2-18).)
The ignition lock is designed so that the
ignition switch position cannot be switched
to LOCK until the shift lever is moved to the
P (Park) position.
When the ignition switch cannot be pushed
toward the LOCK position, proceed as
follows:
1. Move the shift lever into the P (Park)position.
2. Push the ignition switch to the OFF position. The ignition switch position
indicator will not illuminate.
3. Open the door. The ignition switch will change to the LOCK position.
The shift lever can be moved from the P
(Park) position if the ignition switch is in the
ON position and the brake pedal is de-
pressed.PUSH-BUTTON IGNITION
SWITCH POSITIONS
LOCK (Normal parking position)
The ignition switch can only be locked in this
position.
The ignition switch will be unlocked when it
is pushed to the ACC position while carrying
the Intelligent Key.
ACC (Accessories)
This position activates electrical accessories
such as the radio, when the engine is not
running.
ON (Normal operating position)
This position turns on the ignition system
and electrical accessories.
OFF
The engine can be turned off in this position.
The ignition lock is designed so that the
ignition switch cannot be switched to the
LOCK position until the shift lever is moved
to the P (Park) position.
CAUTION
Do not leave the vehicle with the push-
button ignition switch in ACC or ON
positions when the engine is not running
for an extended period. This can dis-
charge the battery.
EMERGENCY ENGINE SHUT OFF
To shut off the engine in an emergency
situation while driving, perform the follow-
ing procedure:
. Rapidly push the push-button ignition
switch 3 consecutive times in less than
1.5 seconds, or
. Push and hold the push-button ignition
switch for more than 2 seconds.
Starting and driving5-13