display INFINITI Q70 2016 Quick Reference Guide
[x] Cancel search | Manufacturer: INFINITI, Model Year: 2016, Model line: Q70, Model: INFINITI Q70 2016Pages: 32, PDF Size: 2.3 MB
Page 2 of 32
23
25
*See your Owner’s Manual for information.
77
22
2424
131415
12
86
21
1110
Behind
steering wheel
Behind
steering wheelBehind
steering wheel
9
3
181917
20
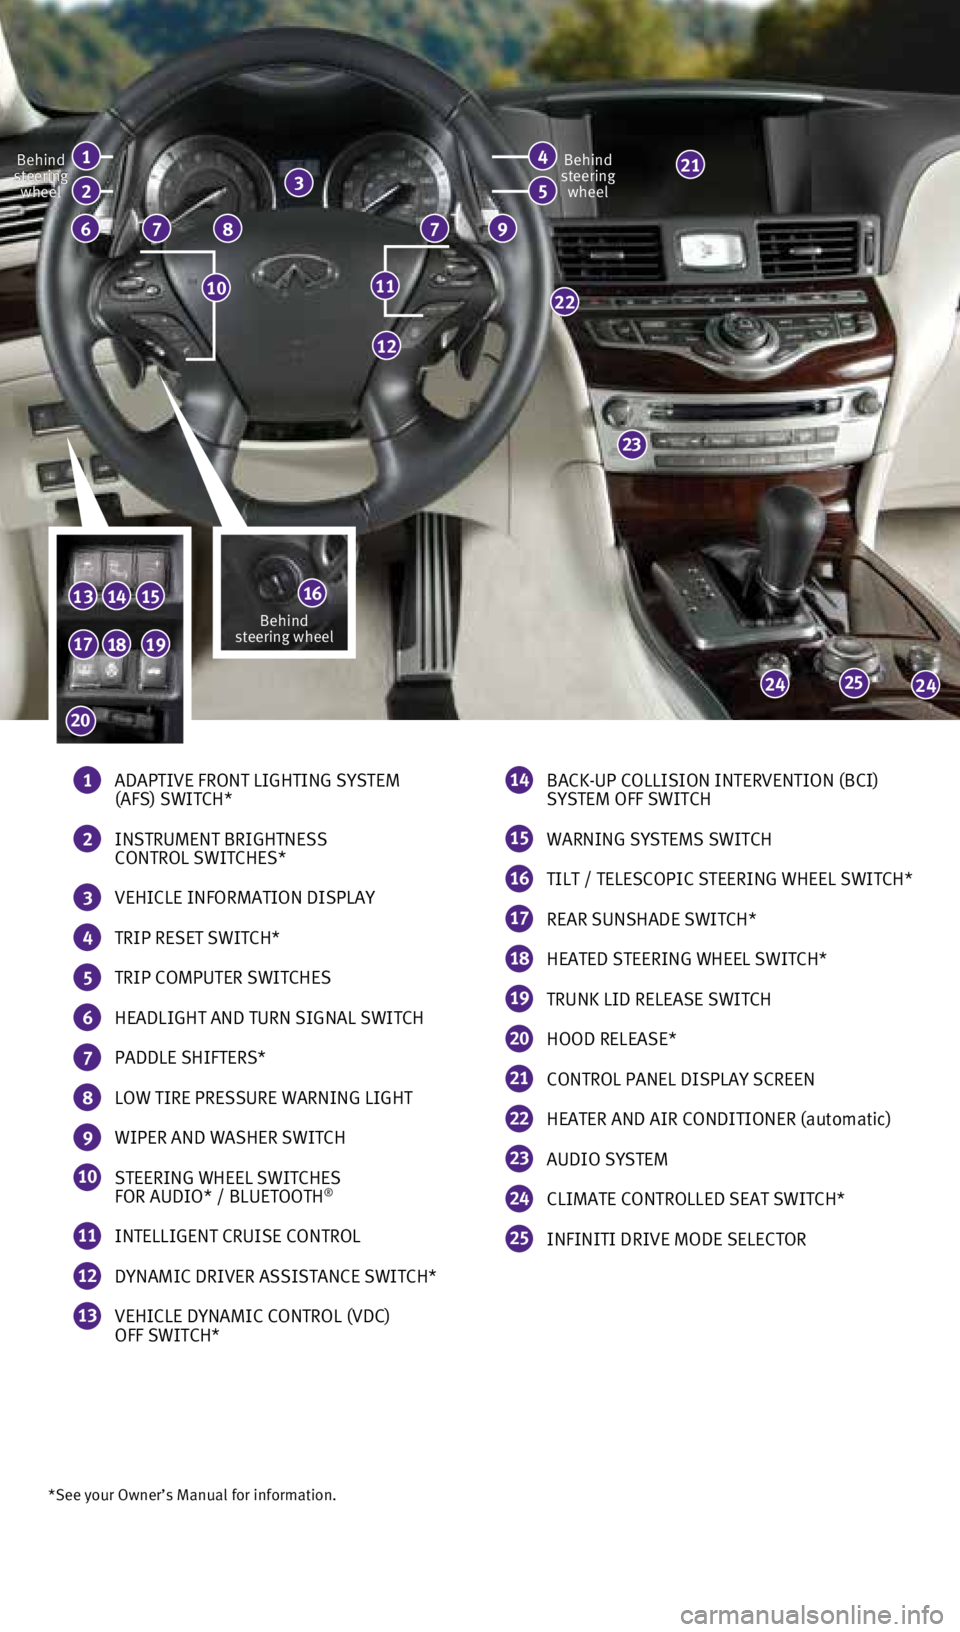
1 ADAPTIVE FRONT LIGHTING SYSTEM
(AFS) SWITCH*
2 INSTRUMENT BRIGHTNESS
CONTROL SWITCHES*
3 VEHICLE INFORMATION DISPLAY
4 TRIP RESET SWITCH*
5 TRIP COMPUTER SWITCHES
6 HEADLIGHT AND TURN SIGNAL SWITCH
7 PADDLE SHIFTERS*
8 LOW TIRE PRESSURE WARNING LIGHT
9 WIPER AND WASHER SWITCH
10 STEERING WHEEL SWITCHES
FOR AUDIO* / BLUETOOTH®
11 INTELLIGENT CRUISE CONTROL
12 DYNAMIC DRIVER ASSISTANCE SWITCH*
13 VEHICLE DYNAMIC CONTROL (VDC)
OFF SWITCH*
14 BACK-UP COLLISION INTERVENTION (BCI)
SYSTEM OFF SWITCH
15 WARNING SYSTEMS SWITCH
16 TILT / TELESCOPIC STEERING WHEEL SWITCH*
17 REAR SUNSHADE SWITCH*
18 HEATED STEERING WHEEL SWITCH*
19 TRUNK LID RELEASE SWITCH
20 HOOD RELEASE*
21 CONTROL PANEL DISPLAY SCREEN
22 HEATER AND AIR CONDITIONER (automatic)
23 AUDIO SYSTEM
24 CLIMATE CONTROLLED SEAT SWITCH*
25 INFINITI DRIVE MODE SELECTOR
41
52
16Behind
steering wheel
1932611_16a_Q70_US_pQRG_092415.indd 39/24/15 11:06 AM
Page 4 of 32
2
Around View® Monitor (AVM) with Moving Object Detection (MOD)
(if so equipped)
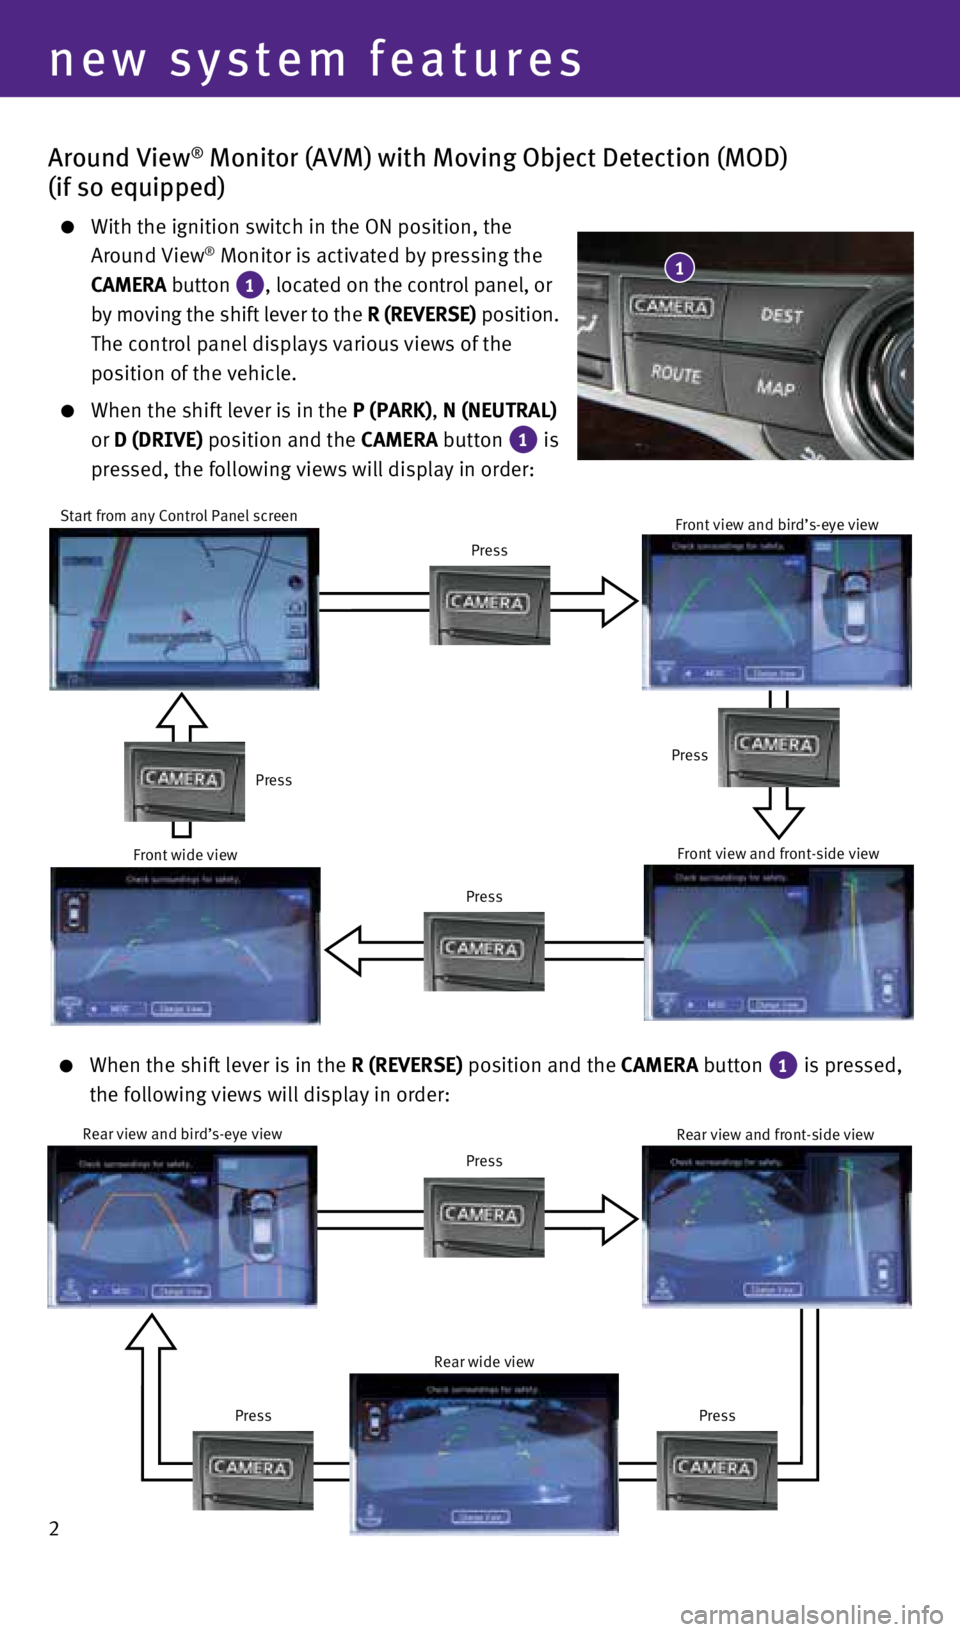
With the ignition switch in the ON position, the
Around View® Monitor is activated by pressing the
CAMERA button
1, located on the control panel, or
by moving the shift lever to the R (REVERSE) position.
The control panel displays various views of the
position of the vehicle.
When the shift lever is in the P (PARK), N (NEUTRAL)
or D (DRIVE) position and the CAMERA button
1 is
pressed, the following views will display in order:
1
Start from any Control Panel screen
Press
Press Press
Press
Front wide view Front view and bird’s-eye viewFront view and front-side view
When the shift lever is in the R (REVERSE) position and the CAMERA button 1 is pressed,
the following views will display in order:
Rear view and bird’s-eye view
Press
Press
Press Rear view and front-side view
Rear wide view
new system features
1932611_16a_Q70_US_pQRG_092415.indd 29/24/15 11:07 AM
Page 5 of 32
3
3
The colored guide lines on the display screen indicate vehicle width and\
approximate
distances to objects with reference to the vehicle body line.
• Red 1.5 ft (0.5 m); Yellow 3 ft (1 m); Green 7 ft (2 m) and 1\
0 ft (3 m).
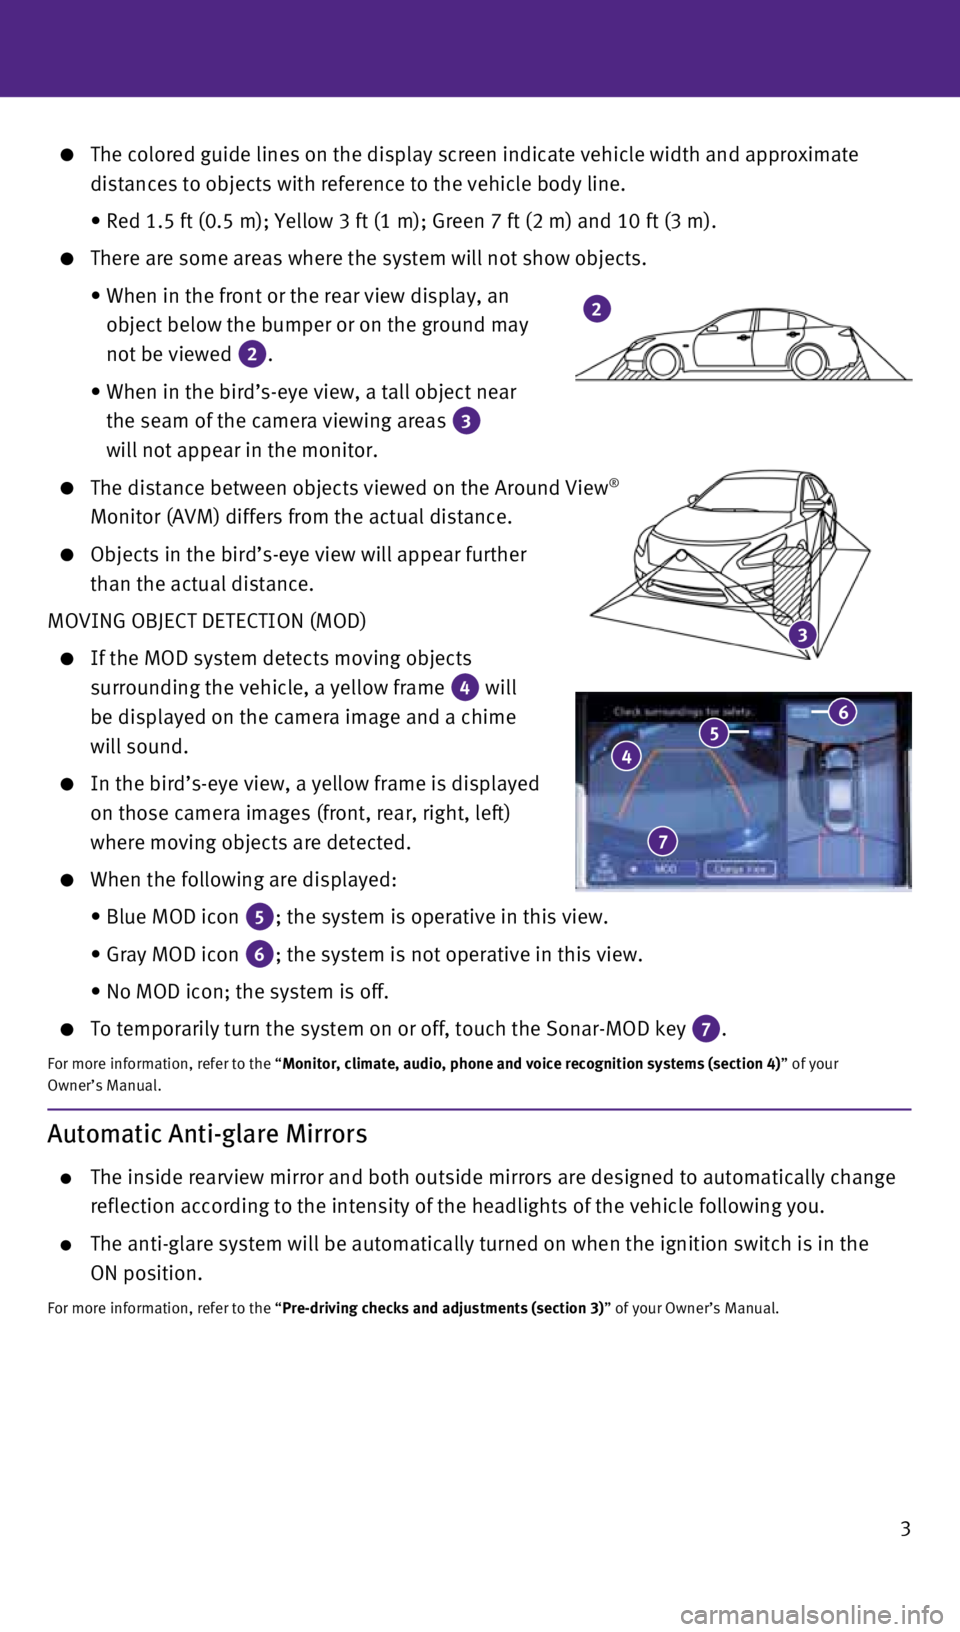
There are some areas where the system will not show objects.
• When in the front or the rear view display, an
object below the bumper or on the ground may
not be viewed
2.
• When in the bird’s-eye view, a tall object near
the seam of the camera viewing areas
3
will not appear in the monitor.
The distance between objects viewed on the Around View®
Monitor (AVM) differs from the actual distance.
Objects in the bird’s-eye view will appear further
than the actual distance.
MOVING OBJECT DETECTION (MOD)
If the MOD system detects moving objects
surrounding the vehicle, a yellow frame
4 will
be displayed on the camera image and a chime
will sound.
In the bird’s-eye view, a yellow frame is displayed
on those camera images (front, rear, right, left)
where moving objects are detected.
When the following are displayed:
• Blue MOD icon
5; the system is operative in this view.
• Gray MOD icon
6; the system is not operative in this view.
• No MOD icon; the system is off.
To temporarily turn the system on or off, touch the Sonar-MOD key 7.
For more information, refer to the “Monitor, climate, audio, phone and voice recognition systems (section 4\
) ” of your
Owner’s Manual.
4 5 6
7
2
Automatic Anti-glare Mirrors
The inside rearview mirror and both outside mirrors are designed to auto\
matically change
reflection according to the intensity of the headlights of the vehicle f\
ollowing you.
The anti-glare system will be automatically turned on when the ignition \
switch is in the
ON position.
For more information, refer to the “Pre-driving checks and adjustments (section 3)” of your Owner’s Manual.
1932611_16a_Q70_US_pQRG_092415.indd 39/24/15 11:08 AM
Page 7 of 32
5
Lane Departure Warning (LDW) (if so equipped)
The LDW system can help alert the driver when the vehicle is traveling t\
oo close to either
the left or the right side of a traveling lane.
The system will operate when the vehicle is driven at speeds of approxim\
ately 45 mph
(70 km/h) and above and only when the lane markings are clearly visibl\
e on the road.
When the vehicle approaches either the left or the right side of the tra\
veling
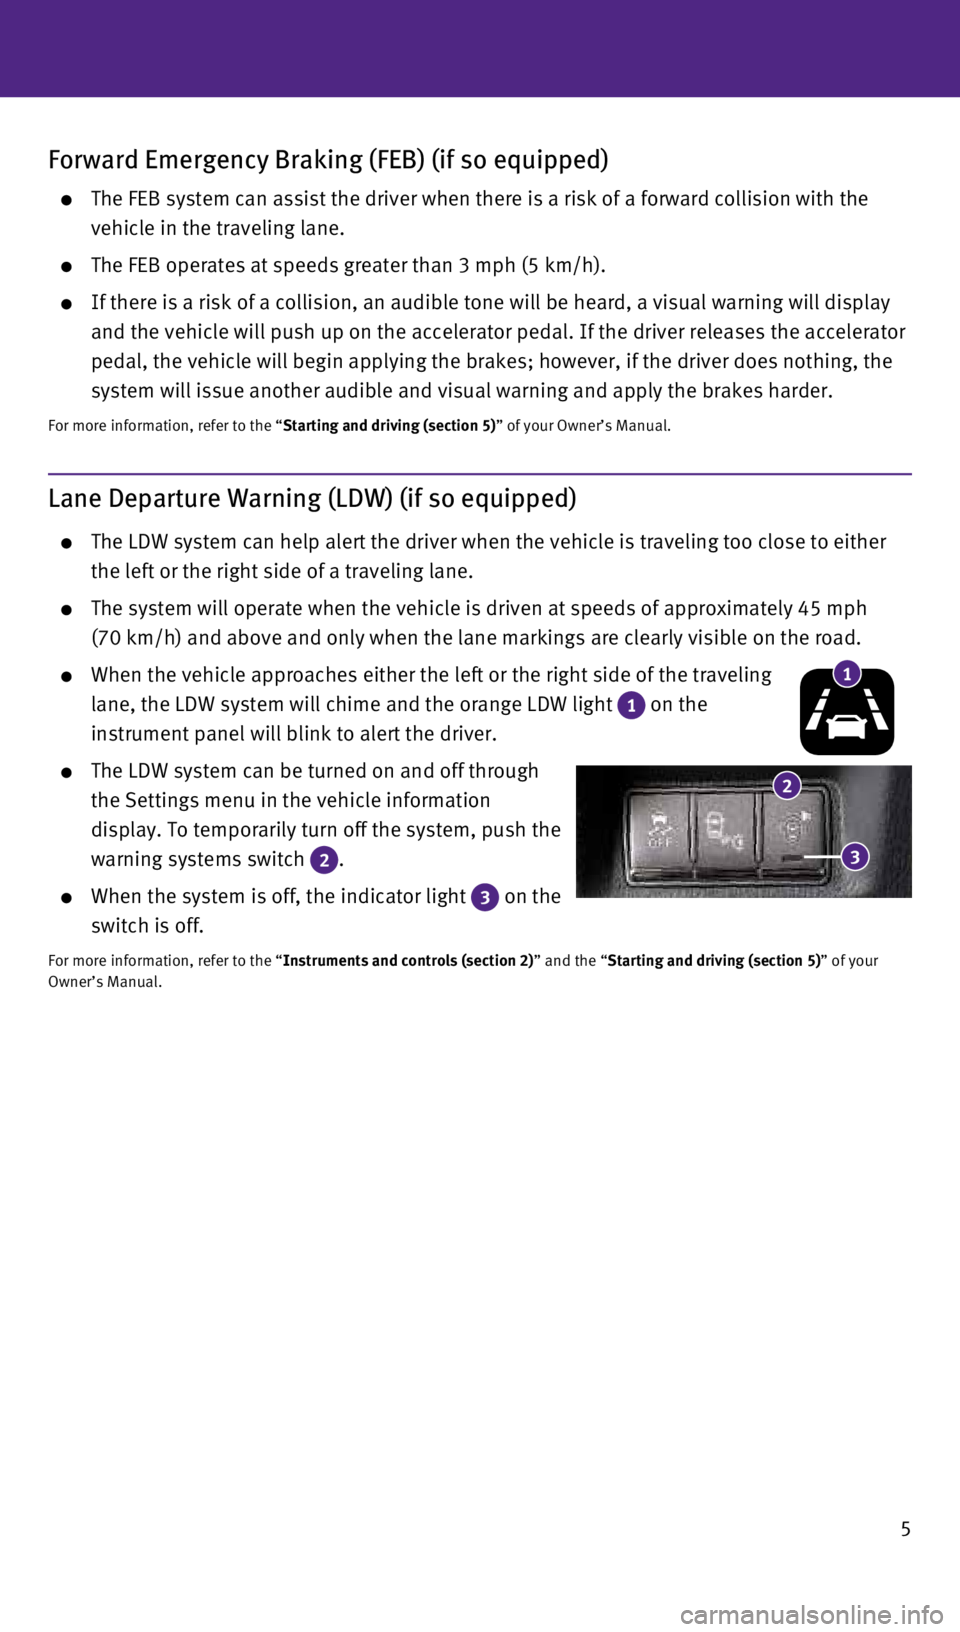
lane, the LDW system will chime and the orange LDW light
1 on the
instrument panel will blink to alert the driver.
The LDW system can be turned on and off through
the Settings menu in the vehicle information
display. To temporarily turn off the system, push the
warning systems switch
2 .
When the system is off, the indicator light 3 on the
switch is off.
For more information, refer to the “Instruments and controls (section 2)” and the “Starting and driving (section 5)” of your
Owner’s Manual.
Forward Emergency Braking (FEB) (if so equipped)
The FEB system can assist the driver when there is a risk of a forward c\
ollision with the
vehicle in the traveling lane.
The FEB operates at speeds greater than 3 mph (5 km/h).
If there is a risk of a collision, an audible tone will be heard, a visu\
al warning will display
and the vehicle will push up on the accelerator pedal. If the driver rel\
eases the accelerator
pedal, the vehicle will begin applying the brakes; however, if the drive\
r does nothing, the
system will issue another audible and visual warning and apply the brake\
s harder.
For more information, refer to the “Starting and driving (section 5)” of your Owner’s Manual.
1
2
3
1932611_16a_Q70_US_pQRG_092415.indd 59/24/15 11:08 AM
Page 8 of 32
6
Tire Pressure Monitoring System (TPMS)
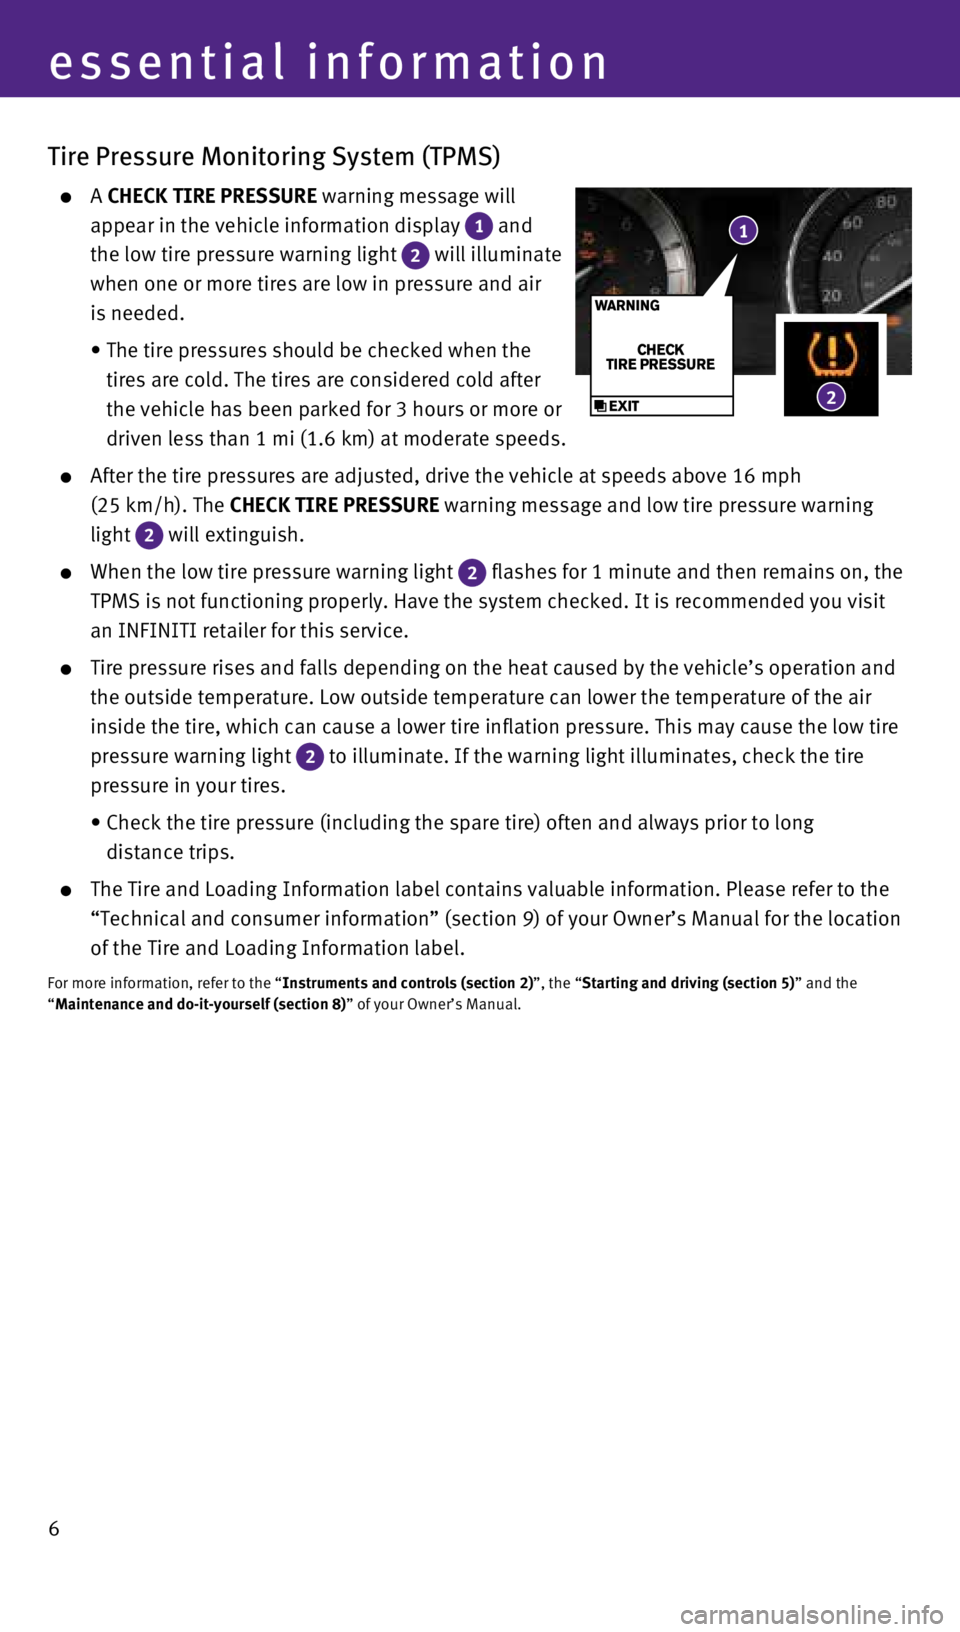
A CHECK TIRE PRESSURE warning message will
appear in the vehicle information display
1 and
the low tire pressure warning light
2 will illuminate
when one or more tires are low in pressure and air
is needed.
• The tire pressures should be checked when the
tires are cold. The tires are considered cold after
the vehicle has been parked for 3 hours or more or
driven less than 1 mi (1.6 km) at moderate speeds.
After the tire pressures are adjusted, drive the vehicle at speeds above\
16 mph
(25 km/h). The CHECK TIRE PRESSURE warning message and low tire pressure warning
light
2 will extinguish.
When the low tire pressure warning light 2 flashes for 1 minute and then remains on, the
TPMS is not functioning properly. Have the system checked. It is recomme\
nded you visit
an INFINITI retailer for this service.
Tire pressure rises and falls depending on the heat caused by the vehicl\
e’s operation and
the outside temperature. Low outside temperature can lower the temperatu\
re of the air
inside the tire, which can cause a lower tire inflation pressure. This m\
ay cause the low tire
pressure warning light
2 to illuminate. If the warning light illuminates, check the tire
pressure in your tires.
• Check the tire pressure (including the spare tire) often and always pr\
ior to long
distance trips.
The Tire and Loading Information label contains valuable information. Pl\
ease refer to the
“Technical and consumer information” (section 9) of your Owner’\
s Manual for the location
of the Tire and Loading Information label.
For more information, refer to the “Instruments and controls (section 2)”, the “Starting and driving (section 5)” and the
“Maintenance and do-it-yourself (section 8)” of your Owner’s Manual.
essential information
1
2
1932611_16a_Q70_US_pQRG_092415.indd 69/24/15 11:08 AM
Page 9 of 32
7
Warning Systems Switch (if so equipped)
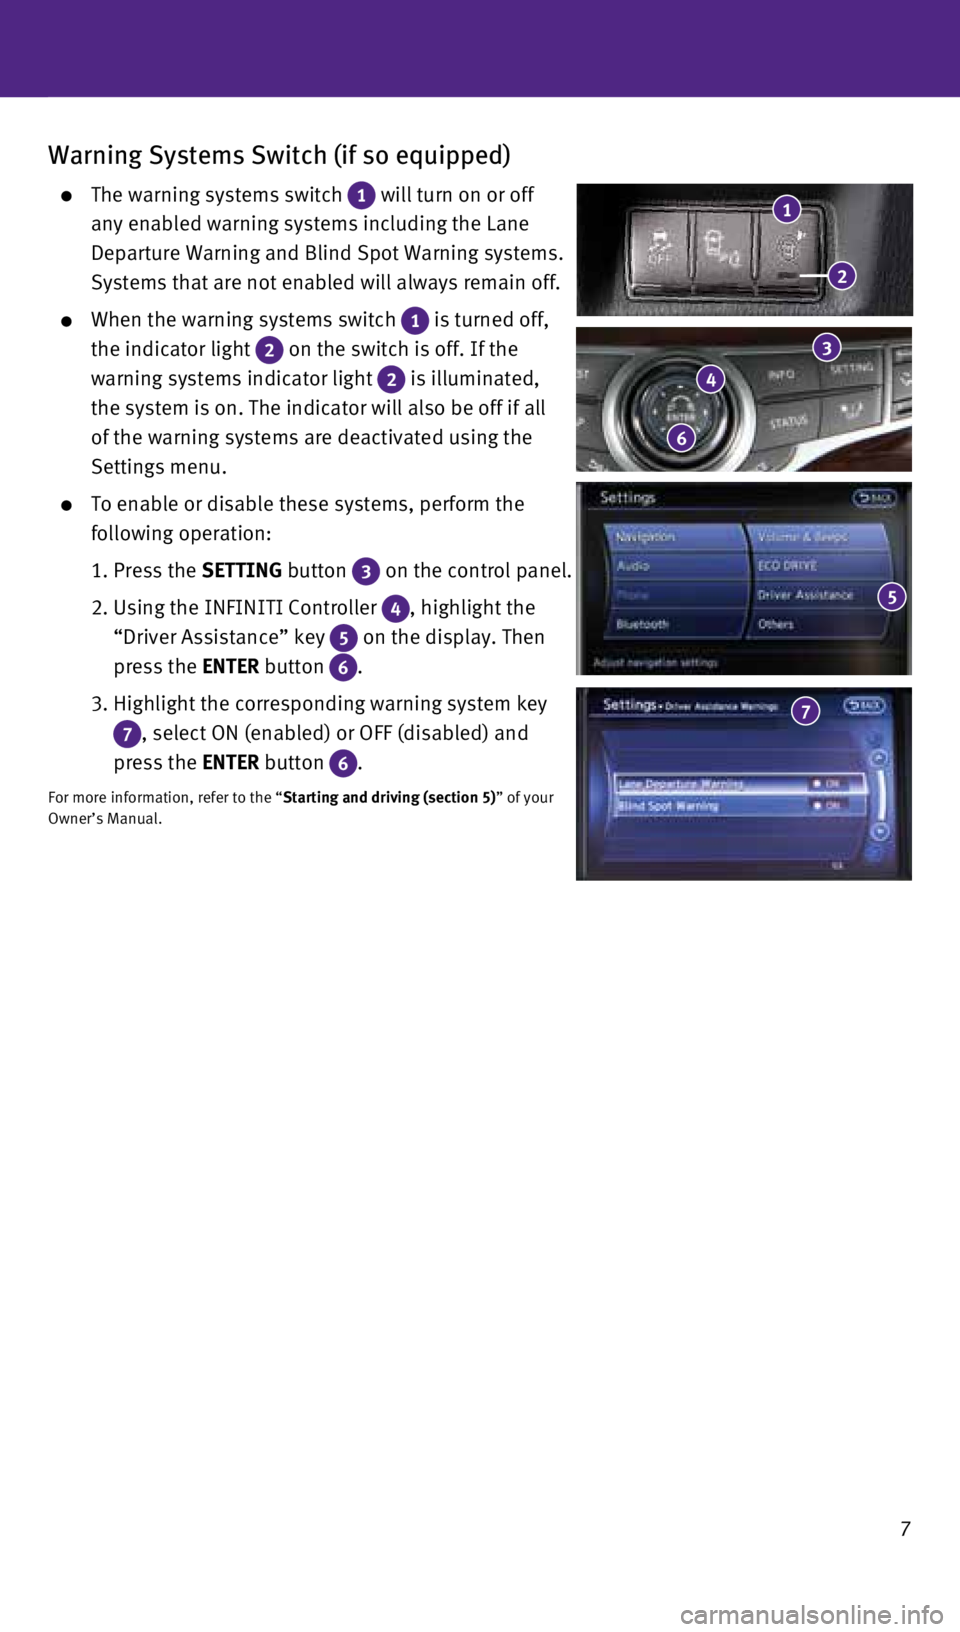
The warning systems switch 1 will turn on or off
any enabled warning systems including the Lane
Departure Warning and Blind Spot Warning systems.
Systems that are not enabled will always remain off.
When the warning systems switch 1 is turned off,
the indicator light
2 on the switch is off. If the
warning systems indicator light
2 is illuminated,
the system is on. The indicator will also be off if all
of the warning systems are deactivated using the
Settings menu.
To enable or disable these systems, perform the
following operation:
1. Press the SETTING button
3 on the control panel.
2. Using the INFINITI Controller
4 , highlight the
“Driver Assistance” key
5 on the display. Then
press the ENTER button
6 .
3. Highlight the corresponding warning system key
7 , select ON (enabled) or OFF (disabled) and
press the ENTER button
6 .
For more information, refer to the “Starting and driving (section 5)” of your
Owner’s Manual.
3
4
6
2
1
5
7
1932611_16a_Q70_US_pQRG_092415.indd 79/24/15 11:08 AM
Page 11 of 32
9
Fuel-filler Door
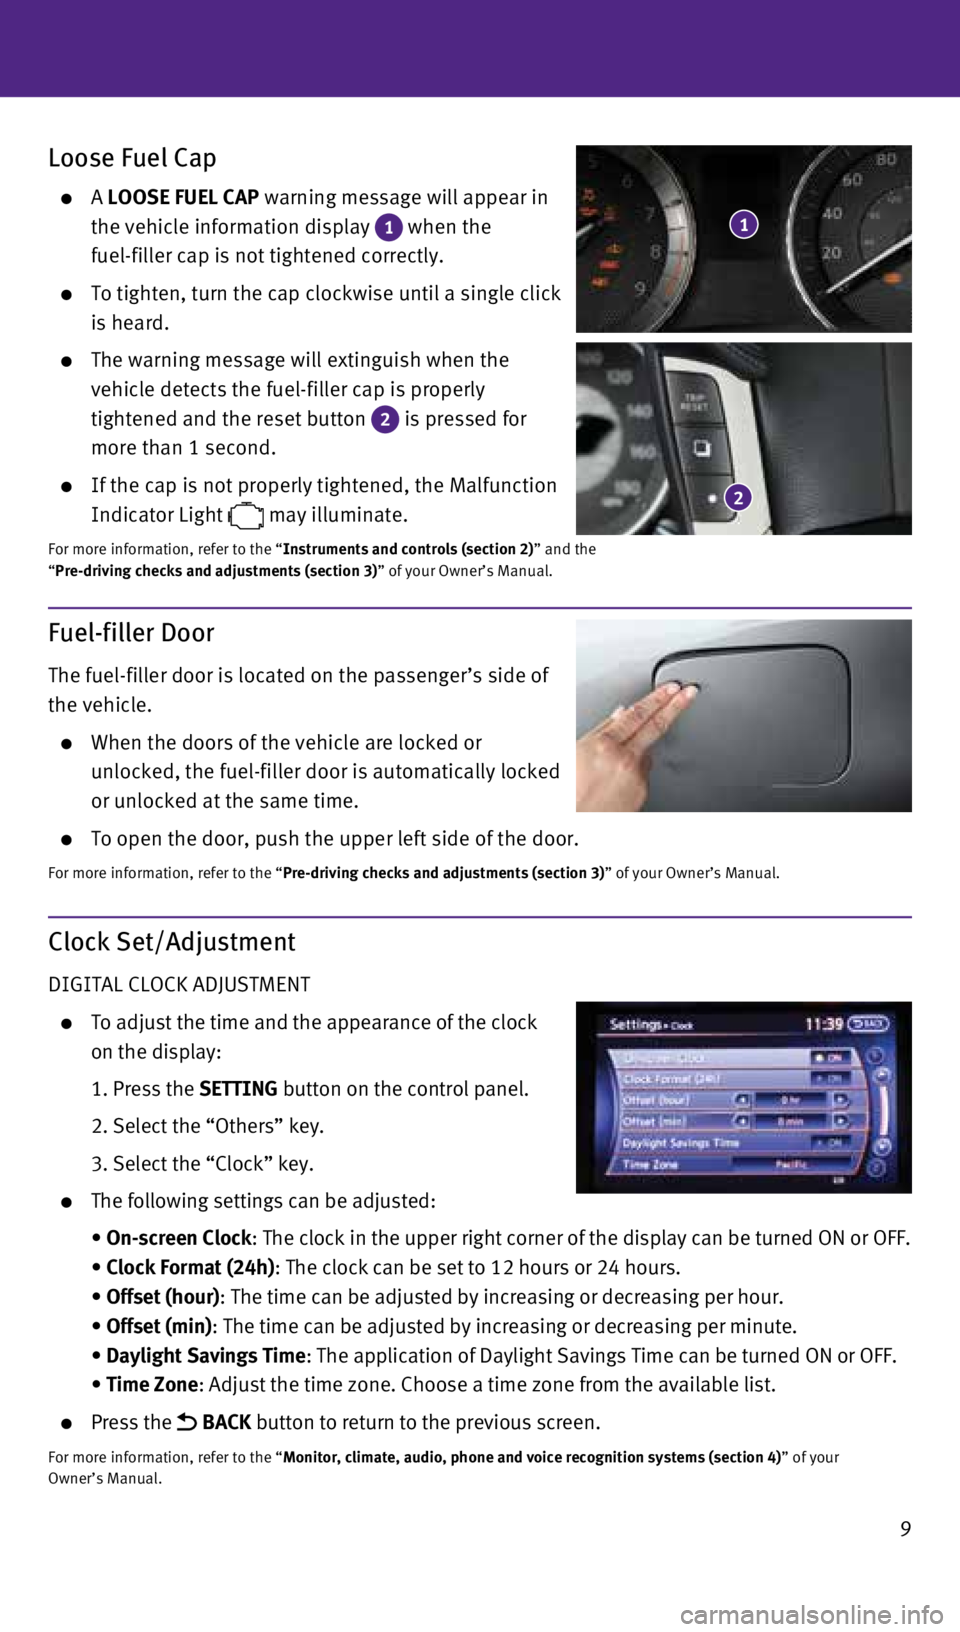
The fuel-filler door is located on the passenger’s side of
the vehicle.
When the doors of the vehicle are locked or
unlocked, the fuel-filler door is automatically locked
or unlocked at the same time.
To open the door, push the upper left side of the door.
For more information, refer to the “Pre-driving checks and adjustments (section 3)” of your Owner’s Manual.
Loose Fuel Cap
A LOOSE FUEL CAP warning message will appear in
the vehicle information display
1 when the
fuel-filler cap is not tightened correctly.
To tighten, turn the cap clockwise until a single click
is heard.
The warning message will extinguish when the
vehicle detects the fuel-filler cap is properly
tightened and the reset button
2 is pressed for
more than 1 second.
If the cap is not properly tightened, the Malfunction
Indicator Light
may illuminate.
For more information, refer to the “Instruments and controls (section 2)” and the
“Pre-driving checks and adjustments (section 3)” of your Owner’s Manual.
2
1
Clock Set/Adjustment
DIGITAL CLOCK ADJUSTMENT
To adjust the time and the appearance of the clock
on the display:
1. Press the SETTING button on the control panel.
2. Select the “Others” key.
3. Select the “Clock” key.
The following settings can be adjusted:
• On-screen Clock: The clock in the upper right corner of the display can be turned ON or\
OFF.
• Clock Format (24h): The clock can be set to 12 hours or 24 hours.
• Offset (hour): The time can be adjusted by increasing or decreasing per hour.
• Offset (min): The time can be adjusted by increasing or decreasing per minute.
• Daylight Savings Time: The application of Daylight Savings Time can be turned ON or OFF.
• Time Zone: Adjust the time zone. Choose a time zone from the available list.
Press the BACK button to return to the previous screen.
For more information, refer to the “Monitor, climate, audio, phone and voice recognition systems (section 4\
) ” of your
Owner’s Manual.
1932611_16a_Q70_US_pQRG_092415.indd 99/24/15 11:08 AM
Page 12 of 32

10
first drive features
INFINITI Connection™* (if so equipped)
Infiniti Connection™ combines personalized convenience, concierge settings and personal
security features to compliment the Total Ownership Experience®. For more details on Infiniti
Connection or to enroll your vehicle, please visit www.InfinitiConnection.com or
call 855-444-7244.
To access Infiniti Connection
™:
1. Press the INFO button
1 on the control panel.
2. Select the “Infiniti Connection” key
2 on the display.
Available services include:
Infiniti Personal Assistant — To access Infiniti
Personal Assistant, select “Connect to Voice Menu”
from the Infiniti Connection menu or touch the
key
3 on the map screen. At the voice prompt, say
“Infiniti Personal Assistant” to be connected.
Automatic Collision Notification – In case of air bag
deployment, a signal is sent containing the vehicle
location and customer information to notify the
proper authorities.
Emergency Call – This service provides emergency
assistance by connecting the subscriber to an
Infiniti Connection Specialist.
• In case of an emergency, press the in-vehicle
telematics SOS button
4.
• A Response Specialist will provide assistance
based on the situation described by the
vehicle’s occupant.
Enhanced Roadside Assistance – Roadside
Assistance can be accessed by touching the “Infiniti
Connection” key
2 on the Info menu or the key 3 on the map screen.
• This service allows subscribers to receive assistance for a non-emergenc\
y incident, such
as towing, or a third party response.
My Schedule – Access your personal online Google Calendar™, hear details read via
text-to-speech** and select a location as a destination via the Navigati\
on System.
Report Stolen Vehicle – A Response Specialist will attempt to obtain \
location
information from a reported stolen vehicle and provide that information \
to a local law
enforcement agency.
Remote Door Lock/Unlock – Remotely access your vehicle via an Infinit\
i Connection
Response Specialist or the designated website to remotely lock or unlock\
your vehicle.
*INFINITI Connection™ is only available on vehicles equipped with an optional INFINITI Connec\
tion subscription service.
**Laws in some communities may restrict the use of text-to-speech. Check\
local regulations before using this feature.
4
1
2
3
1932611_16a_Q70_US_pQRG_092415.indd 109/24/15 11:08 AM
Page 19 of 32

17
Heater and Air Conditioner (automatic)
1 AUTO BUTTON
The automatic mode may be used year-round. Press the AUTO button to turn the system
on, and the system will automatically control the inside temperature (a\
utomatic cooling
and/or dehumidified heating), air flow distribution and fan speed.
2 CLIMATE BUTTON
Press the CLIMATE button to adjust the automatic climate controls using the climate
settings on the control panel display screen.
3 DRIVER’S SIDE TEMPERATURE CONTROL BUTTONS
Press the driver’s side temperature control buttons up for warmer air or down for
cooler air.
4 DRIVER’S SIDE MANUAL AIR FLOW CONTROL BUTTON
Press the driver’s side manual air flow button to manually control th\
e driver’s side air
flow modes.
The following air flow indicator modes will display on the control panel\
display screen:
Air flows from the center and side vents.
Air flows from the center, side and foot vents.
Air flows mainly from the foot vents.
Air flows from the front defroster and foot vents.
5 PASSENGER’S SIDE TEMPERATURE CONTROL BUTTONS
To manually adjust the passenger’s side temperature, press the passen\
ger’s side
temperature control buttons up
for warmer air or down for cooler air.
6 PASSENGER’S SIDE MANUAL AIR FLOW CONTROL BUTTON
Press the passenger’s side manual air flow button to manually control\
the passenger’s
side air flow modes.
The following air flow indicator modes will display on the control panel\
display screen:
Air flows from the center and side vents.
Air flows from the center, side and foot vents.
Air flows mainly from the foot vents.
Air flows from the front defroster and foot vents.
46
89127110112
35
1932611_16a_Q70_US_pQRG_092415.indd 179/24/15 11:09 AM
Page 21 of 32
19
FM/AM/SiriusXM®* Satellite Radio with CD/DVD (if so equipped) Player
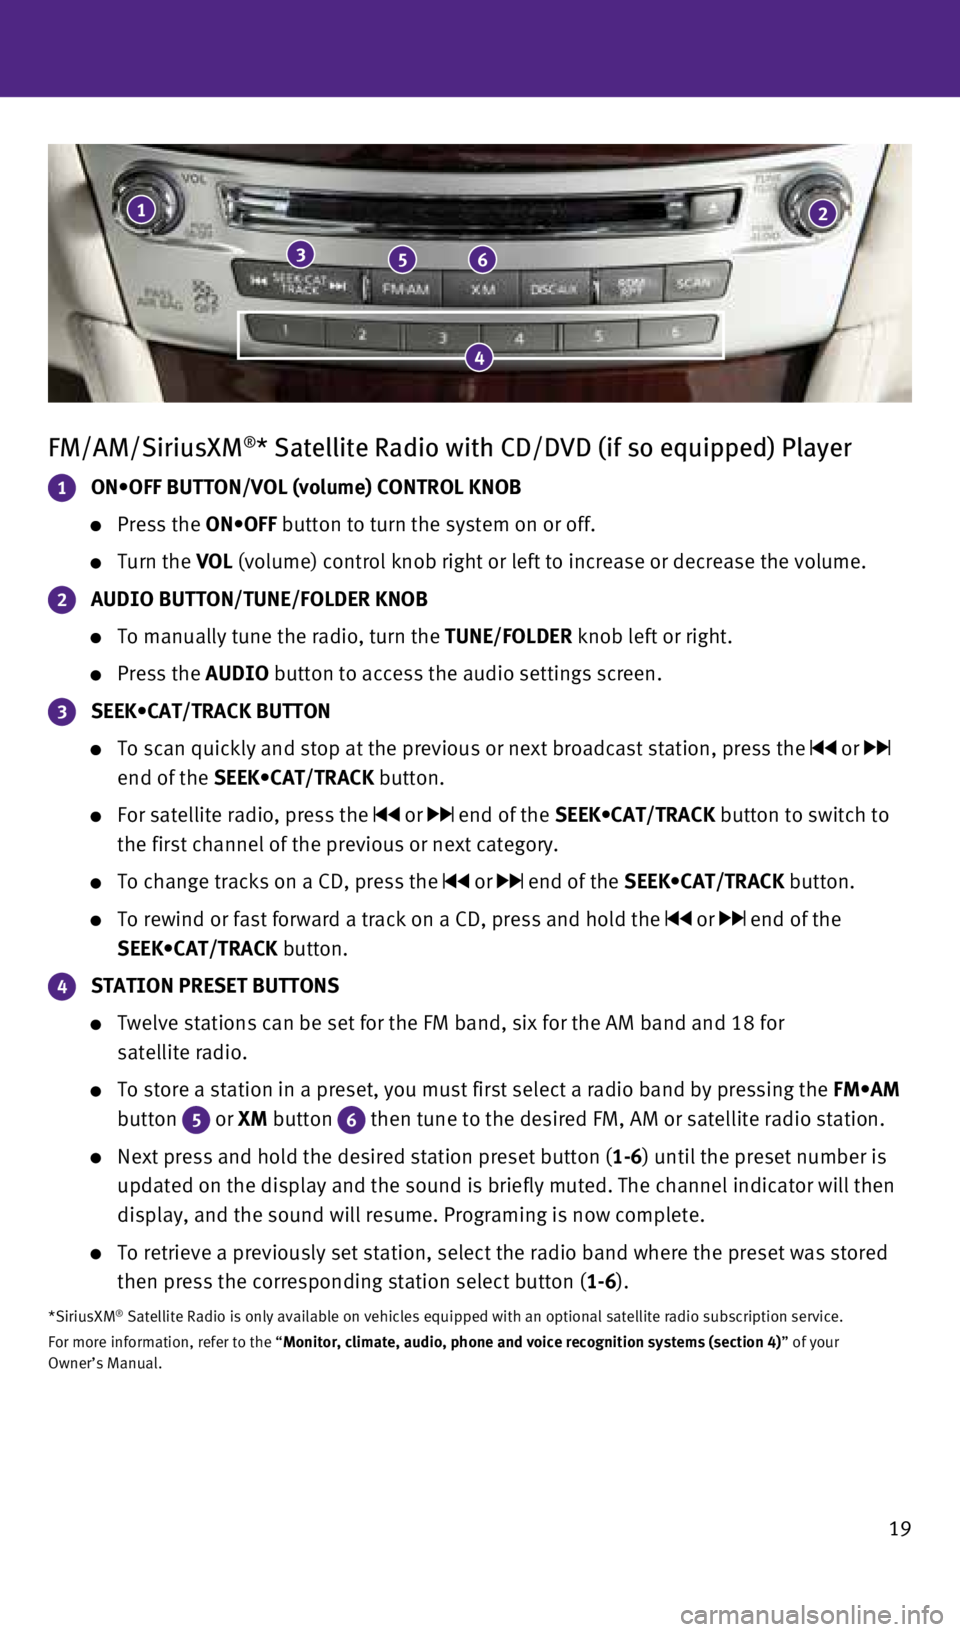
1 ON•OFF BUTTON/VOL (volume) CONTROL KNOB
Press the ON•OFF button to turn the system on or off.
Turn the VOL (volume) control knob right or left to increase or decrease the volum\
e.
2 AUDIO BUTTON/TUNE/FOLDER KNOB
To manually tune the radio, turn the TUNE/FOLDER knob left or right.
Press the AUDIO button to access the audio settings screen.
3 SEEK•CAT/TRACK BUTTON
To scan quickly and stop at the previous or next broadcast station, pres\
s the or
end of the SEEK•CAT/TRACK button.
For satellite radio, press the or end of the SEEK•CAT/TRACK button to switch to
the first channel of the previous or next category.
To change tracks on a CD, press the or end of the SEEK•CAT/TRACK button.
To rewind or fast forward a track on a CD, press and hold the or end of the
SEEK•CAT/TRACK button.
4 STATION PRESET BUTTONS
Twelve stations can be set for the FM band, six for the AM band and 18 f\
or
satellite radio.
To store a station in a preset, you must first select a radio band by pr\
essing the FM•AM
button
5 or XM button 6 then tune to the desired FM, AM or satellite radio station.
Next press and hold the desired station preset button (1-6) until the preset number is
updated on the display and the sound is briefly muted. The channel indic\
ator will then
display, and the sound will resume. Programing is now complete.
To retrieve a previously set station, select the radio band where the pr\
eset was stored
then press the corresponding station select button (1-6).
*SiriusXM® Satellite Radio is only available on vehicles equipped with an optional\
satellite radio subscription service.
For more information, refer to the “Monitor, climate, audio, phone and voice recognition systems (section 4\
) ” of your
Owner’s Manual.
1
356
2
4
1932611_16a_Q70_US_pQRG_092415.indd 199/24/15 11:09 AM