audio INFINITI Q70 HYBRID 2016 Quick Reference Guide
[x] Cancel search | Manufacturer: INFINITI, Model Year: 2016, Model line: Q70 HYBRID, Model: INFINITI Q70 HYBRID 2016Pages: 34, PDF Size: 2.96 MB
Page 2 of 34
*See your Owner’s Manual for information.
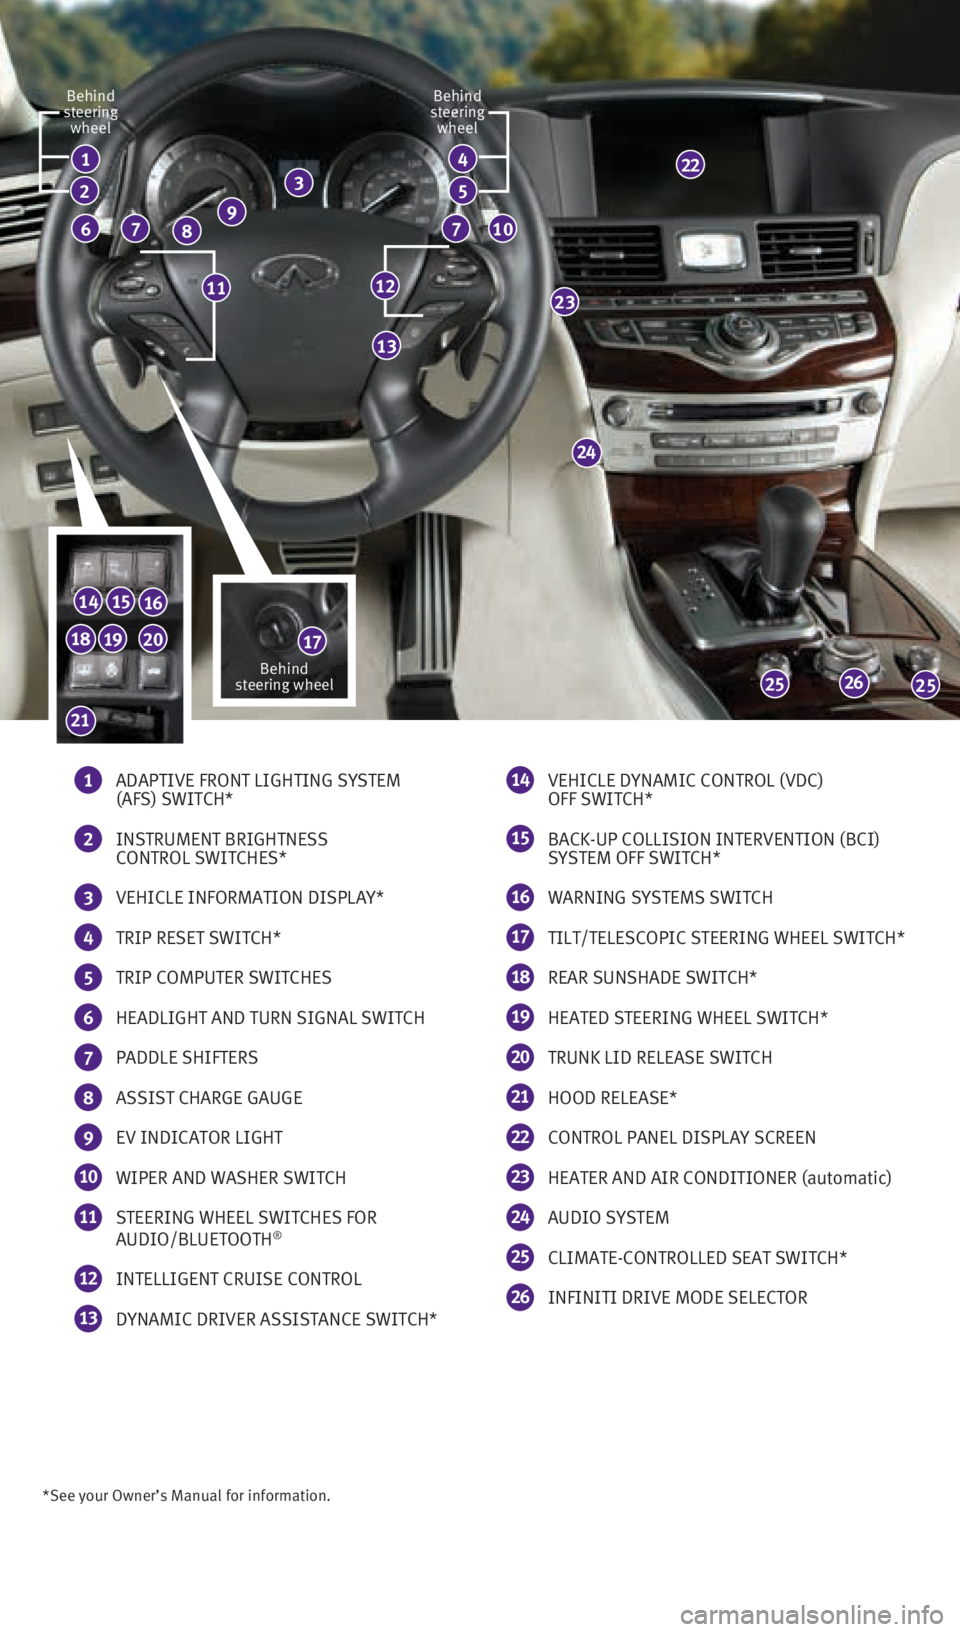
1 ADAPTIVE FRONT LIGHTING SYSTEM
(AFS) SWITCH*
2 INSTRUMENT BRIGHTNESS
CONTROL SWITCHES*
3 VEHICLE INFORMATION DISPLAY*
4 TRIP RESET SWITCH*
5 TRIP COMPUTER SWITCHES
6 HEADLIGHT AND TURN SIGNAL SWITCH
7 PADDLE SHIFTERS
8 ASSIST CHARGE GAUGE
9 EV INDICATOR LIGHT
10 WIPER AND WASHER SWITCH
11 STEERING WHEEL SWITCHES FOR
AUDIO/BLUETOOTH®
12 INTELLIGENT CRUISE CONTROL
13 DYNAMIC DRIVER ASSISTANCE SWITCH*
14 VEHICLE DYNAMIC CONTROL (VDC)
OFF SWITCH*
15 BACK-UP COLLISION INTERVENTION (BCI)
SYSTEM OFF SWITCH*
16 WARNING SYSTEMS SWITCH
17 TILT/TELESCOPIC STEERING WHEEL SWITCH*
18 REAR SUNSHADE SWITCH*
19 HEATED STEERING WHEEL SWITCH*
20 TRUNK LID RELEASE SWITCH
21 HOOD RELEASE*
22 CONTROL PANEL DISPLAY SCREEN
23 HEATER AND AIR CONDITIONER (automatic)
24 AUDIO SYSTEM
25 CLIMATE-CONTROLLED SEAT SWITCH*
26 INFINITI DRIVE MODE SELECTOR
24
26
1
77
23
2525
141516
17
13
8
2
6
22
1211
Behind
steering wheel
Behind
steering wheel Behind
steering wheel
10
34
5
192018
21
9
1932612_16a_Q70_HEV_US_pQRG_091715.indd 49/17/15 10:43 AM
Page 3 of 34
table of contents
new system features
Around View® Monitor with Moving Object Detection (MOD) (if so equipped) ..2
Approaching Vehicle Sound for Pedestrians (VSP) System ................. 3
Automatic Anti-glare Mirrors .......................................... 4
Blind Spot Warning (BSW) and Blind Spot Intervention
® (BSI) (if so equipped) 4
Back-up Collision Intervention (BCI) (if so equipped) ..................... 4
Predictive Forward Collision Warning (PFCW) (if so equipped) ...............5
Forward Emergency Braking (FEB) (if so equipped) ........................5
Lane Departure Warning (LDW) (if so equipped) ..........................5
essential information Tire Pressure Monitoring System (TPMS) ................................6
Direct Response Hybrid™ System Warning Light ......................... 6
Hybrid Awareness .................................................. 7
INFINITI Drive Mode Selector ......................................... 7
Warning Systems Switch (if so equipped) ...............................8
Accessing the Front Cup Holders ...................................... 8
Loose Fuel Cap ..................................................... 9
Fuel-filler Door ..................................................... 9
Clock Set/Adjustment ............................................... 9
first drive features INFINITI Connection™ (if so equipped) ............................... 10
INFINITI Intelligent Key System ...................................... 12
Trunk Lid Release .................................................. 13
Power Front Seat Adjustments ....................................... 13
Automatic Drive Positioner .......................................... 14
Outside Mirror Control Switch ........................................ 14
Assist Charge Gauge ............................................... 15
Starting/Stopping the Hybrid System ................................. 15
Headlight Control Switch ............................................ 15
Wiper and Washer Switch ........................................... 16
Heater and Air Conditioner (automatic) ................................17
FM/AM/SiriusXM
® Satellite Radio with CD/DVD (if so equipped) Player ......19
USB (Universal Serial Bus) Connection Port/iPod® Interface ............... 20
Conventional (Fixed Speed) Cruise Control . . . . . . . . . . . . . . . . . . . . . . . . . . . . .20
Intelligent Cruise Control (ICC) (if so equipped) .........................21
system guide Trip Computer ..................................................... 22
Bluetooth® Hands-free Phone System ................................. 23
System Operating Tips ........................................... 23
Bluetooth
® System with Navigation (if so equipped) ..................... 24
Bluetooth® System without Navigation (if so equipped) .................. 25
Bluetooth® Streaming Audio with Navigation (if so equipped) ............. 27
Navigation System (if so equipped) ................................... 28
DVD Player (if so equipped) ......................................... 30
HomeLink
® Universal Transceiver ..................................... 30
Additional information about your vehicle is also available in your Owne\
r’s
Manual, Navigation System Owner’s Manual and at www.InfinitiUSA.com.
Please see your Owner’s Manual for important safety information
and system operation limitations.
•
A cellular telephone should not be used for any purpose while
driving so full attention may be given to vehicle operation.
• Always wear your seat belt.
• Supplemental air bags do not replace proper seat belt usage.
•
Children 12 and under should always ride in the rear seat
properly secured in child restraints or seat belts according to
their age and weight.
• Do not drink and drive.
For more information, refer to the “Safety — Seats, seat belts and
supplemental restraint system (section 1)”, the “Monitor, climate, audio,
phone and voice recognition systems (section 4)” and the “Starting and
driving (section 5)” of your Owner’s Manual.
To view detailed
instructional videos, go to
www.infinitiownersinfo.mobi/2016/q70 or snap this barcode with an appropriate barcode reader.
1932612_16a_Q70_HEV_US_pQRG_091715.indd 59/17/15 10:43 AM
Page 5 of 34
3
The colored guide lines on the display screen indicate vehicle width and\
approximate
distances to objects with reference to the vehicle body line.
• Red 1.5 ft (0.5 m); Yellow 3 ft (1 m); Green 7 ft (2 m) and 1\
0 ft (3 m).
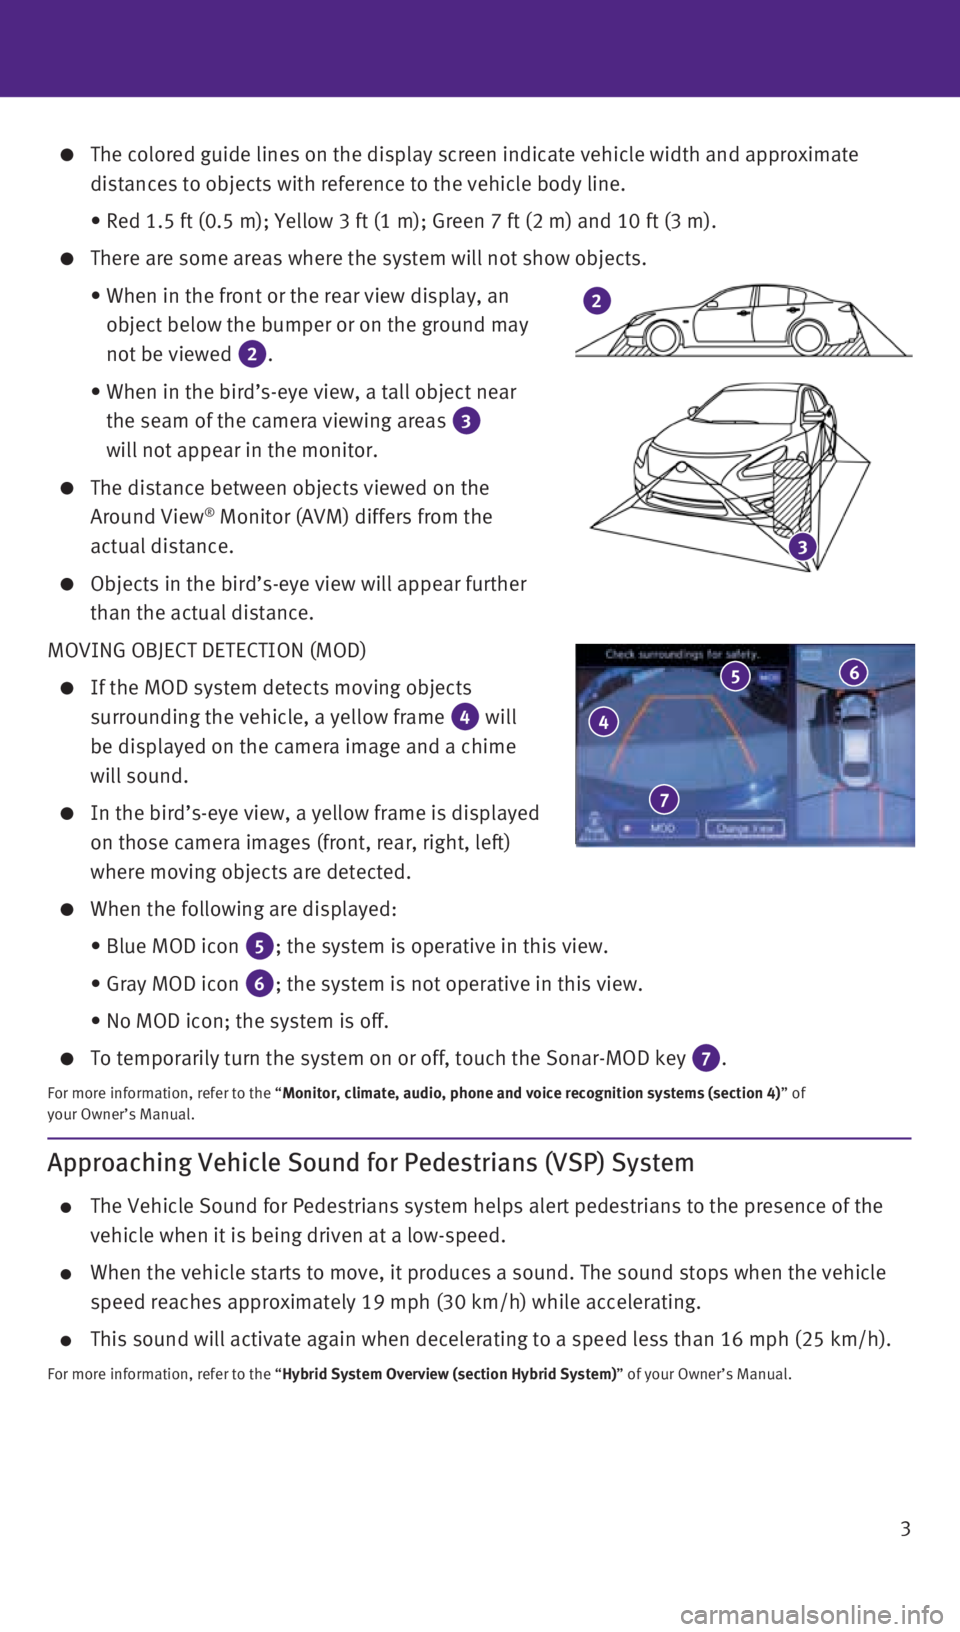
There are some areas where the system will not show objects.
• When in the front or the rear view display, an
object below the bumper or on the ground may
not be viewed
2.
• When in the bird’s-eye view, a tall object near
the seam of the camera viewing areas
3
will not appear in the monitor.
The distance between objects viewed on the
Around View® Monitor (AVM) differs from the
actual distance.
Objects in the bird’s-eye view will appear further
than the actual distance.
MOVING OBJECT DETECTION (MOD)
If the MOD system detects moving objects
surrounding the vehicle, a yellow frame
4 will
be displayed on the camera image and a chime
will sound.
In the bird’s-eye view, a yellow frame is displayed
on those camera images (front, rear, right, left)
where moving objects are detected.
When the following are displayed:
• Blue MOD icon
5; the system is operative in this view.
• Gray MOD icon
6; the system is not operative in this view.
• No MOD icon; the system is off.
To temporarily turn the system on or off, touch the Sonar-MOD key 7.
For more information, refer to the “Monitor, climate, audio, phone and voice recognition systems (section 4\
) ” of
your Owner’s Manual.
3
2
4
5 6
7
Approaching Vehicle Sound for Pedestrians (VSP) System
The Vehicle Sound for Pedestrians system helps alert pedestrians to the \
presence of the
vehicle when it is being driven at a low-speed.
When the vehicle starts to move, it produces a sound. The sound stops wh\
en the vehicle
speed reaches approximately 19 mph (30 km/h) while accelerating.
This sound will activate again when decelerating to a speed less than 16\
mph (25 km/h).
For more information, refer to the “Hybrid System Overview (section Hybrid System)” of your Owner’s Manual.
1932612_16a_Q70_HEV_US_pQRG_091715.indd 39/17/15 10:44 AM
Page 11 of 34
9
Clock Set/Adjustment
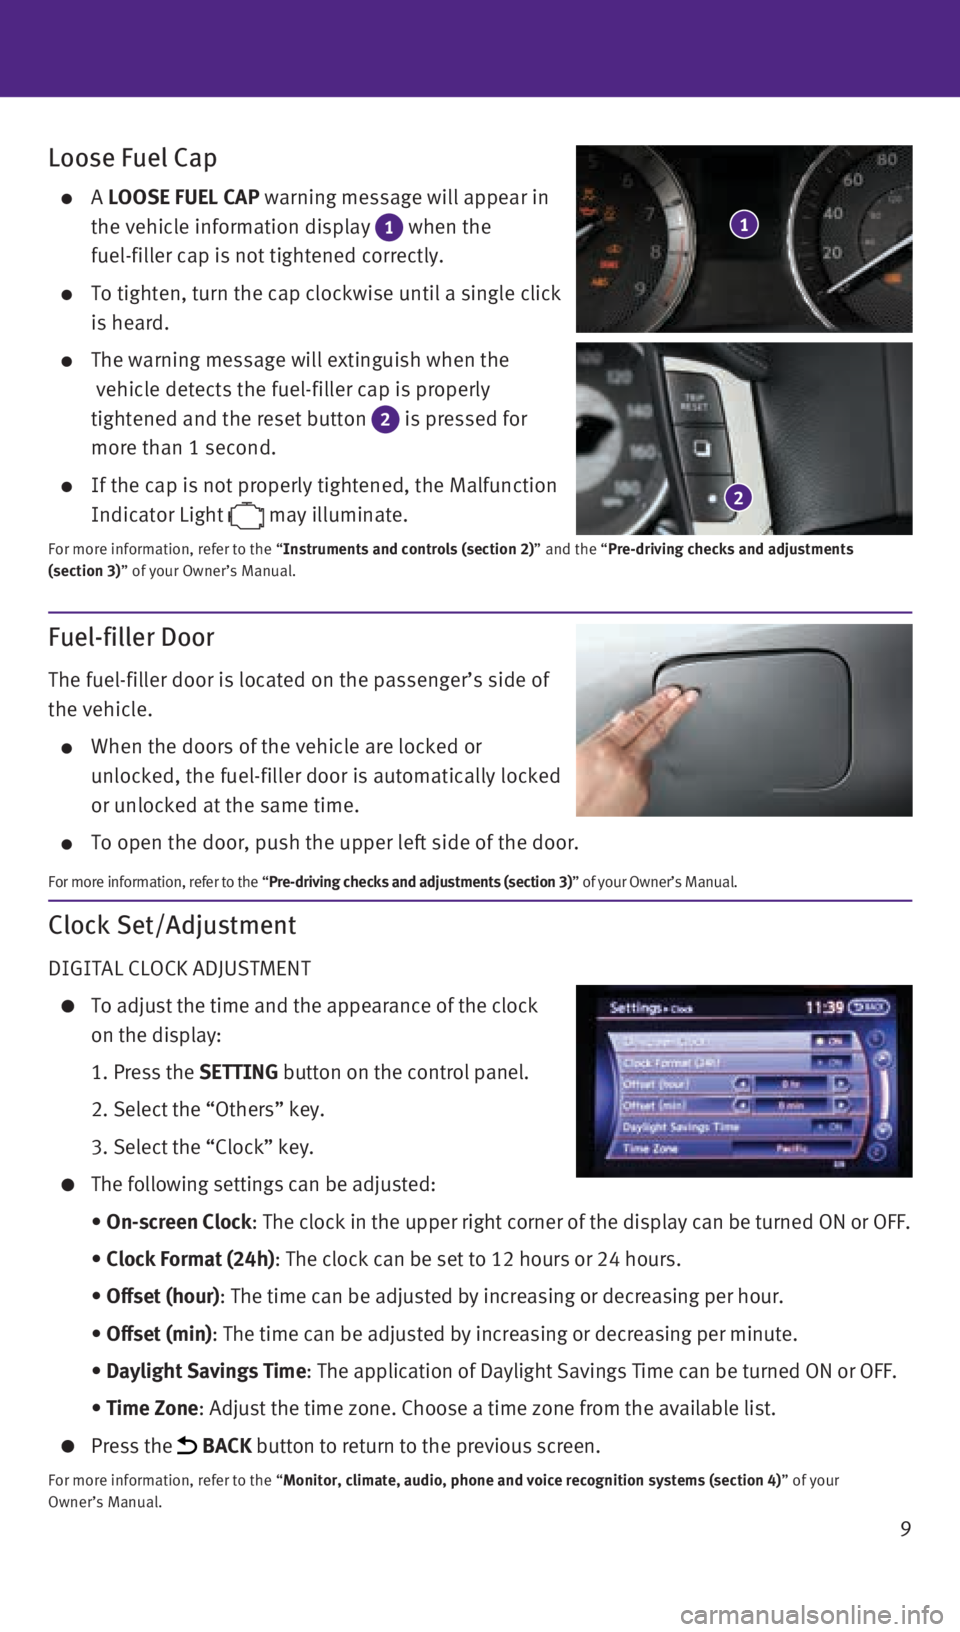
DIGITAL CLOCK ADJUSTMENT
To adjust the time and the appearance of the clock
on the display:
1. Press the SETTING button on the control panel.
2. Select the “Others” key.
3. Select the “Clock” key.
The following settings can be adjusted:
• On-screen Clock: The clock in the upper right corner of the display can be turned ON or\
OFF.
• Clock Format (24h): The clock can be set to 12 hours or 24 hours.
• Offset (hour): The time can be adjusted by increasing or decreasing per hour.
• Offset (min): The time can be adjusted by increasing or decreasing per minute.
• Daylight Savings Time: The application of Daylight Savings Time can be turned ON or OFF.
• Time Zone: Adjust the time zone. Choose a time zone from the available list.
Press the BACK button to return to the previous screen.
For more information, refer to the “Monitor, climate, audio, phone and voice recognition systems (section 4\
) ” of your
Owner’s Manual.
Loose Fuel Cap
A LOOSE FUEL CAP warning message will appear in
the vehicle information display
1 when the
fuel-filler cap is not tightened correctly.
To tighten, turn the cap clockwise until a single click
is heard.
The warning message will extinguish when the
vehicle detects the fuel-filler cap is properly
tightened and the reset button
2 is pressed for
more than 1 second.
If the cap is not properly tightened, the Malfunction
Indicator Light
may illuminate.
For more information, refer to the “Instruments and controls (section 2)” and the “Pre-driving checks and adjustments
(section 3)” of your Owner’s Manual.
2
1
Fuel-filler Door
The fuel-filler door is located on the passenger’s side of
the vehicle.
When the doors of the vehicle are locked or
unlocked, the fuel-filler door is automatically locked
or unlocked at the same time.
To open the door, push the upper left side of the door.
For more information, refer to the “Pre-driving checks and adjustments (section 3)” of your Owner’s Manual.
1932612_16a_Q70_HEV_US_pQRG_091715.indd 99/17/15 10:44 AM
Page 20 of 34
18
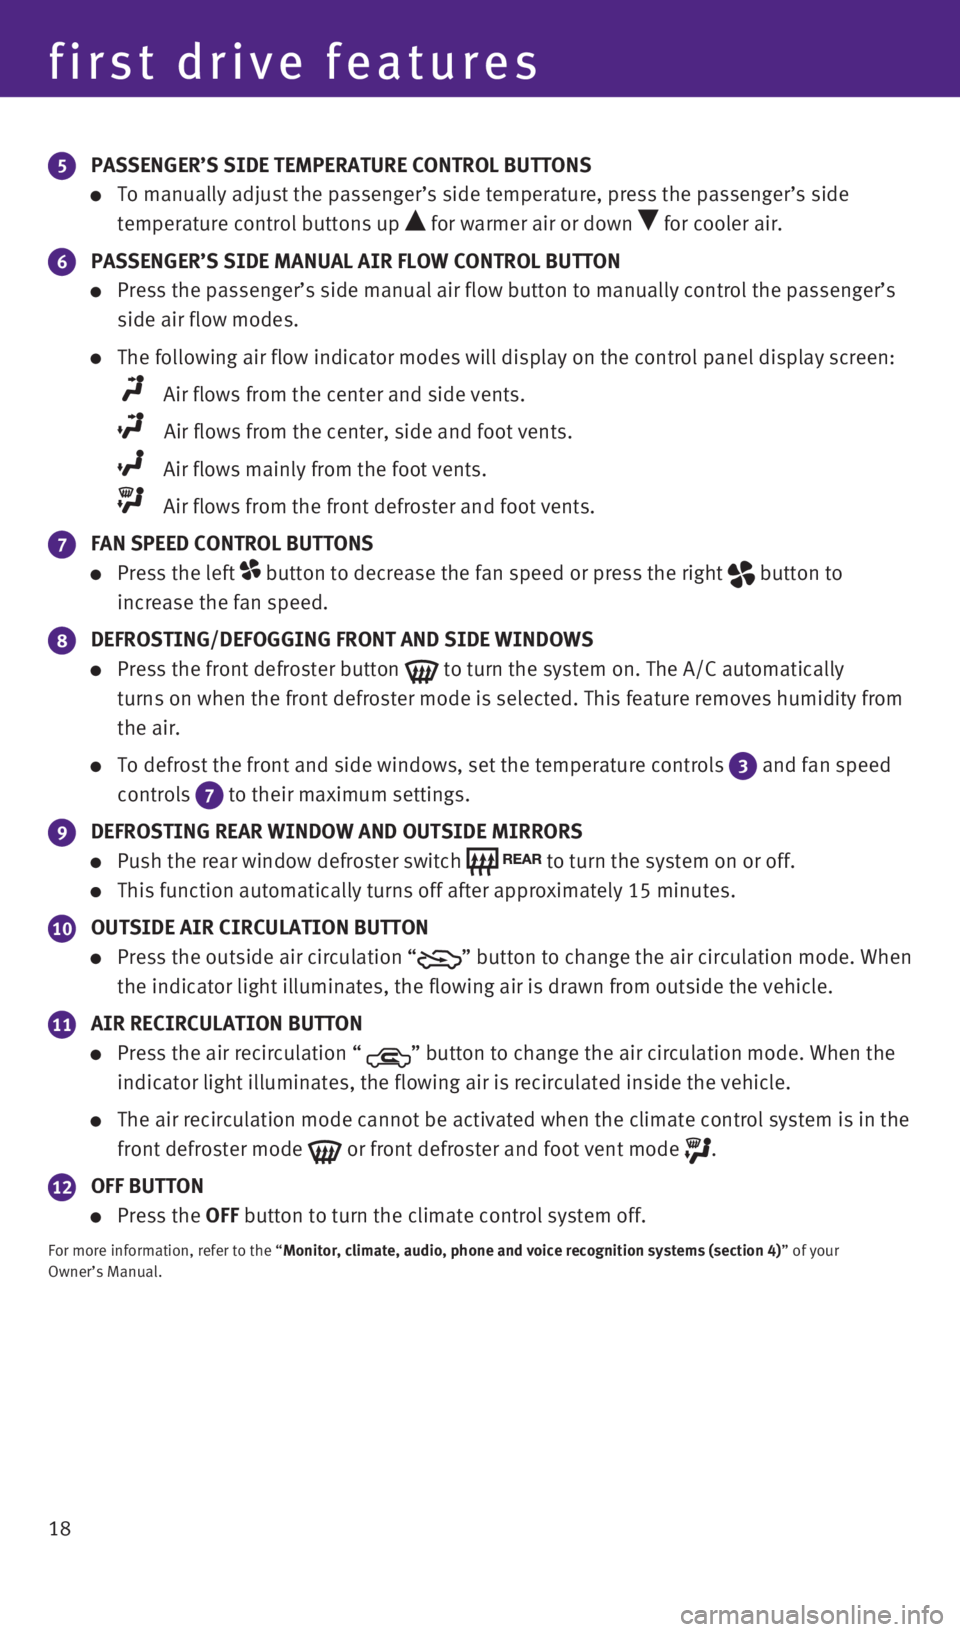
5 PASSENGER’S SIDE TEMPERATURE CONTROL BUTTONS
To manually adjust the passenger’s side temperature, press the passen\
ger’s side
temperature control buttons up
for warmer air or down for cooler air.
6 PASSENGER’S SIDE MANUAL AIR FLOW CONTROL BUTTON
Press the passenger’s side manual air flow button to manually control\
the passenger’s
side air flow modes.
The following air flow indicator modes will display on the control panel\
display screen:
Air flows from the center and side vents.
Air flows from the center, side and foot vents.
Air flows mainly from the foot vents.
Air flows from the front defroster and foot vents.
7 FAN SPEED CONTROL BUTTONS
Press the left button to decrease the fan speed or press the right button to
increase the fan speed.
8 DEFROSTING/DEFOGGING FRONT AND SIDE WINDOWS
Press the front defroster button to turn the system on. The A/C automatically
turns on when the front defroster mode is selected. This feature removes\
humidity from
the air.
To defrost the front and side windows, set the temperature controls 3 and fan speed
controls
7 to their maximum settings.
9 DEFROSTING REAR WINDOW AND OUTSIDE MIRRORS
Push the rear window defroster switch to turn the system on or off.
This function automatically turns off after approximately 15 minutes.
10 OUTSIDE AIR CIRCULATION BUTTON
Press the outside air circulation “” button to change the air circulation mode. When
the indicator light illuminates, the flowing air is drawn from outside t\
he vehicle.
11 AIR RECIRCULATION BUTTON
Press the air recirculation “ ” button to change the air circulation mode. When the
indicator light illuminates, the flowing air is recirculated inside the \
vehicle.
The air recirculation mode cannot be activated when the climate control \
system is in the
front defroster mode
or front defroster and foot vent mode .
12 OFF BUTTON
Press the OFF button to turn the climate control system off.
For more information, refer to the “Monitor, climate, audio, phone and voice recognition systems (section 4\
) ” of your
Owner’s Manual.
first drive features
1932612_16a_Q70_HEV_US_pQRG_091715.indd 189/17/15 10:45 AM
Page 21 of 34
19
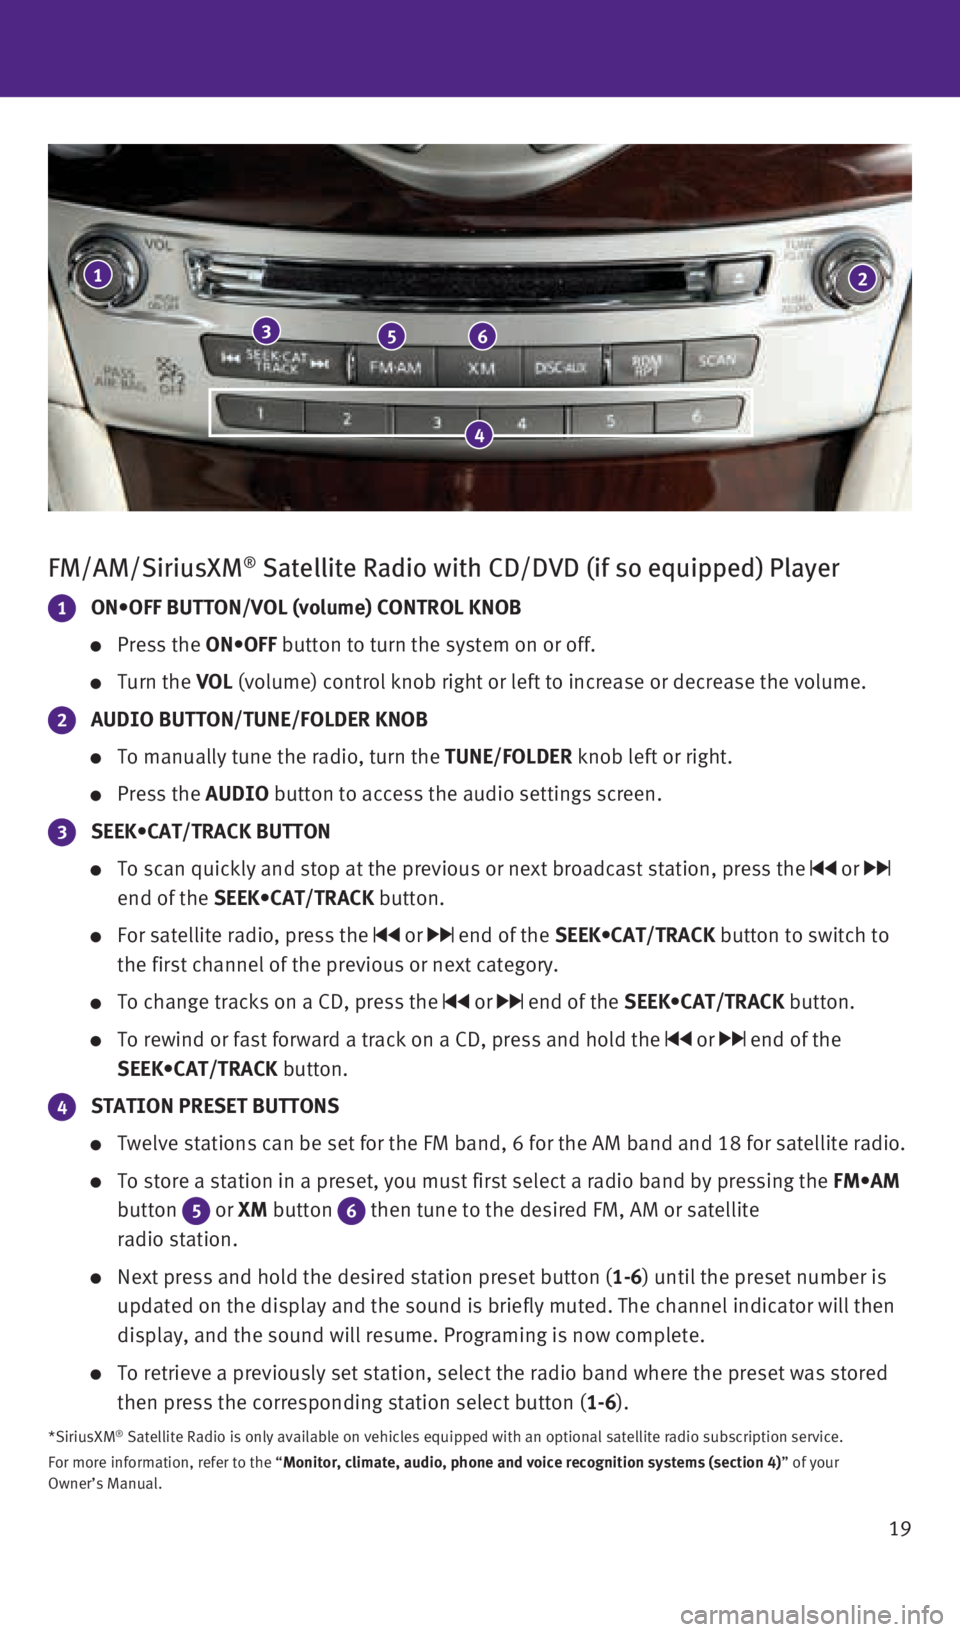
FM/AM/SiriusXM® Satellite Radio with CD/DVD (if so equipped) Player
1 ON•OFF BUTTON/VOL (volume) CONTROL KNOB
Press the ON•OFF button to turn the system on or off.
Turn the VOL (volume) control knob right or left to increase or decrease the volume\
.
2 AUDIO BUTTON/TUNE/FOLDER KNOB
To manually tune the radio, turn the TUNE/FOLDER knob left or right.
Press the AUDIO button to access the audio settings screen.
3 SEEK•CAT/TRACK BUTTON
To scan quickly and stop at the previous or next broadcast station, pres\
s the or
end of the SEEK•CAT/TRACK button.
For satellite radio, press the or end of the SEEK•CAT/TRACK button to switch to
the first channel of the previous or next category.
To change tracks on a CD, press the or end of the SEEK•CAT/TRACK button.
To rewind or fast forward a track on a CD, press and hold the or end of the
SEEK•CAT/TRACK button.
4 STATION PRESET BUTTONS
Twelve stations can be set for the FM band, 6 for the AM band and 18 for\
satellite radio.
To store a station in a preset, you must first select a radio band by pr\
essing the FM•AM
button
5 or XM button 6 then tune to the desired FM, AM or satellite
radio station.
Next press and hold the desired station preset button (1-6) until the preset number is
updated on the display and the sound is briefly muted. The channel indic\
ator will then
display, and the sound will resume. Programing is now complete.
To retrieve a previously set station, select the radio band where the pr\
eset was stored
then press the corresponding station select button (1-6).
*SiriusXM® Satellite Radio is only available on vehicles equipped with an optional\
satellite radio subscription service.
For more information, refer to the “Monitor, climate, audio, phone and voice recognition systems (section 4\
) ” of your
Owner’s Manual.
1
356
2
4
1932612_16a_Q70_HEV_US_pQRG_091715.indd 199/17/15 10:46 AM
Page 22 of 34
20
USB (Universal Serial Bus) Connection Port/iPod® Interface
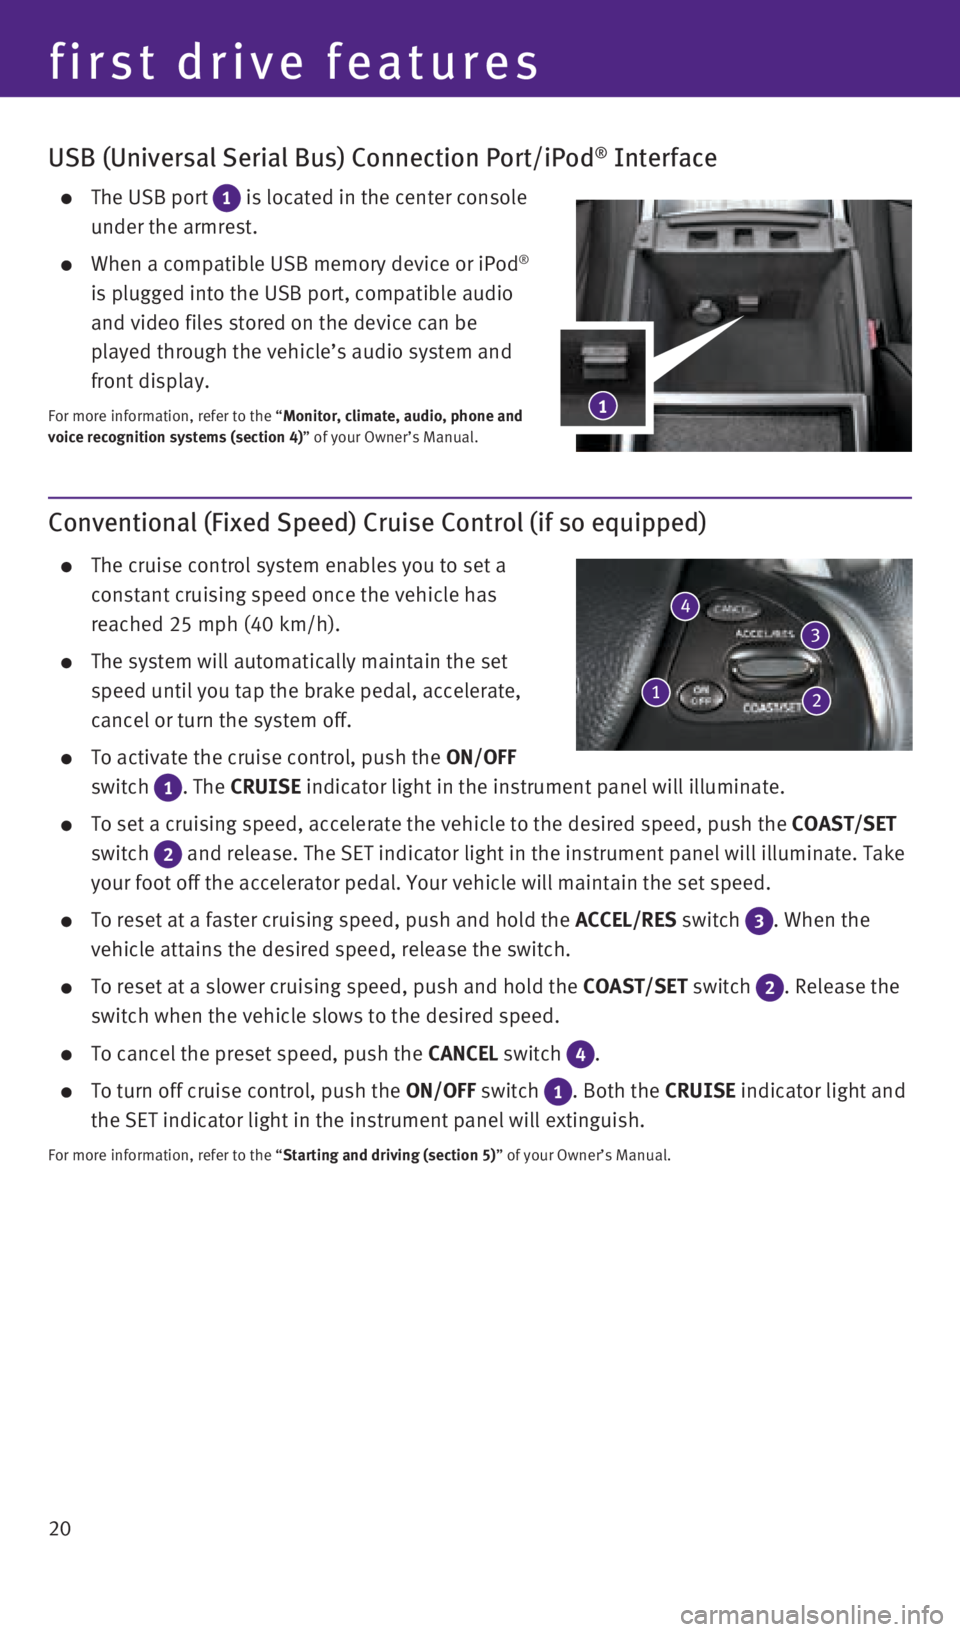
The USB port 1 is located in the center console
under the armrest.
When a compatible USB memory device or iPod®
is plugged into the USB port, compatible audio
and video files stored on the device can be
played through the vehicle’s audio system and
front display.
For more information, refer to the “Monitor, climate, audio, phone and
voice recognition systems (section 4)” of your Owner’s Manual.
Conventional (Fixed Speed) Cruise Control (if so equipped)
The cruise control system enables you to set a
constant cruising speed once the vehicle has
reached 25 mph (40 km/h).
The system will automatically maintain the set
speed until you tap the brake pedal, accelerate,
cancel or turn the system off.
To activate the cruise control, push the ON/OFF
switch
1 . The CRUISE indicator light in the instrument panel will illuminate.
To set a cruising speed, accelerate the vehicle to the desired speed, pu\
sh the COAST/SET
switch
2 and release. The SET indicator light in the instrument panel will illum\
inate. Take
your foot off the accelerator pedal. Your vehicle will maintain the set \
speed.
To reset at a faster cruising speed, push and hold the ACCEL/RES switch 3 . When the
vehicle attains the desired speed, release the switch.
To reset at a slower cruising speed, push and hold the COAST/SET switch 2. Release the
switch when the vehicle slows to the desired speed.
To cancel the preset speed, push the CANCEL switch 4 .
To turn off cruise control, push the ON/OFF switch 1 . Both the CRUISE indicator light and
the SET indicator light in the instrument panel will extinguish.
For more information, refer to the “Starting and driving (section 5)” of your Owner’s Manual.
4
1
first drive features
3
21
1932612_16a_Q70_HEV_US_pQRG_091715.indd 209/17/15 10:46 AM
Page 28 of 34
26
system guide
PHONEBOOK REGISTRATION
When the cellular phone is connected to the in-vehicle module, the data \
stored in the
cellular phone, such as the phonebook, outgoing call logs, incoming call\
logs and missed
call logs, is automatically transferred and registered to the system.
The availability of this function depends on each cellular phone. The co\
pying procedure
also varies according to each cellular phone. See your cellular phone’\
s Owner’s Manual for
more information.
Up to 1,000 entries per registered cellular phone can be stored in the p\
honebook.
MAKING A CALL
1. Push the
button on the steering wheel. A tone will sound.
2. Say: “Call”. The system acknowledges the command and announces the\
next set of
available commands.
3. Say the registered person’s name. The system acknowledges the command\
and
announces the next set of available commands.
4. Say: “Yes”. The system acknowledges the command and makes the call\
.
RECEIVING/ENDING A CALL
To accept the call, press the button on the steering wheel.
To reject the call, press the button on the steering wheel.
To hang up, press the button on the steering wheel.
For more information, refer to the “Monitor, climate, audio, phone and voice recognition systems (section 4\
) ” of your Owner’s
Manual or please visit www.InfinitiUSA.com/bluetooth.
1932612_16a_Q70_HEV_US_pQRG_091715.indd 269/17/15 10:46 AM
Page 29 of 34
27
Bluetooth® Streaming Audio with Navigation (if so equipped)
If you have a compatible Bluetooth® device with streaming audio (A2DP and AVRCP
profiles), you can set up the wireless connection between your Bluetoot\
h® device and your
vehicle’s audio system. This connection allows you to listen to audio\
from the Bluetooth®
device using your vehicle’s speakers.
A cellular telephone should not be used while
driving so full attention may be given to
vehicle operation.*
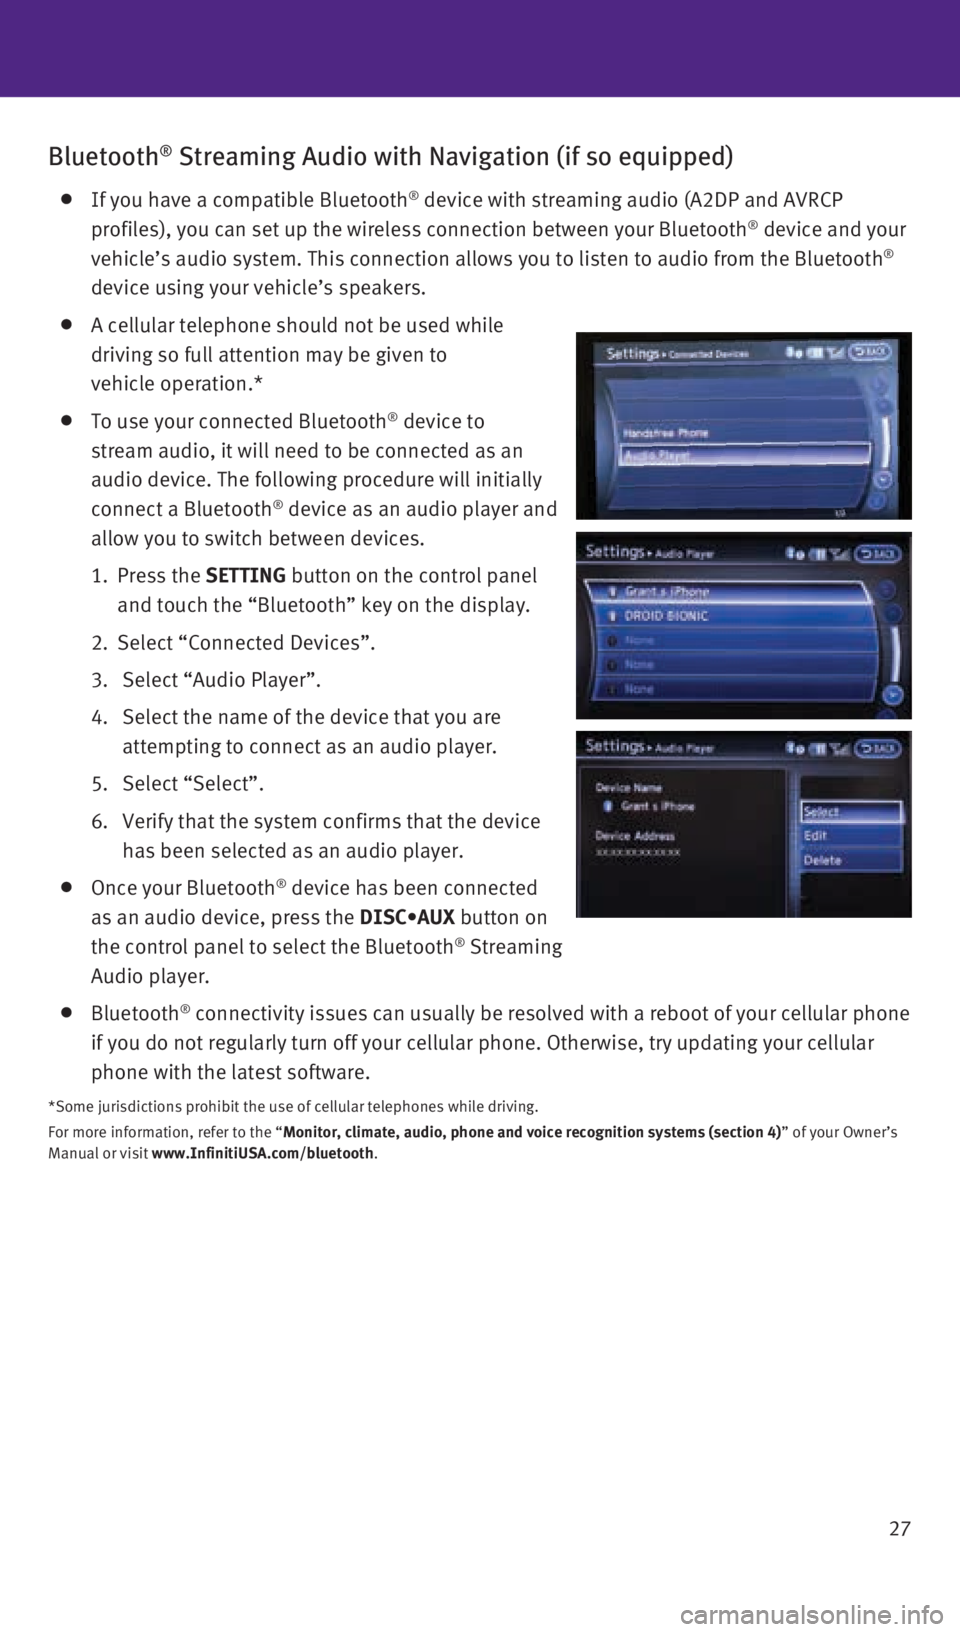
To use your connected Bluetooth® device to
stream audio, it will need to be connected as an
audio device. The following procedure will initially
connect a Bluetooth
® device as an audio player and
allow you to switch between devices.
1. Press the SETTING button on the control panel
and touch the “Bluetooth” key on the display.
2. Select “Connected Devices”.
3. Select “Audio Player”.
4. Select the name of the device that you are
attempting to connect as an audio player.
5. Select “Select”.
6. Verify that the system confirms that the device
has been selected as an audio player.
Once your Bluetooth® device has been connected
as an audio device, press the DISC•AUX button on
the control panel to select the Bluetooth
® Streaming
Audio player.
Bluetooth® connectivity issues can usually be resolved with a reboot of your cellu\
lar phone
if you do not regularly turn off your cellular phone. Otherwise, try upd\
ating your cellular
phone with the latest software.
*Some jurisdictions prohibit the use of cellular telephones while drivin\
g.
For more information, refer to the “Monitor, climate, audio, phone and voice recognition systems (section 4\
) ” of your Owner’s
Manual or visit www.InfinitiUSA.com/bluetooth.
1932612_16a_Q70_HEV_US_pQRG_091715.indd 279/17/15 10:47 AM
Page 32 of 34
30
DVD Player (if so equipped)
This system allows you to play video files via a DVD
or CD from the front display.
To view movies on the front display, stop the vehicle
in a safe location, move the shift lever to the
P (PARK) position and apply the parking brake.
To reduce driver distraction, movies will not be
shown on the front display while the vehicle is in
any drive position.
For more information, refer to the “Monitor, climate, audio, phone and voice
recognition systems (section 4)” of your Owner’s Manual.
HomeLink® Universal Transceiver
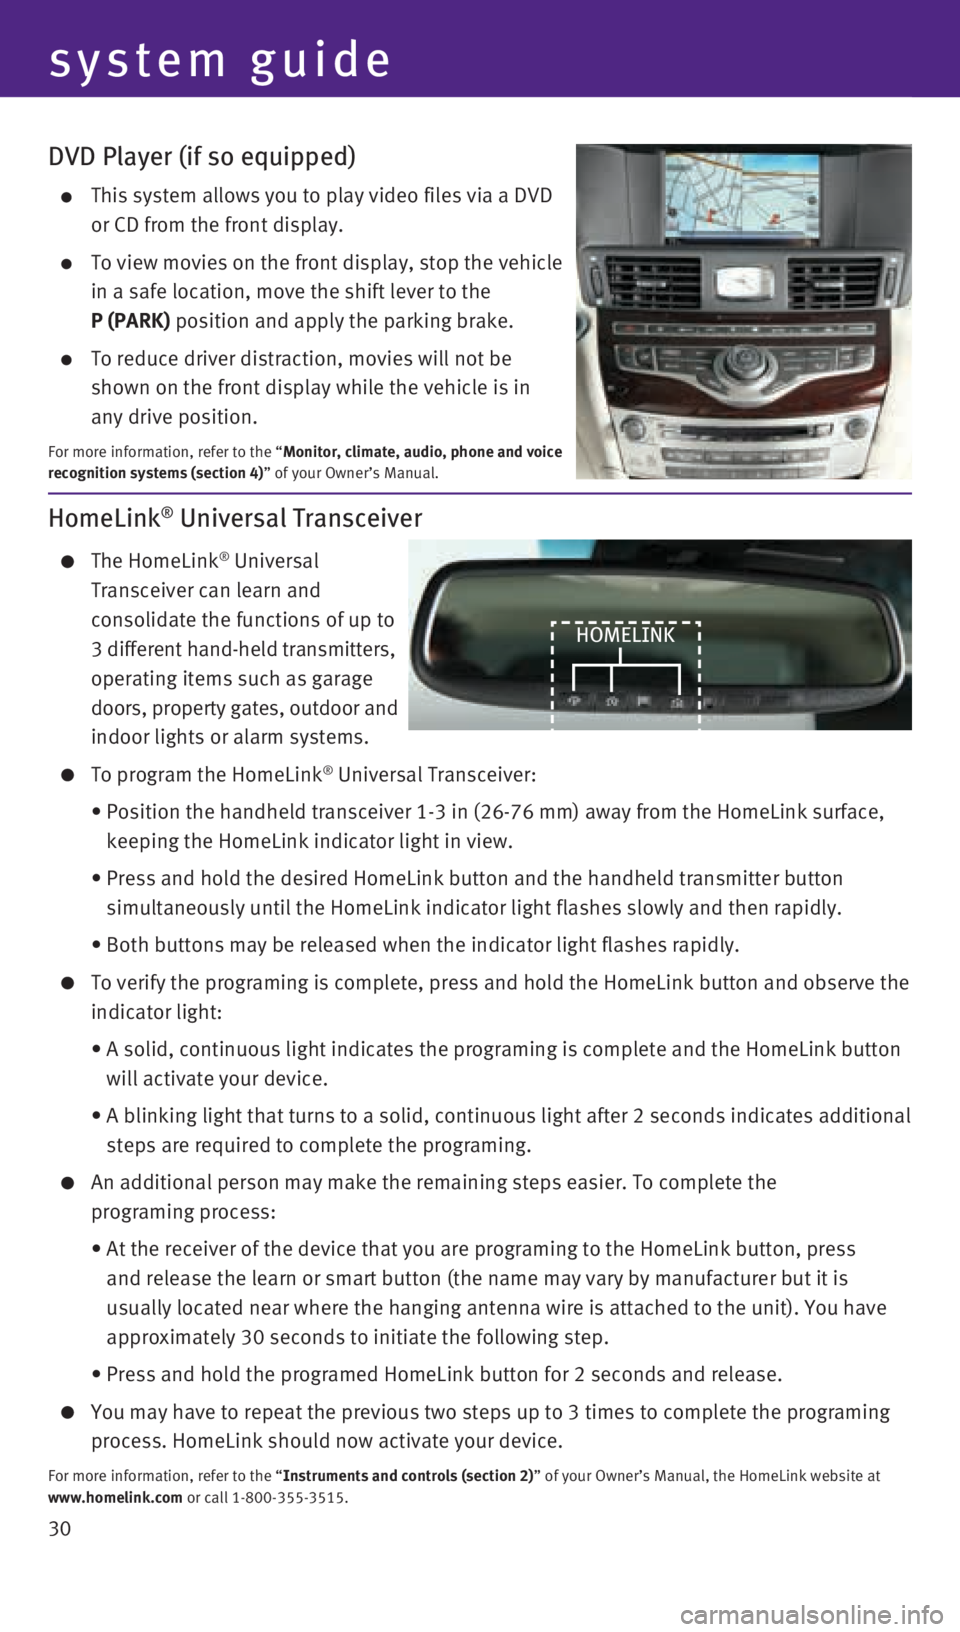
The HomeLink® Universal
Transceiver can learn and
consolidate the functions of up to
3 different hand-held transmitters,
operating items such as garage
doors, property gates, outdoor and
indoor lights or alarm systems.
To program the HomeLink® Universal Transceiver:
• Position the handheld transceiver 1-3 in (26-76 mm) away from the Home\
Link surface,
keeping the HomeLink indicator light in view.
• Press and hold the desired HomeLink button and the handheld transmitter \
button
simultaneously until the HomeLink indicator light flashes slowly and the\
n rapidly.
• Both buttons may be released when the indicator light flashes rapidly.
To verify the programing is complete, press and hold the HomeLink button\
and observe the
indicator light:
• A solid, continuous light indicates the programing is complete and the H\
omeLink button
will activate your device.
• A blinking light that turns to a solid, continuous light after 2 seconds\
indicates additional
steps are required to complete the programing.
An additional person may make the remaining steps easier. To complete th\
e
programing process:
• At the receiver of the device that you are programing to the HomeLink bu\
tton, press
and release the learn or smart button (the name may vary by manufacture\
r but it is
usually located near where the hanging antenna wire is attached to the u\
nit). You have
approximately 30 seconds to initiate the following step.
• Press and hold the programed HomeLink button for 2 seconds and release.
You may have to repeat the previous two steps up to 3 times to complete \
the programing
process. HomeLink should now activate your device.
For more information, refer to the “Instruments and controls (section 2)” of your Owner’s Manual, the HomeLink website at
www.homelink.com or call 1-800-355-3515.
HOMELINK
system guide
1932612_16a_Q70_HEV_US_pQRG_091715.indd 309/17/15 10:47 AM