ESP INFINITI QX 2013 User Guide
[x] Cancel search | Manufacturer: INFINITI, Model Year: 2013, Model line: QX, Model: INFINITI QX 2013Pages: 578, PDF Size: 3.92 MB
Page 219 of 578
4-18Monitor, climate, audio, phone and voice recognition systems
This clock will indicate the time almost
exactly because it is always adjusted by
the GPS system.
Clock Format (24h):
When this item is turned to ON, the 24-
hour clock is displayed. When this item is
not turned to ON, the 12-hour clock is
displayed.
Offset (hour)/(min):
Adjust the time by increasing or decreasing
per hour or per minute.
Daylight Saving Time:
Turn this item to ON for daylight saving
time application.
Time Zone:
Choose the time zone from the following
.Pacific
. Mountain
. Central
. Eastern
. Atlantic
. Newfoundland
. Hawaii
. Alaska
SAA3007
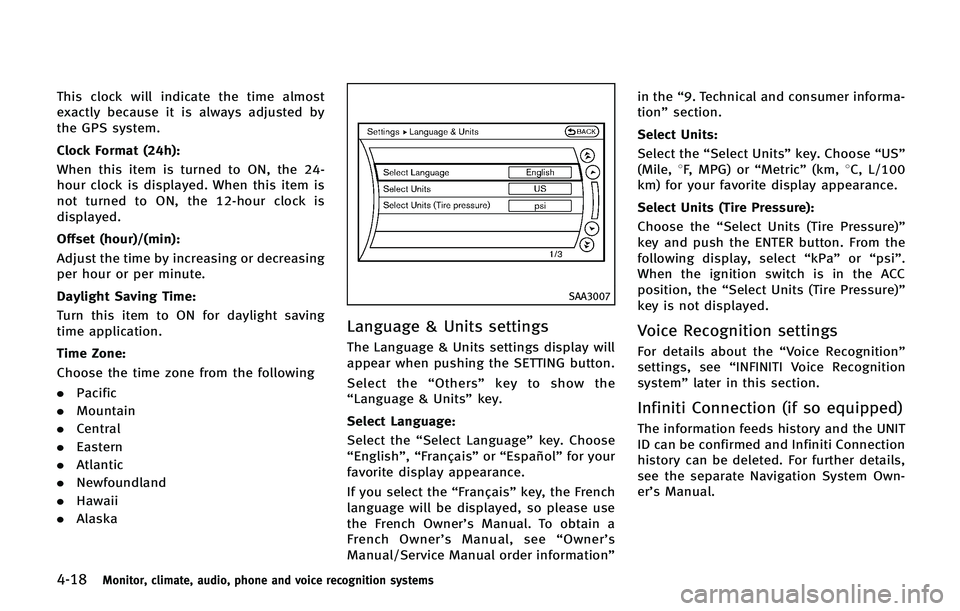
Language & Units settings
The Language & Units settings display will
appear when pushing the SETTING button.
Select the “Others” key to show the
“Language & Units” key.
Select Language:
Select the “Select Language” key. Choose
“English”, “Français” or“Español” for your
favorite display appearance.
If you select the “Français”key, the French
language will be displayed, so please use
the French Owner’s Manual. To obtain a
French Owner’ s Manual, see “Owner’ s
Manual/Service Manual order information” in the
“9. Technical and consumer informa-
tion” section.
Select Units: Select the “Select Units” key. Choose“US”
(Mile, 8F, MPG) or “Metric”(km,8C, L/100
km) for your favorite display appearance.
Select Units (Tire Pressure):
Choose the “Select Units (Tire Pressure)”
key and push the ENTER button. From the
following display, select “kPa”or“psi”.
When the ignition switch is in the ACC
position, the “Select Units (Tire Pressure)”
key is not displayed.Voice Recognition settings
For details about the “Voice Recognition”
settings, see “INFINITI Voice Recognition
system” later in this section.
Infiniti Connection (if so equipped)
The information feeds history and the UNIT
ID can be confirmed and Infiniti Connection
history can be deleted. For further details,
see the separate Navigation System Own-
er’s Manual.
Page 222 of 578
When you push the CAMERA button or shift
the shift lever into the R (Reverse) position
while the ignition switch is in the ON
position, the Around View Monitor oper-
ates. The monitor displays various views of
the position of the vehicle.
Available views:
.Bird-Eye View
The surrounding view of the vehicle.
. Front-Side View
The view around and ahead of the front
passenger’s side wheel.
. Front View
An approximately 150-degree view of
the front of the vehicle.
. Rear view
An approximately 150-degree view of
the rear of the vehicle.
. Rear-Wide View
An approximately 180-degree view of
the rear of the vehicle.
The system is designed as an aid to the
driver in situations such as slot parking or
parallel parking.
SAA3160
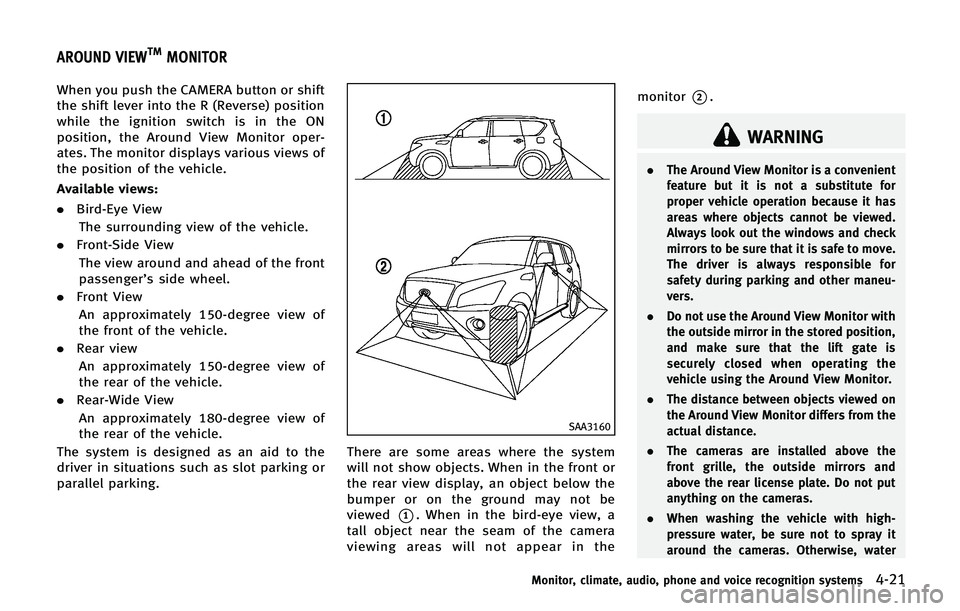
There are some areas where the system
will not show objects. When in the front or
the rear view display, an object below the
bumper or on the ground may not be
viewed
*1. When in the bird-eye view, a
tall object near the seam of the camera
viewing areas will not appear in the monitor
*2.
WARNING
.
The Around View Monitor is a convenient
feature but it is not a substitute for
proper vehicle operation because it has
areas where objects cannot be viewed.
Always look out the windows and check
mirrors to be sure that it is safe to move.
The driver is always responsible for
safety during parking and other maneu-
vers.
. Do not use the Around View Monitor with
the outside mirror in the stored position,
and make sure that the lift gate is
securely closed when operating the
vehicle using the Around View Monitor.
. The distance between objects viewed on
the Around View Monitor differs from the
actual distance.
. The cameras are installed above the
front grille, the outside mirrors and
above the rear license plate. Do not put
anything on the cameras.
. When washing the vehicle with high-
pressure water, be sure not to spray it
around the cameras. Otherwise, water
Monitor, climate, audio, phone and voice recognition systems4-21
AROUND VIEWTMMONITOR
Page 231 of 578
4-30Monitor, climate, audio, phone and voice recognition systems
SAA1923
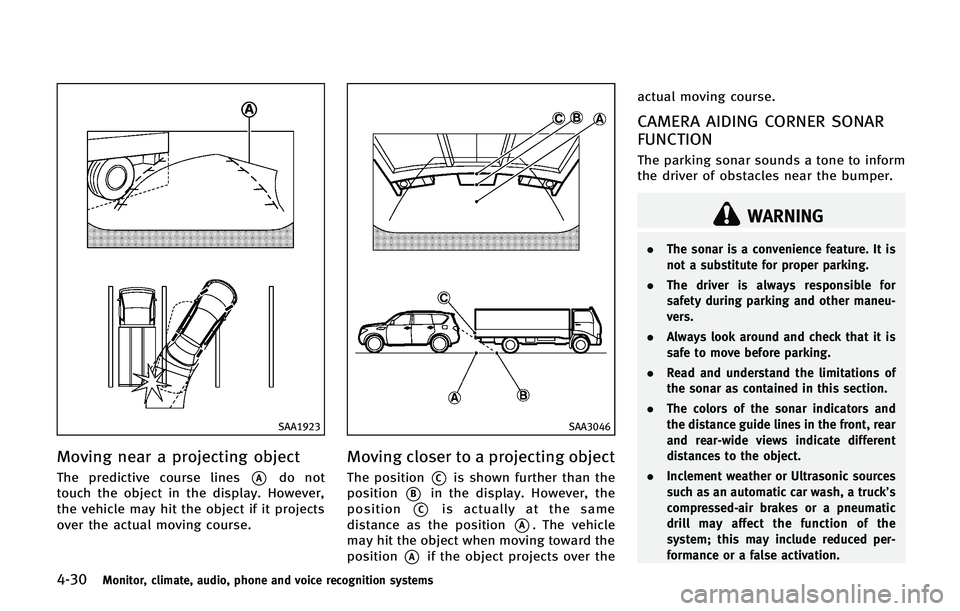
Moving near a projecting object
The predictive course lines*Ado not
touch the object in the display. However,
the vehicle may hit the object if it projects
over the actual moving course.
SAA3046
Moving closer to a projecting object
The position*Cis shown further than the
position
*Bin the display. However, the
position
*Cis actually at the same
distance as the position
*A. The vehicle
may hit the object when moving toward the
position
*Aif the object projects over the actual moving course.
CAMERA AIDING CORNER SONAR
FUNCTION
The parking sonar sounds a tone to inform
the driver of obstacles near the bumper.
WARNING
.
The sonar is a convenience feature. It is
not a substitute for proper parking.
. The driver is always responsible for
safety during parking and other maneu-
vers.
. Always look around and check that it is
safe to move before parking.
. Read and understand the limitations of
the sonar as contained in this section.
. The colors of the sonar indicators and
the distance guide lines in the front, rear
and rear-wide views indicate different
distances to the object.
. Inclement weather or Ultrasonic sources
such as an automatic car wash, a truck’s
compressed-air brakes or a pneumatic
drill may affect the function of the
system; this may include reduced per-
formance or a false activation.
Page 249 of 578
4-48Monitor, climate, audio, phone and voice recognition systems
equipment is used. These characteristics
are completely normal in a given reception
area, and do not indicate any malfunction
in your INFINITI radio system.
Reception conditions will constantly
change because of vehicle movement.
Buildings, terrain, signal distance and
interference from other vehicles can work
against ideal reception. Described below
are some of the factors that can affect your
radio reception.
Some cellular phones or other devices may
cause interference or a buzzing noise to
come from the audio system speakers.
Storing the device in a different location
may reduce or eliminate the noise.
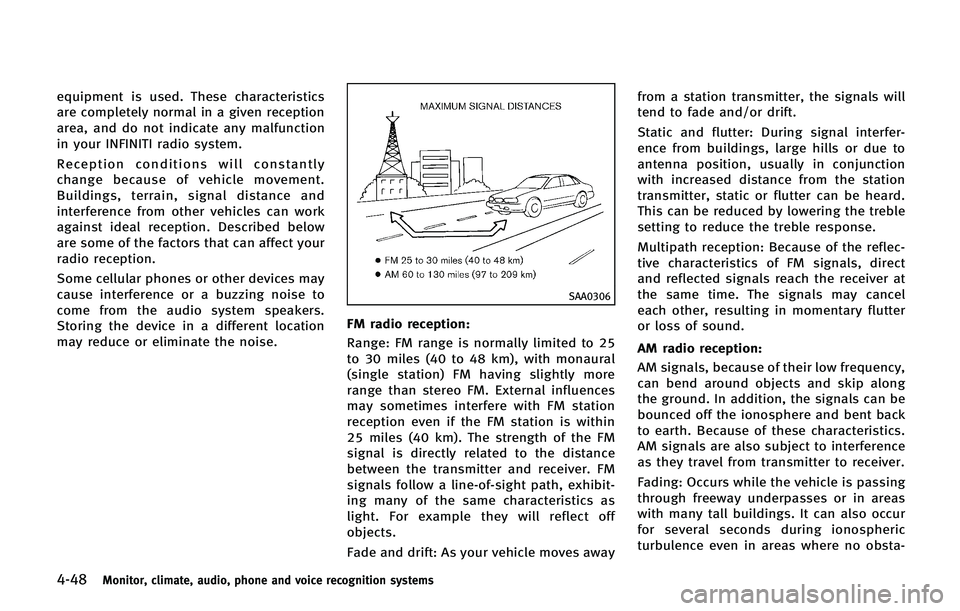
SAA0306
FM radio reception:
Range: FM range is normally limited to 25
to 30 miles (40 to 48 km), with monaural
(single station) FM having slightly more
range than stereo FM. External influences
may sometimes interfere with FM station
reception even if the FM station is within
25 miles (40 km). The strength of the FM
signal is directly related to the distance
between the transmitter and receiver. FM
signals follow a line-of-sight path, exhibit-
ing many of the same characteristics as
light. For example they will reflect off
objects.
Fade and drift: As your vehicle moves awayfrom a station transmitter, the signals will
tend to fade and/or drift.
Static and flutter: During signal interfer-
ence from buildings, large hills or due to
antenna position, usually in conjunction
with increased distance from the station
transmitter, static or flutter can be heard.
This can be reduced by lowering the treble
setting to reduce the treble response.
Multipath reception: Because of the reflec-
tive characteristics of FM signals, direct
and reflected signals reach the receiver at
the same time. The signals may cancel
each other, resulting in momentary flutter
or loss of sound.
AM radio reception:
AM signals, because of their low frequency,
can bend around objects and skip along
the ground. In addition, the signals can be
bounced off the ionosphere and bent back
to earth. Because of these characteristics.
AM signals are also subject to interference
as they travel from transmitter to receiver.
Fading: Occurs while the vehicle is passing
through freeway underpasses or in areas
with many tall buildings. It can also occur
for several seconds during ionospheric
turbulence even in areas where no obsta-
Page 254 of 578
device and dehumidify or ventilate the
USB player completely.
. Do not connect a USB device if a
connector, cable or USB port is wet.
Allow the connector, cable, and USB
port to dry completely before connect-
ing the USB device. (Wait for 24 hours
or more until it is dry.) If the connector
and USB port are exposed to fluids
other than water, evaporative residue
may cause a short circuit between the
connector pins and USB port. In this
case, replace the cable and USB port.
Otherwise damage to the USB device
and a loss of function may occur.
. If the cable is damaged (insulation cut,
connectors cracked, contamination
such as liquids, dust, dirt, etc. in the
connectors), do not use the cable.
Replace the cable with a new one.
. Do not put a USB device in a location
where static electricity occurs, electrical
noise is generated or hot air from the
air conditioner blows directly on it.
Doing so may cause the data stored on
the USB device to be corrupted.
Notes for iPod
®use:
iPod®is a trademark of Apple Inc.,
registered in the U.S. and other countries. .
Improperly plugging in the iPod
®may
cause a checkmark to be displayed on
and off (flickering). Always make sure
that the iPod
®is connected properly.
. An iPod nano®(1st Generation) may
remain in fast forward or rewind mode
if it is connected during a seek opera-
tion. In this case, please manually reset
the iPod
®.
. An iPod nano®(2nd Generation) will
continue to fast-forward or rewind if it
is disconnected during a seek opera-
tion.
. An incorrect song title may appear when
the Play Mode is changed while using
an iPod nano
®(2nd Generation)
. Audiobooks may not play in the same
order as they appear on an iPod
®.
. Large video files cause slow responses
in an iPod
®. The vehicle center display
may momentarily black out, but will
soon recover.
. If an iPod
®automatically selects large
video files while in the shuffle mode,
the vehicle center display may momen-
tarily black out, but will soon recover.
Compressed Audio Files (MP3/
WMA/AAC)
Explanation of terms:
. MP3 —MP3 is short for Moving Pictures
Experts Group Audio Layer 3. MP3 is
the most well known compressed
digital audio file format. This format
allows for near “CD quality”sound, but
at a fraction of the size of normal audio
files. MP3 conversion of an audio track
can reduce the file size by approxi-
mately a 10:1 ratio (Sampling: 44.1
kHz, Bit rate: 128 kbps) with virtually
no perceptible loss in quality. The
compression reduces certain parts of
sound that seem inaudible to most
people.
. WMA —Windows Media Audio (WMA) is
a compressed audio format created by
Microsoft as an alternative to MP3. The
WMA codec offers greater file compres-
sion than the MP3 codec, enabling
storage of more digital audio tracks in
the same amount of space when
compared to MP3s at the same level
of quality.
. AAC/M4A —Advanced Audio Coding
(AAC) is a lossy audio compression
format. Audio files that have been
Monitor, climate, audio, phone and voice recognition systems4-53
Page 267 of 578
4-66Monitor, climate, audio, phone and voice recognition systems
Hide: Hide the operation key.
Title Menu (DVD-VIDEO):
Some menus specific to each disc will be
shown. For details, see the instructions on
the disc.
Title Search (DVD-VIDEO, DVD-VR):
The scene with the specified title will be
displayed each time the “+”side or “−”
side is selected.
Group Search (VIDEO CD):
A scene in the specified group will be
displayed each time the “+”side or “−”
side is selected.
10 Key Search (DVD-VIDEO, VIDEO-CD,CD-
DA, DVD-VR):
Select the “10 Key Search” key to open the
number entry screen. Input the number to
be searched and select the “OK”key. The
specified Title/Chapter or Group/Track will
be played.
Select No. (VIDEO-CD):
Select the “Select No.” key to open the
number entry screen. Input the number to
be searched and select the “OK”key. The
specified scene will be played. Surround Information (DVD-VIDEO, VIDEO-
CD, CD-DA) (Models equipped with BOSE®
Surround Sound System):
Select the
“Surround Information” key and
push the ENTER button. The surround
information screen will appear.
Push the BACK button to return to the
previous screen.
Angle (DVD-VIDEO):
If the DVD contains different angles (such
as moving images), the current image
angle can be switched to another one.
Select the “Angle” key. The angle will
change each time the “+”side or “−”side
is selected.
Angle Mark (DVD-VIDEO):
When this item is turned on, an angle mark
will be shown on the bottom of the screen
if the scene can be seen from a different
angle.
Menu Skip (DVD-VIDEO):
DVD menus are automatically configured
and the contents will be played directly
when the “Menu Skip” key is turned on.
Note that some discs may not be played
directly even if this item is turned on. CM Skip (DVD-VIDEO):
Select the “CM Skip” key. Choose the
setting time from 15, 30 or 60 seconds by
selecting the “+”side or “−”side.
DRC (DVD-VIDEO, DVD-VR):
DRC (Dynamic Range Compression) auto-
matically adjusts the soundtrack volume
level to maintain a more even sound to the
speakers.
DOWN MIX (DVD-VIDEO):
Convert a multi-channel recording to a
traditional two-channel (stereo) recording.
DVD Language (DVD-VIDEO, VIDEO-CD):
Select the “DVD Language” key to open the
number entry screen. Input the number
corresponding to the preferred language
and select the “OK”key. The DVD top menu
language will be changed to the one
specified.
Display:
To adjust the image quality of the screen,
select the preferred adjustment items.
Audio:
Select the preferred language for audio.
Page 285 of 578
4-84Monitor, climate, audio, phone and voice recognition systems
SAA3329
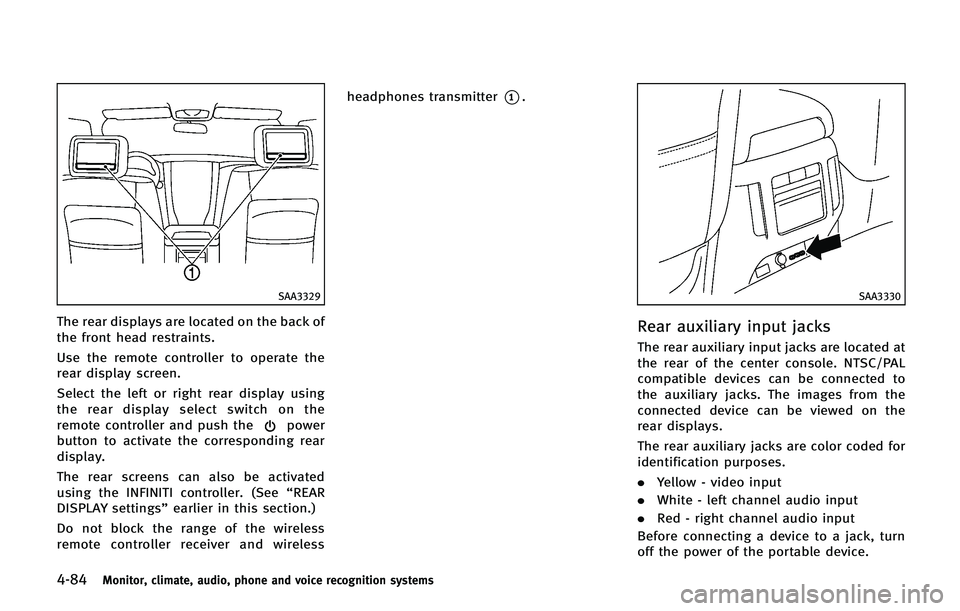
The rear displays are located on the back of
the front head restraints.
Use the remote controller to operate the
rear display screen.
Select the left or right rear display using
the rear display select switch on the
remote controller and push the
power
button to activate the corresponding rear
display.
The rear screens can also be activated
using the INFINITI controller. (See “REAR
DISPLAY settings” earlier in this section.)
Do not block the range of the wireless
remote controller receiver and wireless headphones transmitter
*1.
SAA3330
Rear auxiliary input jacks
The rear auxiliary input jacks are located at
the rear of the center console. NTSC/PAL
compatible devices can be connected to
the auxiliary jacks. The images from the
connected device can be viewed on the
rear displays.
The rear auxiliary jacks are color coded for
identification purposes.
.
Yellow - video input
. White - left channel audio input
. Red - right channel audio input
Before connecting a device to a jack, turn
off the power of the portable device.
Page 290 of 578
JVH0239X
Type A
JVH0407X
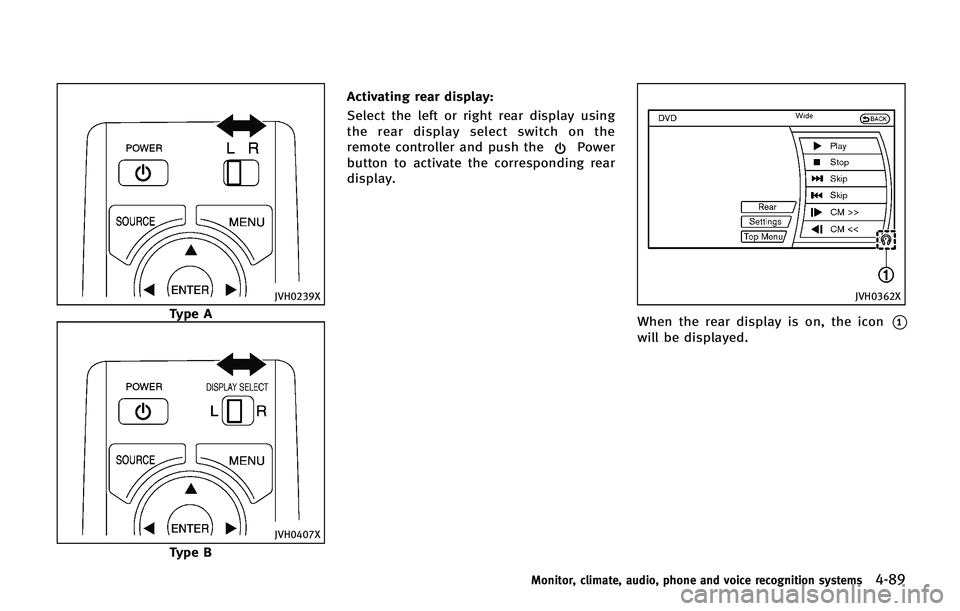
Type BActivating rear display:
Select the left or right rear display using
the rear display select switch on the
remote controller and push the
Power
button to activate the corresponding rear
display.
JVH0362X
When the rear display is on, the icon*1
will be displayed.
Monitor, climate, audio, phone and voice recognition systems4-89
Page 292 of 578
3. Close the lid securely..If you will not be using the remotecontroller for long periods of time,
remove the batteries.
.Replacement of the batteries is
needed when the remote controller
only functions at extremely close
distances to the Dual Head Restraint
DVD System or when it does not
function at all.
FCC Notice:
Changes or modifications not expressly
approved by the party responsible for
compliance could void the user’s authority
to operate the equipment. This device
complies with Part 15 of the FCC Rules
and RSS-210 of Industry Canada. Opera-
tion is subject to the following two
conditions: (1) This device may not cause
harmful interference, and (2) this device
must accept any interference received,
including interference that may cause
undesired operation of the device.
BEFORE OPERATING DUAL HEAD
RESTRAINT DVD SYSTEM
Precautions
Start the engine when using the Dual Head
Restraint DVD System.
WARNING
The driver must not attempt to operate the
Dual Head Restraint DVD System or wear the
headphones while the vehicle is in motion
so that full attention may be given to vehicle
operation.
CAUTION
. Only operate the Dual Head Restraint
DVD System while the vehicle engine is
running. Operating the Dual Head Re-
straint DVD System for extended periods
of time with the engine OFF can dis-
charge the vehicle battery.
. Do not allow the system to get wet.
Excessive moisture such as spilled
liquids may cause the system to mal-
function. .
While playing VIDEO-CD media, this DVD
player does not guarantee complete
functionality of all VIDEO-CD formats.
Parental level (parental control)
Video data with the parental control setting
can be played with this system. Please use
your own judgement to set the parental
control with the system.
Disc selection
You can play the following disc formats
with the DVD player:
.DVD-VIDEO
. VIDEO-CD
. DTS-CD
Use DVDs with the region code “ALL”or the
code applicable to your country. (The
region code is displayed as a small symbol
printed on the top of the DVD.) This
vehicle-installed DVD player can only play
DVDs with an applicable region code.
Available sources
The following sources are available to play
on each display:
Monitor, climate, audio, phone and voice recognition systems4-91
Page 296 of 578
angle.
Menu Skip (DVD-VIDEO):
DVD menus are automatically configured
and the contents will be played directly
when the“Menu Skip” key is turned on.
Note that some discs may not be played
directly even if this item is turned on.
CM Skip (DVD-VIDEO):
The amount of seconds for CM Skip can be
set to 15, 30 or 60 seconds.
DRC (DVD-VIDEO):
DRC (Dynamic Range Compression) allows
tuning of the dynamic range of sound
recorded in the Dolby Digital format.
DOWN MIX (DVD-VIDEO) (if so equipped):
Convert a multi-channel recording to a
traditional two-channel (stereo) recording.
DVD Language (DVD-VIDEO, VIDEO-CD):
Select the “DVD Language” key and push
the ENTER button to open the number entry
screen.
Input the number corresponding to the
preferred language and select the “OK”key
with the INFINITI controller. Then push the
ENTER button. The DVD top menu language
will be changed to the one selected. Display:
Adjust the image quality of the screen,
select the preferred adjustment items and
push the ENTER button.
Audio*:
Choose the preferred language using the
INFINITI controller and push the ENTER
button.
Subtitle* (DVD-VIDEO):
Choose the preferred language using the
INFINITI controller and push the ENTER
button.
To turn off the subtitles, push and hold the
ENTER button until a beep sounds.
Display Mode (DVD-VIDEO, VIDEO-CD):
Choose from the “Full”,“Wide”, “Normal”
or “Cinema” mode using the INFINITI
controller and push the ENTER button
again.
Play Mode:
Choose the preferred play mode using the
INFINITI controller and push the ENTER
button.
Surround Information* (if so equipped):
Display surround sound information.Remote controller operation
Use the remote controller to adjust the
following items.
Rear display select switch:
To activate the left screen or right screen,
move the rear display select switch on the
remote controller to the side correspond-
ing to the screen you want to activate (L or
R).
POWER button:
The rear displays can be activated or
deactivated individually.
To activate or deactivate the rear displays,
push the
button on the remote con-
troller.
SOURCE button:
The media available for playback will be
displayed when the SOURCE button is
pushed.
MENU button:
Push the MENU button to display the
operation screen for the source that is
being played.
Select button:
Push the select button
,to
select the items displayed on the rear
Monitor, climate, audio, phone and voice recognition systems4-95