elec INFINITI QX4 2001 Factory Service Manual
[x] Cancel search | Manufacturer: INFINITI, Model Year: 2001, Model line: QX4, Model: INFINITI QX4 2001Pages: 2395, PDF Size: 43.2 MB
Page 277 of 2395
SAT354I
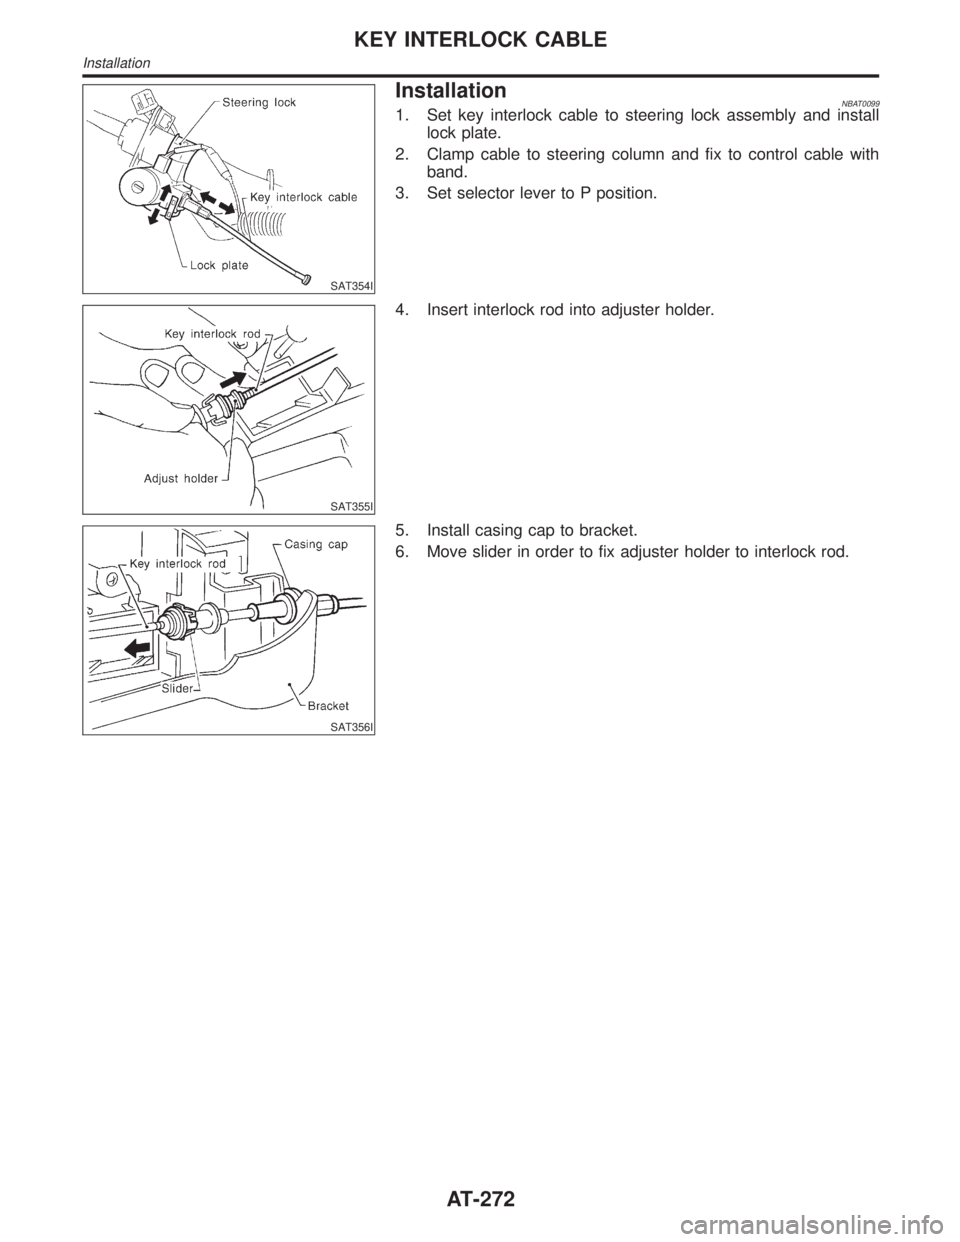
InstallationNBAT00991. Set key interlock cable to steering lock assembly and install
lock plate.
2. Clamp cable to steering column and fix to control cable with
band.
3. Set selector lever to P position.
SAT355I
4. Insert interlock rod into adjuster holder.
SAT356I
5. Install casing cap to bracket.
6. Move slider in order to fix adjuster holder to interlock rod.
KEY INTERLOCK CABLE
Installation
AT-272
Page 281 of 2395
SAT551J
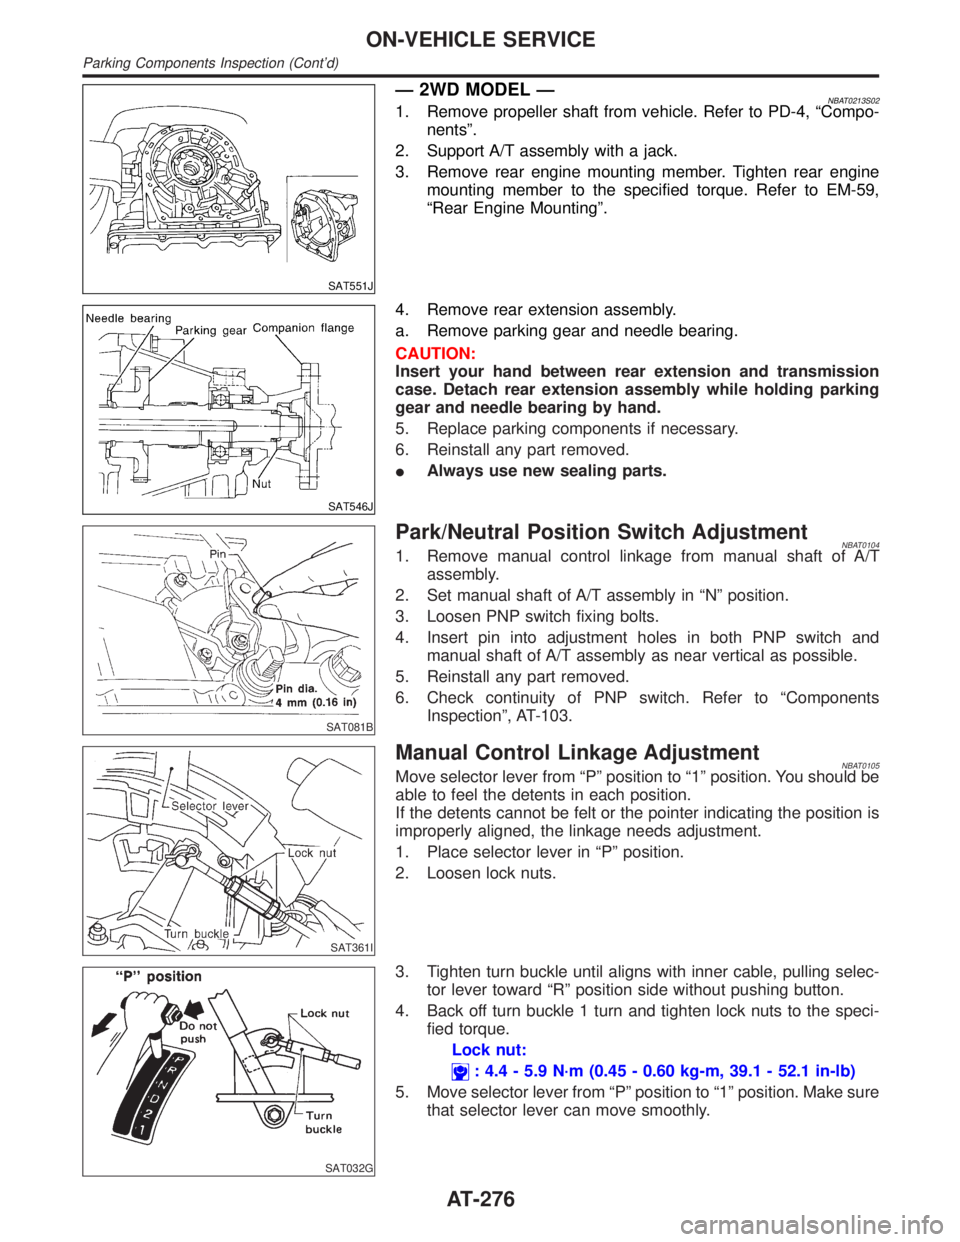
Ð 2WD MODEL ÐNBAT0213S021. Remove propeller shaft from vehicle. Refer to PD-4, ªCompo-
nentsº.
2. Support A/T assembly with a jack.
3. Remove rear engine mounting member. Tighten rear engine
mounting member to the specified torque. Refer to EM-59,
ªRear Engine Mountingº.
SAT546J
4. Remove rear extension assembly.
a. Remove parking gear and needle bearing.
CAUTION:
Insert your hand between rear extension and transmission
case. Detach rear extension assembly while holding parking
gear and needle bearing by hand.
5. Replace parking components if necessary.
6. Reinstall any part removed.
IAlways use new sealing parts.
SAT081B
Park/Neutral Position Switch AdjustmentNBAT01041. Remove manual control linkage from manual shaft of A/T
assembly.
2. Set manual shaft of A/T assembly in ªNº position.
3. Loosen PNP switch fixing bolts.
4. Insert pin into adjustment holes in both PNP switch and
manual shaft of A/T assembly as near vertical as possible.
5. Reinstall any part removed.
6. Check continuity of PNP switch. Refer to ªComponents
Inspectionº, AT-103.
SAT361I
Manual Control Linkage AdjustmentNBAT0105Move selector lever from ªPº position to ª1º position. You should be
able to feel the detents in each position.
If the detents cannot be felt or the pointer indicating the position is
improperly aligned, the linkage needs adjustment.
1. Place selector lever in ªPº position.
2. Loosen lock nuts.
SAT032G
3. Tighten turn buckle until aligns with inner cable, pulling selec-
tor lever toward ªRº position side without pushing button.
4. Back off turn buckle 1 turn and tighten lock nuts to the speci-
fied torque.
Lock nut:
: 4.4 - 5.9 N´m (0.45 - 0.60 kg-m, 39.1 - 52.1 in-lb)
5. Move selector lever from ªPº position to ª1º position. Make sure
that selector lever can move smoothly.
ON-VEHICLE SERVICE
Parking Components Inspection (Cont'd)
AT-276
Page 284 of 2395
SAT017B
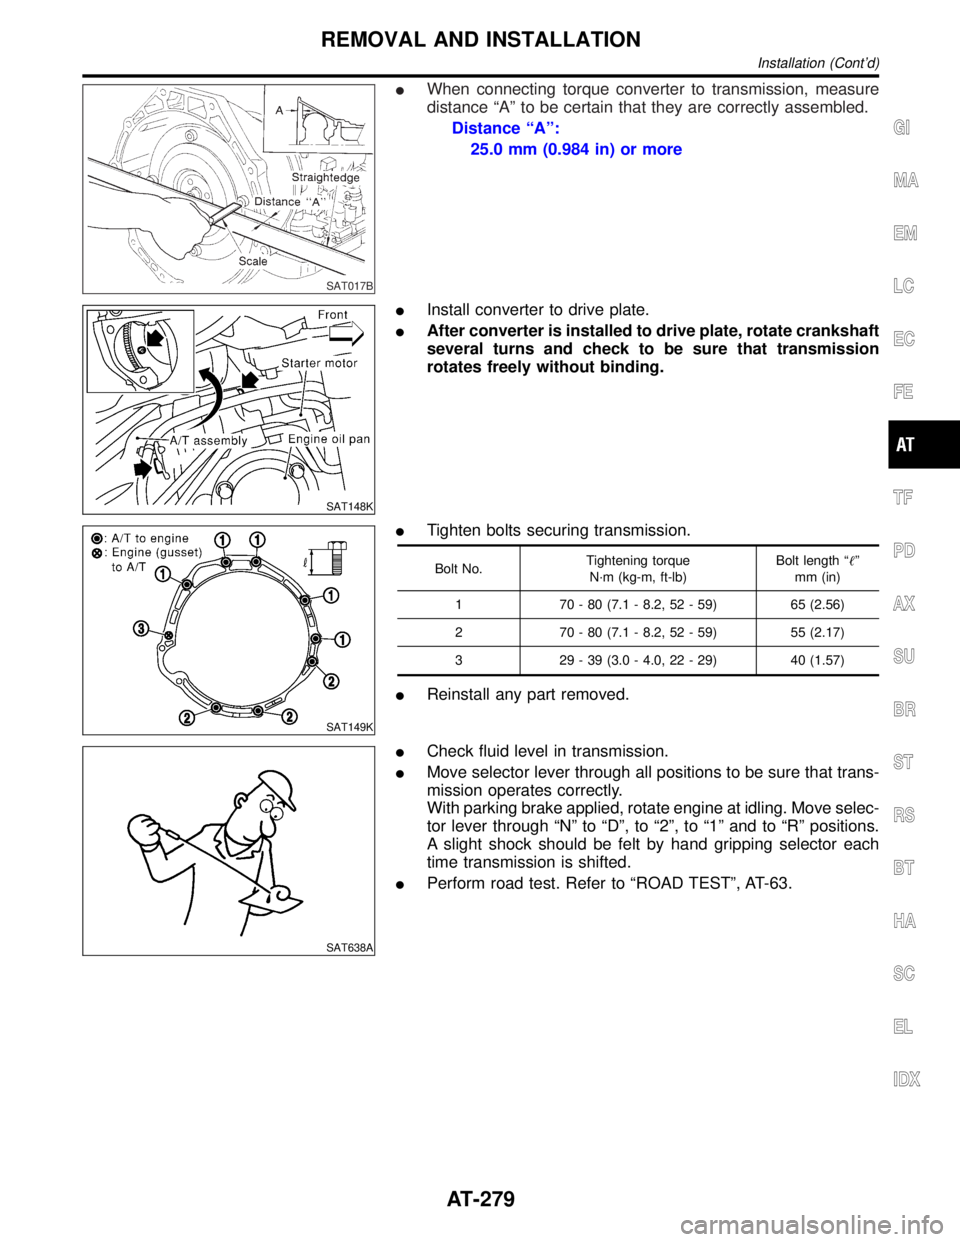
IWhen connecting torque converter to transmission, measure
distance ªAº to be certain that they are correctly assembled.
Distance ªAº:
25.0 mm (0.984 in) or more
SAT148K
IInstall converter to drive plate.
IAfter converter is installed to drive plate, rotate crankshaft
several turns and check to be sure that transmission
rotates freely without binding.
SAT149K
ITighten bolts securing transmission.
Bolt No.Tightening torque
N´m (kg-m, ft-lb)Bolt length ªº
mm (in)
1 70 - 80 (7.1 - 8.2, 52 - 59) 65 (2.56)
2 70 - 80 (7.1 - 8.2, 52 - 59) 55 (2.17)
3 29 - 39 (3.0 - 4.0, 22 - 29) 40 (1.57)
IReinstall any part removed.
SAT638A
ICheck fluid level in transmission.
IMove selector lever through all positions to be sure that trans-
mission operates correctly.
With parking brake applied, rotate engine at idling. Move selec-
tor lever through ªNº to ªDº, to ª2º, to ª1º and to ªRº positions.
A slight shock should be felt by hand gripping selector each
time transmission is shifted.
IPerform road test. Refer to ªROAD TESTº, AT-63.
GI
MA
EM
LC
EC
FE
TF
PD
AX
SU
BR
ST
RS
BT
HA
SC
EL
IDX
REMOVAL AND INSTALLATION
Installation (Cont'd)
AT-279
Page 322 of 2395
SAT852A
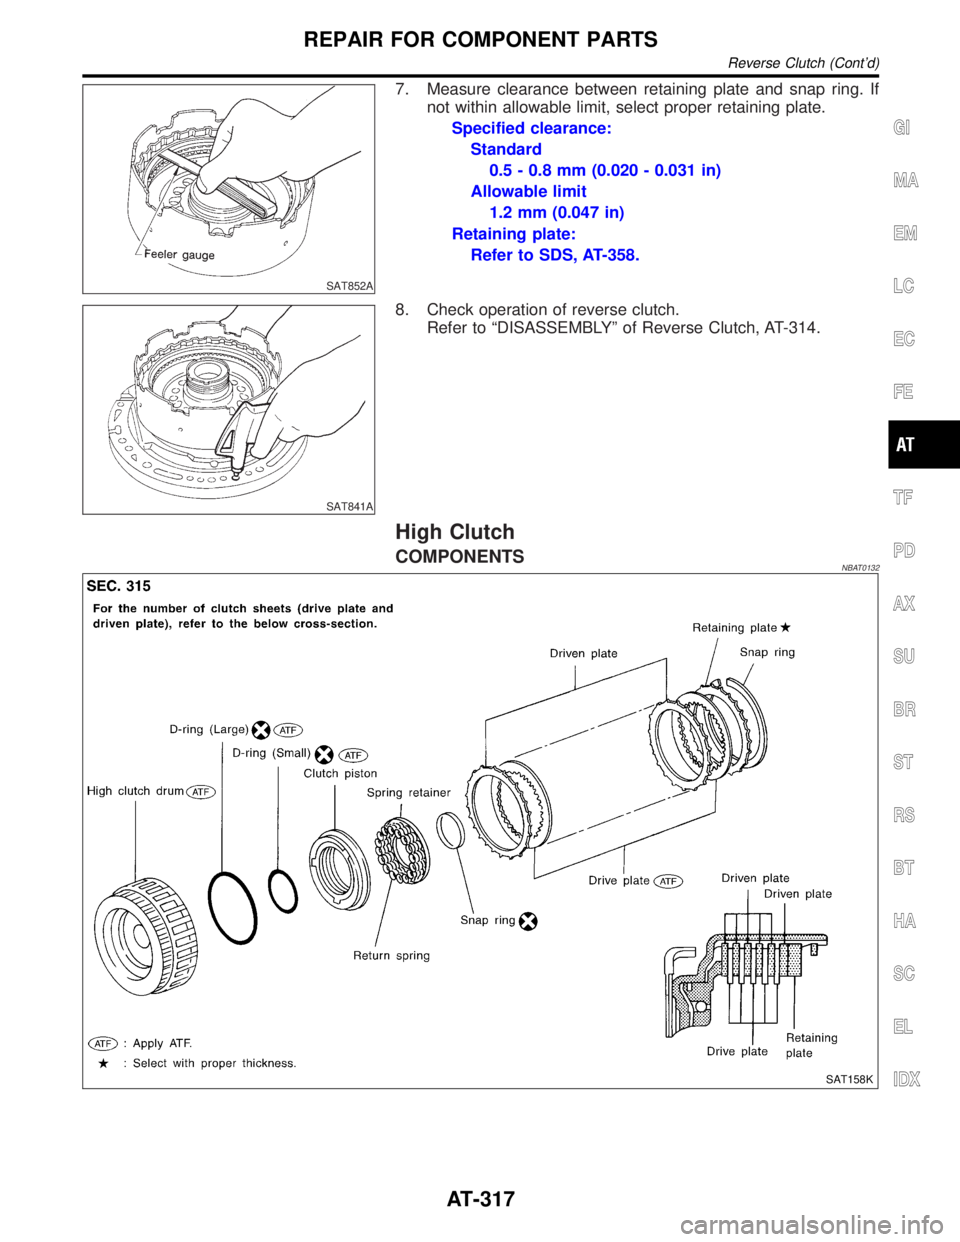
7. Measure clearance between retaining plate and snap ring. If
not within allowable limit, select proper retaining plate.
Specified clearance:
Standard
0.5 - 0.8 mm (0.020 - 0.031 in)
Allowable limit
1.2 mm (0.047 in)
Retaining plate:
Refer to SDS, AT-358.
SAT841A
8. Check operation of reverse clutch.
Refer to ªDISASSEMBLYº of Reverse Clutch, AT-314.
High Clutch
COMPONENTSNBAT0132
SAT158K
GI
MA
EM
LC
EC
FE
TF
PD
AX
SU
BR
ST
RS
BT
HA
SC
EL
IDX
REPAIR FOR COMPONENT PARTS
Reverse Clutch (Cont'd)
AT-317
Page 332 of 2395
SAT880A
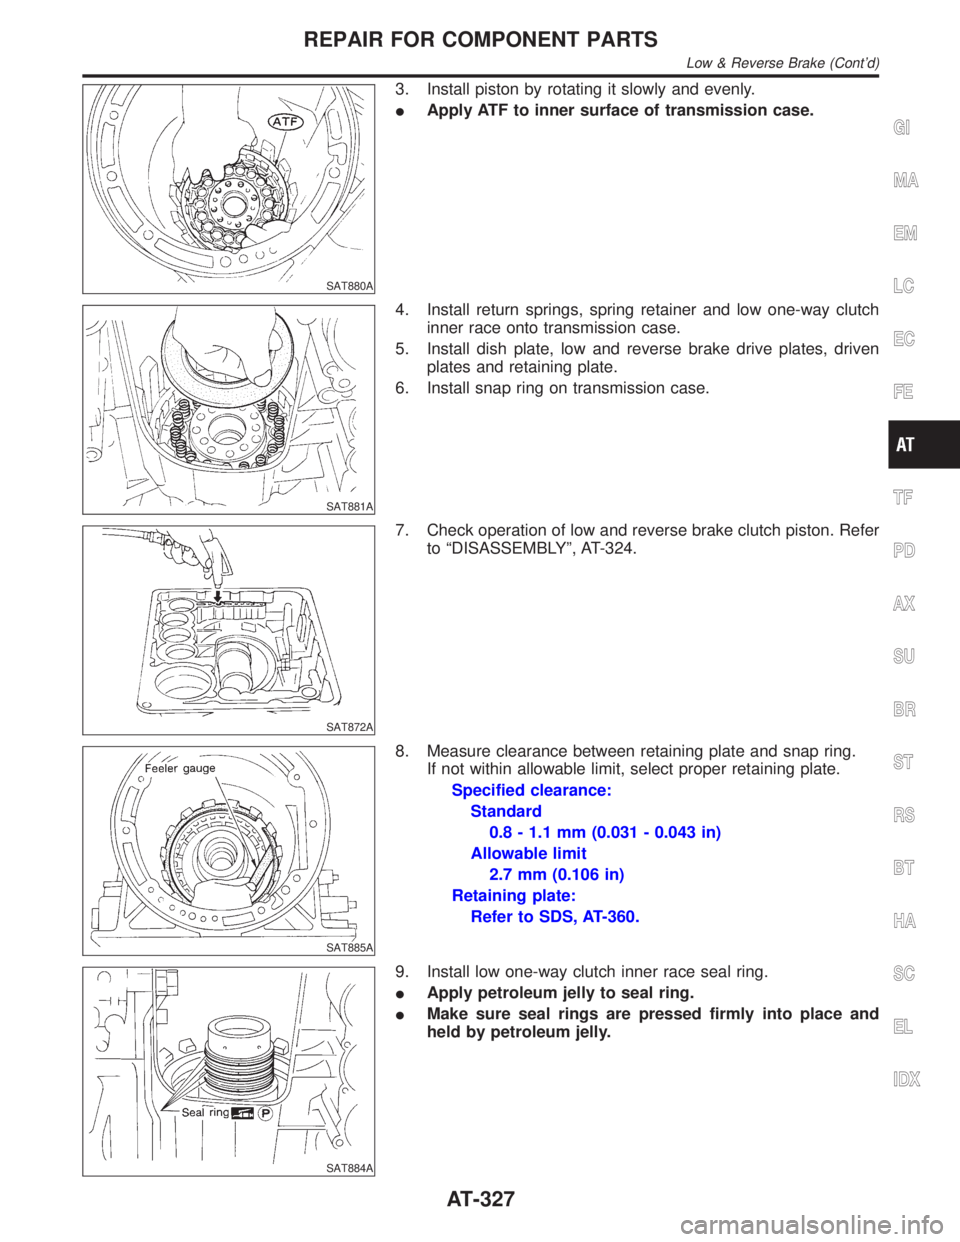
3. Install piston by rotating it slowly and evenly.
IApply ATF to inner surface of transmission case.
SAT881A
4. Install return springs, spring retainer and low one-way clutch
inner race onto transmission case.
5. Install dish plate, low and reverse brake drive plates, driven
plates and retaining plate.
6. Install snap ring on transmission case.
SAT872A
7. Check operation of low and reverse brake clutch piston. Refer
to ªDISASSEMBLYº, AT-324.
SAT885A
8. Measure clearance between retaining plate and snap ring.
If not within allowable limit, select proper retaining plate.
Specified clearance:
Standard
0.8 - 1.1 mm (0.031 - 0.043 in)
Allowable limit
2.7 mm (0.106 in)
Retaining plate:
Refer to SDS, AT-360.
SAT884A
9. Install low one-way clutch inner race seal ring.
IApply petroleum jelly to seal ring.
IMake sure seal rings are pressed firmly into place and
held by petroleum jelly.
GI
MA
EM
LC
EC
FE
TF
PD
AX
SU
BR
ST
RS
BT
HA
SC
EL
IDX
REPAIR FOR COMPONENT PARTS
Low & Reverse Brake (Cont'd)
AT-327
Page 353 of 2395
SAT978A
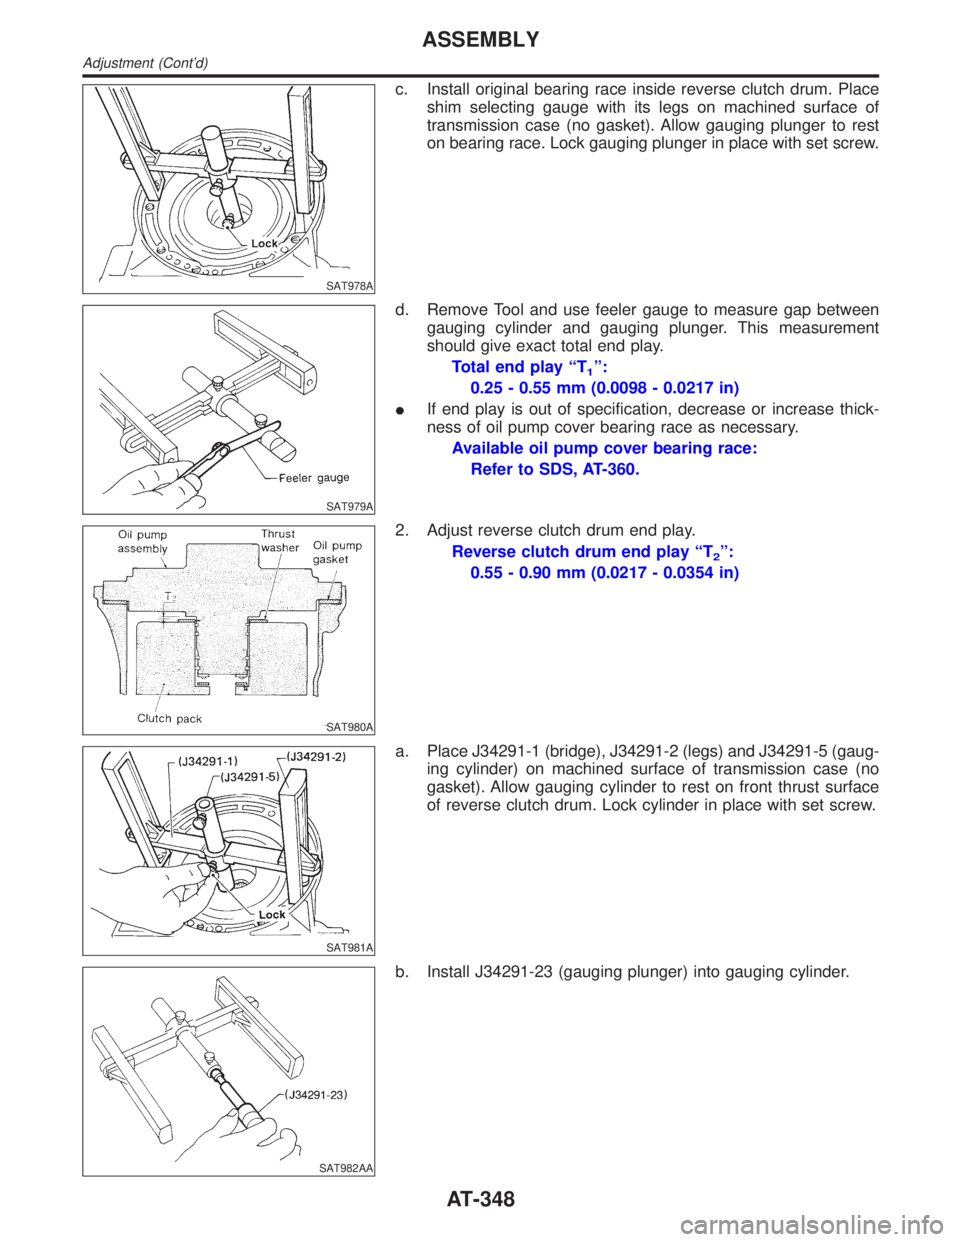
c. Install original bearing race inside reverse clutch drum. Place
shim selecting gauge with its legs on machined surface of
transmission case (no gasket). Allow gauging plunger to rest
on bearing race. Lock gauging plunger in place with set screw.
SAT979A
d. Remove Tool and use feeler gauge to measure gap between
gauging cylinder and gauging plunger. This measurement
should give exact total end play.
Total end play ªT
1º:
0.25 - 0.55 mm (0.0098 - 0.0217 in)
IIf end play is out of specification, decrease or increase thick-
ness of oil pump cover bearing race as necessary.
Available oil pump cover bearing race:
Refer to SDS, AT-360.
SAT980A
2. Adjust reverse clutch drum end play.
Reverse clutch drum end play ªT
2º:
0.55 - 0.90 mm (0.0217 - 0.0354 in)
SAT981A
a. Place J34291-1 (bridge), J34291-2 (legs) and J34291-5 (gaug-
ing cylinder) on machined surface of transmission case (no
gasket). Allow gauging cylinder to rest on front thrust surface
of reverse clutch drum. Lock cylinder in place with set screw.
SAT982AA
b. Install J34291-23 (gauging plunger) into gauging cylinder.
ASSEMBLY
Adjustment (Cont'd)
AT-348
Page 355 of 2395
SAT988A
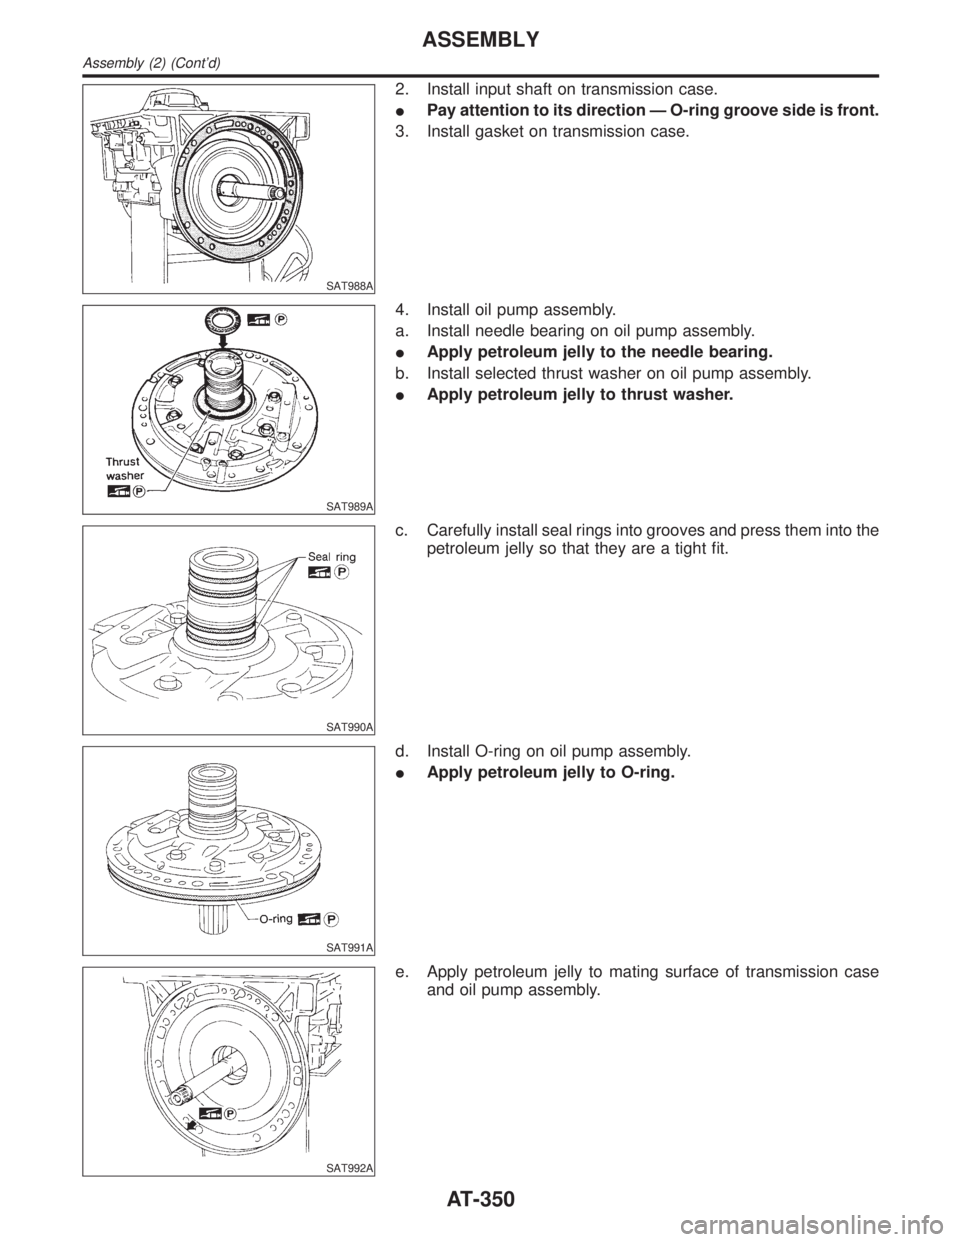
2. Install input shaft on transmission case.
IPay attention to its direction Ð O-ring groove side is front.
3. Install gasket on transmission case.
SAT989A
4. Install oil pump assembly.
a. Install needle bearing on oil pump assembly.
IApply petroleum jelly to the needle bearing.
b. Install selected thrust washer on oil pump assembly.
IApply petroleum jelly to thrust washer.
SAT990A
c. Carefully install seal rings into grooves and press them into the
petroleum jelly so that they are a tight fit.
SAT991A
d. Install O-ring on oil pump assembly.
IApply petroleum jelly to O-ring.
SAT992A
e. Apply petroleum jelly to mating surface of transmission case
and oil pump assembly.
ASSEMBLY
Assembly (2) (Cont'd)
AT-350
Page 382 of 2395
SFA846-A
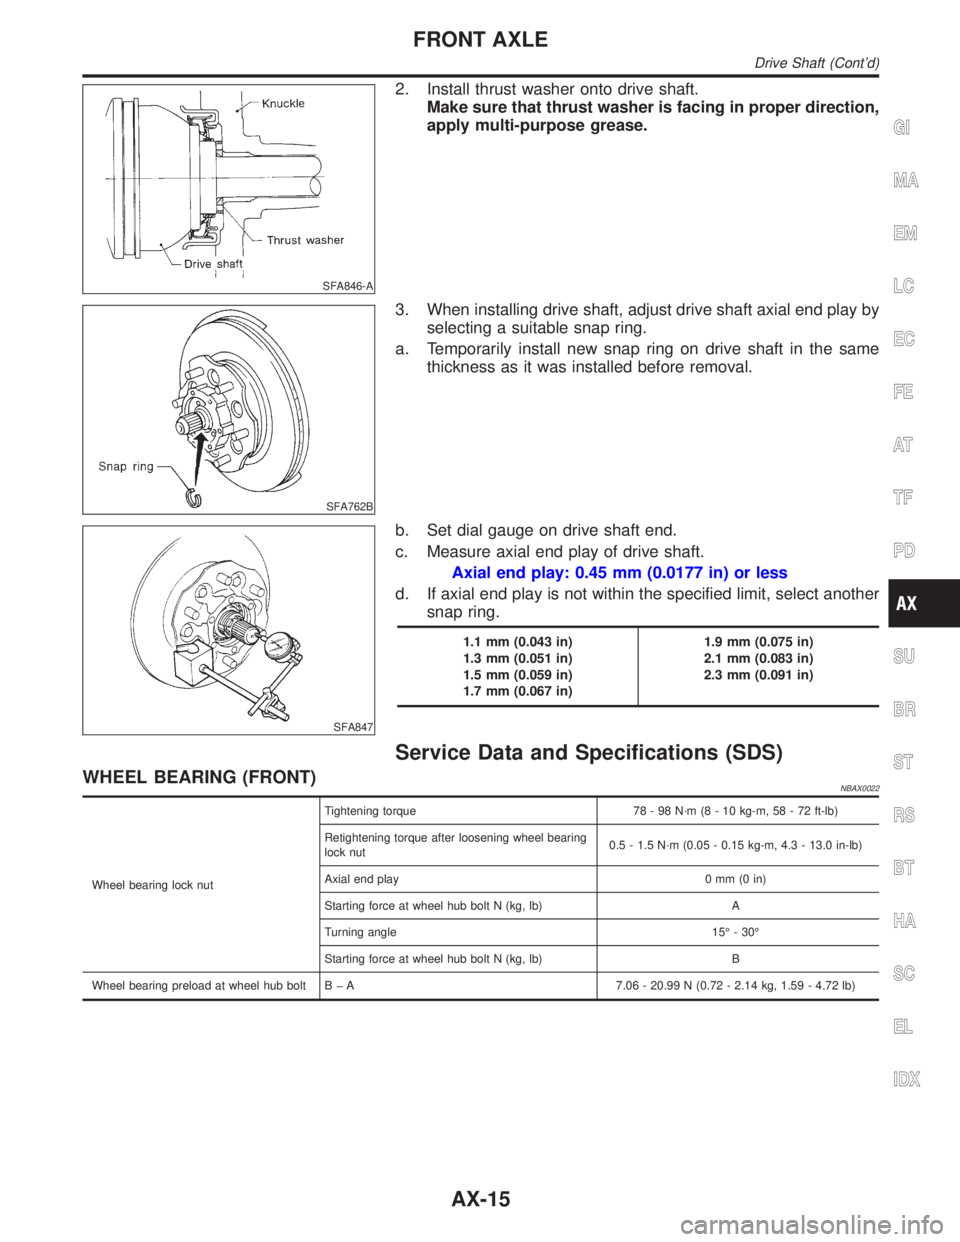
2. Install thrust washer onto drive shaft.
Make sure that thrust washer is facing in proper direction,
apply multi-purpose grease.
SFA762B
3. When installing drive shaft, adjust drive shaft axial end play by
selecting a suitable snap ring.
a. Temporarily install new snap ring on drive shaft in the same
thickness as it was installed before removal.
SFA847
b. Set dial gauge on drive shaft end.
c. Measure axial end play of drive shaft.
Axial end play: 0.45 mm (0.0177 in) or less
d. If axial end play is not within the specified limit, select another
snap ring.
1.1 mm (0.043 in)
1.3 mm (0.051 in)
1.5 mm (0.059 in)
1.7 mm (0.067 in)1.9 mm (0.075 in)
2.1 mm (0.083 in)
2.3 mm (0.091 in)
Service Data and Specifications (SDS)
WHEEL BEARING (FRONT)NBAX0022
Wheel bearing lock nutTightening torque 78 - 98 N´m (8 - 10 kg-m, 58 - 72 ft-lb)
Retightening torque after loosening wheel bearing
lock nut0.5 - 1.5 N´m (0.05 - 0.15 kg-m, 4.3 - 13.0 in-lb)
Axial end play 0 mm (0 in)
Starting force at wheel hub bolt N (kg, lb) A
Turning angle 15É - 30É
Starting force at wheel hub bolt N (kg, lb) B
Wheel bearing preload at wheel hub bolt B þ A 7.06 - 20.99 N (0.72 - 2.14 kg, 1.59 - 4.72 lb)
GI
MA
EM
LC
EC
FE
AT
TF
PD
SU
BR
ST
RS
BT
HA
SC
EL
IDX
FRONT AXLE
Drive Shaft (Cont'd)
AX-15
Page 391 of 2395
ABS
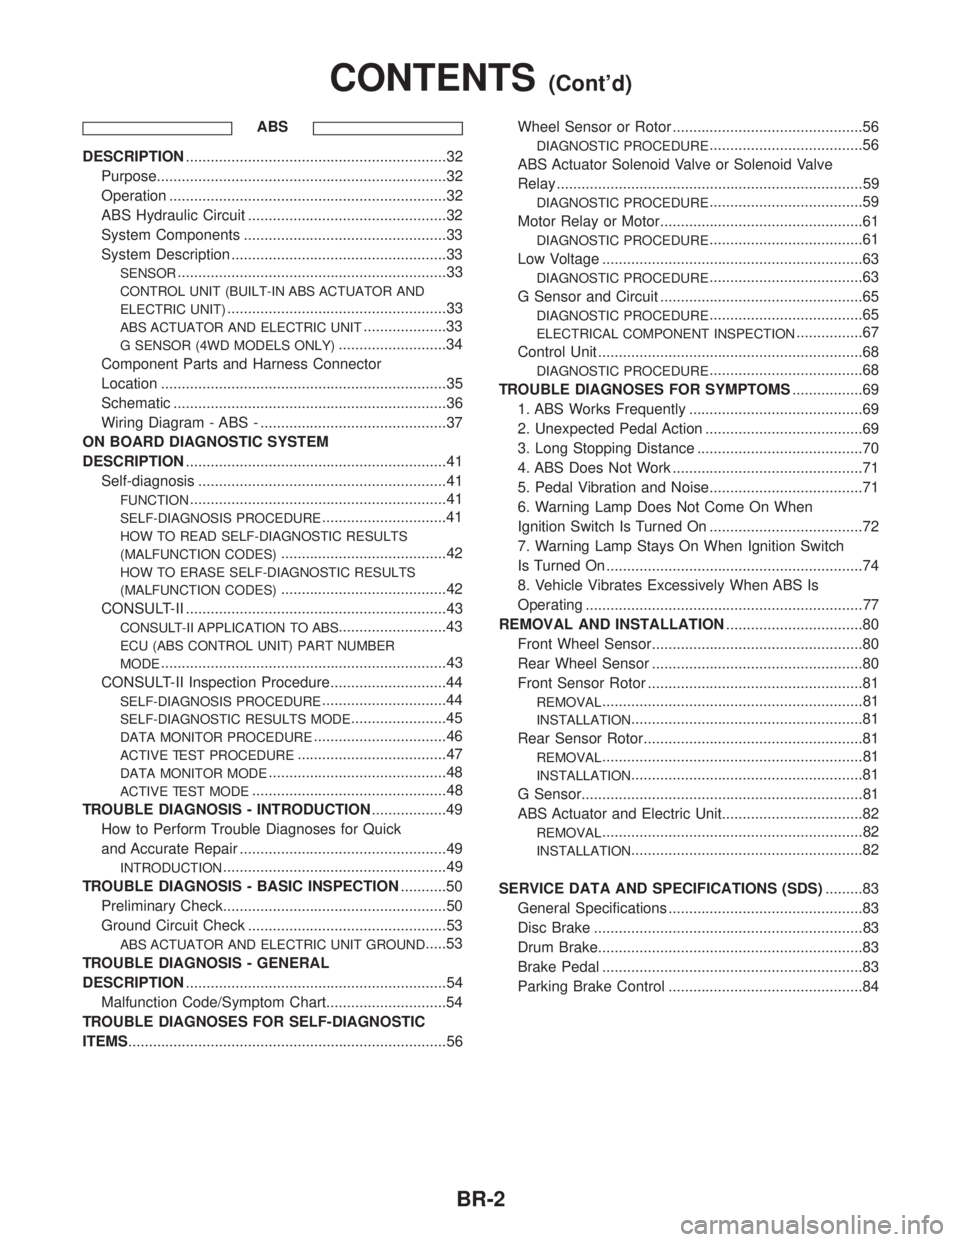
DESCRIPTION...............................................................32
Purpose......................................................................32
Operation ...................................................................32
ABS Hydraulic Circuit ................................................32
System Components .................................................33
System Description ....................................................33
SENSOR.................................................................33
CONTROL UNIT (BUILT-IN ABS ACTUATOR AND
ELECTRIC UNIT)
.....................................................33
ABS ACTUATOR AND ELECTRIC UNIT....................33
G SENSOR (4WD MODELS ONLY)..........................34
Component Parts and Harness Connector
Location .....................................................................35
Schematic ..................................................................36
Wiring Diagram - ABS - .............................................37
ON BOARD DIAGNOSTIC SYSTEM
DESCRIPTION...............................................................41
Self-diagnosis ............................................................41
FUNCTION..............................................................41
SELF-DIAGNOSIS PROCEDURE..............................41
HOW TO READ SELF-DIAGNOSTIC RESULTS
(MALFUNCTION CODES)
........................................42
HOW TO ERASE SELF-DIAGNOSTIC RESULTS
(MALFUNCTION CODES)
........................................42
CONSULT-II ...............................................................43
CONSULT-II APPLICATION TO ABS..........................43
ECU (ABS CONTROL UNIT) PART NUMBER
MODE
.....................................................................43
CONSULT-II Inspection Procedure............................44
SELF-DIAGNOSIS PROCEDURE..............................44
SELF-DIAGNOSTIC RESULTS MODE.......................45
DATA MONITOR PROCEDURE................................46
ACTIVE TEST PROCEDURE....................................47
DATA MONITOR MODE...........................................48
ACTIVE TEST MODE...............................................48
TROUBLE DIAGNOSIS - INTRODUCTION..................49
How to Perform Trouble Diagnoses for Quick
and Accurate Repair ..................................................49
INTRODUCTION......................................................49
TROUBLE DIAGNOSIS - BASIC INSPECTION...........50
Preliminary Check......................................................50
Ground Circuit Check ................................................53
ABS ACTUATOR AND ELECTRIC UNIT GROUND.....53
TROUBLE DIAGNOSIS - GENERAL
DESCRIPTION...............................................................54
Malfunction Code/Symptom Chart.............................54
TROUBLE DIAGNOSES FOR SELF-DIAGNOSTIC
ITEMS.............................................................................56Wheel Sensor or Rotor ..............................................56
DIAGNOSTIC PROCEDURE.....................................56
ABS Actuator Solenoid Valve or Solenoid Valve
Relay ..........................................................................59
DIAGNOSTIC PROCEDURE.....................................59
Motor Relay or Motor.................................................61
DIAGNOSTIC PROCEDURE.....................................61
Low Voltage ...............................................................63
DIAGNOSTIC PROCEDURE.....................................63
G Sensor and Circuit .................................................65
DIAGNOSTIC PROCEDURE.....................................65
ELECTRICAL COMPONENT INSPECTION................67
Control Unit ................................................................68
DIAGNOSTIC PROCEDURE.....................................68
TROUBLE DIAGNOSES FOR SYMPTOMS.................69
1. ABS Works Frequently ..........................................69
2. Unexpected Pedal Action ......................................69
3. Long Stopping Distance ........................................70
4. ABS Does Not Work ..............................................71
5. Pedal Vibration and Noise.....................................71
6. Warning Lamp Does Not Come On When
Ignition Switch Is Turned On .....................................72
7. Warning Lamp Stays On When Ignition Switch
Is Turned On ..............................................................74
8. Vehicle Vibrates Excessively When ABS Is
Operating ...................................................................77
REMOVAL AND INSTALLATION.................................80
Front Wheel Sensor...................................................80
Rear Wheel Sensor ...................................................80
Front Sensor Rotor ....................................................81
REMOVAL...............................................................81
INSTALLATION........................................................81
Rear Sensor Rotor.....................................................81
REMOVAL...............................................................81
INSTALLATION........................................................81
G Sensor....................................................................81
ABS Actuator and Electric Unit..................................82
REMOVAL...............................................................82
INSTALLATION........................................................82
SERVICE DATA AND SPECIFICATIONS (SDS).........83
General Specifications ...............................................83
Disc Brake .................................................................83
Drum Brake................................................................83
Brake Pedal ...............................................................83
Parking Brake Control ...............................................84
CONTENTS(Cont'd)
BR-2
Page 392 of 2395
Supplemental Restraint System (SRS) ªAIR
BAGº and ªSEAT BELT PRE-TENSIONERº
NBBR0001The Supplemental Restraint System such as ªAIR BAGº and ªSEAT BELT PRE-TENSIONERº used along with
a seat belt, helps to reduce the risk or severity of injury to the driver and front passenger for certain types of
collision. The SRS system composition which is available to INFINITI QX4 is as follows:
IFor a frontal collision
The Supplemental Restraint System consists of driver air bag module (located in the center of the steer-
ing wheel), front passenger air bag module (located on the instrument panel on passenger side), seat belt
pre-tensioners, a diagnosis sensor unit, warning lamp, wiring harness and spiral cable.
IFor a side collision
The Supplemental Restraint System consists of side air bag module (located in the outer side of front seat),
satellite sensor, diagnosis sensor unit (one of components of air bags for a frontal collision), wiring harness,
warning lamp (one of components of air bags for a frontal collision).
Information necessary to service the system safely is included in theRS sectionof this Service Manual.
WARNING:
ITo avoid rendering the SRS inoperative, which could increase the risk of personal injury or death
in the event of a collision which would result in air bag inflation, all maintenance must be performed
by an authorized INFINITI dealer.
IImproper maintenance, including incorrect removal and installation of the SRS, can lead to per-
sonal injury caused by unintentional activation of the system. For removal of Spiral Cable and Air
Bag Module, see the RS section.
IDo not use electrical test equipment on any circuit related to the SRS unless instructed to in this
Service Manual. Spiral cable and wiring harnesses covered with yellow insulation tape either just
before the harness connectors or for the complete harness are related to the SRS.
SBR686C
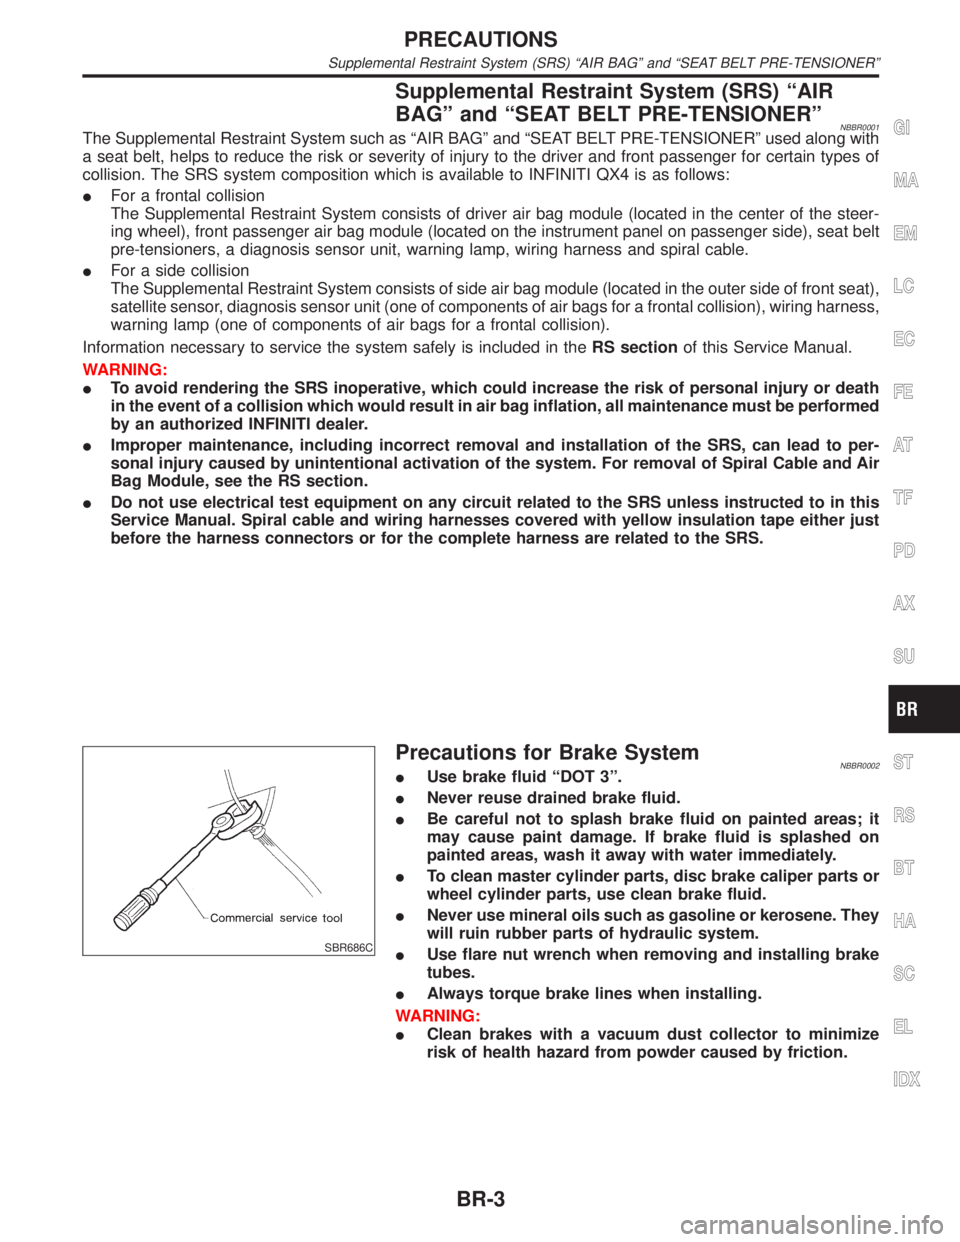
Precautions for Brake SystemNBBR0002IUse brake fluid ªDOT 3º.
INever reuse drained brake fluid.
IBe careful not to splash brake fluid on painted areas; it
may cause paint damage. If brake fluid is splashed on
painted areas, wash it away with water immediately.
ITo clean master cylinder parts, disc brake caliper parts or
wheel cylinder parts, use clean brake fluid.
INever use mineral oils such as gasoline or kerosene. They
will ruin rubber parts of hydraulic system.
IUse flare nut wrench when removing and installing brake
tubes.
IAlways torque brake lines when installing.
WARNING:
IClean brakes with a vacuum dust collector to minimize
risk of health hazard from powder caused by friction.
GI
MA
EM
LC
EC
FE
AT
TF
PD
AX
SU
ST
RS
BT
HA
SC
EL
IDX
PRECAUTIONS
Supplemental Restraint System (SRS) ªAIR BAGº and ªSEAT BELT PRE-TENSIONERº
BR-3