USB INFINITI QX50 2019 Navigation Manual
[x] Cancel search | Manufacturer: INFINITI, Model Year: 2019, Model line: QX50, Model: INFINITI QX50 2019Pages: 288, PDF Size: 1.42 MB
Page 5 of 288

Table of Contents
1Introduction
How to use this manual ..... 1-2
Safety information ............... 1-3
Laser product ....................... 1-4
Licenses ................................... 1-5
2Getting Started
Control buttons and
functions ................................ 2-2
Starting system ..................... 2-7
Touch panel operation ....... 2-8
Menu screen and
operation method ................ 2-9
How to operate dual
display ................................... 2-11
Items to be set initially .... 2-17
Additional system
information .......................... 2-23
3Heater and air conditioner
Heater and air conditioner
operation precautions ........ 3-2
Heater and air conditioner
controls ................................... 3-3
Automatic climate control
system ..................................... 3-6
Rear window and outside
mirror defroster ................... 3-9
Heater and air conditioner
settings ................................. 3-10
4Audio system
Audio operation
precautions ............................ 4-2
Names and functions of
audio control buttons ...... 4-11
Audio operations ............... 4-12
Audio settings .................... 4-32
CD/USB memory device
care and cleaning ............. 4-34Gracenote® End User
License Agreement .......... 4-34
5Hands-Free Phone
Bluetooth® Hands-Free
Phone System ...................... 5-2
6INFINITI InTouchTMApps
INFINITI InTouchTMApps
Overview ................................ 6-2
Using applications ............... 6-2
Vehicle Apps ......................... 6-2
7Monitor system
RearView Monitor (if so
equipped) ................................ 7-2
Around View® Monitor
(if so equipped) .................... 7-8
Page 18 of 288
2. Getting Started
STEERING-WHEEL SWITCHES
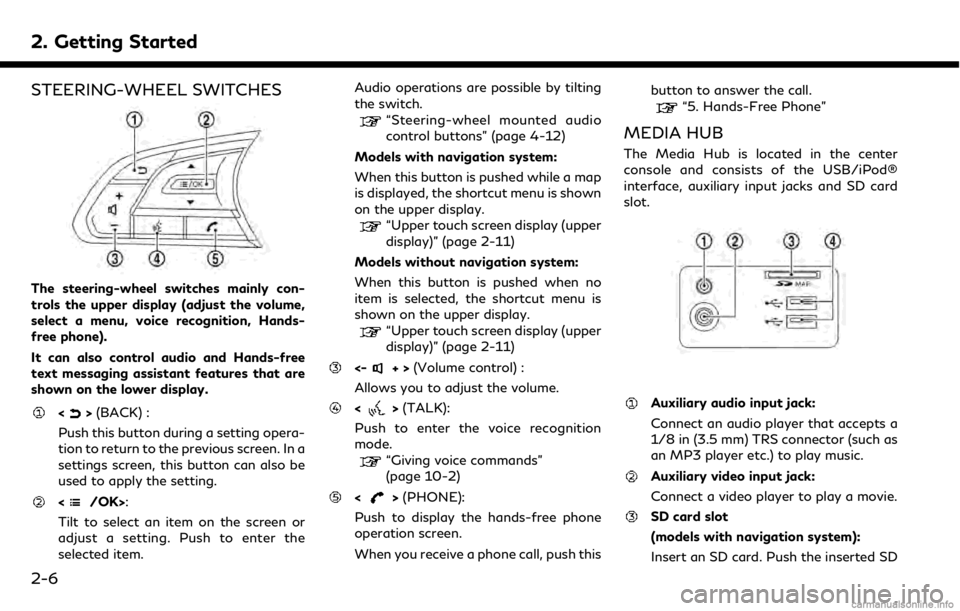
The steering-wheel switches mainly con-
trols the upper display (adjust the volume,
select a menu, voice recognition, Hands-
free phone).
It can also control audio and Hands-free
text messaging assistant features that are
shown on the lower display.
<>(BACK) :
Push this button during a setting opera-
tion to return to the previous screen. In a
settings screen, this button can also be
used to apply the setting.
:
Tilt to select an item on the screen or
adjust a setting. Push to enter the
selected item. Audio operations are possible by tilting
the switch.
“Steering-wheel mounted audio
control buttons” (page 4-12)
Models with navigation system:
When this button is pushed while a map
is displayed, the shortcut menu is shown
on the upper display.
“Upper touch screen display (upper
display)” (page 2-11)
Models without navigation system:
When this button is pushed when no
item is selected, the shortcut menu is
shown on the upper display.
“Upper touch screen display (upper
display)” (page 2-11)
<-+> (Volume control) :
Allows you to adjust the volume.
<> (TALK):
Push to enter the voice recognition
mode.
“Giving voice commands”
(page 10-2)
<> (PHONE):
Push to display the hands-free phone
operation screen.
When you receive a phone call, push this button to answer the call.
“5. Hands-Free Phone”
MEDIA HUB
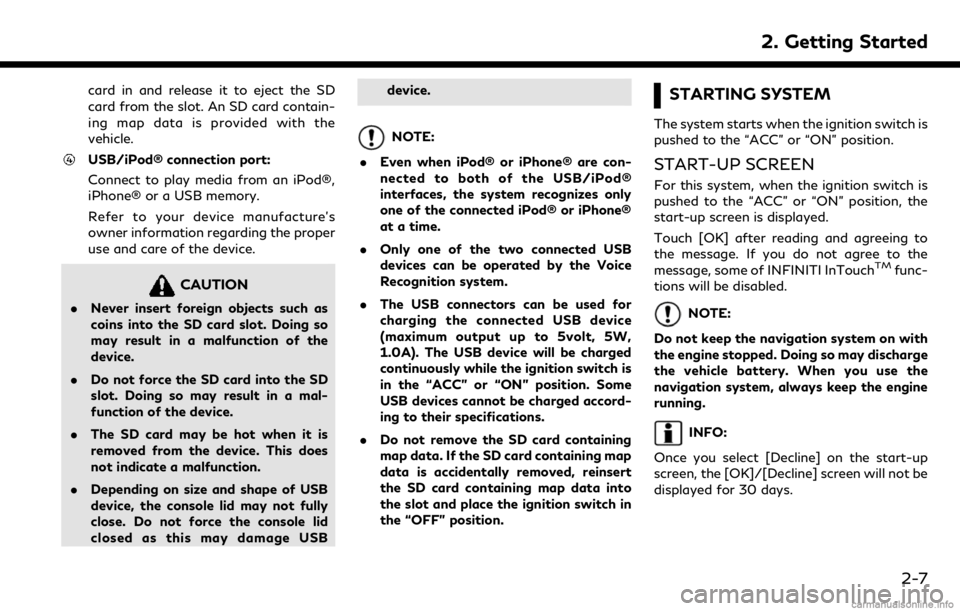
The Media Hub is located in the center
console and consists of the USB/iPod®
interface, auxiliary input jacks and SD card
slot.
Auxiliary audio input jack:
Connect an audio player that accepts a
1/8 in (3.5 mm) TRS connector (such as
an MP3 player etc.) to play music.
Auxiliary video input jack:
Connect a video player to play a movie.
SD card slot
(models with navigation system):
Insert an SD card. Push the inserted SD
2-6
Page 19 of 288
card in and release it to eject the SD
card from the slot. An SD card contain-
ing map data is provided with the
vehicle.
USB/iPod® connection port:
Connect to play media from an iPod®,
iPhone® or a USB memory.
Refer to your device manufacture’s
owner information regarding the proper
use and care of the device.
CAUTION
.Never insert foreign objects such as
coins into the SD card slot. Doing so
may result in a malfunction of the
device.
. Do not force the SD card into the SD
slot. Doing so may result in a mal-
function of the device.
. The SD card may be hot when it is
removed from the device. This does
not indicate a malfunction.
. Depending on size and shape of USB
device, the console lid may not fully
close. Do not force the console lid
closed as this may damage USB device.
NOTE:
. Even when iPod® or iPhone® are con-
nected to both of the USB/iPod®
interfaces, the system recognizes only
one of the connected iPod® or iPhone®
at a time.
. Only one of the two connected USB
devices can be operated by the Voice
Recognition system.
. The USB connectors can be used for
charging the connected USB device
(maximum output up to 5volt, 5W,
1.0A). The USB device will be charged
continuously while the ignition switch is
in the “ACC” or “ON” position. Some
USB devices cannot be charged accord-
ing to their specifications.
. Do not remove the SD card containing
map data. If the SD card containing map
data is accidentally removed, reinsert
the SD card containing map data into
the slot and place the ignition switch in
the “OFF” position.
STARTING SYSTEM
The system starts when the ignition switch is
pushed to the “ACC” or “ON” position.
START-UP SCREEN
For this system, when the ignition switch is
pushed to the “ACC” or “ON” position, the
start-up screen is displayed.
Touch [OK] after reading and agreeing to
the message. If you do not agree to the
message, some of INFINITI InTouch
TMfunc-
tions will be disabled.
NOTE:
Do not keep the navigation system on with
the engine stopped. Doing so may discharge
the vehicle battery. When you use the
navigation system, always keep the engine
running.
INFO:
Once you select [Decline] on the start-up
screen, the [OK]/[Decline] screen will not be
displayed for 30 days.
2. Getting Started
2-7
Page 47 of 288

4 Audio system
Audio operation precautions ......................................... 4-2Radio ........................................................................\
....... 4-2
Compact Disc (CD) player ........................................ 4-4
USB (Universal Serial Bus) connection port ....... 4-5
Compressed Audio Files (MP3/WMA/AAC) ..... 4-7
Bluetooth® streaming audio ................................. 4-10
Names and functions of audio control buttons ..... 4-11
Audio main buttons .................................................. 4-11
Steering-wheel mounted audio
control buttons .......................................................... 4-12
Audio operations ............................................................ 4-12
Audio main operation .............................................. 4-12 Radio ........................................................................\
... 4-14
Compact Disc (CD) player .................................... 4-19
USB (Universal Serial Bus) connection port ..... 4-21
iPod® player ............................................................ 4-24
Bluetooth® streaming audio ................................ 4-27
Auxiliary (AUX) devices ......................................... 4-31
Audio settings ................................................................. 4-32
CD/USB memory device care and cleaning .......... 4-34 CD ........................................................................\
....... 4-34
USB memory device .............................................. 4-34
Gracenote® End User License Agreement ............ 4-34
Page 51 of 288
Unplayable error:
Indicates that a readable file is not found
on the inserted CD. Check the data in
your CD.
USB (Universal Serial Bus) CON-
NECTION PORT
WARNING
Do not connect, disconnect or operate the
USB device while driving. Doing so can be
a distraction. If distracted you could lose
control of your vehicle and cause an
accident or serious injury.
CAUTION
.Do not force the USB device into the
USB connection port. Inserting the
USB device tilted or up-side-down
into the port may damage the port.
Make sure that the USB device is
connected correctly into the USB
connection port.
. Do not grab the USB connection port
cover (if so equipped) when pulling
the USB device out of the port. This
could damage the port and the cover. .
Do not leave the USB cable in a place
where it can be pulled unintentionally.
Pulling the cable may damage the
port.
The vehicle is not equipped with a USB
device. USB devices should be purchased
separately as necessary.
This system cannot be used to format USB
devices. To format a USB device, use a
personal computer.
In some jurisdictions, the USB device for the
front seats plays only sound without images
for regulatory reasons, even when the
vehicle is parked.
This system supports various USB memory
devices, USB hard drives and iPod® players.
Some USB devices may not be supported by
this system. . Partitioned USB devices may not be
played correctly.
. Some characters used in other languages
(Chinese, Japanese, etc.) are not dis-
played properly on the display. Using
English language characters with a USB
device is recommended. General notes for USB use:
Refer to your device manufacture’s owner
information regarding the proper care of the
device.
Notes for iPod® use:
. Improperly plugging in the iPod® may
cause a checkmark to be displayed on
and off (flickering). Always make sure
that the iPod® is connected properly.
. Audiobooks may not play in the same
order as they appear on an iPod®.
. Large video files cause slow responses in
an iPod®. The vehicle dual display may
momentarily black out, but it will soon
recover.
. If an iPod® automatically selects large
video files while in the shuffle mode, the
vehicle dual display may momentarily
black out, but it will soon recover.
4. Audio system
4-5
Page 52 of 288

4. Audio system
Specification chart for USB
Supported mediaUSB2.0
Supported file systems FAT32
Folder levels Folder levels: 8, Folders: 512 (including root folder), Files: 5000
Format Sampling rateSupported/Not supported
MPEG1 Layer-1- Not supported
Layer-2 - Not supported
Layer-3 44.1, 48, 32 kHz Supported (32-320 kbps)
MPEG2 Layer-1- Not supported
Layer-2 - Not supported
Layer-3 22.05, 24, 16 kHz Supported (16-160 kbps)
MPEG2.5 Layer-1- Not supported
Layer-2 - Not supported
Layer-3 11.025, 12, 8 kHz Supported (16-160 kbps)
WMA *1 32, 44.1, 48 kHzSupported VER.7/8 (48-192 bps)
VER.9/9.1/9.2 (48-320 bps)
AAC (MPEG4) *2 (Extension “m4a” only) 8, 11.025, 12, 16, 22.05, 24, 32, 44.1, 48 kHzSupported (16-320 kbps)
*1 Professional (Voice, Lossless, multichannel) is not supported.
*2 MPEG-2 AAC is not supported.
4-6
Page 54 of 288

4. Audio system
.If there is a file in the top level of a disc/
USB, “Root Folder” is displayed.
. The playback order is the order in which
the files were written by the writing
software, so the files might not play in
the desired order.
. Music playback order of compressed
audio files is as illustrated.
4-8
Page 57 of 288
NAMES AND FUNCTIONS OF
AUDIO CONTROL BUTTONS
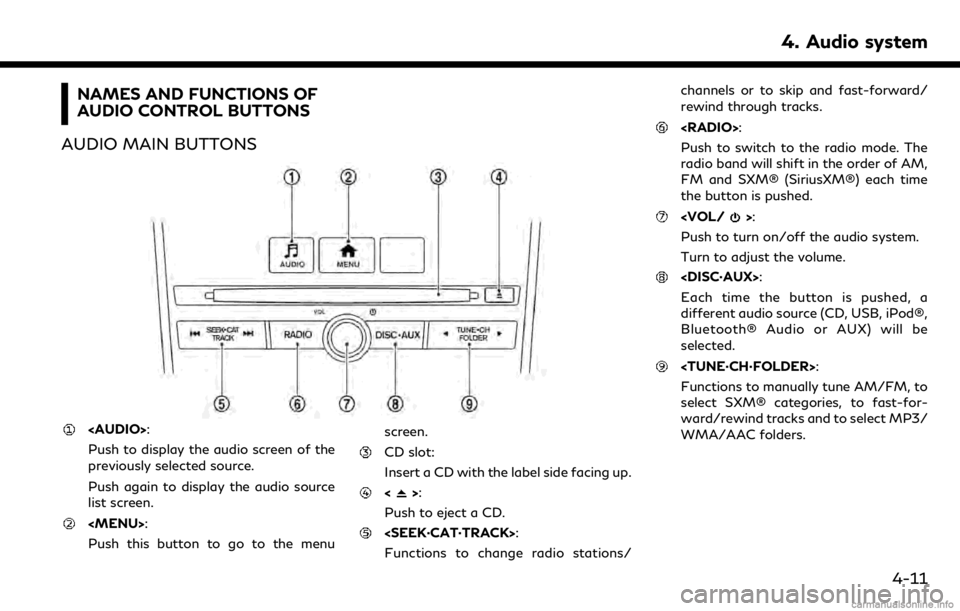
AUDIO MAIN BUTTONS
Page 59 of 288
INFO:
. Pushing
also change the audio source.
“Audio main buttons” (page 4-11)
. If the audio system has been turned off
while the radio, CD, USB memory device
or Bluetooth® Streaming Audio device
was playing, turning the audio system
back on will play the audio source that
was playing when the system was turned
off.
. The audio source can also be changed
with the source bar on top of the audio
screen. The source bar display can be
turned on/off.
. The audio system settings can be linked
and memorized for each of the Intelligent
Keys.
“Fully customizable digital environ-
ment” (page 8-30)
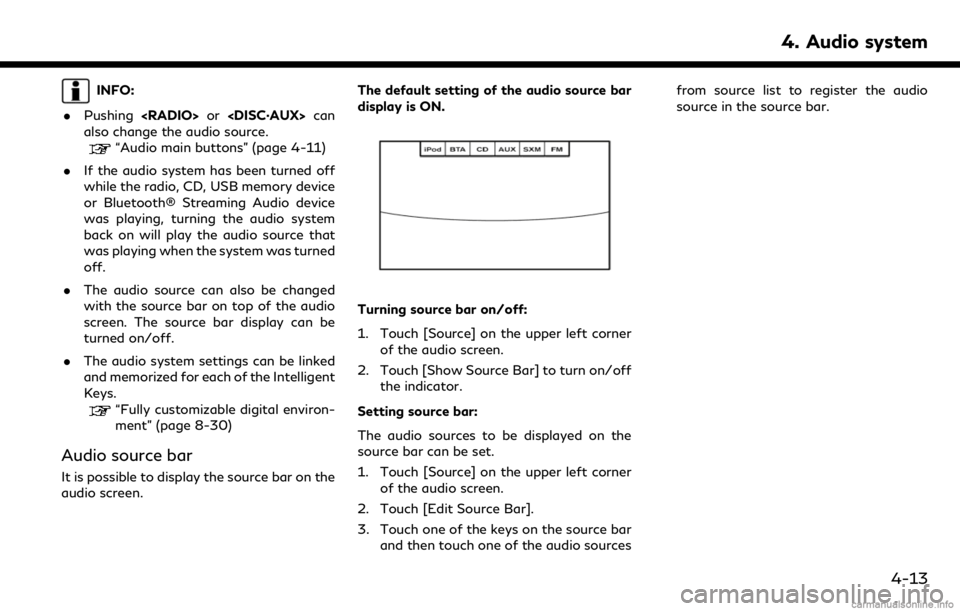
Audio source bar
It is possible to display the source bar on the
audio screen. The default setting of the audio source bar
display is ON.
Turning source bar on/off:
1. Touch [Source] on the upper left corner
of the audio screen.
2. Touch [Show Source Bar] to turn on/off the indicator.
Setting source bar:
The audio sources to be displayed on the
source bar can be set.
1. Touch [Source] on the upper left corner of the audio screen.
2. Touch [Edit Source Bar].
3. Touch one of the keys on the source bar and then touch one of the audio sources from source list to register the audio
source in the source bar.
4. Audio system
4-13
Page 67 of 288
.Disc Repeat
. 1 Folder Repeat
. 1 Track Repeat
. Disc Random
. 1 Folder Random
Ejecting CD:
Push <
>to eject a CD. If the CD is ejected
and left unremoved, it will be reloaded into
the slot for protection.
USB (Universal Serial Bus) CON-
NECTION PORT
Connecting USB memory device
WARNING
Do not connect, disconnect or operate the
USB device while driving. Doing so can be
a distraction. If distracted you could lose
control of your vehicle and cause an
accident or serious injury.
CAUTION
. Do not force the USB device into the
USB connection port. Inserting the
USB device tilted or up-side-down into the port may damage the port.
Make sure that the USB device is
connected correctly into the USB
connection port.
. Do not grab the USB connection port
cover (if so equipped) when pulling
the USB device out of the port. This
could damage the port and the cover.
. Do not leave the USB cable in a place
where it can be pulled unintentionally.
Pulling the cable may damage the
port.
Refer to your device manufacture’s owner
information regarding the proper use and
care of the device.
Two USB connectors are located in the
center console box.
“Media Hub” (page 2-6)
When compatible storage devices are
plugged into the jack, compatible audio files
on the storage devices can be played
through the vehicle’s audio system.
4. Audio system
4-21