warning light INFINITI QX50 2019 Navigation Manual
[x] Cancel search | Manufacturer: INFINITI, Model Year: 2019, Model line: QX50, Model: INFINITI QX50 2019Pages: 288, PDF Size: 1.42 MB
Page 10 of 288
1. Introduction
LASER PRODUCT
This INFINITI InTouchTMis certified as a
Class 1 laser product.
INFINITI InTouch
TMcomplies with DHHS
Rules 21 CFR Chapter 1, Subchapter J.
WARNING
. Do not disassemble or modify this
system. There are no user serviceable
parts in INFINITI InTouch
TM.
. If maintenance, adjustments and op-
erations other than those specified in
this manual are attempted, injury due
to laser radiation and exposure could
occur.
TRADEMARKS
HD Radio Technology manufactured under
license from iBiquity Digital Corporation.
U.S. and Foreign Patents. For patents see
http://patents.dts.com/. HD Radio and the
HD, HD Radio, and “ARC” logos are regis- tered trademarks or trademarks of iBiquity
Digital Corporation in the United States
and/or other countries.
SiriusXM® services require a subscription
after trial period and are sold separately or
as a package. Our satellite service is avail-
able only to those at least 18 and older in the
48 contiguous United States and DC. For
more information visit www.siriusxm.com.
“Made for iPod” and “Made for iPhone”
mean that an electronic accessory has been
designed to connect specifically to iPod® or
iPhone®, respectively, and has been certified
by the developer to meet Apple performance
standards. Apple is not responsible for the
operation of this device or its compliance
with safety and regulatory standards. Please
note that the use of this accessory with
iPod® or iPhone® may affect wireless
performance.
Apple, the Apple logo, iPhone®, iPod®, iPod
classic®, iPod nano® and iPod touch® are trademarks of Apple Inc., registered in the
U.S. and other countries. Lightning
TMis a
trademark of Apple Inc. App StoreSMis a
service mark of Apple Inc.
Music and video recognition technology and
related data are provided by Gracenote®.
Gracenote is the industry standard in music
recognition technology and related content
delivery. For more information, visit www.
gracenote.com.
CD, DVD, Blu-ray Disc, and music and video-
related data from Gracenote, Inc., copyright
© 2000 to present Gracenote. Gracenote
Software, copyright © 2000 to present
Gracenote. One or more patents owned by
Gracenote apply to this product and service.
See the Gracenote website for a non-
exhaustive list of applicable Gracenote pa-
1-4
Page 45 of 288
Without Advanced Climate Control system:
The Climate Control system is equipped with
an in-cabin microfilter that collects dirt,
pollen, dust, etc. To make sure that the air
conditioner heats, defogs and ventilates
efficiently, replace the filter in accordance
with the maintenance schedule in the vehicle
Owner’s Manual. To replace the filter, it is
recommended you visit an INFINITI retailer.The filter should be replaced if the air flow
decreases significantly or if windows fog up
easily when operating the heater or air
conditioner.
SERVICING HEATER AND AIR
CONDITIONER
The heating and air conditioning system in
your vehicle is charged with a refrigerant
designed with the environment in mind. This
refrigerant will not harm the earth’s ozone
layer. However, special charging equipment
and lubricant are required when servicing the
air conditioner. Using improper refrigerants
or lubricants will cause severe damage to
your Climate Control system. Refer to the
vehicle Owner’s Manual for heating and air
conditioning system refrigerant and lubri-
cant recommendations.
It is recommended you visit an INFINITI retailer to service your environmentally
friendly heater and air conditioning system.
WARNING
The system contains refrigerant under
high pressure. To avoid personal injury,
any air conditioner service should be done
only by an experienced technician with
the proper equipment.
REAR WINDOW AND OUTSIDE
MIRROR DEFROSTER
CAUTION
When cleaning the inner side of the rear
window, be careful not to scratch or
damage the rear window defroster.
To defog/defrost the rear window glass and
outside mirrors, start the engine and push
<
>. The indicator light on the button will
illuminate. Push the button again to turn off
the defroster.
The defroster will automatically turn off in
approximately 15 minutes.
If the engine is started using the remote start
function (if so equipped) when the outside
air temperature, the interior temperature
and the engine coolant temperature are
low, the rear window glass and outside
mirror defroster may turn on automatically.
For additional information about the remote
engine start function, refer to the vehicle
Owner’s Manual.
3. Heater and air conditioner
3-9
Page 105 of 288
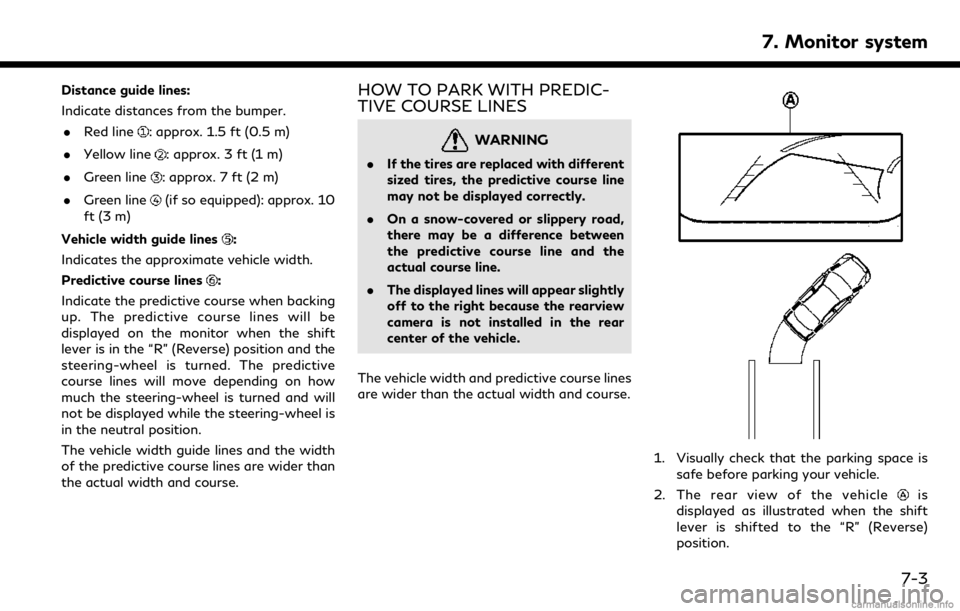
Distance guide lines:
Indicate distances from the bumper.. Red line
: approx. 1.5 ft (0.5 m)
. Yellow line
: approx. 3 ft (1 m)
. Green line
: approx. 7 ft (2 m)
. Green line
(if so equipped): approx. 10
ft (3 m)
Vehicle width guide lines
:
Indicates the approximate vehicle width.
Predictive course lines
:
Indicate the predictive course when backing
up. The predictive course lines will be
displayed on the monitor when the shift
lever is in the “R” (Reverse) position and the
steering-wheel is turned. The predictive
course lines will move depending on how
much the steering-wheel is turned and will
not be displayed while the steering-wheel is
in the neutral position.
The vehicle width guide lines and the width
of the predictive course lines are wider than
the actual width and course.
HOW TO PARK WITH PREDIC-
TIVE COURSE LINES
WARNING
. If the tires are replaced with different
sized tires, the predictive course line
may not be displayed correctly.
. On a snow-covered or slippery road,
there may be a difference between
the predictive course line and the
actual course line.
. The displayed lines will appear slightly
off to the right because the rearview
camera is not installed in the rear
center of the vehicle.
The vehicle width and predictive course lines
are wider than the actual width and course.
1. Visually check that the parking space is safe before parking your vehicle.
2. The rear view of the vehicle
is
displayed as illustrated when the shift
lever is shifted to the “R” (Reverse)
position.
7. Monitor system
7-3
Page 108 of 288
7. Monitor system
the object projects over the actual backing
up course.
ADJUSTING THE SCREEN
The RearView Monitor settings can be
changed with the following procedure.
1. Push
Page 117 of 288
the object projects over the actual backing
up course.
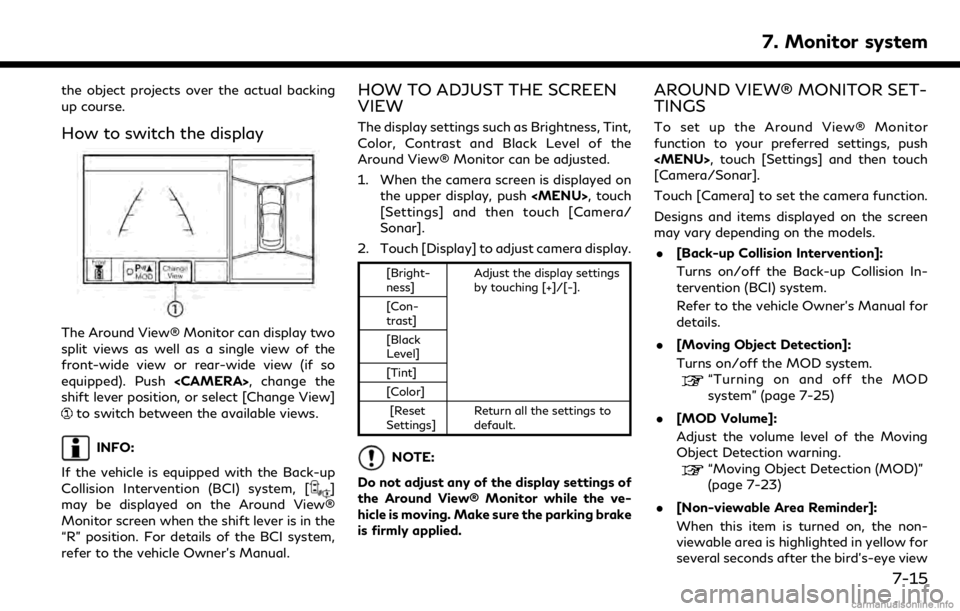
How to switch the display
The Around View® Monitor can display two
split views as well as a single view of the
front-wide view or rear-wide view (if so
equipped). Push
shift lever position, or select [Change View]
to switch between the available views.
INFO:
If the vehicle is equipped with the Back-up
Collision Intervention (BCI) system, [
]
may be displayed on the Around View®
Monitor screen when the shift lever is in the
“R” position. For details of the BCI system,
refer to the vehicle Owner’s Manual.
HOW TO ADJUST THE SCREEN
VIEW
The display settings such as Brightness, Tint,
Color, Contrast and Black Level of the
Around View® Monitor can be adjusted.
1. When the camera screen is displayed on the upper display, push
[Settings] and then touch [Camera/
Sonar].
2. Touch [Display] to adjust camera display.
[Bright-
ness] Adjust the display settings
by touching [+]/[-].
[Con-
trast]
[Black
Level]
[Tint]
[Color]
[Reset
Settings] Return all the settings to
default.
NOTE:
Do not adjust any of the display settings of
the Around View® Monitor while the ve-
hicle is moving. Make sure the parking brake
is firmly applied.
AROUND VIEW® MONITOR SET-
TINGS
To set up the Around View® Monitor
function to your preferred settings, push
[Camera/Sonar].
Touch [Camera] to set the camera function.
Designs and items displayed on the screen
may vary depending on the models. . [Back-up Collision Intervention]:
Turns on/off the Back-up Collision In-
tervention (BCI) system.
Refer to the vehicle Owner’s Manual for
details.
. [Moving Object Detection]:
Turns on/off the MOD system.
“Turning on and off the MOD
system” (page 7-25)
. [MOD Volume]:
Adjust the volume level of the Moving
Object Detection warning.
“Moving Object Detection (MOD)”
(page 7-23)
. [Non-viewable Area Reminder]:
When this item is turned on, the non-
viewable area is highlighted in yellow for
several seconds after the bird’s-eye view
7. Monitor system
7-15
Page 118 of 288
![INFINITI QX50 2019 Navigation Manual 7. Monitor system
is displayed for the first time after the
ignition switch is positioned in the “ON”
position.
. [Predictive Course Lines]:
When this item is turned on, the pre-
dictive course li INFINITI QX50 2019 Navigation Manual 7. Monitor system
is displayed for the first time after the
ignition switch is positioned in the “ON”
position.
. [Predictive Course Lines]:
When this item is turned on, the pre-
dictive course li](/img/42/34995/w960_34995-117.png)
7. Monitor system
is displayed for the first time after the
ignition switch is positioned in the “ON”
position.
. [Predictive Course Lines]:
When this item is turned on, the pre-
dictive course line is displayed in the
front, rear and bird’s-eye view screen.
. [Automatic Display with Sonar]:
The automatic sonar display can be
turned on/off.
“Camera aiding sonar function
(models with Around View® Moni-
tor)” (page 7-19)
AROUND VIEW® MONITOR SYS-
TEM LIMITATIONS
WARNING
Listed below are the system limitations
for Around View® Monitor. Failure to
operate the vehicle in accordance with
these system limitations could result in
serious injury or death.
. Do not use the Around View® Moni-
tor with the outside mirrors in the
stored position, and make sure that
the trunk is securely closed when
operating the vehicle using the Around View® Monitor.
. The apparent distance between ob-
jects viewed on the Around View®
Monitor differs from the actual dis-
tance.
. The cameras are installed on the front
grille, the outside mirrors and above
the rear license plate. Do not put
anything on the vehicle that covers
the cameras.
. When washing the vehicle with high
pressure water, be sure not to spray it
around the cameras. Otherwise,
water may enter the camera unit
causing water condensation on the
lens, a malfunction, fire or an electric
shock.
. Do not strike the cameras. They are
precision instruments. Doing so could
cause a malfunction or cause damage
resulting in a fire or an electric shock.
The following are operating limitations and
do not represent a system malfunction: . The screen displayed on the Around
View® Monitor will automatically return
to the previous screen 3 minutes after
has been pushed while the
shift lever is in a position other than the
“R” (Reverse) position.
. There may be a delay when switching
between views.
. When the temperature is extremely high
or low, the screen may not display
objects clearly.
. When strong light is directly shines on
the camera, objects may not be displayed
clearly.
. The screen may flicker under fluorescent
light.
. The colors of objects on the Around
View® Monitor may differ somewhat
from the actual color of objects.
. Objects on the monitor may not be clear
and the color of the object may differ in a
dark environment.
. There may be differences in sharpness
between each camera view of the bird’s-
eye view.
. When activating the Around View®
Monitor, the icons and the messages
may not be displayed for a while.
7-16