INFINITI QX50 2020 Quick Reference Guide
Manufacturer: INFINITI, Model Year: 2020, Model line: QX50, Model: INFINITI QX50 2020Pages: 27, PDF Size: 8.3 MB
Page 21 of 27

18
Electronic Shift Lever
TO PUT THE VEHICLE IN N (NEUTRAL):
From Park: Press the button
, then push the electronic
shift lever forward between the R and N position, hold,
and release the shift lever, or pull the electronic shift lever
back between the N and D/M position, hold, and release
the shift lever.
From Drive: Press the button
, then push the electronic
shift lever forward between the N and D/M position,
hold, and release the shift lever.
From Reverse: Press the button
, then pull the
electronic shift lever between the R and N position, hold,
and then release the shift lever.
TO PUT THE VEHICLE IN R (REVERSE):
Press the button
, then push the electronic shift lever forward past the point of
resistance and release the shift lever.
TO PUT THE VEHICLE IN D (DRIVE):
Press the button
and pull the electronic shift lever back past the point of resistance and
release the shift lever.
TO PUT THE VEHICLE IN P (PARK):
Make sure the vehicle is completely stopped and press the P (Park) button
.
If you switch the ignition off with the transmission in D (Drive) or R (Reverse), the
transmission automatically shifts into the P (Park) position.
If you open the driver’s door while the vehicle is stationary or moving at a very low speed,
the vehicle automatically switches into the P (Park) position.
Please see your Owner’s Manual for important safety information, system limitations, and additional operating and
feature information.
Electronic Parking Brake
To apply the parking brake, pull the electric
parking brake switch
up, located below the
instrument panel, regardless of the ignition
switch position.
To release the parking brake, push the electric
parking brake switch
down while the ignition
is on. The parking brake will be automatically
released when you depress the accelerator pedal
as long as certain conditions are met, such as
having your seatbelt fastened.
Please see your Owner’s Manual for important safety
information, system limitations, and additional operating and
feature information.
Page 22 of 27

19
ProPILOT Assist (if so equipped)
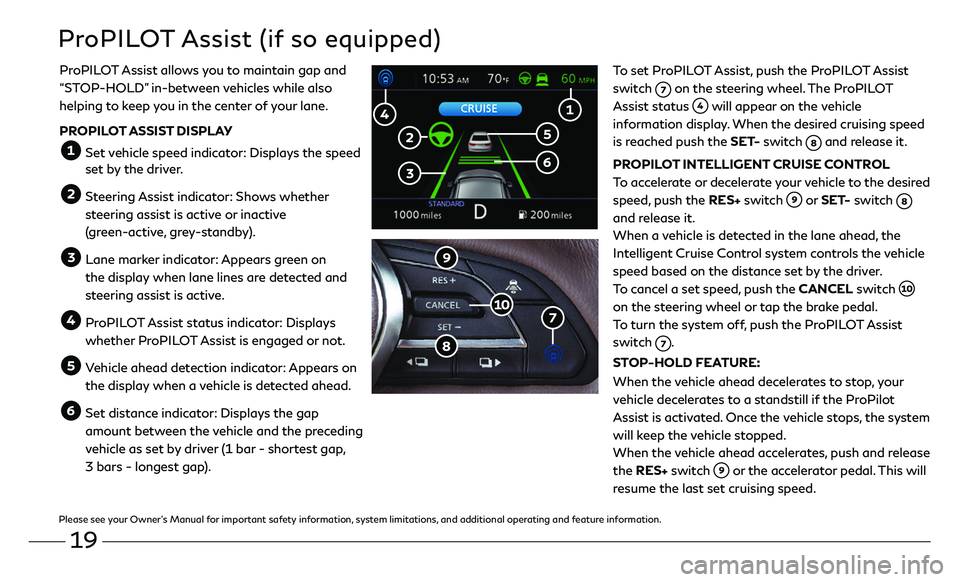
To set ProPILOT Assist, push the ProPILOT Assist
switch
on the steering wheel. The ProPILOT
Assist status will appear on the vehicle
information display. When the desired cruising speed
is reached push the SET- switch
and release it.
PROPILOT INTELLIGENT CRUISE CONTROL
To accelerate or decelerate your vehicle to the desired
speed, push the RES+ switch
or SET- switch
and release it.
When a vehicle is detected in the lane ahead, the
Intelligent Cruise Control system controls the vehicle
speed based on the distance set by the driver.
To cancel a set speed, push the CANCEL switch
on the steering wheel or tap the brake pedal.
To turn the system off, push the ProPILOT Assist
switch
.
STOP-HOLD FEATURE:
When the vehicle ahead decelerates to stop, your
vehicle decelerates to a standstill if the ProPilot
Assist is activated. Once the vehicle stops, the system
will keep the vehicle stopped.
When the vehicle ahead accelerates, push and release
the RES+ switch
or the accelerator pedal. This will
resume the last set cruising speed.
ProPILOT Assist allows you to maintain gap and
“STOP-HOLD
” in-between vehicles while also
helping to keep you in the center of your lane.
PROPILOT ASSIST DISPLAY
Set vehicle speed indicator: Displays the speed set by the driver.
Steering Assist indicator: Shows whether
steering assist is active or inactive
(green-active, grey-standby).
Lane marker indicator: Appears green on
the display when lane lines are detected and
steering assist is active.
ProPILOT Assist status indicator: Displays
whether ProPILOT Assist is engaged or not.
Vehicle ahead detection indicator: Appears on
the display when a vehicle is detected ahead.
Set distance indicator: Displays the gap
amount between the vehicle and the preceding
vehicle as set by driver (1 bar - shortest gap,
3 bars - longest gap).
Please see your Owner’s Manual for important safety information, system limitations, and additional operating and feature information.
Page 23 of 27

20
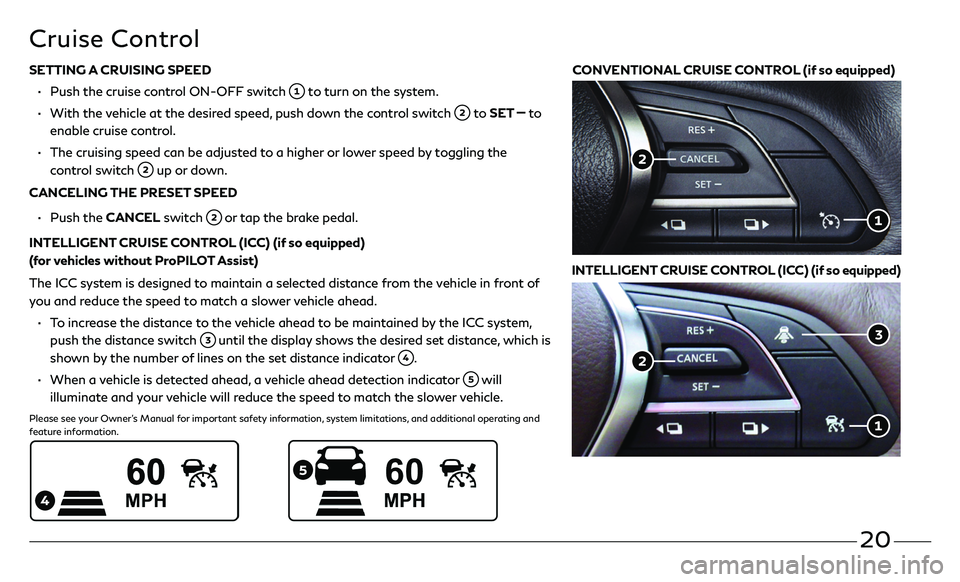
SETTING A CRUISING SPEED
• Push the cruise c ontrol ON-OFF switch to turn on the system.
• With the vehicle at the desired speed, push down the control switch to SET to
enable cruise control.
• The cruising speed c an be adjusted to a higher or lower speed by toggling the
control switch up or down.
CANCELING THE PRESET SPEED
• Push the CANCEL switch or tap the brake pedal.
INTELLIGENT CRUISE CONTROL (ICC) (if so equipped)
(for vehicles without ProPILOT Assist)
The ICC system is designed to maintain a selected distance from the vehicle in front of
you and reduce the speed to match a slower vehicle ahead.
• To increase the distance to the vehicle ahead to be maintained by the ICC system,
push the distance switch until the display shows the desired set distance, which is
shown by the number of lines on the set distance indicator
.
• When a vehicle is detected ahead, a vehicle ahead detection indicator will
illuminate and your vehicle will reduce the speed to match the slower vehicle.
Please see your Owner’s Manual for important safety information, system limitations, and additional operating and
feature information.
Cruise Control
CONVENTIONAL CRUISE CONTROL (if so equipped)
INTELLIGENT CRUISE CONTROL (ICC) (if so equipped)
Page 24 of 27

21
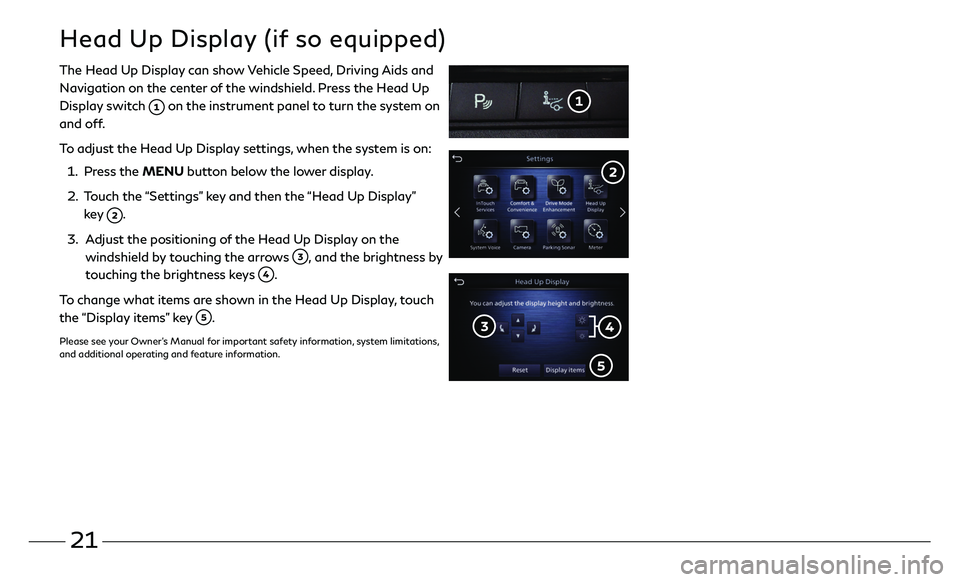
The Head Up Display can show Vehicle Speed, Driving Aids and
Navigation on the center of the windshield. Press the Head Up
Display switch
on the instrument panel to turn the system on
and off.
To adjust the Head Up Display settings, when the system is on:
1. Press the MENU button below the lower display.
2. Touch the “Settings” key and then the “Head Up Display”
key .
3. Adjust the positioning of the Head Up Display on the
windshield by touching the arrows , and the brightness by
touching the brightness keys .
To change what items are shown in the Head Up Display, touch
the “Display items” key
.
Please see your Owner’s Manual for important safety information, system limitations,
and additional operating and feature information.
Head Up Display (if so equipped)
Page 25 of 27

M
Page 26 of 27

M
Page 27 of 27

Printing July 2019QR20E0 0J55U0
Printed in USA
To view detailed instructional videos,
go to www.infinitiquickguide.com/2020/qx50 or
snap this barcode with an appropriate barcode reader.
This Quick Reference Guide is intended to provide an overview of some of
the unique features of your new vehicle. Please see your Owner’s Manual
for important safety information and system operation limitations. Features and equipment in your vehicle may vary depending on model,
trim level, options selected, order, date of production, region or availability.
Therefore, you may find information about features or equipment that are not included or installed on your vehicle.
All information, specifications and illustrations in this Quick Reference Guide are those in effect at the time of printing. INFINITI reserves the right to change specifications, performance, design or component
suppliers without notice and without obligation. From time to time, INFINITI may update or revise this Quick Reference Guide to provide
owners with the most accurate information currently available. Please
carefully read and retain, with this Quick Reference Guide, all revision updates sent to you by INFINITI to ensure you have access to accurate
and up-to-date information regarding your vehicle. Current versions of vehicle Quick Reference Guides, Owner’s Manuals and any updates
can also be found in the Owner section of the INFINITI website at
https://owners.infinitiusa.com/iowners/navigation/manualsAndGuides .
If you have questions concerning any information in your Owner’s Manual,
contact INFINITI Client Support (see contact information listed above).
QX50
2020 QUICK REFERENCE GUIDE