key INFINITI QX50 2021 User Guide
[x] Cancel search | Manufacturer: INFINITI, Model Year: 2021, Model line: QX50, Model: INFINITI QX50 2021Pages: 542, PDF Size: 3.51 MB
Page 131 of 542

3. Adjust the positioning of the HUD on thewindshield by touching the arrows, and
the brightness by touching the brightness
keys. To change what items are shown in
the HUD, touch the “Display items” key.
The following items (if so equipped) may
be turned on or off:
– Driving Aids
– Navigation
– Traffic Sign Recognition
NOTE:
The emergency information may appear
even if the display contents are turned off.
DRIVER ASSISTANCE/
NAVIGATION LINKING
The HUD will display driver assistance and
navigation information
O3.
The driver assistance display will display
warning situations for the following systems:
• FEB with Pedestrian Detection
•LDW
• PFCW
• Hands-free warning (for vehicles with Pro- PILOT Assist) (if so equipped) The Navigation System linking display will
display the following items:
• Intersection names
• Arrows indicating turning direction
• Distance to the next intersection
Display brightness
The brightness of the display may be con-
trolled by the Navigation System. The bright-
ness will also be adjusted automatically ac-
cording to the exterior ambient lighting
brightness.
NOTE:
• A sensorO1is built into the Head Up Dis-
play to control the brightness of the im-
age. Make sure the sensor is clear of ob-
structions or the display may become dark
and difficult to recognize.
LIC4264
Instruments and controls2-47
Page 136 of 542
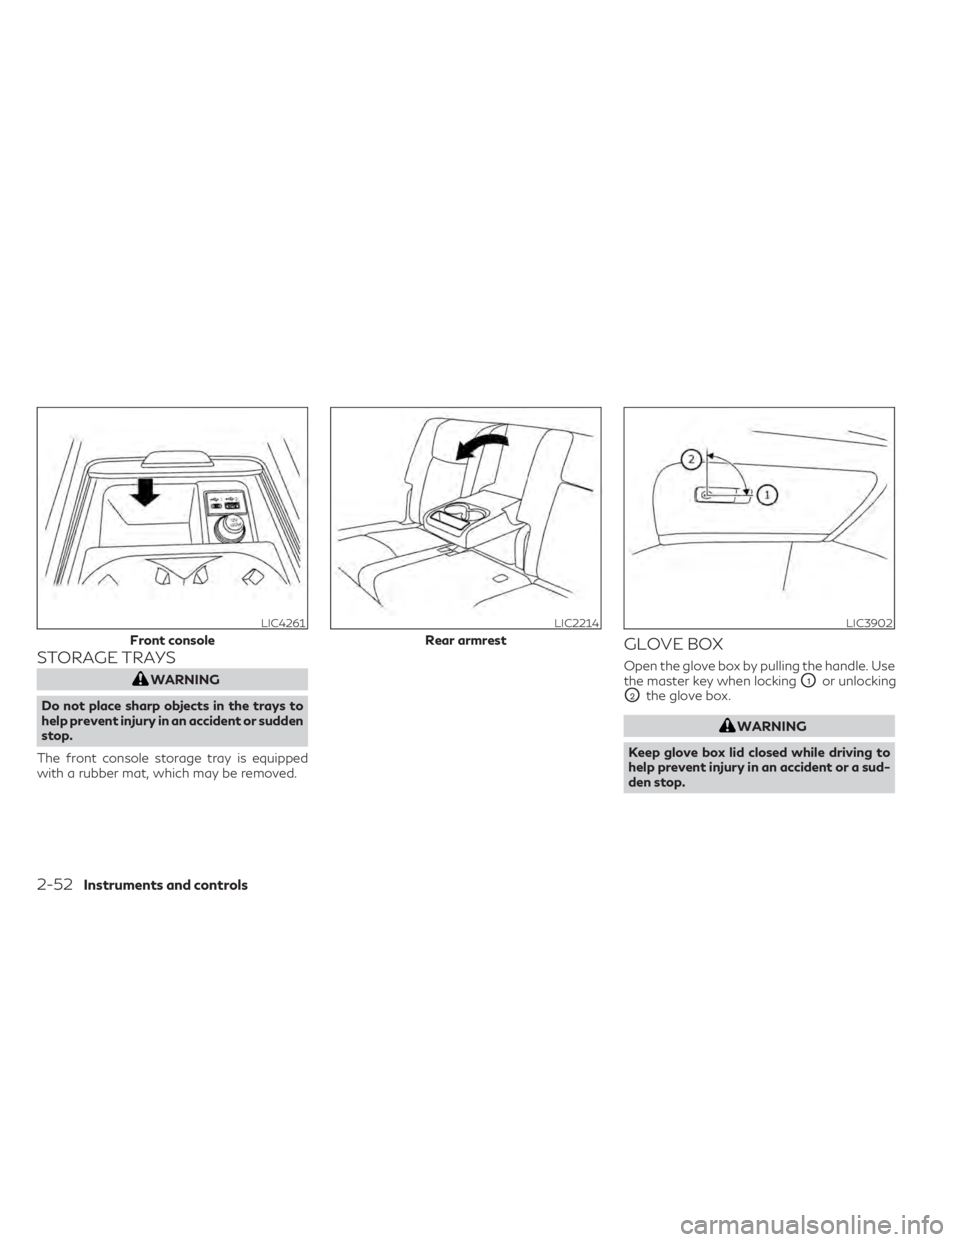
STORAGE TRAYS
WARNING
Do not place sharp objects in the trays to
help prevent injury in an accident or sudden
stop.
The front console storage tray is equipped
with a rubber mat, which may be removed.
GLOVE BOX
Open the glove box by pulling the handle. Use
the master key when locking
O1or unlocking
O2the glove box.
WARNING
Keep glove box lid closed while driving to
help prevent injury in an accident or a sud-
den stop.
LIC4261
Front console
LIC2214
Rear armrest
LIC3902
2-52Instruments and controls
Page 141 of 542

•Heavy loading of the crossbars has the
potential to affect the vehicle stability
and handling during sudden or unusual
handling maneuvers.
• Properly secure all cargo with ropes or
straps to help prevent it from sliding or
shifting. In a sudden stop or collision, un-
secured cargo could cause personal
injury.
• Drive extra carefully when the vehicle is
loaded at or near the cargo carrying ca-
pacity, especially if the significant por-
tion of that load is carried on the
crossbars.
CAUTION
• Use care when placing or removing items
from the roof rack. If you cannot com-
fortably lift the items onto the roof rack
from the ground, use a ladder or a stool.
Do not apply any load directly to the roof side
rails
OA. CrossbarsOBmust be installed be-
fore applying load/cargo/luggage to the
roof of the vehicle.
INFINITI accessory crossbars may be avail-
able through an INFINITI retailer. It is recom-
mended that you visit an INFINITI retailer for
additional information. The service load capacity for the roof side
rails is 165 lbs. (74 kg.), however do not ex-
ceed the crossbars load capacity.
Be careful that your vehicle does not exceed
the Gross Vehicle Weight Rating (GVWR) or
its Gross Axle Weight Rating (GAWR front
and rear).
For additional information regarding GVWR
and GAWR, refer to:
• F.M.V.S.S. or C.M.V.S.S. certification label
(located on the driver’s door pillar).
Installing crossbars (if so equipped)
WARNING
• It is recommended that you have the roof
rack crossbars installed by an INFINITI
retailer.
• Make sure the moonroof (if so equipped)
is in the closed position during the instal-
lation process.
• Protect the painted area on the vehicle’s
roof under the crossbars by placing a
piece of cloth under the cross bars to pre-
vent scratch damage.
• Do not load the crossbars more than the
rated load capacity and always distrib-
ute the load uniformly. The roof rack crossbars may be installed or
removed. Use an L shaped allen key to install
and remove the crossbars.
Instruments and controls2-57
Page 142 of 542
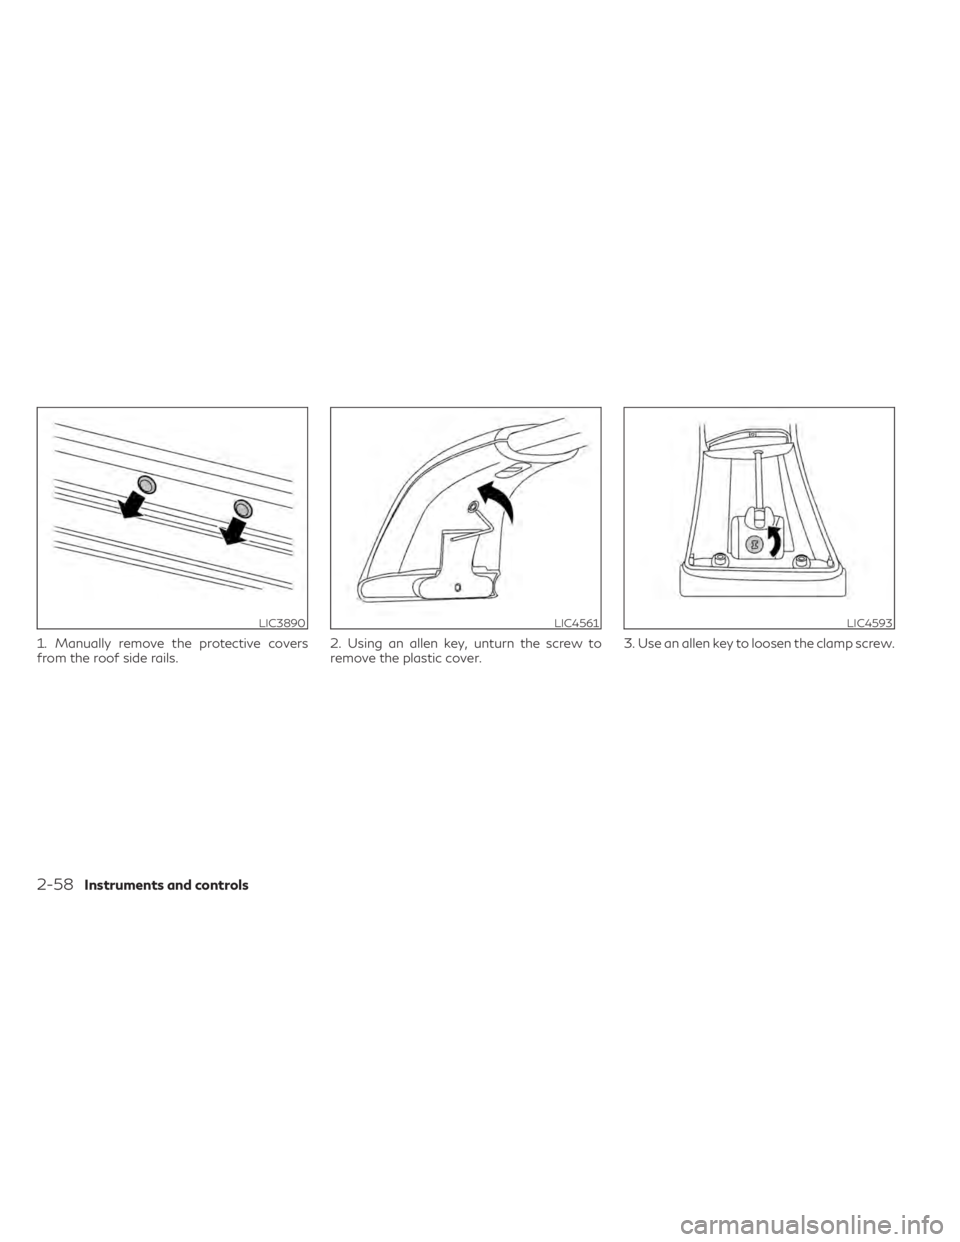
1. Manually remove the protective covers
from the roof side rails.2. Using an allen key, unturn the screw to
remove the plastic cover.3. Use an allen key to loosen the clamp screw.
LIC3890LIC4561LIC4593
2-58Instruments and controls
Page 144 of 542
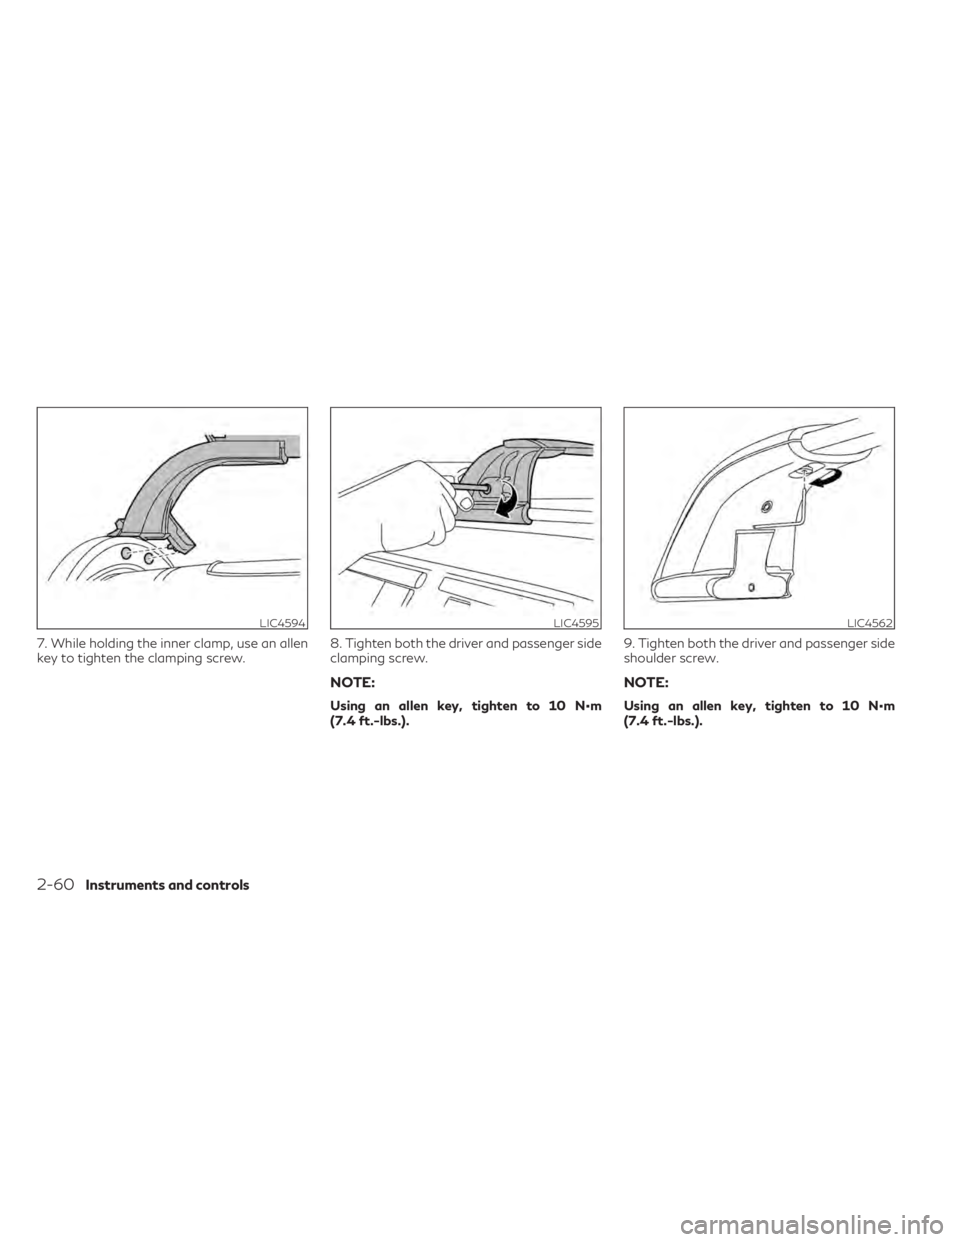
7. While holding the inner clamp, use an allen
key to tighten the clamping screw.8. Tighten both the driver and passenger side
clamping screw.
NOTE:
Using an allen key, tighten to 10 N•m
(7.4 ft.-lbs.).9. Tighten both the driver and passenger side
shoulder screw.
NOTE:
Using an allen key, tighten to 10 N•m
(7.4 ft.-lbs.).
LIC4594LIC4595LIC4562
2-60Instruments and controls
Page 145 of 542

10. Assemble the plastic cover. Slide the
cover over the crossbar.11. Ensure the cover is in the final position. 12. Using an allen key, tighten the screw to
assemble plastic cover.
Using a torque wrench, tighten to 2 N•m
(1.48 ft.-lbs.).
NOTE:
After assembling both the front and rear
crossbars, wiggle the crossbars by hand to
check for loose parts. If either crossbar is
loose, remove the crossbars and repeat steps
1–12 carefully.
To remove crossbars, reverse the installa-
tion steps.
LIC3898LIC3899LIC4596
Instruments and controls2-61
Page 152 of 542

•Do not pull or push the sunshade. This
could cause improper operation or dam-
age it.
CAUTION
• Do not place objects (such as newspa-
pers, handkerchiefs, etc.) on the sun-
shade inlet port. Doing so may entangle
these objects in the sunshade when it is
extending or retracting, causing im-
proper operation or damage to the
sunshade.
• Do not push the sunshade arm with your
hands, etc., as this may deform it. Im-
proper operation or damage to the sun-
shade may result.
• Do not put any object into the sunshade
inlet port as this may result in improper
operation or damage the sunshade.
• Do not hang any object on the arm rail as
this may result in improper operation or
damage the sunshade.
• Do not forcefully pull the sunshade. Do-
ing so may elongate the sunshade. Im-
proper operation or damage to the sun-
shade may result. The interior lights will automatically turn on
and stay on for a period of time when:
• The doors are unlocked by the Intelligent
Key, a key or the request switch while all
doors are closed and the ignition switch is
in the OFF position.
• The doors and/or liftgate is opened.
• The switch is individually pushed.
When the ON switch
O1is pushed, the inte-
rior lights illuminate.
When the DOOR/OFF switch
O2is pushed,
the interior lights do not illuminate unless
individually pushed.
NOTE:
The footwell lights and step lights illuminate
when the driver and passenger doors are
open regardless of the interior light switch
position. These lights will turn off automati-
cally after a period of time while doors are
open to prevent the battery from becoming
discharged.
CAUTION
Do not use for extended periods of time
with the engine stopped. This could result
in a discharged battery.
LIC3841
INTERIOR LIGHTS
2-68Instruments and controls
Page 160 of 542
3 Pre-driving checks and adjustments
Keys.............................................3-2
INFINITI Intelligent Key .......................3-2
INFINITI Vehicle Immobilizer System
keys ..........................................3-4
Doors ...........................................3-4
Locking with key ..............................3-4
Locking with inside lock knob Type A
(if so equipped) ...............................3-5
Locking with inside lock knob Type B
(if so equipped) ...............................3-5
Locking with power door lock switch ..........3-5
Automatic door locks .........................3-6
Child safety rear door lock .....................3-6
INFINITI Intelligent Key System ...................3-6
Operating range ..............................3-8
Door locks/unlocks precaution ................3-9
INFINITI Intelligent Key operation .............3-9
How to use the remote keyless entry
function .................................... 3-13
Warning signals ............................. 3-16
Troubleshooting guide ......................3-16
Log-in function ............................. 3-18
Remote Engine Start (if so equipped) ...........3-18
Remote Engine Start operating range ........3-19
Remote starting the vehicle ..................3-19
Extending engine run time ...................3-19
Canceling a Remote Engine Start ............3-20 Conditions the Remote Engine Start will
not work
................................... 3-20
Hood .......................................... 3-21
Liftgate ....................................... 3-21
Operating the power liftgate ................3-22
Motion-Activated Liftgate
(if so equipped) ............................. 3-24
Power liftgate main switch ..................3-26
Liftgate release ............................. 3-26
Liftgate position setting .....................3-27
Fuel-filler door ................................. 3-28
Opening the fuel-filler door ..................3-28
Fuel-filler cap ............................... 3-28
Steering wheel ................................. 3-31
Manual operation (if so equipped) ...........3-31
Automatic operation (if so equipped) .........3-31
Sun visors ..................................... 3-32
Vanity mirrors .............................. 3-33
C
ard holder ................................. 3-33
Mirrors ........................................ 3-33
Manual anti-glare rearview mirror
(if so equipped) ............................. 3-33
Automatic anti-glare rearview mirror
(if so equipped) ............................. 3-34
Outside mirrors ............................. 3-34
Memory Seat (if so equipped) ...................3-36
Page 162 of 542
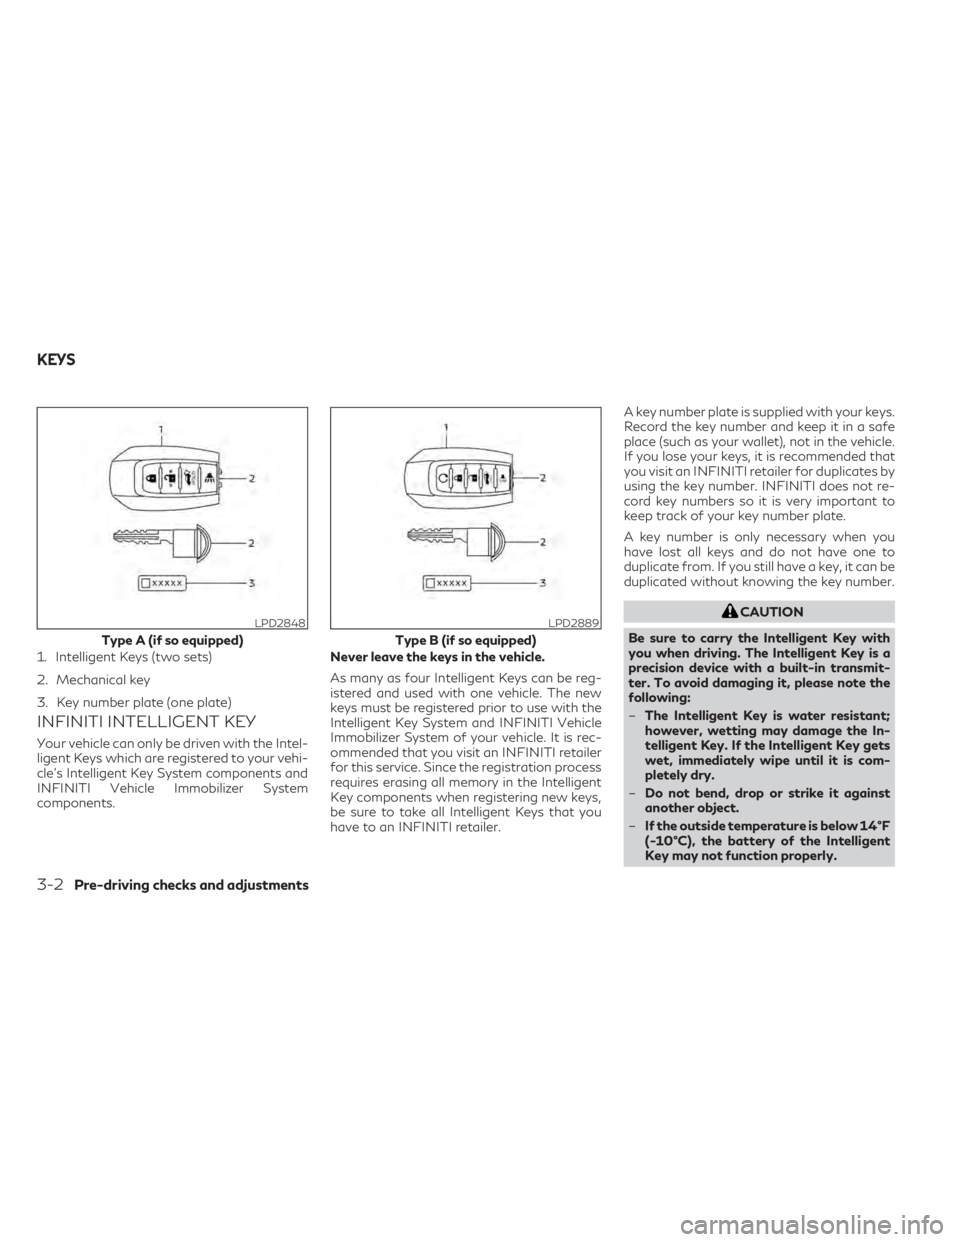
INFINITI INTELLIGENT KEY
Your vehicle can only be driven with the Intel-
ligent Keys which are registered to your vehi-
cle’s Intelligent Key System components and
INFINITI Vehicle Immobilizer System
components.Never leave the keys in the vehicle.
As many as four Intelligent Keys can be reg-
istered and used with one vehicle. The new
keys must be registered prior to use with the
Intelligent Key System and INFINITI Vehicle
Immobilizer System of your vehicle. It is rec-
ommended that you visit an INFINITI retailer
for this service. Since the registration process
requires erasing all memory in the Intelligent
Key components when registering new keys,
be sure to take all Intelligent Keys that you
have to an INFINITI retailer.A key number plate is supplied with your keys.
Record the key number and keep it in a safe
place (such as your wallet), not in the vehicle.
If you lose your keys, it is recommended that
you visit an INFINITI retailer for duplicates by
using the key number. INFINITI does not re-
cord key numbers so it is very important to
keep track of your key number plate.
A key number is only necessary when you
have lost all keys and do not have one to
duplicate from. If you still have a key, it can be
duplicated without knowing the key number.
CAUTION
Be sure to carry the Intelligent Key with
you when driving. The Intelligent Key is a
precision device with a built-in transmit-
ter. To avoid damaging it, please note the
following:
– The Intelligent Key is water resistant;
however, wetting may damage the In-
telligent Key. If the Intelligent Key gets
wet, immediately wipe until it is com-
pletely dry.
– Do not bend, drop or strike it against
another object.
– If the outside temperature is below 14°F
(-10°C), the battery of the Intelligent
Key may not function properly.LPD2848
Type A (if so equipped)
1. Intelligent Keys (two sets)
2. Mechanical key
3. Key number plate (one plate)
LPD2889
Type B (if so equipped)
KEYS
3-2Pre-driving checks and adjustments
Page 163 of 542
–Do not place the Intelligent Key for an
extended period in a place where tem-
peratures exceed 140°F (60°C).
– Do not change or modify the Intelligent
Key.
– Do not use a magnet key holder.
– Do not place the Intelligent Key near an
electric appliance such as a television set
or a personal computer.
– Do not allow the Intelligent Key to come
into contact with water or salt water,
and do not wash it in a washing machine.
This could affect the system function.
If an Intelligent Key is lost or stolen, INFINITI
recommends erasing the ID code of that In-
telligent Key from the vehicle. This may pre-
vent the unauthorized use of the Intelligent
Key to operate the vehicle. For information
regarding the erasing procedure, it is recom-
mended that you visit an INFINITI retailer.
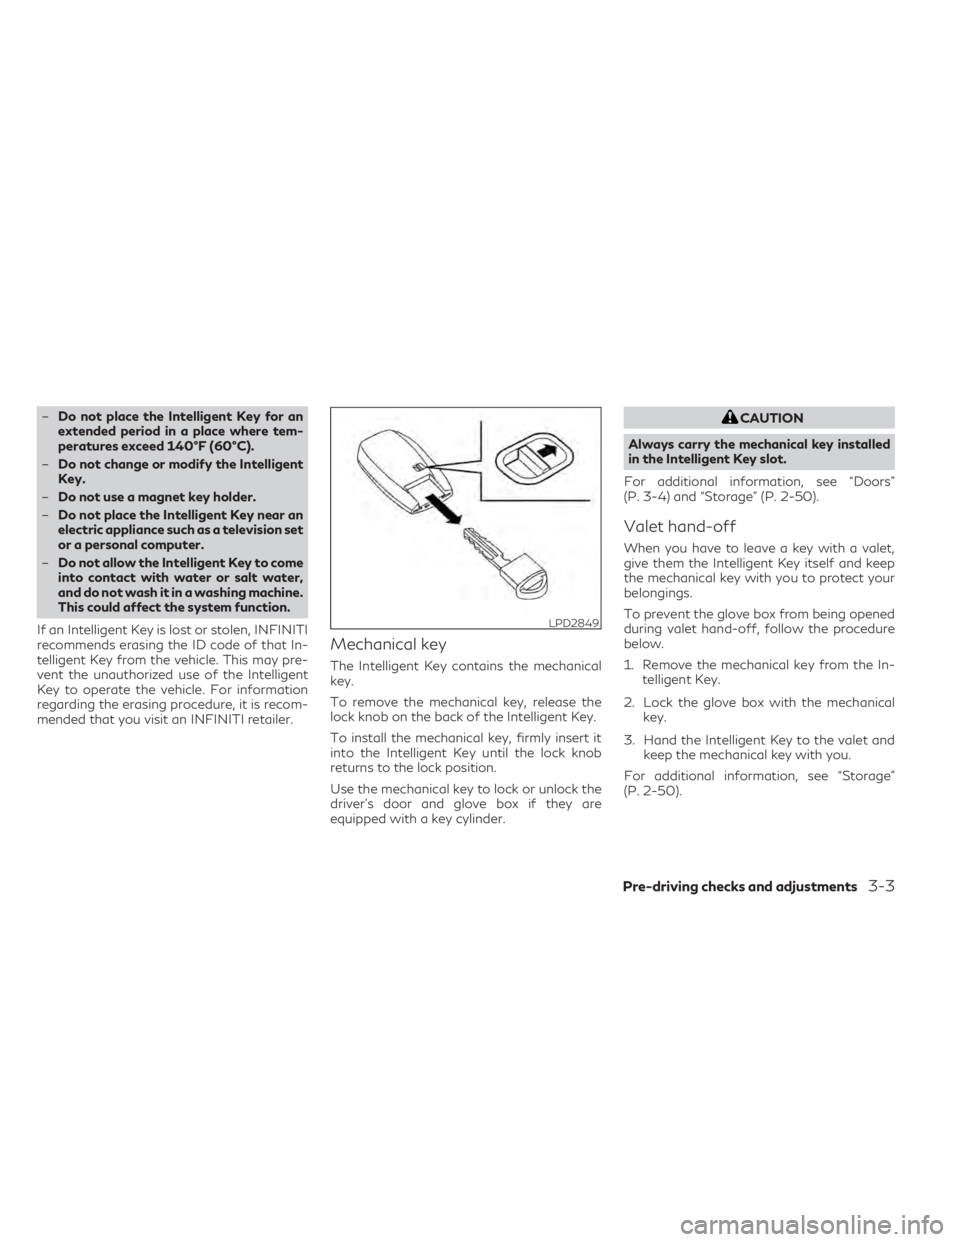
Mechanical key
The Intelligent Key contains the mechanical
key.
To remove the mechanical key, release the
lock knob on the back of the Intelligent Key.
To install the mechanical key, firmly insert it
into the Intelligent Key until the lock knob
returns to the lock position.
Use the mechanical key to lock or unlock the
driver's door and glove box if they are
equipped with a key cylinder.
CAUTION
Always carry the mechanical key installed
in the Intelligent Key slot.
For additional information, see “Doors”
(P. 3-4) and “Storage” (P. 2-50).
Valet hand-off
When you have to leave a key with a valet,
give them the Intelligent Key itself and keep
the mechanical key with you to protect your
belongings.
To prevent the glove box from being opened
during valet hand-off, follow the procedure
below.
1. Remove the mechanical key from the In- telligent Key.
2. Lock the glove box with the mechanical key.
3. Hand the Intelligent Key to the valet and keep the mechanical key with you.
For additional information, see “Storage”
(P. 2-50).
LPD2849
Pre-driving checks and adjustments3-3