wheel INFINITI QX55 2022 Owners Manual
[x] Cancel search | Manufacturer: INFINITI, Model Year: 2022, Model line: QX55, Model: INFINITI QX55 2022Pages: 252, PDF Size: 1.52 MB
Page 13 of 252
2 Getting started
Control buttons and touch screen display ................ 2-2Control buttons and functions ................................ 2-2
Dual display ................................................................... 2-3
INFINITI controller (Type A) (if so equipped) ...... 2-4
INFINITI controller (Type B) (if so equipped) ...... 2-5
Steering wheel switches ........................................... 2-6
USB (Universal Serial Bus) connection ports and
AUX (auxiliary) input jack (if so equipped) ............ 2-7
USB connection ports (if so equipped) ................. 2-8
Starting system ................................................................. 2-9 Start-up screen (if so equipped) ............................. 2-9
Log-in screen ................................................................ 2-9
Touch panel operation .................................................... 2-9
Basic operation ................................................................ 2-10 Main screen operations ........................................... 2-10
Adjusting and turning ON/OFF settings ........... 2-11
How to input letters and numbers ....................... 2-11 How to operate dual display ...................................... 2-12
Upper touch screen display (upper display) ..... 2-12
Lower touch screen display (lower display) .... 2-16
How to view and operate MENU screen ............... 2-17
Functions disabled while driving ............................... 2-19
System settings .............................................................. 2-21 Settings menu .......................................................... 2-21
Connections settings .............................................. 2-27
Volume and Beeps settings .................................. 2-31
Clock settings ........................................................... 2-31
Screen settings ........................................................ 2-33
Language setting .................................................... 2-34
Units settings ........................................................... 2-34
Keyboard type settings ......................................... 2-34
Return all settings to default ............................... 2-34
Quick setting menu screen ................................... 2-34
Page 14 of 252
2. Getting started
CONTROL BUTTONS AND
TOUCH SCREEN DISPLAY
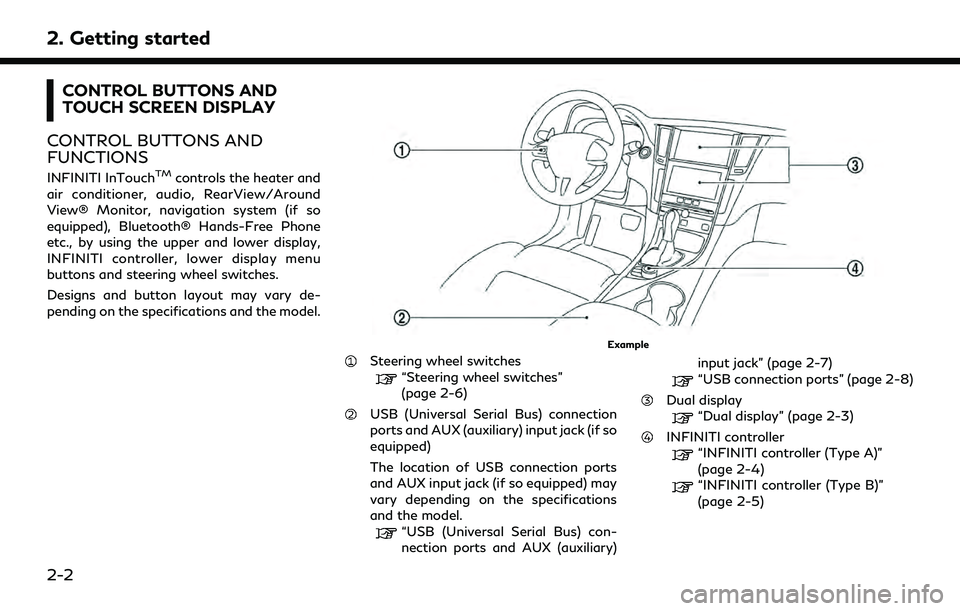
CONTROL BUTTONS AND
FUNCTIONS
INFINITI InTouchTMcontrols the heater and
air conditioner, audio, RearView/Around
View® Monitor, navigation system (if so
equipped), Bluetooth® Hands-Free Phone
etc., by using the upper and lower display,
INFINITI controller, lower display menu
buttons and steering wheel switches.
Designs and button layout may vary de-
pending on the specifications and the model.
Example
Steering wheel switches
“Steering wheel switches”
(page 2-6)
USB (Universal Serial Bus) connection
ports and AUX (auxiliary) input jack (if so
equipped)
The location of USB connection ports
and AUX input jack (if so equipped) may
vary depending on the specifications
and the model.
“USB (Universal Serial Bus) con-
nection ports and AUX (auxiliary) input jack” (page 2-7)
“USB connection ports” (page 2-8)
Dual display“Dual display” (page 2-3)
INFINITI controller“INFINITI controller (Type A)”
(page 2-4)
“INFINITI controller (Type B)”
(page 2-5)
2-2
Page 18 of 252
2. Getting started
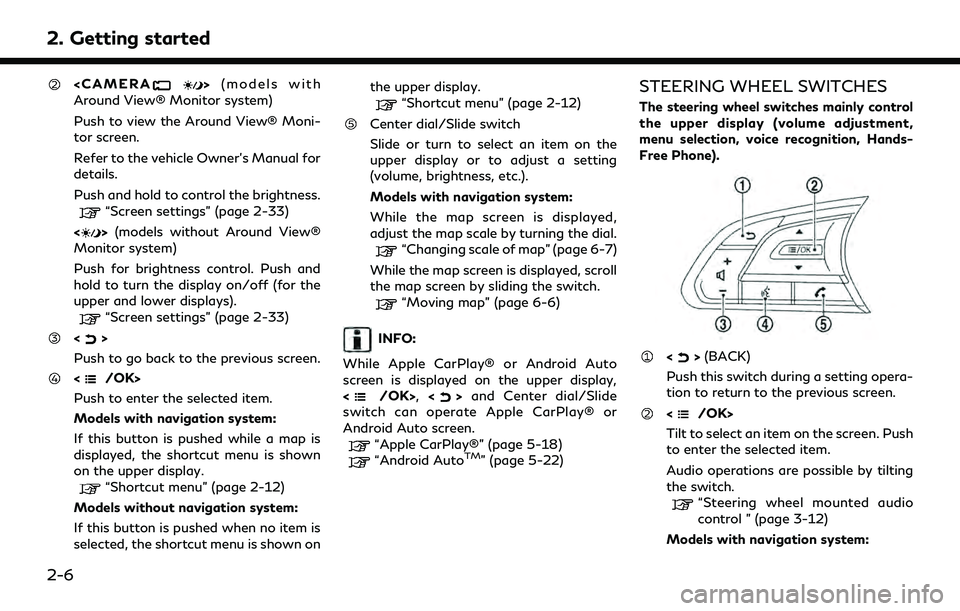
Around View® Monitor system)
Push to view the Around View® Moni-
tor screen.
Refer to the vehicle Owner’s Manual for
details.
Push and hold to control the brightness.
“Screen settings” (page 2-33)
<
> (models without Around View®
Monitor system)
Push for brightness control. Push and
hold to turn the display on/off (for the
upper and lower displays).
“Screen settings” (page 2-33)
<>
Push to go back to the previous screen.
Push to enter the selected item.
Models with navigation system:
If this button is pushed while a map is
displayed, the shortcut menu is shown
on the upper display.
“Shortcut menu” (page 2-12)
Models without navigation system:
If this button is pushed when no item is
selected, the shortcut menu is shown on the upper display.
“Shortcut menu” (page 2-12)
Center dial/Slide switch
Slide or turn to select an item on the
upper display or to adjust a setting
(volume, brightness, etc.).
Models with navigation system:
While the map screen is displayed,
adjust the map scale by turning the dial.
“Changing scale of map” (page 6-7)
While the map screen is displayed, scroll
the map screen by sliding the switch.
“Moving map” (page 6-6)
INFO:
While Apple CarPlay® or Android Auto
screen is displayed on the upper display,
<
/OK>, <>and Center dial/Slide
switch can operate Apple CarPlay® or
Android Auto screen.
“Apple CarPlay®” (page 5-18)“Android AutoTM” (page 5-22)
STEERING WHEEL SWITCHES
The steering wheel switches mainly control
the upper display (volume adjustment,
menu selection, voice recognition, Hands-
Free Phone).
<> (BACK)
Push this switch during a setting opera-
tion to return to the previous screen.
Tilt to select an item on the screen. Push
to enter the selected item.
Audio operations are possible by tilting
the switch.
“Steering wheel mounted audio
control ” (page 3-12)
Models with navigation system:
2-6
Page 24 of 252
2. Getting started
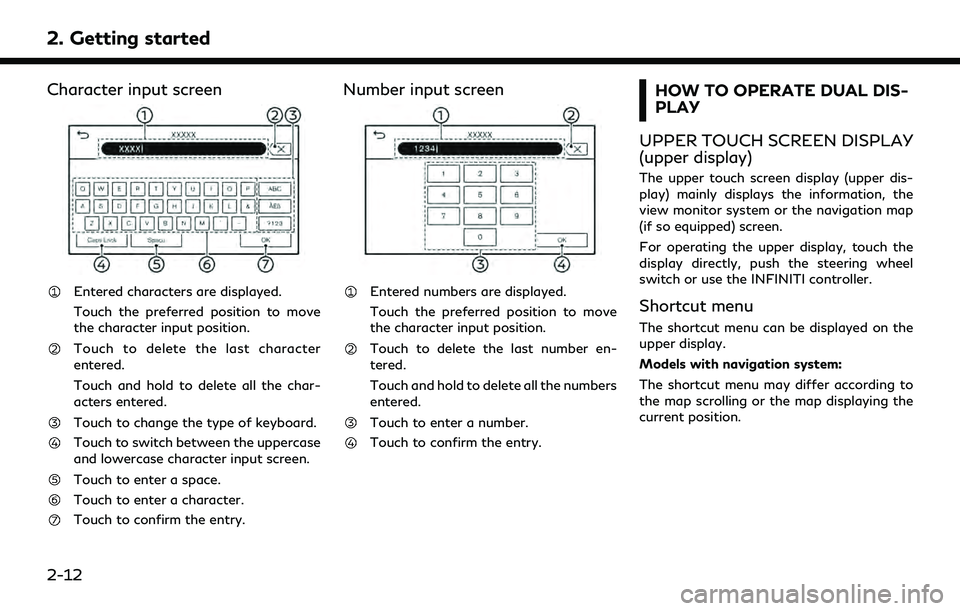
Character input screen
Entered characters are displayed.
Touch the preferred position to move
the character input position.
Touch to delete the last character
entered.
Touch and hold to delete all the char-
acters entered.
Touch to change the type of keyboard.
Touch to switch between the uppercase
and lowercase character input screen.
Touch to enter a space.
Touch to enter a character.
Touch to confirm the entry.
Number input screen
Entered numbers are displayed.
Touch the preferred position to move
the character input position.
Touch to delete the last number en-
tered.
Touch and hold to delete all the numbers
entered.
Touch to enter a number.
Touch to confirm the entry.
HOW TO OPERATE DUAL DIS-
PLAY
UPPER TOUCH SCREEN DISPLAY
(upper display)
The upper touch screen display (upper dis-
play) mainly displays the information, the
view monitor system or the navigation map
(if so equipped) screen.
For operating the upper display, touch the
display directly, push the steering wheel
switch or use the INFINITI controller.
Shortcut menu
The shortcut menu can be displayed on the
upper display.
Models with navigation system:
The shortcut menu may differ according to
the map scrolling or the map displaying the
current position.
2-12
Page 25 of 252
Example
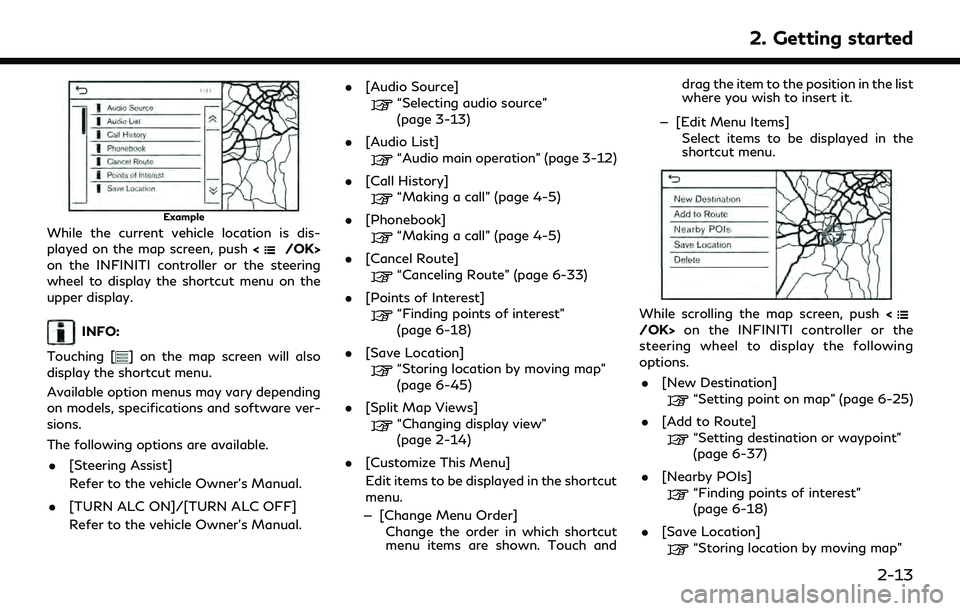
While the current vehicle location is dis-
played on the map screen, push
on the INFINITI controller or the steering
wheel to display the shortcut menu on the
upper display.
INFO:
Touching [
] on the map screen will also
display the shortcut menu.
Available option menus may vary depending
on models, specifications and software ver-
sions.
The following options are available.
. [Steering Assist]
Refer to the vehicle Owner’s Manual.
. [TURN ALC ON]/[TURN ALC OFF]
Refer to the vehicle Owner’s Manual. .
[Audio Source]
“Selecting audio source”
(page 3-13)
. [Audio List]
“Audio main operation” (page 3-12)
. [Call History]
“Making a call” (page 4-5)
. [Phonebook]
“Making a call” (page 4-5)
. [Cancel Route]
“Canceling Route” (page 6-33)
. [Points of Interest]
“Finding points of interest”
(page 6-18)
. [Save Location]
“Storing location by moving map”
(page 6-45)
. [Split Map Views]
“Changing display view”
(page 2-14)
. [Customize This Menu]
Edit items to be displayed in the shortcut
menu.
— [Change Menu Order] Change the order in which shortcut
menu items are shown. Touch and drag the item to the position in the list
where you wish to insert it.
— [Edit Menu Items] Select items to be displayed in the
shortcut menu.
While scrolling the map screen, push on the INFINITI controller or the
steering wheel to display the following
options.
. [New Destination]
“Setting point on map” (page 6-25)
. [Add to Route]
“Setting destination or waypoint”
(page 6-37)
. [Nearby POIs]
“Finding points of interest”
(page 6-18)
. [Save Location]
“Storing location by moving map”
2. Getting started
2-13
Page 26 of 252
![INFINITI QX55 2022 Owners Manual 2. Getting started
(page 6-45)
. [Delete]
“Deleting individual item on map”
(page 6-52)
INFO:
. Touch [
] to display the Google Map
Satellite View. Touching [
]or[]on
the satellite view screen can INFINITI QX55 2022 Owners Manual 2. Getting started
(page 6-45)
. [Delete]
“Deleting individual item on map”
(page 6-52)
INFO:
. Touch [
] to display the Google Map
Satellite View. Touching [
]or[]on
the satellite view screen can](/img/42/41124/w960_41124-25.png)
2. Getting started
(page 6-45)
. [Delete]
“Deleting individual item on map”
(page 6-52)
INFO:
. Touch [
] to display the Google Map
Satellite View. Touching [
]or[]on
the satellite view screen can change the
map scale.
. Touch [
] to display Google Street View.
The view can be shifted to left and right
by touching [<] and [>].
Models without navigation system:
When <
/OK>on the INFINITI controller
or steering wheel is pushed when no item is
selected, the shortcut menu is shown on the
upper display.
INFO:
Touching [
] on the upper display will also
display the shortcut menu.
Available option menus may vary depending
on models, specifications and software ver-
sions.
The following options are available. .
[Audio Source]
“Selecting audio source”
(page 3-13)
. [Audio List]
“Audio main operation” (page 3-12)
. [Call History]
“Making a call” (page 4-5)
. [Phonebook]
“Making a call” (page 4-5)
. [Displayed Feature]
“Changing display view”
(page 2-14)
. [Customize This Menu]
Edit items to be displayed in the shortcut
menu.
— [Change Menu Order] Change the order in which shortcut
menu items are shown. Touch and
drag the item to the position in the list
where you wish to insert it.
— [Edit Menu Items] Select items to be displayed in the
shortcut menu.
Changing display view
Various information screens can be shown
on the upper display by selecting from the display view bar (for models with navigation
system) or displayed feature screen (for
models without navigation system).
For models with navigation system, set
display will be shown in addition to the
navigation map.
Push
Page 39 of 252
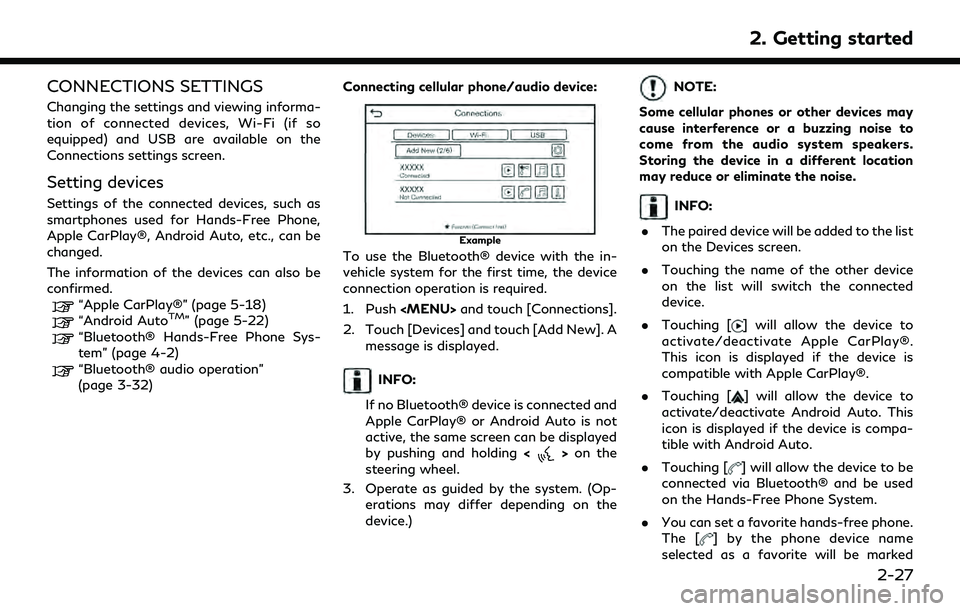
CONNECTIONS SETTINGS
Changing the settings and viewing informa-
tion of connected devices, Wi-Fi (if so
equipped) and USB are available on the
Connections settings screen.
Setting devices
Settings of the connected devices, such as
smartphones used for Hands-Free Phone,
Apple CarPlay®, Android Auto, etc., can be
changed.
The information of the devices can also be
confirmed.
“Apple CarPlay®” (page 5-18)“Android AutoTM” (page 5-22)“Bluetooth® Hands-Free Phone Sys-
tem” (page 4-2)
“Bluetooth® audio operation”
(page 3-32)Connecting cellular phone/audio device:
Example
To use the Bluetooth® device with the in-
vehicle system for the first time, the device
connection operation is required.
1. Push
Page 49 of 252
3 Audio system
Audio operation precautions ......................................... 3-2Radio ........................................................................\
....... 3-2
Compact Disc (CD) ..................................................... 3-4
USB (Universal Serial Bus) connection port ........ 3-5
Compressed Audio Files (MP3/WMA/AAC) ..... 3-6
Bluetooth® audio ...................................................... 3-10
Names and functions of audio control buttons ..... 3-11
Audio main buttons .................................................. 3-11
Steering wheel mounted audio control ............. 3-12
Audio operations ............................................................ 3-12 Audio main operation .............................................. 3-12 Radio ........................................................................\
... 3-14
Compact Disc (CD) player (if so equipped) ...... 3-21
USB memory device player .................................. 3-23
iPod® player ............................................................. 3-26
Bluetooth® audio ................................................... 3-30
Auxiliary (AUX) devices (if so equipped) ........... 3-33
Smartphone audio ................................................... 3-34
Audio settings ................................................................. 3-35
CD/USB memory device care and cleaning ........... 3-36 CD (if so equipped) ................................................. 3-36
USB memory device ............................................... 3-36
Page 60 of 252
3. Audio system
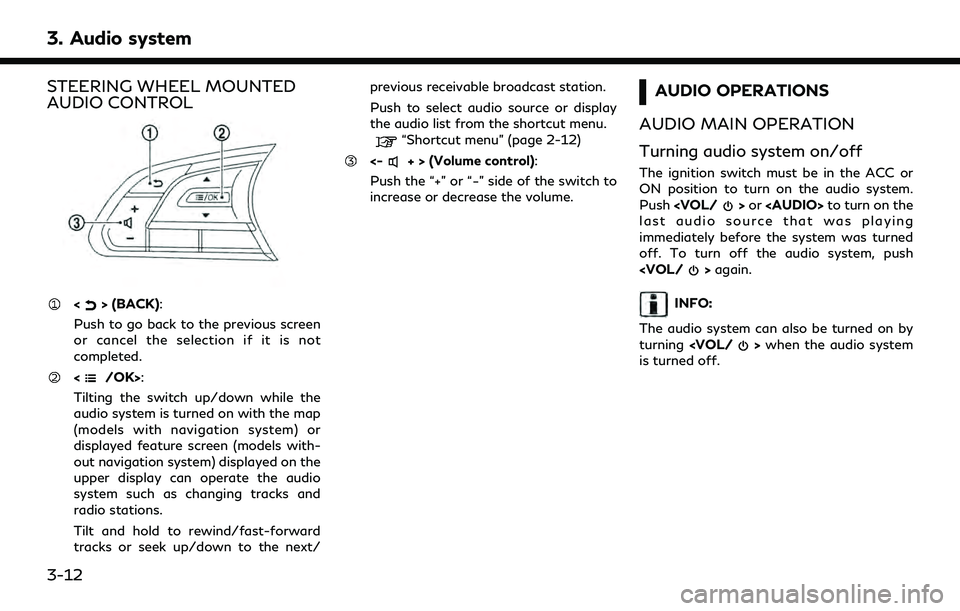
STEERING WHEEL MOUNTED
AUDIO CONTROL
<> (BACK):
Push to go back to the previous screen
or cancel the selection if it is not
completed.
:
Tilting the switch up/down while the
audio system is turned on with the map
(models with navigation system) or
displayed feature screen (models with-
out navigation system) displayed on the
upper display can operate the audio
system such as changing tracks and
radio stations.
Tilt and hold to rewind/fast-forward
tracks or seek up/down to the next/ previous receivable broadcast station.
Push to select audio source or display
the audio list from the shortcut menu.
“Shortcut menu” (page 2-12)
<-+ > (Volume control):
Push the “+” or “−” side of the switch to
increase or decrease the volume.
AUDIO OPERATIONS
AUDIO MAIN OPERATION
Turning audio system on/off
The ignition switch must be in the ACC or
ON position to turn on the audio system.
Push
Page 65 of 252
INFO:
The SiriusXM® Radio function will not
operate without a subscription to SiriusXM®
Radio.
Radio operation
Radio activation and band selection:
Push
band (AM, FM or SXM®) from the audio
source menu to turn on the radio. Each time
change.
“Selecting audio source” (page 3-13)
INFO:
When the stereo broadcast signal is weak,
the radio will automatically change from
stereo to monaural reception.
Tuning:
AM/FM
Tune to stations manually with the following
operations. . Control panel
— Push
Tune to channels manually with the follow-
ing operations.
. Control panel
— Push
Fast tuning:
Fast tune to stations with the following
operation. . Control panel
— Push and hold
Seek tuning (AM or FM mode):
Seek up/down to the next/previous recei-
vable broadcast station with the following
operations. . Control panel
— Push
. Steering wheel
— Tilt and hold <
/OK>
Direct tuning (SiriusXM® mode):
To directly tune to the preferred channels,
touch [Direct Tune] on the [SXM Menu]
screen and then enter the radio frequency.
“How to view radio screen” (page 3-14)“Radio Menu” (page 3-18) Presetting:
Up to 6 for AM, 12 for FM and 18 for
SiriusXM® stations/channels can be regis-
tered in the preset list.
1. Select a radio band (AM, FM or Sir- iusXM®).
2. Tune to the station/channel you wish to store.
3. Touch and hold one of the preset numbers in the preset list.
The information such as frequency (AM/
FM), channel number (SiriusXM®), etc. will
be displayed on the preset list.
Select preset stations with the following
operations. . Steering wheel
— Tilt <
/OK>
. Touch screen
— Briefly touch a preferred station on the preset list on the radio screen.
3. Audio system
3-17