service reset INFINITI QX56 2007 Factory Owner's Manual
[x] Cancel search | Manufacturer: INFINITI, Model Year: 2007, Model line: QX56, Model: INFINITI QX56 2007Pages: 3061, PDF Size: 64.56 MB
Page 2556 of 3061

RF-24
< SERVICE INFORMATION >
SUNROOF
4. Disconnect the harness connector (2) from the sunroof motor
assembly.
•⇐: Vehicle front
5. Remove the screws (3) and the sunroof motor assembly (1).
Installation
CAUTION:
Before installing the sunroof motor assembly, be sure to position the link and wire assembly in the
symmetrical and fully closed position.
1. Move the sunroof motor assembly (1) laterally little by little so
that the gear is completely engaged into the wire on the sunroof
unit until surfaces become parallel. Then secure the sunroof
motor assembly with screws.
•⇐: Vehicle front
2. Secure the sunroof motor assembly (1) with screws (3).
3. Connect the harness connector (2) to the sunroof motor assem-
bly.
4. Install the overhead console assembly. Refer to EI-37
.
5. Connect the battery positive and negative cables.
6. Reset the sunroof motor memory. Refer to RF-10, "
System
Description".
DRAIN HOSES
WIIA0772E
WIIA0772E
1. Rear drain hoses 2. Front drain hoses
WIIA0853E
Page 2602 of 3061

RSU-12
< SERVICE INFORMATION >
TROUBLE DIAGNOSIS
SELF-DIAGNOSIS
Display Item List
WORK SUPPORT
Display Item List
DATA MONITOR
Display Item List
Self-diagnostic item Malfunction detecting condition Check system
Vehicle height sensor
[C1801]Vehicle height sensor voltage is less than 0.2V or greater than
4.8V for more than 60 seconds.Refer to RSU-14, "
Height
Sensor System Inspection" .
Compressor relay
[C1802]1. Driving transistor for compressor relay is off and monitor
voltage continues high level for more than 10 seconds.
2. Driving transistor for compressor relay is on and monitor
voltage continues low level for more than 5 seconds.Refer to RSU-17, "
Compres-
sor Motor, Compressor Motor
Relay and Circuit Inspection"
.
Exhaust solenoid
[C1803]1. Driving transistor for exhaust solenoid is off and monitor volt-
age continues high level for more than 10 seconds.
2. Driving transistor for exhaust solenoid is on and monitor volt-
age continues low level for more than 5 seconds.Refer to RSU-15, "
Exhaust
Valve Solenoid System In-
spection" .
Vehicle height adjusting trouble
(compressor)
[C1804]Continuous compressor relay ON time is more than 120 seconds.Refer to RSU-17, "
Compres-
sor Motor, Compressor Motor
Relay and Circuit Inspection"
.
Vehicle height adjusting trouble
(exhaust solenoid)
[C1805]Continuous exhaust solenoid ON time is more than 120 seconds.Refer to RSU-15, "
Exhaust
Valve Solenoid System In-
spection" .
Vehicle height sensor locking trou-
ble
[C1806]Output sensor voltage variation ±0.02V is more than 100 hour
when vehicle height range is normal.Refer to RSU-14, "
Height
Sensor System Inspection".
Sensor 5V trouble
[C1807]Sensor reference voltage is less than 0.8V or more than 6V for 20
seconds.Refer to RSU-14, "
Height
Sensor System Inspection".
Integral time trouble by supplying
air
[C1808]Integral discontinuous time on the compressor is more than 180
seconds.Refer to RSU-17, "
Compres-
sor Motor, Compressor Motor
Relay and Circuit Inspec-
tion".
Item Description Condition
STANDARD HEIGHT LEVELResets the vehicle height to the initialization flag set-
ting stored in the suspension control unit.Vehicle unladen RSU-44, "
Wheelarch Height
(Unladen*1)" , set in a horizontal position and
not moving.
NOTE:
Do not take your eyes off the vehicle while
CONSULT-II is processing.
ADJUST HEIGHT INISets the height initialization flag in the suspension
control unit when the control unit has been replaced
or when the initialization flag has been cleared using
the "CLEAR HEIGHT INI" procedure.Vehicle unladen RSU-44, "
Wheelarch Height
(Unladen*1)" . Move vehicle forward and back-
ward approx. 5 m (16.4 ft) and rock vehicle from
side to side.
NOTE:
Do not move vehicle while CONSULT-II is pro-
cessing.
CLEAR HEIGHT INIClears the initialization flag in the suspension control
unit.Vehicle unladen RSU-44, "
Wheelarch Height
(Unladen*1)" .
Page 2702 of 3061

SE-30
< SERVICE INFORMATION >
AUTOMATIC DRIVE POSITIONER
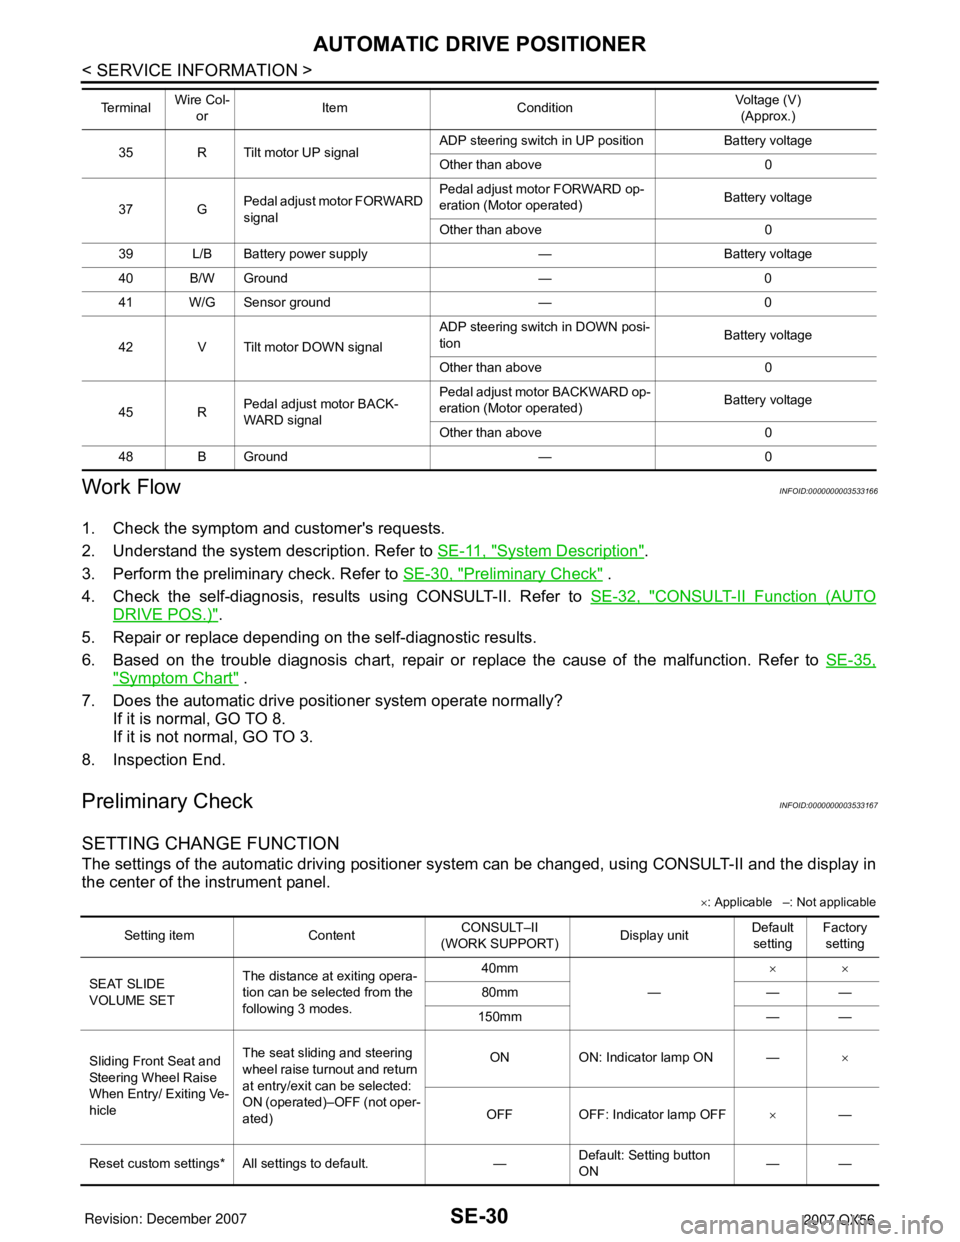
Work Flow
INFOID:0000000003533166
1. Check the symptom and customer's requests.
2. Understand the system description. Refer to SE-11, "
System Description".
3. Perform the preliminary check. Refer to SE-30, "
Preliminary Check" .
4. Check the self-diagnosis, results using CONSULT-II. Refer to SE-32, "
CONSULT-II Function (AUTO
DRIVE POS.)".
5. Repair or replace depending on the self-diagnostic results.
6. Based on the trouble diagnosis chart, repair or replace the cause of the malfunction. Refer to SE-35,
"Symptom Chart" .
7. Does the automatic drive positioner system operate normally?
If it is normal, GO TO 8.
If it is not normal, GO TO 3.
8. Inspection End.
Preliminary CheckINFOID:0000000003533167
SETTING CHANGE FUNCTION
The settings of the automatic driving positioner system can be changed, using CONSULT-II and the display in
the center of the instrument panel.
×: Applicable –: Not applicable
35 R Tilt motor UP signalADP steering switch in UP position Battery voltage
Other than above 0
37 GPedal adjust motor FORWARD
signalPedal adjust motor FORWARD op-
eration (Motor operated)Battery voltage
Other than above 0
39 L/B Battery power supply — Battery voltage
40 B/W Ground — 0
41 W/G Sensor ground — 0
42 V Tilt motor DOWN signalADP steering switch in DOWN posi-
tionBattery voltage
Other than above 0
45 RPedal adjust motor BACK-
WARD signalPedal adjust motor BACKWARD op-
eration (Motor operated)Battery voltage
Other than above 0
48 B Ground — 0 Te r m i n a l Wire Col-
orItem ConditionVoltage (V)
(Approx.)
Setting item ContentCONSULT–II
(WORK SUPPORT)Display unitDefault
settingFactory
setting
SEAT SLIDE
VOLUME SETThe distance at exiting opera-
tion can be selected from the
following 3 modes.40mm
—××
80mm — —
150mm — —
Sliding Front Seat and
Steering Wheel Raise
When Entry/ Exiting Ve-
hicleThe seat sliding and steering
wheel raise turnout and return
at entry/exit can be selected:
ON (operated)–OFF (not oper-
ated)ON ON: Indicator lamp ON —×
OFF OFF: Indicator lamp OFF×—
Reset custom settings* All settings to default. —Default: Setting button
ON——
Page 2703 of 3061

AUTOMATIC DRIVE POSITIONER
SE-31
< SERVICE INFORMATION >
C
D
E
F
G
H
J
K
L
MA
B
SE
N
O
P
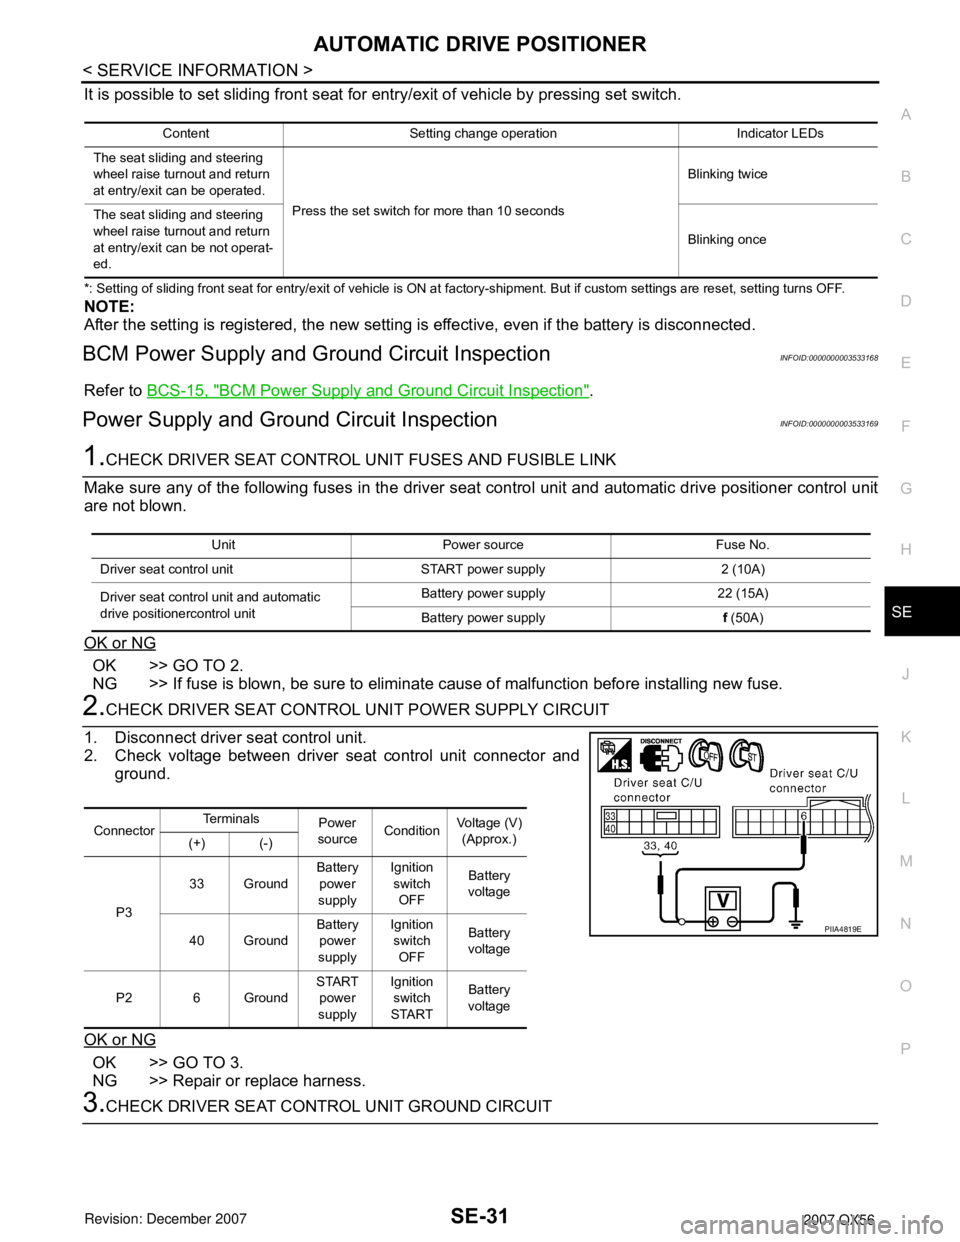
It is possible to set sliding front seat for entry/exit of vehicle by pressing set switch.
*: Setting of sliding front seat for entry/exit of vehicle is ON at factory-shipment. But if custom settings are reset, setting turns OFF.
NOTE:
After the setting is registered, the new setting is effective, even if the battery is disconnected.
BCM Power Supply and Ground Circuit InspectionINFOID:0000000003533168
Refer to BCS-15, "BCM Power Supply and Ground Circuit Inspection".
Power Supply and Ground Circuit InspectionINFOID:0000000003533169
1.CHECK DRIVER SEAT CONTROL UNIT FUSES AND FUSIBLE LINK
Make sure any of the following fuses in the driver seat control unit and automatic drive positioner control unit
are not blown.
OK or NG
OK >> GO TO 2.
NG >> If fuse is blown, be sure to eliminate cause of malfunction before installing new fuse.
2.CHECK DRIVER SEAT CONTROL UNIT POWER SUPPLY CIRCUIT
1. Disconnect driver seat control unit.
2. Check voltage between driver seat control unit connector and
ground.
OK or NG
OK >> GO TO 3.
NG >> Repair or replace harness.
3.CHECK DRIVER SEAT CONTROL UNIT GROUND CIRCUIT
Content Setting change operation Indicator LEDs
The seat sliding and steering
wheel raise turnout and return
at entry/exit can be operated.
Press the set switch for more than 10 secondsBlinking twice
The seat sliding and steering
wheel raise turnout and return
at entry/exit can be not operat-
ed.Blinking once
Unit Power source Fuse No.
Driver seat control unit START power supply 2 (10A)
Driver seat control unit and automatic
drive positionercontrol unitBattery power supply 22 (15A)
Battery power supplyf (50A)
ConnectorTe r m i n a l s
Power
sourceConditionVoltage (V)
(Approx.)
(+) (-)
P333 GroundBattery
power
supplyIgnition
switch
OFFBattery
voltage
40 GroundBattery
power
supplyIgnition
switch
OFFBattery
voltage
P2 6 GroundSTART
power
supplyIgnition
switch
STARTBattery
voltage
PIIA4819E
Page 2707 of 3061

AUTOMATIC DRIVE POSITIONER
SE-35
< SERVICE INFORMATION >
C
D
E
F
G
H
J
K
L
MA
B
SE
N
O
P
If active test is performed, reset seat memory and automatic drive positioner seat memory after performing
work.
DISPLAY ITEM LIST
CAN Communication Inspection Using CONSULT-II (Self-Diagnosis)INFOID:0000000003533171
1.SELF-DIAGNOSTIC RESULT CHECK
CAUTION:
If CONSULT-II is used with no connection of CONSULT-II CONVERTER, malfunctions might be
detected in self-diagnosis depending on control unit which carries out CAN communication.
1. Connect to CONSULT-II, and select “AUTO DRIVE POS.” on the “SELECT DIAG SYSTEM” screen.
2. Select “SELF-DIAG RESULTS” on "SELECT DIAG MODE" screen.
3. Check display content in self-diagnostic results.
Contents displayed
No malfunction>>Inspection End.
Malfunction in CAN communication system>>After printing the monitor items, go to “CAN System”. Refer to
LAN-3, "
Precaution When Using CONSULT-II".
Symptom ChartINFOID:0000000003533172
Test item Description
SEAT SLIDE The sliding motor is activated by receiving the drive signal.
SEAT RECLINING The reclining motor is activated by receiving the drive signal.
SEAT LIFTER FR The lifting motor (front) is activated by receiving the drive signal.
SEAT LIFTER RR The lifting motor (rear) is activated by receiving the drive signal.
PEDAL MOTOR The pedal adjust motor is activated by receiving the drive signal.
MEMORY SW INDCTR The memory switch indicator is lit by receiving the drive signal.
MIRROR MOTOR RHThe RH mirror motor moves the mirror UP/DOWN and LEFT/RIGHT by receiving the drive
signal.
MIRROR MOTOR LHThe LH mirror motor moves the mirror UP/DOWN and LEFT/RIGHT by receiving the drive
signal.
CONSULT-II display code Diagnosis item
U1000INITIAL DIAG
TRANSMIT DIAG
BCM
METER/M&A
ECM
I-KEY
Symptom Diagnoses / service procedure Refer to page
Only setting change function cannot be set with display.1. Preliminary checkSE-30
2. CAN communication inspection using CONSULT-II (self-
diagnosis)SE-35
3. If the above systems are normal, check display system.AV- 7 3
Page 2788 of 3061

SRS-18
< SERVICE INFORMATION >
TROUBLE DIAGNOSIS
CONSULT-II Function
INFOID:0000000003532866
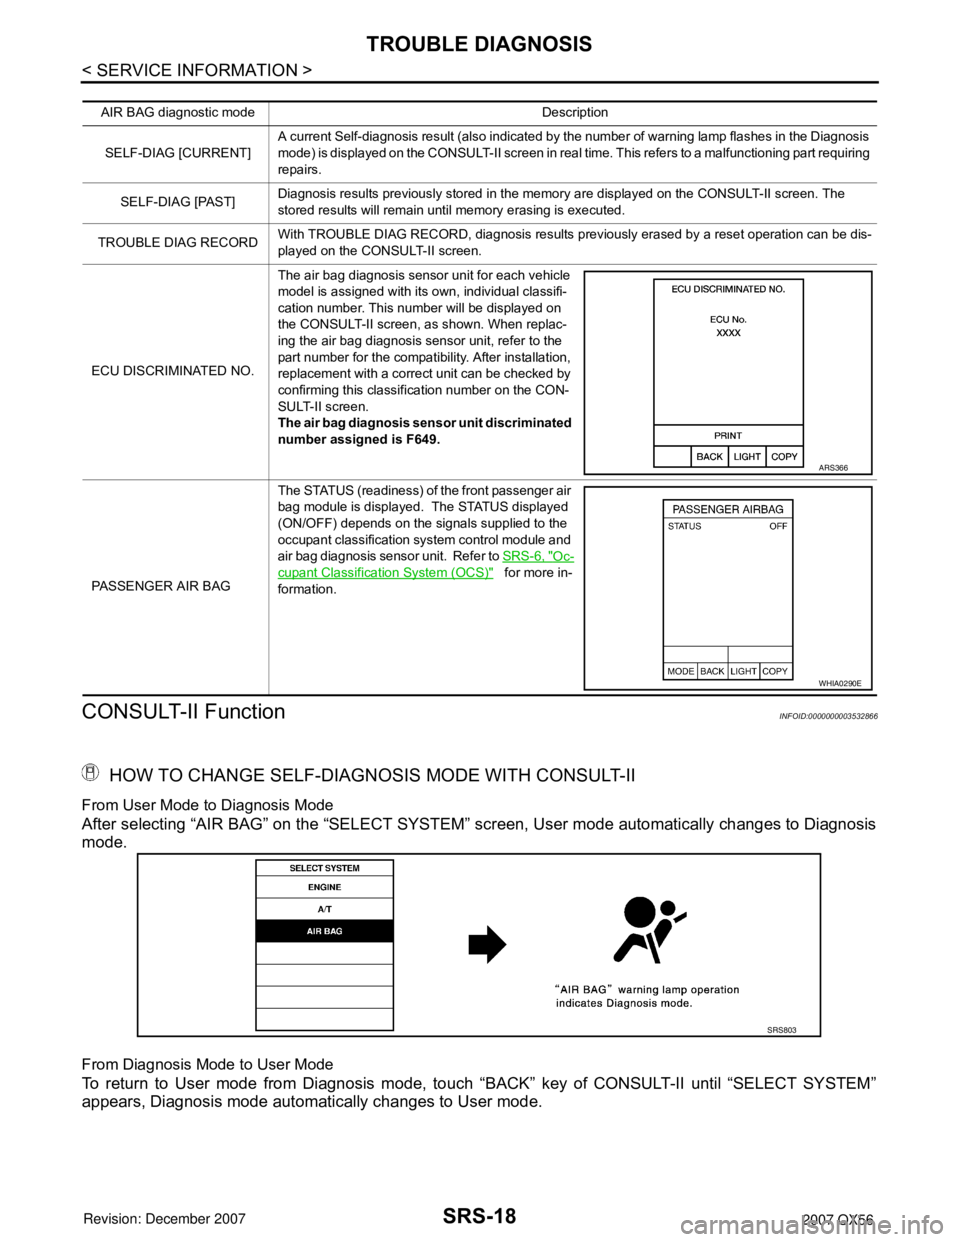
HOW TO CHANGE SELF-DIAGNOSIS MODE WITH CONSULT-II
From User Mode to Diagnosis Mode
After selecting “AIR BAG” on the “SELECT SYSTEM” screen, User mode automatically changes to Diagnosis
mode.
From Diagnosis Mode to User Mode
To return to User mode from Diagnosis mode, touch “BACK” key of CONSULT-II until “SELECT SYSTEM”
appears, Diagnosis mode automatically changes to User mode.
AIR BAG diagnostic mode Description
SELF-DIAG [CURRENT]A current Self-diagnosis result (also indicated by the number of warning lamp flashes in the Diagnosis
mode) is displayed on the CONSULT-II screen in real time. This refers to a malfunctioning part requiring
repairs.
SELF-DIAG [PAST]Diagnosis results previously stored in the memory are displayed on the CONSULT-II screen. The
stored results will remain until memory erasing is executed.
TROUBLE DIAG RECORDWith TROUBLE DIAG RECORD, diagnosis results previously erased by a reset operation can be dis-
played on the CONSULT-II screen.
ECU DISCRIMINATED NO.The air bag diagnosis sensor unit for each vehicle
model is assigned with its own, individual classifi-
cation number. This number will be displayed on
the CONSULT-II screen, as shown. When replac-
ing the air bag diagnosis sensor unit, refer to the
part number for the compatibility. After installation,
replacement with a correct unit can be checked by
confirming this classification number on the CON-
SULT-II screen.
The air bag diagnosis sensor unit discriminated
number assigned is F649.
PASSENGER AIR BAGThe STATUS (readiness) of the front passenger air
bag module is displayed. The STATUS displayed
(ON/OFF) depends on the signals supplied to the
occupant classification system control module and
air bag diagnosis sensor unit. Refer to SRS-6, "
Oc-
cupant Classification System (OCS)" for more in-
formation.
ARS366
WHIA0290E
SRS803
Page 2798 of 3061

SRS-28
< SERVICE INFORMATION >
TROUBLE DIAGNOSIS
Check SRS Intermittent Malfunction Using CONSULT-II—Diagnosis Mode
Refer to GI-36, "CONSULT-II Start Procedure" .
1. If diagnostic codes are displayed on “SELF-DIAG [PAST]”, go to
step 4.
If no malfunction is detected on “SELF-DIAG [PAST]”, touch
“BACK” and go back to “SELECT DIAG MODE”.
2. Touch “TROUBLE DIAG RECORD”.
NOTE:
With “TROUBLE DIAG RECORD”, diagnosis results previ-
ously erased by a reset operation can be displayed.
3. Diagnostic code is displayed on “TROUBLE DIAG RECORD”.
4. Touch “PRINT”.
5. Compare diagnostic codes to "CONSULT-II Diagnostic Code
Chart".
6. Touch “BACK” key of CONSULT-II until “SELECT SYSTEM”
appears.
7. Turn ignition switch OFF, then turn off and disconnect CON-
SULT-II, and both battery cables.
8. Repair the system as outlined by the “Repair order” in “Intermit-
tent Malfunction Diagnostic Code Chart”, that corresponds to the
self-diagnostic result. For replacement procedure of component
parts, refer to the Removal and Installation procedure for the appropriate component.
9. Go to "DIAGNOSTIC PROCEDURE 3" , for final checking.
Trouble Diagnosis without CONSULT-IIINFOID:0000000003532870
DIAGNOSTIC PROCEDURE 6
Inspect SRS Malfunction Using "AIR BAG" Warning Lamp—Diagnosis Mode
NOTE:
WHIA0152E
SRS702
BCIA0031E
WHIA0153E