belt INFINITI QX56 2008 Factory Owner's Manual
[x] Cancel search | Manufacturer: INFINITI, Model Year: 2008, Model line: QX56, Model: INFINITI QX56 2008Pages: 4083, PDF Size: 81.73 MB
Page 714 of 4083

CHG-2
< PRECAUTION >
PRECAUTIONS
PRECAUTION
PRECAUTIONS
Precaution for Supplemental Restraint System (SRS) "AIR BAG" and "SEAT BELT
PRE-TENSIONER"
INFOID:0000000004857596
The Supplemental Restraint System such as “A IR BAG” and “SEAT BELT PRE-TENSIONER”, used along
with a front seat belt, helps to reduce the risk or severity of injury to the driver and front passenger for certain
types of collision. This system includes seat belt switch inputs and dual stage front air bag modules. The SRS
system uses the seat belt switches to determine the front air bag deployment, and may only deploy one front
air bag, depending on the severity of a collision and w hether the front occupants are belted or unbelted.
Information necessary to service the system safely is included in the SR and SB section of this Service Man-
ual.
WARNING:
• To avoid rendering the SRS inopera tive, which could increase the risk of personal injury or death in
the event of a collision which would result in air bag inflation, all maintenance must be performed by
an authorized NISSAN/INFINITI dealer.
• Improper maintenance, including in correct removal and installation of the SRS, can lead to personal
injury caused by unintent ional activation of the system. For re moval of Spiral Cable and Air Bag
Module, see the SR section.
• Do not use electrical test equipmen t on any circuit related to the SRS unless instructed to in this
Service Manual. SRS wiring harn esses can be identified by yellow and/or orange harnesses or har-
ness connectors.
PRECAUTIONS WHEN USING POWER TOOLS (AIR OR ELECTRIC) AND HAMMERS
WARNING:
• When working near the Airbag Diagnosis Sensor Unit or other Airbag System sensors with the Igni-
tion ON or engine running, DO NOT use air or electri c power tools or strike near the sensor(s) with a
hammer. Heavy vibration could activate the sensor( s) and deploy the air bag(s), possibly causing
serious injury.
• When using air or electric power tools or hammers , always switch the Ignition OFF, disconnect the
battery, and wait at least 3 minu tes before performing any service.
Precaution Necessary for Steering W heel Rotation After Battery Disconnect
INFOID:0000000004857595
NOTE:
• This Procedure is applied only to models with Intelligent Key system and NATS (NISSAN ANTI-THEFT SYS-
TEM).
• Remove and install all control units after disconnecting both battery cables with the ignition knob in the
″LOCK ″ position.
• Always use CONSULT-III to perform self-diagnosis as a part of each function inspection after finishing work.
If DTC is detected, perform trouble diagnosis according to self-diagnostic results.
For models equipped with the Intelligent Key system and NATS, an electrically controlled steering lock mech-
anism is adopted on the key cylinder.
For this reason, if the battery is disconnected or if the battery is discharged, the steering wheel will lock and
steering wheel rotation will become impossible.
If steering wheel rotation is required when battery pow er is interrupted, follow the procedure below before
starting the repair operation.
OPERATION PROCEDURE
1. Connect both battery cables. NOTE:
Supply power using jumper cables if battery is discharged.
2. Use the Intelligent Key or mechanical key to turn the ignition switch to the ″ACC ″ position. At this time, the
steering lock will be released.
3. Disconnect both battery cables. The steering lock will remain released and the steering wheel can be rotated.
4. Perform the necessary repair operation.
Revision: March 2010 2008 QX56
Page 722 of 4083

CHG-10
< COMPONENT DIAGNOSIS >
CHARGING SYSTEM PRELIMINARY INSPECTION
COMPONENT DIAGNOSIS
CHARGING SYSTEM PRELIMINARY INSPECTION
Inspection ProcedureINFOID:0000000001696184
1.CHECK BATTERY TERMINALS CONNECTION
Check if battery terminals are clean and tight.
Is the inspection result normal?
YES >> GO TO 2
NO >> Repair battery terminals connection.
2.CHECK FUSE
Check for blown fuse and fusible link.
Is the inspection result normal?
YES >> GO TO 3
NO >> Be sure to eliminate cause of malfunction before installing new fuse or fusible link.
3.CHECK GENERATOR GROUND TERMINAL CONNECTION
Verify connector E206 terminal 5 (generator ground harness) is clean and tight.
Is the inspection result normal?
YES >> GO TO 4
NO >> Repair connection.
4.CHECK DRIVE BELT TENSION
Check drive belt tension. Refer to EM-13, "
Checking Drive Belts".
Is the inspection result normal?
YES >> Inspection end.
NO >> Repair as needed.
Unit Power source (Power supply terminals) Fuse or Fusible Link
Generator Battery (terminal 3)
Fuse 30
Battery (terminal 1) Fusible Link A
Combination meter Ignition switch ON (terminal 2) Fuse 14
Revision: March 2010 2008 QX56
Page 734 of 4083

CHG-22
< ON-VEHICLE REPAIR >
GENERATOR
ON-VEHICLE REPAIR
GENERATOR
Removal and InstallationINFOID:0000000001538884
REMOVAL
1. Disconnect the negative battery terminal.
2. Remove the fan shroud. Refer to CO-15, "
Removal and Installation".
3. Remove the drive belt. Refer to EM-13, "
Removal and Installation".
4. Remove lower bracket, using power tools.
5. Remove the generator upper bolt, using power tools.
6. Remove/disconnect the generator harness connectors.
7. Remove the generator.
INSTALLATION
Installation is in the reverse order of removal.
• Install the generator and check the tension of the drive belt. Refer to EM-13, "
Checking Drive Belts".
CAUTION:
Tighten terminal nut carefully.
WKIA1390E
Terminal nut : 10.8 N·m (1.1 kg-m, 8 ft-lb)
Revision: March 2010 2008 QX56
Page 736 of 4083

CO-1
ENGINE
C
DE
F
G H
I
J
K L
M
SECTION CO
A
CO
N
O P
CONTENTS
ENGINE COOLING SYSTEM
PRECAUTION ....... ........................................2
PRECAUTIONS .............................................. .....2
Precaution for Supplemental Restraint System
(SRS) "AIR BAG" and "SEAT BELT PRE-TEN-
SIONER" ............................................................. ......
2
Precaution Necessary for Steering Wheel Rota-
tion After Battery Disconnect ............................... ......
2
Precaution for Liquid Gasket .....................................3
PREPARATION ............................................4
PREPARATION .............................................. .....4
Special Service Tool ........................................... ......4
Commercial Service Tool ..........................................5
FUNCTION DIAGNOSIS ...............................6
COOLING SYSTEM ....................................... .....6
Cooling Circuit ..................................................... ......6
Schematic .................................................................7
OVERHEATING CAUSE ANALYSIS ..................8
Troubleshooting Chart ...............................................8
ON-VEHICLE MAINTENA NCE ....................10
ENGINE COOLANT ....................................... ....10
Inspection ............................................................ ....10
Changing Engine Coolant ........................................11
RADIATOR ........................................................14
Checking Radiator ............................................... ....14
ON-VEHICLE REPAIR .................................15
RADIATOR ....... .................................................15
Removal and Installation ..................................... ....15
ENGINE COOLING FAN ...................................18
Removal and Installation (Crankshaft Driven
Type) .......................................................................
18
Removal and Installation (Motor Driven Type) ........19
WATER PUMP ..................................................20
Removal and Installation .........................................20
THERMOSTAT AND WATER PIPING ..............22
Removal and Installation .........................................22
SERVICE DATA AND SPECIFICATIONS
(SDS) ............... .......................................... ...
24
SERVICE DATA AND SPECIFICATIONS
(SDS) .................................................................
24
Standard and Limit .............................................. ....24
Revision: March 2010 2008 QX56
Page 737 of 4083

CO-2
< PRECAUTION >
PRECAUTIONS
PRECAUTION
PRECAUTIONS
Precaution for Supplemental Restraint System (SRS) "AIR BAG" and "SEAT BELT
PRE-TENSIONER"
INFOID:0000000004857577
The Supplemental Restraint System such as “A IR BAG” and “SEAT BELT PRE-TENSIONER”, used along
with a front seat belt, helps to reduce the risk or severity of injury to the driver and front passenger for certain
types of collision. This system includes seat belt switch inputs and dual stage front air bag modules. The SRS
system uses the seat belt switches to determine the front air bag deployment, and may only deploy one front
air bag, depending on the severity of a collision and w hether the front occupants are belted or unbelted.
Information necessary to service the system safely is included in the SR and SB section of this Service Man-
ual.
WARNING:
• To avoid rendering the SRS inopera tive, which could increase the risk of personal injury or death in
the event of a collision which would result in air bag inflation, all maintenance must be performed by
an authorized NISSAN/INFINITI dealer.
• Improper maintenance, including in correct removal and installation of the SRS, can lead to personal
injury caused by unintent ional activation of the system. For re moval of Spiral Cable and Air Bag
Module, see the SR section.
• Do not use electrical test equipmen t on any circuit related to the SRS unless instructed to in this
Service Manual. SRS wiring harn esses can be identified by yellow and/or orange harnesses or har-
ness connectors.
PRECAUTIONS WHEN USING POWER TOOLS (AIR OR ELECTRIC) AND HAMMERS
WARNING:
• When working near the Airbag Diagnosis Sensor Unit or other Airbag System sensors with the Igni-
tion ON or engine running, DO NOT use air or electri c power tools or strike near the sensor(s) with a
hammer. Heavy vibration could activate the sensor( s) and deploy the air bag(s), possibly causing
serious injury.
• When using air or electric power tools or hammers , always switch the Ignition OFF, disconnect the
battery, and wait at least 3 minu tes before performing any service.
Precaution Necessary for Steering W heel Rotation After Battery Disconnect
INFOID:0000000004857586
NOTE:
• This Procedure is applied only to models with Intelligent Key system and NATS (NISSAN ANTI-THEFT SYS-
TEM).
• Remove and install all control units after disconnecting both battery cables with the ignition knob in the
″LOCK ″ position.
• Always use CONSULT-III to perform self-diagnosis as a part of each function inspection after finishing work.
If DTC is detected, perform trouble diagnosis according to self-diagnostic results.
For models equipped with the Intelligent Key system and NATS, an electrically controlled steering lock mech-
anism is adopted on the key cylinder.
For this reason, if the battery is disconnected or if the battery is discharged, the steering wheel will lock and
steering wheel rotation will become impossible.
If steering wheel rotation is required when battery pow er is interrupted, follow the procedure below before
starting the repair operation.
OPERATION PROCEDURE
1. Connect both battery cables. NOTE:
Supply power using jumper cables if battery is discharged.
2. Use the Intelligent Key or mechanical key to turn the ignition switch to the ″ACC ″ position. At this time, the
steering lock will be released.
3. Disconnect both battery cables. The steering lock will remain released and the steering wheel can be rotated.
4. Perform the necessary repair operation.
Revision: March 2010 2008 QX56
Page 743 of 4083

CO-8
< FUNCTION DIAGNOSIS >
OVERHEATING CAUSE ANALYSIS
OVERHEATING CAUSE ANALYSIS
Troubleshooting ChartINFOID:0000000001538857
SymptomCheck items
Cooling sys-
tem parts
malfunction Poor heat transfer
Water pump malfunction Worn or loose drive belt
—
Thermostat stuck closed
—
Damaged fins Dust contamination or pa-
per clogging
Physical damage
Clogged radiator cooling
tube Excess foreign material
(rust, dirt, sand, etc.)
Water cut valve malfunction Excess foreign material
(rust, dirt, sand, etc.), phys-
ical damage
Reduced air flow Cooling fan does not oper-
ate
Fan assembly —
High resistance to fan rota-
tion
Damaged fan blades
Damaged radiator shroud —— —
Improper engine coolant
mixture ratio ———
Poor engine coolant quality —Engine coolant density —
Insufficient engine coolant Engine coolant leaksCooling hose
Loose clamp
Cracked hose
Water pump Poor sealing
Radiator cap Loose
Poor sealing
Radiator O-ring for da
mage, deterio-
ration or improper fitting
Cracked radiator tank
Cracked radiator core
Reservoir tank Cracked reservoir tank
Overflowing reservoir tank Exhaust gas leaks into cool-
ing system Cylinder head deterioration
Cylinder head gasket deteri-
oration
Revision: March 2010
2008 QX56
Page 746 of 4083

ENGINE COOLANTCO-11
< ON-VEHICLE MAINTENANCE >
C
DE
F
G H
I
J
K L
M A
CO
NP
O
Changing Engine CoolantINFOID:0000000001538859
WARNING:
• To avoid being scalded, never change the coolant when the engine is hot.
• Wrap a thick cloth around the cap to carefully remo
ve the cap. First, turn the cap a quarter of a turn
to release any built-up pressure, then push down and turn the cap all the way to remove it.
DRAINING ENGINE COOLANT
1. Turn ignition switch ON and set temperature control lever all the way to HOT position or the highest tem-
perature position. Wait 10 seconds and turn ignition switch OFF.
2. Remove the engine front undercover using power tool.
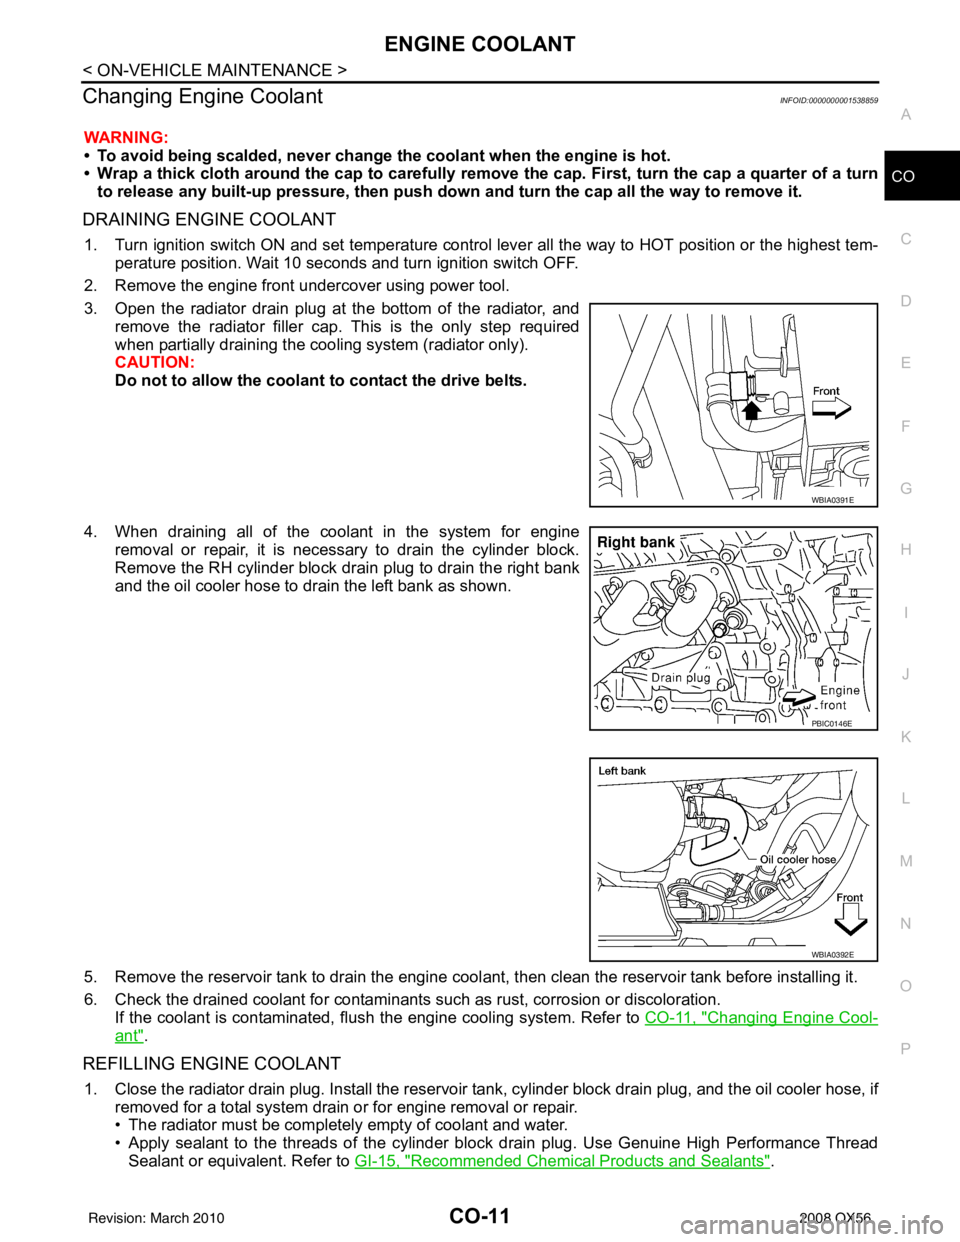
3. Open the radiator drain plug at the bottom of the radiator, and remove the radiator filler cap. This is the only step required
when partially draining the cooling system (radiator only).
CAUTION:
Do not to allow the coolant to contact the drive belts.
4. When draining all of the coolant in the system for engine removal or repair, it is necessary to drain the cylinder block.
Remove the RH cylinder block drain plug to drain the right bank
and the oil cooler hose to drain the left bank as shown.
5. Remove the reservoir tank to drain the engine cool ant, then clean the reservoir tank before installing it.
6. Check the drained coolant for contaminants such as rust, corrosion or discoloration. If the coolant is contaminated, flush the engine cooling system. Refer to CO-11, "
Changing Engine Cool-
ant".
REFILLING ENGINE COOLANT
1. Close the radiator drain plug. Install the reservoir tank, cylinder block drain plug, and the oil cooler hose, if
removed for a total system drain or for engine removal or repair.
• The radiator must be complete ly empty of coolant and water.
• Apply sealant to the threads of the cylinder block drain plug. Use Genuine High Performance Thread Sealant or equivalent. Refer to GI-15, "
Recommended Chemical Products and Sealants".
WBIA0391E
PBIC0146E
WBIA0392E
Revision: March 2010 2008 QX56
Page 750 of 4083

RADIATORCO-15
< ON-VEHICLE REPAIR >
C
DE
F
G H
I
J
K L
M A
CO
NP
O
ON-VEHICLE REPAIR
RADIATOR
Removal and InstallationINFOID:0000000001538861
WARNING:
Never remove the radiator cap when the engine is hot.
Serious burns could occur from high-pressure
engine coolant escaping from the radiator.
REMOVAL
CAUTION:
Perform when the engine is cold.
1. Remove engine room cover. Refer to EM-24, "
Removal and Installation".
2. Drain engine coolant from the radiator. Refer to CO-11, "
Changing Engine Coolant".
3. Remove air cleaner and air duct assembly. Refer to EM-25, "
Removal and Installation".
4. Disconnect A/T fluid cooler hoses. • Install blind plug to avoid leakage of A/T fluid.
5. Disconnect radiator upper and lower hoses from radiator. CAUTION:
Do not allow coolant to contact drive belts.
WBIA0694E
1. Radiator 2. Bolt 3. Mounting rubber
4. A/T fluid cooler hose 5. Radiator hose (lower) 6. Flaps
7. Radiator shroud (upper) 8. Radiator shroud (lower) 9. Drain plug
10. Radiator hose (upper) 11. Reservoir tank hose 12. By-pass hose
13. Reservoir tank 14. Reservoir tank cap A. To radiator fill neck
B. To A/T cooler tube C. To water suction pipe D. To thermostat housing
Revision: March 2010 2008 QX56
Page 753 of 4083

CO-18
< ON-VEHICLE REPAIR >
ENGINE COOLING FAN
ENGINE COOLING FAN
Removal and Installation (Crankshaft Driven Type)INFOID:0000000001538862
REMOVAL
1. Remove the air duct and resonator assembly. Refer to EM-25, "Removal and Installation".
2. Remove the engine front undercover using power tool.
3. Remove the lower radiator shroud. Refer to CO-15, "
Removal and Installation".
4. Remove the drive belt. Refer to EM-13, "
Removal and Installation".
5. Remove the cooling fan.
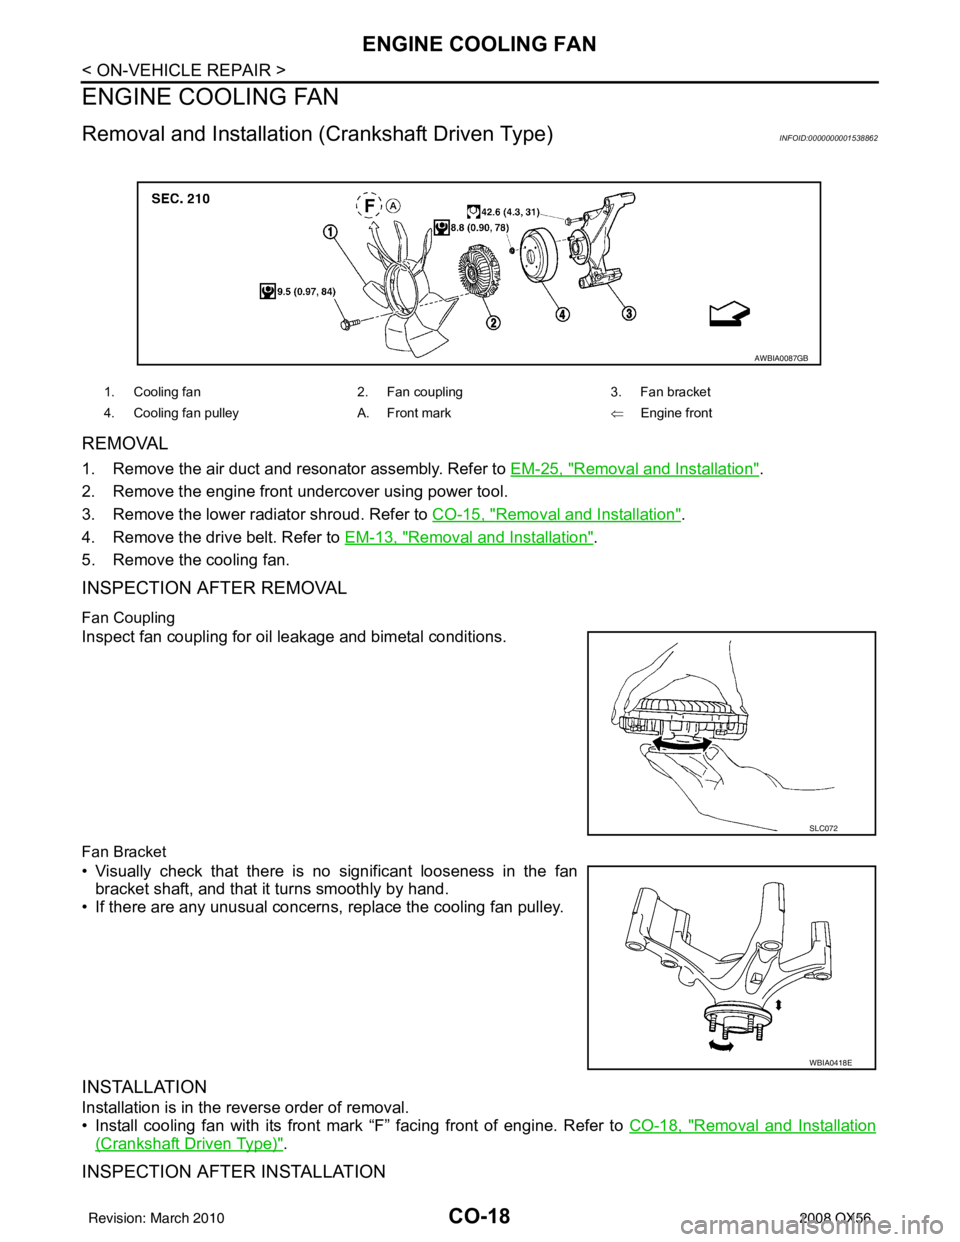
INSPECTION AFTER REMOVAL
Fan Coupling
Inspect fan coupling for oil leakage and bimetal conditions.
Fan Bracket
• Visually check that there is no significant looseness in the fan bracket shaft, and that it turns smoothly by hand.
• If there are any unusual concerns, replace the cooling fan pulley.
INSTALLATION
Installation is in the reverse order of removal.
• Install cooling fan with its front mark “F” facing front of engine. Refer to CO-18, "
Removal and Installation
(Crankshaft Driven Type)".
INSPECTION AFTER INSTALLATION
1. Cooling fan 2. Fan coupling3. Fan bracket
4. Cooling fan pulley A. Front mark ⇐Engine front
AWBIA0087GB
SLC072
WBIA0418E
Revision: March 2010 2008 QX56
Page 755 of 4083

CO-20
< ON-VEHICLE REPAIR >
WATER PUMP
WATER PUMP
Removal and InstallationINFOID:0000000001538864
CAUTION:
• When removing water pump, be careful not to get engine coolant on drive belt.
• Water pump cannot be disassembled and should be replaced as a unit.
REMOVAL
1. Drain engine coolant so that no engine coolant comes out from water pump fitting hole. Refer to CO-11,
"Changing Engine Coolant".
CAUTION:
Perform when the engine is cold.
2. Remove the engine front undercover using power tool.
3. Remove the air duct and resonator assembly. Refer to EM-25, "
Removal and Installation".
4. Remove the drive belt. Refer to EM-13, "
Removal and Installation".
5. Remove the water pump pulley.
6. Remove the water pump. • Engine coolant will leak from the cylinder block, so have a receptacle ready below.
CAUTION:
Handle water pump vane so that it does not contact any other parts.
INSPECTION AFTER REMOVAL
• Visually check that there is no signi ficant dirt or rust on the water
pump body and vane.
• Make sure there is no looseness in the vane shaft, and that it turns smoothly when rotated by hand.
• Replace the water pump assembly, if necessary.
INSTALLATION
Installation is in the reverse order of removal.
• After installation bleed the air from the cooling system. Refer to CO-11, "
Changing Engine Coolant".
INSPECTION AFTER INSTALLATION
KBIA2543E
1. Gasket2. Water pump3. Water pump pulley
KBIA2552E
Revision: March 2010 2008 QX56