brake fluid INFINITI QX56 2008 Factory Owner's Manual
[x] Cancel search | Manufacturer: INFINITI, Model Year: 2008, Model line: QX56, Model: INFINITI QX56 2008Pages: 4083, PDF Size: 81.73 MB
Page 457 of 4083

BRAKE MASTER CYLINDERBR-37
< DISASSEMBLY AND ASSEMBLY >
C
DE
G H
I
J
K L
M A
B
BR
N
O P
DISASSEMBLY AND ASSEMBLY
BRAKE MASTER CYLINDER
Disassembly and AssemblyINFOID:0000000004894496
DISASSEMBLY
CAUTION:
• Master cylinder assembly cannot be disassembled.
• Do not drop parts. If a part is dropped, do not use it.
1. Pull the reservoir tank off the master cylinder assembly.
2. Remove the grommets from master cylinder assembly and discard the grommets. CAUTION:
Discard the grommets, do not reuse.
3. Remove the fluid level sensor from the reservoir tank.
4. Remove the front and rear pressure sensors and discard. CAUTION:
Discard the front and rear pressure sensors, do not reuse.
ASSEMBLY
CAUTION:
• Never use mineral oil such as kerosene, g asoline during the cleaning and assembly process.
• Do not drop parts. If a part is dropped, do not use it.
1. Reservoir cap 2. Fluid level sensor 3. Grommet
4. Master cylinder assembly 5. Rear pressure sensor6. Front pressure sensor
7. Seal 8. Reservoir tankB. Brake fluid
R. Rubber grease
AWFIA0415GB
Revision: March 2010 2008 QX56
Page 458 of 4083

BR-38
< DISASSEMBLY AND ASSEMBLY >
BRAKE MASTER CYLINDER
1. Apply brake fluid or rubber grease to the new grommets, then insert the new grommets into the mastercylinder assembly.
CAUTION:
Do not reuse the grommets.
2. Install the reservoir tank onto the master cylinder assembly.
3. Install the fluid level sensor on the reservoir tank.
4. Install the new front and rear pressure sensors. CAUTION:
Do not reuse the front and rear pressure sensors.
Revision: March 2010 2008 QX56
Page 459 of 4083
FRONT DISC BRAKEBR-39
< DISASSEMBLY AND ASSEMBLY >
C
DE
G H
I
J
K L
M A
B
BR
N
O P
FRONT DISC BRAKE
Disassembly and AssemblyINFOID:0000000004894497
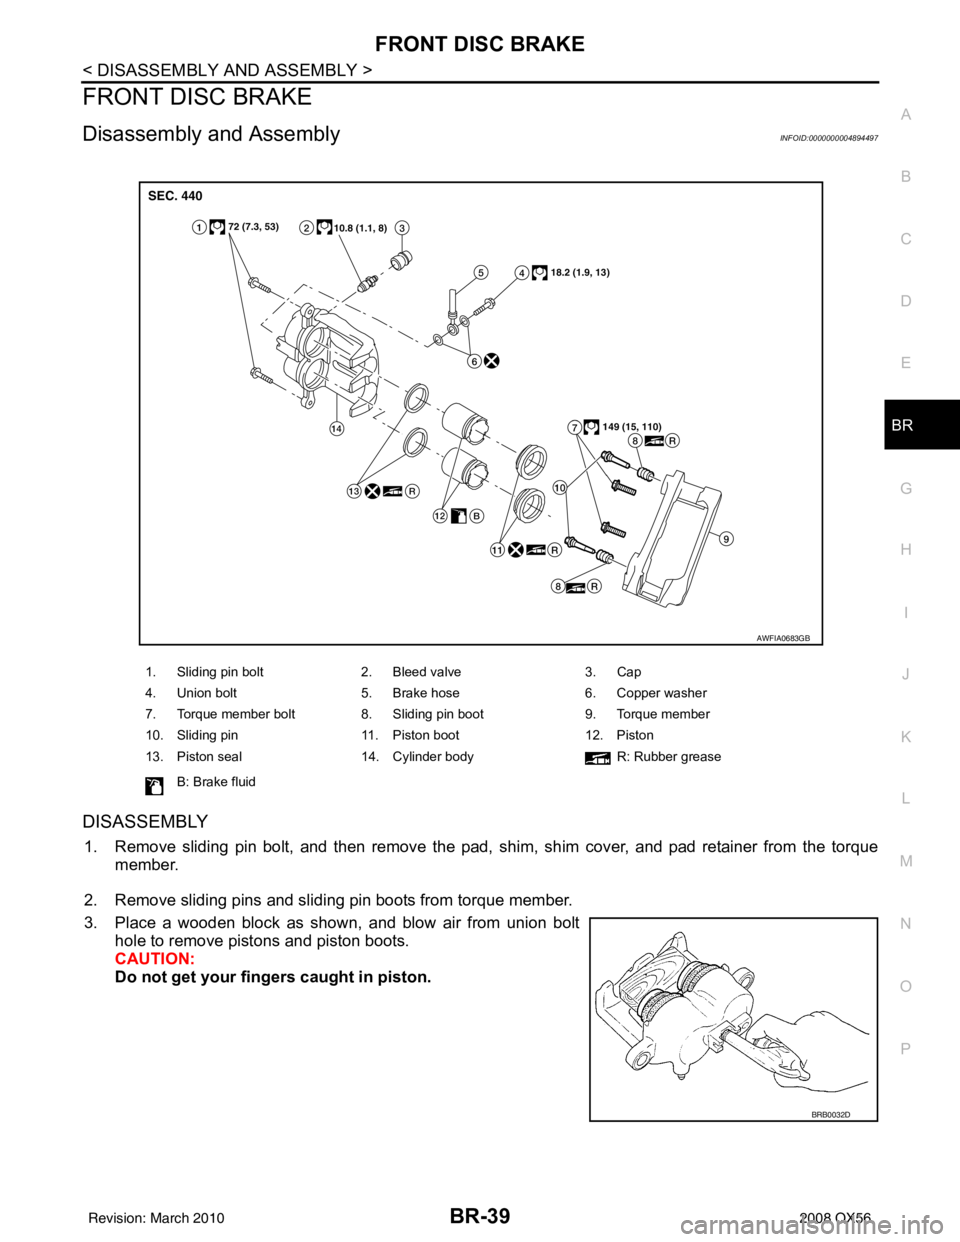
DISASSEMBLY
1. Remove sliding pin bolt, and then remove the pad, shim, shim cover, and pad retainer from the torque member.
2. Remove sliding pins and sliding pin boots from torque member.
3. Place a wooden block as shown, and blow air from union bolt hole to remove pistons and piston boots.
CAUTION:
Do not get your fingers caught in piston.
1. Sliding pin bolt 2. Bleed valve 3. Cap
4. Union bolt 5. Brake hose 6. Copper washer
7. Torque member bolt 8. Sliding pin boot 9. Torque member
10. Sliding pin 11. Piston boot 12. Piston
13. Piston seal 14. Cylinder body R: Rubber grease
B: Brake fluid
AWFIA0683GB
BRB0032D
Revision: March 2010 2008 QX56
Page 460 of 4083
BR-40
< DISASSEMBLY AND ASSEMBLY >
FRONT DISC BRAKE
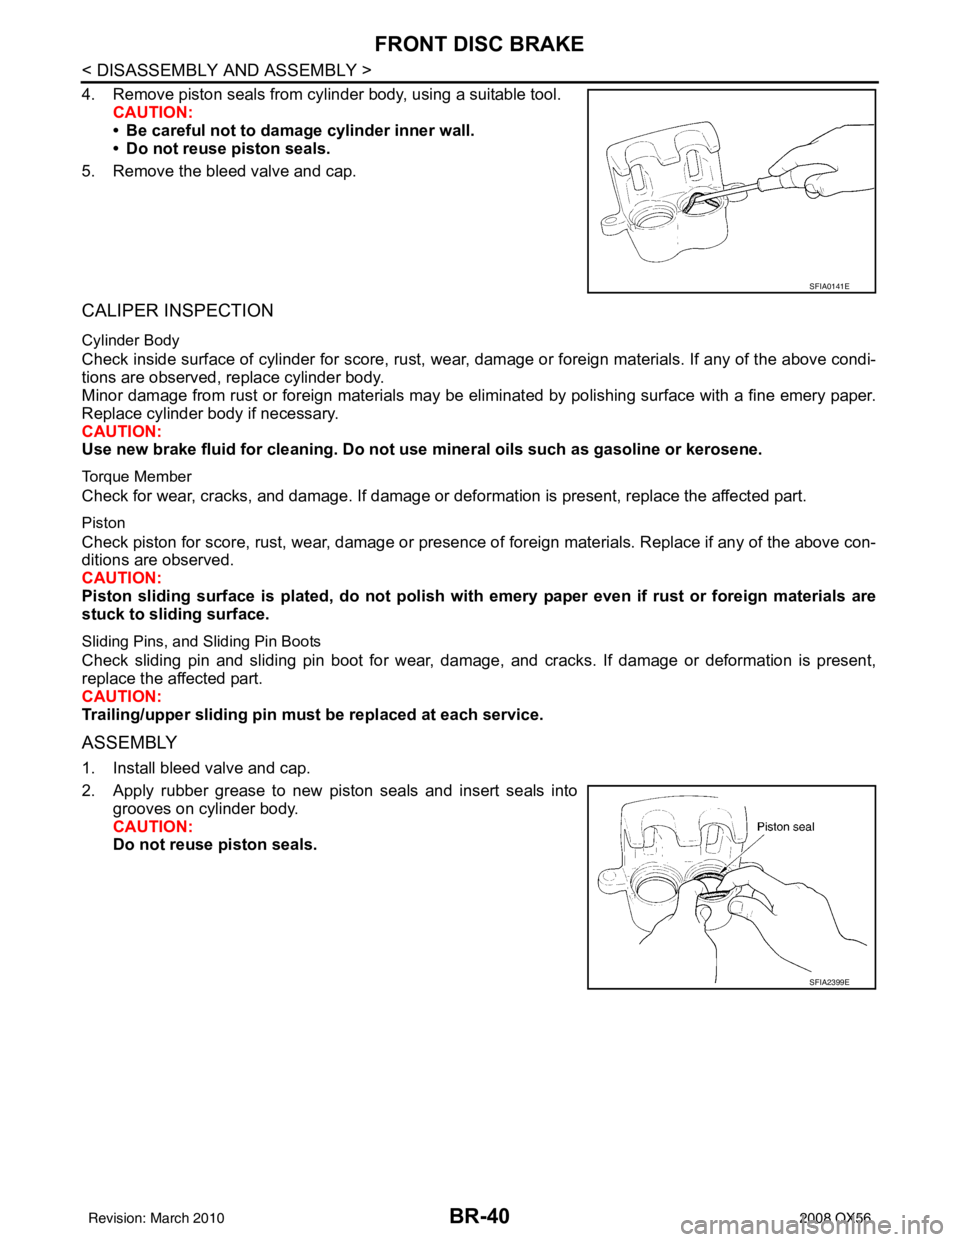
4. Remove piston seals from cylinder body, using a suitable tool.CAUTION:
• Be careful not to damage cylinder inner wall.
• Do not reuse piston seals.
5. Remove the bleed valve and cap.
CALIPER INSPECTION
Cylinder Body
Check inside surface of cylinder for score, rust, wear, damage or foreign materials. If any of the above condi-
tions are observed, replace cylinder body.
Minor damage from rust or foreign materials may be el iminated by polishing surface with a fine emery paper.
Replace cylinder body if necessary.
CAUTION:
Use new brake fluid for cleaning. Do not use mineral oils such as gasoline or kerosene.
Torque Member
Check for wear, cracks, and damage. If damage or def ormation is present, replace the affected part.
Piston
Check piston for score, rust, wear, damage or presence of foreign materials. Replace if any of the above con-
ditions are observed.
CAUTION:
Piston sliding surface is plated, do not polish with emery paper even if rust or foreign materials are
stuck to sliding surface.
Sliding Pins, and Sliding Pin Boots
Check sliding pin and sliding pin boot for wear, damage, and cracks. If damage or deformation is present,
replace the affected part.
CAUTION:
Trailing/upper slidi ng pin must be replaced at each service.
ASSEMBLY
1. Install bleed valve and cap.
2. Apply rubber grease to new piston seals and insert seals into
grooves on cylinder body.
CAUTION:
Do not reuse piston seals.
SFIA0141E
SFIA2399E
Revision: March 2010 2008 QX56
Page 461 of 4083
FRONT DISC BRAKEBR-41
< DISASSEMBLY AND ASSEMBLY >
C
DE
G H
I
J
K L
M A
B
BR
N
O P
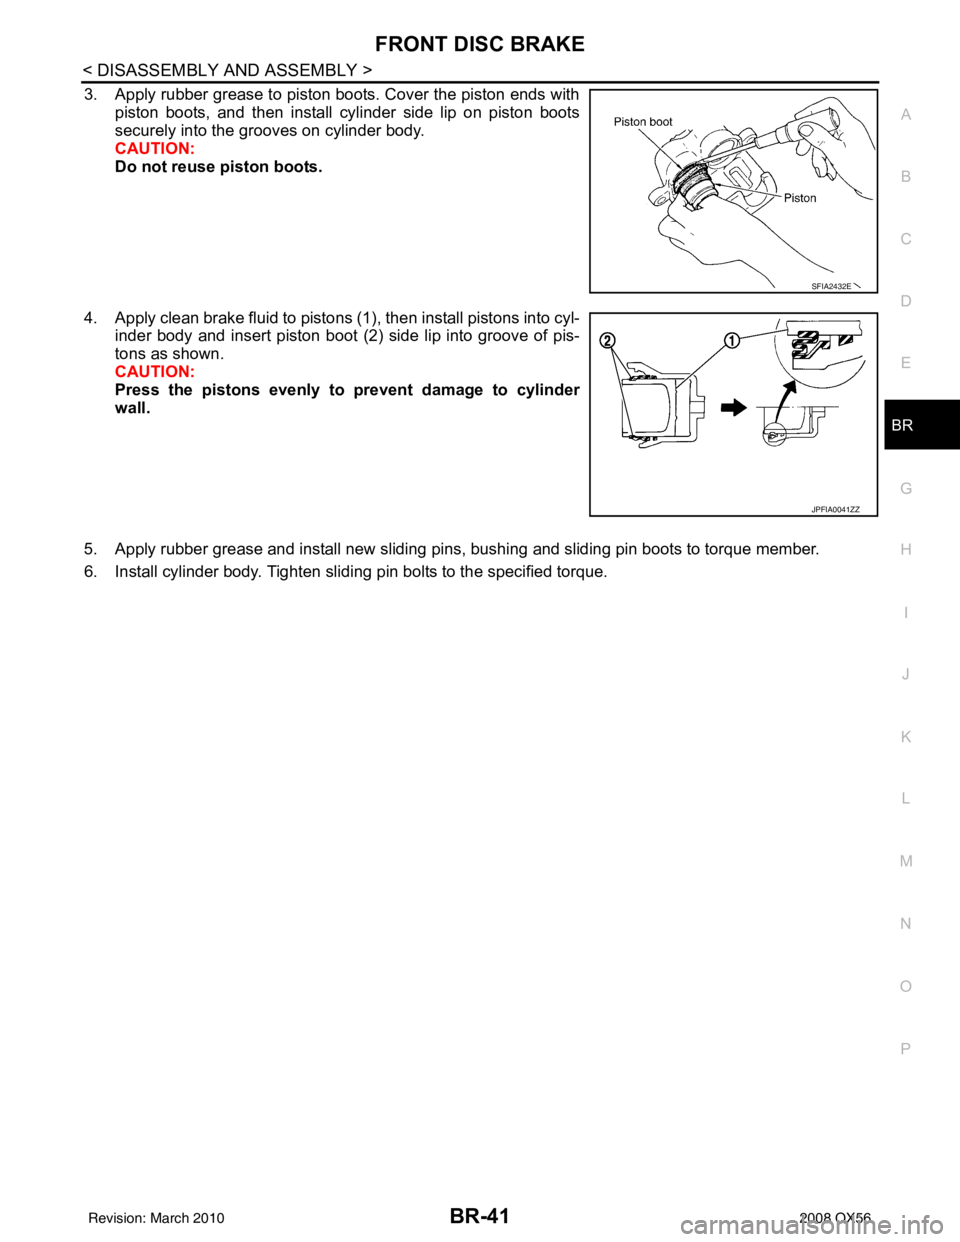
3. Apply rubber grease to piston boots. Cover the piston ends with piston boots, and then install cylinder side lip on piston boots
securely into the grooves on cylinder body.
CAUTION:
Do not reuse piston boots.
4. Apply clean brake fluid to pistons (1), then install pistons into cyl- inder body and insert piston boot (2) side lip into groove of pis-
tons as shown.
CAUTION:
Press the pistons evenly to prevent damage to cylinder
wall.
5. Apply rubber grease and install new sliding pins, bushing and sliding pin boots to torque member.
6. Install cylinder body. Tighten sliding pin bolts to the specified torque.
SFIA2432E
JPFIA0041ZZ
Revision: March 2010 2008 QX56
Page 462 of 4083
BR-42
< DISASSEMBLY AND ASSEMBLY >
REAR DISC BRAKE
REAR DISC BRAKE
Disassembly and AssemblyINFOID:0000000004894498
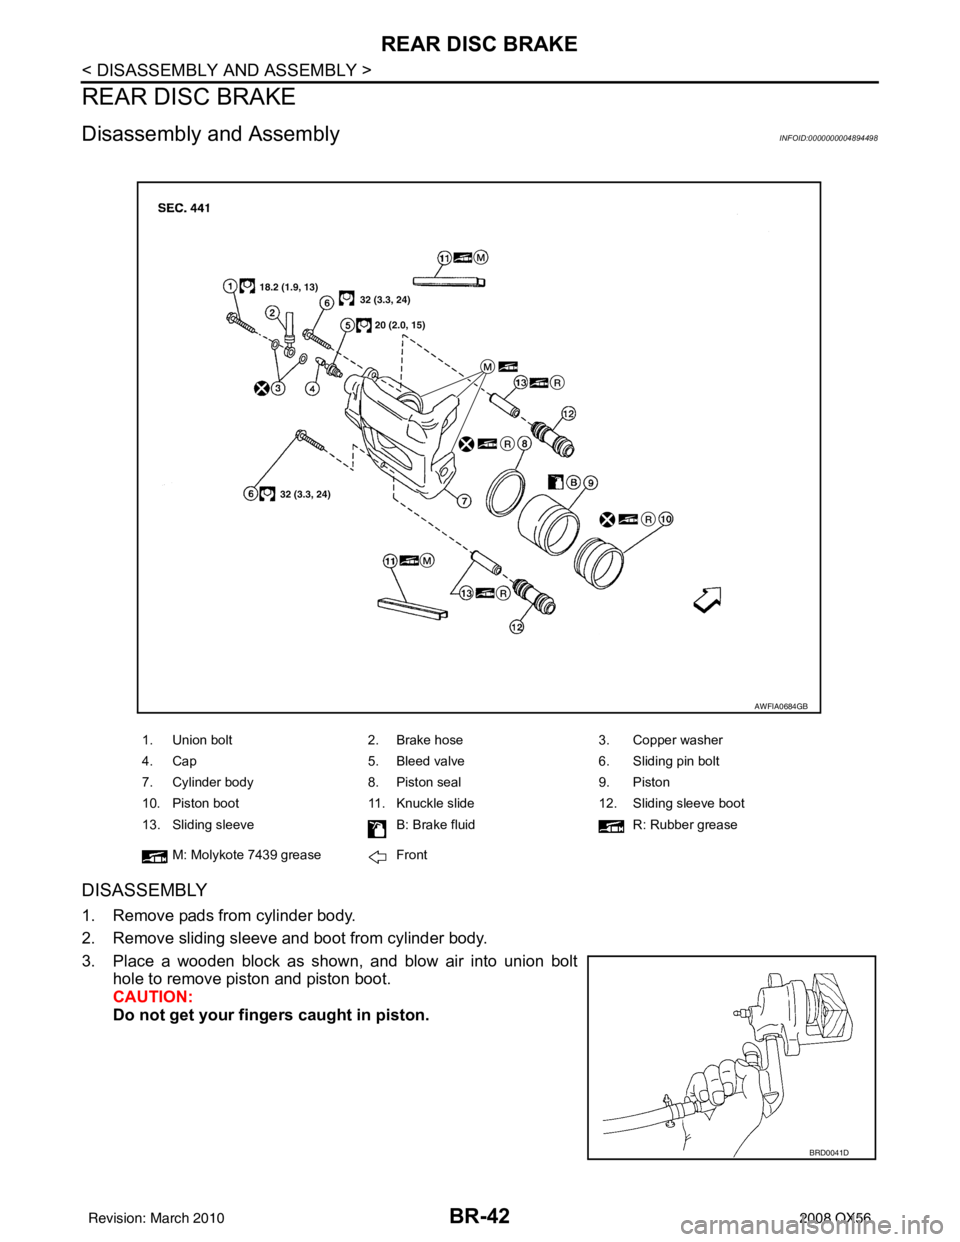
DISASSEMBLY
1. Remove pads from cylinder body.
2. Remove sliding sleeve and boot from cylinder body.
3. Place a wooden block as shown, and blow air into union bolthole to remove piston and piston boot.
CAUTION:
Do not get your fingers caught in piston.
1. Union bolt 2. Brake hose 3. Copper washer
4. Cap 5. Bleed valve 6. Sliding pin bolt
7. Cylinder body 8. Piston seal 9. Piston
10. Piston boot 11. Knuckle slide 12. Sliding sleeve boot
13. Sliding sleeve B: Brake fluidR: Rubber grease
M: Molykote 7439 grease Front
AWFIA0684GB
BRD0041D
Revision: March 2010 2008 QX56
Page 463 of 4083
REAR DISC BRAKEBR-43
< DISASSEMBLY AND ASSEMBLY >
C
DE
G H
I
J
K L
M A
B
BR
N
O P
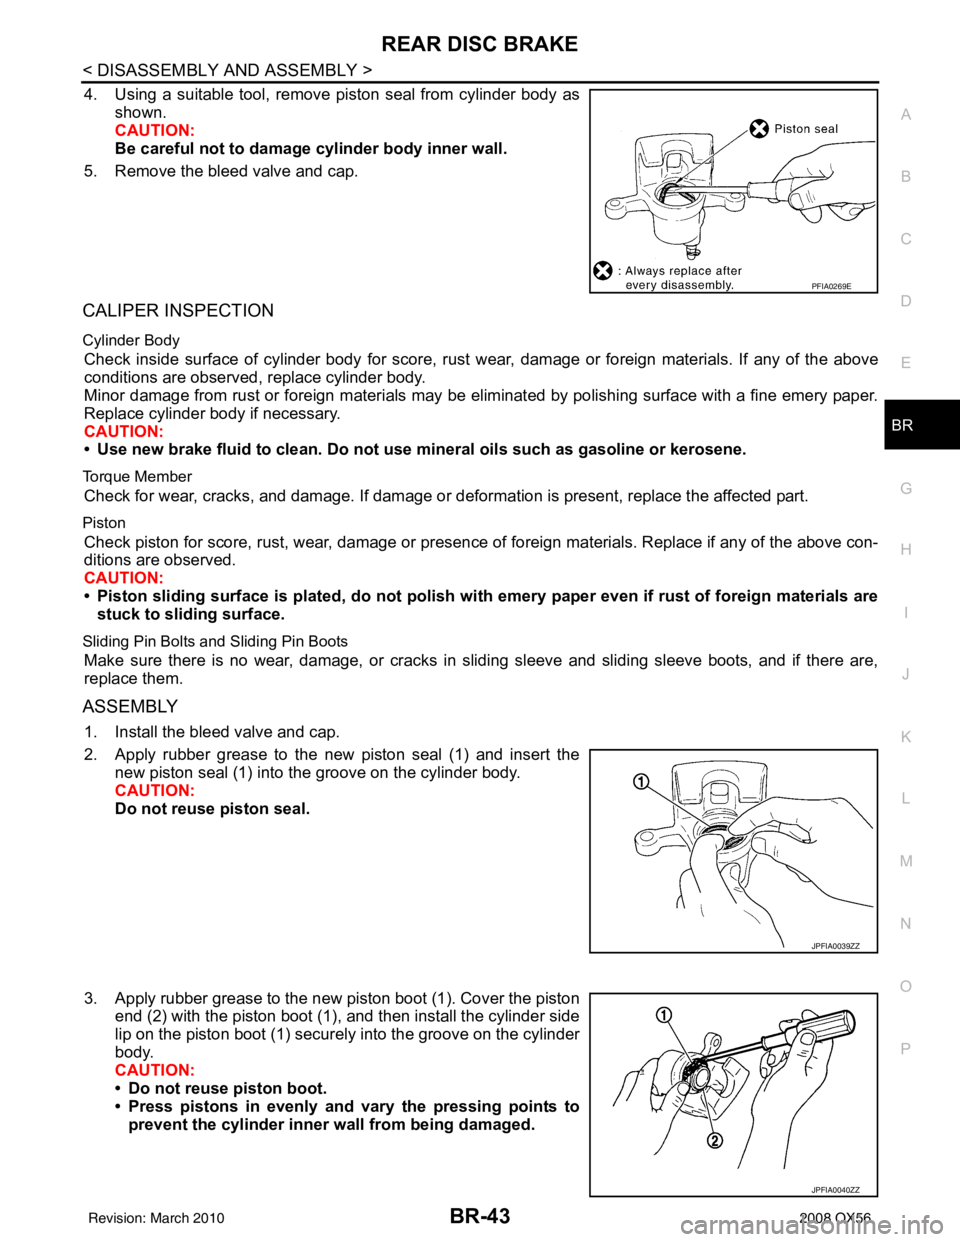
4. Using a suitable tool, remove piston seal from cylinder body as shown.
CAUTION:
Be careful not to damage cylinder body inner wall.
5. Remove the bleed valve and cap.
CALIPER INSPECTION
Cylinder Body
Check inside surface of cylinder body for score, rust wear, damage or foreign materials. If any of the above
conditions are observed, replace cylinder body.
Minor damage from rust or foreign materials may be eliminated by polishing surface with a fine emery paper.
Replace cylinder body if necessary.
CAUTION:
• Use new brake fluid to clean. Do not use mi neral oils such as gasoline or kerosene.
Torque Member
Check for wear, cracks, and damage. If damage or deformation is present, replace the affected part.
Piston
Check piston for score, rust, wear, damage or presence of foreign materials. Replace if any of the above con-
ditions are observed.
CAUTION:
• Piston sliding surface is plated, do not polish with emery paper even if rust of foreign materials are
stuck to sliding surface.
Sliding Pin Bolts and Sliding Pin Boots
Make sure there is no wear, damage, or cracks in sliding sleeve and sliding sleeve boots, and if there are,
replace them.
ASSEMBLY
1. Install the bleed valve and cap.
2. Apply rubber grease to the new piston seal (1) and insert the new piston seal (1) into the groove on the cylinder body.
CAUTION:
Do not reuse piston seal.
3. Apply rubber grease to the new piston boot (1). Cover the piston end (2) with the piston boot (1), and then install the cylinder side
lip on the piston boot (1) securely into the groove on the cylinder
body.
CAUTION:
• Do not reuse piston boot.
• Press pistons in evenly and vary the pressing points toprevent the cylinder inner wall from being damaged.
PFIA0269E
JPFIA0039ZZ
JPFIA0040ZZ
Revision: March 2010 2008 QX56
Page 465 of 4083
SERVICE DATA AND SPECIFICATIONS (SDS)BR-45
< SERVICE DATA AND SPECIFICATIONS (SDS)
C
DE
G H
I
J
K L
M A
B
BR
N
O P
SERVICE DATA AND SPECIFICATIONS (SDS)
SERVICE DATA AND SPECIFICATIONS (SDS)
General SpecificationINFOID:0000000004894499
Unit: mm (in)
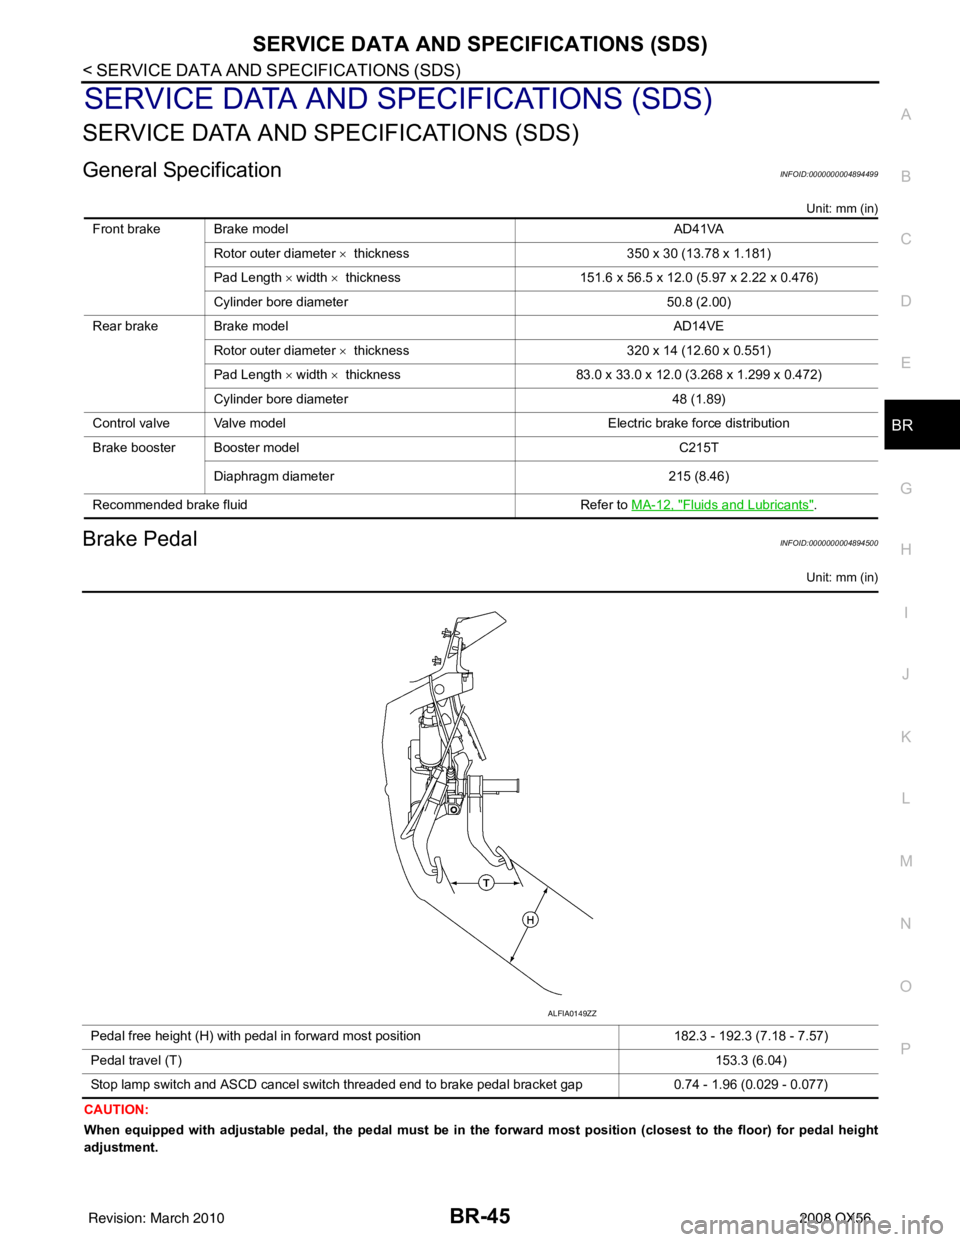
Brake PedalINFOID:0000000004894500
Unit: mm (in)
CAUTION:
When equipped with adjustable pedal, the pedal must be in the forward most position (closest to the floor) for pedal height
adjustment. Front brake Brake model
AD41VA
Rotor outer diameter × thickness 350 x 30 (13.78 x 1.181)
Pad Length × width × thickness 151.6 x 56.5 x 12.0 (5.97 x 2.22 x 0.476)
Cylinder bore diameter 50.8 (2.00)
Rear brake Brake model AD14VE
Rotor outer diameter × thickness 320 x 14 (12.60 x 0.551)
Pad Length × width × thickness 83.0 x 33.0 x 12.0 (3.268 x 1.299 x 0.472)
Cylinder bore diameter 48 (1.89)
Control valve Valve model Electric brake force distribution
Brake booster Booster model C215T
Diaphragm diameter 215 (8.46)
Recommended brake fluid Refer to MA-12, "
Fluids and Lubricants".
Pedal free height (H) with pedal in forward most position 182.3 - 192.3 (7.18 - 7.57)
Pedal travel (T) 153.3 (6.04)
Stop lamp switch and ASCD cancel switch threaded end to brake pedal bracket gap 0.74 - 1.96 (0.029 - 0.077)
ALFIA0149ZZ
Revision: March 2010 2008 QX56
Page 469 of 4083

BRC-2
C1110, C1170 ABS ACTUATOR AND ELEC-
TRIC UNIT (CONTROL UNIT) ...........................
37
DTC Logic ...............................................................37
Diagnosis Procedure ..............................................37
Special Repair Requirement ...................................37
C1111 ABS MOTOR, MOTOR RELAY SYS-
TEM ................................................................. ...
38
Description ........................................................... ...38
DTC Logic ...............................................................38
Diagnosis Procedure ..............................................38
Component Inspection ............................................39
Special Repair Requirement ...................................39
C1113, C1145, C1146 YAW RATE/SIDE/DE-
CEL G SENSOR ............................................. ...
40
Description ........................................................... ...40
DTC Logic ...............................................................40
Diagnosis Procedure ..............................................40
Component Inspection ............................................41
Special Repair Requirement ...................................41
C1115 WHEEL SENSOR ................................ ...43
Description ........................................................... ...43
DTC Logic ...............................................................43
Diagnosis Procedure ..............................................43
Component Inspection ............................................44
Special Repair Requirement ...................................45
C1116 STOP LAMP SWITCH ......................... ...46
Description ........................................................... ...46
DTC Logic ...............................................................46
Diagnosis Procedure ..............................................46
Special Repair Requirement ...................................47
C1120, C1122, C1124, C1126 IN ABS SOL .....48
Description ........................................................... ...48
DTC Logic ...............................................................48
Diagnosis Procedure ..............................................48
Component Inspection ............................................49
Special Repair Requirement ...................................50
C1121, C1123, C1125, C1127 OUT ABS SOL ...51
Description ........................................................... ...51
DTC Logic ...............................................................51
Diagnosis Procedure ..............................................51
Component Inspection ............................................52
Special Repair Requirement ...................................53
C1130, C1131, C1132, C1133, C1136 EN-
GINE SIGNAL ................................................. ...
54
Description ........................................................... ...54
DTC Logic ...............................................................54
Diagnosis Procedure ..............................................54
Special Repair Requirement ...................................54
C1140 ACTUATOR RLY ................................ ...56
Description ........................................................... ...56
DTC Logic ...............................................................56
Diagnosis Procedure ..............................................56
Component Inspection ......................................... ...57
Special Repair Requirement ...................................57
C1142 PRESS SENSOR ...................................58
Description ........................................................... ...58
DTC Logic ...............................................................58
Diagnosis Procedure ...............................................58
Component Inspection ............................................60
Special Repair Requirement ...................................60
C1143, C1144 STEERING ANGLE SENSOR ...61
Description ..............................................................61
DTC Logic ...............................................................61
Diagnosis Procedure ...............................................61
Component Inspection ............................................62
Special Repair Requirement ...................................62
C1155 BRAKE FLUID LEVEL SWITCH ...........64
Description ........................................................... ...64
DTC Logic ...............................................................64
Diagnosis Procedure ...............................................64
Component Inspection ............................................65
Special Repair Requirement ...................................65
C1156 ST ANG SEN COM CIR .........................67
Description ..............................................................67
DTC Logic ...............................................................67
Diagnosis Procedure ...............................................67
C1160 DECEL G SEN SET ...............................68
Description ..............................................................68
DTC Logic ...............................................................68
Diagnosis Procedure ...............................................68
C1163 ST ANGLE SEN SAFE ..........................69
Description ........................................................... ...69
DTC Logic ...............................................................69
Diagnosis Procedure ...............................................69
C1164, C1165, C1166, C1167 CV/SV SYS-
TEM ....................................................................
70
Description ........................................................... ...70
DTC Logic ...............................................................70
Diagnosis Procedure ...............................................70
Component Inspection ............................................71
Special Repair Requirement ...................................72
C1178, C1181, C1184, C1189 ABS ACTIVE
BOOSTER .........................................................
73
Description ........................................................... ...73
DTC Logic ...............................................................73
Diagnosis Procedure ...............................................73
Component Inspection ............................................74
Special Repair Requirement ...................................75
C1179 ABS DELTA S SEN NG .........................76
Description ........................................................... ...76
DTC Logic ...............................................................76
Diagnosis Procedure ...............................................76
Component Inspection ............................................77
Special Repair Requirement ...................................77
Revision: March 2010 2008 QX56
Page 480 of 4083
![INFINITI QX56 2008 Factory Owners Manual VDC
BRC-13
< FUNCTION DIAGNOSIS > [VDC/TCS/ABS]
C
D
E
G H
I
J
K L
M A
B
BRC
N
O P
Component Parts LocationINFOID:0000000001686241
1. Front wheel sensor LH E18 Front wheel sensor RH E117 2. Delta strok INFINITI QX56 2008 Factory Owners Manual VDC
BRC-13
< FUNCTION DIAGNOSIS > [VDC/TCS/ABS]
C
D
E
G H
I
J
K L
M A
B
BRC
N
O P
Component Parts LocationINFOID:0000000001686241
1. Front wheel sensor LH E18 Front wheel sensor RH E117 2. Delta strok](/img/42/57030/w960_57030-479.png)
VDC
BRC-13
< FUNCTION DIAGNOSIS > [VDC/TCS/ABS]
C
D
E
G H
I
J
K L
M A
B
BRC
N
O P
Component Parts LocationINFOID:0000000001686241
1. Front wheel sensor LH E18 Front wheel sensor RH E117 2. Delta stroke sensor E114 3. Brake fluid level switch E21
4. Active booster E49 5. Front pressure sensor E31 6. Rear pressure sensor E32
7. ABS actuator and electric unit (con- trol unit) E125 8. Stop lamp switch E38
9. Combination meter M23, M24
AWFIA0713GB
Revision: March 2010 2008 QX56