INFINITI QX56 2008 Factory Service Manual
Manufacturer: INFINITI, Model Year: 2008, Model line: QX56, Model: INFINITI QX56 2008Pages: 4083, PDF Size: 81.73 MB
Page 3981 of 4083

LOW TIRE PRESSURE WARNING LAMP DOES NOT TURN ON
WT-35
< SYMPTOM DIAGNOSIS >
C
D F
G H
I
J
K L
M A
B
WT
N
O P
LOW TIRE PRESSURE WARNIN G LAMP DOES NOT TURN ON
Low Tire Pressure Warning Lamp Does Not Come On When Ignition Switch Is Turned
On
INFOID:0000000001735400
DIAGNOSTIC PROCEDURE
1.SELF-DIAGNOSTIC RESULT CHECK
Using CONSULT-III, check display contents of BCM in SELF-DIAGNOSIS.
Is "CAN COMM CIRCUIT" displayed in the self-diagnosis display items?
YES >> Malfunction in CAN communication system.
NO >> GO TO 2
2.CHECK COMBINATION METER
Check combination meter operation. Refer to MWI-25, "
CONSULT-III Function (METER/M&A)".
Inspection results OK?
YES >> GO TO 3
NO >> Replace combination meter. Refer to MWI-76, "
Removal and Installation".
3.CHECK LOW TIRE PRE SSURE WARNING LAMP
Disconnect BCM harness connector.
Does the low tire pressure warning lamp activate?
YES >> Replace BCM. Refer to BCS-55, "Removal and Installation".
NO >> Check combination meter operation.
Revision: March 2010 2008 QX56
Page 3982 of 4083

WT-36
< SYMPTOM DIAGNOSIS >
LOW TIRE PRESSURE WARNING LAMP STAYS ON
LOW TIRE PRESSURE WARNING LAMP STAYS ON
Low Tire Pressure Warning Lamp Stays On When Ignition Switch Is Turned On
INFOID:0000000001735401
DIAGNOSTIC PROCEDURE
1.BCM CONNECTORS
1. Turn ignition switch OFF.
2. Disconnect BCM harness connectors.
3. Check terminals for damage or loose connections.
Are any of the BCM connectors loose or damaged?
YES >> Repair or replace damaged parts.
NO >> GO TO 2
2.BCM POWER SUPPLY AND GROUND CIRCUITS
Check BCM power supply and ground circuits. Refer to BCS-32, "
Diagnosis Procedure".
Are the BCM power supply and ground circuits OK?
YES >> Replace BCM. Refer to BCS-55, "Removal and Installation".
NO >> Repair BCM circuits.
Revision: March 2010 2008 QX56
Page 3983 of 4083

LOW TIRE PRESSURE WARNING LAMP BLINKSWT-37
< SYMPTOM DIAGNOSIS >
C
DF
G H
I
J
K L
M A
B
WT
N
O P
LOW TIRE PRESSURE WA RNING LAMP BLINKS
Low Tire Pressure Warning Lamp Flas hes When Ignition Switch Is Turned On
INFOID:0000000001735402
NOTE:
If low tire pressure warning lamp fl ashes as shown, the system is normal.
Flash Mode A
• This mode shows transmitter status is OFF-mode.
Carry out transmitter wake up operation. Refer to WT-5, "
Transmit-
ter Wake Up Operation".
DIAGNOSTIC PROCEDURE
1.CHECK BCM CONNECTORS
1. Turn ignition switch OFF.
2. Disconnect BCM harness connectors.
3. Check terminals for damage or loose connections.
Inspection results OK?
YES >> GO TO 2
NO >> Repair or replace damaged parts.
2.CHECK TIRE PRESSURE WARNING CHECK CONNECTOR CIRCUIT
Check continuity between BCM harness connector M18 terminal 15
and ground.
Does continuity exist?
YES >> Repair circuit for short to ground.
NO >> Replace BCM. Refer to BCS-55, "
Removal and Installa-
tion".
SEIA0347E
Continuity should not exist.
AWEIA0116ZZ
Revision: March 2010 2008 QX56
Page 3984 of 4083

WT-38
< SYMPTOM DIAGNOSIS >
HAZARD WARNING LAMPS FLASH
HAZARD WARNING LAMPS FLASH
Hazard Warning Lamps Flash When Ignition Switch Is Turned OnINFOID:0000000001735403
DIAGNOSTIC PROCEDURE
1.CHECK BCM GROUND CIRCUIT
Check BCM ground circuit. Refer to BCS-32, "
Diagnosis Procedure".
Is BCM ground circuit OK?
YES >> Replace BCM. Refer to BCS-55, "Removal and Installation".
NO >> Repair BCM ground circuit.
Revision: March 2010 2008 QX56
Page 3985 of 4083

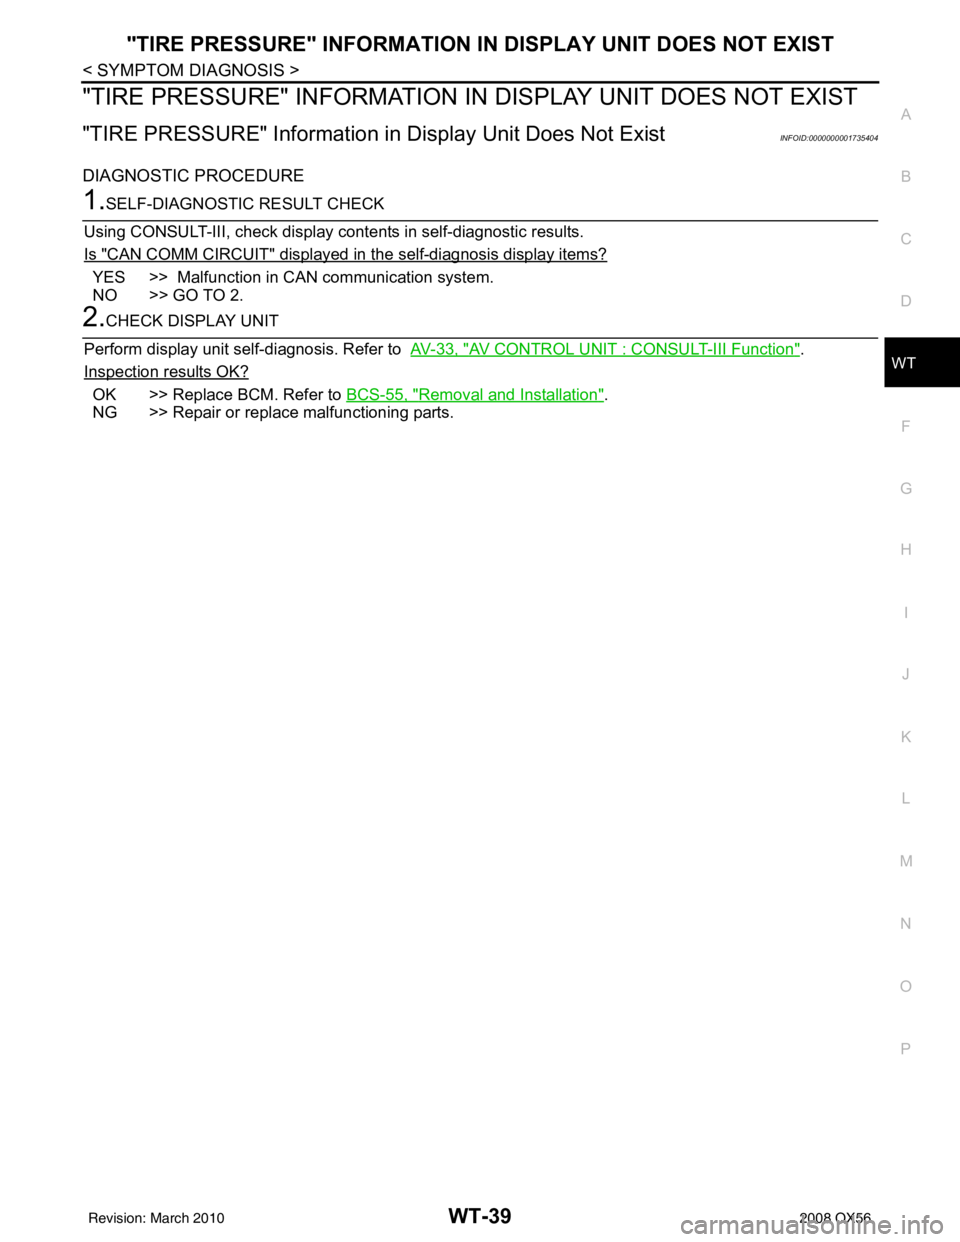
"TIRE PRESSURE" INFORMATION IN DISPLAY UNIT DOES NOT EXIST
WT-39
< SYMPTOM DIAGNOSIS >
C
D F
G H
I
J
K L
M A
B
WT
N
O P
"TIRE PRESSURE" INFORMATION IN DISPLAY UNIT DOES NOT EXIST
"TIRE PRESSURE" Information in Display Unit Does Not ExistINFOID:0000000001735404
DIAGNOSTIC PROCEDURE
1.SELF-DIAGNOSTIC RESULT CHECK
Using CONSULT-III, check display contents in self-diagnostic results.
Is "CAN COMM CIRCUIT" displayed in the self-diagnosis display items?
YES >> Malfunction in CAN communication system.
NO >> GO TO 2.
2.CHECK DISPLAY UNIT
Perform display unit self-diagnosis. Refer to AV-33, "
AV CONTROL UNIT : CONSULT-III Function".
Inspection results OK?
OK >> Replace BCM. Refer to BCS-55, "Removal and Installation".
NG >> Repair or replace malfunctioning parts.
Revision: March 2010 2008 QX56
Page 3986 of 4083

WT-40
< SYMPTOM DIAGNOSIS >
ID REGISTRATION CANNOT BE COMPLETED
ID REGISTRATION CANNOT BE COMPLETED
ID Registration Cannot Be CompletedINFOID:0000000001735405
DIAGNOSTIC PROCEDURE
1.PERFORM ID REGISTRATION OF ALL TRANSMITTERS
Carry out ID registration of all transmitters. Refer to WT-6, "
ID Registration Procedure".
Can ID registration of all transmitters be completed?
YES >> Inspection End.
NO >> Refer to WT-14, "
Diagnosis Procedure".
Revision: March 2010 2008 QX56
Page 3987 of 4083

NOISE, VIBRATION AND HARSHNESS (NVH) TROUBLESHOOTINGWT-41
< SYMPTOM DIAGNOSIS >
C
DF
G H
I
J
K L
M A
B
WT
N
O P
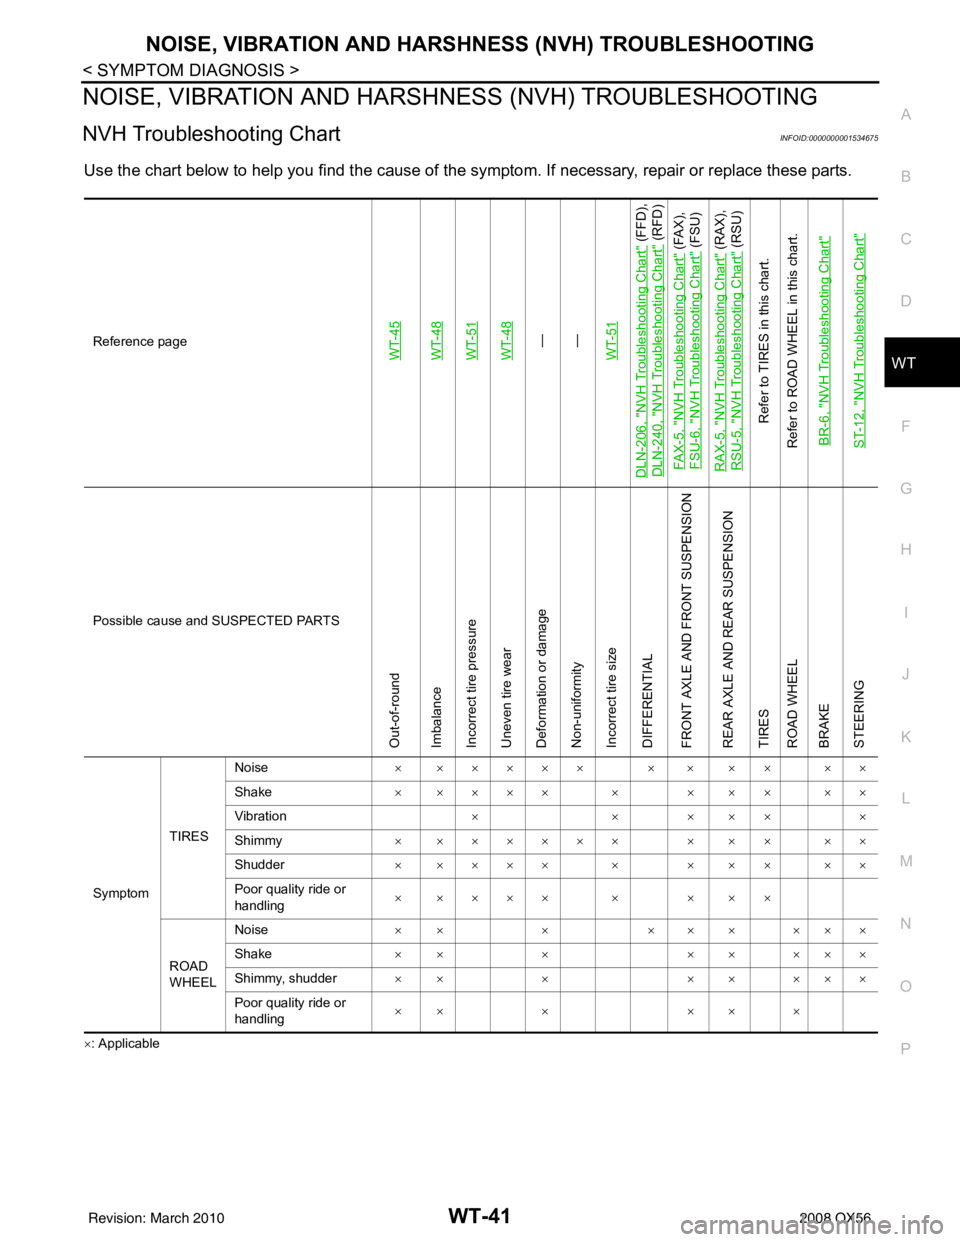
NOISE, VIBRATION AND HARSHN ESS (NVH) TROUBLESHOOTING
NVH Troubleshooting ChartINFOID:0000000001534675
Use the chart below to help you find t he cause of the symptom. If necessary, repair or replace these parts.
×: ApplicableReference page
WT-45WT-48WT-51WT-48—
—
WT-51
DLN-206, "
NVH Troubleshooting Chart
" (FFD),
DLN-240, "
NVH Troubleshooting Chart
" (RFD)
FAX-5, "
NVH Troubleshooting Chart
" (FAX),
FSU-6, "
NVH Troubleshooting Chart
" (FSU)
RAX-5, "
NVH Troubleshooting Chart
" (RAX),
RSU-5, "
NVH Troubleshooting Chart
" (RSU)
Refer to TIRES in this chart.
Refer to ROAD WHEEL in this chart.
BR-6, "
NVH Troubleshooting Chart
"
ST-12, "
NVH Troubleshooting Chart
"
Possible cause and SUSPECTED PARTS
Out-of-round
Imbalance
Incorrect tire pressure
Uneven tire wear
Deformation or damage
Non-uniformity
Incorrect tire size
DIFFERENTIAL
FRONT AXLE AND FRONT SUSPENSION
REAR AXLE AND REAR SUSPENSION
TIRES
ROAD WHEEL
BRAKE
STEERING
Symptom TIRESNoise
× ××××× × × ×× ××
Shake × ×××× × × ×× ××
Vibration ××× ×××
Shimmy × ×××××× × ×× ××
Shudder × ×××× × × ×× ××
Poor quality ride or
handling × ×××× × × ××
ROAD
WHEEL Noise
×× × ××× ×××
Shake ×× × ×× ×××
Shimmy, shudder ×× × ×× ×××
Poor quality ride or
handling ×× ×
×× ×
Revision: March 2010 2008 QX56
Page 3988 of 4083

WT-42
< PRECAUTION >
PRECAUTIONS
PRECAUTION
PRECAUTIONS
Precaution for Supplemental Restraint System (SRS) "AIR BAG" and "SEAT BELT
PRE-TENSIONER"
INFOID:0000000004884205
The Supplemental Restraint System such as “A IR BAG” and “SEAT BELT PRE-TENSIONER”, used along
with a front seat belt, helps to reduce the risk or severity of injury to the driver and front passenger for certain
types of collision. This system includes seat belt switch inputs and dual stage front air bag modules. The SRS
system uses the seat belt switches to determine the front air bag deployment, and may only deploy one front
air bag, depending on the severity of a collision and w hether the front occupants are belted or unbelted.
Information necessary to service the system safely is included in the SR and SB section of this Service Man-
ual.
WARNING:
• To avoid rendering the SRS inopera tive, which could increase the risk of personal injury or death in
the event of a collision which would result in air bag inflation, all maintenance must be performed by
an authorized NISSAN/INFINITI dealer.
• Improper maintenance, including in correct removal and installation of the SRS, can lead to personal
injury caused by unintent ional activation of the system. For re moval of Spiral Cable and Air Bag
Module, see the SR section.
• Do not use electrical test equipmen t on any circuit related to the SRS unless instructed to in this
Service Manual. SRS wiring harn esses can be identified by yellow and/or orange harnesses or har-
ness connectors.
PRECAUTIONS WHEN USING POWER TOOLS (AIR OR ELECTRIC) AND HAMMERS
WARNING:
• When working near the Airbag Diagnosis Sensor Unit or other Airbag System sensors with the Igni-
tion ON or engine running, DO NOT use air or electri c power tools or strike near the sensor(s) with a
hammer. Heavy vibration could activate the sensor( s) and deploy the air bag(s), possibly causing
serious injury.
• When using air or electric power tools or hammers , always switch the Ignition OFF, disconnect the
battery, and wait at least 3 minu tes before performing any service.
Precaution Necessary for Steering W heel Rotation After Battery Disconnect
INFOID:0000000004884204
NOTE:
• This Procedure is applied only to models with Intelligent Key system and NATS (NISSAN ANTI-THEFT SYS-
TEM).
• Remove and install all control units after disconnecting both battery cables with the ignition knob in the
″LOCK ″ position.
• Always use CONSULT-III to perform self-diagnosis as a part of each function inspection after finishing work.
If DTC is detected, perform trouble diagnosis according to self-diagnostic results.
For models equipped with the Intelligent Key system and NATS, an electrically controlled steering lock mech-
anism is adopted on the key cylinder.
For this reason, if the battery is disconnected or if the battery is discharged, the steering wheel will lock and
steering wheel rotation will become impossible.
If steering wheel rotation is required when battery pow er is interrupted, follow the procedure below before
starting the repair operation.
OPERATION PROCEDURE
1. Connect both battery cables. NOTE:
Supply power using jumper cables if battery is discharged.
2. Use the Intelligent Key or mechanical key to turn the ignition switch to the ″ACC ″ position. At this time, the
steering lock will be released.
3. Disconnect both battery cables. The steering lock will remain released and the steering wheel can be rotated.
4. Perform the necessary repair operation.
Revision: March 2010 2008 QX56
Page 3989 of 4083

PRECAUTIONSWT-43
< PRECAUTION >
C
DF
G H
I
J
K L
M A
B
WT
N
O P
5. When the repair work is completed, return the ignition switch to the ″LOCK ″ position before connecting
the battery cables. (At this time, the steering lock mechanism will engage.)
6. Perform a self-diagnosis check of al l control units using CONSULT-III.
Revision: March 2010 2008 QX56
Page 3990 of 4083

WT-44
< PREPARATION >
PREPARATION
PREPARATION
PREPARATION
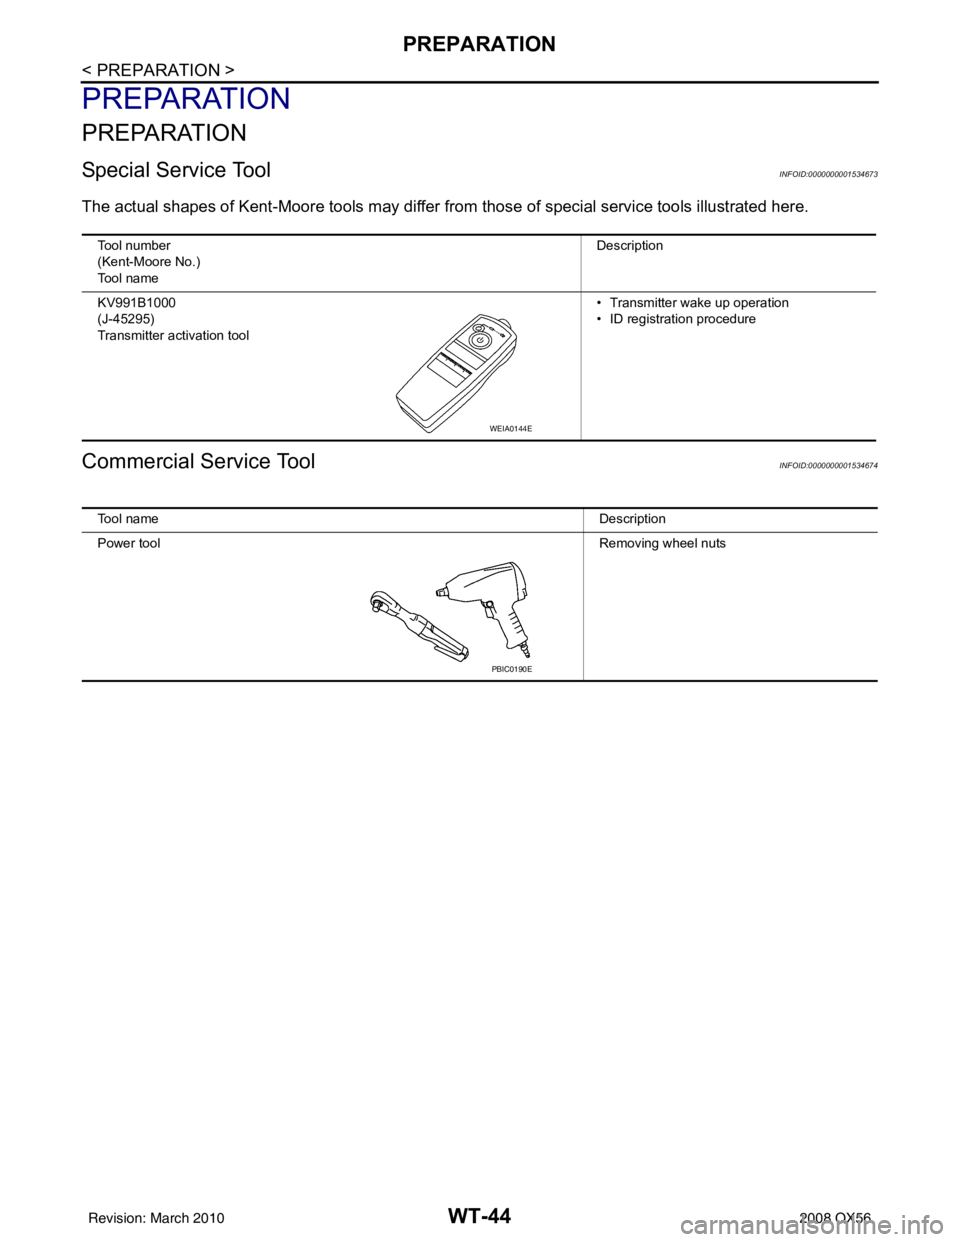
Special Service ToolINFOID:0000000001534673
The actual shapes of Kent-Moore tools may differ from those of special service tools illustrated here.
Commercial Service ToolINFOID:0000000001534674
Tool number
(Kent-Moore No.)
Tool name Description
KV991B1000
(J-45295)
Transmitter activation tool • Transmitter wake up operation
• ID registration procedure
WEIA0144E
Tool name
Description
Power tool Removing wheel nuts
PBIC0190E
Revision: March 2010 2008 QX56