battery INFINITI QX56 2008 Factory Service Manual
[x] Cancel search | Manufacturer: INFINITI, Model Year: 2008, Model line: QX56, Model: INFINITI QX56 2008Pages: 4083, PDF Size: 81.73 MB
Page 2219 of 4083

HA-14
< PREPARATION >
PREPARATION
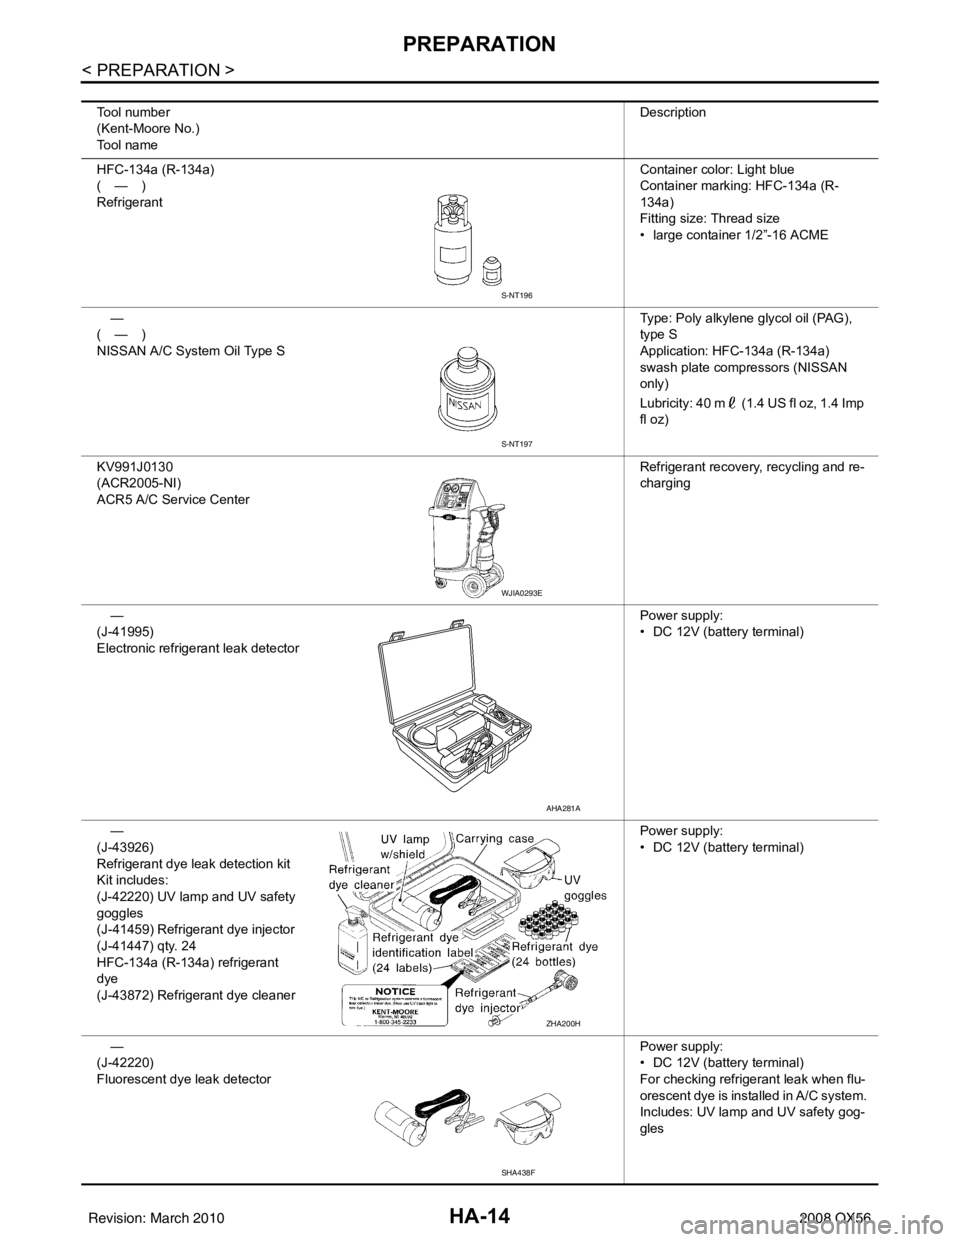
Tool number
(Kent-Moore No.)
Tool nameDescription
HFC-134a (R-134a)
(—)
Refrigerant Container color: Light blue
Container marking: HFC-134a (R-
134a)
Fitting size: Thread size
• large container 1/2”-16 ACME
—
(—)
NISSAN A/C System Oil Type S Type: Poly alkylene glycol oil (PAG),
type S
Application: HFC-134a (R-134a)
swash plate compressors (NISSAN
only)
Lubricity: 40 m (1.4 US fl oz, 1.4 Imp
fl oz)
KV991J0130
(ACR2005-NI)
ACR5 A/C Service Center Refrigerant recovery, recycling and re-
charging
—
(J-41995)
Electronic refrigerant leak detector Power supply:
• DC 12V (battery terminal)
—
(J-43926)
Refrigerant dye leak detection kit
Kit includes:
(J-42220) UV lamp and UV safety
goggles
(J-41459) Refrigerant dye injector
(J-41447) qty. 24
HFC-134a (R-134a) refrigerant
dye
(J-43872) Refrigerant dye cleaner Power supply:
• DC 12V (battery terminal)
—
(J-42220)
Fluorescent dye leak detector Power supply:
• DC 12V (battery terminal)
For checking refrigerant leak when flu-
orescent dye is installed in A/C system.
Includes: UV lamp and UV safety gog-
gles
S-NT196
S-NT197
WJIA0293E
AHA281A
ZHA200H
SHA438F
Revision: March 2010
2008 QX56
Page 2243 of 4083

HA-38
< ON-VEHICLE REPAIR >
LOW-PRESSURE PIPE
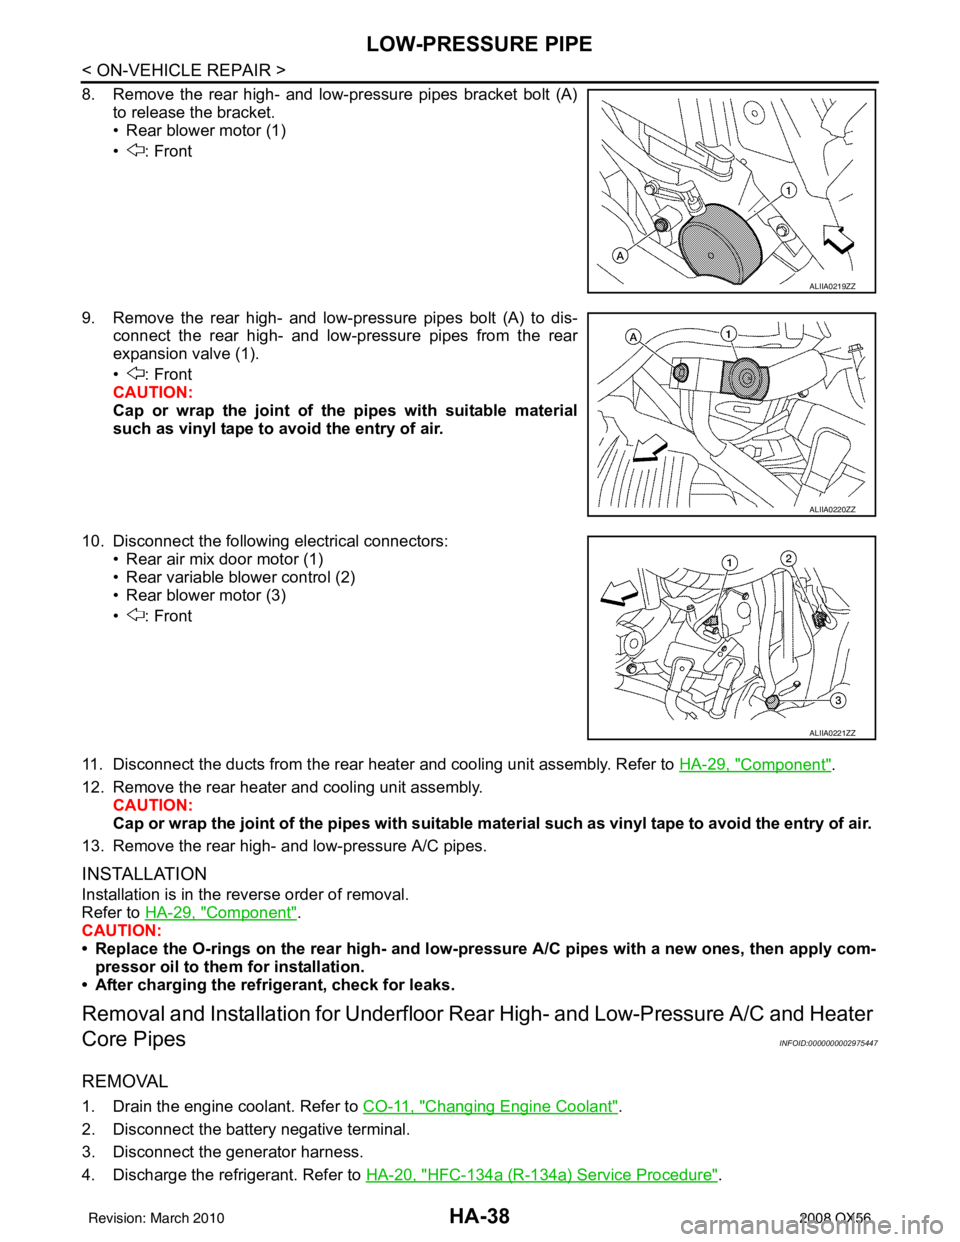
8. Remove the rear high- and low-pressure pipes bracket bolt (A)to release the bracket.
• Rear blower motor (1)
• : Front
9. Remove the rear high- and low-pressure pipes bolt (A) to dis- connect the rear high- and low-pressure pipes from the rear
expansion valve (1).
• : Front
CAUTION:
Cap or wrap the joint of the pipes with suitable material
such as vinyl tape to avoid the entry of air.
10. Disconnect the following electrical connectors: • Rear air mix door motor (1)
• Rear variable blower control (2)
• Rear blower motor (3)
• : Front
11. Disconnect the ducts from the rear heater and cooling unit assembly. Refer to HA-29, "
Component".
12. Remove the rear heater and cooling unit assembly. CAUTION:
Cap or wrap the joint of the pipes with suitable material such as viny l tape to avoid the entry of air.
13. Remove the rear high- and low-pressure A/C pipes.
INSTALLATION
Installation is in the reverse order of removal.
Refer to HA-29, "
Component".
CAUTION:
• Replace the O-rings on the rear high- and low-pr essure A/C pipes with a new ones, then apply com-
pressor oil to them for installation.
• After charging the refrigerant, check for leaks.
Removal and Installati on for Underfloor Rear High- and Low-Pressure A/C and Heater
Core Pipes
INFOID:0000000002975447
REMOVAL
1. Drain the engine coolant. Refer to CO-11, "Changing Engine Coolant".
2. Disconnect the battery negative terminal.
3. Disconnect the generator harness.
4. Discharge the refrigerant. Refer to HA-20, "
HFC-134a (R-134a) Service Procedure".
ALIIA0219ZZ
ALIIA0220ZZ
ALIIA0221ZZ
Revision: March 2010 2008 QX56
Page 2246 of 4083

HIGH-PRESSURE PIPEHA-41
< ON-VEHICLE REPAIR >
C
DE
F
G H
J
K L
M A
B
HA
N
O P
HIGH-PRESSURE PIPE
Removal and Installation for High-Pressure PipeINFOID:0000000001516657
REMOVAL
1. Remove the cowl top extension. Refer to EXT-18, "Removal and Installation".
2. Disconnect the battery negative terminal and positive battery terminal.
3. Reposition the IPDM E/R aside.
4. Remove the front right wheel and tire assembly. Refer to WT-48, "
Rotation".
5. Remove front right fender protector. Refer to EXT-23, "
Removal and Installation"
6. Position aside the front floor insulator.
7. Discharge the refrigerant. Refer to HA-20, "
HFC-134a (R-134a) Service Procedure".
8. Remove the low pressure pipe. Refer to HA-37, "
Removal and Installation for Low-Pressure Pipe".
9. Remove the high-pressure pipe. CAUTION:
Cap or wrap the joint of the pipe with suitable mate rial such as vinyl tape to avoid the entry of air.
INSTALLATION
Installation is in the reverse order of removal.
Refer to HA-29, "
Component".
CAUTION:
• Replace the O-ring of the high-pressure pipe with a new one, then apply compressor oil to it when
installing it.
• After charging refrigerant, check for leaks.
Removal and Installation for Rear High- and Low-Pressure A/C and Heater Core Pipes
INFOID:0000000002975448
REMOVAL
1. Discharge the refrigerant from the A/C system. Refer to HA-20, "HFC-134a (R-134a) Service Procedure".
2. Drain the coolant from the engine cooling system. Refer to CO-11, "
Changing Engine Coolant".
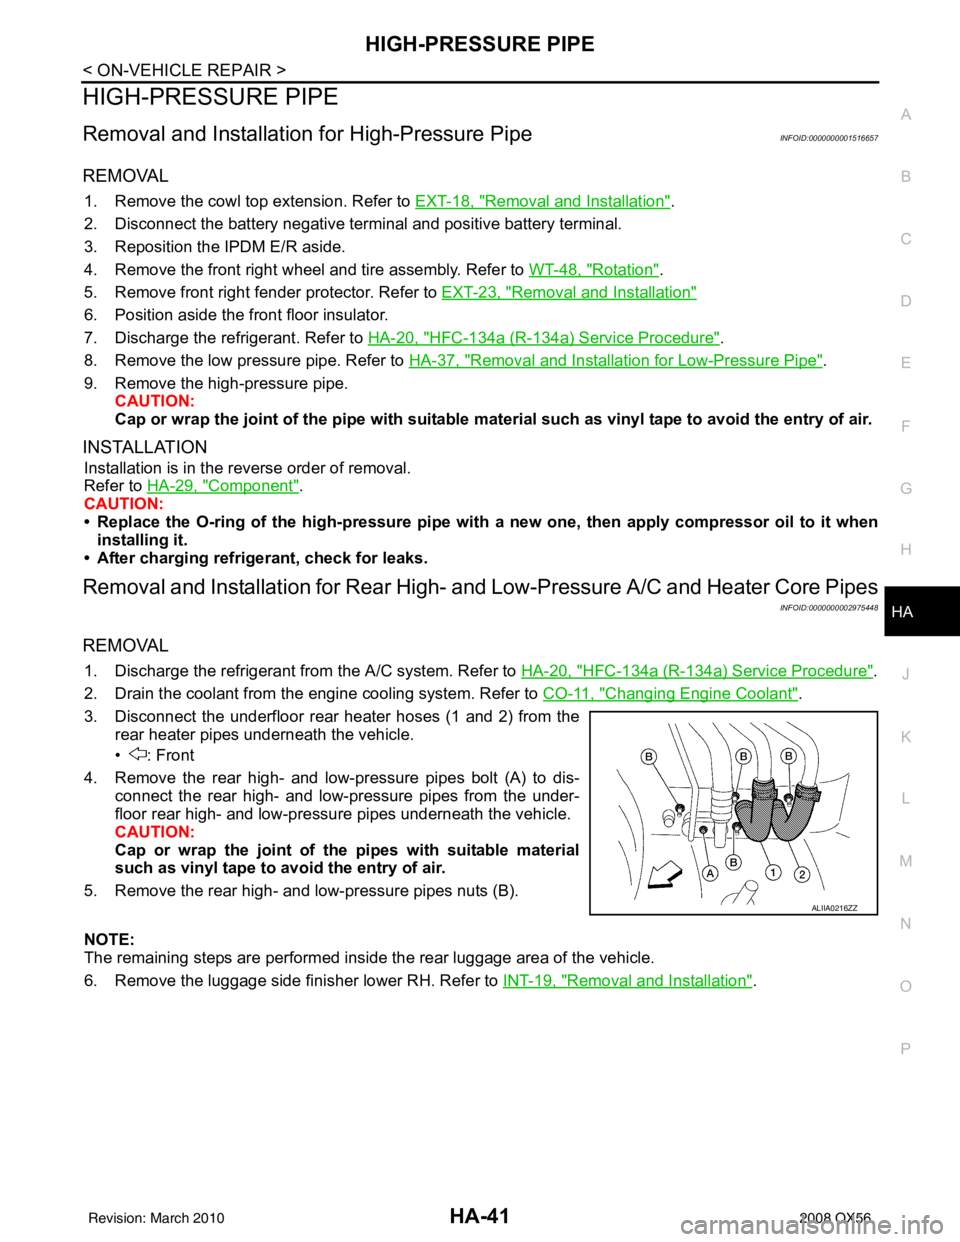
3. Disconnect the underfloor rear heater hoses (1 and 2) from the rear heater pipes underneath the vehicle.
• : Front
4. Remove the rear high- and low-pressure pipes bolt (A) to dis- connect the rear high- and low-pressure pipes from the under-
floor rear high- and low-pressure pipes underneath the vehicle.
CAUTION:
Cap or wrap the joint of the pipes with suitable material
such as vinyl tape to avo id the entry of air.
5. Remove the rear high- and low-pressure pipes nuts (B).
NOTE:
The remaining steps are performed inside the rear luggage area of the vehicle.
6. Remove the luggage side finisher lower RH. Refer to INT-19, "
Removal and Installation".
ALIIA0216ZZ
Revision: March 2010 2008 QX56
Page 2248 of 4083

HIGH-PRESSURE PIPEHA-43
< ON-VEHICLE REPAIR >
C
DE
F
G H
J
K L
M A
B
HA
N
O P
• Replace the O-rings on the rear high- and low-pr essure A/C pipes with a new ones, then apply com-
pressor oil to them for installation.
• After charging the refrigerant, check for leaks.
Removal and Installation for Underfloor Rear High- and Lo w-Pressure A/C and Heater
Core Pipes
INFOID:0000000002975449
REMOVAL
1. Drain the engine coolant. Refer to CO-11, "Changing Engine Coolant".
2. Disconnect the battery negative terminal.
3. Disconnect the generator harness.
4. Discharge the refrigerant. Refer to HA-20, "
HFC-134a (R-134a) Service Procedure".
5. Remove the front and rear bumper fascia. Refer to EXT-13, "
Removal and Installation" (front), EXT-15,
"Removal and Installation" (rear).
6. Reposition the front fender protector out of the way. Refer to EXT-23, "
Removal and Installation".
7. Disconnect the chassis harness connector.
8. Remove the spare wheel and tire.
9. Remove the tailpipe and tailpipe hanger bracket. Refer to EX-6, "
Removal and Installation".
10. Remove the seatbelt latch anchor. Refer to EX-6, "
Removal and Installation".
11. Remove the front floor heat shield.
12. Disconnect each end of the underfloor rear high- and low-pressure A/C and heater core pipes. Refer to HA-29, "
Component".
CAUTION:
Cap or wrap the joint of the pipes with suitable material such as viny l tape to avoid the entry of air.
13. Set two suitable jacks at the RH body mount points to support the vehicle body when it is separated from the RH side of the frame.
14. Remove the RH body mount bolts. Refer to BRM-2, "
Body Mounting".
15. Use the vehicle hoist to lower the RH side of the frame from the RH side of the body [approximately 305 mm (12 in)] until there is sufficient clearance to remove the underfloor rear high- and low-pressure A/C
and heater core pipes from between the body and the frame.
16. Remove the underfloor rear high- and low-pressure A/C and heater core pipes from the back of the vehi- cle.
INSTALLATION
Installation is in the reverse order of removal.
CAUTION:
• Replace the O-rings of the underfloor rear high - and low-pressure A/C and heater core pipes with
new ones, then apply compressor oil to them for installation.
• After charging refrigerant, check for leaks.
Revision: March 2010 2008 QX56
Page 2273 of 4083
![INFINITI QX56 2008 Factory Service Manual HAC-20
< FUNCTION DIAGNOSIS >[AUTOMATIC AIR CONDITIONER]
DIAGNOSIS SYSTEM (HVAC)
DIAGNOSIS SYSTEM (HVAC)
CONSULT-III Function (HVAC)INFOID:0000000001679777
CONSULT-III can display each diagnostic item INFINITI QX56 2008 Factory Service Manual HAC-20
< FUNCTION DIAGNOSIS >[AUTOMATIC AIR CONDITIONER]
DIAGNOSIS SYSTEM (HVAC)
DIAGNOSIS SYSTEM (HVAC)
CONSULT-III Function (HVAC)INFOID:0000000001679777
CONSULT-III can display each diagnostic item](/img/42/57030/w960_57030-2272.png)
HAC-20
< FUNCTION DIAGNOSIS >[AUTOMATIC AIR CONDITIONER]
DIAGNOSIS SYSTEM (HVAC)
DIAGNOSIS SYSTEM (HVAC)
CONSULT-III Function (HVAC)INFOID:0000000001679777
CONSULT-III can display each diagnostic item using the diagnostic test modes shown following.
SELF-DIAGNOSIS
Display Item List
DATA MONITOR
Display Item List
Diagnostic mode
Description
SELF-DIAG RESULTS Displays A/C au to amp. self-diagnosis results.
DATA MONITOR Displays A/C auto amp. input/output data in real time.
CAN DIAG SUPPORT MNTR The result of transmit/receive diagnosis of CAN communication can be read. ECU PART NUMBER A/C auto amp. part number can be read.
DTC Description
Reference page
B2573 Battery voltage out of range CHG-10, "
Inspection Procedure"
B2578 In-vehicle sensor circuit out of range (low)
HAC-81, "In-Vehicle Sensor Diagnosis Procedure"B2579 In-vehicle sensor circuit out of range (high)
B257B Ambient sensor circuit short HAC-78, "
Ambient Sensor Diagnosis Procedure"B257C Ambient sensor circuit open
B257F Optical sensor (Driver) circuit open or short HAC-84, "
Optical Sensor Diagnosis Procedure".
B2580 Optical sensor (Passenger) circuit open or short
B2581 Intake sensor circuit short HAC-86, "
Intake Sensor Diagnosis Procedure"B2582 Intake sensor circuit open
U1000 CAN bus fault LAN-14, "
Trouble Diagnosis Flow Chart"
Monitor itemValue Contents
BATT VIA CAN "V" Displays battery voltage signal.
IGN VIA CAN "ON/OFF" Displays ignition switch signal.
DVR SUNLD SEN "w/m2" Displays optical sensor (driver) signal.
PAS SUNLD SEN "w/m2" Displays optical sensor (passenger) signal.
AMB TEMP SEN "° C" Displays ambient sensor signal.
EVAP TEMP SEN "° C" Displays intake sensor signal.
INCAR TMP SEN "° C" Displays in-vehicle sensor signal.
RR TEMPSET FR "V" Displays air mix door (front) set point signal.
RR TEMPSET RR "V" Displays air mix door (rear) set point signal.
MODE FDBCK "V" Displays mode door motor feedback signal.
DVR MIX FDBCK "V" Displays air mix door motor (driver) feedback signal.
PAS MIX FDBCK "V" Displays air mix door motor (passenger) feedback signal.
RR FDBCK "V" Displays air mix door motor (rear) feedback signal.
DEF FDBCK "V" Displays defroster door motor feedback signal.
Revision: March 2010 2008 QX56
Page 2275 of 4083
![INFINITI QX56 2008 Factory Service Manual HAC-22
< FUNCTION DIAGNOSIS >[AUTOMATIC AIR CONDITIONER]
SELF-DIAGNOSIS FUNCTION
SELF-DIAGNOSIS FUNCTION
A/C Auto Amp. Self-DiagnosisINFOID:0000000001679779
A/C SYSTEM SELF-DIAGNOSIS FUNCTION
The self INFINITI QX56 2008 Factory Service Manual HAC-22
< FUNCTION DIAGNOSIS >[AUTOMATIC AIR CONDITIONER]
SELF-DIAGNOSIS FUNCTION
SELF-DIAGNOSIS FUNCTION
A/C Auto Amp. Self-DiagnosisINFOID:0000000001679779
A/C SYSTEM SELF-DIAGNOSIS FUNCTION
The self](/img/42/57030/w960_57030-2274.png)
HAC-22
< FUNCTION DIAGNOSIS >[AUTOMATIC AIR CONDITIONER]
SELF-DIAGNOSIS FUNCTION
SELF-DIAGNOSIS FUNCTION
A/C Auto Amp. Self-DiagnosisINFOID:0000000001679779
A/C SYSTEM SELF-DIAGNOSIS FUNCTION
The self-diagnosis function is built into the A/C aut
o amp. to quickly locate the cause of malfunctions.
DESCRIPTION
The self-diagnostic system diagnoses sensors, CAN sys tem, and battery voltage on A/C auto amp. Refer to
applicable sections (items) for details. Fault codes (if any are present) will be displayed in the ambient temper-
ature display area. Refer to HAC-23, "
A/C System Self-Diagnosis Code Chart".
SELF-DIAGNOSTIC MODE
NOTE:
Radio must be off.
1. On the A/C and AV switch asse mbly, press the "SETTING" but-
ton and twist the volume knob clockwise and counterclockwise
until the Self-Diagnosis screen shows on the display.
2. Scroll down to "Confirmation/Adjustment" and press the "ENTER" button.
3. Scroll down to "Climate Control" and press the "ENTER" button.
4. The fan bars will flash on the display during the self-test, and then the fault codes will display in the ambient temperature area.
They will continue scrolling until diagnostic mode is exited.
5. Exit by pressing the "BACK" button on A/C and AV switch assembly until display returns to its normal operation screen.
HVAC system will be OFF.
The self-diagnostic system diagnoses sensors, CAN sys tem, and battery voltage on A/C auto amp. Refer to
applicable sections (items) for details. Fault codes (if any are present) will be displayed in the ambient temper-
ature display area. Refer to HAC-23, "
A/C System Self-Diagnosis Code Chart".
A/C and AV Switch Asse mbly Self-DiagnosisINFOID:0000000001679780
A/C and AV switch assembly self-diagnosis function
The ON/OFF operation (continuity) of each switch in the A/C and AV switch assembly can be checked.
Self-diagnosis mode
AWNIA0098ZZ
AWIIA0081ZZ
Revision: March 2010 2008 QX56
Page 2276 of 4083
![INFINITI QX56 2008 Factory Service Manual SELF-DIAGNOSIS FUNCTIONHAC-23
< FUNCTION DIAGNOSIS > [AUTOMATIC AIR CONDITIONER]
C
D
E
F
G H
J
K L
M A
B
HAC
N
O P
• Press the “BACK” switch and the “UP” switch within 10 seconds after turni INFINITI QX56 2008 Factory Service Manual SELF-DIAGNOSIS FUNCTIONHAC-23
< FUNCTION DIAGNOSIS > [AUTOMATIC AIR CONDITIONER]
C
D
E
F
G H
J
K L
M A
B
HAC
N
O P
• Press the “BACK” switch and the “UP” switch within 10 seconds after turni](/img/42/57030/w960_57030-2275.png)
SELF-DIAGNOSIS FUNCTIONHAC-23
< FUNCTION DIAGNOSIS > [AUTOMATIC AIR CONDITIONER]
C
D
E
F
G H
J
K L
M A
B
HAC
N
O P
• Press the “BACK” switch and the “UP” switch within 10 seconds after turning the ignition switch from OFF to ACC and hold them for
3 seconds or more. Then the buzzer sounds, all indicators of the
preset switch illuminate, and the self-diagnosis mode starts.
• The continuity of each switch and control dials (A/C and AV switch assembly only) at the ON position can be checked by pressing
each switch and turning each control dial. The buzzer sounds and
LED’s will illuminate if the switch is normal.
Finishing self-diagnosis mode
Self-diagnosis mode is canceled when turning the ignition switch OFF.
A/C System Self-Diagnosis Code ChartINFOID:0000000001679781
SELF-DIAGNOSTIC CODE CHART
AWIIA0171GB
Code No. Reference page
03 Battery voltage out of range CHG-11, "
Inspection Procedure"
30 In-vehicle sensor circuit out of range (low)
HAC-81, "In-Vehicle Sensor Diagnosis Procedure"31 In-vehicle sensor circuit out of range (high)
40 Ambient sensor circuit shortHAC-78, "
Ambient Sensor Diagnosis Procedure"41 Ambient sensor circuit open
50 Optical sensor (Driver) circuit open or shortHAC-84, "
Optical Sensor Diagnosis Procedure"52 Optical sensor (Passenger) circuit open or short
56 Intake sensor circuit shortHAC-86, "
Intake Sensor Diagnosis Procedure"57 Intake sensor circuit open
80 CAN bus faultLAN-14, "
Trouble Diagnosis Flow Chart"
Revision: March 2010 2008 QX56
Page 2279 of 4083
![INFINITI QX56 2008 Factory Service Manual HAC-26
< COMPONENT DIAGNOSIS >[AUTOMATIC AIR CONDITIONER]
MODE DOOR MOTOR
7.CHECK THE MODE DOOR MO
TOR (FRONT) PBR CIRCUIT
Perform diagnostic procedure for the mode door motor (front). Refer to HAC- INFINITI QX56 2008 Factory Service Manual HAC-26
< COMPONENT DIAGNOSIS >[AUTOMATIC AIR CONDITIONER]
MODE DOOR MOTOR
7.CHECK THE MODE DOOR MO
TOR (FRONT) PBR CIRCUIT
Perform diagnostic procedure for the mode door motor (front). Refer to HAC-](/img/42/57030/w960_57030-2278.png)
HAC-26
< COMPONENT DIAGNOSIS >[AUTOMATIC AIR CONDITIONER]
MODE DOOR MOTOR
7.CHECK THE MODE DOOR MO
TOR (FRONT) PBR CIRCUIT
Perform diagnostic procedure for the mode door motor (front). Refer to HAC-25, "
Mode Door Motor (Front)
Component Function Check".
Is the inspection result normal?
YES >> GO TO 8.
NO >> Repair PBR circuit or replace motor. Refer to HAC-26, "
Mode Door Motor (Front) Diagnosis Pro-
cedure".
8.RECHECK FOR CODES
Perform A/C auto amp. self-diagnosis. Refer to HAC-22, "
A/C Auto Amp. Self-Diagnosis".
Are any self-diagnostic codes present?
YES >> Refer to HAC-23, "A/C System Self-Diagnosis Code Chart".
NO >> GO TO 9.
9.RECHECK FOR SYMPTOMS
Perform a complete operational check and check for any symptoms. Refer to HAC-4, "
Operational Check
(Front)".
Does another symptom exist?
YES >> Repair as necessary.
NO >> Replace A/C auto amp. Refer to VTL-7, "
Removal and Installation".
Mode Door Motor (Front) Diagnosis ProcedureINFOID:0000000001679784
SYMPTOM:
• Air outlet does not change.
• Mode door motor does not operate normally.
1.CHECK A/C AUTO AMP. FOR POWER AND GROUND
1. Turn ignition switch ON.
2. Press the mode switch to the B/L ( ) mode.
3. Check voltage between A/C auto amp. harness connector M49 terminal 19 and terminal 20 while pressing the mode switch to
the floor ( ) mode.
Is the inspection result normal?
YES >> GO TO 3.
NO >> GO TO 2.
2.CHECK MODE DOOR MOTOR CIRCUITS FOR SHORT TO GROUND
1. Turn ignition switch OFF.
2. Disconnect the A/C auto amp. harness connector.
3. Check continuity between A/C auto amp. harness connector M49 terminal 19, 20 and ground.
Is the inspection result normal?
YES >> Replace A/C auto amp. Refer to VTL-7, "Removal and
Installation".
Connector Te r m i n a l s
Condition Voltage
(Approx.)
(+) (-)
A/C auto amp.: M49 20
19Press
mode
switch Battery
voltage
AWIIA0095ZZ
19 - Ground : Continuity should not exist.
20 - Ground : Continuity should not exist.
AWIIA0096ZZ
Revision: March 2010 2008 QX56
Page 2280 of 4083
![INFINITI QX56 2008 Factory Service Manual MODE DOOR MOTORHAC-27
< COMPONENT DIAGNOSIS > [AUTOMATIC AIR CONDITIONER]
C
D
E
F
G H
J
K L
M A
B
HAC
N
O P
NO >> Repair or replace harness as necessary.
3.CHECK A/C AUTO AMP. FOR GROUND AND POWER
1. INFINITI QX56 2008 Factory Service Manual MODE DOOR MOTORHAC-27
< COMPONENT DIAGNOSIS > [AUTOMATIC AIR CONDITIONER]
C
D
E
F
G H
J
K L
M A
B
HAC
N
O P
NO >> Repair or replace harness as necessary.
3.CHECK A/C AUTO AMP. FOR GROUND AND POWER
1.](/img/42/57030/w960_57030-2279.png)
MODE DOOR MOTORHAC-27
< COMPONENT DIAGNOSIS > [AUTOMATIC AIR CONDITIONER]
C
D
E
F
G H
J
K L
M A
B
HAC
N
O P
NO >> Repair or replace harness as necessary.
3.CHECK A/C AUTO AMP. FOR GROUND AND POWER
1. Press the mode switch to the D/F ( ) mode.
2. Check voltage between A/C auto amp. harness connector M49 terminal 19 and terminal 20 while pressing the mode switch to
the vent ( ) mode.
Is the inspection result normal?
YES >> GO TO 4.
NO >> Replace A/C auto amp. Refer to VTL-7, "
Removal and Installation".
4.CHECK MODE DOOR MOTOR AND CIRCUITS FOR OPEN
1. Turn ignition switch OFF.
2. Disconnect the A/C auto amp. harness connector.
3. Check continuity between A/C auto amp. harness connector M49 terminal 19 and terminal 20.
Is the inspection result normal?
YES >> GO TO 6.
NO >> GO TO 5.
5.CHECK MODE DOOR MOTOR CIRCUITS FOR OPEN
1. Disconnect the mode door motor harness connector.
2. Check continuity between A/C auto amp. harness connector M49 (A) terminal 19, 20 and the mode door motor harness con-
nector M142 (B) terminal 5, 6.
Is the inspection result normal?
YES >> Replace mode door motor. Refer to VTL-24, "Removal
and Installation".
NO >> Repair or replace harness as necessary.
6.CHECK A/C AUTO AMP. FOR PBR POWER AND GROUND
1. Reconnect A/C auto amp. harness connector.
2. Turn ignition switch ON.
3. Check voltage between A/C auto amp. harness connector M50 (A) terminal 28 and M49 (B) terminal 3.
Is the inspection result normal?
YES >> GO TO 8.
NO >> GO TO 7.
Connector Te r m i n a l s
Condition Voltage
(Approx.)
(+) (-)
A/C auto amp.: M49 19 20 Press
mode
switch Battery
voltage
AWIIA0097ZZ
Continuity should exist.
AWIIA0098ZZ
5 - 19 : Continuity should exist.
6 - 20 : Continuity should exist.
AWIIA0094ZZ
Connector Te r m i n a l s
Voltage (Ap-
prox.)
(+) (-)
A/C auto amp.: M49, M50 28 35V
AWIIA0099ZZ
Revision: March 2010 2008 QX56
Page 2286 of 4083
![INFINITI QX56 2008 Factory Service Manual AIR MIX DOOR MOTORHAC-33
< COMPONENT DIAGNOSIS > [AUTOMATIC AIR CONDITIONER]
C
D
E
F
G H
J
K L
M A
B
HAC
N
O P
1. Turn ignition switch ON.
2. Rotate temperature control dial (driver) to 32 °C (90 °F INFINITI QX56 2008 Factory Service Manual AIR MIX DOOR MOTORHAC-33
< COMPONENT DIAGNOSIS > [AUTOMATIC AIR CONDITIONER]
C
D
E
F
G H
J
K L
M A
B
HAC
N
O P
1. Turn ignition switch ON.
2. Rotate temperature control dial (driver) to 32 °C (90 °F](/img/42/57030/w960_57030-2285.png)
AIR MIX DOOR MOTORHAC-33
< COMPONENT DIAGNOSIS > [AUTOMATIC AIR CONDITIONER]
C
D
E
F
G H
J
K L
M A
B
HAC
N
O P
1. Turn ignition switch ON.
2. Rotate temperature control dial (driver) to 32 °C (90 °F).
3. Check voltage between A/C auto amp. harness connector M49
terminal 17 and terminal 18 while rotating temperature control
dial (driver) to 18 °C (60° F).
Is the inspection result normal?
YES >> GO TO 3.
NO >> GO TO 2.
2.CHECK AIR MIX DOOR MOTOR (DRIVER) CIRCUITS FOR SHORT TO GROUND
1. Turn ignition switch OFF.
2. Disconnect the A/C auto amp. harness connector.
3. Check continuity between A/C auto amp. harness connector M49 terminal 17, 18 and ground.
Is the inspection result normal?
YES >> Replace A/C auto amp. Refer to VTL-7, "Removal and
Installation".
NO >> Repair or replace harness as necessary.
3.CHECK A/C AUTO AMP. FOR POWER AND GROUND
1. Turn ignition switch ON.
2. Rotate temperature control dial (driver) to 32 °C (90 °F).
3. Check voltage between A/C auto amp. harness connector M49
terminal 17 and terminal 18 while rotating temperature control
dial (driver) to 18 °C (60° F).
Is the inspection result normal?
YES >> GO TO 4.
NO >> Replace A/C auto amp. Refer to VTL-7, "
Removal and Installation".
4.CHECK AIR MIX DOOR MOTOR (DRIVER) CIRCUITS FOR OPEN
1. Turn ignition switch OFF.
2. Disconnect the A/C auto amp. harness connector.
3. Check continuity between A/C auto amp. harness connector M49 terminal 17 and terminal 18.
Is the inspection result normal?
YES >> GO TO 6.
NO >> GO TO 5.
5.CHECK AIR MIX DOOR MOTOR (DRIVER) CIRCUITS FOR OPEN
Connector Te r m i n a l s
Condition Voltage
(Approx.)
(+) (-)
A/C auto amp.: M49 17 18 Rotate temp
control dial Battery
voltage
AWIIA0112ZZ
17 - Ground : Continuity should not exist.
18 - Ground : Continuity should not exist.
AWIIA0114ZZ
Connector Te r m i n a l s
Condition Voltage
(Approx.)
(+) (-)
A/C auto amp.: M49 18 17
Rotate temp
control dial Battery
voltage
AWIIA0115ZZ
Continuity should exist.
AWIIA0116ZZ
Revision: March 2010 2008 QX56