drain bolt INFINITI QX56 2008 Factory Service Manual
[x] Cancel search | Manufacturer: INFINITI, Model Year: 2008, Model line: QX56, Model: INFINITI QX56 2008Pages: 4083, PDF Size: 81.73 MB
Page 433 of 4083

BRAKE TUBE AND HOSEBR-13
< BASIC INSPECTION >
C
DE
G H
I
J
K L
M A
B
BR
N
O P
BRAKE TUBE AND HOSE
Hydraulic CircuitINFOID:0000000004894489
CAUTION:
• All hoses and piping (tubes) must be fr ee from excessive bending, twisting and pulling.
• Make sure there is no interference with other parts when turning the steering wheel both clockwise
and counterclockwise.
• The brake piping is an important safety part. If a brake fluid leak is detected, always disassemble the
parts. Replace applicable part with a new one, if necessary.
• Be careful not to splash brake fluid on painted areas; it may cause paint damage. If brake fluid is
splashed on painted areas, wash it away with water immediately.
• Do not bend or twist brake hose sharply, or strongly pull it.
• When removing components, cover connections so that no dirt, dust, or other foreign matter gets in.
• Refill with new specified brake fluid. Refer to MA-12, "
Fluids and Lubricants".
• Do not reuse drained brake fluid.
FRONT BRAKE
FRONT BRAKE : InspectionINFOID:0000000004894490
INSPECTION AFTER REMOVAL
CAUTION:
Brake tubes and hoses are important safety parts. Always disassemble the parts and retighten their fit-
tings, if a brake fluid leak is det ected. Replace applicable part with a new one, if damaged part is
detected.
1. Actuator 2. Master cylinder3. Brake booster
4. Connector A. Union bolt
18.2 N·m (1.9 kg-m, 13 ft-lb) B. Flare nut M12
18.2 N·m (1.9 kg-m, 13 ft-lb)
C. Flare nut M10 13.0 N·m (1.3 kg-m, 10 ft-lb)
AWFIA0411ZZ
Revision: March 2010 2008 QX56
Page 441 of 4083

BRAKE TUBE AND HOSEBR-21
< ON-VEHICLE REPAIR >
C
DE
G H
I
J
K L
M A
B
BR
N
O P
BRAKE TUBE AND HOSE
Hydraulic CircuitINFOID:0000000004894506
CAUTION:
• All hoses and piping (tubes) must be fr ee from excessive bending, twisting and pulling.
• Make sure there is no interference with other parts when turning the steering wheel both clockwise
and counterclockwise.
• The brake piping is an important safety part. If a brake fluid leak is detected, always disassemble the
parts. Replace applicable part with a new one, if necessary.
• Be careful not to splash brake fluid on painted areas; it may cause paint damage. If brake fluid is
splashed on painted areas, wash it away with water immediately.
• Do not bend or twist brake hose sharply, or strongly pull it.
• When removing components, cover connections so that no dirt, dust, or other foreign matter gets in.
• Refill with new specified brake fluid. Refer to MA-12, "
Fluids and Lubricants".
• Do not reuse drained brake fluid.
Removal and Installation of Fr ont Brake Piping and Brake HoseINFOID:0000000004894507
REMOVAL
1. Remove front wheel and tire using power tools.
2. Remove brake reservoir cap.
1. Actuator 2. Master cylinder3. Brake booster
4. Connector A. Union bolt
18.2 N·m (1.9 kg-m, 13 ft-lb) B. Flare nut M12
18.2 N·m (1.9 kg-m, 13 ft-lb)
C. Flare nut M10 13.0 N·m (1.3 kg-m, 10 ft-lb)
AWFIA0411ZZ
Revision: March 2010 2008 QX56
Page 442 of 4083

BR-22
< ON-VEHICLE REPAIR >
BRAKE TUBE AND HOSE
3. Remove brake tube from brake hose, using a suitable tool.
4. Remove lock plate and brake hose from bracket.
5. Remove union bolt and then remove brake hose from cylinderbody.
INSTALLATION
1. Install brake hose by aligning with the protrusion on cylinderbody, then install the union bolt and new copper washers and
tighten to specification. Refer to BR-13, "
Hydraulic Circuit".
CAUTION:
Do not reuse copper washer.
2. Insert brake hose end through bracket, then secure it to bracket with lock plate.
3. Install brake tube to brake hose, then tighten the flare nut using a suitable tool. Refer to BR-13, "
Hydraulic Circuit".
4. Refill brake fluid and bleed air. Refer to BR-17, "
Drain and Refill".
5. Install the front wheel and tire. Refer to WT-48, "
Rotation".
Removal and Installation of Rear Brake Piping and Brake HoseINFOID:0000000004894508
REMOVAL
1. Remove rear wheel and tire using power tools.
2. Remove brake reservoir cap.
LFIA0213E
LFIA0214E
SFIA1137E
LFIA0213E
Revision: March 2010 2008 QX56
Page 449 of 4083

FRONT DISC BRAKEBR-29
< ON-VEHICLE REPAIR >
C
DE
G H
I
J
K L
M A
B
BR
N
O P
FRONT DISC BRAKE
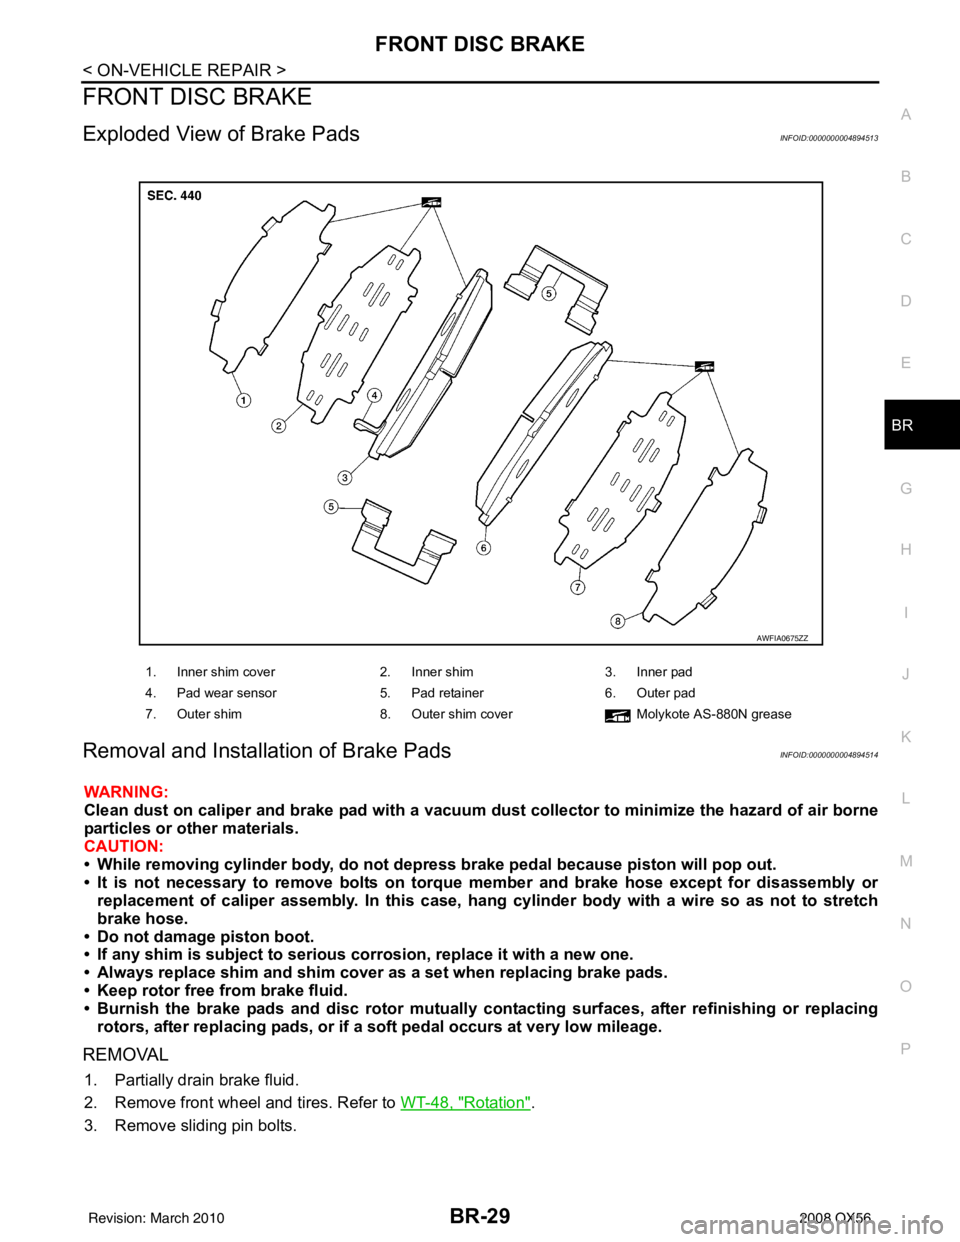
Exploded View of Brake PadsINFOID:0000000004894513
Removal and Installation of Brake PadsINFOID:0000000004894514
WARNING:
Clean dust on caliper and brake pad with a vacuum dust collector to minimize the hazard of air borne
particles or other materials.
CAUTION:
• While removing cylinder bod y, do not depress brake pedal because piston will pop out.
• It is not necessary to remove bolts on torque member and brake hose except for disassembly or replacement of caliper assembly. In this case, hang cylinder body with a wire so as not to stretch
brake hose.
• Do not damage piston boot.
• If any shim is subject to serious corrosion, replace it with a new one.
• Always replace shim and shim cover as a set when replacing brake pads.
• Keep rotor free from brake fluid.
• Burnish the brake pads and disc rotor mutually contacting surfaces, after refinishing or replacing rotors, after replacing pads, or if a so ft pedal occurs at very low mileage.
REMOVAL
1. Partially drain brake fluid.
2. Remove front wheel and tires. Refer to WT-48, "
Rotation".
3. Remove sliding pin bolts.
1. Inner shim cover 2. Inner shim3. Inner pad
4. Pad wear sensor 5. Pad retainer6. Outer pad
7. Outer shim 8. Outer shim cover Molykote AS-880N grease
AWFIA0675ZZ
Revision: March 2010 2008 QX56
Page 451 of 4083

FRONT DISC BRAKEBR-31
< ON-VEHICLE REPAIR >
C
DE
G H
I
J
K L
M A
B
BR
N
O P
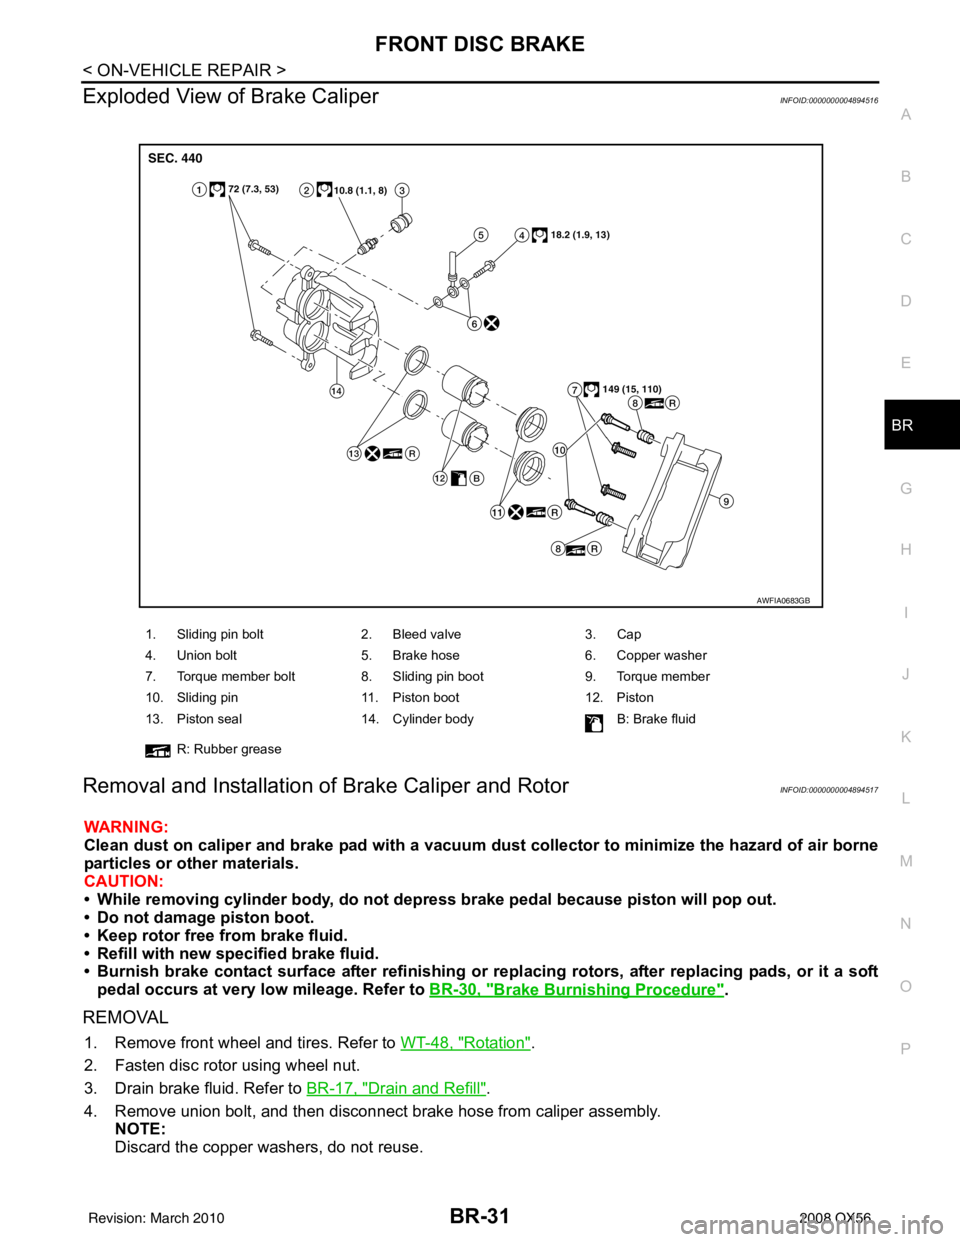
Exploded View of Brake CaliperINFOID:0000000004894516
Removal and Installation of Brake Caliper and RotorINFOID:0000000004894517
WARNING:
Clean dust on caliper and brake pad with a vacuum dust collector to minimize the hazard of air borne
particles or other materials.
CAUTION:
• While removing cylinder bod y, do not depress brake pedal because piston will pop out.
• Do not damage piston boot.
• Keep rotor free from brake fluid.
• Refill with new specified brake fluid.
• Burnish brake contact surface after refinishing or replacing rotors, after replacing pads, or it a soft
pedal occurs at very low mileage. Refer to BR-30, "
Brake Burnishing Procedure".
REMOVAL
1. Remove front wheel and tires. Refer to WT-48, "Rotation".
2. Fasten disc rotor using wheel nut.
3. Drain brake fluid. Refer to BR-17, "
Drain and Refill".
4. Remove union bolt, and then disconnect brake hose from caliper assembly. NOTE:
Discard the copper washers, do not reuse.
1. Sliding pin bolt 2. Bleed valve 3. Cap
4. Union bolt 5. Brake hose 6. Copper washer
7. Torque member bolt 8. Sliding pin boot 9. Torque member
10. Sliding pin 11. Piston boot 12. Piston
13. Piston seal 14. Cylinder body B: Brake fluid
R: Rubber grease
AWFIA0683GB
Revision: March 2010 2008 QX56
Page 454 of 4083

BR-34
< ON-VEHICLE REPAIR >
REAR DISC BRAKE
REAR DISC BRAKE
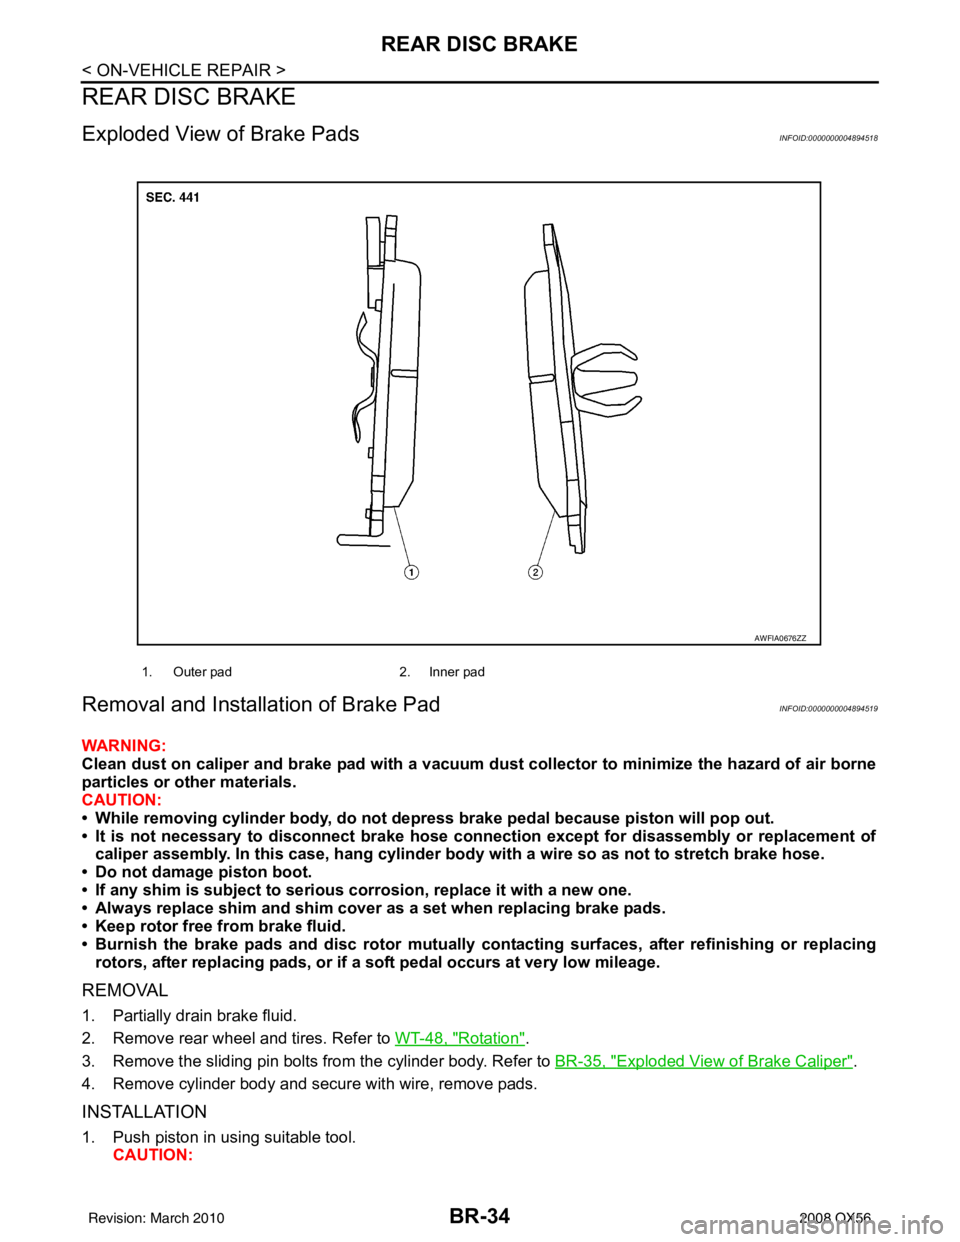
Exploded View of Brake PadsINFOID:0000000004894518
Removal and Installation of Brake PadINFOID:0000000004894519
WARNING:
Clean dust on caliper and brake pad with a vacuum dust collector to minimize the hazard of air borne
particles or other materials.
CAUTION:
• While removing cylinder body, do not depress brake pedal because piston will pop out.
• It is not necessary to disconnect brake hose connection except for disassembly or replacement of caliper assembly. In this case, ha ng cylinder body with a wire so as not to stretch brake hose.
• Do not damage piston boot.
• If any shim is subject to serious corrosion, replace it with a new one.
• Always replace shim and shim cover as a set when replacing brake pads.
• Keep rotor free from brake fluid.
• Burnish the brake pads and disc rotor mutually contacting surfaces, after refinishing or replacing
rotors, after replacing pads, or if a soft pedal occurs at very low mileage.
REMOVAL
1. Partially drain brake fluid.
2. Remove rear wheel and tires. Refer to WT-48, "
Rotation".
3. Remove the sliding pin bolts from the cylinder body. Refer to BR-35, "
Exploded View of Brake Caliper".
4. Remove cylinder body and secure with wire, remove pads.
INSTALLATION
1. Push piston in using suitable tool. CAUTION:
1. Outer pad 2. Inner pad
AWFIA0676ZZ
Revision: March 2010 2008 QX56
Page 456 of 4083

BR-36
< ON-VEHICLE REPAIR >
REAR DISC BRAKE
Removal and Installation of Brake Caliper and Disc Rotor
INFOID:0000000004894522
WARNING:
Clean dust on caliper and brake pad with a vacuum dust collector to minimize the hazard of air borne
particles or other materials.
CAUTION:
• While removing cylinder body, do not depress brake pedal because piston will pop out.
• Do not damage piston boot.
• Keep rotor free from brake fluid.
• Refill with new specified brake fluid.
• Burnish brake contact surface after refinishing or re placing rotors, after replacing pads, or it a soft
pedal occurs at very low mileage. Refer to BR-35, "
Brake Burnishing Procedure".
REMOVAL
1. Remove rear wheel and tires. Refer to WT-48, "Rotation".
2. Fasten disc rotor using wheel nut.
3. Drain brake fluid as necessary. Refer to BR-17, "
Drain and Refill".
4. Remove union bolt and cylinder body bolts, then remove cylin- der body.
NOTE:
Discard the copper washers, do not reuse.
5. Apply matching marks to disc rotor and wheel hub assembly if the disc rotor is to be reused, then remove disc rotor.
CAUTION:
Put matching marks on wheel hub assembly and disc rotor
if the disc rotor is to be reused.
INSTALLATION
1. If reusing the disc rotor, use the matching marks to align disc rotor on the wheel hub assembly, then install
disc rotor using a wheel nut to hold it in place.
CAUTION:
Use matching marks on wheel hub assembly and di sc rotor if the disc rotor is to be reused.
2. Install cylinder body and tighten cylinder body bolts to specification. CAUTION:
Before installing cylinder body to the vehic le, wipe off mating surface of cylinder body.
3. Install brake hose to cylinder body with new copper washers and tighten union bolt to specification.
CAUTION:
• Do not reuse copper washers.
• Securely attach brake hose to projection on cylinderbody.
4. Refill with new brake fluid and bleed. Refer to BR-17, "
Bleeding
Brake System".
5. Check rear disc brake for drag and correct as necessary.
6. Install rear wheel and tires. Refer to WT-48, "
Rotation".
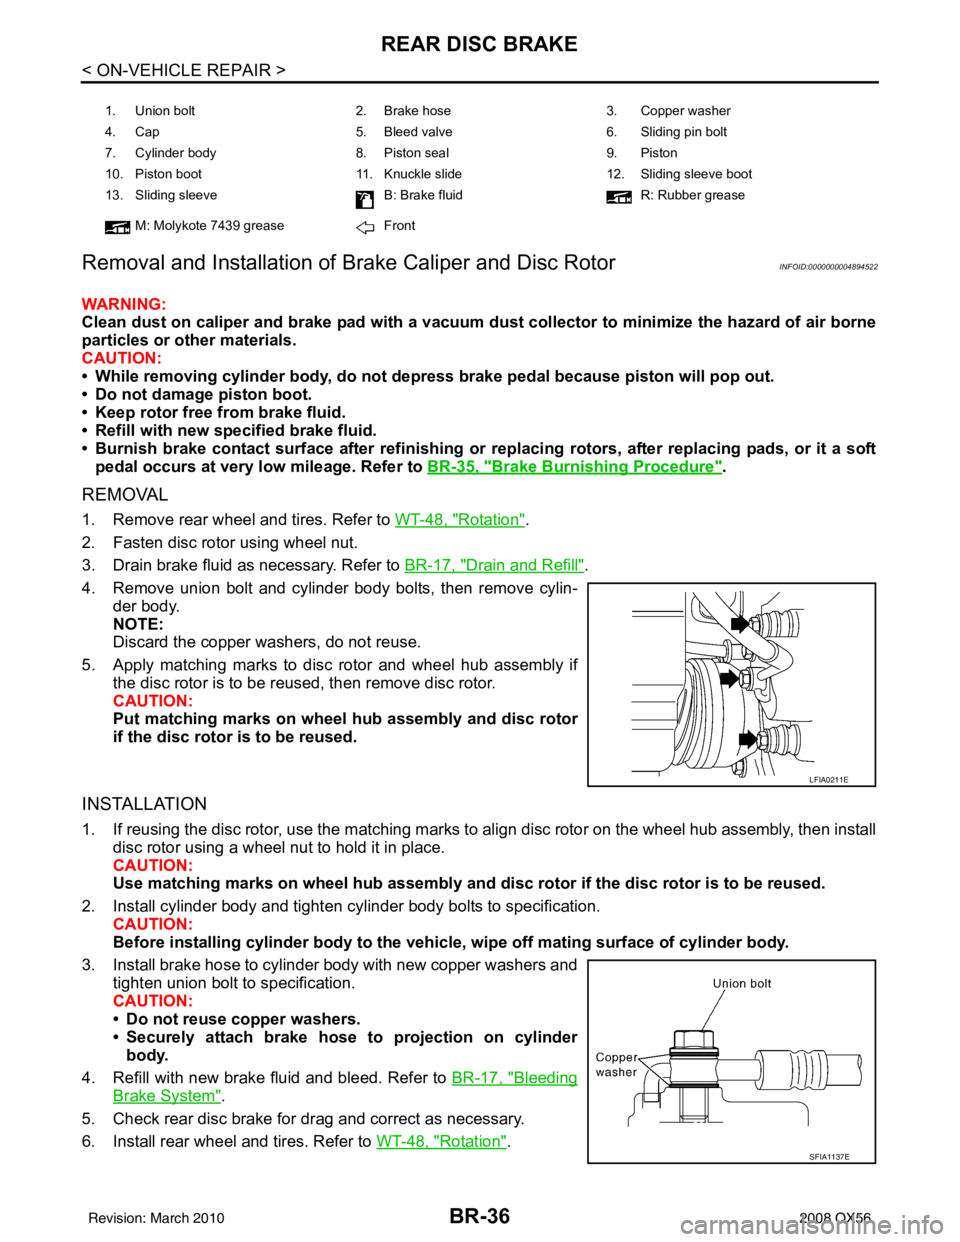
1. Union bolt 2. Brake hose 3. Copper washer
4. Cap 5. Bleed valve 6. Sliding pin bolt
7. Cylinder body 8. Piston seal9. Piston
10. Piston boot 11. Knuckle slide 12. Sliding sleeve boot
13. Sliding sleeve B: Brake fluidR: Rubber grease
M: Molykote 7439 grease Front
LFIA0211E
SFIA1137E
Revision: March 2010 2008 QX56
Page 583 of 4083
![INFINITI QX56 2008 Factory Service Manual BRC-116
< REMOVAL AND INSTALLATION >[VDC/TCS/ABS]
ACTUATOR AND ELECTRIC UNIT (ASSEMBLY)
ACTUATOR AND ELECTRIC UNIT (ASSEMBLY)
Removal and InstallationINFOID:0000000001604550
REMOVAL
1. Disconnect the INFINITI QX56 2008 Factory Service Manual BRC-116
< REMOVAL AND INSTALLATION >[VDC/TCS/ABS]
ACTUATOR AND ELECTRIC UNIT (ASSEMBLY)
ACTUATOR AND ELECTRIC UNIT (ASSEMBLY)
Removal and InstallationINFOID:0000000001604550
REMOVAL
1. Disconnect the](/img/42/57030/w960_57030-582.png)
BRC-116
< REMOVAL AND INSTALLATION >[VDC/TCS/ABS]
ACTUATOR AND ELECTRIC UNIT (ASSEMBLY)
ACTUATOR AND ELECTRIC UNIT (ASSEMBLY)
Removal and InstallationINFOID:0000000001604550
REMOVAL
1. Disconnect the negative battery terminal.
2. Remove the air duct and resonator assembly and air cleaner case. Refer to
EM-25, "
Removal and Instal-
lation".
3. Drain the brake fluid. Refer to BR-17, "
Drain and Refill" .
4. Disconnect the actuator harness from the ABS actuator and electric unit (control unit).
5. Disconnect the brake tubes. CAUTION:
• To remove the brake tubes, use a flare nut wrench to prevent the flare nuts and brake tubes from
being damaged.
• Be careful not to splash brake fluid on painted areas.
6. Remove the three bolts and remove the ABS actuator and electric unit (control unit).
INSTALLATION
Installation is in the reverse order of removal.
CAUTION:
To install, use a flare nut wr ench (commercial service tool).
1. To rear left caliper
13 N·m (1.3 kg-m, 10 ft-lb) 2. To rear right caliper
13 N·m (1.3 kg-m, 10 ft-lb) 3. To front left caliper
13 N·m (1.3 kg-m, 10 ft-lb)
4. To front right caliper 13 N·m (1.3 kg-m, 10 ft-lb) 5. From the master cylinder secondary side
18.2 N·m (1.9 kg-m, 13 ft-lb) 6. From the master cylinder primary side
18.2 N·m (1.9 kg-m, 13 ft-lb)
7. ABS actuator and electric unit (control unit) 8. Actuator harness connector
WFIA0375E
Revision: March 2010
2008 QX56
Page 750 of 4083

RADIATORCO-15
< ON-VEHICLE REPAIR >
C
DE
F
G H
I
J
K L
M A
CO
NP
O
ON-VEHICLE REPAIR
RADIATOR
Removal and InstallationINFOID:0000000001538861
WARNING:
Never remove the radiator cap when the engine is hot.
Serious burns could occur from high-pressure
engine coolant escaping from the radiator.
REMOVAL
CAUTION:
Perform when the engine is cold.
1. Remove engine room cover. Refer to EM-24, "
Removal and Installation".
2. Drain engine coolant from the radiator. Refer to CO-11, "
Changing Engine Coolant".
3. Remove air cleaner and air duct assembly. Refer to EM-25, "
Removal and Installation".
4. Disconnect A/T fluid cooler hoses. • Install blind plug to avoid leakage of A/T fluid.
5. Disconnect radiator upper and lower hoses from radiator. CAUTION:
Do not allow coolant to contact drive belts.
WBIA0694E
1. Radiator 2. Bolt 3. Mounting rubber
4. A/T fluid cooler hose 5. Radiator hose (lower) 6. Flaps
7. Radiator shroud (upper) 8. Radiator shroud (lower) 9. Drain plug
10. Radiator hose (upper) 11. Reservoir tank hose 12. By-pass hose
13. Reservoir tank 14. Reservoir tank cap A. To radiator fill neck
B. To A/T cooler tube C. To water suction pipe D. To thermostat housing
Revision: March 2010 2008 QX56
Page 1169 of 4083
![INFINITI QX56 2008 Factory Service Manual TRANSFER ASSEMBLYDLN-139
< REMOVAL AND INSTALLATION > [ATX14B]
C
EF
G H
I
J
K L
M A
B
DLN
N
O P
REMOVAL AND INSTALLATION
TRANSFER ASSEMBLY
Removal and InstallationINFOID:0000000001604419
REMOVAL
1. Se INFINITI QX56 2008 Factory Service Manual TRANSFER ASSEMBLYDLN-139
< REMOVAL AND INSTALLATION > [ATX14B]
C
EF
G H
I
J
K L
M A
B
DLN
N
O P
REMOVAL AND INSTALLATION
TRANSFER ASSEMBLY
Removal and InstallationINFOID:0000000001604419
REMOVAL
1. Se](/img/42/57030/w960_57030-1168.png)
TRANSFER ASSEMBLYDLN-139
< REMOVAL AND INSTALLATION > [ATX14B]
C
EF
G H
I
J
K L
M A
B
DLN
N
O P
REMOVAL AND INSTALLATION
TRANSFER ASSEMBLY
Removal and InstallationINFOID:0000000001604419
REMOVAL
1. Set transfer state as 2WD when 4WD shift switch is at 2WD.
2. Remove the undercovers using power tool.
3. Drain the transfer fluid. Refer to DLN-127, "
Replacement".
4. Remove the center exhaust tube and main muffler. Refer to EX-6, "
Removal and Installation".
5. Remove the front and rear propeller shafts. Refer to DLN-184, "
Removal and Installation" (front), DLN-
184, "Removal and Installation" (rear).
CAUTION:
Do not damage spline, sleeve yoke and rear oi l seal when removing rear propeller shaft.
NOTE:
Insert a plug into the rear oil seal after removing the rear propeller shaft.
6. Remove the A/T nuts from the A/T crossmember. Refer to TM-216, "
Removal and Installation (4WD)".
7. Position two suitable jacks under the A/T and transfer assembly.
8. Remove the crossmember. Refer to TM-216, "
Removal and Installation (4WD)".
WARNING:
Support A/T and transfer assembly using two suitable jacks while removing crossmember.
9. Disconnect the electrical connectors from the following: • ATP switch
• Neutral 4LO switch
• Wait detection switch
• Transfer motor
• Transfer control device
• Transfer terminal cord assembly
10. Disconnect each air breather hose from the following. Refer to DLN-135, "
Removal and Installation".
• Actuator
• Breather tube (transfer)
• Transfer motor
11. Remove the transfer control dev ice from the extension housing.
12. Remove the transfer to A/T and A/T to transfer bolts.
13. Remove the transfer assembly. WARNING:
Support transfer assembly with su itable jack while removing it.
CAUTION:
Do not damage rear oil seal (A/T).
INSTALLATION
Installation is in the reverse order of removal.
• Tighten the bolts to specification.
• Fill the transfer with new fluid and check for fluid leakage and fluid level. Refer to DLN-127, "
Replacement".
• Start the engine for one minute. Then stop the engine and recheck the transfer fluid. Refer to DLN-127, "
Inspection".
Transfer bolt torque : 36 N·m (3.7 kg-m, 27 ft-lb)
SMT872C
Revision: March 2010
2008 QX56