brake fluid INFINITI QX56 2009 Factory Workshop Manual
[x] Cancel search | Manufacturer: INFINITI, Model Year: 2009, Model line: QX56, Model: INFINITI QX56 2009Pages: 4171, PDF Size: 84.65 MB
Page 593 of 4171
![INFINITI QX56 2009 Factory Workshop Manual BRC-116
< REMOVAL AND INSTALLATION >[VDC/TCS/ABS]
ACTUATOR AND ELECTRIC UNIT (ASSEMBLY)
ACTUATOR AND ELECTRIC UNIT (ASSEMBLY)
Removal and InstallationINFOID:0000000005855796
REMOVAL
1. Disconnect the INFINITI QX56 2009 Factory Workshop Manual BRC-116
< REMOVAL AND INSTALLATION >[VDC/TCS/ABS]
ACTUATOR AND ELECTRIC UNIT (ASSEMBLY)
ACTUATOR AND ELECTRIC UNIT (ASSEMBLY)
Removal and InstallationINFOID:0000000005855796
REMOVAL
1. Disconnect the](/img/42/57031/w960_57031-592.png)
BRC-116
< REMOVAL AND INSTALLATION >[VDC/TCS/ABS]
ACTUATOR AND ELECTRIC UNIT (ASSEMBLY)
ACTUATOR AND ELECTRIC UNIT (ASSEMBLY)
Removal and InstallationINFOID:0000000005855796
REMOVAL
1. Disconnect the battery negative terminal. Refer to
PG-76, "Removal and Installation".
2. Remove the air cleaner and air duct assembly. Refer to EM-25, "
Exploded View".
3. Drain the brake fluid. Refer to BR-17, "
Drain and Refill".
4. Disconnect the actuator harness connector from t he ABS actuator and electric unit (control unit).
CAUTION:
• To remove the brake tubes, use a flare nut wrench to prevent the flare nuts and brake tubes from
being damaged.
• Be careful not to splash brake fluid on painted areas; it may cause paint damage. If brake fluid is splashed on painted areas, wash it away with water immediately.
5. Disconnect the brake tubes.
6. Remove the three bolts and remove the ABS actuator and electric unit (control unit).
INSTALLATION
Installation is in the reverse order of removal.
CAUTION:
• To install, use a flare nut crowfoot and torque wrench (commercial service tools).
1. To rear left caliper
13.0 N·m (1.3 kg-m, 10 ft-lb) 2. To rear right caliper
13.0 N·m (1.3 kg-m, 10 ft-lb) 3. To front left caliper
13.0 N·m (1.3 kg-m, 10 ft-lb)
4. To front right caliper 13.0 N·m (1.3 kg-m, 10 ft-lb) 5. From the master cylinder secondary side
18.2 N·m (1.9 kg-m, 13 ft-lb) 6. From the master cylinder primary side
18.2 N·m (1.9 kg-m, 13 ft-lb)
7. ABS actuator and electric unit (control unit) 8. Actuator harness connector
WFIA0375E
Revision: December 20092009 QX56
Page 594 of 4171
![INFINITI QX56 2009 Factory Workshop Manual ACTUATOR AND ELECTRIC UNIT (ASSEMBLY)BRC-117
< REMOVAL AND INSTALLATION > [VDC/TCS/ABS]
C
D
E
G H
I
J
K L
M A
B
BRC
N
O P
• Always tighten brake tubes to sp ecification when installing.
• Never re INFINITI QX56 2009 Factory Workshop Manual ACTUATOR AND ELECTRIC UNIT (ASSEMBLY)BRC-117
< REMOVAL AND INSTALLATION > [VDC/TCS/ABS]
C
D
E
G H
I
J
K L
M A
B
BRC
N
O P
• Always tighten brake tubes to sp ecification when installing.
• Never re](/img/42/57031/w960_57031-593.png)
ACTUATOR AND ELECTRIC UNIT (ASSEMBLY)BRC-117
< REMOVAL AND INSTALLATION > [VDC/TCS/ABS]
C
D
E
G H
I
J
K L
M A
B
BRC
N
O P
• Always tighten brake tubes to sp ecification when installing.
• Never reuse drained brake fluid.
• After installation of the ABS actuator and elect ric unit (control unit), perform the following.
- Refill brake system with new br ake fluid. Then bleed the air from the system. Refer to BR-17, "
Bleed-
ing Brake System".
- Adjust the steering angle sensor. Refer to BRC-8, "
ADJUSTMENT OF STEERING ANGLE SENSOR
NEUTRAL POSITION : Speci al Repair Requirement".
- Calibrate the decel G sensor. Refer to BRC-9, "
CALIBRATION OF DECEL G SENSOR : Special Repair
Requirement".
Revision: December 20092009 QX56
Page 667 of 4171

CCS-16
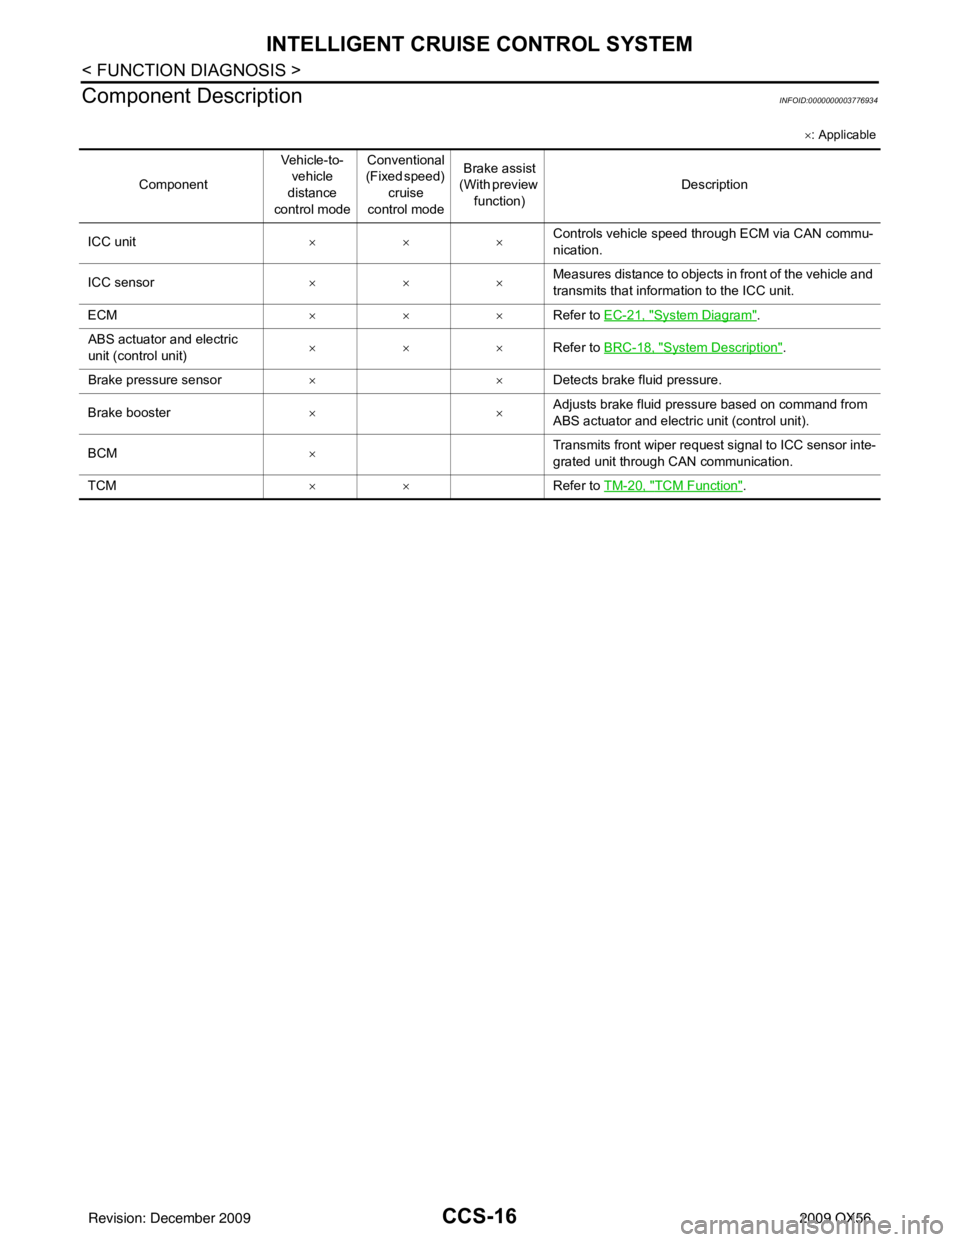
< FUNCTION DIAGNOSIS >
INTELLIGENT CRUISE CONTROL SYSTEM
Component Description
INFOID:0000000003776934
× : Applicable
Component Veh ic le-t o-
vehicle
distance
control mode Conventional
(Fixed speed)
cruise
control mode Brake assist
(With preview function) Description
ICC unit ××× Controls vehicle speed through ECM via CAN commu-
nication.
ICC sensor ××× Measures distance to objects in front of the vehicle and
transmits that information to the ICC unit.
ECM ××× Refer to EC-21, "
System Diagram".
ABS actuator and electric
unit (control unit) ×××
Refer to BRC-18, "
System Description".
Brake pressure sensor ×× Detects brake fluid pressure.
Brake booster ×× Adjusts brake fluid pressure based on command from
ABS actuator and electric unit (control unit).
BCM × Transmits front wiper request signal to ICC sensor inte-
grated unit through CAN communication.
TCM ×× Refer to TM-20, "
TCM Function".
Revision: December 20092009 QX56
Page 1137 of 4171
![INFINITI QX56 2009 Factory Workshop Manual
TRANSFER CONTROL UNITDLN-81
< ECU DIAGNOSIS > [ATX14B]
C
EF
G H
I
J
K L
M A
B
DLN
N
O P
ECU DIAGNOSIS
TRANSFER CONTROL UNIT
Reference ValueINFOID:0000000003772158
VALUE ON THE DIAGNOSIS TOOL
CONSULT- INFINITI QX56 2009 Factory Workshop Manual
TRANSFER CONTROL UNITDLN-81
< ECU DIAGNOSIS > [ATX14B]
C
EF
G H
I
J
K L
M A
B
DLN
N
O P
ECU DIAGNOSIS
TRANSFER CONTROL UNIT
Reference ValueINFOID:0000000003772158
VALUE ON THE DIAGNOSIS TOOL
CONSULT-](/img/42/57031/w960_57031-1136.png)
TRANSFER CONTROL UNITDLN-81
< ECU DIAGNOSIS > [ATX14B]
C
EF
G H
I
J
K L
M A
B
DLN
N
O P
ECU DIAGNOSIS
TRANSFER CONTROL UNIT
Reference ValueINFOID:0000000003772158
VALUE ON THE DIAGNOSIS TOOL
CONSULT-III data monitor item
Monitored item [Unit] Content Condition Display value
VHCL/S SEN·FR [km/h]
or [mph] Wheel speed (Front
wheel) Vehicle stopped 0 km/h (0 mph)
Vehicle running
CAUTION:
Check air pressure of tire under standard condition.
Approximately
equal to the indica-
tion on speedome-
ter (Inside of
±
10%)
VHCL/S SEN·RR [km/h]
or [mph] Wheel speed (Rear
wheel) Vehicle stopped 0 km/h (0 mph)
Vehicle running
CAUTION:
Check air pressure of tire under standard condition.
Approximately
equal to the indica-
tion on speedome-
ter (Inside of
±
10%)
ENGINE SPEED [rpm ] Engine speed Engine stopped
(Engine speed: Less than 400 rpm)
0 rpm
Engine running
(Engine speed: 400 rpm or more) Approximately
equal to the indica-
tion on tachometer
THRTL POS SEN [V] Accelertor pedal position
(APP) sensor signal volt-
age Accelerator pedal: Released Approx. 0.5V
Accelerator pedal: Fully depressed Approx. 4.0V
FLUID TEMP SE [V] Transfer fluid tempera-
ture signal voltage Transfer fluid temperature approx. 20 - 80
°C (68 - 176 °F) Approx. 1.1 - 0.3V
BATTERY VOLT [V] Power supply voltage for
transfer control unit Ignition switch: ON Battery voltage
2WD SWITCH [ON/OFF] Input condition from 4WD
shift switch 4WD shift switch: 2WD ON
4WD shift switch: AUTO, 4H or 4LO OFF
AUTO SWITCH [ON/
OFF] Input condition from 4WD
shift switch 4WD shift switch: AUTO ON
4WD shift switch: 2WD, 4H or 4LO OFF
LOCK SWITCH [ON/
OFF] Input condition from 4WD
shift switch 4WD shift switch: 4H ON
4WD shift switch: 2WD, AUTO or 4LO OFF
4L SWITCH [ON/OFF] Input condition from 4WD
shift switch 4WD shift switch: 4LO ON
4WD shift switch: 2WD, AUTO or 4H OFF
N POSI SW TF [ON/
OFF] Condition of neutral-4LO
switch Vehicle stopped
Engine running
A/T selector lever N posi-
tion
Brake pedal depressed 4WD shift switch: 2WD,
AUTO or 4H
OFF
4WD shift switch: 4H to
4LO (While actuator mo-
tor is operating.) OFF
→ON
4WD shift switch: 4LO to
4H (While actuator motor
is operating.) ON
→OFF
4WD shift switch: 4LO ON
Revision: December 20092009 QX56
Page 1143 of 4171
![INFINITI QX56 2009 Factory Workshop Manual
TRANSFER CONTROL UNITDLN-87
< ECU DIAGNOSIS > [ATX14B]
C
EF
G H
I
J
K L
M A
B
DLN
N
O P
25 V Neutral-4LO switch Vehicle stopped
Engine running
A/T selector lever
“N” position
Brake pedal INFINITI QX56 2009 Factory Workshop Manual
TRANSFER CONTROL UNITDLN-87
< ECU DIAGNOSIS > [ATX14B]
C
EF
G H
I
J
K L
M A
B
DLN
N
O P
25 V Neutral-4LO switch Vehicle stopped
Engine running
A/T selector lever
“N” position
Brake pedal](/img/42/57031/w960_57031-1142.png)
TRANSFER CONTROL UNITDLN-87
< ECU DIAGNOSIS > [ATX14B]
C
EF
G H
I
J
K L
M A
B
DLN
N
O P
25 V Neutral-4LO switch Vehicle stopped
Engine running
A/T selector lever
“N” position
Brake pedal de- pressed 4WD shift switch: 2WD, AUTO or 4H Battery voltage
4WD shift switch: 4H to 4LO (While actua-
tor motor is operating.)
Battery voltage
→
0V
4WD shift switch: 4LO to 4H (While actua-
tor motor is operating.) 0V
→ Battery
voltage
4WD shift switch: 4LO 0V
27 W/L Actuator position switch 2
(High) Vehicle stopped
Engine running
A/T selector lever
“N” position
Brake pedal de-
pressed 4WD shift switch: 4H, AUTO or 2WD 0V
4WD shift switch: 4LO Battery voltage
28 B/G Sensor ground Always 0V
29 L/W Ignition switch monitor Ignition switch: ON Battery voltage
Ignition switch: OFF 0V
30 SB Shut off relay Ignition switch: ON 0V
Ignition switch: OFF Battery voltage
31 G Transfer fluid temperature
sensor
Ignition switch: ONTransfer fluid temperature approx. 20
°C
(68 °F) 1.1V
Transfer fluid temperature approx. 80 °C
(176 °F) 0.3V
33 R/L Transfer shift high relay
monitor Vehicle stopped
Engine running
A/T selector lever
“N” position
Brake pedal de- pressed 4WD shift switch: 4H to 4LO (“Wait” func-
tion is operating.)
Battery voltage
Except the above 0V
34 BR Clutch pressure switch Vehicle stopped
Engine running
A/T selector lever
“D” position 4WD shift switch: AUTO or 4H (“Wait” func-
tion is not operating.)
0V
Vehicle stopped
Engine running 4WD shift switch: 2WD (“Wait” function is
not operating.)
Battery voltage
35 BR/
W Line pressure switch Ignition switch: ON
A/T selector lever “D” position
4WD shift switch: AUTO
0V
After the vehicle has been left at
room temperature
for 5 minutes and
more with ignition
switch in “OFF” po-
sition. Ignition switch: ON
A/T selector lever: “P” or "N" position
4WD shift switch: other than AUTO
Battery voltage
40 L/Y ATP switch Vehicle stopped
Engine running
A/T selector lever
“N”
Brake pedal de- pressed 4WD shift switch: 4H to 4LO or 4LO to 4H
(While actuator motor is operating.)
0V
Except the above Battery voltage
Te r m i n a l
Wire
color Item Condition Data (Approx.)
Revision: December 20092009 QX56
Page 1298 of 4171
![INFINITI QX56 2009 Factory Workshop Manual
DLN-242
< SYMPTOM DIAGNOSIS >[REAR FINAL DRIVE: R230]
NOISE, VIBRATION AND HARSHNESS
(NVH) TROUBLESHOOTING
SYMPTOM DIAGNOSIS
NOISE, VIBRATION AND HARSHNESS (NVH) TROUBLESHOOTING
NVH Troubleshooting INFINITI QX56 2009 Factory Workshop Manual
DLN-242
< SYMPTOM DIAGNOSIS >[REAR FINAL DRIVE: R230]
NOISE, VIBRATION AND HARSHNESS
(NVH) TROUBLESHOOTING
SYMPTOM DIAGNOSIS
NOISE, VIBRATION AND HARSHNESS (NVH) TROUBLESHOOTING
NVH Troubleshooting](/img/42/57031/w960_57031-1297.png)
DLN-242
< SYMPTOM DIAGNOSIS >[REAR FINAL DRIVE: R230]
NOISE, VIBRATION AND HARSHNESS
(NVH) TROUBLESHOOTING
SYMPTOM DIAGNOSIS
NOISE, VIBRATION AND HARSHNESS (NVH) TROUBLESHOOTING
NVH Troubleshooting ChartINFOID:0000000004193552
Use the chart below to help you find the cause of the sy mptom. If necessary, repair or replace these parts.
×: ApplicableReference page
DLN-253, "Disassembly and Assembly"DLN-253, "Disassembly and Assembly"DLN-253, "Disassembly and Assembly"DLN-270, "Inspection and Adjustment"DLN-270, "Inspection and Adjustment"
MA-12, "Fluids and Lubricants"
DLN-194, "NVH Troubleshooting Chart"RAX-5, "NVH Troubleshooting Chart"RSU-5, "NVH Troubleshooting Chart"WT-36, "NVH Troubleshooting Chart"WT-36, "NVH Troubleshooting Chart"RAX-5, "NVH Troubleshooting Chart"BR-6, "NVH Troubleshooting Chart"ST-12, "NVH Troubleshooting Chart"
Possible cause and SUSPECTED PARTS
Gear tooth rough
Gear contact improper
Tooth surfaces worn
Backlash incorrect
Companion flange excessive runout
Gear oil improper
PROPELLER SHAFT
REAR AXLE
REAR SUSPENSION
TIRES
ROAD WHEEL
DRIVE SHAFT
BRAKES
STEERING
Symptom Noise
××××××× ××××××
Revision: December 20092009 QX56
Page 1352 of 4171
![INFINITI QX56 2009 Factory Workshop Manual
ENGINE CONTROL SYSTEMEC-25
< FUNCTION DIAGNOSIS > [VK56DE]
C
D
E
F
G H
I
J
K L
M A
EC
NP
O
1. EVAP canister purge volume control
solenoid valve (view with engine
cover removed) 2. EVAP service port INFINITI QX56 2009 Factory Workshop Manual
ENGINE CONTROL SYSTEMEC-25
< FUNCTION DIAGNOSIS > [VK56DE]
C
D
E
F
G H
I
J
K L
M A
EC
NP
O
1. EVAP canister purge volume control
solenoid valve (view with engine
cover removed) 2. EVAP service port](/img/42/57031/w960_57031-1351.png)
ENGINE CONTROL SYSTEMEC-25
< FUNCTION DIAGNOSIS > [VK56DE]
C
D
E
F
G H
I
J
K L
M A
EC
NP
O
1. EVAP canister purge volume control
solenoid valve (view with engine
cover removed) 2. EVAP service port (view with engine
cover removed) 3. Crankshaft position sensor (POS)
(view from under the vehicle)
4. Engine oil pan (view from under the vehicle) 5. Condenser-1 6. Brake fluid reservoir
7. EVAP canister (view with fuel tank removed) 8. EVAP control system pressure sen-
sor (view with fuel tank removed) 9. EVAP canister vent control valve
(view with fuel tank removed)
10. Rear suspension member (view with fuel tank removed) 11. Refrigerant pressure sensor (view
with front grille removed) 12. Intake valve timing control position
sensor (bank 2) (view with engine
cover and intake air duct removed)
13. Intake valve timing control position sensor (bank 1) (view with engine
cover and intake air duct removed) 14. Intake valve timing control solenoid
valve (bank 2) (view with engine cov-
er and intake air duct removed) 15. Drive belt (view with engine cover
and intake air duct removed)
16. Radiator hose (view with engine cov- er and intake air duct removed) 17. Intake valve timing control solenoid
valve (bank 1) (view with engine cov-
er and intake air duct removed)
: Vehicle front
BBIA0774E
Revision: December 20092009 QX56
Page 1875 of 4171

EM-52
< ON-VEHICLE REPAIR >
TIMING CHAIN
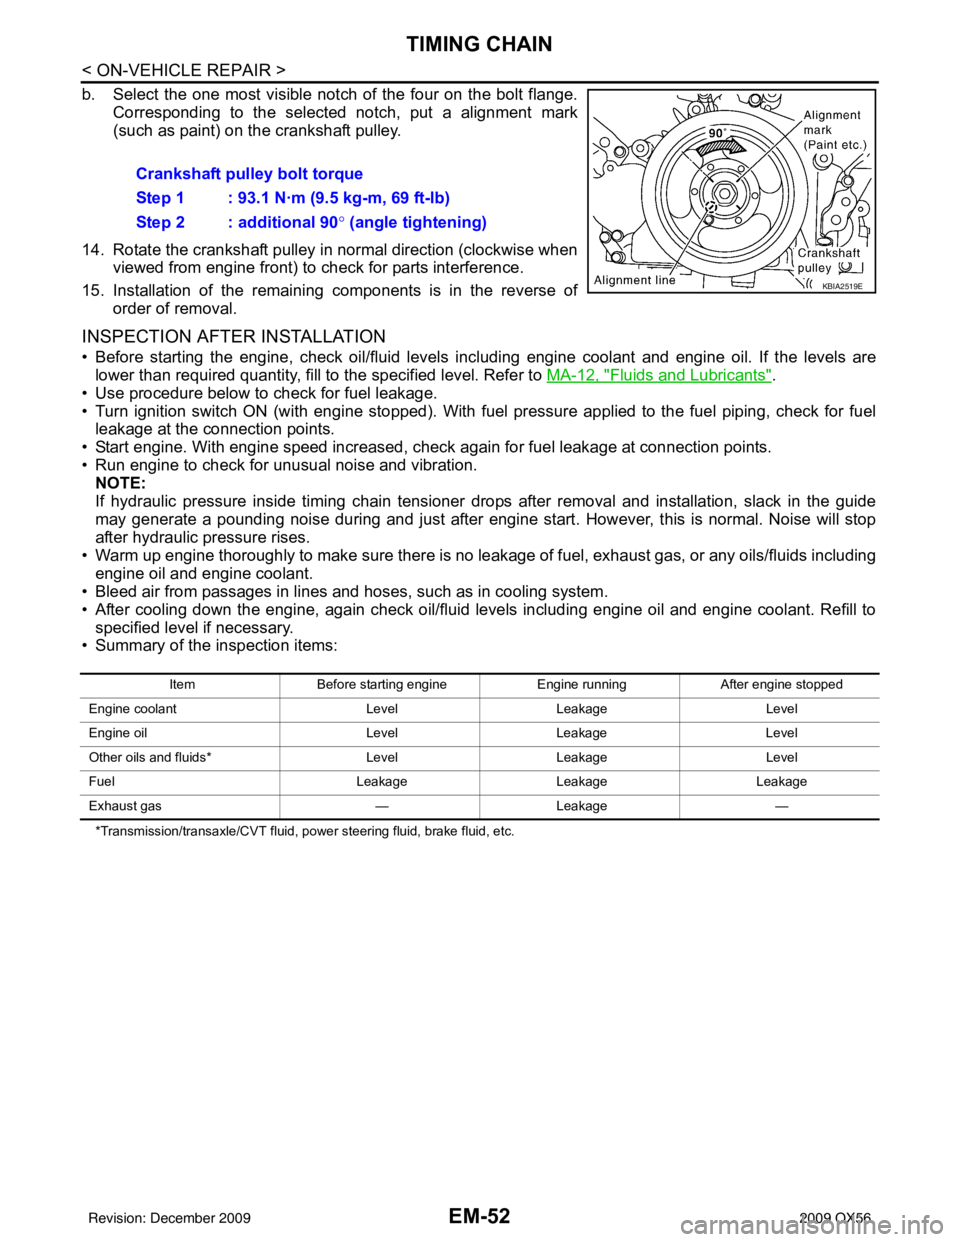
b. Select the one most visible notch of the four on the bolt flange.Corresponding to the selected notch, put a alignment mark
(such as paint) on the crankshaft pulley.
14. Rotate the crankshaft pulley in normal direction (clockwise when viewed from engine front) to check for parts interference.
15. Installation of the remaining components is in the reverse of order of removal.
INSPECTION AFTER INSTALLATION
• Before starting the engine, check oil/fluid levels in cluding engine coolant and engine oil. If the levels are
lower than required quantity, fill to the specified level. Refer to MA-12, "
Fluids and Lubricants".
• Use procedure below to check for fuel leakage.
• Turn ignition switch ON (with engine stopped). With fuel pressure applied to the fuel piping, check for fuel leakage at the connection points.
• Start engine. With engine speed increased, che ck again for fuel leakage at connection points.
• Run engine to check for unusual noise and vibration. NOTE:
If hydraulic pressure inside timing chain tensioner drops after removal and installation, slack in the guide
may generate a pounding noise during and just after engine start. However, this is normal. Noise will stop
after hydraulic pressure rises.
• Warm up engine thoroughly to make sure there is no leakage of fuel, exhaust gas, or any oils/fluids including engine oil and engine coolant.
• Bleed air from passages in lines and hoses, such as in cooling system.
• After cooling down the engine, again check oil/fluid levels including engine oil and engine coolant. Refill to
specified level if necessary.
• Summary of the inspection items:
*Transmission/transaxle/CVT fluid, power steering fluid, brake fluid, etc.
Crankshaft pulley bolt torque
Step 1 : 93.1 N·m (9.5 kg-m, 69 ft-lb)
Step 2 : additional 90 ° (angle tightening)
KBIA2519E
Item Before starting engine Engine runningAfter engine stopped
Engine coolant LevelLeakage Level
Engine oil LevelLeakage Level
Other oils and fluids* LevelLeakage Level
Fuel LeakageLeakageLeakage
Exhaust gas —Leakage —
Revision: December 20092009 QX56
Page 1893 of 4171

EM-70
< ON-VEHICLE REPAIR >
CYLINDER HEAD
• After cooling down the engine, again check oil/fluid levels including engine oil and engine coolant. Refill tospecified level if necessary.
• Summary of the inspection items:
*Transmission/transaxle/CVT fluid, power steering fluid, brake fluid, etc.
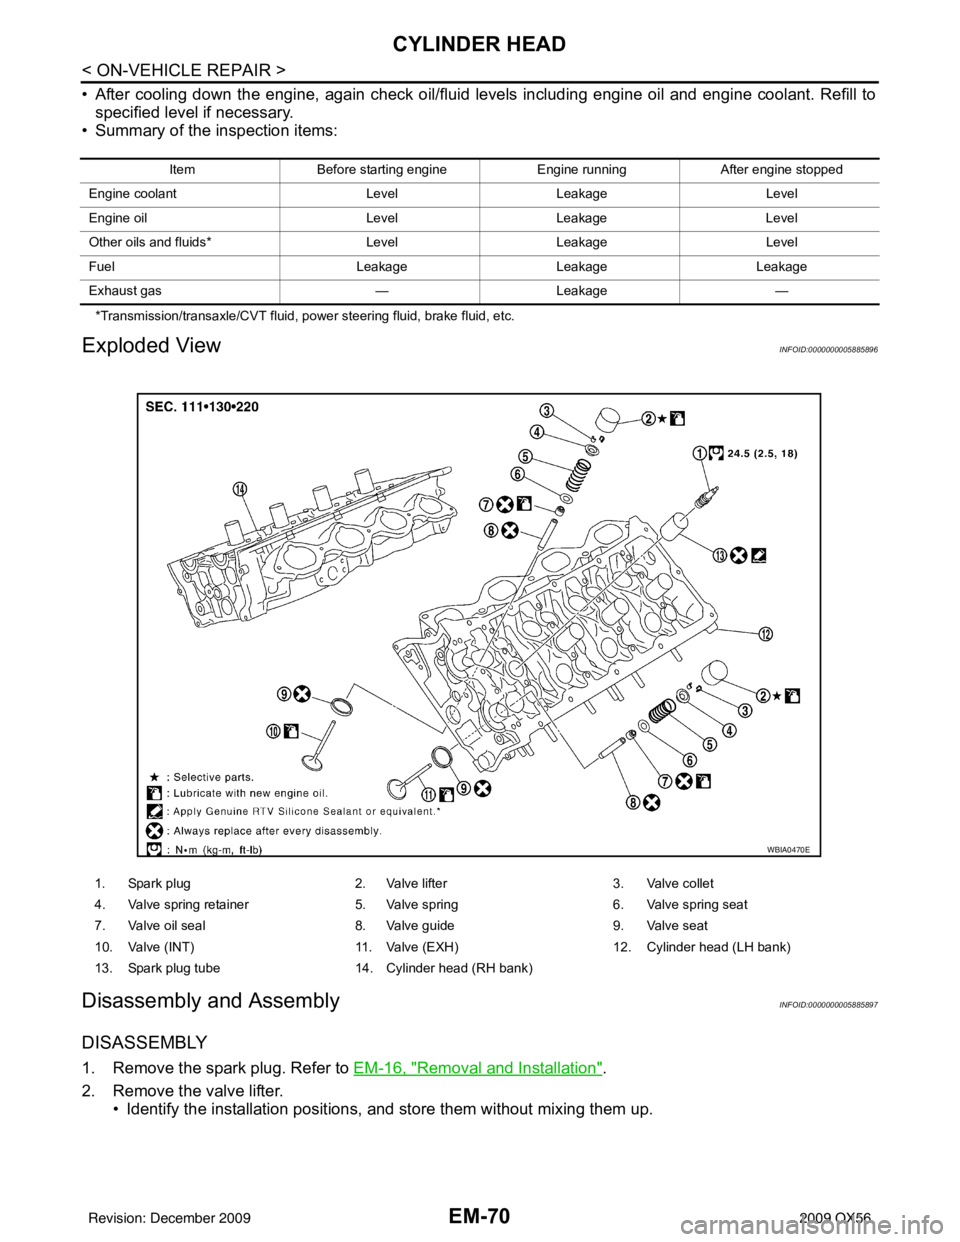
Exploded ViewINFOID:0000000005885896
Disassembly and AssemblyINFOID:0000000005885897
DISASSEMBLY
1. Remove the spark plug. Refer to EM-16, "Removal and Installation".
2. Remove the valve lifter. • Identify the installation positions, and store them without mixing them up.
Item Before starting engine Engine runningAfter engine stopped
Engine coolant LevelLeakage Level
Engine oil LevelLeakage Level
Other oils and fluids* LevelLeakage Level
Fuel LeakageLeakageLeakage
Exhaust gas —Leakage —
1. Spark plug 2. Valve lifter3. Valve collet
4. Valve spring retainer 5. Valve spring6. Valve spring seat
7. Valve oil seal 8. Valve guide9. Valve seat
10. Valve (INT) 11. Valve (EXH)12. Cylinder head (LH bank)
13. Spark plug tube 14. Cylinder head (RH bank)
WBIA0470E
Revision: December 20092009 QX56
Page 1902 of 4171

ENGINE ASSEMBLYEM-79
< REMOVAL AND INSTALLATION >
C
DE
F
G H
I
J
K L
M A
EM
NP
O
1. Release the fuel pressure. Refer to
EC-487, "Fuel Pressure Check".
2. Drain the engine coolant. Refer to CO-11, "
Changing Engine Coolant".
3. Drain the engine oil. Refer to LU-9, "
Changing Engine Oil".
4. Disconnect the battery negative and positive terminal. Refer to PG-76, "
Removal and Installation".
5. Remove the engine hood. Refer to DLK-230, "
Removal and Installation of Hood Assembly".
6. Remove the cowl extension. Refer to EXT-18, "
Removal and Installation".
7. Remove the air duct and air cleaner case assembly. Refer to EM-25, "
Removal and Installation".
8. Remove the radiator assembly and hoses. Refer to CO-15, "
Removal and Installation".
NOTE:
To prevent possible A/T fluid drain from transmissi on opening, use appropriate cap to close off transmis-
sion opening during operation.
9. Remove the drive belt. Refer to EM-13, "
Removal and Installation".
10. Remove the fan blade. Refer to CO-18, "
Removal and Installation (Crankshaft Driven Type)".
11. Disconnect the engine room harness from the fuse box and set it aside.
12. Disconnect the ECM.
13. Disconnect the engine room harness from the engine side and set it aside.
14. Disconnect the engine harness grounds.
15. Disconnect the power steering reservoir t ank from the engine and move it aside.
16. Disconnect the power steering oil pump from the engine. Move it aside and secure it using suitable wire or rope. Refer to ST-26, "
Removal and Installation"
17. Remove the A/C compressor bolts and set the compressor aside. Refer to HA-31, "Removal and Installa-
tion for Compressor" (ATC).
18. Disconnect the brake booster vacuum hose.
19. Disconnect the EVAP line.
20. Disconnect the fuel hose at the engine side connection. Refer to EM-40, "
Removal and Installation".
21. Disconnect the heater hoses at the cowl, and in stall plugs to avoid leakage of engine coolant.
22. Remove the A/T oil level indicator and indicator tube upper bolts.
23. Remove the front final drive assembly (4WD only). Refer to DLN-215, "
Removal and Installation".
24. Remove the exhaust manifolds. Refer to EM-30, "
Removal and Installation".
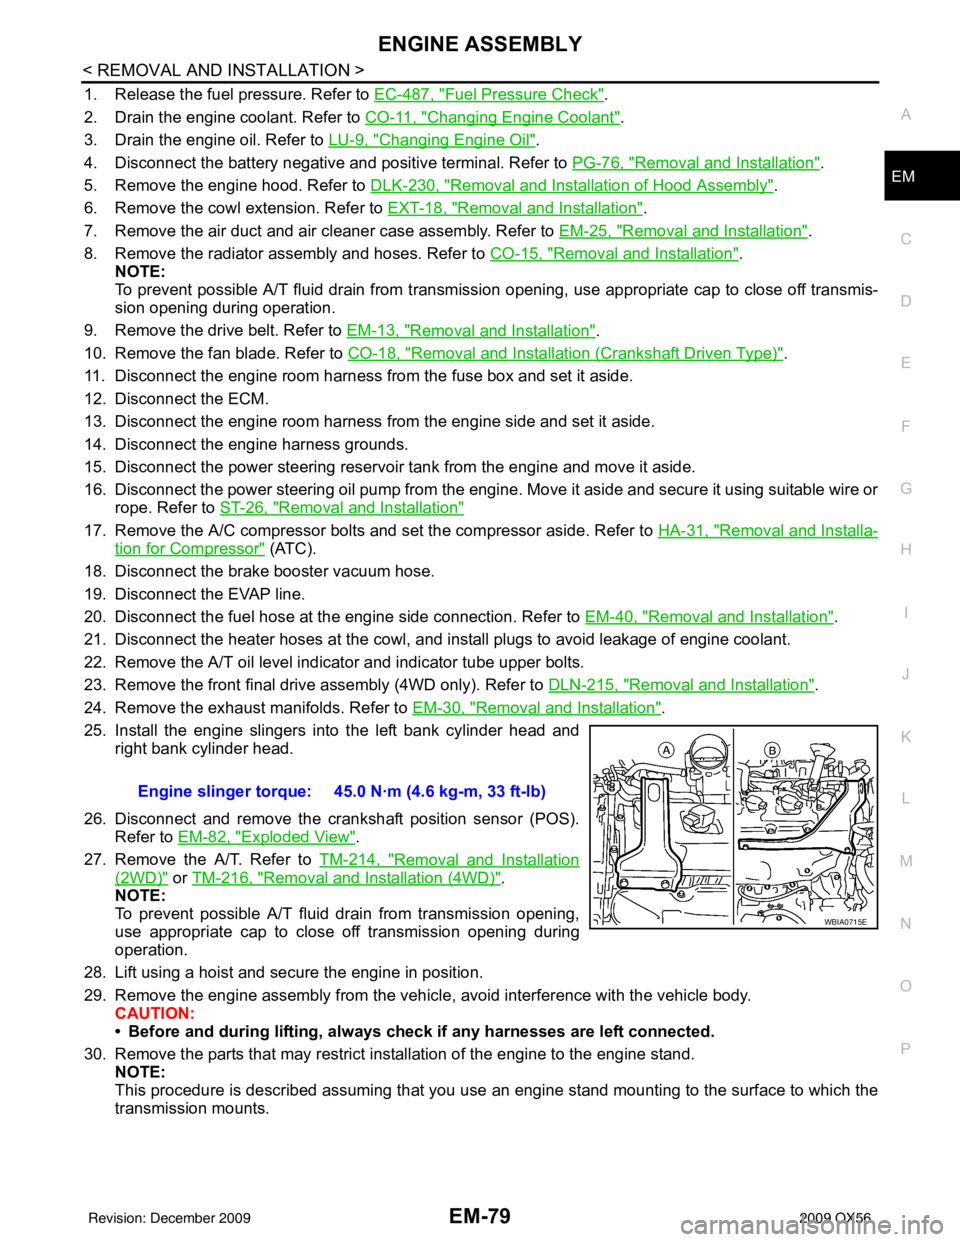
25. Install the engine slingers into the left bank cylinder head and right bank cylinder head.
26. Disconnect and remove the crankshaft position sensor (POS). Refer to EM-82, "
Exploded View".
27. Remove the A/T. Refer to TM-214, "
Removal and Installation
(2WD)" or TM-216, "Removal and Installation (4WD)".
NOTE:
To prevent possible A/T fluid drain from transmission opening,
use appropriate cap to close off transmission opening during
operation.
28. Lift using a hoist and secure the engine in position.
29. Remove the engine assembly from the vehicl e, avoid interference with the vehicle body.
CAUTION:
• Before and during lifting, always check if any harnesses are left connected.
30. Remove the parts that may restrict installation of the engine to the engine stand. NOTE:
This procedure is described assuming that you use an engine stand mounting to the surface to which the
transmission mounts. Engine slinger torque: 45.0 N·m (4.6 kg-m, 33 ft-lb)
WBIA0715E
Revision: December 20092009 QX56