sensor INFINITI QX56 2009 Factory Repair Manual
[x] Cancel search | Manufacturer: INFINITI, Model Year: 2009, Model line: QX56, Model: INFINITI QX56 2009Pages: 4171, PDF Size: 84.65 MB
Page 428 of 4171
![INFINITI QX56 2009 Factory Repair Manual
BCS-54
< PRECAUTION >[BCM]
PRECAUTIONS
PRECAUTION
PRECAUTIONS
Precaution for Supplemental Restraint S
ystem (SRS) "AIR BAG" and "SEAT BELT
PRE-TENSIONER"
INFOID:0000000005851887
The Supplemental Res INFINITI QX56 2009 Factory Repair Manual
BCS-54
< PRECAUTION >[BCM]
PRECAUTIONS
PRECAUTION
PRECAUTIONS
Precaution for Supplemental Restraint S
ystem (SRS) "AIR BAG" and "SEAT BELT
PRE-TENSIONER"
INFOID:0000000005851887
The Supplemental Res](/img/42/57031/w960_57031-427.png)
BCS-54
< PRECAUTION >[BCM]
PRECAUTIONS
PRECAUTION
PRECAUTIONS
Precaution for Supplemental Restraint S
ystem (SRS) "AIR BAG" and "SEAT BELT
PRE-TENSIONER"
INFOID:0000000005851887
The Supplemental Restraint System such as “A IR BAG” and “SEAT BELT PRE-TENSIONER”, used along
with a front seat belt, helps to reduce the risk or severi ty of injury to the driver and front passenger for certain
types of collision. This system includes seat belt switch inputs and dual stage front air bag modules. The SRS
system uses the seat belt switches to determine the front air bag deployment, and may only deploy one front
air bag, depending on the severity of a collision and w hether the front occupants are belted or unbelted.
Information necessary to service the system safely is included in the SR and SB section of this Service Man-
ual.
WARNING:
To avoid rendering the SRS inopera tive, which could increase the risk of personal injury or death in
the event of a collision which would result in air bag inflation, all maintenance must be performed by
an authorized NISS AN/INFINITI dealer.
Improper maintenance, including in correct removal and installation of the SRS, can lead to personal
injury caused by unintent ional activation of the system. For re moval of Spiral Cable and Air Bag
Module, see the SR section.
Do not use electrical test equipmen t on any circuit related to the SRS unless instructed to in this
Service Manual. SRS wiring harnesses can be identi fied by yellow and/or orange harnesses or har-
ness connectors.
PRECAUTIONS WHEN USING POWER TOOLS (AIR OR ELECTRIC) AND HAMMERS
WARNING:
When working near the Airbag Diagnosis Sensor Unit or other Airbag System sensors with the Igni-
tion ON or engine running, DO NOT use air or electri c power tools or strike near the sensor(s) with a
hammer. Heavy vibration could activate the sensor( s) and deploy the air bag(s), possibly causing
serious injury.
When using air or electric power tools or hammers , always switch the Ignition OFF, disconnect the
battery, and wait at least 3 minu tes before performing any service.
Precaution Necessary for Steering W heel Rotation After Battery Disconnect
INFOID:0000000005851888
NOTE:
This Procedure is applied only to models with Intelli gent Key system and NATS (NISSAN ANTI-THEFT SYS-
TEM).
Remove and install all control units after disconnecting both battery cables with the ignition knob in the
″LOCK ″ position.
Always use CONSULT-III to perform self-diagnosis as a part of each function inspection after finishing work.
If DTC is detected, perform trouble diagnosis according to self-diagnostic results.
For models equipped with the Intelligent Key system and NATS, an electrically controlled steering lock mech-
anism is adopted on the key cylinder.
For this reason, if the battery is disconnected or if the battery is discharged, the steering wheel will lock and
steering wheel rotation will become impossible.
If steering wheel rotation is required when battery pow er is interrupted, follow the procedure below before
starting the repair operation.
OPERATION PROCEDURE
1. Connect both battery cables. NOTE:
Supply power using jumper cables if battery is discharged.
2. Use the Intelligent Key or mechanical key to turn the ignition switch to the ″ACC ″ position. At this time, the
steering lock will be released.
3. Disconnect both battery cables. The steering lock will remain released and the steering wheel can be
rotated.
4. Perform the necessary repair operation.
Revision: December 20092009 QX56
Page 433 of 4171
PRECAUTIONSBR-3
< PRECAUTION >
C
DE
G H
I
J
K L
M A
B
BR
N
O P
PRECAUTION
PRECAUTIONS
Precaution for Supplemental Restraint System (SRS) "AIR BAG" and "SEAT BELT
PRE-TENSIONER"
INFOID:0000000005864602
The Supplemental Restraint System such as “AIR BAG” and “SEAT BELT PRE-TENSIONER”, used along
with a front seat belt, helps to reduce the risk or severi ty of injury to the driver and front passenger for certain
types of collision. This system includes seat belt switch inputs and dual stage front air bag modules. The SRS
system uses the seat belt switches to determine the front air bag deployment, and may only deploy one front
air bag, depending on the severity of a collision and w hether the front occupants are belted or unbelted.
Information necessary to service the system safely is included in the SR and SB section of this Service Man-
ual.
WARNING:
• To avoid rendering the SRS inoper ative, which could increase the risk of personal injury or death in
the event of a collision which would result in air bag inflation, all maintenance must be performed by
an authorized NISSAN/INFINITI dealer.
• Improper maintenance, including in correct removal and installation of the SRS, can lead to personal
injury caused by unintentional act ivation of the system. For removal of Spiral Cable and Air Bag
Module, see the SR section.
• Do not use electrical test equipm ent on any circuit related to the SRS unless instructed to in this
Service Manual. SRS wiring harnesses can be identi fied by yellow and/or orange harnesses or har-
ness connectors.
PRECAUTIONS WHEN USING POWER TOOLS (AIR OR ELECTRIC) AND HAMMERS
WARNING:
• When working near the Airbag Diagnosis Sensor Un it or other Airbag System sensors with the Igni-
tion ON or engine running, DO NOT use air or el ectric power tools or strike near the sensor(s) with a
hammer. Heavy vibration could activate the sensor( s) and deploy the air bag(s), possibly causing
serious injury.
• When using air or electric power tools or hammers, always switch the Ignition OFF, disconnect the battery, and wait at least 3 minutes before performing any service.
Precaution Necessary for Steering Wheel Rotation After Battery Disconnect
INFOID:0000000005864603
NOTE:
• This Procedure is applied only to models with Intelligent Key system and NATS (NISSAN ANTI-THEFT SYS-
TEM).
• Remove and install all control units after disconnecti ng both battery cables with the ignition knob in the
″ LOCK ″ position.
• Always use CONSULT-III to perform self-diagnosis as a part of each function inspection after finishing work.
If DTC is detected, perform trouble diagnosis according to self-diagnostic results.
For models equipped with the Intelligent Key system and NATS , an electrically controlled steering lock mech-
anism is adopted on the key cylinder.
For this reason, if the battery is disconnected or if the battery is discharged, the steering wheel will lock and
steering wheel rotation will become impossible.
If steering wheel rotation is required when battery power is interrupted, follow the procedure below before
starting the repair operation.
OPERATION PROCEDURE
1. Connect both battery cables. NOTE:
Supply power using jumper cables if battery is discharged.
2. Use the Intelligent Key or mechanical key to turn the ignition switch to the ″ACC ″ position. At this time, the
steering lock will be released.
3. Disconnect both battery cables. The steering lock will remain released and the steering wheel can be
rotated.
4. Perform the necessary repair operation.
Revision: December 20092009 QX56
Page 455 of 4171
BRAKE MASTER CYLINDERBR-25
< ON-VEHICLE REPAIR >
C
DE
G H
I
J
K L
M A
B
BR
N
O P
BRAKE MASTER CYLINDER
Removal and InstallationINFOID:0000000004042336
REMOVAL
CAUTION:
• Be careful not to splash brake fluid on painted areas; it may cause paint damage. If brake fluid is
splashed on painted areas, wash it away with water immediately.
• Before removing brake master cylinder, depress the brake pedal 5-6 times with the key OFF to deplete vacuum in the booster.
1. Remove brake reservoir cap.
2. Disconnect harness connectors for fluid level sensor, front and rear pressure sensors.
3. Using suitable tool, disconnect brake tube from master cylinder assembly.
4. Remove master cylinder assembly nuts, and remove master cylinder assembly.
INSTALLATION
Installation is in the reverse order of removal.
• Refill brake fluid and bleed air. Refer to BR-17, "
Bleeding Brake System".
CAUTION:
• Refill with new brake fluid. Refer to MA-12, "
Fluids and Lubricants".
• Do not reuse drained brake fluid.
• Adjust brake pedal. Refer to BR-15, "
Inspection and Adjustment" .
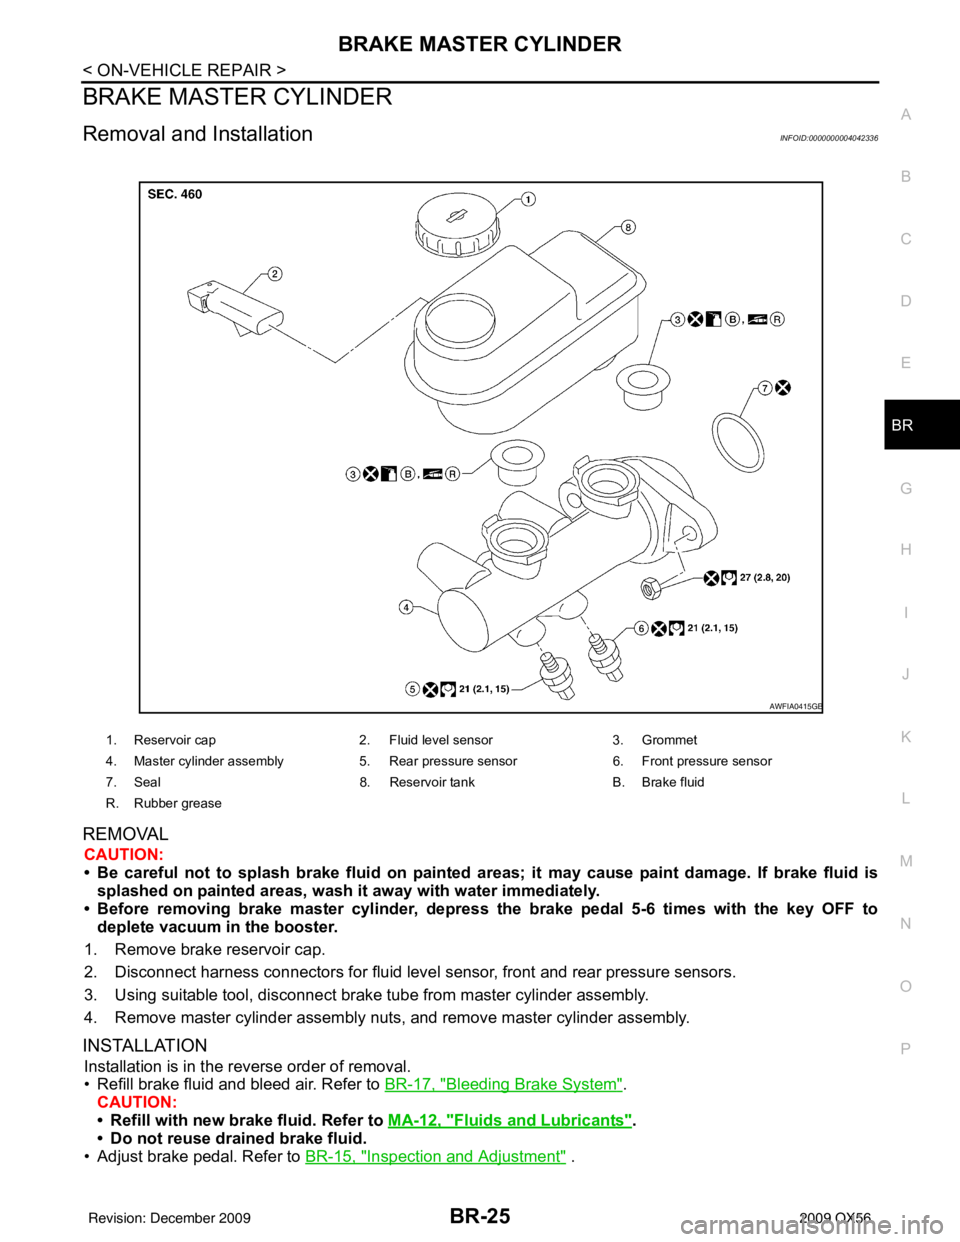
1. Reservoir cap 2. Fluid level sensor 3. Grommet
4. Master cylinder assembly 5. Rear pressure sensor6. Front pressure sensor
7. Seal 8. Reservoir tankB. Brake fluid
R. Rubber grease
AWFIA0415GB
Revision: December 20092009 QX56
Page 456 of 4171
BR-26
< ON-VEHICLE REPAIR >
BRAKE BOOSTER
BRAKE BOOSTER
Removal and InstallationINFOID:0000000005890851
CAUTION:
• Be careful not to deform or bend brake piping while removing and installing brake booster.
• Replace clevis pin if it is damaged.
• Be careful not to damage brake booster stud bolt threads. If brake booster is tilted or inclined during
installation, dash panel may damage the threads.
• Attach the check valve in the correct direction.
REMOVAL
1. Remove air duct and resonator assembly. Refer to EM-25, "Removal and Installation".
2. Remove cowl top extension. Refer to EXT-18, "
Removal and Installation".
3. Remove master cylinder assembly from brake booster. Refer to BR-25, "
Removal and Installation".
4. Remove vacuum hose from brake booster. Refer to BR-28, "
Removal and Installation".
5. Disconnect active booster harness connector and delta stroke sensor harness connectors from brake booster.
6. Remove the instrument lower panel LH. Refer to IP-12, "
Exploded View".
7. Remove brake pedal to clevis attachment snap pin and clevis pin from inside the vehicle.
8. Remove brake booster to brake pedal assembly nuts.
9. Reposition the A/C line out of the way.
10. Remove brake booster and spacer block from dash panel.
INSPECTION AFTER REMOVAL
Output Rod Length Inspection
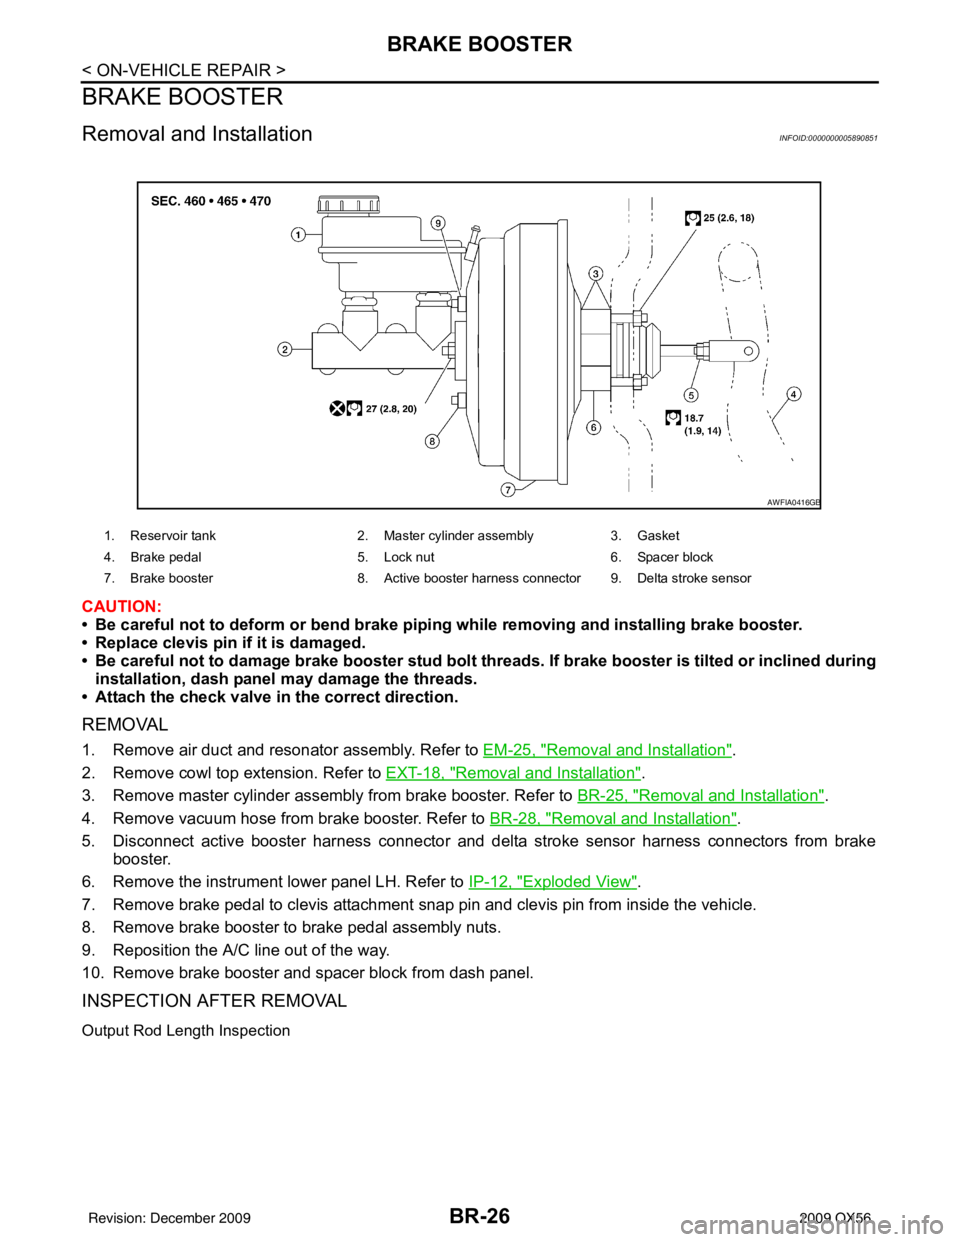
1. Reservoir tank 2. Master cylinder assembly3. Gasket
4. Brake pedal 5. Lock nut 6. Spacer block
7. Brake booster 8. Active booster harness connector 9. Delta stroke sensor
AWFIA0416GB
Revision: December 20092009 QX56
Page 457 of 4171
BRAKE BOOSTERBR-27
< ON-VEHICLE REPAIR >
C
DE
G H
I
J
K L
M A
B
BR
N
O P
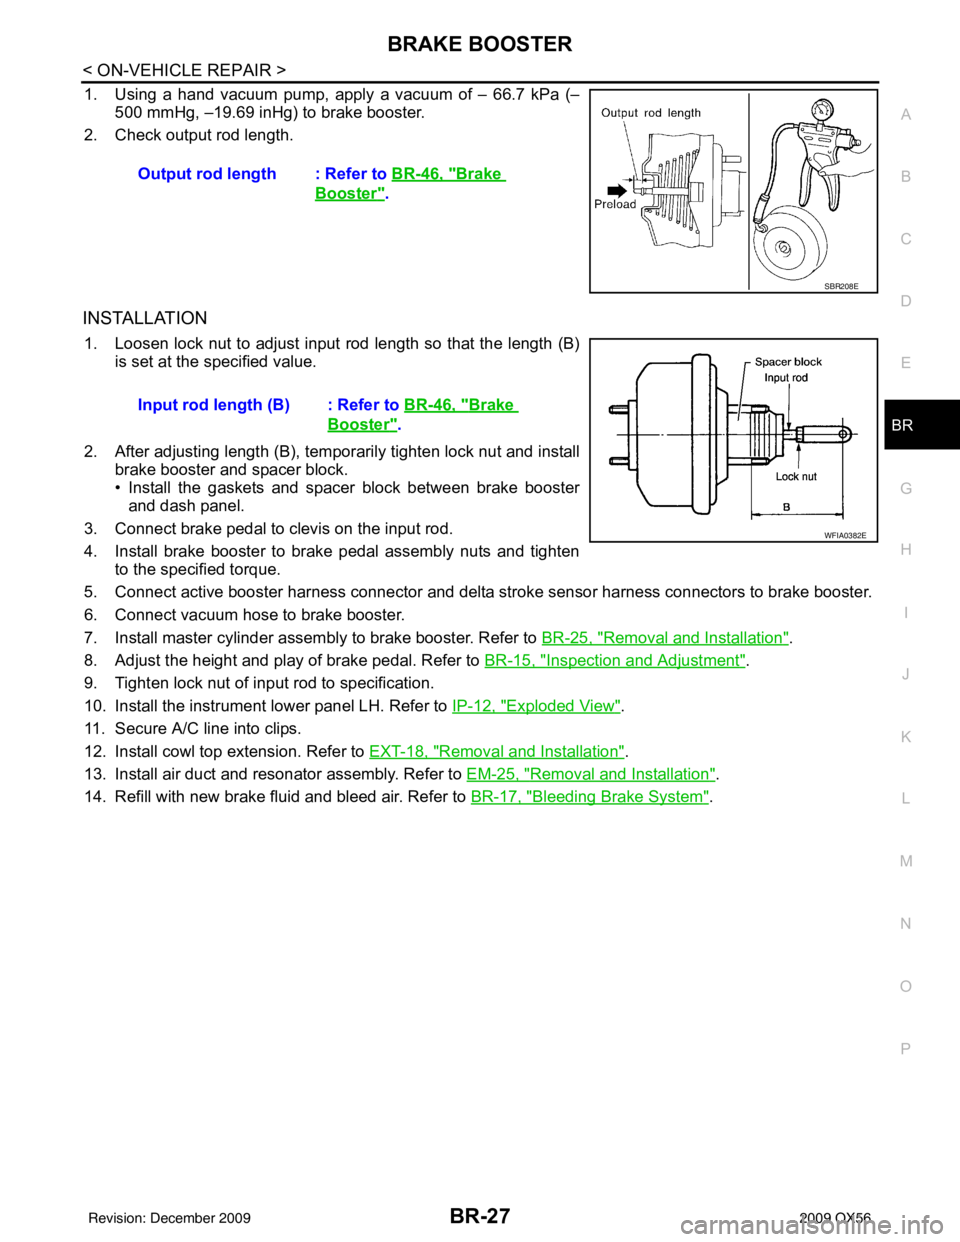
1. Using a hand vacuum pump, apply a vacuum of – 66.7 kPa (– 500 mmHg, –19.69 inHg) to brake booster.
2. Check output rod length.
INSTALLATION
1. Loosen lock nut to adjust input r od length so that the length (B)
is set at the specified value.
2. After adjusting length (B), temporarily tighten lock nut and install brake booster and spacer block.
• Install the gaskets and spacer block between brake boosterand dash panel.
3. Connect brake pedal to clevis on the input rod.
4. Install brake booster to brake pedal assembly nuts and tighten to the specified torque.
5. Connect active booster harness connector and delta st roke sensor harness connectors to brake booster.
6. Connect vacuum hose to brake booster.
7. Install master cylinder assembly to brake booster. Refer to BR-25, "
Removal and Installation".
8. Adjust the height and play of brake pedal. Refer to BR-15, "
Inspection and Adjustment".
9. Tighten lock nut of input rod to specification.
10. Install the instrument lower panel LH. Refer to IP-12, "
Exploded View".
11. Secure A/C line into clips.
12. Install cowl top extension. Refer to EXT-18, "
Removal and Installation".
13. Install air duct and resonator assembly. Refer to EM-25, "
Removal and Installation".
14. Refill with new brake fluid and bleed air. Refer to BR-17, "
Bleeding Brake System".
Output rod length : Refer to
BR-46, "
Brake
Booster".
SBR208E
Input rod length (B) : Refer to BR-46, "Brake
Booster".
WFIA0382E
Revision: December 20092009 QX56
Page 459 of 4171
FRONT DISC BRAKEBR-29
< ON-VEHICLE REPAIR >
C
DE
G H
I
J
K L
M A
B
BR
N
O P
FRONT DISC BRAKE
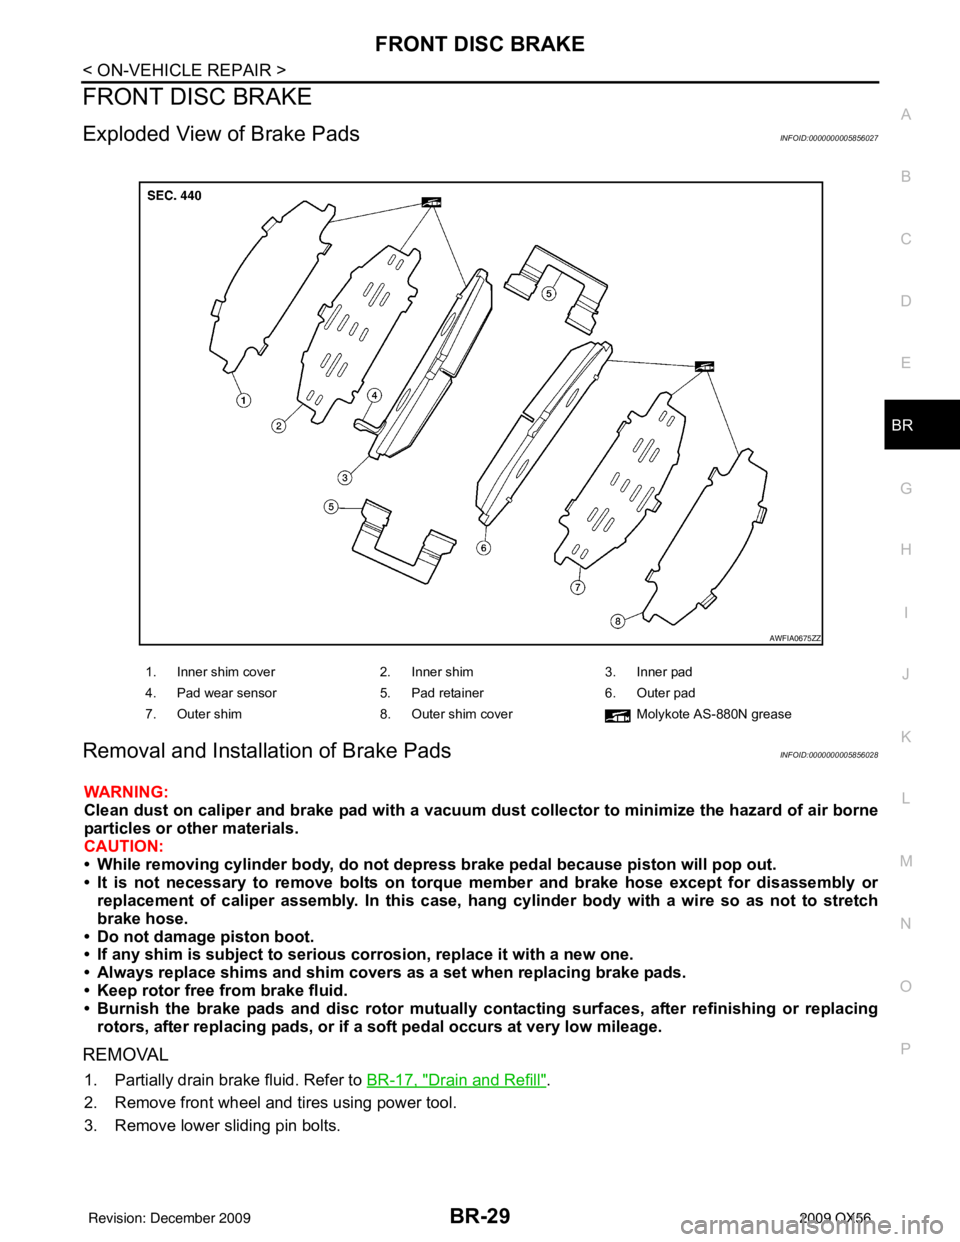
Exploded View of Brake PadsINFOID:0000000005856027
Removal and Installation of Brake PadsINFOID:0000000005856028
WARNING:
Clean dust on caliper and brake pad with a vacuum dust collector to minimize the hazard of air borne
particles or other materials.
CAUTION:
• While removing cylinder bod y, do not depress brake pedal because piston will pop out.
• It is not necessary to remove bolts on torque member and brake hose except for disassembly or replacement of caliper assembly. In this case, hang cylinder body with a wire so as not to stretch
brake hose.
• Do not damage piston boot.
• If any shim is subject to serious corrosion, replace it with a new one.
• Always replace shims and shim covers as a set when replacing brake pads.
• Keep rotor free from brake fluid.
• Burnish the brake pads and disc rotor mutually contacting surfaces, after refinishing or replacing rotors, after replacing pads, or if a so ft pedal occurs at very low mileage.
REMOVAL
1. Partially drain brake fluid. Refer to BR-17, "Drain and Refill".
2. Remove front wheel and tires using power tool.
3. Remove lower sliding pin bolts.
1. Inner shim cover 2. Inner shim3. Inner pad
4. Pad wear sensor 5. Pad retainer6. Outer pad
7. Outer shim 8. Outer shim cover Molykote AS-880N grease
AWFIA0675ZZ
Revision: December 20092009 QX56
Page 460 of 4171
BR-30
< ON-VEHICLE REPAIR >
FRONT DISC BRAKE
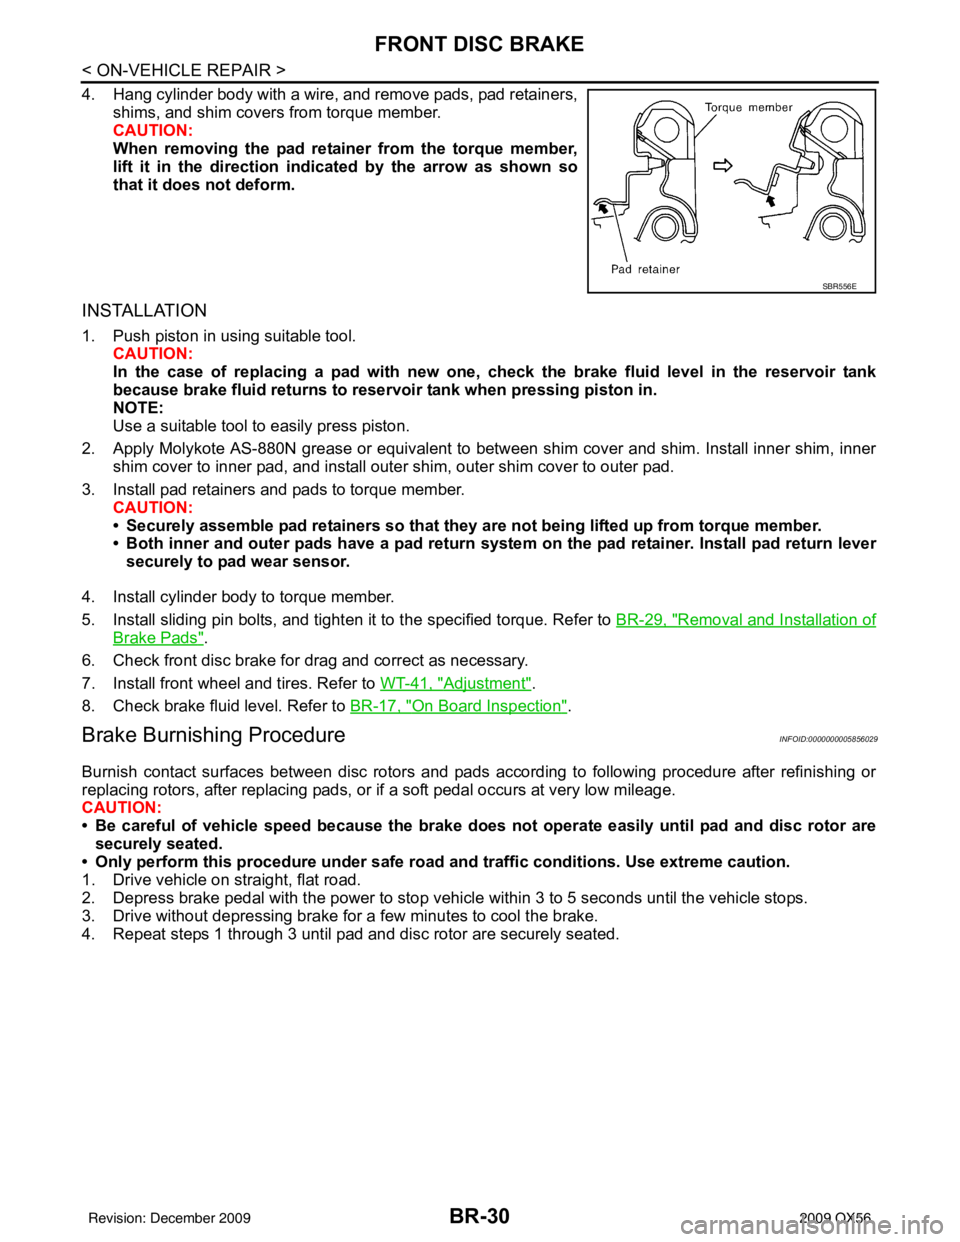
4. Hang cylinder body with a wire, and remove pads, pad retainers,shims, and shim covers from torque member.
CAUTION:
When removing the pad retainer from the torque member,
lift it in the direction indi cated by the arrow as shown so
that it does not deform.
INSTALLATION
1. Push piston in using suitable tool.
CAUTION:
In the case of replacing a pad with new one, ch eck the brake fluid level in the reservoir tank
because brake fluid returns to reservoir tank when pressing piston in.
NOTE:
Use a suitable tool to easily press piston.
2. Apply Molykote AS-880N grease or equivalent to between shim cover and shim. Install inner shim, inner shim cover to inner pad, and install outer shim, outer shim cover to outer pad.
3. Install pad retainers and pads to torque member. CAUTION:
• Securely assemble pad retainers so that they ar e not being lifted up from torque member.
• Both inner and outer pads have a pad return system on the pad retainer. Install pad return lever
securely to pad wear sensor.
4. Install cylinder body to torque member.
5. Install sliding pin bolts, and tighten it to the specified torque. Refer to BR-29, "
Removal and Installation of
Brake Pads".
6. Check front disc brake for drag and correct as necessary.
7. Install front wheel and tires. Refer to WT-41, "
Adjustment".
8. Check brake fluid level. Refer to BR-17, "
On Board Inspection".
Brake Burnishing ProcedureINFOID:0000000005856029
Burnish contact surfaces between disc rotors and pads according to following procedure after refinishing or
replacing rotors, after replacing pads, or if a soft pedal occurs at very low mileage.
CAUTION:
• Be careful of vehicle speed because the brake does not operate easily until pad and disc rotor are securely seated.
• Only perform this procedure under safe road and traffic conditions. Use extreme caution.
1. Drive vehicle on straight, flat road.
2. Depress brake pedal with the power to stop vehicle within 3 to 5 seconds until the vehicle stops.
3. Drive without depressing brake for a few minutes to cool the brake.
4. Repeat steps 1 through 3 until pad and disc rotor are securely seated.
SBR556E
Revision: December 20092009 QX56
Page 467 of 4171
BRAKE MASTER CYLINDERBR-37
< DISASSEMBLY AND ASSEMBLY >
C
DE
G H
I
J
K L
M A
B
BR
N
O P
DISASSEMBLY AND ASSEMBLY
BRAKE MASTER CYLINDER
Disassembly and AssemblyINFOID:0000000004045487
DISASSEMBLY
CAUTION:
• Master cylinder assembly cannot be disassembled.
• Do not drop parts. If a part is dropped, do not use it.
1. Pull the reservoir tank off the master cylinder assembly.
2. Remove the grommets from master cylinder assembly and discard the grommets. CAUTION:
Discard the grommets, do not reuse.
3. Remove the fluid level sensor from the reservoir tank.
4. Remove the front and rear pressure sensors and discard. CAUTION:
Discard the front and rear pressure sensors, do not reuse.
ASSEMBLY
CAUTION:
• Never use mineral oil such as kerosene, g asoline during the cleaning and assembly process.
• Do not drop parts. If a part is dropped, do not use it.
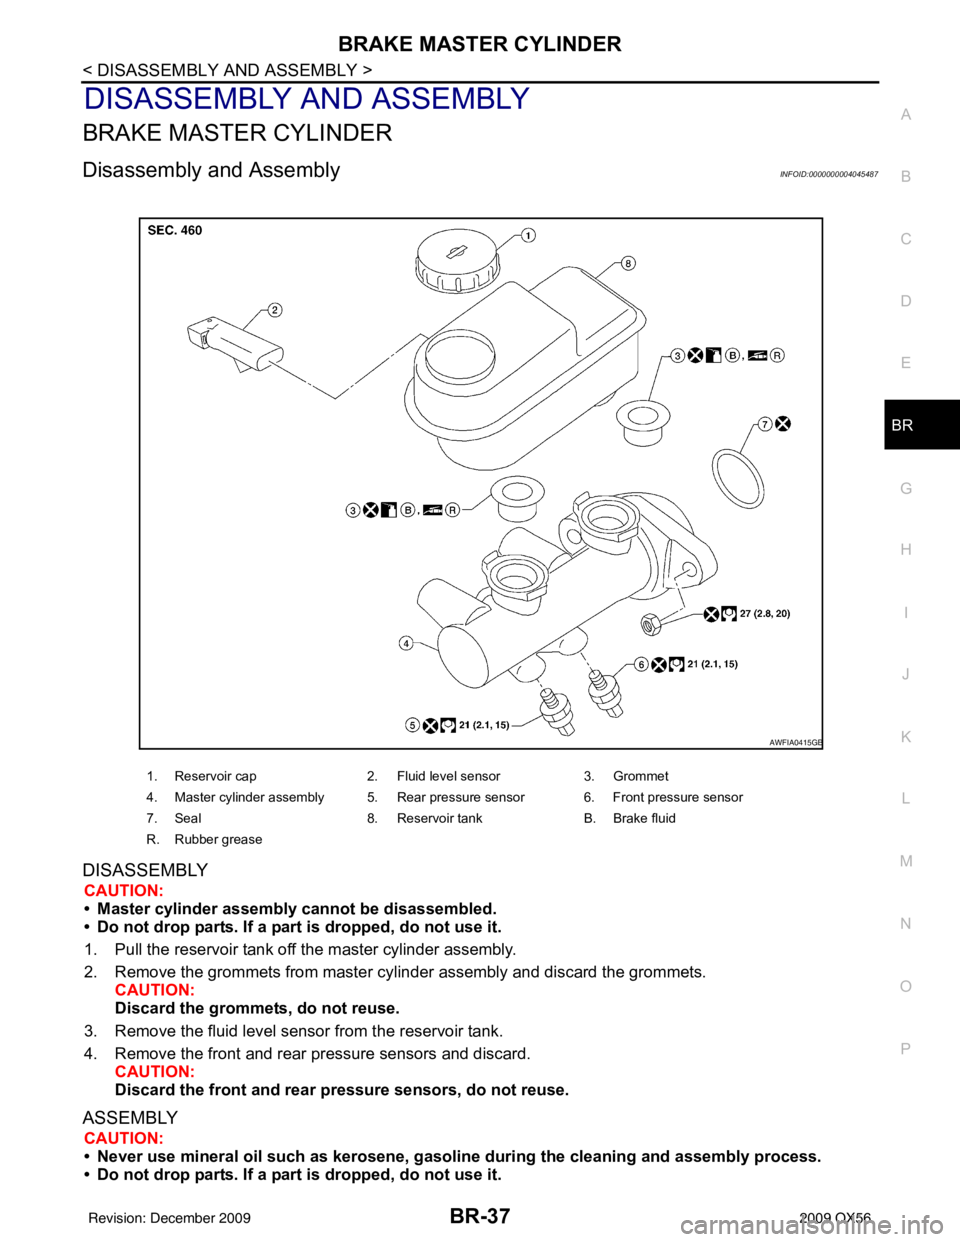
1. Reservoir cap 2. Fluid level sensor3. Grommet
4. Master cylinder assembly 5. Rear pressure sensor 6. Front pressure sensor
7. Seal 8. Reservoir tankB. Brake fluid
R. Rubber grease
AWFIA0415GB
Revision: December 20092009 QX56
Page 468 of 4171

BR-38
< DISASSEMBLY AND ASSEMBLY >
BRAKE MASTER CYLINDER
1. Apply brake fluid or rubber grease to the new grommets, then insert the new grommets into the mastercylinder assembly.
CAUTION:
Do not reuse the grommets.
2. Install the reservoir tank onto the master cylinder assembly.
3. Install the fluid level sensor on the reservoir tank.
4. Install the new front and rear pressure sensors. CAUTION:
Do not reuse the front and rear pressure sensors.
Revision: December 20092009 QX56
Page 478 of 4171

BRC-1
BRAKES
C
DE
G H
I
J
K L
M
SECTION BRC
A
B
BRC
N
O P
CONTENTS
BRAKE CONTROL SYSTEM
VDC/TCS/ABS
BASIC INSPECTION ....... .............................
4
DIAGNOSIS AND REPAIR WORKFLOW ..... .....4
Work Flow ........................................................... ......4
Diagnostic Work Sheet ..............................................7
INSPECTION AND ADJUSTMENT .....................8
ADDITIONAL SERVICE WHEN REPLACING
CONTROL UNIT .................................................... ......
8
ADDITIONAL SERVICE WHEN REPLACING
CONTROL UNIT : Description ..................................
8
ADDITIONAL SERVICE WHEN REPLACING
CONTROL UNIT : Special Repair Requirement .......
8
ADJUSTMENT OF STEERING ANGLE SENSOR
NEUTRAL POSITION ............................................ ......
8
ADJUSTMENT OF STEERING ANGLE SENSOR
NEUTRAL POSITION : Description ..........................
8
ADJUSTMENT OF STEERING ANGLE SENSOR
NEUTRAL POSITION : Special Repair Require-
ment ..........................................................................
8
CALIBRATION OF DECEL G SENSOR ............... ......9
CALIBRATION OF DECEL G SENSOR : Descrip-
tion ............................................................................
9
CALIBRATION OF DECEL G SENSOR : Special
Repair Requirement ..................................................
9
FUNCTION DIAGNOSIS ..............................11
VDC ................................................................ ....11
System Diagram .................................................. ....11
Hydraulic Circuit Diagram .......................................12
System Description ............................................. ....12
Component Parts Location ......................................13
Component Description ...........................................14
TCS .....................................................................15
System Diagram .................................................. ....15
System Description .................................................15
Component Parts Location .................................. ....16
Component Description ...........................................17
ABS ...................................................................18
System Diagram ......................................................18
System Description ..................................................18
Component Parts Location ......................................19
Component Description ...........................................20
EBD ...................................................................21
System Diagram ......................................................21
System Description ..................................................21
Component Parts Location ......................................22
Component Description ...........................................23
DIAGNOSIS SYSTEM [ABS ACTUATOR
AND ELECTRIC UNIT (CONTROL UNIT)] .......
24
CONSULT-III Function (ABS) ..................................24
COMPONENT DIAGNOSIS .........................29
C1101, C1102, C1103, C1104 WHEEL SEN-
SOR-1 ................................................................
29
Description ........................................................... ....29
DTC Logic ................................................................29
Diagnosis Procedure ...............................................29
Component Inspection .............................................31
Special Repair Requirement ....................................31
C1105, C1106, C1107, C1108 WHEEL SEN-
SOR-2 ................................................................
32
Description ...............................................................32
DTC Logic ................................................................32
Diagnosis Procedure ...............................................32
Component Inspection .............................................34
Special Repair Requirement ....................................34
C1109 POWER AND GROUND SYSTEM ........35
Description ...............................................................35
DTC Logic ................................................................35
Diagnosis Procedure ...............................................35
Special Repair Requirement ....................................36
Revision: December 20092009 QX56