flat tire INFINITI QX56 2009 Factory Service Manual
[x] Cancel search | Manufacturer: INFINITI, Model Year: 2009, Model line: QX56, Model: INFINITI QX56 2009Pages: 4171, PDF Size: 84.65 MB
Page 401 of 4171
![INFINITI QX56 2009 Factory Service Manual
BCS
DIAGNOSIS SYSTEM (BCM)BCS-27
< FUNCTION DIAGNOSIS > [BCM]
C
D
E
F
G H
I
J
K L
B A
O P
N
AIR PRESSURE MONITOR
AIR PRESSURE MONITOR : Diagnosis DescriptionINFOID:0000000003776404
DESCRIPTION
During INFINITI QX56 2009 Factory Service Manual
BCS
DIAGNOSIS SYSTEM (BCM)BCS-27
< FUNCTION DIAGNOSIS > [BCM]
C
D
E
F
G H
I
J
K L
B A
O P
N
AIR PRESSURE MONITOR
AIR PRESSURE MONITOR : Diagnosis DescriptionINFOID:0000000003776404
DESCRIPTION
During](/img/42/57031/w960_57031-400.png)
BCS
DIAGNOSIS SYSTEM (BCM)BCS-27
< FUNCTION DIAGNOSIS > [BCM]
C
D
E
F
G H
I
J
K L
B A
O P
N
AIR PRESSURE MONITOR
AIR PRESSURE MONITOR : Diagnosis DescriptionINFOID:0000000003776404
DESCRIPTION
During driving, the TPMS receives the signal transmitt
ed from the transmitter installed in each wheel, when
the tire pressure becomes low. The control unit (BC M) of this system has pressure judgment and trouble diag-
nosis functions.
When the TPMS detects low inflation pressure or anot her unusual symptom, the warning lamps in the combi-
nation meter comes on.
SELF DIAGNOSTIC PROCE DURE (WITH CONSULT-III)
With CONSULT-III
Touch “SELF-DIAG RESULTS” display to show malf unction experienced since the last erasing operation.
Refer to BCS-51, "DTC Index"
.
SELF DIAGNOSTIC PROCE DURE (WITHOUT CONSULT-III)
Without CONSULT-III
To start the self-diagnostic results mode, ground terminal of the tire pressure warning check connector. The
malfunction location is indicated by the warning lamp flashing.
NOTE:
When the low tire warning lamp flashes 5 Hz and continues repeating it, the system is normal.
Test Item Operation Description
OIL PRESSURE SW OFF OFF
ON
BCM transmits the oil pressure switch signal to the combination meter via CAN communica-
tion, which operates the oil pressure gauge in the combination meter.
SEIA0745E
Flickering
pattern Items Diagnostic items detected when··· Check item
15 Tire pressure value (Front LH) Front LH tire pressure drops to 181 kPa (1.8 kg/cm, 25.25 psi) or less.
–
16 Tire pressure value (Front RH) Front RH tire pressure drops to 181 kPa (1.8 kg/cm, 25.25 psi) or less.
17 Tire pressure value (Rear RH) Rear RH tire pressure drops to 181 kPa (1.8 kg/cm, 25.25 psi) or less.
18 Tire pressure value (Rear LH) Rear LH tire pressure drops to 181 kPa (1.8 kg/cm, 25.25 psi) or less.
21 Transmitter no data (Front LH) Data from front LH transmitter can not be received.
WT-27
22 Transmitter no data (Front RH) Data from front RH transmitter can not be received.
23 Transmitter no data (Rear RH) Data from Rear RH transmitter can not be received.
24 Transmitter no data (Rear LH) Data from Rear LH transmitter can not be received.
Revision: December 20092009 QX56
Page 460 of 4171
BR-30
< ON-VEHICLE REPAIR >
FRONT DISC BRAKE
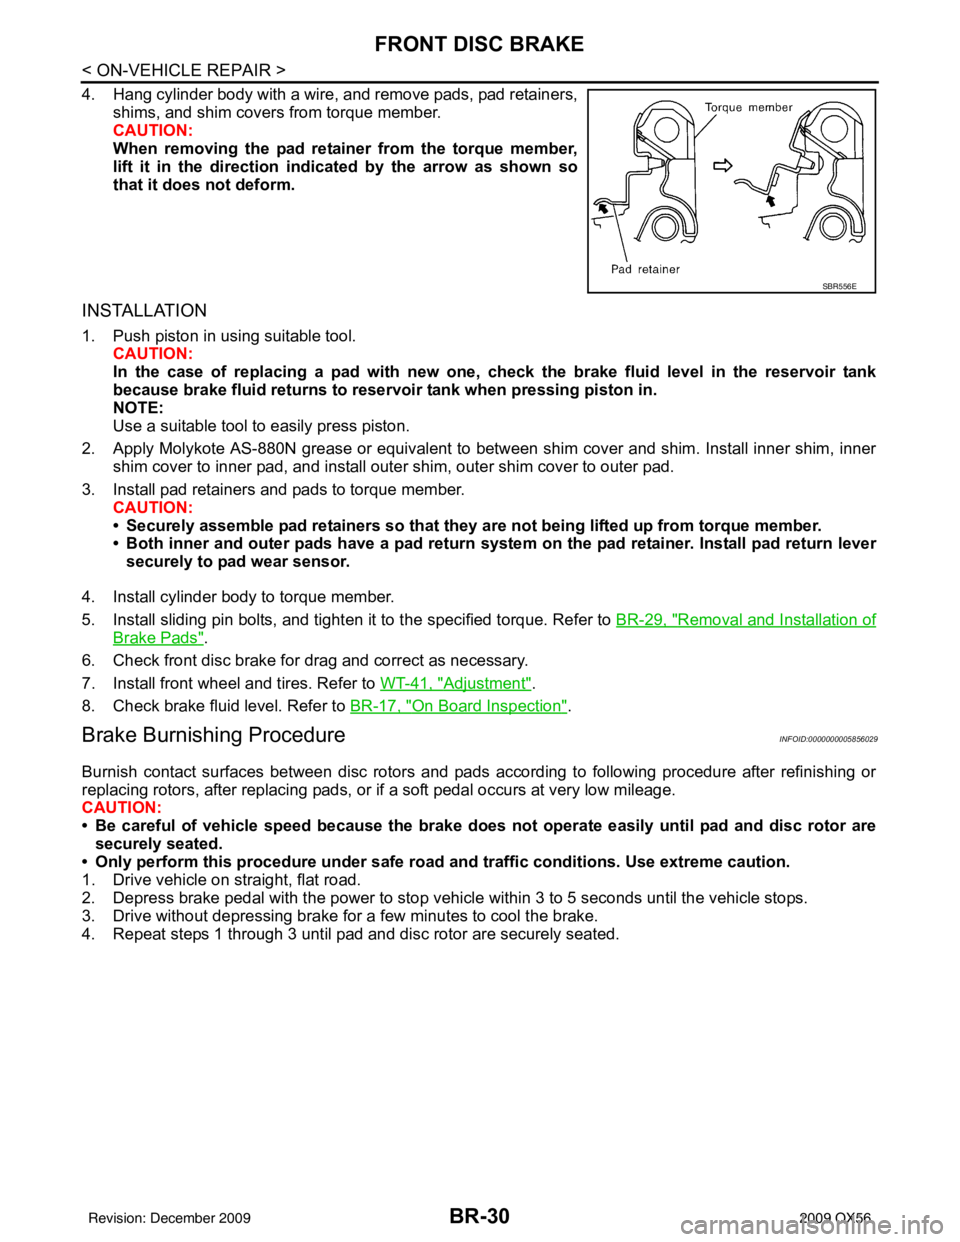
4. Hang cylinder body with a wire, and remove pads, pad retainers,shims, and shim covers from torque member.
CAUTION:
When removing the pad retainer from the torque member,
lift it in the direction indi cated by the arrow as shown so
that it does not deform.
INSTALLATION
1. Push piston in using suitable tool.
CAUTION:
In the case of replacing a pad with new one, ch eck the brake fluid level in the reservoir tank
because brake fluid returns to reservoir tank when pressing piston in.
NOTE:
Use a suitable tool to easily press piston.
2. Apply Molykote AS-880N grease or equivalent to between shim cover and shim. Install inner shim, inner shim cover to inner pad, and install outer shim, outer shim cover to outer pad.
3. Install pad retainers and pads to torque member. CAUTION:
• Securely assemble pad retainers so that they ar e not being lifted up from torque member.
• Both inner and outer pads have a pad return system on the pad retainer. Install pad return lever
securely to pad wear sensor.
4. Install cylinder body to torque member.
5. Install sliding pin bolts, and tighten it to the specified torque. Refer to BR-29, "
Removal and Installation of
Brake Pads".
6. Check front disc brake for drag and correct as necessary.
7. Install front wheel and tires. Refer to WT-41, "
Adjustment".
8. Check brake fluid level. Refer to BR-17, "
On Board Inspection".
Brake Burnishing ProcedureINFOID:0000000005856029
Burnish contact surfaces between disc rotors and pads according to following procedure after refinishing or
replacing rotors, after replacing pads, or if a soft pedal occurs at very low mileage.
CAUTION:
• Be careful of vehicle speed because the brake does not operate easily until pad and disc rotor are securely seated.
• Only perform this procedure under safe road and traffic conditions. Use extreme caution.
1. Drive vehicle on straight, flat road.
2. Depress brake pedal with the power to stop vehicle within 3 to 5 seconds until the vehicle stops.
3. Drive without depressing brake for a few minutes to cool the brake.
4. Repeat steps 1 through 3 until pad and disc rotor are securely seated.
SBR556E
Revision: December 20092009 QX56
Page 465 of 4171
REAR DISC BRAKEBR-35
< ON-VEHICLE REPAIR >
C
DE
G H
I
J
K L
M A
B
BR
N
O P
By pushing in piston, br ake fluid returns to master cylinder reservoir tank. Watch the brake fluid
level in the reservoir tank.
NOTE:
Using a suitable tool, makes it easier to push in the piston.
2. Apply Molykote M-77 grease to knuckle slide where brake pad contacts. CAUTION:
Do not get grease on the brake pads or brake rotor friction surfaces.
3. Install pads to cylinder body.
4. Install cylinder body to torque member
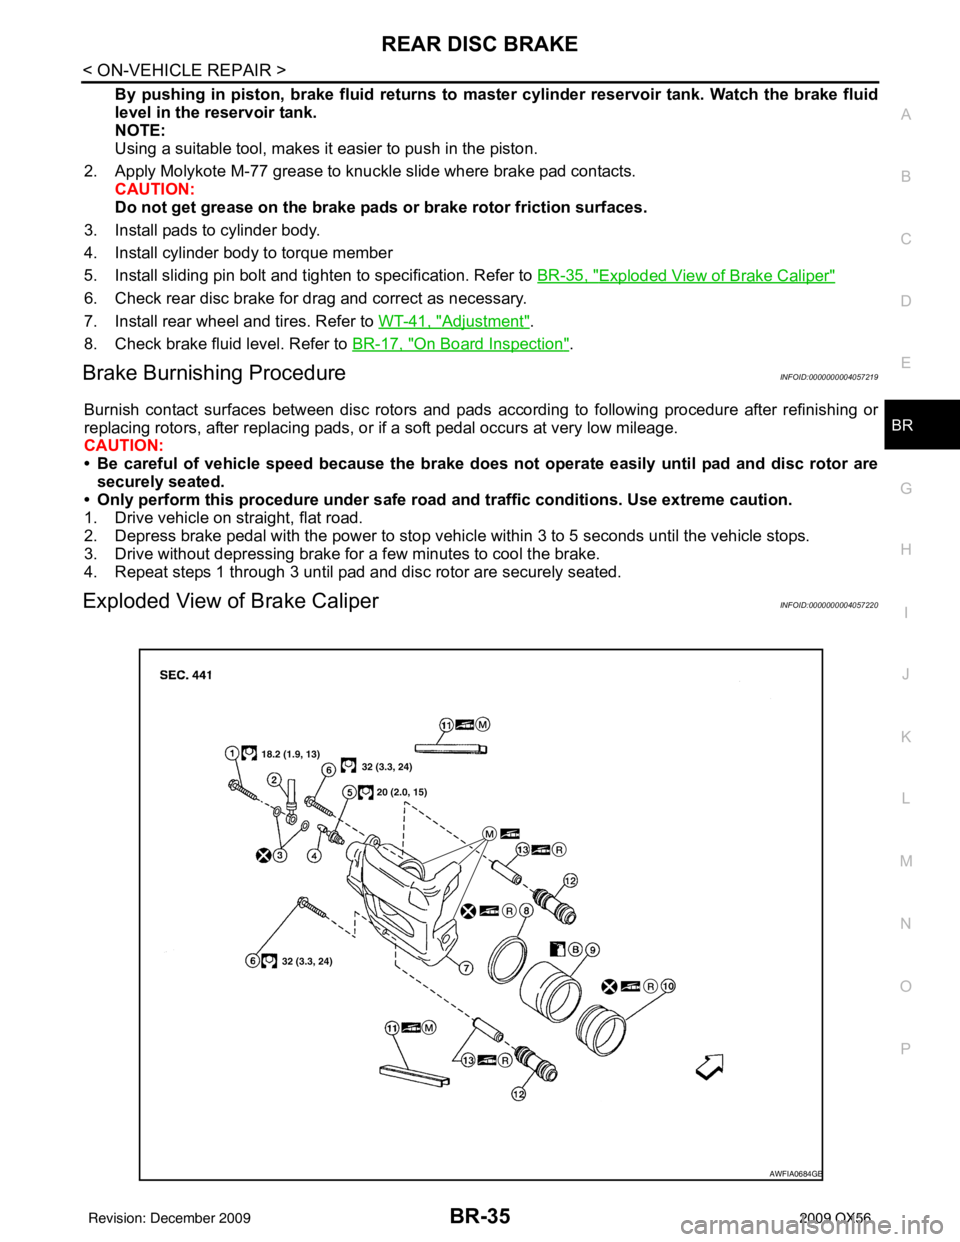
5. Install sliding pin bolt and tighten to specification. Refer to BR-35, "
Exploded View of Brake Caliper"
6. Check rear disc brake for drag and correct as necessary.
7. Install rear wheel and tires. Refer to WT-41, "
Adjustment".
8. Check brake fluid level. Refer to BR-17, "
On Board Inspection".
Brake Burnishing ProcedureINFOID:0000000004057219
Burnish contact surfaces between disc rotors and pads according to following procedure after refinishing or
replacing rotors, after replacing pads, or if a soft pedal occurs at very low mileage.
CAUTION:
• Be careful of vehicle speed because the brake does not operate easily until pad and disc rotor are securely seated.
• Only perform this procedure under safe road and traffic conditions. Use extreme caution.
1. Drive vehicle on straight, flat road.
2. Depress brake pedal with the power to stop vehicle within 3 to 5 seconds until the vehicle stops.
3. Drive without depressing brake for a few minutes to cool the brake.
4. Repeat steps 1 through 3 until pad and disc rotor are securely seated.
Exploded View of Brake CaliperINFOID:0000000004057220
AWFIA0684GB
Revision: December 20092009 QX56
Page 507 of 4171
![INFINITI QX56 2009 Factory Service Manual BRC-30
< COMPONENT DIAGNOSIS >[VDC/TCS/ABS]
C1101, C1102, C1103,
C1104 WHEEL SENSOR-1
3. Spin the wheel of the vehicle by hand and observe the red SENSOR indicator on the ABS active wheel
sensor tes INFINITI QX56 2009 Factory Service Manual BRC-30
< COMPONENT DIAGNOSIS >[VDC/TCS/ABS]
C1101, C1102, C1103,
C1104 WHEEL SENSOR-1
3. Spin the wheel of the vehicle by hand and observe the red SENSOR indicator on the ABS active wheel
sensor tes](/img/42/57031/w960_57031-506.png)
BRC-30
< COMPONENT DIAGNOSIS >[VDC/TCS/ABS]
C1101, C1102, C1103,
C1104 WHEEL SENSOR-1
3. Spin the wheel of the vehicle by hand and observe the red SENSOR indicator on the ABS active wheel
sensor tester. The red SENSOR indicator should flash on and off to indicate an output signal.
NOTE:
If the red SENSOR indicator illuminates but does not flash, reverse the polarity of the tester leads and
retest.
Does the ABS active wheel sensor tester detect a signal?
YES >> GO TO 3
NO >> Replace the wheel sensor. Refer to BRC-114, "
Removal and Installation".
3.CHECK TIRES
Check for inflation pressure, wear and size of each tire.
Are tire pressure and size correct and is tire wear within specifications?
YES >> GO TO 4
NO >> Adjust tire pressure or replace tire(s).
4.CHECK WHEEL BEARINGS
Check wheel bearing axial end play. Refer to FAX-6, "
On-Vehicle Inspection and Service" (front) or RAX-6,
"On-Vehicle Inspection and Service" (rear).
Is the inspection result normal?
YES >> GO TO 5
NO >> Repair or replace as necessary. Refer to FA X - 7 , "
Removal and Installation" (front) or RAX-7,
"Removal and Installation" (rear).
5.CHECK WIRING HARNESS FOR SHORT CIRCUIT
1. Disconnect ABS actuator and elec tric unit (control unit) connec-
tor and wheel sensor connector of malfunction code No.
2. Check continuity between wheel sensor harness connector ter-
minals and ground.
Is the inspection result normal?
YES >> GO TO 6
NO >> Repair the circuit.
6.CHECK WIRING HARNESS FOR OPEN CIRCUIT
1. Check continuity between ABS actuator and electric unit (control unit) harness connector E125 and the malfunctioning wheel sensor harness c onnector E18, E117, C10, or C11.
Is the inspection result normal?
YES >> Replace the ABS actuator and electric unit (control unit). Refer to BRC-116, "Removal and Instal-
lation".
NO >> Repair the circuit. Continuity should not exist.
WFIA0343E
Wheel sensor
ABS actuator and
electric unit (control unit) Wheel sensor
Continuity
Connector Terminal Connector Terminal
Front LH
E12545
E18 1
Ye s
46
2
Front RH 34
E117 1
33 2
Rear LH 37
C11 2
36 1
Rear RH 42
C10 2
43 1
Revision: December 20092009 QX56
Page 510 of 4171
![INFINITI QX56 2009 Factory Service Manual C1105, C1106, C1107, C1108 WHEEL SENSOR-2
BRC-33
< COMPONENT DIAGNOSIS > [VDC/TCS/ABS]
C
D
E
G H
I
J
K L
M A
B
BRC
N
O P
2.CHECK WHEEL SENSOR OUTPUT SIGNAL
1. Connect ABS active wheel sensor tester (J INFINITI QX56 2009 Factory Service Manual C1105, C1106, C1107, C1108 WHEEL SENSOR-2
BRC-33
< COMPONENT DIAGNOSIS > [VDC/TCS/ABS]
C
D
E
G H
I
J
K L
M A
B
BRC
N
O P
2.CHECK WHEEL SENSOR OUTPUT SIGNAL
1. Connect ABS active wheel sensor tester (J](/img/42/57031/w960_57031-509.png)
C1105, C1106, C1107, C1108 WHEEL SENSOR-2
BRC-33
< COMPONENT DIAGNOSIS > [VDC/TCS/ABS]
C
D
E
G H
I
J
K L
M A
B
BRC
N
O P
2.CHECK WHEEL SENSOR OUTPUT SIGNAL
1. Connect ABS active wheel sensor tester (J- 45741) to wheel sensor using appropriate adapter.
2. Turn on the ABS active wheel sensor tester power switch.
NOTE:
The green POWER indicator should illuminate. If the POWER indicator does not illuminate, replace the
battery in the ABS active wheel sensor tester before proceeding.
3. Spin the wheel of the vehicle by hand and observe the red SENSOR indicator on the ABS active wheel
sensor tester. The red SENSOR indicator should flash on and off to indicate an output signal.
NOTE:
If the red SENSOR indicator illuminates but does not flash, reverse the polarity of the tester leads and
retest.
Does the ABS active wheel s ensor tester detect a signal?
YES >> GO TO 3
NO >> Replace the wheel sensor. Refer to BRC-114, "
Removal and Installation".
3.CHECK TIRES
Check for inflation pressure, wear and size of each tire.
Are tire pressure and size correct and is tire wear within specifications?
YES >> GO TO 4
NO >> Adjust tire pressure or replace tire(s).
4.CHECK WHEEL BEARINGS
Check wheel bearing axial end play. Refer to FA X - 6 , "
On-Vehicle Inspection and Service" (front) or RAX-6,
"On-Vehicle Inspection and Service" (rear).
Is the inspection result normal?
YES >> GO TO 5
NO >> Repair or replace as necessary. Refer to FAX-7, "
Removal and Installation" (front) or RAX-7,
"Removal and Installation" (rear).
5.CHECK WIRING HARNESS FOR SHORT CIRCUIT
1. Disconnect ABS actuator and electric unit (control unit) connec- tor and wheel sensor connector of malfunction code No.
2. Check continuity between wheel sensor harness connector ter-
minals and ground.
Is the inspection result normal?
YES >> GO TO 6
NO >> Repair the circuit.
6.CHECK WIRING HARNESS FOR OPEN CIRCUIT
1. Check continuity between ABS actuator and electric unit (control unit) harness connector E125 and the malfunctioning wheel sensor harness connector E18, E117, C10, or C11.Continuity should not exist.
WFIA0343E
Revision: December 20092009 QX56
Page 521 of 4171
![INFINITI QX56 2009 Factory Service Manual BRC-44
< COMPONENT DIAGNOSIS >[VDC/TCS/ABS]
C1115 WHEEL SENSOR
Check for inflation pressure, wear and size of each tire.
Are tire pressure and size correct and is tire wear within specifications?
YES INFINITI QX56 2009 Factory Service Manual BRC-44
< COMPONENT DIAGNOSIS >[VDC/TCS/ABS]
C1115 WHEEL SENSOR
Check for inflation pressure, wear and size of each tire.
Are tire pressure and size correct and is tire wear within specifications?
YES](/img/42/57031/w960_57031-520.png)
BRC-44
< COMPONENT DIAGNOSIS >[VDC/TCS/ABS]
C1115 WHEEL SENSOR
Check for inflation pressure, wear and size of each tire.
Are tire pressure and size correct and is tire wear within specifications?
YES >> GO TO 4
NO >> Adjust tire pressure or replace tire(s).
4.CHECK WHEEL BEARINGS
Check wheel bearing axial end play. Refer to FAX-6, "
On-Vehicle Inspection and Service" (front) or RAX-6,
"On-Vehicle Inspection and Service" (rear).
Is the inspection result normal?
YES >> GO TO 5
NO >> Repair or replace as necessary. Refer to FA X - 7 , "
Removal and Installation" (front) or RAX-7,
"Removal and Installation" (rear).
5.CHECK WIRING HARNESS FOR SHORT CIRCUIT
1. Disconnect ABS actuator and elec tric unit (control unit) connec-
tor and wheel sensor connector of malfunction code No.
2. Check continuity between wheel sensor harness connector ter-
minals and ground.
Is the inspection result normal?
YES >> GO TO 6
NO >> Repair the circuit.
6.CHECK WIRING HARNESS FOR OPEN CIRCUIT
1. Check continuity between ABS actuator and electric unit (control unit) harness connector E125 and the malfunctioning wheel sensor harness c onnector E18, E117, C10, or C11.
Is the inspection result normal?
YES >> Replace the ABS actuator and electric unit (control unit). Refer to BRC-116, "Removal and Instal-
lation".
NO >> Repair the circuit.
Component InspectionINFOID:0000000003772531
1.CHECK DATA MONITOR
On “DATA MONITOR”, select “FR LH SENSOR”, “FR RH SENSOR”, “RR LH SENSOR”, and “RR RH SEN-
SOR”, and check the vehicle speed. Continuity should not exist.
WFIA0343E
Wheel sensor
ABS actuator and
electric unit (control unit) Wheel sensor
Continuity
Connector Terminal Connector Terminal
Front LH
E12545
E18 1
Ye s
46
2
Front RH 34
E117 1
33 2
Rear LH 37
C11 2
36 1
Rear RH 42
C10 2
43 1
Wheel sensorVehicle speed (DATA MONITOR)
Revision: December 20092009 QX56
Page 2091 of 4171
ADJUSTMENT AND INSPECTIONEXL-143
< ON-VEHICLE REPAIR >
C
DE
F
G H
I
J
K
M A
B
EXL
N
O P
ON-VEHICLE REPAIR
ADJUSTMENT AND INSPECTION
HEADLAMP
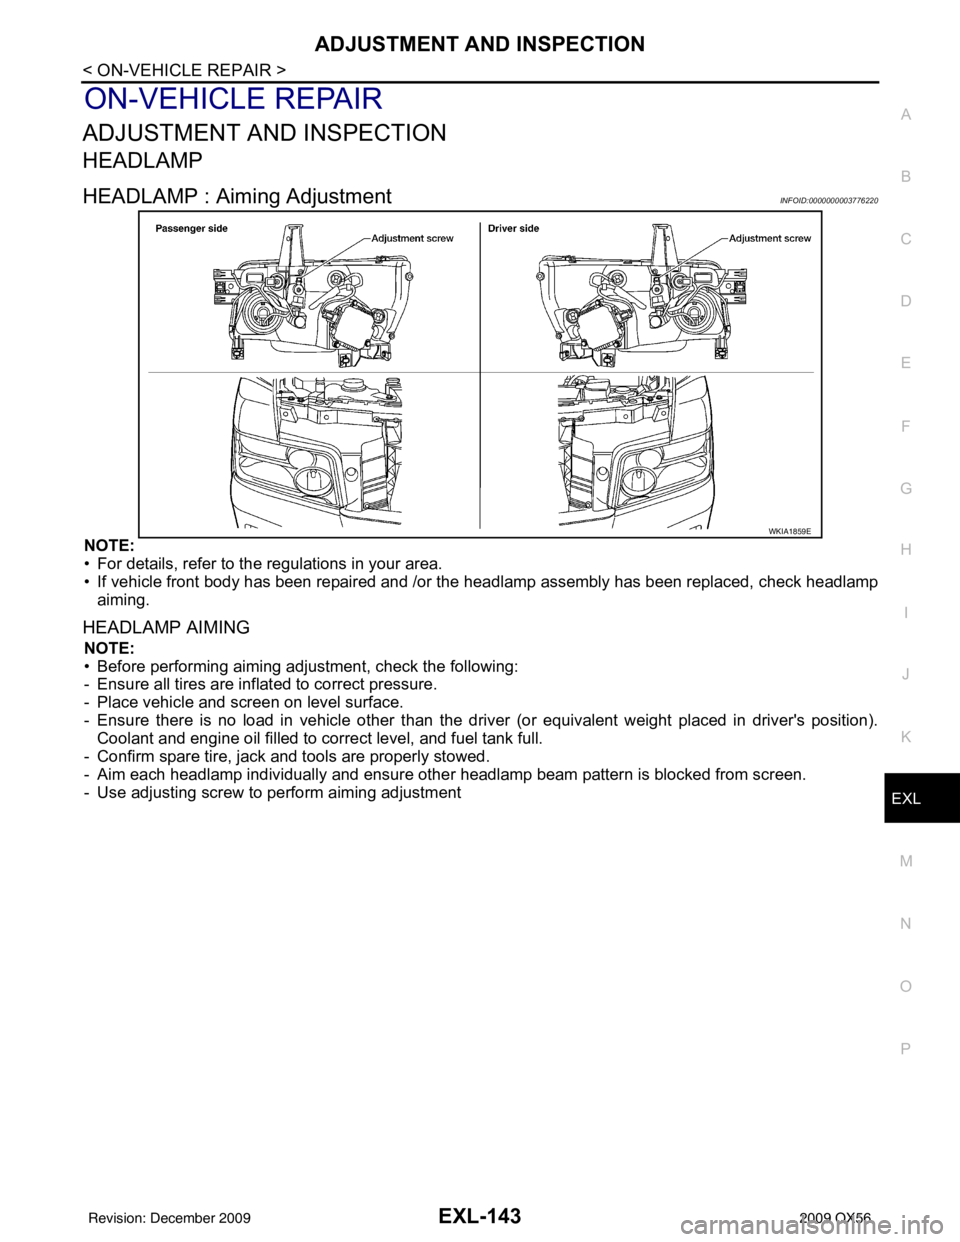
HEADLAMP : Aiming AdjustmentINFOID:0000000003776220
NOTE:
• For details, refer to the regulations in your area.
• If vehicle front body has been repaired and /or the headlamp assembly has been replaced, check headlamp
aiming.
HEADLAMP AIMING
NOTE:
• Before performing aiming adjustment, check the following:
- Ensure all tires are inflated to correct pressure.
- Place vehicle and screen on level surface.
- Ensure there is no load in vehicle other than the driver (or equivalent weight placed in driver's position). Coolant and engine oil filled to correct level, and fuel tank full.
- Confirm spare tire, jack and tools are properly stowed.
- Aim each headlamp individually and ensure other headlamp beam pattern is blocked from screen.
- Use adjusting screw to perform aiming adjustment
WKIA1859E
Revision: December 20092009 QX56
Page 2092 of 4171
EXL-144
< ON-VEHICLE REPAIR >
ADJUSTMENT AND INSPECTION
NOTE:
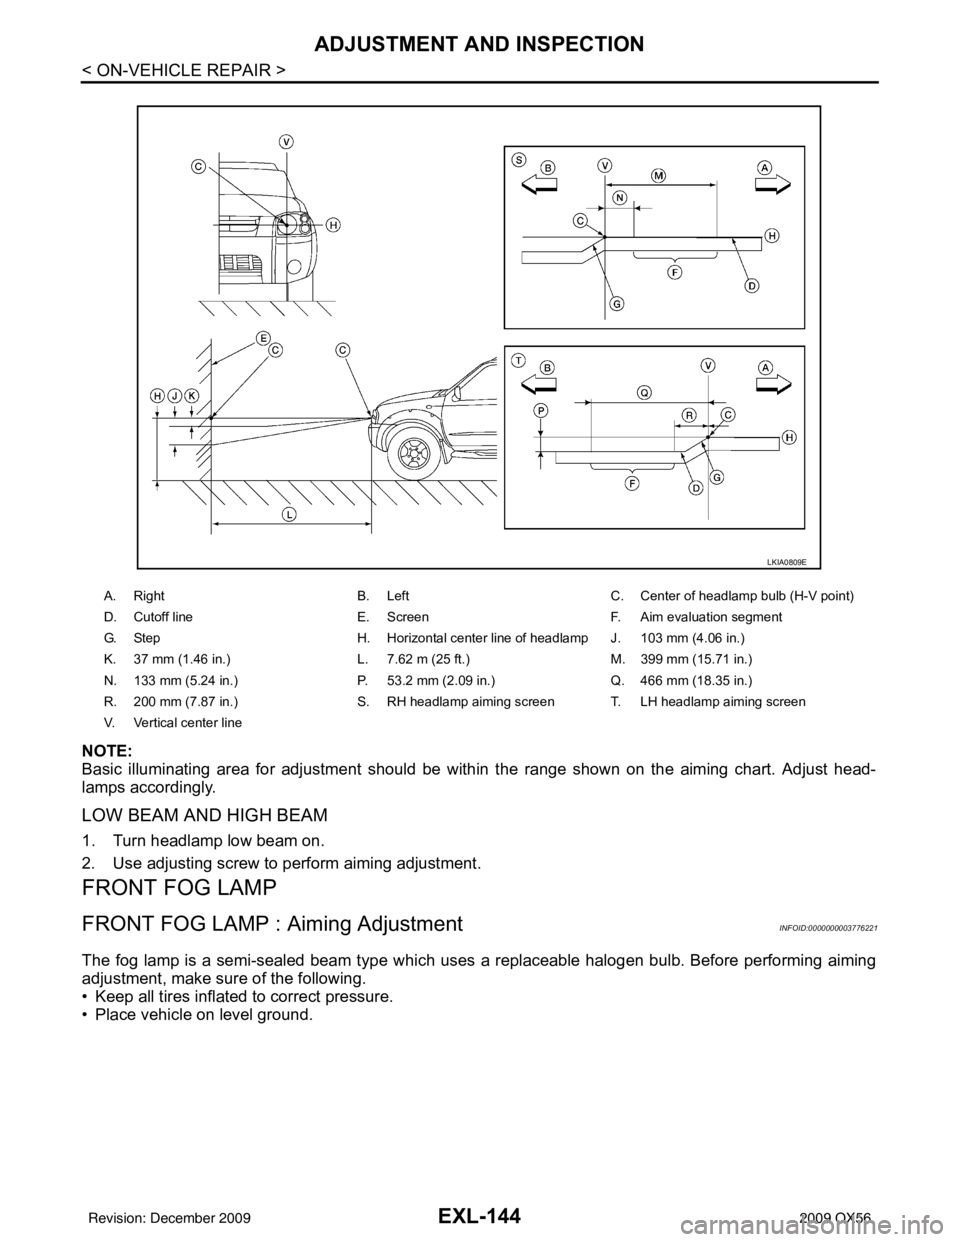
Basic illuminating area for adjustment should be within the range shown on the aiming chart. Adjust head-
lamps accordingly.
LOW BEAM AND HIGH BEAM
1. Turn headlamp low beam on.
2. Use adjusting screw to perform aiming adjustment.
FRONT FOG LAMP
FRONT FOG LAMP : Aiming AdjustmentINFOID:0000000003776221
The fog lamp is a semi-sealed beam type which uses a replaceable halogen bulb. Before performing aiming
adjustment, make sure of the following.
• Keep all tires inflated to correct pressure.
• Place vehicle on level ground.
A. RightB. Left C. Center of headlamp bulb (H-V point)
D. Cutoff line E. ScreenF. Aim evaluation segment
G. Step H. Horizontal center line of headlamp J. 103 mm (4.06 in.)
K. 37 mm (1.46 in.) L. 7.62 m (25 ft.) M. 399 mm (15.71 in.)
N. 133 mm (5.24 in.) P. 53.2 mm (2.09 in.)Q. 466 mm (18.35 in.)
R. 200 mm (7.87 in.) S. RH headlamp aiming screen T. LH headlamp aiming screen
V. Vertical center line
LKIA0809E
Revision: December 20092009 QX56
Page 2176 of 4171
FSU-6
< ON-VEHICLE MAINTENANCE >
ON-VEHICLE SERVICE
ON-VEHICLE MAINTENANCE
ON-VEHICLE SERVICE
Front Suspension PartsINFOID:0000000003772269
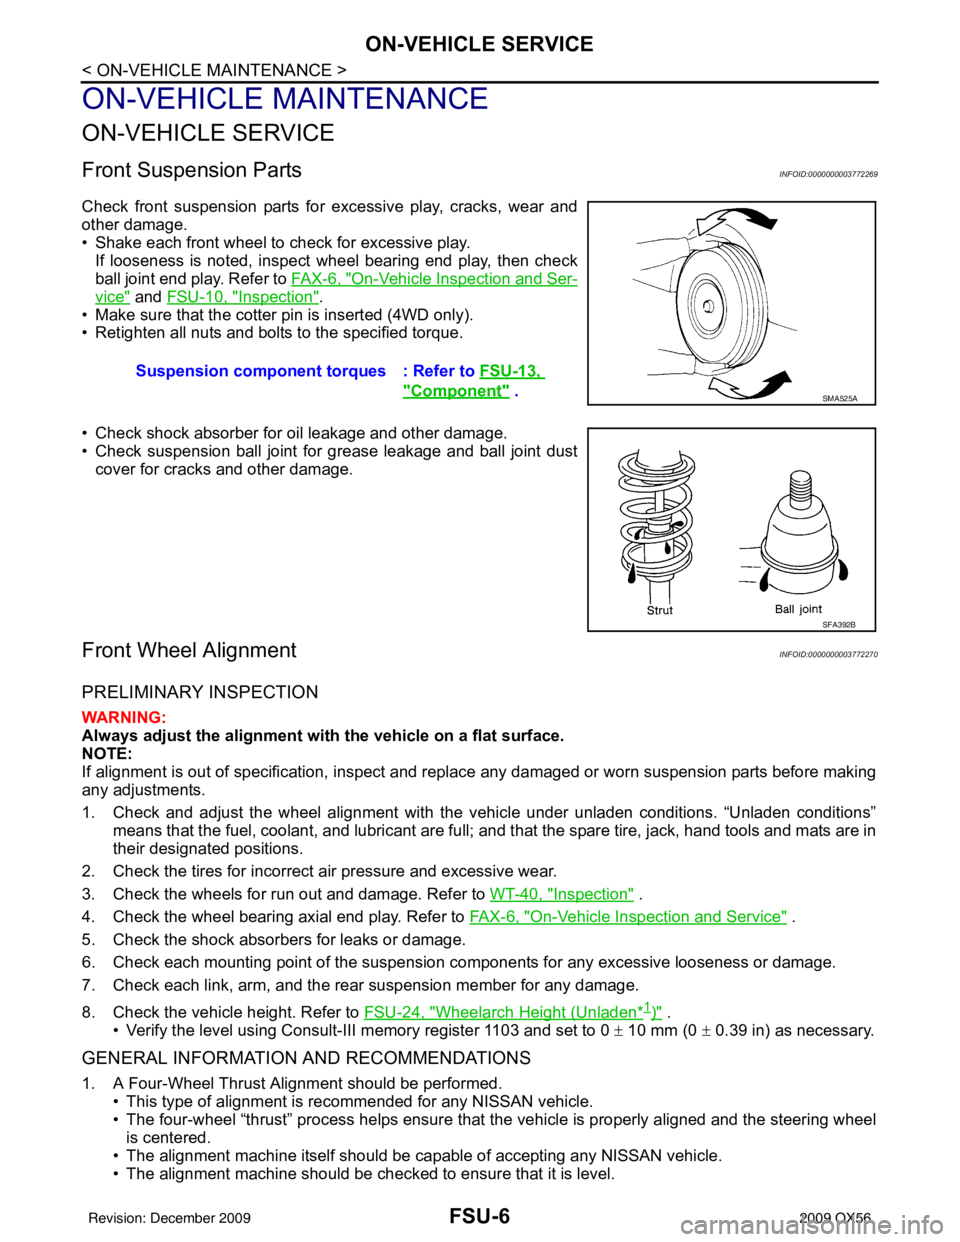
Check front suspension parts for excessive play, cracks, wear and
other damage.
• Shake each front wheel to check for excessive play.If looseness is noted, inspect wheel bearing end play, then check
ball joint end play. Refer to FA X - 6 , "
On-Vehicle Inspection and Ser-
vice" and FSU-10, "Inspection".
• Make sure that the cotter pin is inserted (4WD only).
• Retighten all nuts and bolts to the specified torque.
• Check shock absorber for oil leakage and other damage.
• Check suspension ball joint for grease leakage and ball joint dust cover for cracks and other damage.
Front Wheel AlignmentINFOID:0000000003772270
PRELIMINARY INSPECTION
WARNING:
Always adjust the alignment with the vehicle on a flat surface.
NOTE:
If alignment is out of specificat ion, inspect and replace any damaged or worn suspension parts before making
any adjustments.
1. Check and adjust the wheel alignment with the vehicle under unladen conditions. “Unladen conditions”
means that the fuel, coolant, and lubricant are full; and that the spare tire, jack, hand tools and mats are in
their designated positions.
2. Check the tires for incorrect air pressure and excessive wear.
3. Check the wheels for run out and damage. Refer to WT-40, "
Inspection" .
4. Check the wheel bearing axial end play. Refer to FA X - 6 , "
On-Vehicle Inspection and Service" .
5. Check the shock absorbers for leaks or damage.
6. Check each mounting point of the suspension components for any excessive looseness or damage.
7. Check each link, arm, and the rear suspension member for any damage.
8. Check the vehicle height. Refer to FSU-24, "
Wheelarch Height (Unladen*1)" .
• Verify the level using Consult-III memory register 1103 and set to 0 ± 10 mm (0 ± 0.39 in) as necessary.
GENERAL INFORMATION AND RECOMMENDATIONS
1. A Four-Wheel Thrust Alignment should be performed.
• This type of alignment is recommended for any NISSAN vehicle.
• The four-wheel “thrust” process helps ensure that the vehicle is properly aligned and the steering wheel
is centered.
• The alignment machine itself should be ca pable of accepting any NISSAN vehicle.
• The alignment machine should be checked to ensure that it is level. Suspension component
torques : Refer to FSU-13,
"Component" . SMA525A
SFA392B
Revision: December 20092009 QX56
Page 2178 of 4171
FSU-8
< ON-VEHICLE MAINTENANCE >
ON-VEHICLE SERVICE
• Always perform the following procedure on a flat surface.
• Make sure that no person is in front of the vehicle before pushing it.
1. Bounce the front of vehicle up and down to stabilize the vehicle height (posture).
2. Push the vehicle straight ahead about 5 m (16 ft).
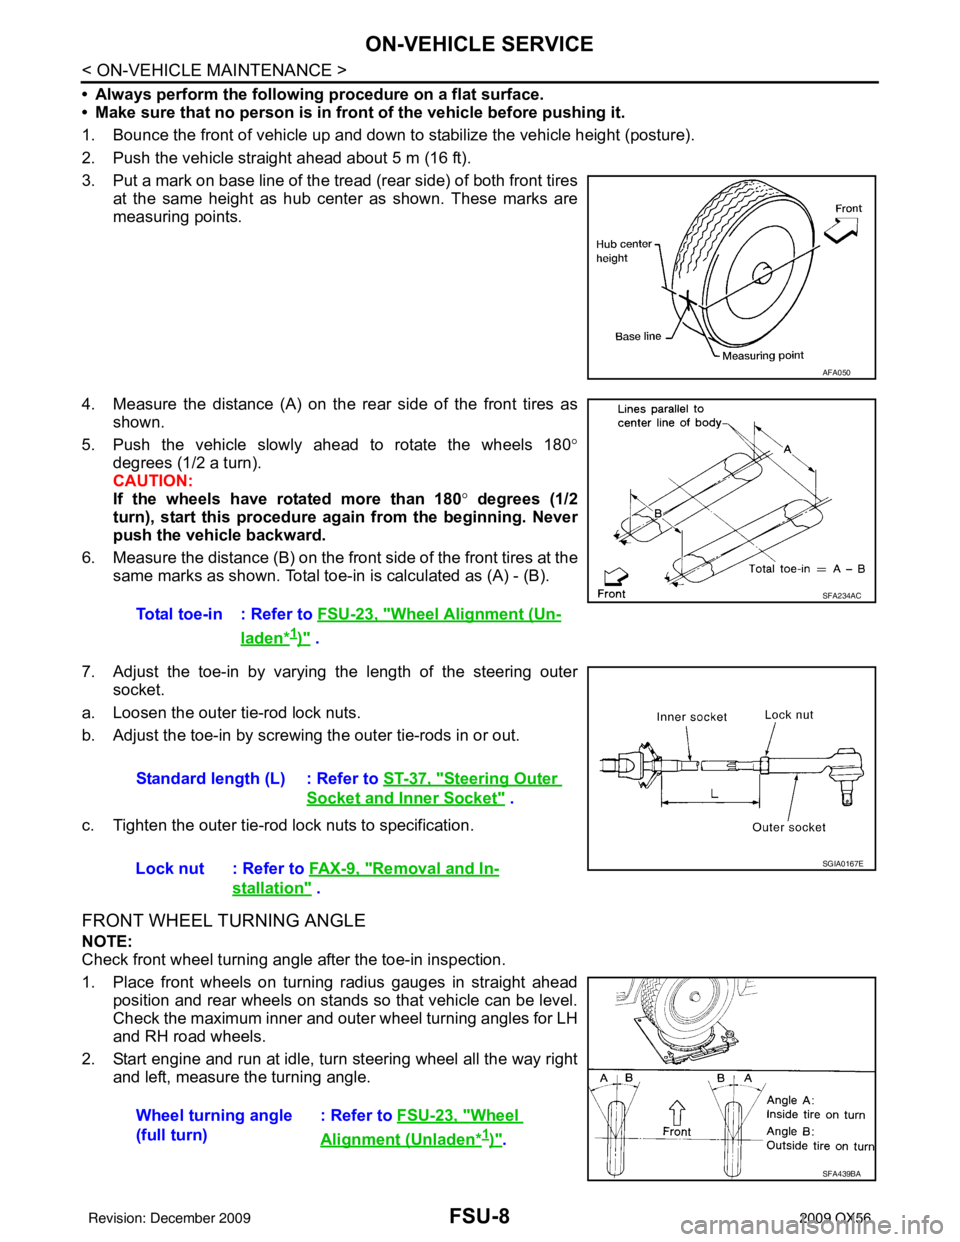
3. Put a mark on base line of the tread (rear side) of both front tires at the same height as hub center as shown. These marks are
measuring points.
4. Measure the distance (A) on the rear side of the front tires as shown.
5. Push the vehicle slowly ahead to rotate the wheels 180 °
degrees (1/2 a turn).
CAUTION:
If the wheels have rotated more than 180 ° degrees (1/2
turn), start this procedure again from the beginning. Never
push the vehicle backward.
6. Measure the distance (B) on the front side of the front tires at the
same marks as shown. Total toe- in is calculated as (A) - (B).
7. Adjust the toe-in by varying the length of the steering outer socket.
a. Loosen the outer tie-rod lock nuts.
b. Adjust the toe-in by screwing the outer tie-rods in or out.
c. Tighten the outer tie-rod lock nuts to specification.
FRONT WHEEL TURNING ANGLE
NOTE:
Check front wheel turning angle after the toe-in inspection.
1. Place front wheels on turning radius gauges in straight ahead position and rear wheels on stands so that vehicle can be level.
Check the maximum inner and outer wheel turning angles for LH
and RH road wheels.
2. Start engine and run at idle, turn steering wheel all the way right and left, measure the turning angle.
AFA050
Total toe-in : Refer to FSU-23, "Wheel Alignment (Un-
laden*1)" .
SFA234AC
Standard length (L) : Refer to ST-37, "Steering Outer
Socket and Inner Socket" .
Lock nut : Refer to FA X - 9 , "
Removal and In-
stallation" .
SGIA0167E
Wheel turning angle
(full turn) : Refer to
FSU-23, "Wheel
Alignment (Unladen*1)".
SFA439BA
Revision: December 20092009 QX56