height adjustment INFINITI QX56 2009 Factory Service Manual
[x] Cancel search | Manufacturer: INFINITI, Model Year: 2009, Model line: QX56, Model: INFINITI QX56 2009Pages: 4171, PDF Size: 84.65 MB
Page 7 of 4171
QUICK REFERNCE CHART: QX56
2010
*2: Verify the vehicle height. If vehicle height is not within ± 10 mm (0.39 in) of the specification, perform the control unit initialization pro-
cedure.
Brake SpecificationsINFOID:0000000005987157
Unit: mm (in)
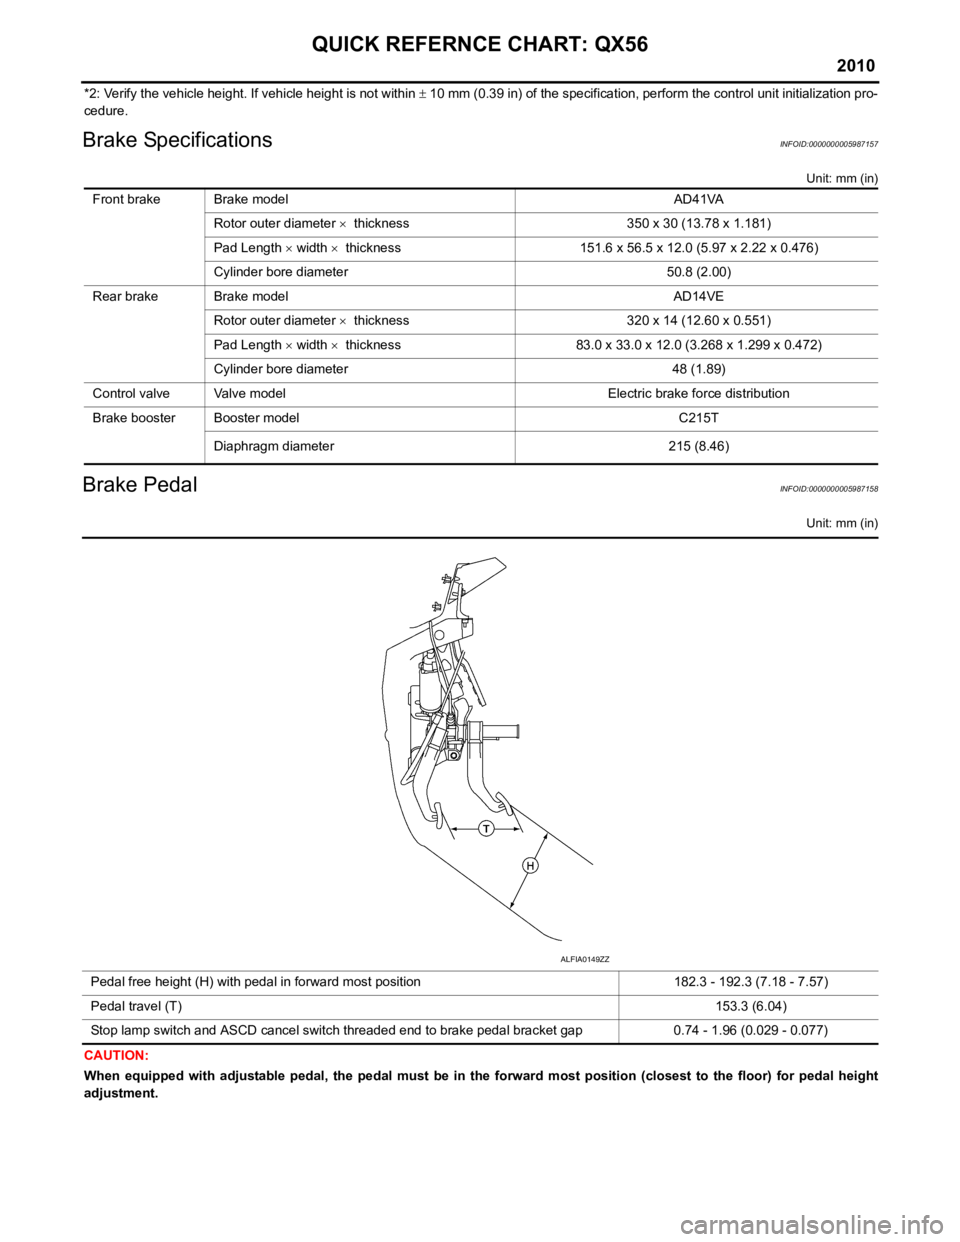
Brake PedalINFOID:0000000005987158
Unit: mm (in)
CAUTION:
When equipped with adjustable pedal, the pedal must be in th e forward most position (closest to the floor) for pedal height
adjustment. Front brake Brake model AD41VA
Rotor outer diameter × thickness 350 x 30 (13.78 x 1.181)
Pad Length × width × thickness 151.6 x 56.5 x 12.0 (5.97 x 2.22 x 0.476)
Cylinder bore diameter 50.8 (2.00)
Rear brake Brake model AD14VE Rotor outer diameter × thickness 320 x 14 (12.60 x 0.551)
Pad Length × width × thickness 83.0 x 33.0 x 12.0 (3.268 x 1.299 x 0.472)
Cylinder bore diameter 48 (1.89)
Control valve Valve model Electric brake force distribution
Brake booster Booster model C215T
Diaphragm diameter 215 (8.46)
Pedal free height (H) with pedal in forward most position 182.3 - 192.3 (7.18 - 7.57)
Pedal travel (T) 153.3 (6.04)
Stop lamp switch and ASCD cancel switch threaded end to brake pedal bracket gap 0.74 - 1.96 (0.029 - 0.077)
ALFIA0149ZZ
Page 445 of 4171
BRAKE PEDALBR-15
< ON-VEHICLE MAINTENANCE >
C
DE
G H
I
J
K L
M A
B
BR
N
O P
ON-VEHICLE MAINTENANCE
BRAKE PEDAL
Inspection and AdjustmentINFOID:0000000004068343
INSPECTION
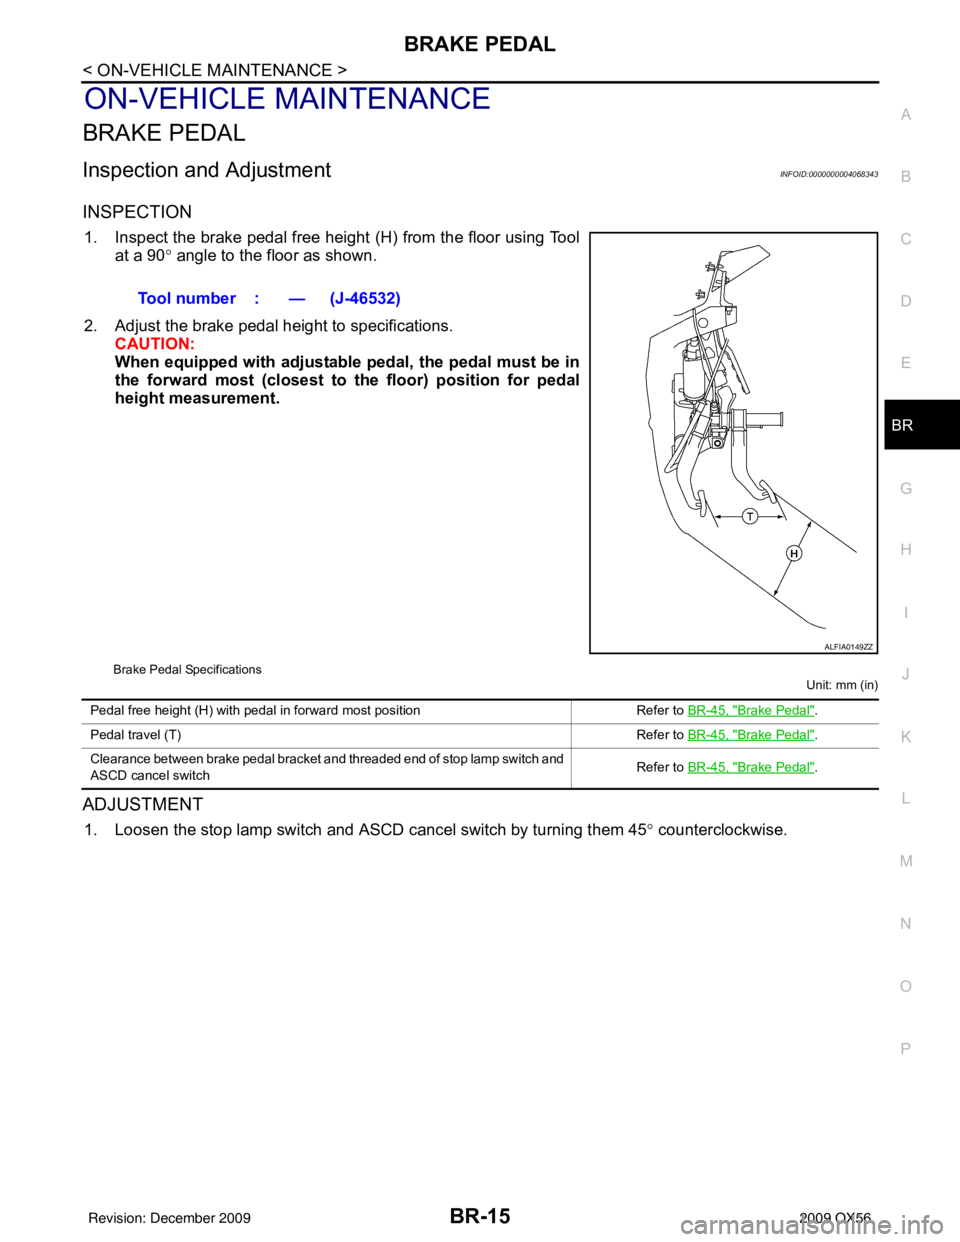
1. Inspect the brake pedal free height (H) from the floor using Tool at a 90 ° angle to the floor as shown.
2. Adjust the brake pedal height to specifications. CAUTION:
When equipped with adjustable pedal, the pedal must be in
the forward most (closest to th e floor) position for pedal
height measurement.
Brake Pedal Specifications
Unit: mm (in)
ADJUSTMENT
1. Loosen the stop lamp switch and ASCD cancel switch by turning them 45° counterclockwise.
Tool number : — (J-46532)
ALFIA0149ZZ
Pedal free height (H) with pedal in forward most position
Refer to BR-45, "Brake Pedal".
Pedal travel (T) Refer to BR-45, "
Brake Pedal".
Clearance between brake pedal bracket and threaded end of stop lamp switch and
ASCD cancel switch Refer to
BR-45, "
Brake Pedal".
Revision: December 20092009 QX56
Page 457 of 4171
BRAKE BOOSTERBR-27
< ON-VEHICLE REPAIR >
C
DE
G H
I
J
K L
M A
B
BR
N
O P
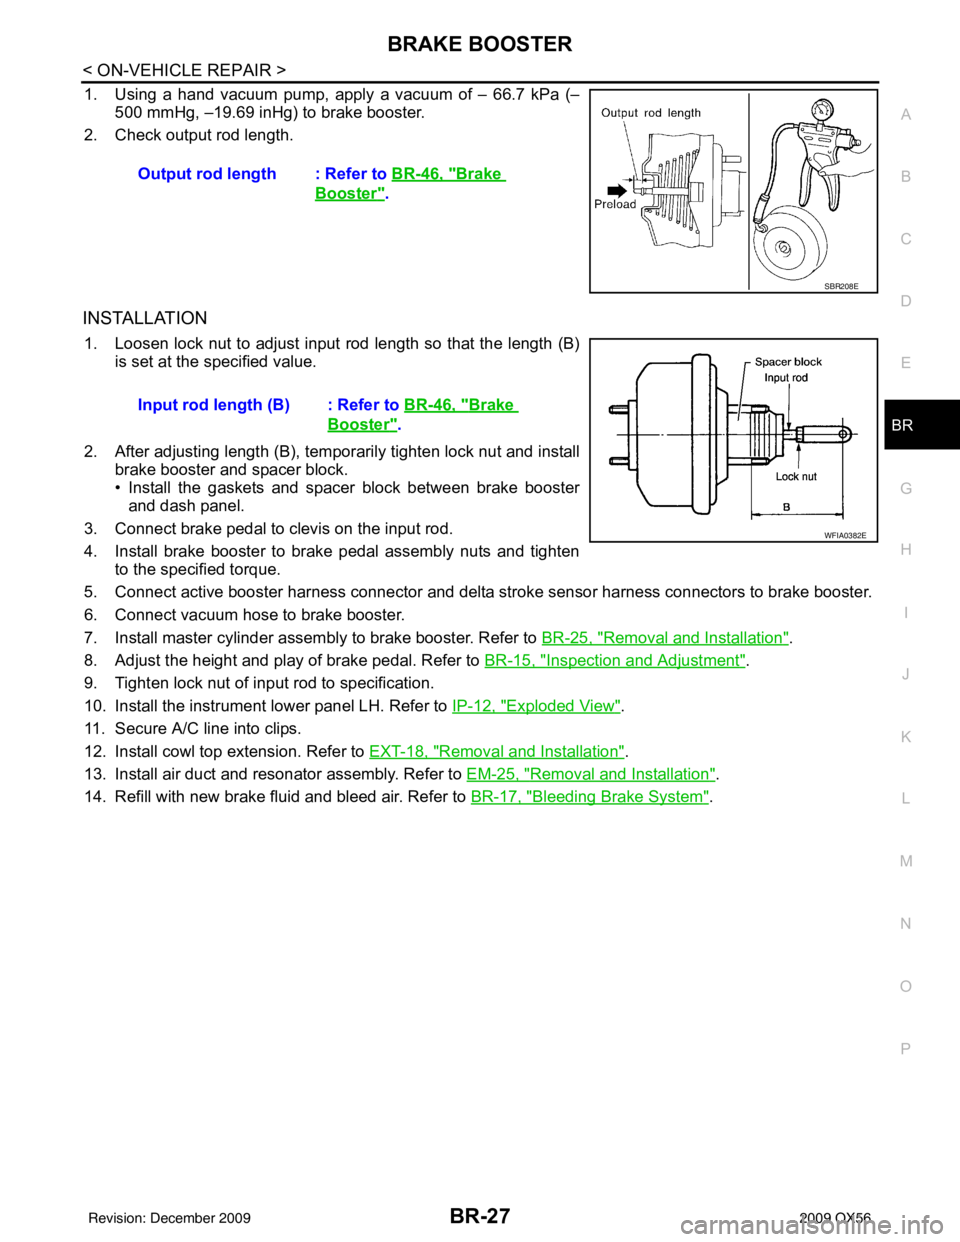
1. Using a hand vacuum pump, apply a vacuum of – 66.7 kPa (– 500 mmHg, –19.69 inHg) to brake booster.
2. Check output rod length.
INSTALLATION
1. Loosen lock nut to adjust input r od length so that the length (B)
is set at the specified value.
2. After adjusting length (B), temporarily tighten lock nut and install brake booster and spacer block.
• Install the gaskets and spacer block between brake boosterand dash panel.
3. Connect brake pedal to clevis on the input rod.
4. Install brake booster to brake pedal assembly nuts and tighten to the specified torque.
5. Connect active booster harness connector and delta st roke sensor harness connectors to brake booster.
6. Connect vacuum hose to brake booster.
7. Install master cylinder assembly to brake booster. Refer to BR-25, "
Removal and Installation".
8. Adjust the height and play of brake pedal. Refer to BR-15, "
Inspection and Adjustment".
9. Tighten lock nut of input rod to specification.
10. Install the instrument lower panel LH. Refer to IP-12, "
Exploded View".
11. Secure A/C line into clips.
12. Install cowl top extension. Refer to EXT-18, "
Removal and Installation".
13. Install air duct and resonator assembly. Refer to EM-25, "
Removal and Installation".
14. Refill with new brake fluid and bleed air. Refer to BR-17, "
Bleeding Brake System".
Output rod length : Refer to
BR-46, "
Brake
Booster".
SBR208E
Input rod length (B) : Refer to BR-46, "Brake
Booster".
WFIA0382E
Revision: December 20092009 QX56
Page 475 of 4171
SERVICE DATA AND SPECIFICATIONS (SDS)BR-45
< SERVICE DATA AND SPECIFICATIONS (SDS)
C
DE
G H
I
J
K L
M A
B
BR
N
O P
SERVICE DATA AND SPECIFICATIONS (SDS)
SERVICE DATA AND SPECIFICATIONS (SDS)
General SpecificationINFOID:0000000004181524
Unit: mm (in)
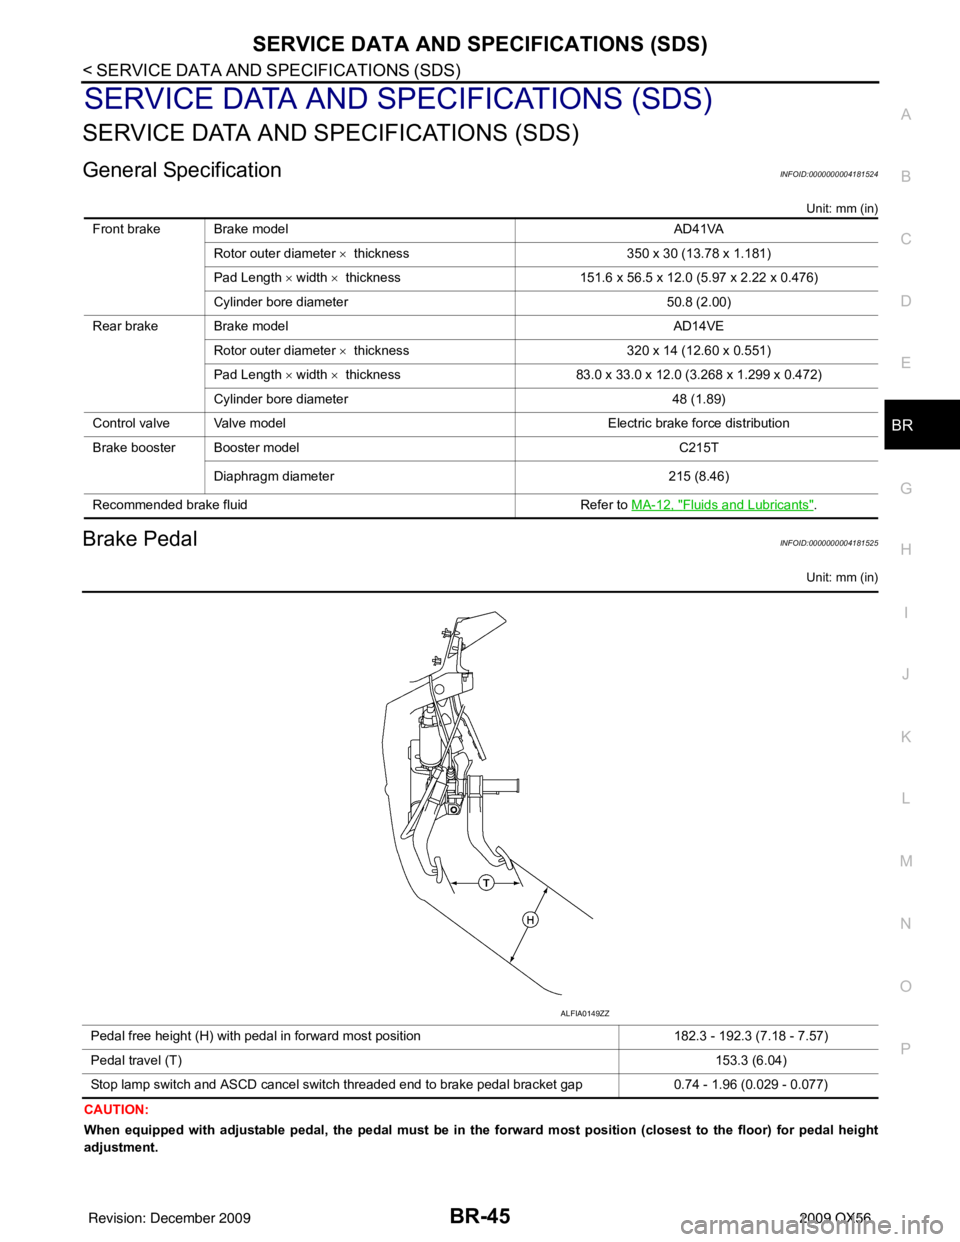
Brake PedalINFOID:0000000004181525
Unit: mm (in)
CAUTION:
When equipped with adjustable pedal, the pedal must be in the forward most position (closest to the floor) for pedal height
adjustment. Front brake Brake model
AD41VA
Rotor outer diameter × thickness 350 x 30 (13.78 x 1.181)
Pad Length × width × thickness 151.6 x 56.5 x 12.0 (5.97 x 2.22 x 0.476)
Cylinder bore diameter 50.8 (2.00)
Rear brake Brake model AD14VE
Rotor outer diameter × thickness 320 x 14 (12.60 x 0.551)
Pad Length × width × thickness 83.0 x 33.0 x 12.0 (3.268 x 1.299 x 0.472)
Cylinder bore diameter 48 (1.89)
Control valve Valve model Electric brake force distribution
Brake booster Booster model C215T
Diaphragm diameter 215 (8.46)
Recommended brake fluid Refer to MA-12, "
Fluids and Lubricants".
Pedal free height (H) with pedal in forward most position 182.3 - 192.3 (7.18 - 7.57)
Pedal travel (T) 153.3 (6.04)
Stop lamp switch and ASCD cancel switch threaded end to brake pedal bracket gap 0.74 - 1.96 (0.029 - 0.077)
ALFIA0149ZZ
Revision: December 20092009 QX56
Page 656 of 4171
CCS
INSPECTION AND ADJUSTMENTCCS-5
< BASIC INSPECTION >
C
DE
F
G H
I
J
K L
M B
N P A
INSPECTION AND ADJUSTMENT
ADDITIONAL SERVICE WHEN REPLACING CONTROL UNIT
ADDITIONAL SERVICE WHEN REPL ACING CONTROL UNIT : Description
INFOID:0000000003776923
Always perform the laser beam aiming adjustment after repl acing the ICC unit. In addition, test the ICC sys-
tem operations to see if it functions normally.
ADDITIONAL SERVICE WHEN REPLACING CONTROL UNIT : Special Repair Re-
quirement
INFOID:0000000003776924
1.LASER BEAM AIMING ADJUSTMENT
Adjust laser beam aiming. Refer to CCS-5, "
LASER BEAM AIMING ADJUSTMENT : Outline of Laser Beam
Aiming Adjustment Procedure".
>> GO TO 2
2.ICC SYSTEM ACTION TEST
1. Perform the ICC system operation test. Refer to CCS-8, "
ACTION TEST : ICC System Running Test".
2. Check that the ICC system operates normally.
>> INSPECTION END.
LASER BEAM AIMI NG ADJUSTMENT
LASER BEAM AIMING ADJUSTMENT : Outlin e of Laser Beam Aiming Adjustment
Procedure
INFOID:0000000003776925
CAUTION:
• The laser beam aiming adjustment can not be performed without CONSULT-III.
• The laser beam aiming adjustment must be performed every time the ICC sensor is removed,
installed or has been moved as a result of a collision.
1. Prepare the vehicle and the work area.
2. Set up the ICC target board. For details, refer to Technical Service Bulletin.
3. Adjust the sensor following the procedure on CONSULT-III.
4. Check system operation after the adjustment.
LASER BEAM AIMING ADJU STMENT : PreparationINFOID:0000000003776926
• Place the vehicle on level ground. Shift the transmi ssion into "P" position and release the parking brake.
• Adjust the tire pressure to the specified value.
• See that there is no load in the vehicle. Coolant , engine oil and fuel should be filled to correct level.
• Check that the vehicle suspension has been adjusted to the standard height by the load leveling rear air sus-
pension system. Refer to SCS-7, "
CONSULT-III Function" .
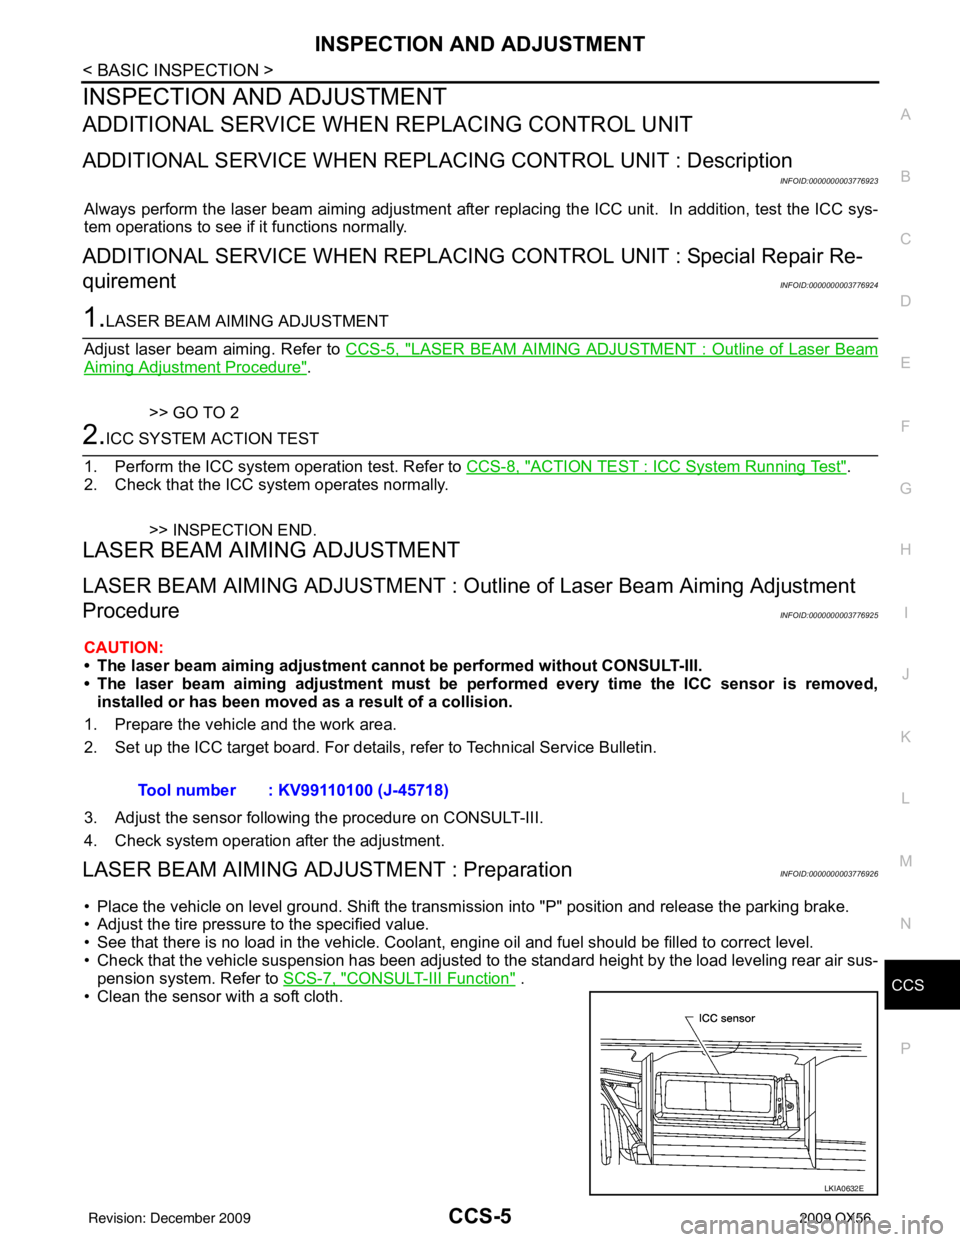
• Clean the sensor with a soft cloth. Tool number : KV99110100 (J-45718)
LKIA0632E
Revision: December 20092009 QX56
Page 657 of 4171
CCS-6
< BASIC INSPECTION >
INSPECTION AND ADJUSTMENT
LASER BEAM AIMING ADJUSTMENT : Setting up the ICC Target Board
INFOID:0000000003776927
CAUTION:
Accuracy in setting up the ICC target board is essential for the laser beam aiming adjustment.
For details, refer to T echnical Service Bulletin.
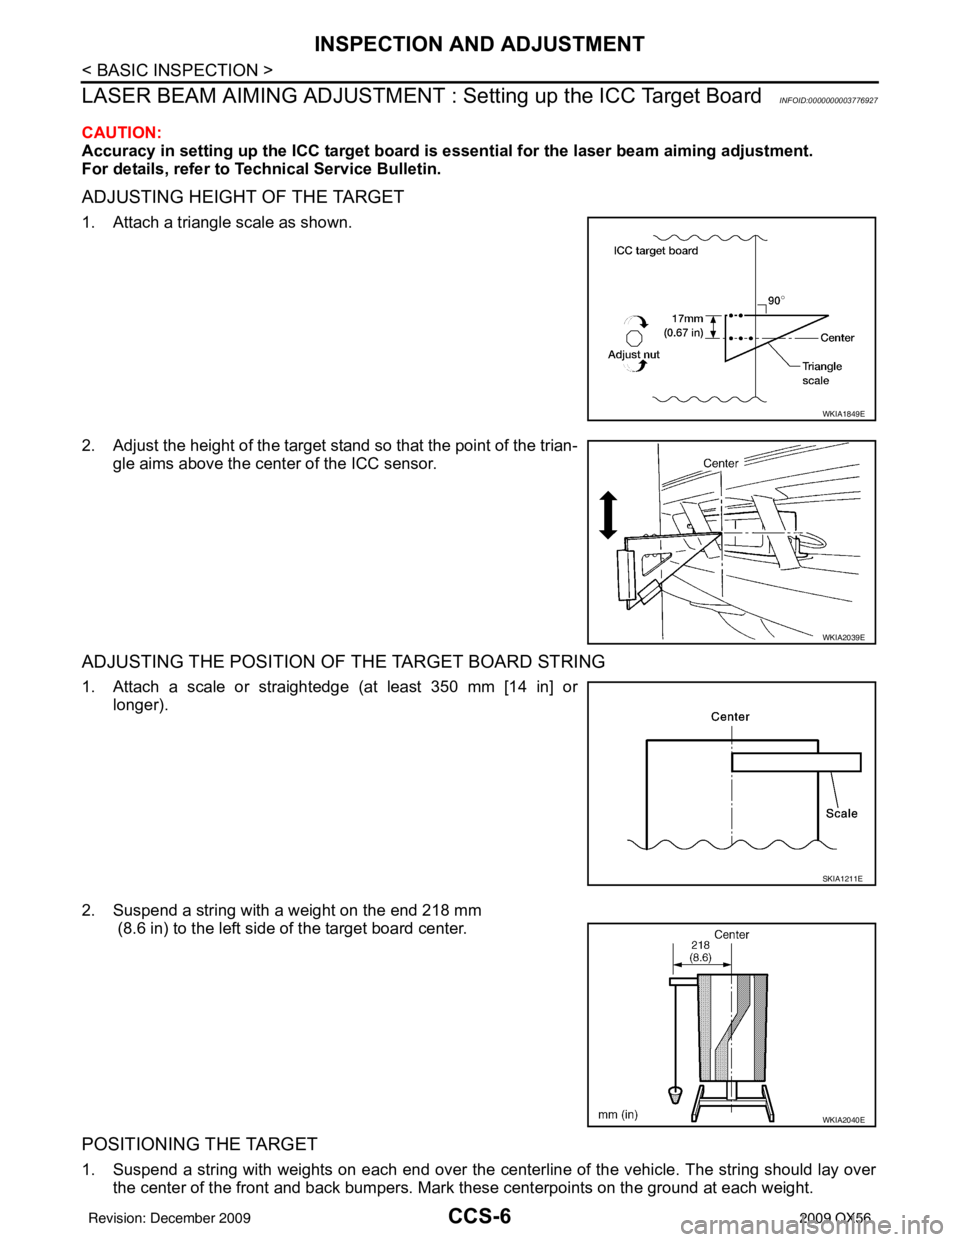
ADJUSTING HEIGHT OF THE TARGET
1. Attach a triangle scale as shown.
2. Adjust the height of the target stand so that the point of the trian-
gle aims above the center of the ICC sensor.
ADJUSTING THE POSITION OF THE TARGET BOARD STRING
1. Attach a scale or straightedge (at least 350 mm [14 in] orlonger).
2. Suspend a string with a weight on the end 218 mm (8.6 in) to the left side of the target board center.
POSITIONING THE TARGET
1. Suspend a string with weights on each end over the cent erline of the vehicle. The string should lay over
the center of the front and bac k bumpers. Mark these centerpoi nts on the ground at each weight.
WKIA1849E
WKIA2039E
SKIA1211E
WKIA2040E
Revision: December 20092009 QX56
Page 1042 of 4171
![INFINITI QX56 2009 Factory Service Manual DLK-230
< ON-VEHICLE REPAIR >[WITH INTELLIGENT KEY SYSTEM]
HOOD
CLEARANCE AND SURFACE HEIGHT ADJUSTMENT
1. Remove the front grille. Refer to
EXT-17, "Removal and Installation".
2. Remove the hood loc INFINITI QX56 2009 Factory Service Manual DLK-230
< ON-VEHICLE REPAIR >[WITH INTELLIGENT KEY SYSTEM]
HOOD
CLEARANCE AND SURFACE HEIGHT ADJUSTMENT
1. Remove the front grille. Refer to
EXT-17, "Removal and Installation".
2. Remove the hood loc](/img/42/57031/w960_57031-1041.png)
DLK-230
< ON-VEHICLE REPAIR >[WITH INTELLIGENT KEY SYSTEM]
HOOD
CLEARANCE AND SURFACE HEIGHT ADJUSTMENT
1. Remove the front grille. Refer to
EXT-17, "Removal and Installation".
2. Remove the hood lock assembly and adjust the height by rotating the bumper rubber until the hood clear- ance of hood and fender becomes 1 mm (0.04 in) lower than fitting standard dimension.
3. Temporarily tighten the hood lock, and position it by engaging it with the hood striker. Check the lock and striker for looseness, and tighten the lock mounting bolt to the specified torque.
4. Adjust the clearance and surface height of hood and fender according to \
the fitting standard dimension by rotating right and left bumper rubbers.
CAUTION:
Adjust right/left gap between hood and each part to the following specification.
5. Install the front grille. Refer to EXT-17, "
Removal and Installation".
HOOD LOCK ADJUSTMENT
1. Remove the front grille. Refer to EXT-17, "Removal and Installation".
2. Move the hood lock to the left or right so that striker center is vertically aligned with hood lock center (when viewed from vehicle front).
3. Make sure the secondary latch is properly engaged with the sec- ondary striker with hood's own weight by dropping it from
approx. 200 mm (7.87 in) height or by pressing it lightly approx.
3 kg (29 N, 7lb).
CAUTION:
Do not drop the hood from 300 mm (11.81 in) height or
higher.
4. After adjusting hood lock, tighten the lock bolts.
5. Install the front grille. Refer to EXT-17, "
Removal and Installa-
tion".
Removal and Installation of Hood AssemblyINFOID:0000000003775852
1. Support the hood striker with proper material to prevent it from falling.
WARNING:
Body injury may occur if no supporting rod is holding the
hood open when removing the damper stay.
2. Remove the hinge nuts from the hood to remove the hood assembly.
CAUTION:
Operate with two workers, because of its heavy weight.
Installation is in the reverse order of removal. Hood and headlamp (B–B) : 2.0 mm or less
PIIA3806E
LIIA1443E
Revision: December 20092009 QX56
Page 1044 of 4171
![INFINITI QX56 2009 Factory Service Manual DLK-232
< ON-VEHICLE REPAIR >[WITH INTELLIGENT KEY SYSTEM]
HOOD
4. Install the primary and secondary cables securely to the hood
lock.
5. Install the hood lock and the secondary hood lock release asse INFINITI QX56 2009 Factory Service Manual DLK-232
< ON-VEHICLE REPAIR >[WITH INTELLIGENT KEY SYSTEM]
HOOD
4. Install the primary and secondary cables securely to the hood
lock.
5. Install the hood lock and the secondary hood lock release asse](/img/42/57031/w960_57031-1043.png)
DLK-232
< ON-VEHICLE REPAIR >[WITH INTELLIGENT KEY SYSTEM]
HOOD
4. Install the primary and secondary cables securely to the hood
lock.
5. Install the hood lock and the secondary hood lock release assemblies.
6. Check the hood lock adjustment and hood opener operation. Refer to DLK-229, "
Fitting Adjustment".
7. Install the remaing componets in the reverse order of removal.
Hood Lock Control InspectionINFOID:0000000003775854
CAUTION:
If the hood lock cable is bent or deformed, replace it.
1. Remove the front grille. Refer to EXT-17, "
Removal and Installation".
2. Make sure the secondary latch is properly engaged with the sec- ondary striker with hood's own weight by dropping it from
approx. 200 mm (7.87 in) height.
3. While operating the hood opener, carefully make sure the front end of the hood is raised by approx. 20 mm (0.79 in). Also make
sure the hood opener returns to the original position.
4. Check the hood lock lubrication condition. If necessary, apply “body grease” to the points shown in the figure.
5. Install the front grille. Refer to EXT-17, "
Removal and Installa-
tion".
Hood Stay DisposalINFOID:0000000005877751
1. Fix hood stay (1) using a vise (C).
2. Using hacksaw (A) slowly make 2 holes in the hood stay, in numerical order as shown in the figure.
CAUTION:
• When cutting a hole on hood stay, always cover a hack-saw using a shop cloth (B) to avoid scattering metal frag-
ments or oil.
• Wear eye protection (safety glasses).
• Wear gloves.
PIIA0174E
PIIA1086E
PIIA0176E
JMKIA3336ZZ
Revision: December 20092009 QX56
Page 1046 of 4171
![INFINITI QX56 2009 Factory Service Manual DLK-234
< ON-VEHICLE REPAIR >[WITH INTELLIGENT KEY SYSTEM]
DOOR
DOOR
Fitting AdjustmentINFOID:0000000003775855
Front door
Longitudinal clearance and surface height adjustment at front end
1. Remove th INFINITI QX56 2009 Factory Service Manual DLK-234
< ON-VEHICLE REPAIR >[WITH INTELLIGENT KEY SYSTEM]
DOOR
DOOR
Fitting AdjustmentINFOID:0000000003775855
Front door
Longitudinal clearance and surface height adjustment at front end
1. Remove th](/img/42/57031/w960_57031-1045.png)
DLK-234
< ON-VEHICLE REPAIR >[WITH INTELLIGENT KEY SYSTEM]
DOOR
DOOR
Fitting AdjustmentINFOID:0000000003775855
Front door
Longitudinal clearance and surface height adjustment at front end
1. Remove the fender. Refer to
EXT-20, "Removal and Installation".
2. Loosen the hinge bolts. Raise the front door at rear end to adjust.
3. Install the fender. Refer to EXT-20, "
Removal and Installation".
Rear door
Longitudinal clearance and surface height adjustment at front end
1. Loosen the bolts. Open the rear door, and raise the rear door at rear end to adjust.
Striker adjustment
D. 4.5 ± 1.0 mm (0.177 ± 0.039 in)
AWKIA0675ZZ
Revision: December 20092009 QX56
Page 1275 of 4171
![INFINITI QX56 2009 Factory Service Manual
FRONT FINAL DRIVEDLN-219
< DISASSEMBLY AND ASSEMBLY > [FRONT FINAL DRIVE: M205]
C
EF
G H
I
J
K L
M A
B
DLN
N
O P
1. Apply red lead to the drive gear. NOTE:
Apply red lead to both faces of thr ee to f INFINITI QX56 2009 Factory Service Manual
FRONT FINAL DRIVEDLN-219
< DISASSEMBLY AND ASSEMBLY > [FRONT FINAL DRIVE: M205]
C
EF
G H
I
J
K L
M A
B
DLN
N
O P
1. Apply red lead to the drive gear. NOTE:
Apply red lead to both faces of thr ee to f](/img/42/57031/w960_57031-1274.png)
FRONT FINAL DRIVEDLN-219
< DISASSEMBLY AND ASSEMBLY > [FRONT FINAL DRIVE: M205]
C
EF
G H
I
J
K L
M A
B
DLN
N
O P
1. Apply red lead to the drive gear. NOTE:
Apply red lead to both faces of thr ee to four gears, at four loca-
tions evenly spaced on the drive gear.
2. Rotate the drive gear back and forth several times. Then check for correct drive pinion to drive gear tooth contact as shown.
CAUTION:
Check tooth contact on dri ve side and reverse side.
3. If the tooth contact is improper ly adjusted, follow the procedure
below to adjust the drive pinion height (dimension X).
If the tooth contact is near the face (face contact), or near the heel (heel contact), use a thicker drive pinion height adjusting washer to
move drive pinion closer to the drive gear.
Refer to DLN-234, "Inspection and Adjustment"
.
If the tooth contact is near the flank (flank contact), or near the toe
(toe contact), use a thinner drive pinion height adjusting washer to
move the drive pinion farther from the drive gear.
Refer to DLN-234, "Inspection and Adjustment"
.
SPD357
SDIA0570E
SDIA0517E
PDIA0440E
PDIA0441E
Revision: December 20092009 QX56