brake rotor INFINITI QX56 2011 Factory User Guide
[x] Cancel search | Manufacturer: INFINITI, Model Year: 2011, Model line: QX56, Model: INFINITI QX56 2011Pages: 5598, PDF Size: 94.53 MB
Page 488 of 5598

BR-18
< PERIODIC MAINTENANCE >
REAR DISC BRAKE
REAR DISC BRAKE
BRAKE PAD
BRAKE PAD : Inspection and AdjustmentINFOID:0000000006222470
INSPECTION
Check the thickness of brake pad from the inspection hole (A) on
brake caliper assembly. Check use a scale if necessary.
ADJUSTMENT
CAUTION:
Burnish contact surfaces between pads according to the following procedure after refinishing or
replacing brake pads, or if a soft pedal occurs at very low mileage.
Be careful of vehicle speed because the brake does not operate firmly/securely until pads and disc
rotor are securely fitted.
Only perform this procedure under safe road and traffic conditions. Use extreme caution.
1. Drive vehicle on straight, flat road.
2. Depress brake pedal with the power to stop vehicl e within 3 to 5 seconds until the vehicle stops.
3. Drive without depressing brake for a few minutes to cool the brake.
4. Repeat steps 1 to 3 until pad and disc rotor are securely fitted.
DISC ROTOR
DISC ROTOR : Inspec tion and AdjustmentINFOID:0000000006222471
INSPECTION
Appearance
Check surface of disc rotor for uneven wear, cracks, and serious damage. Replace it if necessary. Refer to
RAX-7, "
Removal and Installation".
Runout
1. Fix the disc rotor to the wheel hub and bearing assembly with wheel nuts (2 points at least).
2. Check the wheel bearing axial end play before the inspection. Refer to RAX-5, "
Inspection".
3. Inspect the runout with a dial indicator to measure at 10 mm (0.39 in) inside the disc edge.
4. Find the installation position that has a minimum runout by shift-
ing the disc rotor-to-wheel hub and bearing assembly installation
position by one hole at a time if the runout exceeds the limit
value.
5. Refinish the disc rotor if the runout is outside the limit even after performing the above operation. [When refinishing, use the Pro-
Cut PEM On-Car brake Lathe (Tool No. 38-PFM90.5) or equiva-
lent.]
CAUTION:
Check in advance that the thickn ess of the disc rotor is wear thickness + 0.3 mm (0.012 in) or
more. Wear thickness : Refer to
BR-47, "
Rear Disc Brake".
JPFIA0720ZZ
Runout : Refer to BR-47, "Rear Disc Brake".
JPFIA0721ZZ
Revision: 2010 May2011 QX56
Page 489 of 5598

REAR DISC BRAKEBR-19
< PERIODIC MAINTENANCE >
C
DE
G H
I
J
K L
M A
B
BR
N
O P
If the thickness is less than wear thickness + 0. 3 mm (0.012 in), replace the disc rotor. Refer to
RAX-7, "
Removal and Installation".
Thickness
Check the thickness of the disc rotor using a micrometer. Replace
the disc rotor if the thickness is below the wear limit. Refer to RAX-7,
"Removal and Installation".
ADJUSTMENT
CAUTION:
Burnish contact surfaces between pads according to the following procedure after refinishing or
replacing brake pads, or if a soft pedal occurs at very low mileage.
Be careful of vehicle speed because the brake does not operate firmly/securely until pads and disc
rotor are securely fitted.
Only perform this procedure under safe road and traffic conditions. Use extreme caution.
1. Drive vehicle on straight, flat road.
2. Depress brake pedal with the power to stop vehicl e within 3 to 5 seconds until the vehicle stops.
3. Drive without depressing brake for a few minutes to cool the brake.
4. Repeat steps 1 to 3 until pad and disc rotor are securely fitted. Wear thickness : Refer to
BR-47, "
Rear Disc Brake".
Wear thickness : Refer to BR-47, "
Rear Disc Brake".
JPFIA0722ZZ
Revision: 2010 May2011 QX56
Page 493 of 5598

BRAKE PIPINGBR-23
< REMOVAL AND INSTALLATION >
C
DE
G H
I
J
K L
M A
B
BR
N
O P
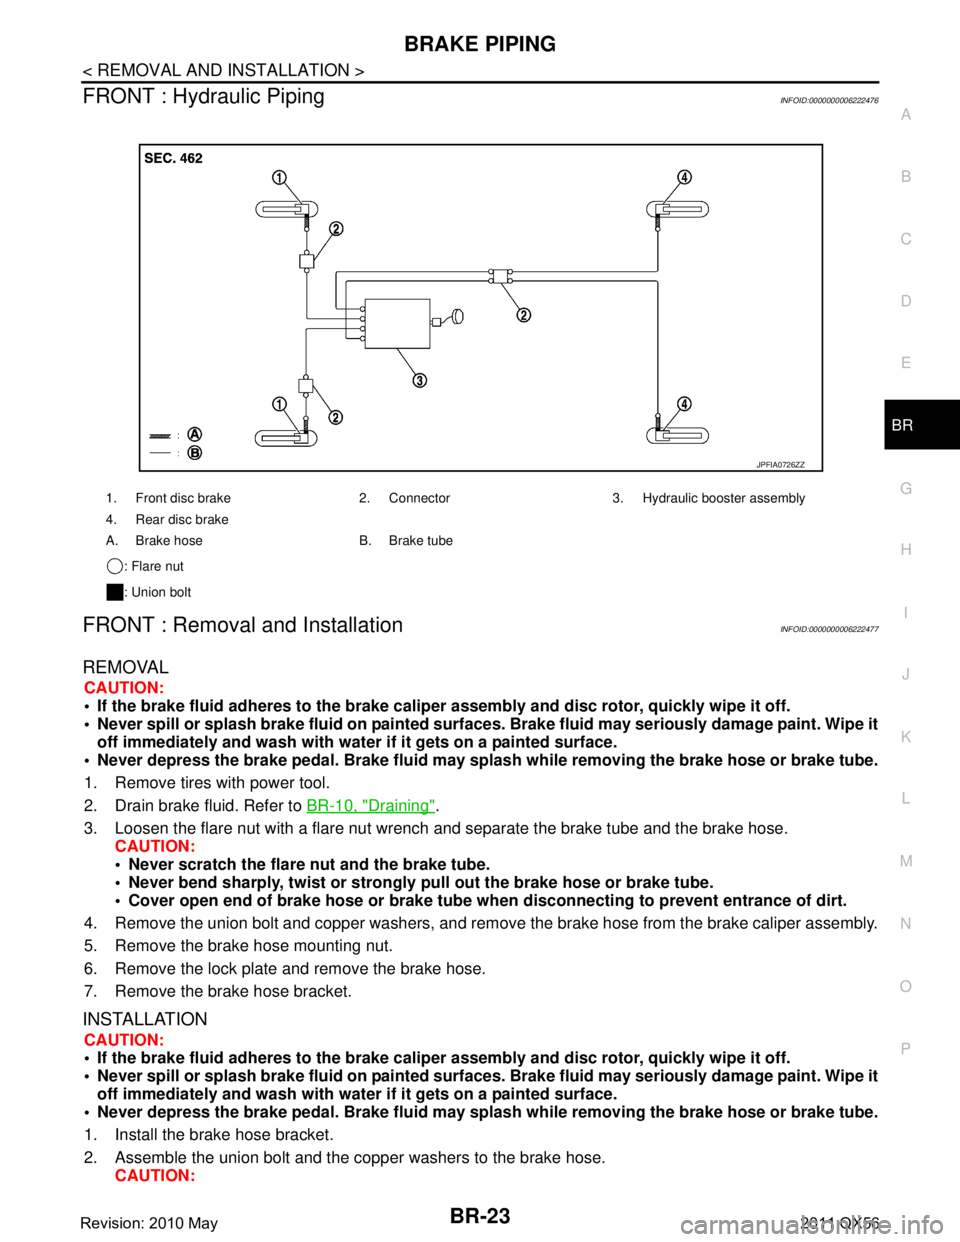
FRONT : Hydraulic PipingINFOID:0000000006222476
FRONT : Removal and InstallationINFOID:0000000006222477
REMOVAL
CAUTION:
If the brake fluid adheres to the brake caliper assembly and disc rotor, quickly wipe it off.
Never spill or splash brake fluid on painted surfaces. Brake fluid may seriously damage paint. Wipe it
off immediately and wash with wate r if it gets on a painted surface.
Never depress the brake pedal. Brake fluid may spl ash while removing the brake hose or brake tube.
1. Remove tires with power tool.
2. Drain brake fluid. Refer to BR-10, "
Draining".
3. Loosen the flare nut with a flare nut wrench and separate the brake tube and the brake hose.
CAUTION:
Never scratch the flare nut and the brake tube.
Never bend sharply, twist or strongly pull out the brake hose or brake tube.
Cover open end of brake hose or brake tube wh en disconnecting to prevent entrance of dirt.
4. Remove the union bolt and copper washers, and remove the brake hose from the brake caliper assembly.
5. Remove the brake hose mounting nut.
6. Remove the lock plate and remove the brake hose.
7. Remove the brake hose bracket.
INSTALLATION
CAUTION:
If the brake fluid adheres to the brake caliper assembly and disc rotor, quickly wipe it off.
Never spill or splash brake fluid on painted surfaces. Brake fluid may seriously damage paint. Wipe it
off immediately and wash with wate r if it gets on a painted surface.
Never depress the brake pedal. Brake fluid may spl ash while removing the brake hose or brake tube.
1. Install the brake hose bracket.
2. Assemble the union bolt and the copper washers to the brake hose. CAUTION:
1. Front disc brake 2. Connector 3. Hydraulic booster assembly
4. Rear disc brake
A. Brake hose B. Brake tube
: Flare nut
: Union bolt
JPFIA0726ZZ
Revision: 2010 May2011 QX56
Page 496 of 5598

BR-26
< REMOVAL AND INSTALLATION >
BRAKE PIPING
REAR : Removal and Installation
INFOID:0000000006222481
REMOVAL
CAUTION:
If the brake fluid adheres to the brake caliper assembly and disc rotor, quickly wipe it off.
Never spill or splash brake fluid on painted surfaces. Brake fluid may seriously damage paint. Wipe it
off immediately and wash with wate r if it gets on a painted surface.
Never depress the brake pedal. Brake fluid may spl ash while removing the brake hose or brake tube.
1. Remove tires with power tool.
2. Drain brake fluid. Refer to BR-10, "
Draining".
3. Loosen the flare nut with a flare nut wrench and separate the brake tube and the brake hose. CAUTION:
Never scratch the flare nut and the brake tube.
Never bend sharply, twist or strongly pull out the brake hose or brake tube.
Cover open end of brake hose or brake tube wh en disconnecting to prevent entrance of dirt.
4. Remove the union bolt and copper washers, and remove the brake hose from the brake caliper assembly.
5. Remove the lock plate and remove the brake hose.
INSTALLATION
CAUTION:
If the brake fluid adheres to the brake caliper assembly and disc rotor, quickly wipe it off.
Never spill or splash brake fluid on painted surfaces. Brake fluid may seriously damage paint. Wipe it
off immediately and wash with wate r if it gets on a painted surface.
Never depress the brake pedal. Brake fluid may spl ash while removing the brake hose or brake tube.
1. Assemble the union bolt and the copper washers to the brake hose. CAUTION:
Never reuse the copper washer.
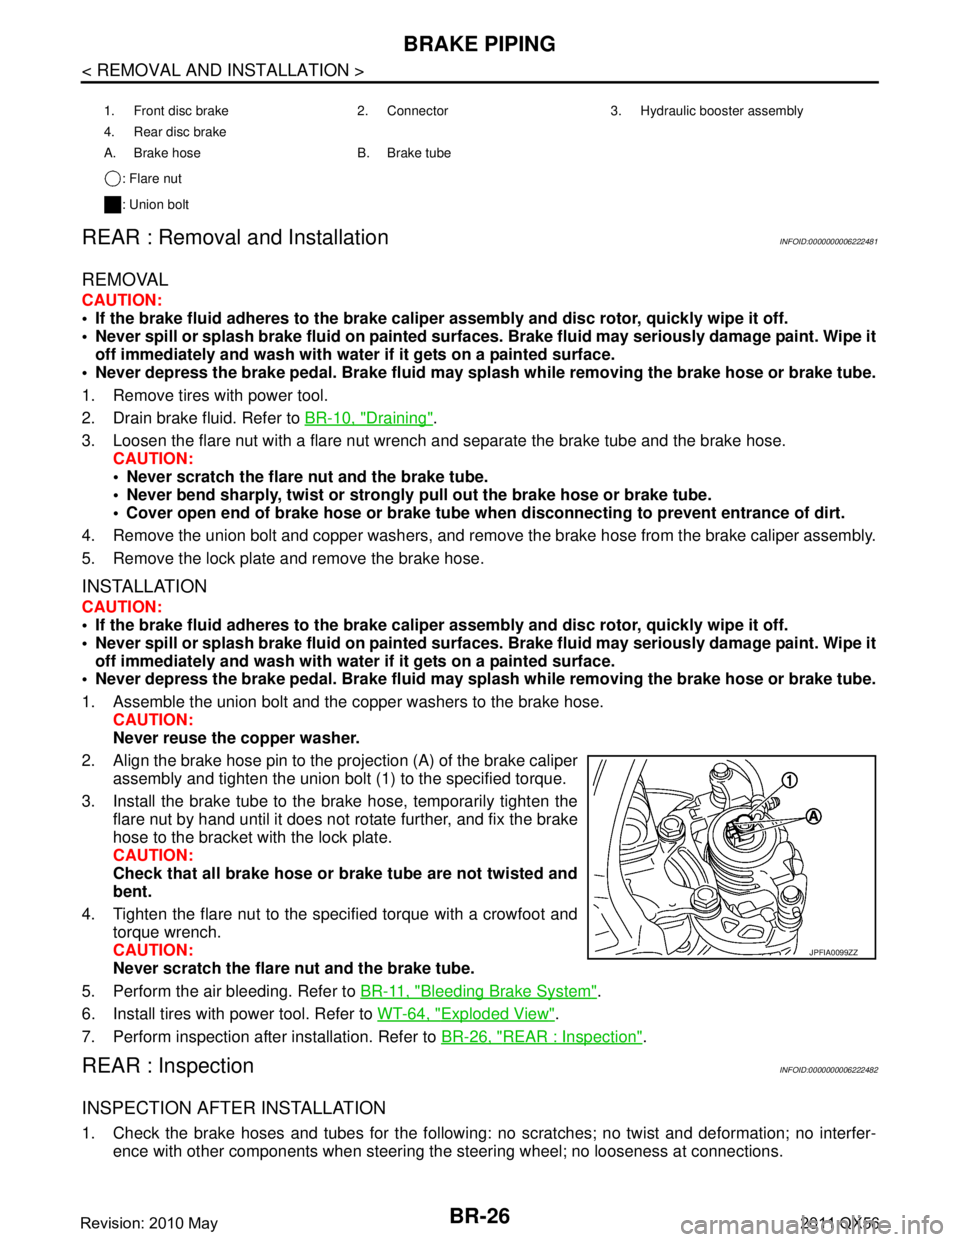
2. Align the brake hose pin to the projection (A) of the brake caliper
assembly and tighten the union bolt (1) to the specified torque.
3. Install the brake tube to the brake hose, temporarily tighten the flare nut by hand until it does not rotate further, and fix the brake
hose to the bracket with the lock plate.
CAUTION:
Check that all brake hose or brake tube are not twisted and
bent.
4. Tighten the flare nut to the specified torque with a crowfoot and torque wrench.
CAUTION:
Never scratch the flare nut and the brake tube.
5. Perform the air bleeding. Refer to BR-11, "
Bleeding Brake System".
6. Install tires with power tool. Refer to WT-64, "
Exploded View".
7. Perform inspection after installation. Refer to BR-26, "
REAR : Inspection".
REAR : InspectionINFOID:0000000006222482
INSPECTION AFTER INSTALLATION
1. Check the brake hoses and tubes for the following: no scratches; no twist and deformation; no interfer-
ence with other components when steering the steering wheel; no looseness at connections.
1. Front disc brake 2. Connector 3. Hydraulic booster assembly
4. Rear disc brake
A. Brake hose B. Brake tube
: Flare nut
: Union bolt
JPFIA0099ZZ
Revision: 2010 May2011 QX56
Page 504 of 5598

BR-34
< REMOVAL AND INSTALLATION >
FRONT DISC BRAKE
FRONT DISC BRAKE
BRAKE PAD
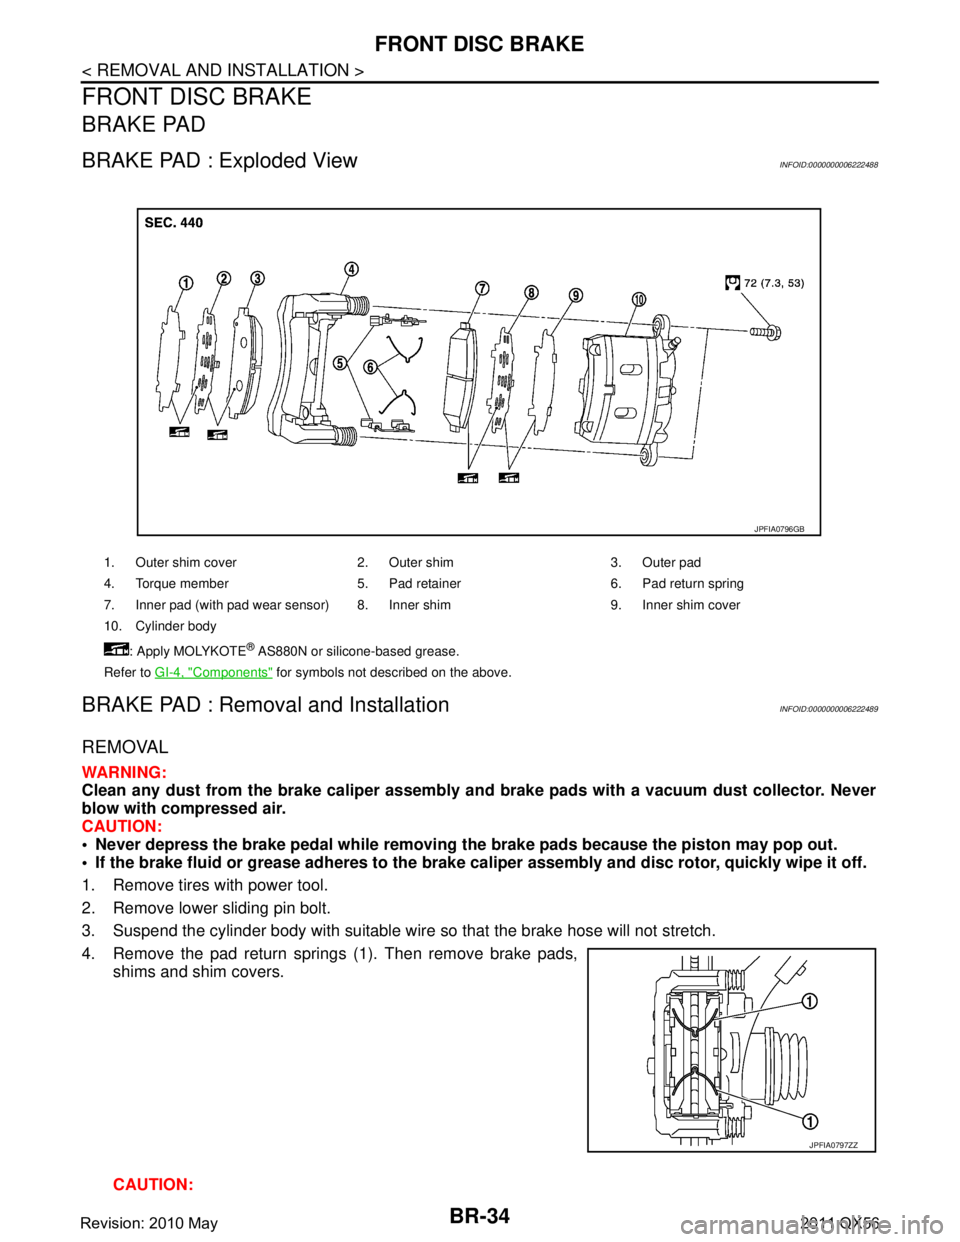
BRAKE PAD : Exploded ViewINFOID:0000000006222488
BRAKE PAD : Removal and InstallationINFOID:0000000006222489
REMOVAL
WARNING:
Clean any dust from the brake caliper assembly and brake pads with a vacuum dust collector. Never
blow with compressed air.
CAUTION:
Never depress the brake pedal while removing th e brake pads because the piston may pop out.
If the brake fluid or grease adheres to the brake calip er assembly and disc rotor, quickly wipe it off.
1. Remove tires with power tool.
2. Remove lower sliding pin bolt.
3. Suspend the cylinder body with suitable wire so that the brake hose will not stretch.
4. Remove the pad return springs (1). Then remove brake pads, shims and shim covers.
CAUTION:
1. Outer shim cover 2. Outer shim 3. Outer pad
4. Torque member 5. Pad retainer 6. Pad return spring
7. Inner pad (with pad wear sensor) 8. Inner shim 9. Inner shim cover
10. Cylinder body
: Apply MOLYKOTE
® AS880N or silicone-based grease.
Refer to GI-4, "
Components" for symbols not described on the above.
JPFIA0796GB
JPFIA0797ZZ
Revision: 2010 May2011 QX56
Page 505 of 5598

FRONT DISC BRAKEBR-35
< REMOVAL AND INSTALLATION >
C
DE
G H
I
J
K L
M A
B
BR
N
O P
Never deform the pad retainer when removing the pad retainers (2) from the torque member (1).
Never damage the piston boot.
Never drop the brake pads, shims and shim covers.
Remember each position of the removed brake pads.
5. Perform inspection after removal. Refer to BR-36, "
BRAKE PAD
: Inspection".
INSTALLATION
WARNING:
Clean any dust from the brake caliper assembly an d brake pads with a vacuum dust collector. Never
blow with compressed air.
CAUTION:
Never depress the brake pedal while removing th e brake pads because the piston may pop out.
If the brake fluid or grease adheres to the brake cal iper assembly and disc rotor, quickly wipe it off.
1. Install the torque member if the pad retainers has been removed. CAUTION:
Securely assemble the pad retainers (1) so that it will notbe lifted up from the torque member (2).
Never deform the pad retainers.
2. Apply MOLYKOTE
® AS880N or silicone-based grease mating
faces (A and B) between the brake pad, shim and shim cover,
and install shim and shim cover to the brake pad.
CAUTION:
Always replace the shims and shim covers when replacing
the brake pad.
3. Install the brake pads to the torque member.
4. Install pad return springs (1). CAUTION:
Correctly insert the pad return spring into the pad return
spring hole on the brake pad.
5. Install cylinder body to torque member. CAUTION:
Never damage the piston boot.
When replacing brake pad with new one, check a brakefluid level in the reservoir tank because brake fluid
returns to reservoir tank when pressing piston in.
NOTE:
Use a disc brake piston tool to easily press piston.
6. Install lower sliding bolt and tighter it to the specified torque.
JPFIA0118ZZ
PFIA0763J
JPFIA0798ZZ
JPFIA0797ZZ
Revision: 2010 May2011 QX56
Page 506 of 5598

BR-36
< REMOVAL AND INSTALLATION >
FRONT DISC BRAKE
7. Depress the brake pedal several times to check that no drag feel is present for the front disc brake. Refer
to BR-36, "
BRAKE PAD : Inspection".
8. Install tires with power tool. Refer to WT-64, "
Exploded View".
BRAKE PAD : InspectionINFOID:0000000006222490
INSPECTION AFTER REMOVAL
Replace the shims and shim covers if rust is excessively attached.
Eliminate rust on the pad retainers and the torque mem ber. Replace them if rust is excessively attached.
INSPECTION AFTER INSTALLATION
1. Check a drag of front disc brake. If any drag is found, follow the procedure described below.
2. Remove brake pads. Refer to BR-34, "
BRAKE PAD : Removal and Installation".
3. Press the pistons. Refer to BR-34, "
BRAKE PAD : Removal and Installation".
4. Install brake pads. Refer to BR-34, "
BRAKE PAD : Removal and Installation".
5. Depress the brake pedal several times.
6. Check a drag of front disc brake again. If any drag is found, disassemble the caliper. Refer to BR-38,
"BRAKE CALIPER ASSEMBLY : Disassembly and Assembly".
7. Burnish contact surfaces brake pads and disc rotor after refinishing or replacing brake pads, or if a soft pedal occurs at very low mileage. Refer to BR-16, "
BRAKE PAD : Inspection and Adjustment".
BRAKE CALIPER ASSEMBLY
BRAKE CALIPER ASSEMBLY : Exploded ViewINFOID:0000000006222491
REMOVAL
DISASSEMBLY
1. Brake caliper assembly
Refer to GI-4, "
Components" for symbols in the figure.
JPFIA0799GB
Revision: 2010 May2011 QX56
Page 507 of 5598

FRONT DISC BRAKEBR-37
< REMOVAL AND INSTALLATION >
C
DE
G H
I
J
K L
M A
B
BR
N
O P
BRAKE CALIPER ASSEMBLY : Removal and InstallationINFOID:0000000006222492
REMOVAL
WARNING:
Clean any dust from the brake caliper assembly an d brake pads with a vacuum dust collector. Never
blow with compressed air.
CAUTION:
Never spill or splash brake fluid on painted surfaces. Brake fluid may seriously damage paint. Wipe it
off immediately and wash with wate r if it gets on a painted surface.
Never depress the brake pedal. Brake fluid m ay splash while removing the brake hose.
If the brake fluid or grease adheres to the brake cal iper assembly and disc rotor, quickly wipe it off.
1. Remove tires with power tool.
2. Fix the disc rotor using wheel nuts.
3. Drain brake fluid. Refer to BR-10, "
Draining".
4. Separate brake hose from brake caliper assembly. Refer to BR-23, "
FRONT : Removal and Installation".
5. Remove torque member mounting bolts, and remove brake caliper assembly. CAUTION:
Never drop brake pad and brake caliper assembly.
6. Remove disc rotor. Refer to FA X - 8 , "
Removal and Installation" (2WD), FAX-18, "Removal and Installation"
(AWD).
INSTALLATION
WARNING:
Clean any dust from the brake caliper assembly an d brake pads with a vacuum dust collector. Never
blow with compressed air.
CAUTION:
Never spill or splash brake fluid on painted surfaces. Brake fluid may seriously damage paint. Wipe it
off immediately and wash with wate r if it gets on a painted surface.
Never depress the brake pedal. Brake fluid m ay splash while removing the brake hose.
If the brake fluid or grease adheres to the brake cal iper assembly and disc rotor, quickly wipe it off.
1. Torque member 2. Sliding pin boot 3. Sliding pin
4. Piston boot 5. Piston 6. Piston seal
7. Cylinder body 8. Bleeder valve 9. Cap
: Apply rubber grease.
: Apply brake fluid.
Refer to GI-4, "
Components" for symbols not described on the above.
JPFIA0800GB
Revision: 2010 May2011 QX56
Page 508 of 5598

BR-38
< REMOVAL AND INSTALLATION >
FRONT DISC BRAKE
1. Install disc rotor. Refer to FA X - 8 , "Removal and Installation" (2WD), FAX-18, "Removal and Installation"
(AWD).
2. Install the brake caliper assembly to the steeri ng knuckle and tighten the torque member mounting bolts to
the specified torque.
CAUTION:
Never spill or splash any grease and moisture on the torque member mounting face, threads,
mounting bolts. Wipe out any grease and moisture.
3. Install brake hose to brake caliper assembly. Refer to BR-23, "
FRONT : Removal and Installation".
4. Perform the air bleeding. Refer to BR-11, "
Bleeding Brake System".
5. Check a drag of front disc brake. If any drag is found, refer to BR-39, "
BRAKE CALIPER ASSEMBLY :
Inspection".
6. Install tires with power tool. Refer to WT-64, "
Exploded View".
BRAKE CALIPER ASSEMBLY : Disassembly and AssemblyINFOID:0000000006222493
DISASSEMBLY
NOTE:
Never remove the torque member, brake pads and pad retainers when disassembling and assembling the cyl-
inder body.
1. Remove the sliding pin bolt, and remove the cylinder body from the torque member.
CAUTION:
Fix the brake pad at suitable tape so that the brake pad will not drop.
2. Remove sliding pin boots from torque member.
3. Place a wooden block as shown in the figure, and blow air from brake hose mounting hole to remove pistons and piston boots.
CAUTION:
Never get fingers caught in the pistons.
4. Remove piston seals from cylinder body using suitable tool. CAUTION:
Be careful not to damage a cylinder inner wall.
5. Remove bleeder valve and cap.
6. Perform inspection after disassembly. Refer to BR-39, "
BRAKE
CALIPER ASSEMBLY : Inspection".
ASSEMBLY
1. Install bleeder valve and cap.
BRB0032D
JPFIA0781ZZ
Revision: 2010 May2011 QX56
Page 510 of 5598

BR-40
< REMOVAL AND INSTALLATION >
FRONT DISC BRAKE
3. Press the pistons. Refer to BR-34, "BRAKE PAD : Removal and Installation".
4. Install brake pads. Refer to BR-34, "
BRAKE PAD : Removal and Installation".
5. Depress the brake pedal several times.
6. Check a drag of front disc brake again. If any drag is found, disassemble the caliper. Refer to BR-38,
"BRAKE CALIPER ASSEMBLY : Disassembly and Assembly".
7. Burnish contact surfaces brake pads and disc rotor after refinishing or replacing disc rotor, or if a soft pedal occurs at very low mileage. Refer to BR-16, "
DISC ROTOR : Inspection and Adjustment".
Revision: 2010 May2011 QX56