ECO mode INFINITI QX60 2020 Infiniti Connection
[x] Cancel search | Manufacturer: INFINITI, Model Year: 2020, Model line: QX60, Model: INFINITI QX60 2020Pages: 276, PDF Size: 1.17 MB
Page 64 of 276
3. Audio system
Manual tuning:
To tune to the preferred station manually,
turn
station is selected.
Scan tuning:
To scan tune the stations/channels, touch
[Control] on the display and then touch
[Scan]. The stations/channels will be tuned
from low to high frequencies and stop at
each broadcasting station/channel for 5
seconds. Touching [Scan] again during this
5 seconds period will stop scan tuning and
the radio will remain tuned to that station/
channel.
For models with
button can also scan tune the stations/
channels.
Presetting:
Up to 36 stations/channels can be regis-
tered for AM, FM and SXM® in the preset
list.
1. Select a radio band (AM, FM or SXM®).
2. Tune to the station/channel you wish to
store in the preset list. 3. Touch and hold one of the preset
numbers in the preset list or push and
hold the desired radio memory buttons.
4. The information such as frequency (AM/ FM), channel number (SXM®), etc. will
be displayed on the preset list.
INFO:
. To change the preset stations/channels,
touch and hold one of the preset num-
bers. You can select whether to change
the station/channel or to delete the
preset setting.
. Tilting
so equipped) will scroll up/down the
preset stations/channels.
Alert Notification (SXM® only):
Favorite artists and songs can be registered
to receive an alert notice when a song of the
registered conditions is on the radio. To tune
to the respective channel, touch [Listen to be
consistent]. The alert can be ignored by
touching [Cancel].
“Radio controls” (page 3-21)
INFO:
Satellite Radio: . The satellite mode requires an active
SiriusXM® Satellite Radio subscription.
The Satellite service is available only to
those at least 18 and older in the 48
contiguous United States and DC.
. It may take some time to receive the
activation signal after the initiation of
the SiriusXM® Satellite Radio subscrip-
tion. After receiving the activation signal,
an available channel list will automati-
cally be updated in the radio. Change the
ignition switch position from LOCK to
ACC to update the SiriusXM® channel
list.
3-20
Page 67 of 276
![INFINITI QX60 2020 Infiniti Connection COMPACT DISC (CD) PLAYER
How to view CD operation screen
[Source]:
Touch to switch to the source list
screen.
“Selecting audio source”
(page 3-17)
[Scan]:
Touch to play the first 10 seconds of the INFINITI QX60 2020 Infiniti Connection COMPACT DISC (CD) PLAYER
How to view CD operation screen
[Source]:
Touch to switch to the source list
screen.
“Selecting audio source”
(page 3-17)
[Scan]:
Touch to play the first 10 seconds of the](/img/42/35140/w960_35140-66.png)
COMPACT DISC (CD) PLAYER
How to view CD operation screen
[Source]:
Touch to switch to the source list
screen.
“Selecting audio source”
(page 3-17)
[Scan]:
Touch to play the first 10 seconds of the
tracks. Touch again to stop scanning.
Track information:
Track information such as the song title,
artist name and album name is dis-
played.
Audio source indicator:
Indicates that CD is currently selected.
Play time:
The play time of the track is displayed.
Track number:
This indicates the current track number
and the total number of tracks.
CD menu:
CD menu items are displayed. Touch an
icon to display the list or to change the
setting.
- [Track]
- [Folder] (for MP3, WMA, AAC)
- [Play Mode]
Play Mode indicator:
This indicates the current play mode.
Touch to change the play mode.
For CDs without compressed audio files:
Mode Screen display
[Disc Repeat]
Disc
[1 Track Repeat]
1 Track
[Disc Random]
Disc
3. Audio system
3-23
Page 68 of 276
![INFINITI QX60 2020 Infiniti Connection 3. Audio system
For CDs with compressed audio files:
ModeScreen display
[Disc Repeat]
Disc
[1 Folder Repeat]
1 Folder
[1 Track Repeat]
1 Track
[Disc Random]
Disc
[1 Folder Random]
1 Folder
Folder numb INFINITI QX60 2020 Infiniti Connection 3. Audio system
For CDs with compressed audio files:
ModeScreen display
[Disc Repeat]
Disc
[1 Folder Repeat]
1 Folder
[1 Track Repeat]
1 Track
[Disc Random]
Disc
[1 Folder Random]
1 Folder
Folder numb](/img/42/35140/w960_35140-67.png)
3. Audio system
For CDs with compressed audio files:
ModeScreen display
[Disc Repeat]
Disc
[1 Folder Repeat]
1 Folder
[1 Track Repeat]
1 Track
[Disc Random]
Disc
[1 Folder Random]
1 Folder
Folder number (for MP3, WMA, AAC):
This indicates the folder number when a
CD with compressed audio files is
loaded.
CD player operation
Loading:
Insert the CD into the slot with the label side
facing up. The CD will be guided automati-
cally into the slot and starts playing.
After loading the CD, the CD screen will
appear on the display.
Activation and playing:
The CD mode can be selected from the
source list or by pushing the
“Names and functions of audio control
buttons” (page 3-14)
“Selecting audio source” (page 3-17)
If the audio system has been turned off while
the CD was playing, pushing
steering wheel (if so equipped) will start
playing the CD again.
Selecting track/folder:
Touch [Track] or [Folder] in the CD menu
and select a preferred track or folder from
the list.
Push
next or previous track.
Tilting up/down the
steering wheel (if so equipped) can also
move the tracks.
For CDs with compressed audio files, turn
equipped) to move to the next or previous
folder.
“Names and functions of audio control
buttons” (page 3-14) Fast-forwarding or rewind:
Push and hold
forward or rewind the track. Release to play
the track at normal speed.
Scanning:
Touch [Scan] on the display or push
(if so equipped) to scan the tracks in the CD.
While scanning, the CD will play the first 10
seconds of each track and move on to the
next track. Touching [Scan] or pushing
10 seconds will stop scanning.
Changing play mode:
Touch [Play Mode], [
]or[] to select
the play mode.
For models with
button can also change the play mode.
Ejecting CD:
Push <
>to eject the CD. If the CD is
ejected and left unremoved, it will be
reloaded into the slot to protect the CD.
3-24
Page 74 of 276
![INFINITI QX60 2020 Infiniti Connection 3. Audio system
[1 Folder Random]1 Folder
Folder number:
This indicates the folder number and the
total number of folders/lists.
USB memory device player opera-
tion
Activation and playing:
USB memory INFINITI QX60 2020 Infiniti Connection 3. Audio system
[1 Folder Random]1 Folder
Folder number:
This indicates the folder number and the
total number of folders/lists.
USB memory device player opera-
tion
Activation and playing:
USB memory](/img/42/35140/w960_35140-73.png)
3. Audio system
[1 Folder Random]1 Folder
Folder number:
This indicates the folder number and the
total number of folders/lists.
USB memory device player opera-
tion
Activation and playing:
USB memory device mode can also be
activated from the audio source list and the
audio source bar by the touch panel opera-
tion or by pushing
“Names and functions of audio control
buttons” (page 3-14)
“Selecting audio source” (page 3-17)
To play the USB memory device, touch [
],
and to pause the USB memory, touch []
on the USB operation screen.
Selecting play list:
Select a play list by touching an icon on the
USB menu. . Folder/Track (List)
. Artist (List) .
Album (List)
. Previous (List)
Skipping tracks/folders:
Push
next or previous track.
Tilting up/down the
steering wheel (if so equipped) can also
skip the tracks.
To skip to the next or previous folder, turn
equipped).
Fast-forwarding or rewinding:
Push and hold
forward or rewind the track. Release to play
the track at normal speed.
Scanning:
Touch [Scan] on the display or push
(if so equipped) to scan the tracks in the USB
memory device. While scanning, the USB
memory device will play the first 10 seconds
of each track and move on to the next track.
Touching [Scan] or pushing
equipped) again within the 10 seconds will
stop scanning. Changing play mode:
Touch [Play Mode], [
]or[] to select
the play mode.
For models with
button can also change the play mode.
3-30
Page 77 of 276
![INFINITI QX60 2020 Infiniti Connection Track number:
This indicates the current track number
and the total number of tracks.
Shuffle mode indicator:
Touch to change the shuffle mode.
ModeScreen display
[Shuffle albums]
Albums
[All songs]
S INFINITI QX60 2020 Infiniti Connection Track number:
This indicates the current track number
and the total number of tracks.
Shuffle mode indicator:
Touch to change the shuffle mode.
ModeScreen display
[Shuffle albums]
Albums
[All songs]
S](/img/42/35140/w960_35140-76.png)
Track number:
This indicates the current track number
and the total number of tracks.
Shuffle mode indicator:
Touch to change the shuffle mode.
ModeScreen display
[Shuffle albums]
Albums
[All songs]
Songs
[Shuffle Off]
Off
[]/[]:
Touch to play or pause the track.
iPod® menu:
- [Previous List]
- [Playlists]
- [Artists]
- [Songs]
- [Albums]
- [Genres]
- [Composers]
- [Podcasts]
- [Audiobooks]
- [Shuffle]
- [Repeat]
Repeat mode indicator:
Touch to change the repeat mode.
Mode Screen display
[All Track Repeat]
All
[1 Track Repeat]
1 Track
[Repeat Off]
Off
iPod® player operation
Activation and playing:
Inserting the iPod® cable into the connec-
tion port will activate the iPod® mode.
iPod® can also be selected from the audio
sources list and the source bar by touch
panel operation or by pushing
“Names and functions of audio control
buttons” (page 3-14)
“Selecting audio source” (page 3-17)
To play and pause the iPod®, touch
[
]/[] in the iPod® menu.
Selecting search method:
A list of search methods is displayed in the
iPod® menu. Touch and select an item to
play the iPod® in your preferred settings. Fast-forwarding or rewinding:
Push and hold
forward or rewind the song. Release to play
the song at normal speed.
Changing play mode:
Touch [Shuffle], [Repeat], [
]or[]to
select the play mode.
For models with
button can also change the play mode.
Skipping songs:
Push
next or previous song.
Tilting up/down the
steering wheel (if so equipped) can also
skip the songs.
Even when iPod® and/or iPhone® are
inserted into both of the two USB connec-
tion ports, the system recognizes only one of
the connected iPod® and/or iPhone® at a
time.
3. Audio system
3-33
Page 82 of 276
3. Audio system
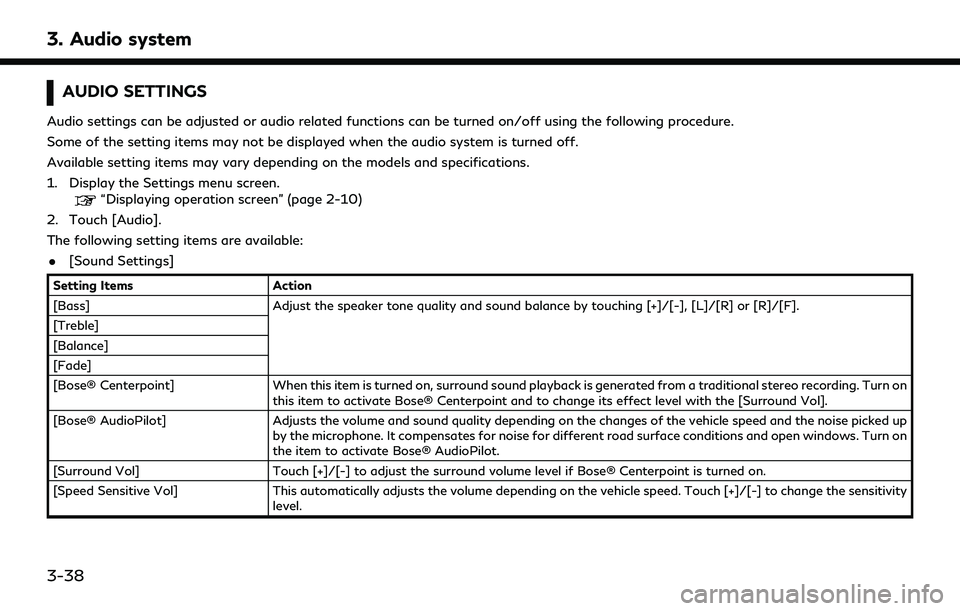
AUDIO SETTINGS
Audio settings can be adjusted or audio related functions can be turned on/off using the following procedure.
Some of the setting items may not be displayed when the audio system is turned off.
Available setting items may vary depending on the models and specifications.
1. Display the Settings menu screen.
“Displaying operation screen” (page 2-10)
2. Touch [Audio].
The following setting items are available:
. [Sound Settings]
Setting Items Action
[Bass] Adjust the speaker tone quality and sound balance by touching [+]/[-], [L]/[R] or [R]/[F].
[Treble]
[Balance]
[Fade]
[Bose® Centerpoint] When this item is turned on, surround sound playback is generated from a traditional stereo recording. Turn on
this item to activate Bose® Centerpoint and to change its effect level with the [Surround Vol].
[Bose® AudioPilot] Adjusts the volume and sound quality depending on the changes of the vehicle speed and the noise picked up
by the microphone. It compensates for noise for different road surface conditions and open windows. Turn on
the item to activate Bose® AudioPilot.
[Surround Vol] Touch [+]/[-] to adjust the surround volume level if Bose® Centerpoint is turned on.
[Speed Sensitive Vol] This automatically adjusts the volume depending on the vehicle speed. Touch [+]/[-] to change the sensitivity
level.
3-38
Page 83 of 276
![INFINITI QX60 2020 Infiniti Connection [Driver’s Audio Stage]When this item is turned on, a better sound quality will be provided to the driver’s position. The driver can enjoy
a more crisp and clear sound that is specialized for the d INFINITI QX60 2020 Infiniti Connection [Driver’s Audio Stage]When this item is turned on, a better sound quality will be provided to the driver’s position. The driver can enjoy
a more crisp and clear sound that is specialized for the d](/img/42/35140/w960_35140-82.png)
[Driver’s Audio Stage]When this item is turned on, a better sound quality will be provided to the driver’s position. The driver can enjoy
a more crisp and clear sound that is specialized for the driver’s seat position. The prominence of the effect of
this feature depends on the type of music that is played. For some music, it may be difficult to recognize the
effect of this feature.
. [Display Album Cover Art]
Turn this item on to display image files from the media device. If the media device does not contain images, no image will be displayed.
. [Radio Settings]
Setting Items Action
[HD Radio Mode (AM)] When this item is turned on, the analog and digital reception switches automatically.
When this item is turned off, the reception is fixed in the analog mode.
[HD Radio Mode (FM)]
. [DVD Settings]
Setting Items Action
[Angle] Images and movies can be viewed in different angles if the DVD contains this data. Switch the angle
number by touching [+]/[-].
[CM Skip] Select commercial skip length from 15, 30 and 60 seconds.
[DRC] Select the DRC (Dynamic Range Compression) setting from OFF, 1 and 2. DRC allows tuning of the
dynamic range of sound recorded in the Dolby Digital format.
[Angle Mark] Turn the angle mark display on/off. When this item is turned on, [Multi Angle] will be displayed on the DVD
screen.
[Menu Skip] DVD menus are automatically configured and the contents will be played directly when this item is turned
on. Note that some discs may not be played directly even if this item is turned on.
[DOWN MIX] When this item is turned on, a multi-channel recording will be converted to a traditional two channel
(stereo) recording.
[DVD Language] Enter the language code of the preferred language.
3. Audio system
3-39
Page 90 of 276
3. Audio system
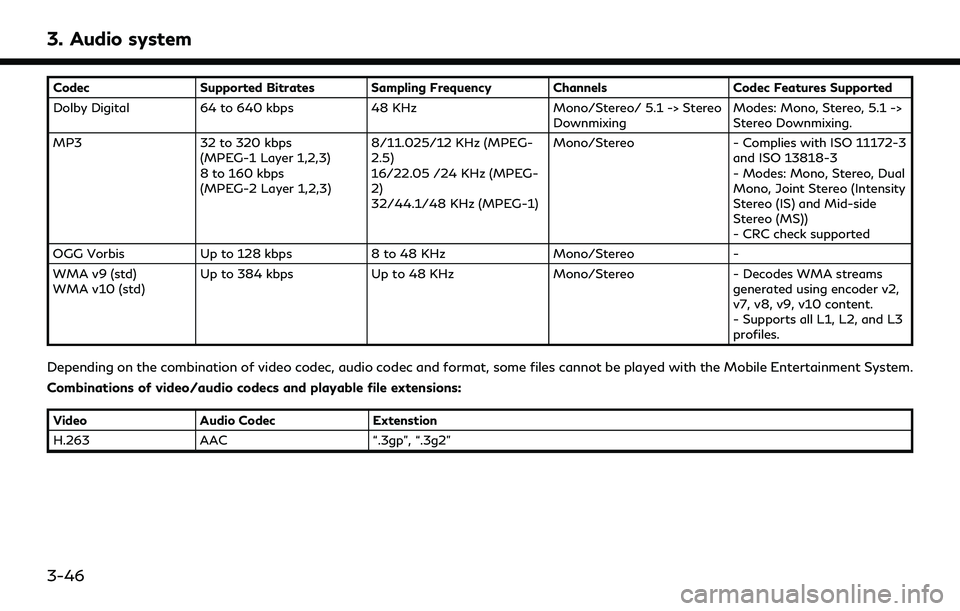
CodecSupported Bitrates Sampling Frequency Channels Codec Features Supported
Dolby Digital 64 to 640 kbps 48 KHz Mono/Stereo/ 5.1 -> Stereo
Downmixing Modes: Mono, Stereo, 5.1 ->
Stereo Downmixing.
MP3 32 to 320 kbps
(MPEG-1 Layer 1,2,3)
8 to 160 kbps
(MPEG-2 Layer 1,2,3) 8/11.025/12 KHz (MPEG-
2.5)
16/22.05 /24 KHz (MPEG-
2)
32/44.1/48 KHz (MPEG-1) Mono/Stereo
- Complies with ISO 11172-3
and ISO 13818-3
- Modes: Mono, Stereo, Dual
Mono, Joint Stereo (Intensity
Stereo (IS) and Mid-side
Stereo (MS))
- CRC check supported
OGG Vorbis Up to 128 kbps 8 to 48 KHz Mono/Stereo-
WMA v9 (std)
WMA v10 (std) Up to 384 kbps
Up to 48 KHz Mono/Stereo- Decodes WMA streams
generated using encoder v2,
v7, v8, v9, v10 content.
- Supports all L1, L2, and L3
profiles.
Depending on the combination of video codec, audio codec and format, some files cannot be played with the Mobile Entertainment System.
Combinations of video/audio codecs and playable file extensions:
Video Audio Codec Extenstion
H.263 AAC “.3gp”, “.3g2”
3-46
Page 98 of 276
3. Audio system
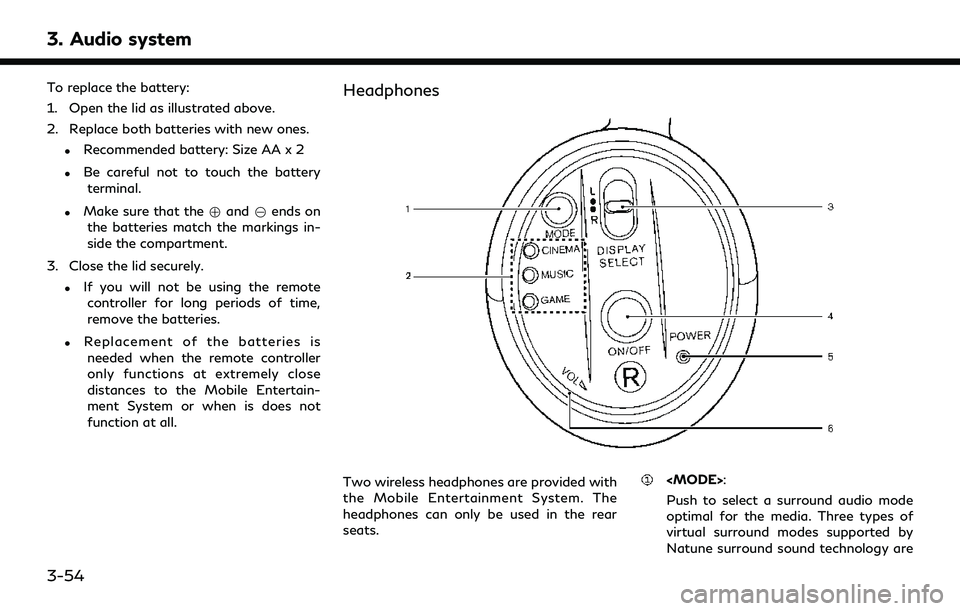
To replace the battery:
1. Open the lid as illustrated above.
2. Replace both batteries with new ones.
.Recommended battery: Size AA x 2
.Be careful not to touch the batteryterminal.
.Make sure that the +and 7ends on
the batteries match the markings in-
side the compartment.
3. Close the lid securely.
.If you will not be using the remote controller for long periods of time,
remove the batteries.
.Replacement of the batteries is
needed when the remote controller
only functions at extremely close
distances to the Mobile Entertain-
ment System or when is does not
function at all.
Headphones
Two wireless headphones are provided with
the Mobile Entertainment System. The
headphones can only be used in the rear
seats.
Push to select a surround audio mode
optimal for the media. Three types of
virtual surround modes supported by
Natune surround sound technology are
3-54
Page 124 of 276
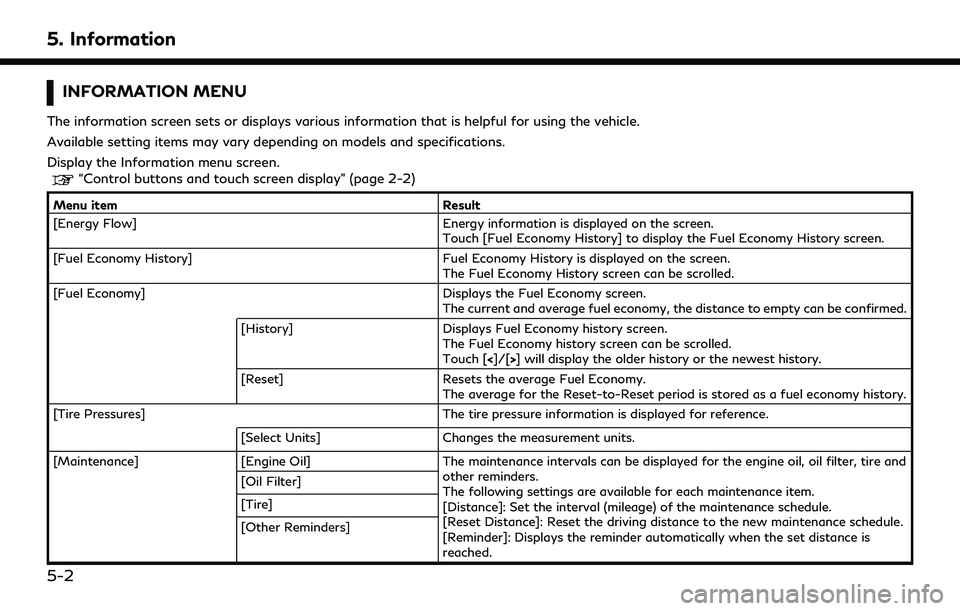
5. Information
INFORMATION MENU
The information screen sets or displays various information that is helpful for using the vehicle.
Available setting items may vary depending on models and specifications.
Display the Information menu screen.
“Control buttons and touch screen display” (page 2-2)
Menu itemResult
[Energy Flow] Energy information is displayed on the screen.
Touch [Fuel Economy History] to display the Fuel Economy History screen.
[Fuel Economy History] Fuel Economy History is displayed on the screen.
The Fuel Economy History screen can be scrolled.
[Fuel Economy] Displays the Fuel Economy screen.
The current and average fuel economy, the distance to empty can be confirmed.
[History] Displays Fuel Economy history screen.
The Fuel Economy history screen can be scrolled.
Touch [<]/[>] will display the older history or the newest history.
[Reset] Resets the average Fuel Economy.
The average for the Reset-to-Reset period is stored as a fuel economy history.
[Tire Pressures] The tire pressure information is displayed for reference.
[Select Units] Changes the measurement units.
[Maintenance] [Engine Oil] The maintenance intervals can be displayed for the engine oil, oil filter, tire and
other reminders.
The following settings are available for each maintenance item.
[Distance]: Set the interval (mileage) of the maintenance schedule.
[Reset Distance]: Reset the driving distance to the new maintenance schedule.
[Reminder]: Displays the reminder automatically when the set distance is
reached.
[Oil Filter]
[Tire]
[Other Reminders]
5-2