warning INFINITI QX80 2014 Owner's Manual
[x] Cancel search | Manufacturer: INFINITI, Model Year: 2014, Model line: QX80, Model: INFINITI QX80 2014Pages: 578, PDF Size: 2.8 MB
Page 193 of 578

3-28Pre-driving checks and adjustments
3. Push theswitch*Aon the right
side of the combination meter panel for
longer than 1 second to turn off the
LOOSE FUEL CAP warning after tighten-
ing the fuel cap.WARNING
. Do not adjust the steering wheel while
driving. You could lose control of your
vehicle and cause an accident.
. Do not adjust the steering wheel any
closer to you than is necessary for
proper steering operation and comfort.
The driver’s air bag inflates with great
force. If you are unrestrained, leaning
forward, sitting sideways or out of
position in any way, you are at greater
risk of injury or death in a crash. You
may also receive serious or fatal injuries
from the air bag if you are up against it
when it inflates. Always sit back against
the seatback and as far away as practical
from the steering wheel. Always use the
seat belts.
SPA2754
ELECTRIC OPERATION
Tilt or telescopic operation
Move the lever*1to adjust the steering
wheel up or down, forward or rearward to
the desired position.
Entry/Exit function operation:
The automatic drive positioner system will
make the steering wheel move up auto-
matically when the driver’s door is opened
with the ignition switch in the LOCK
position. This lets the driver get into and
out of the seat more easily.
For more information, see “Automatic drive
TILT/TELESCOPIC STEERING
Page 195 of 578

3-30Pre-driving checks and adjustments
SPA2447
INSIDE MIRROR
Adjust the height and the angle of the
inside mirror to the desired position.
SPA2450-A
Automatic anti-glare type
The inside mirror is designed so that it
automatically changes reflection according
to the intensity of the headlights of the
following vehicle.
The anti-glare system will be automatically
turned on when the ignition switch is
pushed to the ON position.
When the anti-glare system is turned on,
the indicator light
*Awill illuminate and
excessive glare from the headlights of the
vehicle behind you will be reduced.
Push the “*”switch
*Bto make the
inside rearview mirror operate normally. The indicator light will turn off. Push the
“I”
switch
*Cto turn the system on.
Do not allow any object to cover the
sensors
*Dor apply glass cleaner on
them. Doing so will reduce the sensitivity
of the sensor, resulting in improper
operation.
For the HomeLink
®Universal Transceiver
operation, see “HomeLink®Universal
Transceiver” in the“2. Instruments and
controls” section.
OUTSIDE MIRRORS
WARNING
.Objects viewed in the outside mirror on
the passenger side are closer than they
appear. Be careful when moving to the
right. Using only this mirror could cause
an accident. Use the inside mirror or
glance over your shoulder to properly
judge distances to other objects.
. Do not adjust the mirrors while driving.
You could lose control of your vehicle
and cause an accident.
MIRRORS
Page 204 of 578

WARNING
.Do not disassemble or modify this
system. If you do, it may result in
accidents, fire, or electric shock.
. Do not use this system if you notice any
abnormality, such as a frozen screen or
lack of sound. Continued use of the
system may result in accident, fire or
electric shock.
. In case you notice any foreign object in
the system hardware, spill liquid on it,
or notice smoke or smell coming from it,
stop using the system immediately and
contact your nearest INFINITI retailer.
Ignoring such conditions may lead to
accidents, fire, or electric shock.
. Park the vehicle in a safe location and
apply the parking brake to view the
images on the front center display
screen.
Do not attempt to operate the system in
extreme temperature conditions [below
−48F( −208C) and above 1588F (708C)].
Operating this system under these condi-
tions may result in system malfunctions.
SAA3020
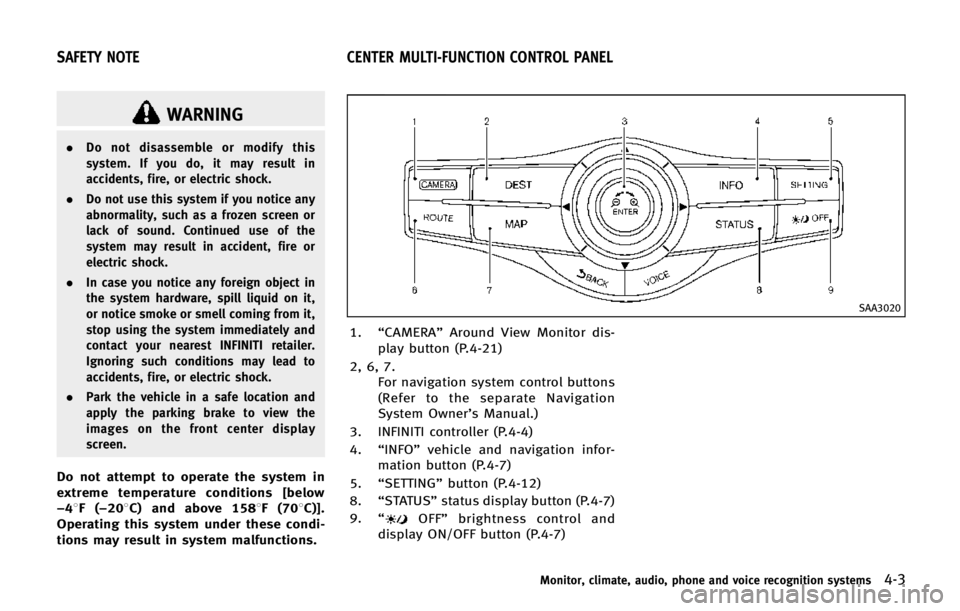
1. “CAMERA” Around View Monitor dis-
play button (P.4-21)
2, 6, 7. For navigation system control buttons
(Refer to the separate Navigation
System Owner’s Manual.)
3. INFINITI controller (P.4-4)
4. “INFO” vehicle and navigation infor-
mation button (P.4-7)
5. “SETTING” button (P.4-12)
8. “STATUS” status display button (P.4-7)
9. “
OFF” brightness control and
display ON/OFF button (P.4-7)
Monitor, climate, audio, phone and voice recognition systems4-3
SAFETY NOTE CENTER MULTI-FUNCTION CONTROL PANEL
Page 205 of 578

4-4Monitor, climate, audio, phone and voice recognition systems
SAA3025
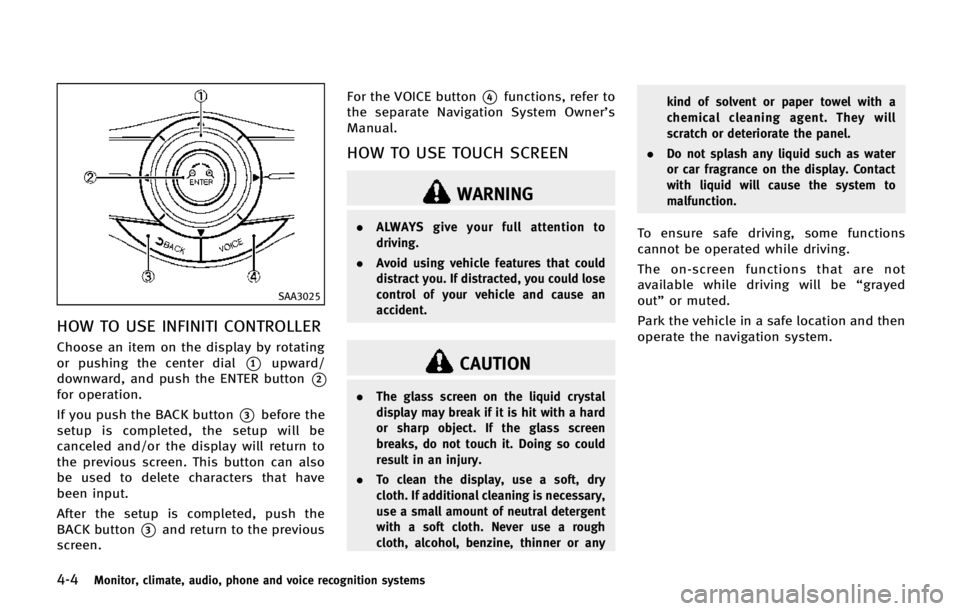
HOW TO USE INFINITI CONTROLLER
Choose an item on the display by rotating
or pushing the center dial
*1upward/
downward, and push the ENTER button
*2
for operation.
If you push the BACK button
*3before the
setup is completed, the setup will be
canceled and/or the display will return to
the previous screen. This button can also
be used to delete characters that have
been input.
After the setup is completed, push the
BACK button
*3and return to the previous
screen. For the VOICE button
*4functions, refer to
the separate Navigation System Owner’s
Manual.
HOW TO USE TOUCH SCREEN
WARNING
. ALWAYS give your full attention to
driving.
. Avoid using vehicle features that could
distract you. If distracted, you could lose
control of your vehicle and cause an
accident.
CAUTION
.The glass screen on the liquid crystal
display may break if it is hit with a hard
or sharp object. If the glass screen
breaks, do not touch it. Doing so could
result in an injury.
. To clean the display, use a soft, dry
cloth. If additional cleaning is necessary,
use a small amount of neutral detergent
with a soft cloth. Never use a rough
cloth, alcohol, benzine, thinner or any kind of solvent or paper towel with a
chemical cleaning agent. They will
scratch or deteriorate the panel.
. Do not splash any liquid such as water
or car fragrance on the display. Contact
with liquid will cause the system to
malfunction.
To ensure safe driving, some functions
cannot be operated while driving.
The on-screen functions that are not
available while driving will be “grayed
out” or muted.
Park the vehicle in a safe location and then
operate the navigation system.
Page 210 of 578

Fuel Economy information
The approximate distance to empty, aver-
age fuel economy and current fuel econo-
my will be displayed for reference.
To reset the average fuel economy (Avg
Fuel Econ), select the“Reset Fuel Eco”key.
If the “Fuel Eco History” key is selected,
the average fuel consumption history will
be displayed in graph form along with the
average for the previous Reset-to-Reset
period.
The unit can be converted between “US”
and “Metric”. (See “How to use SETTING
button” later in this section.)
The fuel economy information may differ
from the information displayed on the
vehicle information display. This is due to
the timing difference in updating the
information and does not indicate a mal-
function.
SAA3146
TIRE PRESSURE information
WARNING
. When a spare tire is mounted or a wheel
is replaced, tire pressure will not be
indicated, the TPMS will not function
and the low tire pressure warning light
will flash for approximately 1 minute.
The light will remain on after 1 minute.
Contact your INFINITI retailer as soon as
possible for tire replacement and/or
system resetting. .
Replacing tires with those not originally
specified by INFINITI could affect the
proper operation of the TPMS.
The tire pressure will be displayed for
reference.
The pressure indication “** kPa”or“**
psi ”on the screen means that the pressure
is being measured. After a few driving
trips, the pressure for each tire will be
displayed.
To change the measurement units, select
the “Select Units” key with the INFINITI
controller and push the ENTER button.
In case of low tire pressure, LOW PRES-
SURE information will be displayed on the
screen. Check the pressure of all tires.
Tire pressure rises and falls depending on
the heat caused by the vehicle’s traveling
condition and the temperature.
After tire rotation is performed, tire pres-
sure will not be displayed in the actual tire
position. Drive the vehicle at over 25 MPH
(40 km/h) for approximately 10 minutes to
reset the display.
For more details about the Tire Pressure
Monitoring System (TPMS), see “Tire Pres-
sure Monitoring System (TPMS)” in the“5.
Monitor, climate, audio, phone and voice recognition systems4-9
Page 215 of 578

4-14Monitor, climate, audio, phone and voice recognition systems
You can also adjust the guidance voice
volume by turning the VOLUME control
knob while voice guidance is being an-
nounced.
Ringtone/Incoming Call/Outgoing Call:
For the details of these items, see“Blue-
tooth
®Hands-Free Phone System” later in
this section.
Switch Beeps:
When this item is turned to ON, you will
hear a beep sound when you use a button.
Guidance Voice:
When this item is turned to ON, you will
hear voice guidance in the navigation
operation or in other operations.
NOTE:
When the voice guidance is being an-
nounced during audio playback, turning
the volume knob does not adjust the
music level; it adjusts the guidance
volume level. If voice guidance is not
being heard, please check the Guidance
Volume level.
JVH0356M
REAR DISPLAY settings (if so
equipped)
The “Rear Display” screen will appear
when the SETTING button is pushed, the
“Rear Display” key is selected. (See “Dual
head restraint DVD system” later in this
section.)
Display Control:
The rear seat display can be set from the
front seat using the control panel. Select
the “L”(left) or “R”(right) display and push
Enter button. When an item is set to ON,
the selected side of the rear display turns
on. Select “DVD”,“USB”, “F.AUX” (if so equipped) or
“R.AUX”for Source “L”(left)
and “R”(right) and push the ENTER button
to switch each display to the selected
source.
Auto Display:
When an item is turned on and a DVD or
USB (movie file only) is played, the rear
display turns on automatically.
Rear Speaker:
This item turns the rear speakers on/off.
DRIVER ASSISTANCE settings (if so
equipped)
For details of the “Driver Assistance ”
settings, refer to the following items:
. “Lane Departure Warning (LDW)/Preven-
tion (LDP) system ”in the “5. Starting
and driving” section.
. “Blind Spot Warning/Blind Spot Inter-
vention
TM/Back-up Collision Interven-
tion systems” in the“5. Starting and
driving” section.
. “Distance Control Assist (DCA) system”
in the “5. Starting and driving” section.
. “Forward Collision Warning (FCW) sys-
tem” in the “5. Starting and driving”
section.
Page 222 of 578

When you push the CAMERA button or shift
the shift lever into the R (Reverse) position
while the ignition switch is in the ON
position, the Around View Monitor oper-
ates. The monitor displays various views of
the position of the vehicle.
Available views:
.Bird-Eye View
The surrounding view of the vehicle.
. Front-Side View
The view around and ahead of the front
passenger’s side wheel.
. Front View
An approximately 150-degree view of
the front of the vehicle.
. Rear view
An approximately 150-degree view of
the rear of the vehicle.
. Rear-Wide View
An approximately 180-degree view of
the rear of the vehicle.
The system is designed as an aid to the
driver in situations such as slot parking or
parallel parking.
SAA3160
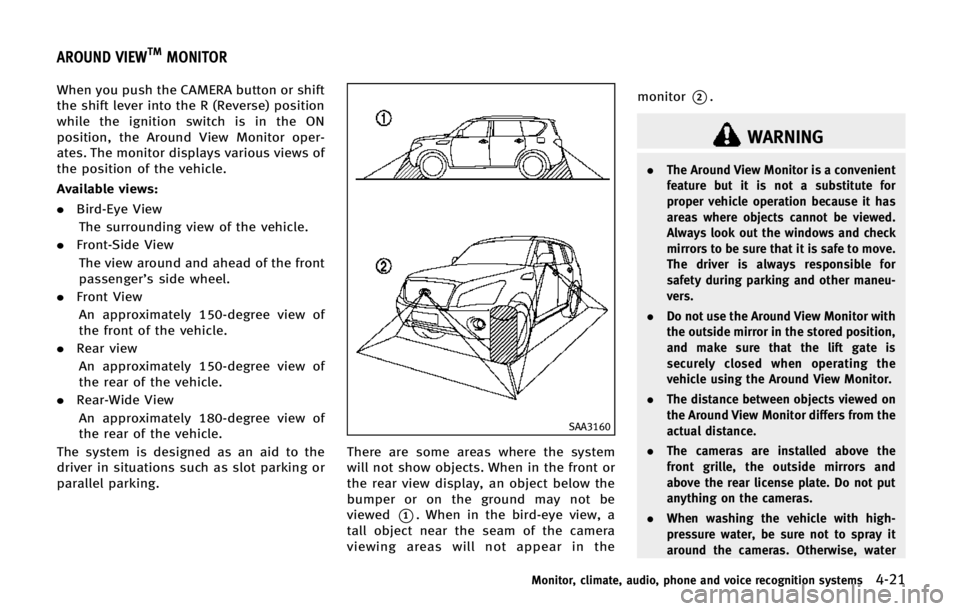
There are some areas where the system
will not show objects. When in the front or
the rear view display, an object below the
bumper or on the ground may not be
viewed
*1. When in the bird-eye view, a
tall object near the seam of the camera
viewing areas will not appear in the monitor
*2.
WARNING
.
The Around View Monitor is a convenient
feature but it is not a substitute for
proper vehicle operation because it has
areas where objects cannot be viewed.
Always look out the windows and check
mirrors to be sure that it is safe to move.
The driver is always responsible for
safety during parking and other maneu-
vers.
. Do not use the Around View Monitor with
the outside mirror in the stored position,
and make sure that the lift gate is
securely closed when operating the
vehicle using the Around View Monitor.
. The distance between objects viewed on
the Around View Monitor differs from the
actual distance.
. The cameras are installed above the
front grille, the outside mirrors and
above the rear license plate. Do not put
anything on the cameras.
. When washing the vehicle with high-
pressure water, be sure not to spray it
around the cameras. Otherwise, water
Monitor, climate, audio, phone and voice recognition systems4-21
AROUND VIEWTMMONITOR
Page 225 of 578

4-24Monitor, climate, audio, phone and voice recognition systems
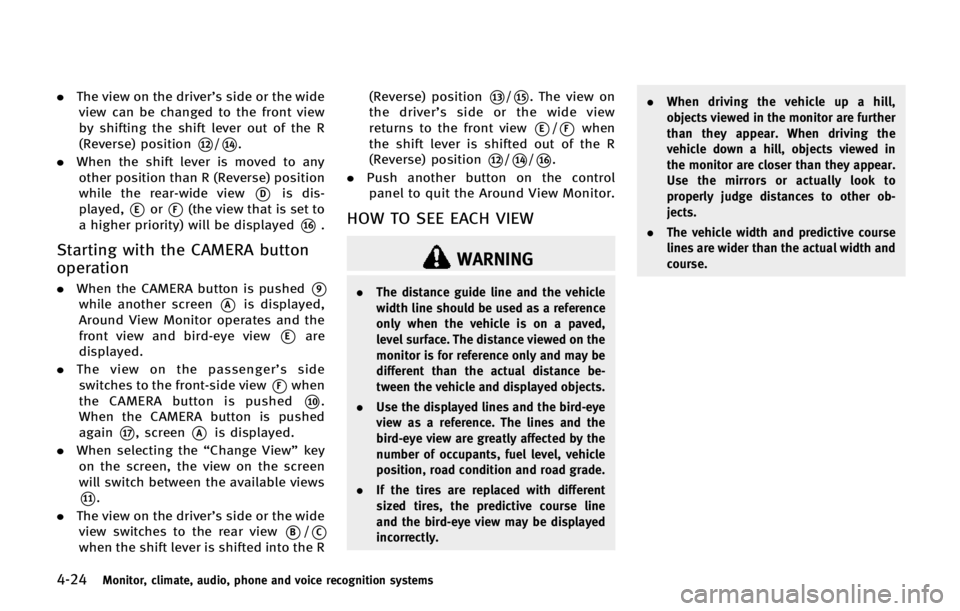
.The view on the driver’s side or the wide
view can be changed to the front view
by shifting the shift lever out of the R
(Reverse) position
*12/*14.
. When the shift lever is moved to any
other position than R (Reverse) position
while the rear-wide view
*Dis dis-
played,
*Eor*F(the view that is set to
a higher priority) will be displayed
*16.
Starting with the CAMERA button
operation
. When the CAMERA button is pushed*9
while another screen*Ais displayed,
Around View Monitor operates and the
front view and bird-eye view
*Eare
displayed.
. The view on the passenger’ s side
switches to the front-side view
*Fwhen
the CAMERA button is pushed
*10.
When the CAMERA button is pushed
again
*17, screen*Ais displayed.
. When selecting the “Change View”key
on the screen, the view on the screen
will switch between the available views
*11.
. The view on the driver’s side or the wide
view switches to the rear view
*B/*C
when the shift lever is shifted into the R (Reverse) position
*13/*15. The view on
the driver’ s side or the wide view
returns to the front view
*E/*Fwhen
the shift lever is shifted out of the R
(Reverse) position
*12/*14/*16.
. Push another button on the control
panel to quit the Around View Monitor.
HOW TO SEE EACH VIEW
WARNING
. The distance guide line and the vehicle
width line should be used as a reference
only when the vehicle is on a paved,
level surface. The distance viewed on the
monitor is for reference only and may be
different than the actual distance be-
tween the vehicle and displayed objects.
. Use the displayed lines and the bird-eye
view as a reference. The lines and the
bird-eye view are greatly affected by the
number of occupants, fuel level, vehicle
position, road condition and road grade.
. If the tires are replaced with different
sized tires, the predictive course line
and the bird-eye view may be displayed
incorrectly. .
When driving the vehicle up a hill,
objects viewed in the monitor are further
than they appear. When driving the
vehicle down a hill, objects viewed in
the monitor are closer than they appear.
Use the mirrors or actually look to
properly judge distances to other ob-
jects.
. The vehicle width and predictive course
lines are wider than the actual width and
course.
Page 226 of 578

SAA1840
Front view
SAA1896
Rear view
Front and rear view
Guiding lines, which indicate the vehicle
width and distances to objects with re-
ference to the vehicle body line
*A, are
displayed on the monitor.
Distance guide lines:
Indicate distances from the vehicle body.
. Red line
*1: approx. 1.5 ft (0.5 m)
. Yellow line
*2: approx. 3 ft (1 m)
. Green line
*3: approx. 7 ft (2 m)
. Green line
*4: approx. 10 ft (3 m)
Vehicle width guide lines
*5:
Indicate the vehicle width when backing
up.
Predictive course lines
*6:
Indicate the predictive course when oper-
ating the vehicle. The predictive course
lines will be displayed on the monitor
when the steering wheel is turned. The
predictive course lines will move depend-
ing on how much the steering wheel is
turned and will not be displayed while the
steering wheel is in the neutral position.
The front view will not be displayed when
the vehicle speed is above 6 MPH (10
km/h).
WARNING
. The distance between objects viewed in
the rear view differs from actual distance
because a wideangle lens is used.
Objects in the RearView will appear
visually opposite than when viewed in
the rear view and outside mirrors.
. On a snow-covered or slippery road,
there may be a difference between the
predictive course line and the actual
course line.
. The displayed lines on the RearView will
appear slightly off to the right because
the RearView camera is not installed in
the rear center of the vehicle.
NOTE:
When the monitor displays the front view
and the steering wheel turns about 90
degrees or less from the neutral position,
both the right and left predictive course
lines
*6are displayed. When the steering
wheel turns about 90 degrees or more, a
line is displayed only on the opposite side
of the turn.
Monitor, climate, audio, phone and voice recognition systems4-25
Page 227 of 578

4-26Monitor, climate, audio, phone and voice recognition systems
Bird-eye view
WARNING
.Objects in the bird-eye view will appear
further than the actual distance because
the bird-eye view is a pseudo view that
is processed by combining the views
from the cameras on the outside mirrors,
the front and the rear of the vehicle.
. Tall objects, such as a curb or vehicle,
may be misaligned or not displayed at
the seam of the views.
. Objects that are above the camera
cannot be displayed.
. The view for the bird-eye view may be
misaligned when the camera position
alters.
. A line on the ground may be misaligned
and is not seen as being straight at the
seam of the views. The misalignment will
increase as the line proceeds away from
the vehicle.
. Tire angle display does not indicate the
actual tire angle
JVH0265X
The bird-eye view shows the overhead view
of the vehicle, which helps confirm the
vehicle position and the predicted course
to a parking space.
The vehicle icon
*1shows the position of
the vehicle. Note that the size of the
vehicle icon on the bird-eye view may
differ somewhat from the actual vehicle.
The areas that the cameras cannot cover
*2
are indicated in black.
The non-viewable area
*2is highlighted in
yellow for several seconds after the bird-
eye view is displayed. It will be shown only
the first time after the ignition switch is
placed in the “ON”position. When the corner of the vehicle moves
closer to an object, the corner sonar
indicators
*3appears.
The driver can check the direction and
angle of the tire on the display by tire icon
*4when driving the vehicle forward or
backward.
Predictive course lines (
*5and*6)
indicate the predictive course when oper-
ating the vehicle. The predictive course
lines will be displayed on the monitor
when the steering wheel is turned. The
predictive course lines will move depend-
ing on how much the steering wheel is
turned and will not be displayed while the
steering wheel is in the neutral position.
When the monitor displays the front view
and the steering wheel turns about 90
degrees or less from the neutral position,
the two green predictive course lines
*5
are shown in front of the vehicle.
When the steering wheel turns about 90
degrees or more, one green predictive
course line
*6is shown in front of the
vehicle and the other green predictive
course line
*6is shown at side of the
vehicle.
When the monitor displays the rear view,