key INFINITI QX80 2019 Workshop Manual
[x] Cancel search | Manufacturer: INFINITI, Model Year: 2019, Model line: QX80, Model: INFINITI QX80 2019Pages: 524, PDF Size: 2.45 MB
Page 231 of 524

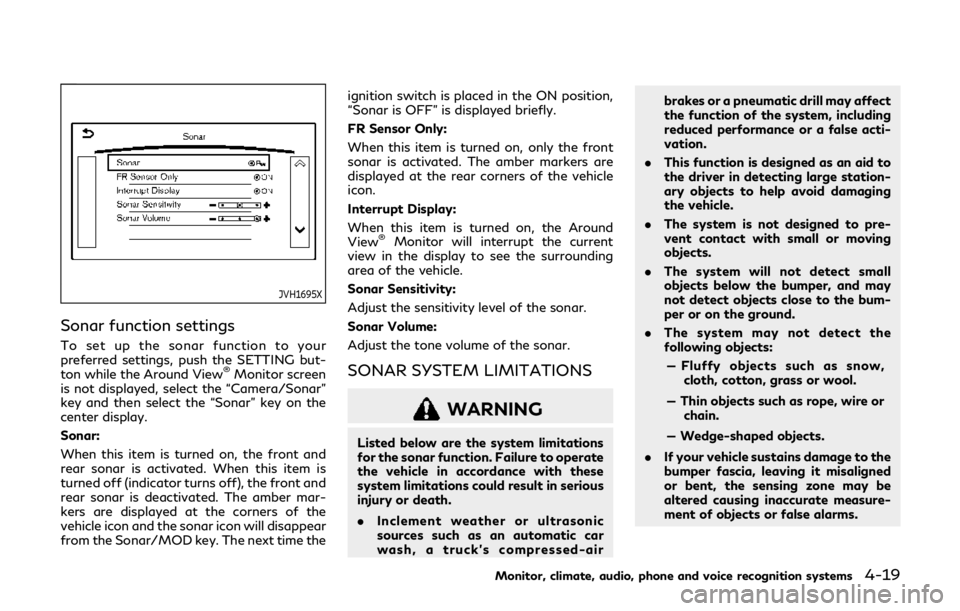
JVH1695X
Sonar function settings
To set up the sonar function to your
preferred settings, push the SETTING but-
ton while the Around View
®Monitor screen
is not displayed, select the “Camera/Sonar”
key and then select the “Sonar” key on the
center display.
Sonar:
When this item is turned on, the front and
rear sonar is activated. When this item is
turned off (indicator turns off), the front and
rear sonar is deactivated. The amber mar-
kers are displayed at the corners of the
vehicle icon and the sonar icon will disappear
from the Sonar/MOD key. The next time the ignition switch is placed in the ON position,
“Sonar is OFF” is displayed briefly.
FR Sensor Only:
When this item is turned on, only the front
sonar is activated. The amber markers are
displayed at the rear corners of the vehicle
icon.
Interrupt Display:
When this item is turned on, the Around
View
®Monitor will interrupt the current
view in the display to see the surrounding
area of the vehicle.
Sonar Sensitivity:
Adjust the sensitivity level of the sonar.
Sonar Volume:
Adjust the tone volume of the sonar.
SONAR SYSTEM LIMITATIONS
WARNING
Listed below are the system limitations
for the sonar function. Failure to operate
the vehicle in accordance with these
system limitations could result in serious
injury or death.
. Inclement weather or ultrasonic
sources such as an automatic car
wash, a truck’s compressed-air brakes or a pneumatic drill may affect
the function of the system, including
reduced performance or a false acti-
vation.
. This function is designed as an aid to
the driver in detecting large station-
ary objects to help avoid damaging
the vehicle.
. The system is not designed to pre-
vent contact with small or moving
objects.
. The system will not detect small
objects below the bumper, and may
not detect objects close to the bum-
per or on the ground.
. The system may not detect the
following objects:
— Fluffy objects such as snow, cloth, cotton, grass or wool.
— Thin objects such as rope, wire or chain.
— Wedge-shaped objects.
. If your vehicle sustains damage to the
bumper fascia, leaving it misaligned
or bent, the sensing zone may be
altered causing inaccurate measure-
ment of objects or false alarms.
Monitor, climate, audio, phone and voice recognition systems4-19
Page 235 of 524

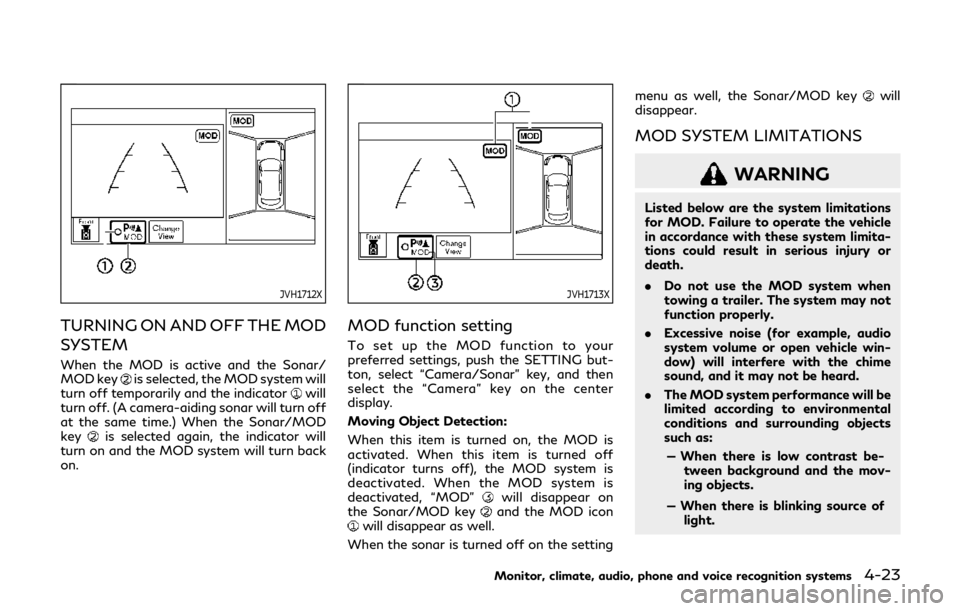
JVH1712X
TURNING ON AND OFF THE MOD
SYSTEM
When the MOD is active and the Sonar/
MOD keyis selected, the MOD system will
turn off temporarily and the indicatorwill
turn off. (A camera-aiding sonar will turn off
at the same time.) When the Sonar/MOD
key
is selected again, the indicator will
turn on and the MOD system will turn back
on.
JVH1713X
MOD function setting
To set up the MOD function to your
preferred settings, push the SETTING but-
ton, select “Camera/Sonar” key, and then
select the “Camera” key on the center
display.
Moving Object Detection:
When this item is turned on, the MOD is
activated. When this item is turned off
(indicator turns off), the MOD system is
deactivated. When the MOD system is
deactivated, “MOD”
will disappear on
the Sonar/MOD keyand the MOD iconwill disappear as well.
When the sonar is turned off on the setting menu as well, the Sonar/MOD key
will
disappear.
MOD SYSTEM LIMITATIONS
WARNING
Listed below are the system limitations
for MOD. Failure to operate the vehicle
in accordance with these system limita-
tions could result in serious injury or
death.
. Do not use the MOD system when
towing a trailer. The system may not
function properly.
. Excessive noise (for example, audio
system volume or open vehicle win-
dow) will interfere with the chime
sound, and it may not be heard.
. The MOD system performance will be
limited according to environmental
conditions and surrounding objects
such as:
— When there is low contrast be- tween background and the mov-
ing objects.
— When there is blinking source of light.
Monitor, climate, audio, phone and voice recognition systems4-23
Page 243 of 524

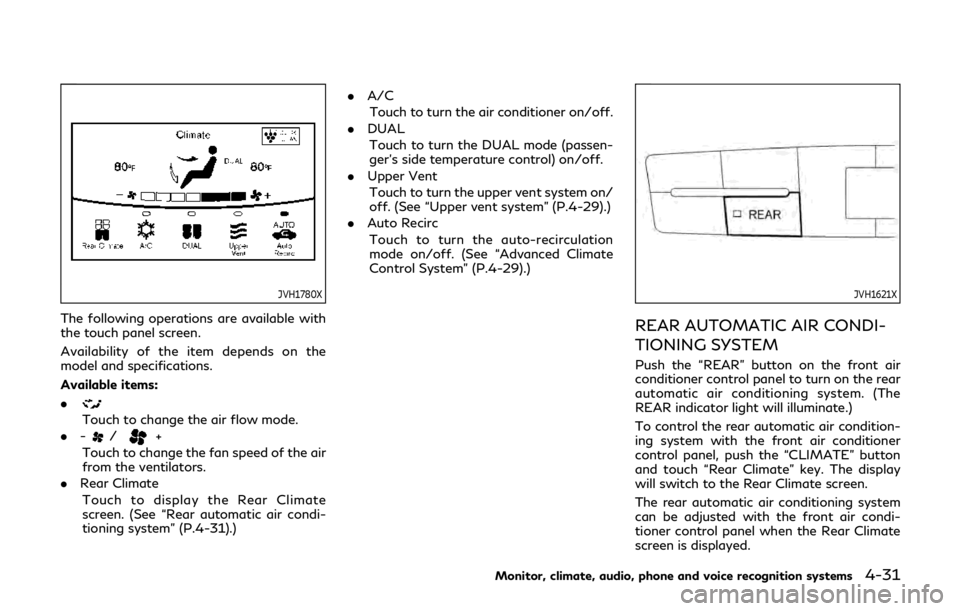
JVH1780X
The following operations are available with
the touch panel screen.
Availability of the item depends on the
model and specifications.
Available items:
.
Touch to change the air flow mode.
. -
/+
Touch to change the fan speed of the air
from the ventilators.
. Rear Climate
Touch to display the Rear Climate
screen. (See “Rear automatic air condi-
tioning system” (P.4-31).) .
A/C
Touch to turn the air conditioner on/off.
. DUAL
Touch to turn the DUAL mode (passen-
ger’s side temperature control) on/off.
. Upper Vent
Touch to turn the upper vent system on/
off. (See “Upper vent system” (P.4-29).)
. Auto Recirc
Touch to turn the auto-recirculation
mode on/off. (See “Advanced Climate
Control System” (P.4-29).)
JVH1621X
REAR AUTOMATIC AIR CONDI-
TIONING SYSTEM
Push the “REAR” button on the front air
conditioner control panel to turn on the rear
automatic air conditioning system. (The
REAR indicator light will illuminate.)
To control the rear automatic air condition-
ing system with the front air conditioner
control panel, push the “CLIMATE” button
and touch “Rear Climate” key. The display
will switch to the Rear Climate screen.
The rear automatic air conditioning system
can be adjusted with the front air condi-
tioner control panel when the Rear Climate
screen is displayed.
Monitor, climate, audio, phone and voice recognition systems4-31
Page 244 of 524

4-32Monitor, climate, audio, phone and voice recognition systems
Push the “CLIMATE” button one more time,
the display will return to the Climate screen.
The rear automatic air conditioning system
can also be adjusted by using the rear air
conditioner control panel located on the rear
of the center console. (See “Rear air condi-
tioner control panel operation” (P.4-34).)
This table shows the relation between the
front air conditioner control panel and the
rear air conditioner control panel.
Display status
Rear Climate
screen is dis-
played Rear Climate
screen is not dis-
played (Climate
screen)
Front air
condition-
er control
panel Only the rear
automatic air
conditioning
system can be
operated Only the front air
conditioner can
be operated
Rear air
condition-
er control
panel Cannot be op-
erated Only the rear
automatic air
conditioning sys-
tem can be oper-
ated
Front air conditioner control panel
operation
Automatic operation:
1. Push the “REAR” button to turn on rear
automatic air conditioning system. Push the “CLIMATE” button and select the
“Rear Climate” key to display the Rear
Climate screen.
2. Push the “AUTO” button. (The AUTO indicator light will illuminate and “AUTO”
will appear on the display.)
3. Turn the temperature control dial (dri- ver’s side) to set the desired tempera-
ture.
Cooling and dehumidified heating:
1. Push the “REAR” button to turn on the rear automatic air conditioning system.
Push the “CLIMATE” button and touch
“Rear Climate” key to display the Rear
Climate screen.
2. Turn the temperature control dial (dri- ver’s side) to set the desired tempera-
ture.
3. Switch the air flow mode to
by
pushing the “MODE” button.
4. Push the “CLIMATE” button one more time to return to the Climate screen. If
the A/C indicator light does not illumi-
nate, push the “A/C” button. (The A/C
indicator light will turn on.)
NOTE:
When the front air conditioner is off, the
rear automatic air conditioning system only
operates the fan. When you would like to use the air conditioner, be sure to push the
“A/C” button on the front air conditioner
control panel to turn on the A/C indicator
light.
Manual operation:
.
Temperature control
Turn the temperature control dial (dri-
ver’s side) to set the desired tempera-
ture.
. Fan speed control
Push the fan speed control “
” button
or “” button to manually control the
fan speed.
. Air flow control
Push the “MODE” button to change the
air flow mode.
: The air outlet is fixed at foot level.
: The air outlet is fixed at both the head and foot levels.
: The air outlet is fixed at the head level.
Touch panel operation
The rear automatic air conditioning system
can also be controlled on the Rear Climate
screen.
Touch the “Rear Climate” key on the Climate
screen to display the Rear Climate screen.
Page 246 of 524

4-34Monitor, climate, audio, phone and voice recognition systems
Rear air conditioner control panel
operation
Rear control buttons:
The rear seat passengers can adjust the rear
automatic air conditioning system using the
control switches on the rear of the center
console.
The rear control buttons do not function
when the Rear Climate screen is shown on
the front display. To activate the rear control
buttons, push the “CLIMATE” button and
switch the screen to the Climate screen.
.“OFF” button:
Rear automatic air conditioning system
off
. “
” button:
Rear fan speed control up/down
. “AUTO” button:
Rear automatic air conditioning system
on, AUTO mode on
. “MODE” button:
Rear air flow control change
. “TEMP” button:
Rear temperature control up/down
Turning the system off
Use the following methods to turn the rear
automatic air conditioning system off. .
Operating the front air conditioner con-
trol panel:
Push the “OFF” button on the front air
conditioner control panel when the Rear
Climate screen is displayed.
. Operating the Rear Climate screen:
Touch the “ON/OFF” key on the Rear
Climate screen when the rear automatic
air conditioning system is on.
. Operating the rear air conditioner control
panel:
Push the “OFF” button on the rear air
conditioner control panel when the Rear
Climate screen is not displayed.
SAA3088
SAA3058
Page 247 of 524

OPERATING TIPS
When the engine coolant temperature and
outside air temperature are low, the air flow
from the foot outlets may not operate.
However, this is not a malfunction. After
the coolant temperature warms up, the air
flow from the foot outlets will operate
normally.
The sensors
andlocated on the instru-
ment panel help maintain a constant tem-
perature. Do not put anything on or around
the sensors.
LINKING INTELLIGENT KEY
The Climate control system settings can be
memorized for each Intelligent Key. For
more details, see “Setting memory function”
(P.3-41).
IN-CABIN MICROFILTER
Models without Advanced Climate Control
System:
The climate control system is equipped with
an in-cabin microfilter which collects dirt,
pollen, dust, etc.
Models with Advanced Climate Control
System:
The climate control system is equipped with
a natural grape seed polyphenol filter which
collects and neutralizes dirt, pollen, dust, etc. To make sure the air conditioner heats,
defogs, and ventilates efficiently, replace
the filter in accordance with the specified
maintenance intervals listed in the “9. Main-
tenance and schedules” section. If replace-
ment is required, it is recommended you visit
an INFINITI retailer for this service.
The filter should be replaced if the air flow
decreases significantly or if windows fog up
easily when operating the heater or air
conditioner.
SERVICING CLIMATE CONTROL
The climate control system in your vehicle is
charged with a refrigerant designed with the
environment in mind.
This refrigerant will
not harm the earth’s ozone layer. However,
special charging equipment and lubricant are
required when servicing your air conditioner.
Using improper refrigerants or lubricants will
cause severe damage to your climate control
system. (See “Capacities and recommended
fluids/lubricants” (P.10-2) for climate con-
trol system refrigerant and lubricant recom-
mendations.)
Your INFINITI retailer will be able to service
your environmentally friendly climate control
system.
WARNING
The system contains refrigerant under
high pressure. To avoid personal injury,
any air conditioner service should be
done only by an experienced technician
with the proper equipment.
Monitor, climate, audio, phone and voice recognition systems4-35
Page 251 of 524

5 Starting and driving
Precautions when starting and driving ...................... 5-4Exhaust gas (carbon monoxide) .............................. 5-4
Three-way catalyst ..................................................... 5-4
Tire Pressure Monitoring System (TPMS) ........... 5-5
Avoiding collision and rollover ................................. 5-8
On-pavement and off-road
driving precautions ..................................................... 5-8
Off-road recovery ....................................................... 5-9
Rapid air pressure loss ............................................... 5-9
Drinking alcohol/drugs and driving ..................... 5-10
Driving safety precautions ..................................... 5-10
Push-button ignition switch ........................................ 5-12 Operating range for engine start function ........ 5-12
Push-button ignition switch positions ................ 5-13
Emergency engine shut off .................................... 5-14
Intelligent Key battery discharge .......................... 5-14
Before starting the engine ........................................... 5-15
Starting the engine ......................................................... 5-15 Remote start (if so equipped) ................................ 5-16
Driving the vehicle .......................................................... 5-17
Engine protection mode .......................................... 5-17
Automatic transmission ........................................... 5-18
Parking brake ................................................................... 5-22 Lane Departure Warning (LDW)/Lane Departure
Prevention (LDP) (if so equipped) ............................ 5-22
LDW system operation ......................................... 5-24
Turning the LDW system ON/OFF ................... 5-25
How to enable/disable the LDW system ........ 5-26
LDP system operation ........................................... 5-26
Turning the LDP system ON/OFF .................... 5-27
How to enable/disable the LDP system .......... 5-28
LDW/LDP system limitations ............................. 5-28
System temporarily unavailable ......................... 5-30
System malfunction ................................................ 5-31
System maintenance .............................................. 5-31
Blind Spot Warning (BSW) (if so equipped) ........... 5-32
BSW system operation .......................................... 5-34
Turning the BSW system ON/OFF ................... 5-35
How to enable/disable the BSW system ......... 5-35
BSW system limitations ........................................ 5-36
BSW driving situations .......................................... 5-37
System temporarily unavailable ......................... 5-40
System malfunction ............................................... 5-40
System maintenance .............................................. 5-41
Blind Spot Intervention
®(BSI) (if so equipped) ..... 5-42
BSI system operation ............................................. 5-43
Page 262 of 524

5-12Starting and driving
the maintenance schedules shown in
the "9. Maintenance and schedules"
section.
. Spinning the rear wheels on slippery
surfaces may cause the 4WD warn-
ing light to flash. The 4WD system
may also automatically switch from
the 4WD mode to the 2WD mode.
This could reduce traction. Be espe-
cially careful when towing a trailer
(4WD models).WARNING
Do not operate the push-button ignition
switch while driving the vehicle except in
an emergency. (The engine will stop
when the ignition switch is pushed 3
consecutive times or the ignition switch
is pushed and held for more than 2
seconds.) If the engine stops while the
vehicle is being driven, this could lead to
a crash and serious injury.
Before operating the push-button ignition
switch, be sure to move the shift lever to the
P (Park) position.
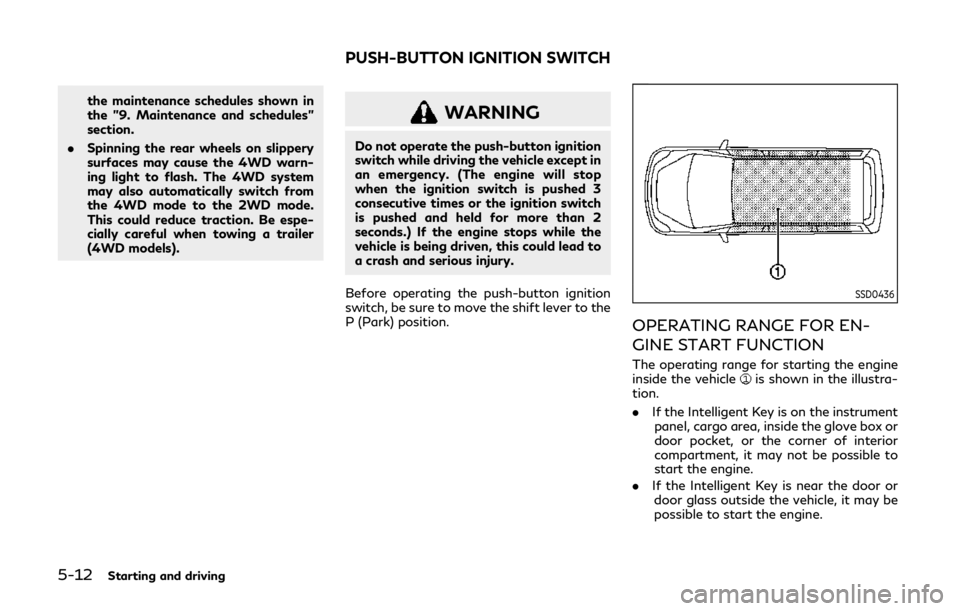
SSD0436
OPERATING RANGE FOR EN-
GINE START FUNCTION
The operating range for starting the engine
inside the vehicleis shown in the illustra-
tion.
. If the Intelligent Key is on the instrument
panel, cargo area, inside the glove box or
door pocket, or the corner of interior
compartment, it may not be possible to
start the engine.
. If the Intelligent Key is near the door or
door glass outside the vehicle, it may be
possible to start the engine.
PUSH-BUTTON IGNITION SWITCH
Page 263 of 524

SSD1021
When the ignition switch is pushed without
depressing the brake pedal, the ignition
switch position will change as follows:
.Push center once to change to ACC.
. Push center two times to change to ON.
. Push center three times to change to
OFF. (No position illuminates.)
. Push center four times to return to ACC.
. Open or close any door to return to
LOCK during the OFF position.
The ignition lock is designed so that the
ignition switch position cannot be switched
to LOCK until the shift lever is moved to the
P (Park) position. When the ignition switch cannot be pushed
toward the LOCK position, proceed as
follows:
1. Move the shift lever into the P (Park)
position.
2. Push the ignition switch to the OFF position. The ignition switch position
indicator will not illuminate.
3. Open the door. The ignition switch will change to the LOCK position.
The shift lever can be moved from the P
(Park) position if the ignition switch is in the
ON position and the brake pedal is de-
pressed.
If the battery of the vehicle is discharged,
the push-button ignition switch cannot be
turned from the LOCK position.
Some indicators and warnings for operation
are displayed on the vehicle information
display between the speedometer and tach-
ometer. (See “Vehicle information display”
(P.2-21).)
PUSH-BUTTON IGNITION
SWITCH POSITIONS
LOCK (Normal parking position)
The ignition switch can only be locked in this
position.
The ignition switch will be unlocked when it
is pushed to the ACC position while carrying
the Intelligent Key.
ACC (Accessories)
This position activates electrical accessories
such as the radio, when the engine is not
running.
ACC has a battery saver feature that will
turn the ignition switch to the OFF position
after a period of time under the following
conditions:
. all doors are closed.
. shift lever is in P (Park).
. turn signal/hazard indicator lights are
not flashing.
The battery saver feature will be cancelled if
any of the following occur:
. any door is opened.
. shift lever is moved out of P (Park).
. ignition switch changes position.
Starting and driving5-13
Page 264 of 524

5-14Starting and driving
ON (Normal operating position)
This position turns on the ignition system
and electrical accessories.
ON has a battery saver feature that will turn
the ignition switch to the OFF position, if the
vehicle is not running, after some time under
the following conditions:
.all doors are closed.
. shift lever is in P (Park).
. turn signal/hazard indicator lights are
not flashing.
The battery saver feature will be cancelled if
any of the following occur:
. any door is opened.
. shift lever is moved out of P (Park).
. ignition switch changes position.
OFF
The engine can be turned off in the position.
The ignition lock is designed so that the
ignition switch cannot be switched to the
LOCK position until the shift lever is moved
to the P (Park) position.
CAUTION
Do not leave the vehicle with the push-
button ignition switch in ACC or ON
positions when the engine is not running for an extended period. This can dis-
charge the battery.
EMERGENCY ENGINE SHUT OFF
To shut off the engine in an emergency
situation while driving, perform the follow-
ing procedure:
.
Rapidly push the push-button ignition
switch 3 consecutive times in less than
1.5 seconds, or
. Push and hold the push-button ignition
switch for more than 2 seconds.
SSD0944
INTELLIGENT KEY BATTERY DIS-
CHARGE
If the battery of the Intelligent Key is
discharged, or environmental conditions in-
terfere with the Intelligent Key operation,
start the engine according to the following
procedure:
1. Move the shift lever to the P (Park)
position.
2. Firmly apply the foot brake.
3. Touch the ignition switch with the Intelligent Key as illustrated. (A chime
will sound.)
4. Push the ignition switch while depressing